QUICK START GUIDE Version 1.0

Page created by Frederick Gibbs
 
CONTINUE READING
QUICK START GUIDE Version 1.0
Version 1.0
REV. NR. 001 2021-01

                       EN
                       DE
DIVUS D+
QUICK START GUIDE
QUICK START GUIDE Version 1.0
INDEX                                                         1 GENERAL INFORMATION
     1       GENERAL INFORMATION                           -3-     DIVUS GmbH                                     flawlessness    and    correctness    of
                                                                   Pillhof 51                                     the programs and data contained
     1.1     Conventions                                   -4-     I-39057 Eppan (BZ)                             on the delivered storage medium.
     1.2     Safety Instructions                           -5-                                                    You are always welcome to inform us of
     1.3     Standard                                      -6-     Operating instructions, manuals and soft-      errors or make suggestions for improving
                                                                   ware are protected by copyright. All rights    the program.
     2       FIRST COMMISSIONING                           -7-     are reserved. Copying, multiplication,
EN

                                                                                                                                                                EN
     2.1     Introduction                                  -7-     translation and conversion, either partially   The present agreement also applies to
                                                                   or as a whole, is not permitted. You are       special appendices to the manual.
     2.2     Content of the Packaging                      -8-
                                                                   allowed to make a single copy for back-
     2.3     Installation, Connection and Commissioning    -8-     up purposes.                                   This manual can contain terms and de-
     2.3.1   Installation and Connection                   -8-                                                    scriptions, which inproper use by third can
                                                                   We reserve the right to make changes to        harm the copyrights of the author.
     2.3.2   Environmental Conditions                     - 10 -   the manual without prior notification.
     2.3.3   Commissioning                                - 10 -                                                  Please read the manual BEFORE begin-
                                                                   We assume no responsibility for any er-        ning and keep the manual for later use.
     2.4     Maintenance / Warranty                       - 11 -   rors or omissions that may appear in this
     2.5     Network connection                           - 12 -   document.                                      The manual has been conceived and writ-
                                                                                                                  ten for users who are experienced in the
     2.6     Reset of the IP address                      - 13 -
                                                                   We do not assume liability for the             use of PCs and automation technology.
     3       IN THREE STEPS TO A VISUALISATION            - 14 -
                                                                                                                                                           3
QUICK START GUIDE Version 1.0
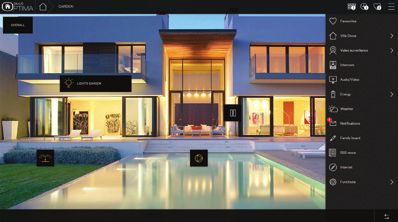
1.1 CONVENTIONS                                                                         1.2 SAFETY INSTRUCTIONS
     [KEY]                                       Names of buttons to be pressed, menus       The present operating instructions contain    negative effects to the machine or other
     Keys that are to be pressed by the user     or other onscreen elements and product      those safety instructions that are required   material cannot be excluded if the machi-
     are given in square brackets, e.g. [CTRL]   names are given within double quotes.       to safely operate the machine.                ne is operated.
     or [DEL]                                    (e.g. “Configuration”).
                                                                                             All persons working with the machine          The machine meets the requirements of
     Courier                                     Symbolic                                    must heed the present operating instruc-      the EMC guidelines and of the harmo-
     On-screen messages are given in the         In this manual the following symbolic are   tions, especially the safety instructions.    nized European standards. Modifications
EN

                                                                                                                                                                                        EN
     Courier font, e.g. C:\>                     used to indicate particular text blocks.                                                  to the machine hardware may affect the
                                                                                             In addition, all local stipulations gover-    system’s EMC compatibility.
     Courier bold                                       Caution! A dangerous situation       ning the prevention of accidents must be
     Keyboard input to be made by the user              may arise that may cause dama-       heeded.                                       Without special protection measures, the
     are given in Courier bold, e.g. C:\>DIR).          ge to material                                                                     machine must not be used in EX areas and
                                                                                             Only trained and authorized personnel         in plants that require special monitoring.
     “…” (double quotes)                                Note. Hints and additional notes     may install and operate the machine.
                                                                                             Proper     application:    The   machi-       Danger of explosion. Do not ex-
                                                                                             ne has been designed for appli-               pose the buffer batteries to heat.
                                                                                             cation     in     building   automation.      Serious injury may be the result.
                                                                                             The machine has been built using state-       The operating voltage of the machine must
                                                                                             of-the-art technology and all applicable      be within the specified range! The product
                                                                                             safety regulations. However, damage or        label provides the required information.

     4                                                                                                                                                                             5
QUICK START GUIDE Version 1.0
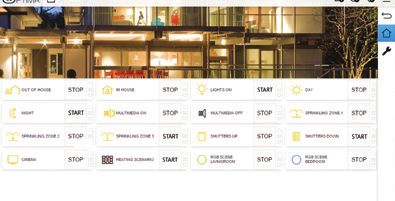
SOFTWARE                                                                                 2 FIRST COMMISSIONING
     The Linux Kernel 2.6.32 is provided under the terms of the GNU General Public License
     version 2. https://www.gnu.org/licenses/gpl-2.0.html                                     2.1 INTRODUCTION
                                                                                              DIVUS D+ is a web server, on which
     1.3 STANDARD                                                                             the cross-platform software OPTIMA is            Details about the configuration
     DIVUS D+ conforms with the essential        EN 50581:2012                                running. This way DIVUS D+ becomes               of OPTIMA can be found in the
     requirements of the following Directives:                                                a web based visualisation and monito-            OPTIMA ADMINISTRATOR-MA-
                                                 The installation and wiring instructions     ring solution for home & building au-      NUAL, while details about the usage
EN

                                                                                                                                                                                     EN
     2014/35/EU                                  contained in this documentation must be      tomation systems, which are realized       of the visualisation can be found in
     2014/30/EU                                  heeded. Conformity is indicated by the at-   according to the world wide KNX stan-      the OPTIMA USER-MANUAL.
     2011/65/EU                                  tached CE label.                             dard. The configuration and the use of
                                                                                              OPTIMA takes place directly over the OP-
     based on the following harmonized stan-     The EC conformity statements can be
                                                                                              TIMA web interface that can be displayed
     dards applied:                              obtained from:
                                                                                              on different devices / operating systems
                                                 DIVUS GmbH | Pillhof 51 | I-39057
     EN 50491-3:2009, EN 62368-1:2014/                                                        through using a conventional web brow-
                                                 Eppan (BZ)
     A11:2017                                                                                 ser.
                                                       Regarding DIRECTIVE 2002/96/
     EN 50491-5-1:2011, EN 50491-5-2:2011,             EC waste electrical and electronic
     EN 55032:2013, EN 55035:2017, Draft               equipment has to be collected se-
     ETSI 301 489-1 V2.2.0, Draft ETSI 301             parately and is not allowed to dis-
     489-17 V.3.2.0                                    pose as unsorted municipal waste.
     6                                                                                                                                                                           7
QUICK START GUIDE Version 1.0
2.2 CONTENT OF THE PACKAGING                                                            supplied    connector                         ˚ RS485-interface and 1 USB-port: for in-
     The DIVUS D+ packaging contains the fol-                                                ˚ KNX bus connection via supplied               tegration of third party systems
                                                          DIVUS D+ is a pure web ser-        connector
     lowing material:                                                                                                                      When commissioning DIVUS D+, the
                                                          ver and not usable for stan-       ˚ Network connection via CAT5 network
                                                                                             cable (not supplied)                          following steps must be followed:
     ˚ DIVUS D+                                           dalone visualisation, because
                                                   it has no display. The visualisation is                                                 ˚ Power off the system/installation
     ˚ connector for power supply and KNX bus      accessed through client PCs like e.g.
                                                                                             The LED marked with the label „POWER“         ˚ Install DIVUS D+ on a DIN-Rail
                                                                                             on the front of the server signals that the   ˚ Connect power supply and KNX bus to
     ˚ Printed installation guide                  touch panels of DIVUS, which con-
                                                                                             power supply is active, while the “SER-         DIVUS D+
EN

                                                                                                                                                                                       EN
                                                   nect via network to the server. The
                                                                                             VICE” LED remains off in normal circum-       ˚ Power on the system/installation
                                                   server has no graphical interface
                                                                                             stances.                                      ˚ Wait  until DIVUS D+ has booted up
                                                   (VGA, DVI, HDMI, ...) and therefore
                                                   can’t display any graphical contents.     DIVUS D+ has furthermore the following
                                                                                             interfaces:

                                                                                                    The connection to the KNX bus                 ATTENTION!
     2.3 INSTALLATION, CONNECTION AN COMISSIONING                                                   is not really needed for the con-             If the DIVUS D+ hardware is
     2.3.1 INSTALLATION AND CONNECTION                                                              figuration of DIVUS D+, but it                changed, irreversible damage
                                                                                               allows a more efficient programming,          can occur. Any intervention on the
     DIVUS D+ is, like most KNX components,     be guaranteed:                                 since direct tests of the system can          equipment should be performed only
     mounted on a DIN rail. For a correct       ˚ Power supply 12-24V DC (current              be performed.                                 by authorized personnel of DIVUS.
     function, the following connections must   consumption 240 mA a 12V) using the
     8                                                                                                                                                                             9
QUICK START GUIDE Version 1.0
2.3.2 ENVIRONMENTAL CONDITIONS                                                          2.4 MAINTAINANCE / WARRANTY
     The correct function of DIVUS D+ can be granted only if the following requests are      DIVUS D+ is completely fanless and has        us using support@divus.eu. You may
     met:                                                                                    no moving parts. The industry-tested          then get all the necessary information, as
                                                                                             hardware, the reduced size and minimal        well as the document „repair request“.
      OPERATION                                Ambient temperature 0°C - 50°C                power consumption make it ideal for
                                                                                             home automation. The PC does not requi-       Repair shipments must be boxed within
      STORAGE                                  Ambient temperature -10°C - 70°C              re any complicated installation or mainte-    the original packaging. Otherwise we can’t
                                                                                             nance and there are no special require-       guarantee any warranty. If the device was
EN

                                                                                                                                                                                         EN
                                                                                             ments on the installation location.           shipped in an improper packaging a flat
                                                                                                                                           fee for a new original packaging for the
                                                                                             The PC has 24 months warranty from date       return shipment will be charged to the
     2.3.3 COMMISSIONING
                                                                                             of delivery (date of the delivery docu-       customer. In addition, the “repair request”
     DIVUS D+ is power supplied by a power                                                   ment). This can only be maintained if the     document must be filled out correctly and
     adapter NOT included in the DIVUS D+               ATTENTION!                           device is shipped back for reparation in      be shipped together with the device, in
     packaging.                                         Before commissioning DIVUS           its original packaging, with all the shock-   order to provide an efficient service and a
                                                        D+ all connections must be che-      absorbing parts.                              processing time of 2 weeks.
     The device supports power supply volta-     cked! Verify that the voltage of the con-
     ges of 12-24V DC.                           nected power supply doesn’t exceed          To be noticed:                                For technical reasons, only complete sys-
                                                 the supported voltage range, in order       Each repair shipment must be approved         tems can be accepted for reparation.
                                                 to avoid damage on the device!              by our technical support. Please contact

     10                                                                                                                                                                            11
QUICK START GUIDE Version 1.0
2.5 NETWORK CONNECTION                                                                         After successful login, the configura-
                                                                                                    tion menu can be reached by clicking                 The maximum comfort for
     For the usage/configuration of DIVUS D+       ˚ Save the new settings; depending on the        on the ADMIN-button in the tool-                     using/programming DIVUS OP-
     a working network connection is required.       installed OS a restart can be necessary.                                                            TIMA can be achieved with the
                                                                                                    bar of the displayed navigation menu
     In order to make the first access to DI-                                                                                                      following browsers:
                                                   Once the network settings have been              (     - show/hide navigation menu). De-
     VUS D+, or if a compatible network is not                                                                                                     •     Google Chrome
                                                   changed, open a browser on your PC               tailed information about the visualisati-
     available, follow these steps:                                                                                                                •     Apple Safari
                                                   (Google Chrome preferred) and enter the          on and configuration of OPTIMA can be
                                                   following URL into the address bar of the        found in the OPTIMA USER-MANUAL and
     ˚ Connect DIVUS D+ through a crossed
EN

                                                   browser:                                         the OPTIMA ADMINISTRATOR-MANUAL.

                                                                                                                                                                                             EN
       network cable (“crossover-cable”) with
       your PC
                                                   This link will directly open the login page of
     ˚ Open the network configuration of your PC
                                                             http://192.168.0.110                   2.6 RESET OF THE IP ADRESS
     ˚ Change the settings of the TCP/IP – Pro-
       tocol (Version 4) of the network inter-                                                      If needed, the IP address of DIVUS D+ can     RESET-button through the small cutout
                                                   OPTIMA, where you can login as adminis-          be reset to factory settings through the      in the housing of the device.
       face, on which you connected the DIVUS
                                                   trator with the following login credentials.     RESET-button on the bottom side of the
       D+ using a network cable and enter the
                                                                                                                                                 ˚ Press the RESET-button until the SER-
       following values:                                                                            device:
                                                                                                                                                   VICE-LED starts blinking (about 10 se-
          ˚ IP address: 192.168.0.100                                                                                                              conds); afterwards release the RESET-
                                                                                                    ˚ Localize the RESET-button on the de-
                                                               Username: admin                                                                     button.
          ˚ Subnet mask: 255.255.255.0                                                                vice and get a screw driver or a similar
                                                               Password: admin                        tool with a small diameter to reach the    ˚ Press the RESET-button again within the
          ˚ Gateway: 192.168.0.110
     12                                                                                                                                                                                13
QUICK START GUIDE Version 1.0
next 5 seconds for max. 2 seconds and          IP address (“192.168.0.110”)                IMPORT”, you can find a wizard, which
      then release the button again; after a                                                     will guide you through the ETS-Import.
      short pause the SERVICE-LED stays on          If the SERVICE-LED stops blinking after      Select the project file created in step 1
      for some seconds.                             the RESET-button was pressed for the first   and follow the steps on the screen.
                                                    time (10 seconds) and before you were
     ˚ As soon as the SERVICE-LED turns off,        able to press the RESET-button again, ple-   VISUALIZATION
       DIVUS D+ is reachable under the factory-
                                                    ase repeat the whole procedure.              After the import and the configuration of
                                                                                                 the KNX functions, you can start to create
                                                                                                 the visualisation. For this you can create
EN

     3 IN THREE STEPS TO A VISUALISATION

                                                                                                                                                   EN
                                                                                                 several rooms in the configuration area
                                                                                                 under “VISUALISATION – ROOMS”.
     ETS PROJECT
     The start point for the creation of the
                                                                                                 To equip the new created rooms with KNX
     KNX visualisation with DIVUS OPTIMA is
                                                                                                 objects, you can search them using the
     your ETS project.
                                                                                                 search engine and drag&drop the whished
     Using the OPC export in ETS can be
                                                                                                 objects into the corresponding tables of
     created a project file that contains all the
                                                                                                 the whished rooms.
     information needed from DIVUS OPTIMA.
                                                                                                 Detailed information about the program-
     ETS IMPORT                                                                                  ming/usage of DIVUS OPTIMA can be
     In the configuration area of DIVUS OPTI-                                                    found in the OPTIMA ADMINSTRATOR-
     MA under “TECHNOLOGIES - KNX – ETS                                                          MANUAL/OPTIMA USER-MANUAL.
     14                                                                                                                                       15
INDEX                                                        1 ALLGEMEINE INFORMATIONEN
     1       ALLGEMEINE INFORMATIONEN                -   17   -   DIVUS GmbH                                  Verbesserungen sowie Hinweise auf Feh-
     1.1     Darstellungskonventionen                -   18   -   Pillhof 51                                  ler sind uns jederzeit willkommen. Die Ver-
                                                                  I-39057 Eppan (BZ)                          einbarungen gelten auch für die speziellen
     1.2     Sicherheitsvorschriften                 -   19   -                                               Anhänge zu diesem Handbuch.
     1.3     Normen                                  -   20   -   Betriebsanleitungen, Handbücher und
                                                                  Software sind urheberrechtlich geschützt.   Die Bezeichnungen in diesem Dokument
     2       ERSTE INBETRIEBNAHME                    -   21   -
                                                                  Alle Rechte bleiben vorbehalten. Das Ko-    können Marken sein, deren Benutzung
     2.1     Einleitung                              -   21   -   pieren, Vervielfältigen, Übersetzen, Um-    durch Dritte für eigene Zwecke die Rechte
     2.2     Inhalt der Verpackung                   -   21   -   setzen im Ganzen oder in Teilen ist nicht   der Inhaber verletzen können.
                                                                  gestattet. Eine Ausnahme gilt für die An-
     2.3     Montage, Anschluss und Inbetriebnahme   -   23   -   fertigung einer Sicherungskopie der Soft-   Benutzerhinweise: Bitte lesen Sie das
DE

                                                                                                                                                            DE
     2.3.1   Montage und Anschluss                   -   23   -   ware für den eigenen Gebrauch.              Handbuch VOR dem ersten Einsatz und
                                                                                                              bewahren Sie es zur späteren Verwen-
     2.3.2   Umgebungsbedingungen                    -   25   -
                                                                  Änderungen des Handbuchs behalten wir       dung sorgfältig auf.
     2.3.3   Inbetriebnahme                          -   25   -   uns ohne Vorankündigung vor. Die Feh-
     2.4     Wartung / Garantiebedingungen           -   26   -   lerfreiheit und Richtigkeit der in diesem   Zielgruppe: Das Handbuch ist für Anwen-
                                                                  Dokument und auf den mitgelieferten         der mit Vorkenntnissen in der PC- und Au-
     2.5     Netzwerkverbindung                      -   27   -   Speichermedien enthaltenen Daten kön-       tomatisierungstechnik geschrieben.
     2.6     Zurücksetzen der IP-Adresse             -   29   -   nen wir nicht garantieren. Anregungen zu
     3       IN DREI SCHRITTEN ZUR VISUALISIERUNG    -   30   -
     16                                                                                                                                               17
1.1 DARSTELLUNGSKONVENTIONEN                                                                1.2 Sicherheitsvorschriften
     [TASTE]                                        “…”                                          Diese Betriebsanleitung enthält die wichtigs-   wendung Gefahren bzw. Beeinträchtigungen
     Tasteneingaben des Benutzers werden in         Namen von auszuwählenden Schaltflä-          ten Hinweise, um das Gerät sicherheitsge-       an der Maschine oder an anderen Sachwer-
     eckigen Klammern dargestellt, z.B. [STRG]      chen, Menüs oder anderen Bildschirm-         recht zu betreiben.                             ten entstehen.
     oder [ENTF]                                    elementen werden in „Gänsefüßchen“           Diese Bedienungsanleitung, insbesondere die     Das Gerät erfüllt die Anforderungen der EMV-
                                                    wiedergegeben.                               Sicherheits-Hinweise, sind von allen Personen   Richtlinien und harmonisierten europäischen
     Courier                                                                                     zu beachten, die mit dem Gerät arbeiten.        Normen. Jede hardwareseitige Veränderung
     Bildschirmausgaben werden in der               Piktogramme: Im Handbuch sind folgende                                                       am System kann das EMV-Verhalten beein-
     Schriftart Courier beschrieben, z.B. C:\>      Piktogramme zur Kennzeichnung bestimm-       Darüber hinaus sind die für den Einsatzort
                                                                                                                                                 flussen.
                                                    ter Textabschnitte verwendet:                geltenden Regeln und Vorschriften zur Un-
     Courier bold                                            Achtung! Möglicherweise gefähr-     fallverhütung zu beachten.                      Das Gerät darf ohne spezielle Schutzmaß-
     Tastatureingaben durch den Benutzer sind                liche Situation. Sachschäden kön-                                                   nahmen nicht eingesetzt werden im Ex-Be-
                                                                                                 Die Installation und Bedienung darf nur von
DE

                                                                                                                                                                                                   DE
     in Schriftart Courier fett beschrieben, z.B.            nen die Folge sein.                                                                 reich und in Anlagen, welche einer besonde-
                                                                                                 ausgebildetem und geschultem Personal
     C:\>DIR                                                                                                                                     ren Überwachung bedürfen.
                                                                                                 erfolgen.
                                                            Notizen - Tipps und ergänzende                                                       Explosionsgefahr. Pufferbatterien nicht er-
                                                            Hinweise                             Bestimmungsgemäßer Gebrauch: Das Gerät
                                                                                                                                                 hitzen. Schwere Verletzungen können die
                                                                                                 ist ausgelegt für den Einsatz in der Gebäu-
                                                                                                                                                 Folge sein.
                                                                                                 deautomation.
                                                                                                                                                 Die Betriebsspannung des Gerätes darf nur in
                                                                                                 Das Gerät ist nach dem Stand der Technik
                                                                                                                                                 den spezifizierten Bereichen liegen! Informati-
                                                                                                 und den anerkannten sicherheitstechnischen
                                                                                                                                                 onen hierzu finden Sie auf dem Typenschild.
                                                                                                 Regeln gebaut. Dennoch können bei der Ver-
     18                                                                                                                                                                                     19
SOFTWARE                                                                            2 ERSTE INBETRIEBNAHME
     Der Linux-Kernel 2.6.32 wird unter den Bedingungen der GNU General Public License
     Version 2 bereitgestellt. https://www.gnu.org/licenses/gpl-2.0.html                 2.1 EINLEITUNG
                                                                                         DIVUS D+ ist ein Webserver, auf
     1.3 Normen                                                                          welchem        die    produktübergreifen-          Details zur Konfiguration von
     DIVUS D+ stimmt mit den grundle-         Die in dieser Dokumentation beschrie-      de     Visualisierungssoftware   OPTIMA            OPTIMA finden Sie im OPTIMA
     genden Anforderungen der folgenden       benen Montage- und Anschluss-              zum Einsatz kommt. Dadurch wird                    ADMINISTRATOR-HANDBUCH
     Richtlinien überein:                     anweisungen sind einzuhalten. Die          DIVUS D+ zu einem webbasierten              während Details zur Verwendung der
                                                                                         Visualisierungssystem zur Überwachung       Visualisierung im OPTIMA BENUTZER-
     2014/35/EU                               Konformität wird durch Anbringung
                                                                                         und Visualisierung von Home & Building      HANDBUCH nachgelesen werden
     2014/30/EU                               des CE-Zeichens bestätigt.
                                                                                         Automation Anlagen, welche auf Basis        können.
     2011/65/EU                               Die EG Konformitätserklärungen
                                                                                         des weltweiten KNX-Standards reali-
DE

     basierend auf den folgenden ange-        können angefordert werden bei:

                                                                                                                                                                                 DE
                                                                                         siert worden sind. Die Konfiguration und
     wandten harmonisierten Normen:           DIVUS GmbH | Pillhof 51 | I-39057          Verwendung von OPTIMA erfolgt direkt
     EN 50491-3:2009, EN 62368-1:2014/        Eppan (BZ)                                                                                   DIVUS D+ ist ein purer Web-
                                                                                         über Web-Interface, welches durch ei-
     A11:2017                                                                                                                              Server und alleinstehend nicht
                                                                                         nen herkömmlichen Browser (von jedem
     EN 50491-5-1:2011, EN 50491-5-2:2011,           Laut RICHTLINIE 2002/96/EG                                                            zur Visualisierung der Anlage ge-
                                                                                         beliebigen Gerät / Betriebssystem aus)
     EN 55032:2013, EN 55035:2017, Draft             müssen Elektro- und Elektronik-                                                 eignet, da er über kein Display verfügt.
                                                                                         angezeigt werden kann.
     ETSI 301 489-1 V2.2.0, Draft ETSI 301           Altgeräte getrennt gesammelt                                                    Die Visualisierung wird über Client-PCs
     489-17 V.3.2.0                                                                                                                  wie z.B. Touchpanels von DIVUS reali-
                                                     und dürfen nicht als unsortierter
     EN 50581:2012                                   Siedlungsabfall beseitigt werden.
     20                                                                                                                                                                     21
2.3 MONTAGE, ANSCHLUSS UND INBETRIEBNAHME
       siert, welche sich über Netzwerk mit
       dem Server verbinden. Der Server ver-                           2.3.1 MONTAGE UND ANSCHLUSS
       fügt über keinerlei Grafik-Schnittstelle                        DIVUS D+ wird, wie die meisten KNX-            vorhandene Stromversorgung, während
       (VGA, DVI, HDMI,…) und kann somit                               Komponenten, auf DIN-Schiene montiert.         die SERVICE-LED im Normalfall ausge-
       keine Inhalte darstellen...                                     Zur korrekten Funktion von DIVUS D+            schaltet bleibt.
                                                                       müssen folgende Verbindungen garantiert        DIVUS D+ verfügt des Weiteren über fol-
                                                                       werden:                                        gende Schnittstellen:

                                                                       ˚ Stromversorgung 12-24V DC (Stromauf-         ˚ RS485-Schnittstelle und 1 USB-Port: zur
                                                                         nahme 240 mA a 12V) über mitgelieferte         Einbindung von Fremdsystemen
     2.2 INHALT DER VERPACKUNG                                           Steckverbindung
DE

                                                                                                                              Die Verbindung zum KNX-BUS

                                                                                                                                                                  DE
     Die Verpackung beinhaltet folgendes Material:
                                                                                                                              ist für die Konfiguration von
                                                                       ˚ KNX-Bus-Anbindung über mitgelieferte                 DIVUS D+ nicht zwingend not-
     ˚ DIVUS D+                                                          Steckverbindung                                wendig, allerdings ermöglicht sie
     ˚ Steckanschluss zur Verbindung von Stromversorgung und KNX-Bus   ˚ Netzwerkverbindung über CAT5-Netz-             eine effizientere Programmierung, da
     ˚ Installationsanleitung in gedruckter Form                         werkkabel (nicht mitgeliefert)                 direkt Tests an der Anlage durchge-
                                                                                                                        führt werden können.
                                                                       Die mit “POWER” gekennzeichnete LED an
                                                                       der Frontseite des Servers signalisiert eine

     22                                                                                                                                                     23
Bei der Inbetriebnahme müssen folgende                                            2.3.2 UMGEBUNGSBEDINGUNGEN
     Schritte befolgt werden:                          ACHTUNG!                        Die korrekte Funktion von DIVUS D+ kann nur bei Erfüllung folgender Bedingungen ga-
                                                       Wenn die Hardware von DI-       rantiert werden:
     ˚ System/Anlage stromlos schalten                 VUS D+ verändert wird, kön-
     ˚ DIVUS D+ auf DIN-Schiene installieren    nen irreversible Schäden entstehen.
                                                Eventuelle Eingriffe am Gerät dürfen    BETRIEB            Umgebungstemperatur zwischen 0°C und 50°C
     ˚ Strom- und Busverbindung an Server an-   nur durch von DIVUS autorisiertes
       schließen                                Personal durchgeführt werden.           LAGERUNG           Umgebungstemperatur zwischen -10°C und 70°C
     ˚ System/Anlage hochfahren
     ˚ Start von DIVUS D+ abwarten
                                                                                       2.3.3 INBETRIEBNAHME
                                                                                       Die Stromversorgung des DIVUS D+ er-
DE

                                                                                                                                                                             DE
                                                                                       folgt durch ein externes, nicht mitgelie-         ACHTUNG!
                                                                                       fertes Netzteil.                                  Vor Inbetriebnahme unbedingt
                                                                                                                                         alle Kabelverbindungen prüfen!
                                                                                       Das Gerät unterstützt eine Betriebsspan-    Vergewissern Sie sich, dass die an-
                                                                                       nung von 12-24V DC.                         zulegende Spannung dem korrekten
                                                                                                                                   Wert entspricht, um Schäden zu ver-
                                                                                                                                   meiden!

     24                                                                                                                                                                25
2.4 WARTUNG / GARANTIEBEDINGUNGEN                                                        2.5 NETZWERKVERBINDUNG
     DIVUS D+ kommt vollständig ohne Lüfter       support@divus.eu. Dabei erhalten Sie        Voraussetzung für den Zugriff auf OPTIMA          ˚ IP Adresse: 192.168.0.100
     und ohne bewegliche Teile aus. Die indus-    auch alle nötigen Informationen, sowie      ist eine funktionierende Netzwerk-Verbin-         ˚ Subnet-Maske: 255.255.255.0
     triegeprüfte Hardware, die reduzierten       das Begleitschreiben „Reparaturauftrag“.    dung zu DIVUS D+. Zur ersten Verwendung           ˚ Gateway: 192.168.0.110
     Ausmaße sowie die minimale Stromauf-                                                     von OPTIMA, sowie bei Absenz eines funkti-
                                                  Reparatursendungen müssen originalver-                                                    ˚ Speichern Sie die neuen Einstellungen.
     nahme machen ihn zum idealen PC für die                                                  onierenden Netzwerks, muss wie folgt vor-
                                                                                                                                              Je nach Betriebssystem kann im An-
     Haus- und Gebäudeverwaltung. Der PC          packt versendet werden. Ansonsten kann      gegangen werden:
                                                                                                                                              schluss ein Neustart erforderlich sein.
     benötigt keinerlei komplizierte Montage      keine Garantiehaftung mehr gewährleistet
     oder Wartung.                                werden. Auch werden dem Kunden bei un-      ˚ Verbinden Sie DIVUS D+ über ein “ge-        Nach Anpassung der Netzwerk-Ein-
                                                  sachgemäßer Verpackung eventuelle Trans-      kreuztes” Netzwerkkabel (“Cross-Over”-      stellungen öffnen Sie ein Browser-
     Der PC hat 24 Monate Garantie ab Liefe-      portschäden und eine Pauschale für die        Kabel) mit Ihrem PC                         Fenster und geben die IP-Adresse
     rung (Gültigkeit Datum des Lieferscheins).   Verpackung bei Rücksendung verrechnet.                                                    des DIVUS D+ in die Adressleiste ein:
                                                                                              ˚ Greifen Sie auf die Netzwerkeinstellungen
DE

                                                                                                                                                                                        DE
     Diese bleibt nur erhalten, wenn das Gerät    Des Weiteren muss das Begleitschreiben        Ihres PCs zu, wie für Ihr Betriebssystem
     in seiner Originalverpackung, komplett mit   “Reparaturauftrag“ korrekt ausgefüllt dem     vorgesehen.
     allen stoßdämpfenden Teilen, transpor-       Gerät beigelegt werden, um einen effizi-                                                           http://192.168.0.110
     tiert wird.                                  enten Service sowie eine Bearbeitungszeit   ˚ Bearbeiten Sie die Einstellungen des
                                                  von 2 Wochen gewähren zu können.              TCP/IP – Protokolls (Version 4) der Netz-
     Zu beachten:                                                                               werk-Schnittstelle, welche mit DIVUS D+     Dieser Link führt Sie direkt zur Anmel-
     Jede Reparatursendung muss vom               Aus technischen Gründen können nur            verbunden ist, und stellen folgende Wer-    deseite von OPTIMA, wo Sie sich mit
     technischen Support genehmigt wer-           komplette Systeme der Reparatur zuge-         te ein:                                     folgenden Anmeldedaten als Administra-
     den. Kontaktieren Sie uns hierzu unter       führt werden.
     26                                                                                                                                                                           27
tor anmelden können:                                                                 2.6 ZURÜCKSETZEN DER IP-ADRESSE
                                                                                          Die IP-Adresse von DIVUS D+ kann im          ˚ Drücken Sie den Button innerhalb der
              Benutzername: admin                                                         Bedarfsfall über den RESET-Button an der       folgenden 5 Sekunden erneut für max.
                Passwort: admin                                                           Unterseite des Webservers auf Werksein-        2 Sekunden und lassen diesen dann
                                                                                          stellung zurückgesetzt werden:                 wieder los; nach kurzer Zeit bleibt die
     Nach erfolgter Anmeldung können Sie                                                  ˚ Lokalisieren Sie den RESET-Button am         SERVICE-LED für einige Sekunden einge-
                                                        Die maximale Bedienfreund-          Gerät und besorgen Sie Sich einen            schaltet.
     von der Visualisierungs-Ebene aus über
                                                        lichkeit der Benutzeroberfläche     Schraubenzieher oder ein ähnliches         ˚ Nachdem die LED erlischt, ist der
     den entsprechenden ADMIN-Button in
                                                        kann mit folgenden Browsern         Utensil mit ausreichend kleinem Durch-       Webserver     unter     der   Werks-IP
     der Toolbar des eingeblendeten Naviga-
                                                  erreicht werden:                          messer, um den Button durch die Öff-         (192.168.0.110) erreichbar
     tionsmenüs auf die Verwaltung zugreifen
                                                  •     Google Chrome                       nung im Gehäuse zu erreichen.              Wenn die LED nach dem ersten Mal Drü-
     (     - Navigationsmenü ein/ausblenden);
                                                  •     Apple Safari                      ˚ Drücken Sie den Button solange durch       cken (10 Sekunden) mit dem Blinken auf-
     detaillierte Informationen zur Visualisie-
DE

                                                                                                                                                                                   DE
     rung und deren Programmierung finden                                                   (mindestens 10 Sekunden), bis die SER-     hört, bevor Sie den Button ein weiteres
     Sie im OPTIMA BENUTZER-HANDBUCH                                                        VICE-LED an der Vorderseite zu blinken     Mal gedrückt haben, wiederholen Sie bitte
     bzw. im OPTIMA ADMINISTRATOR-HAND-                                                     beginnt. Lassen Sie den Button dann los.   den gesamten Vorgang.
     BUCH.

     28                                                                                                                                                                      29
3    IN 3 SCHRITTEN ZUR VISUALISIERUNG        VISUALISIERUNG
                                                   Nach dem Import und der Konfiguration
     ETS-PROJEKT                                   der KNX Funktionen können Sie mit der
     Der Startpunkt für die Erstellung Ihrer KNX   Erstellung der Visualisierung beginnen.
     Visualisierung mit Hilfe von DIVUS OPTI-      Hierfür können Sie im Konfigurationsme-
     MA ist Ihr ETS-Projekt.                       nü von DIVUS OPTIMA unter „VISUALISIE-
     Mit Hilfe des OPC-Exports in ETS kann         RUNG - RÄUMLICHKEITEN“ verschiedene
     eine Projekt-Datei erstellt werden, wel-      Räumlichkeiten erstellen.
     che alle für DIVUS OPTIMA notwendigen         Um die neu erstellten Räumlichkeiten mit
     Daten beinhaltet.                             KNX-Objekten zu füllen, können die ent-
                                                   sprechenden KNX-Objekte mit der Such-
                                                   maschine gesucht und anschließend von
     ETS-IMPORT
DE

                                                                                                   DE
                                                   dort per Drag&Drop in die entsprechen-
     Im Konfigurationsmenü von DIVUS OP-           den Tabellen der gewünschten Räumlich-
     TIMA finden Sie unter „TECHNOLOGIEN           keiten eingefügt werden.
     – KNX – ETS-IMPORT“ einen Wizard, wel-
     cher Sie von A-Z durch den ETS-Import         Detaillierte      Informationen    zur
     begleitet.                                    Programmierung/ Verwendung
                                                   von      DIVUS   OPTIMA     können  im
     Einfach die in Schritt 1 erstellte Projekt-   OPTIMA       ADMINISTRATOR-HANDBUCH/
     datei auswählen und die Anweisungen           OPTIMA BENUTZER-HANDBUCH nachge-
     am Bildschirm befolgen.                       lesen werden.
     30                                                                                       31
PROJECT / PROJEKT
Name / Bezeichnung
Contact person / Kontaktperson        
                                      
Start / Beginn                                    /        /
End / Fertigstellung                             /         /

DIVUS D+
IP address / IP-Adresse               ______ . ______ . ______ . ______
Subnet mask / Subnetzmaske            ______ . ______ . ______ . ______
Gateway / Gateway                     ______ . ______ . ______ . ______
DNS server / DNS-Server               ______ . ______ . ______ . ______
Physical address / Physikalische Adr. ______ . ______ . ______

                                                                          10151-01
Serial number / Seriennummer
OPTIMA Version                        ______ . ______ . ______
You can also read