Boss Frog Installation Instructions Single Hoop Rollbar for Mazda Miata
←
→
Page content transcription
If your browser does not render page correctly, please read the page content below

Boss Frog Installation Instructions
                   Single Hoop Rollbar for Mazda Miata

Introduction
Congratulations! You have purchased one of the highest quality rollbars available today.
Installing your new rollbar involves many steps, but is really not that difficult if you take your time and
understand what you are trying to accomplish. These instructions will clearly illustrate the methods we
have found to work the best. If something does not fit properly, we would like to know about it, so that we
can improve our products. Contact us at bossfrog@bossfrog.biz.

Safety
The most important factor when installing a roll bar is your personal safety.
• Always use safety glasses while installing the rollbar.
• Use care when operating power tools, and always follow manufacturer’s recommendations.
• Lift and support the car using the recommendations of the vehicle manufacturer.
• Beware of sharp metal edges and corners.

WARNING: This product does not guarantee the safety of the occupant in the case of a rollover or other
vehicle accident. This rollbar has been designed and tested following the intent of the SCCA and FIA
rollbar guidelines, but has not undergone automotive industry testing. The owner assumes the
responsibility for proper mounting and padding of the rollbar. Always wear your seatbelt and follow safe
driving practices.

1204 Boss Frog Installation Instructions – Copyright 2012 – US Patent #7,032,927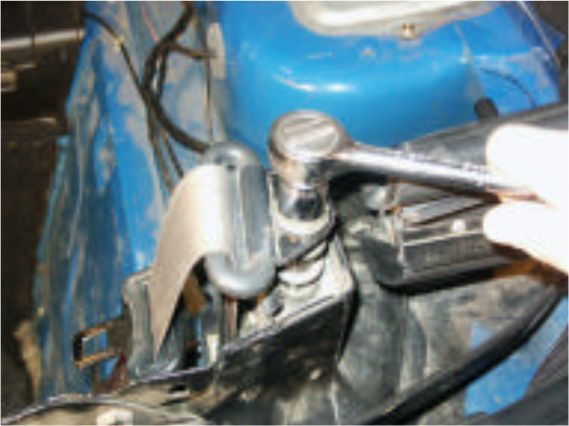
Boss Frog Warranty
A. Standard Boss Frog Warranty
Boss Frog Inc. (Boss Frog) warrants, in accordance with the provisions below,
to the original purchaser for the period of 30 days from the date of delivery of a
Boss Frog product, that the product is free from defects in material or
workmanship. Boss Frog’s obligation under this warranty is to repair or
replace, at Boss Frog’s election, without charge and at Boss Frog’s place of
business, any part or parts of the product which, in the judgment of Boss Frog,
prove to be defective.
THIS WARRANTY AND BOSS FROG’S OBLIGATION HEREUNDER IS IN LIEU
OF ALL OTHER WARRANTIES, EXPRESSED OR IMPLIED, INCLUDING,
WITHOUT LIMITATION, THE IMPLIED WARRANTY OF MERCHANTABILITY OR
IMPLIED WARRANTY OF FITNESS FOR PARTICULAR PURPOSE, and all other
obligations or liabilities of Boss Frog for incidental and consequential
damages resulting from the design, manufacture, sale or use of the machine.
No person is authorized to make any warranty or assume for Boss Frog any
liability not strictly in accordance with this warranty.
B. Purchased Product Warranty
This warranty does not apply to component parts not manufactured by Boss Frog,
except to the extent of their individual manufacturer’s guarantees.
C. Warranty Limitations and Exclusions
This warranty shall not apply to any product which, in the judgment of Boss Frog, has
been altered or tampered with in any way, or has been subjected to misuse, neglect
or accident. This warranty applies only to the original purchaser and may not be
assigned without the express written consent of Boss Frog, Inc.
D. Product Changes and Improvement
Boss Frog is continually striving to improve its products, and therefore reserves the
right to make improvements or changes when it becomes practical and possible to
do so, without incurring any obligations to make changes or additions to the products
sold previously.

WARNING: This product does not guarantee the safety of the occupant in the case of a rollover or other
vehicle accident. This rollbar has been designed and tested following the intent of the SCCA and FIA
rollbar guidelines, but has not undergone automotive industry testing. The owner assumes the
responsibility for proper mounting and padding of the rollbar. Always wear your seatbelt and follow safe
driving practices.

1204 Boss Frog Installation Instructions – Copyright 2012 – US Patent #7,032,927
Kit Contents
Parts
(1) Rollbar Assembly
(2) Rear Foot Backer Plates (short)
(2) Front Foot Support Backer Plates
(2) Seatbelt Adapters
(2) Front Foot Support Plates

Hardware
(2) 7/16”-20 x 1.25” GRD 8 bolts
(2) 7/16”-20 x 3” GRD 8 bolts
(16) 3/8” x 1.5” GRD 8 bolts
(2) 3/8” x 1.25” GRD 8 bolts
(4) 3/8” x 1” GRD 8 bolts
(22) 3/8” Flat Washers
(22) 3/8” Lock Washers
(22) 3/8” Hex Nuts GRD 8
(2) 7/16” Flat Washers
(2) 1” OD seat belt tower bushings
(4) black trim caps & washers

Tools Required
Safety Glasses
Metric wrenches and sockets; 10mm, 14mm, 17mm
US wrenches and sockets; 9/16”, 5/8”
T-40 Torx Drive 6 pt (late models or hardtops only)
Phillips Screwdriver
3/8” drill bit
12” long drill bit (5/16” preferred, 1/4” or 3/8” OK)
Drill
Tin snips or aviation shears
Claw hammer or small crow bar
Flat and round file
Hacksaw or Dremel tool
Floor Jack and jackstands (4)
Utility Knife

Guide to the rollbar installation and instructions:
Many people who will install these rollbars do not like to read instructions, but need some general
direction on what to do. For these people, we have provided a summary of the steps (in bold) preceding
the detailed instructions.

We recommend setting aside some plastic bags or small containers to put fasteners and small parts
during disassembly. Most of these parts will be reused during final assembly, and there is nothing more
frustrating than not being able to find a part or fastener when you are almost done.

Also, there will likely be items on the car that may need adjustments, which are not specifically mentioned
in these instructions. Wiring routing and ties, connectors, rubber plugs, excessive undercoating or caulk,
or other items may need to be removed or modified to fit the rollbar in place.

WARNING: This product does not guarantee the safety of the occupant in the case of a rollover or other
vehicle accident. This rollbar has been designed and tested following the intent of the SCCA and FIA
rollbar guidelines, but has not undergone automotive industry testing. The owner assumes the
responsibility for proper mounting and padding of the rollbar. Always wear your seatbelt and follow safe
driving practices.

1204 Boss Frog Installation Instructions – Copyright 2012 – US Patent #7,032,927
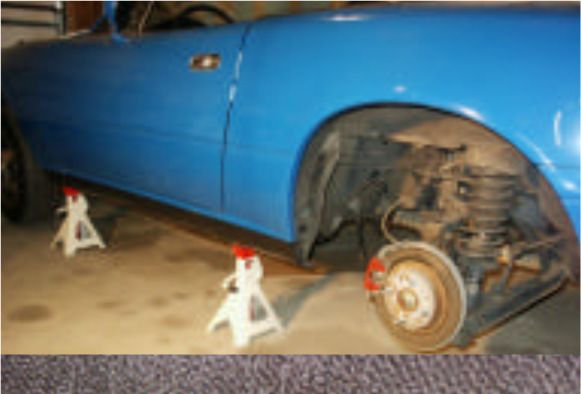
DISASSEMBLE AND PREPARE THE CAR
1) Jack up the car and support with heavy jackstands.
• Following the manufacturer’s instructions, raise the entire car and
support at the four recommended lift points. Also remove the rear wheels.
Note: Do not lift only one side or one end!!! Uneven support of the car
will cause the chassis to twist, and the rollbar will not fit properly.
2) Remove the seats (and windscreen).
• Removal of the seats is optional, but allows easier access to the work
area.
• Remove the 4 (metric) bolts from the base of each seat using a 14mm
wrench or socket and remove the seats from the car.
• If your car has headrest speakers, remember to disconnect the wiring
harness plug under the seats.
• Remove the windscreen, if installed.
3) Remove the carpeting (with the top up).
• Using a small crow bar, claw hammer, or button removal tool, carefully
pry the plastic buttons from the carpet at the front edge of the package
tray.
• With the top partially raised, roll or fold the horizontal package tray
carpet back under the convertible top (some prefer to completely remove
the carpet).
4) Remove the cockpit brace (’94 – ’97).
• Remove the cockpit brace end covers, loosen the bolts and remove the
brace.
5) Remove the hardtop mounting brackets (if installed).
6) Remove the plastic side panels.
• Remove the top plastic cover over the seat belt tower bolts by pulling
upwards.
• Remove the boot snaps with a phillips screwdriver and remove any other
fasteners from the plastic panels.
• There is a small rectangular plastic piece that connects the plastic panel
behind the seat belt tower. Carefully use a screwdriver to pry this out
toward the rear of the car.
• A metal top corner connector and weather stripping must be removed
from each side.
• Remove any remaining screws from the plastic side panels and remove
both plastic panels by sliding them forward over the seat belt bolt.
7) Remove the metal package tray cover.
• Remove the bolts from the perimeter of the cover using a 10mm
socket, and set the tray aside.
• This will reveal the flat areas on each side of the fuel tank where
the rear mounting feet will be bolted. Anything in these areas
(insulation pads, security system, rubber plugs) should be moved
so that these areas are clear.
8) Put the convertible top down.
• You may want to cover the rear window area with a towel or cloth
to protect it during rollbar installation.

WARNING: This product does not guarantee the safety of the occupant in the case of a rollover or other
vehicle accident. This rollbar has been designed and tested following the intent of the SCCA and FIA
rollbar guidelines, but has not undergone automotive industry testing. The owner assumes the
responsibility for proper mounting and padding of the rollbar. Always wear your seatbelt and follow safe
driving practices.

1204 Boss Frog Installation Instructions – Copyright 2012 – US Patent #7,032,927
9) Remove seat belt tower bolts.
• Remove the top bolts holding the seat belt guides using a 17mm
or 5/8” wrench or socket. Remove the bolt and any spacer
bushings or brackets from the seat belt guides and set them aside
(they will not be reused).
• On the front side of the seat belt towers underneath the seat belt
reels is a bolt that secures the reels in place. Remove the bolt and
any washers from each side using a 17mm socket or wrench.
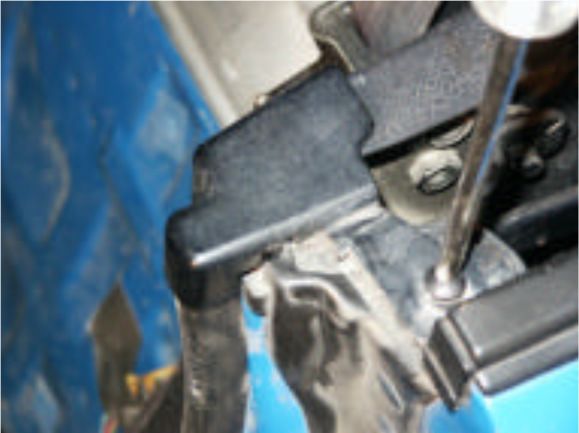
10) Modify ECU mounting (if installed).
• If an ECU is installed behind the passenger seat, the top bolt must
be removed. Remove the nut, then bend the stud back and forth
with a pliers until it snaps off.
Tilt the Seatbelt Reel.
• In order to make the seatbelts retract better, the seatbelt reel can
be repositioned slightly for better alignment with the guide.
• With the lower bolt loosely installed and the top bolt removed, tilt
the top of the reel assembly towards the inside of the car. Mark and drill a new hole for the metal tang so
the reel is tilted as far as possible inside the housing (about 5/8”). Another option is to bend the tang flat.
• Drill and tap a new hole for the top bolt, or use an oversize washer on the existing bolt to hold the
seatbelt reel in its new position.
11) Remove the plastic splash panels from the front of the inner rear
fenders.
• Remove the small bolts with a 10mm socket (or plastic fasteners
with a phillips screwdriver) and remove the plastic panels.
WARNING: This product does not guarantee the safety of the occupant in the case of a rollover or other
vehicle accident. This rollbar has been designed and tested following the intent of the SCCA and FIA
rollbar guidelines, but has not undergone automotive industry testing. The owner assumes the
responsibility for proper mounting and padding of the rollbar. Always wear your seatbelt and follow safe
driving practices.
1204 Boss Frog Installation Instructions – Copyright 2012 – US Patent #7,032,927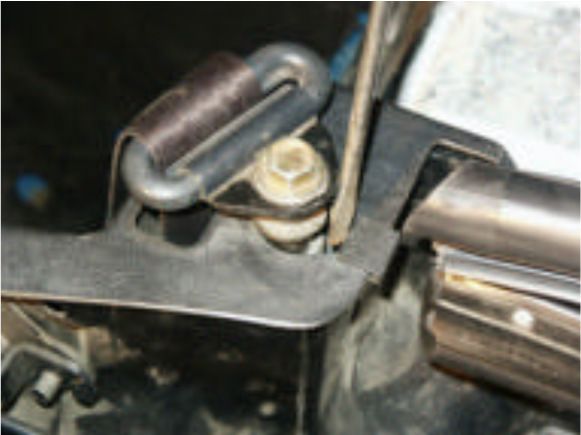
• INSTALL THE ROLLBAR
12) Fit the rollbars into position.
• Be very careful not to cut or damage the wiring harnesses during installation of the rollbar. Two people
will be needed to properly handle the rollbar in the next steps.
IMPORTANT!!!!
• Install the front foot support plates (rectangular with 4 holes) to the front feet. Insert 2 of the
3/8”x1” bolts from the back of each front foot, then install the support plate, washer, LW, and nut.
Tighten these bolts down.
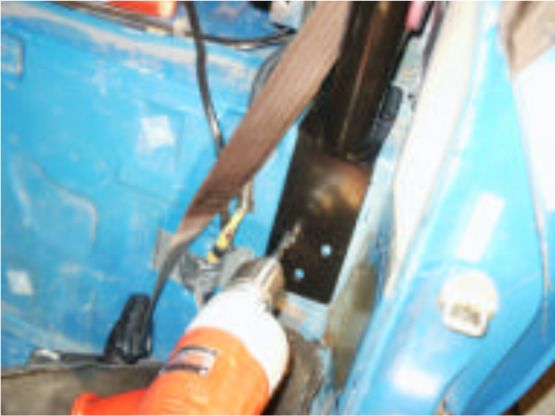
• Install the hoop by carefully guiding the rear feet into position onto the flat steel areas on each side of
the fuel tank. It may help to position the driver’s side rear foot first, to get behind the various wires and
cables, then guide the passenger side foot into position. • If there are electrical plugs or hardware that
obstruct the foot location, carefully move these items.
• If you have ABS brakes, the rear foot may interfere with the wiring location. If so, disconnect the wiring
harness (behind the seat) and pull the wires into the inner fender area. Re-route the wires after the
installation is complete.
• The seatbelts should be inside the rollbars on both sides.
• The two front feet should now begin to line up with the lower bolt hole at the base of the seat belt tower.
Generally, we recommend that the bottom of the seat belt reel bracket should be installed in front of
the rollbar front foot. This will require loosening or removing the top screw holding the reel in place. In
some cases, the bottom edge of the reel bracket may need to be trimmed or ground in order for the lower
bolt hole to align properly.
13) Bolt the rollbars into position.
• When the front feet appear to be properly aligned, insert the 7/16” x 1.25”
bolts (fine thread) with 7/16” flat washer through the seat belt reel bracket
and front foot of the rollbar into the threaded holes at the base of each seat
belt tower. The assembly sequence is; bolt, washer, seat belt reel, front foot,
and into the threaded hole. Use a 5/8” wrench to turn the bolt while pushing
it into the threaded hole. If the bolt will not thread into the hole, check for
proper bolt alignment and file any parts as necessary.
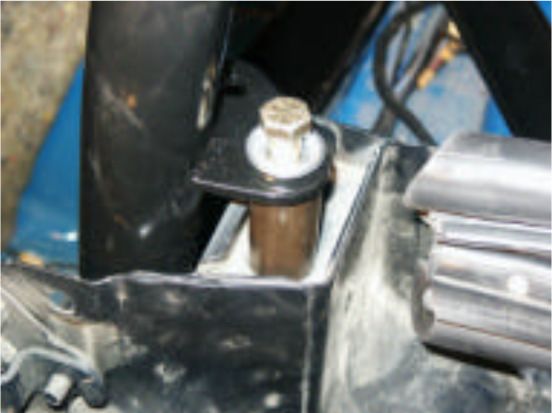
• With the lower seat belt tower bolts started and the rollbar pushed back
against the tower, the vertical holes on top of the tower should be roughly
lined up. Install a trim cap washer on each 7/16” x 3” bolt (except for
stainless installations), then a 7/16” flat washer, and insert through the
slotted hole in the top mount plates of the rollbar, through the 1-7/8” long
spacer tube, and into the threaded holes at the top of the seat belt towers.
Important note: This top bolt does not always align perfectly with the
threaded hole due to variations in seat belt tower dimensions and rear foot
clearance. You may need to rock the rollbar or apply pressure on the hoop to
get the bolt started. We recommend recruiting a friend to help position the bar. An alternate method is to
start the upper 3” bolt first, then the lower 1.25” bolt. In rare cases, the hole on the top mount plate can be
enlarged slightly using a rat-tail file to allow proper fit.
• After all fasteners are started, recheck to see that all wires are clear and the seatbelts are inside the
rollbar, then tighten all the bolts to approximately 50 ft lbs using 5/8” wrenches.
• Install the plastic trim caps on the seat belt tower bolts.
WARNING: This product does not guarantee the safety of the occupant in the case of a rollover or other
vehicle accident. This rollbar has been designed and tested following the intent of the SCCA and FIA
rollbar guidelines, but has not undergone automotive industry testing. The owner assumes the
responsibility for proper mounting and padding of the rollbar. Always wear your seatbelt and follow safe
driving practices.
1204 Boss Frog Installation Instructions – Copyright 2012 – US Patent #7,032,927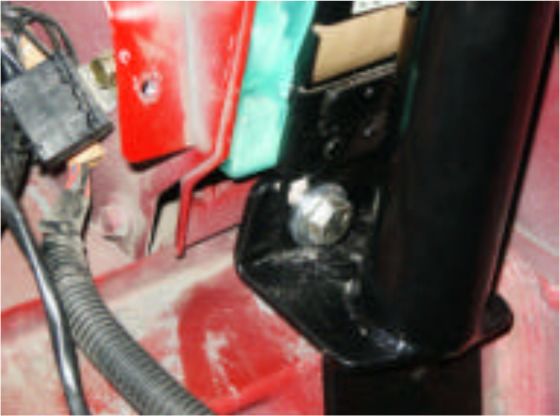
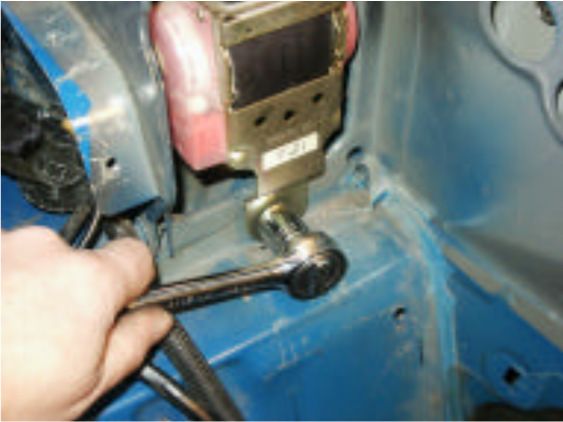
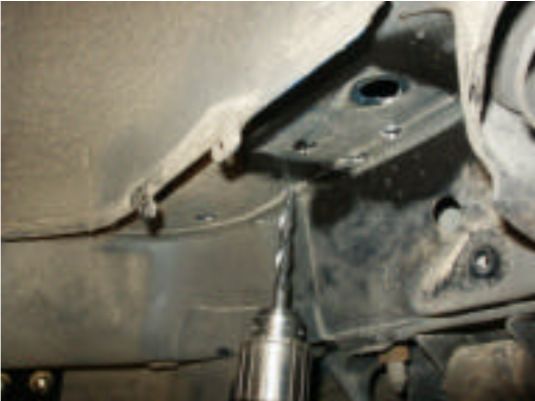
14) Drill the front foot support holes and install backer plates.
• With a 3/8” drill bit, drill through the holes in the front foot supports (2 each
side).
• Install the 3/8” x 1.5” bolts from the front, then attach the front foot support
backer plates from inside the fender well with the supplied washers,
lockwashers, and nuts. The fastener sequence is generally; bolt, finished part,
chassis, backer plate, flat washer, lock washer, and nut. Tighten the nuts to
50 ft lbs each using 9/16” wrenches.
15) Drill the rear mounting foot holes and install the backer plates.
• Using the long drill bit, drill down through the three mounting holes in each of
the rear mounting feet. The space is tight here, but it can be done.
• If you can’t drill all three holes from the top, then drill the front two holes, bolt
in the backer plate from underneath, and drill the third hole from below. It may
help to hold the convertible top partially open.
• Using the 3/8” drill bit from underneath the car, drill up through the new
holes. Spend a few extra minutes making sure these holes are reamed out
well, to give as much bolt clearance as possible. Note that it may be easier to
access the rear bolts from the trunk compartment.
• Bolt in the backer plate from inside the fender well using the 3/8” x 1.5” bolts, washers, lockwashers,
nuts, and 9/16” wrenches, and tighten the nuts to 50 ft lbs each. The fastener sequence is generally bolt,
finished part, chassis, backer plate, flat washer, lock washer, and nut. NOTE: If you have a fuel vent hose
attached in this area, it needs to be unclipped and relocated to allow the backer plate to fit.
• Your rollbar is now structurally installed.

WARNING: This product does not guarantee the safety of the occupant in the case of a rollover or other
vehicle accident. This rollbar has been designed and tested following the intent of the SCCA and FIA
rollbar guidelines, but has not undergone automotive industry testing. The owner assumes the
responsibility for proper mounting and padding of the rollbar. Always wear your seatbelt and follow safe
driving practices.

1204 Boss Frog Installation Instructions – Copyright 2012 – US Patent #7,032,927
RE-ASSEMBLE THE CAR
16) Re-install the fender liners and wheels.
• We suggest coating the installed backer plates with some undercoating spray
(underneath the car) to seal up the area and reduce road noise.
• Re-install the fender liners and wheels, and carefully lower the car
from the jackstands.
17) Attach the seat belt guides.
• A pair of Boss Frog Seatbelt Adapters has been included with your rollbar. These
will generally allow the seatbelt to retract more smoothly than the stock guides.
However, you have the option of re-installing the stock seatbelt guides, or cutting the
stock guides off and installing the Seatbelt Adapters. Choose one option from the
following;

If re-installing the stock seatbelt guides:
• Install the seat belt guide as shown the illustration.
• Tighten the 3/8” x 1.25” GRD 8 bolts using 9/16” wrenches to 50 ft
lbs and install the plastic trim caps.
• Note: Because the angle of the seat belt guide is different that the
factory installation, it is normal for the belts to retract slower than
before the rollbar was installed.

If installing the seatbelt adapters:
• Remove the seatbelt anchor bolt near the floor of the vehicle using a
5/8” wrench.
• Position the hole toward the rear of the car, with the fat end toward the
inside of the car (driver’s side shown).

• Slide the adapter up to the male end of the buckle and
manipulate the buckle through the adapter’s slot. This may
require some effort, but the buckle must be able to fit through
the slot. If it doesn’t fit through, DO NOT proceed further*.

WARNING: This product does not guarantee the safety of the occupant in the case of a rollover or other
vehicle accident. This rollbar has been designed and tested following the intent of the SCCA and FIA
rollbar guidelines, but has not undergone automotive industry testing. The owner assumes the
responsibility for proper mounting and padding of the rollbar. Always wear your seatbelt and follow safe
driving practices.

1204 Boss Frog Installation Instructions – Copyright 2012 – US Patent #7,032,927
• Unbolt the stock seatbelt guide from the rollbar tab using a 9/16”
wrench.
• Carefully cut through the stock seatbelt guide using a hacksaw, jigsaw,
or rotary cutoff tool and remove it from the seatbelt. Be very careful not
to cut, burn, or damage the seatbelt.

• Install the new seatbelt adapter into place on top of the rollbar tab, in
the same position as the stock guide. Use the 3/8” x 1.25” grade 8
fasteners. Re-install the plastic bolt cap and flange if desired.
• Reinstall the seatbelt anchor end using the stock seatbelt
anchor bolt.

18) Re-install package tray.
• Re-install any padding, insulation, or electronic devices located under
the package tray.
• The metal package tray must be notched to re-install. This will not
effect the performance or appearance of the finished installation.
• Using the package tray template provided, cut the sheet metal with tin
snips or a jigsaw.
Warning: the package tray edges are sharp, and will damage the paint if
allowed to contact the rollbar tubes. One option is to apply electrical or
duct tape over these sharp edges to prevent injury to fingers or paint.
• Carefully guide the package tray into position and attach with the
original 10mm bolts.

WARNING: This product does not guarantee the safety of the occupant in the case of a rollover or other
vehicle accident. This rollbar has been designed and tested following the intent of the SCCA and FIA
rollbar guidelines, but has not undergone automotive industry testing. The owner assumes the
responsibility for proper mounting and padding of the rollbar. Always wear your seatbelt and follow safe
driving practices.

1204 Boss Frog Installation Instructions – Copyright 2012 – US Patent #7,032,927
19) Re-install carpet.
• With the top partially raised, lay the package tray carpet as flat as possible behind the
rollbars. Mark where the carpet meets the base of the rear hoop braces, and carefully
cut a slot in the carpet toward the sides of the package tray.
• Mark and cut the carpet around the tubes – careful, this will show if you make the holes
too big. Cut the hole small at first, and enlarge until it just fits around the tubes.
• Use some duct or carpet tape underneath the carpet to hold the trimmed edges together,
and re-install all the plastic buttons.
20) Re-install seats.
• Re-install the seats and plug in the headrest speakers (if installed).
• Even though you are not completely done with the installation, we recommend that you
take a break and go for a test drive. Careful, heads will turn to look at the new addition to
your car.
21) Fit plastic trim panels.
• Back to work.
• The plastic trim panels are not difficult to modify, but they require some time and patience
to do it properly. Cutting templates are provided, but only give an idea of what your
panels will look like when they are completely trimmed.
• The easiest way to explain the process is that you will be cutting each plastic panel in half
vertically. Roughly draw the lines vertically down the front as shown on the template, but
only make a single vertical cut in the panel, roughly centered between the drawn
lines.
• Continue test fitting and trimming toward the drawn lines until the two panel halves lay as
flat as you want them next to the installed rollbar.
• We suggest using an aviation shears or tins nips for this job. When you are done
trimming, a flat file will help straighten the lines and make them look professional.
• A round cutout will need to be made on the top of the panel for the tube to go through –
measure carefully and take small cuts to be sure it will fit properly.
• You will need to cut the end off the seat belt trim rings and elongate the hole to make it fit
properly. Again, use a file to make the final edge straight and smooth.
• Reinstall all trim rings and panels. Automotive trim edging can be used to “fix” any
cutting errors you might make, or to make the install more professional looking.
• The windscreen on M2’s can be made to fit around the rollbars, but most people prefer to
leave it out, or to use a custom acrylic windscreen.
22) Boot Cover.
• The boot cover no longer fits properly. Some people continue to use it this way, some
discontinue using it, and some modify it to fit – this is your choice.
• If you choose to modify the boot, it can be done by ripping the corner seams and having it
re-sewn to fit around the bars. We recommend taking it to an upholstery shop for advice.
23) Rollbar Padding.
• Many different types of rollbar padding can be purchased from a variety of sources.
• Depending on the normal seat adjustment and height of the driver, padding may be
needed to prevent injury in case of an accident.
• The purchase and installation of proper padding on the rollbar is the responsibility of the
owner.
24) Enjoy your new rollbar. Thanks for buying Boss Frog.

WARNING: This product does not guarantee the safety of the occupant in the case of a rollover or other
vehicle accident. This rollbar has been designed and tested following the intent of the SCCA and FIA
rollbar guidelines, but has not undergone automotive industry testing. The owner assumes the
responsibility for proper mounting and padding of the rollbar. Always wear your seatbelt and follow safe
driving practices.

1204 Boss Frog Installation Instructions – Copyright 2012 – US Patent #7,032,927
This page intentionally blank

WARNING: This product does not guarantee the safety of the occupant in the case of a rollover or other
vehicle accident. This rollbar has been designed and tested following the intent of the SCCA and FIA
rollbar guidelines, but has not undergone automotive industry testing. The owner assumes the
responsibility for proper mounting and padding of the rollbar. Always wear your seatbelt and follow safe
driving practices.

1204 Boss Frog Installation Instructions – Copyright 2012 – US Patent #7,032,927
Plastic Trim Panel Cutting Instructions
Measure 1-3/8” from inside corner of panel and mark a vertical line. Cut the panel vertically between the drawn
lines, then trim to fit.

WARNING: This product does not guarantee the safety of the occupant in the case of a rollover or other
vehicle accident. This rollbar has been designed and tested following the intent of the SCCA and FIA
rollbar guidelines, but has not undergone automotive industry testing. The owner assumes the
responsibility for proper mounting and padding of the rollbar. Always wear your seatbelt and follow safe
driving practices.

1204 Boss Frog Installation Instructions – Copyright 2012 – US Patent #7,032,927
Plastic Trim Template (top view)
Approximate cut lines only – cut inside lines and trim to fit.

Cut a vertical line down the inside corner of the trim panel, then trim to fit.

WARNING: This product does not guarantee the safety of the occupant in the case of a rollover or other
vehicle accident. This rollbar has been designed and tested following the intent of the SCCA and FIA
rollbar guidelines, but has not undergone automotive industry testing. The owner assumes the
responsibility for proper mounting and padding of the rollbar. Always wear your seatbelt and follow safe
driving practices.

1204 Boss Frog Installation Instructions – Copyright 2012 – US Patent #7,032,927
You can also read