CameraPosition X Documentation - 2018 Lorby-SI
←
→
Page content transcription
If your browser does not render page correctly, please read the page content below
CameraPosition X

 Documentation

      Version 1.21
      02.05.2018
   © 2018 Lorby-SI
   http://lorby-si.weebly.com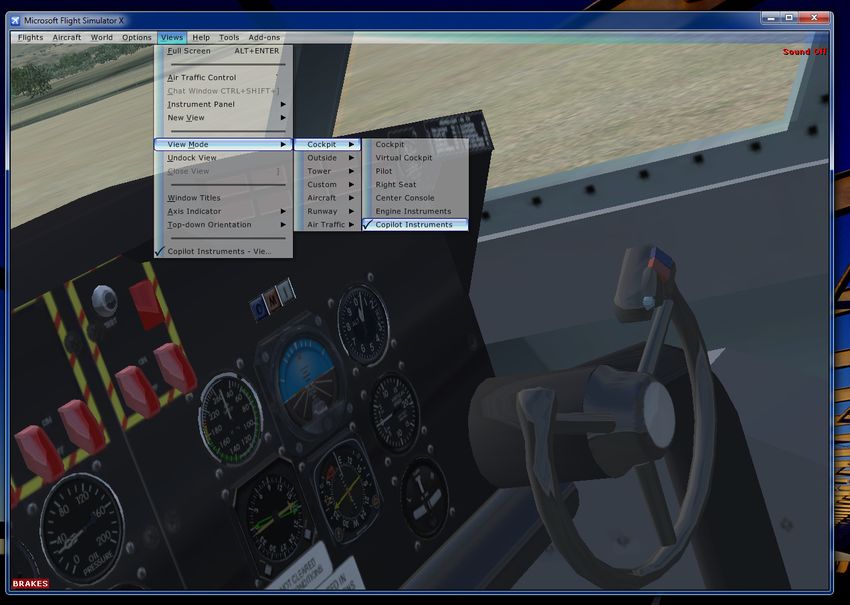
Table of contents
1.          Overview
2.          Installation
     2.1.    Distribution
     2.2.    Installation
     2.3.    Microsoft .Net 4.5.1
     2.4.    SimConnect
     2.5.    Pause on Task Switch
     2.6.    Run as Administrator
     2.7.    EZDOK compatibility

3.          Main Window
     3.1.    Description
     3.2.    Connecting to the simulator
     3.3.    Camera control
     3.4.    Selecting existing cameras
     3.5.    Selecting cameras in the simulator
     3.6.    Camera switching getting out of sync

4.          Save Camera Window
     4.1.    Add a new camera
     4.2.    Replace an existing camera
     4.3.    Add a fixed camera
     4.4.    Editing a fixed camera
     4.5.    File backups
     4.6.    Change camera order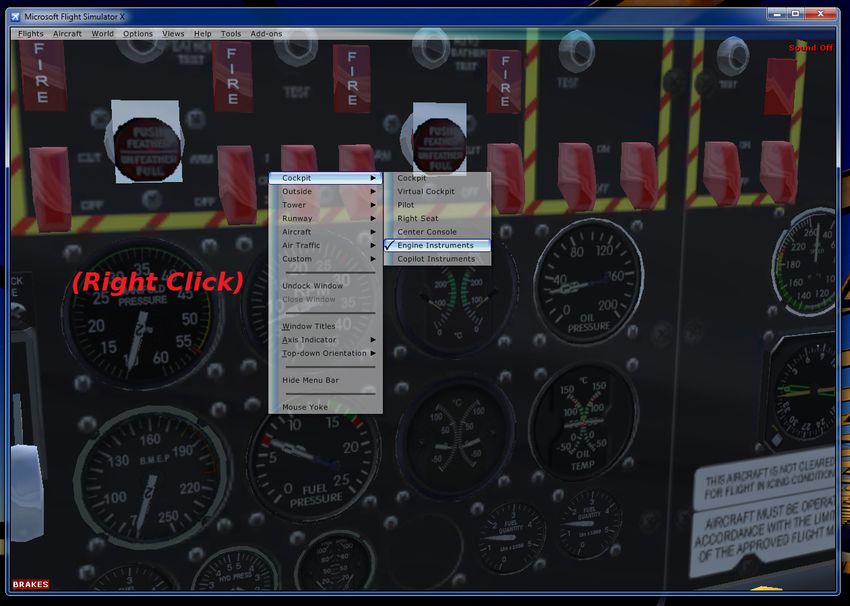
4.7.    Transfer cameras
     4.8.    Camera parameters

5.          Virtual Hotkeys
     5.1.    Functionality
     5.2.    Assigning hotkeys to cameras
     5.3.    Cycling through cameras
     5.4.    Global hotkey preset

6.          Dynamic Head Movement
7.          Timed Cameras
     7.1.    Overview
     7.2.    Add a camera to the playlist
     7.3.    Show playlist
     7.4.    Change the timing
     7.5.    Change camera order
     7.6.    Remove camera from the playlist
     7.7.    Run playlist
     7.8.    Save playlist
     7.9.    Load playlist
     7.10.   Clear playlist

8.          Starting CPX with the simulator
9.          Disclaimer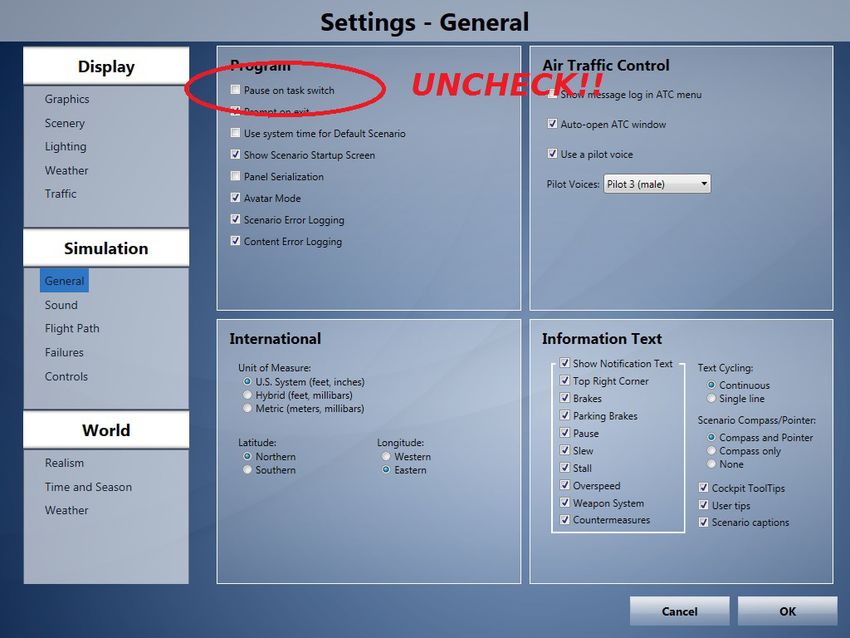
1. Overview

This small application makes it very easy to add and edit camera
definitions for your aircraft.

You can:
  – Load and edit CameraDefinition - tags from your aircraft and
     simulator definition files
  – Add end Edit new cameras by visually positioning them in the
     simulator world
  – Add fixed point “world” cameras either globally or individually for
     your aircraft
  – Remove unwanted camera definitions.
  – Build a playlist out of camera definitions that cycles through the
     different positions automatically
  – Works completely stand alone – camera definitions are saved to
     your aircraft.cfg or cameras.cfg.
     It is not required to run this app alongside your simulator once
     you have set up your cameras.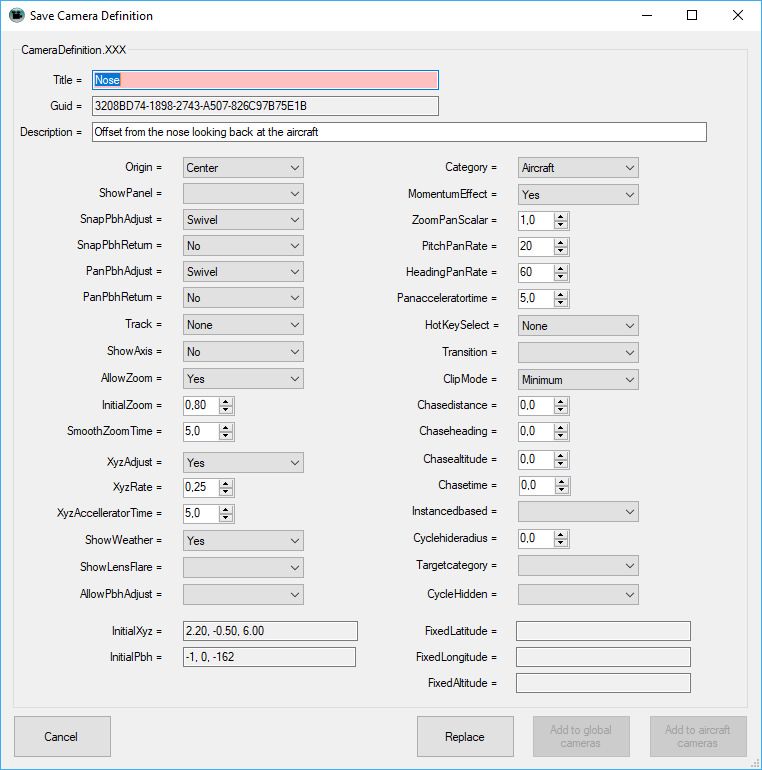
2.        Installation

      2.1     Distribution

CameraPosition X is distributed as self-extracting installer packages.

      2.2     Installation

  –   Please use the installer intended for your sim:
      – FSX boxed or dual install with SE: CameraPositionX_Install.exe
      – FSX SE stand alone: CameraPositionX_SE_Install.exe
      – Prepar3D V2.5: CameraPositionX_P3D_Install.exe
      – Prepar3D V3: CameraPositionX_P3D_V3_Install.exe
      – Prepar3D V4: CameraPositionX_P3D_V4_Install.exe

Running the installer:

  –   “Start Menu Shortcuts”: CameraPosition X will be added to your
      Start Menu (advised)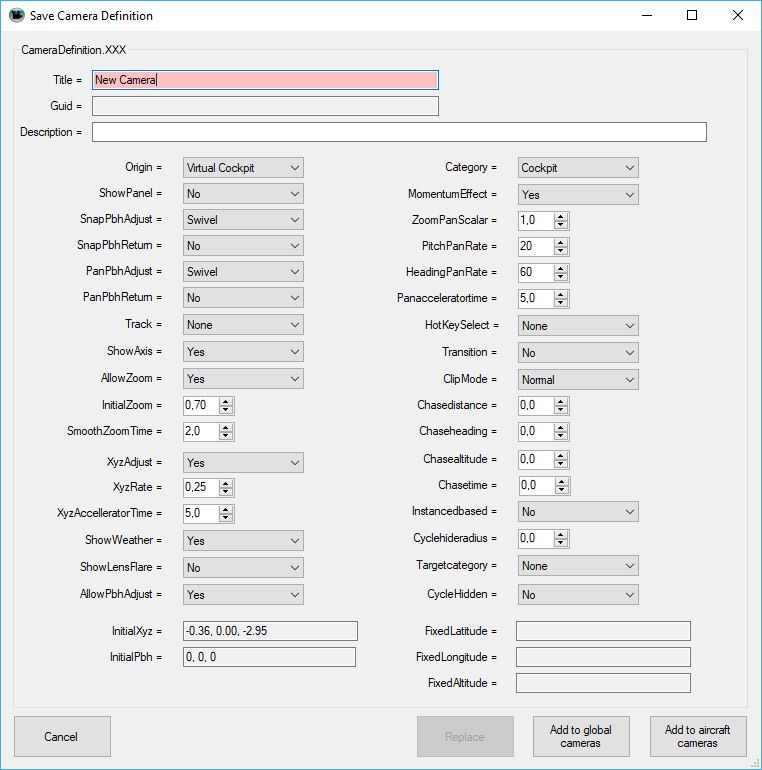
–   On the next page you choose the installation path for CameraPosition
      X.
      THIS IS NOT THE PATH TO YOUR SIMULATOR
      DIRECTORY, IT IS USED EXCLUSIVELY FOR
      CameraPosition X!
  –   Selecting “Install” will begin the installation

      2.3     Microsoft .Net 4.5.1

The CameraPosition X requires that the .Net (“dot Net”) library version
4.5.1 is installed and current on your PC.

This library can be obtained here:

https://www.microsoft.com/en-us/download/details.aspx?id=40779

      2.4     SimConnect

CameraPosition X relies on SimConnect being installed correctly on your
computer. SimConnect is a part of FSX/P3D and it is set up automatically
when you first install the simulator. To save you the trouble of installing
the SDK, the necessary SimConnect DLL for each sim is shipped inside
CameraPosition X and gets deployed in your Temp folder when
CameraPosition X is run.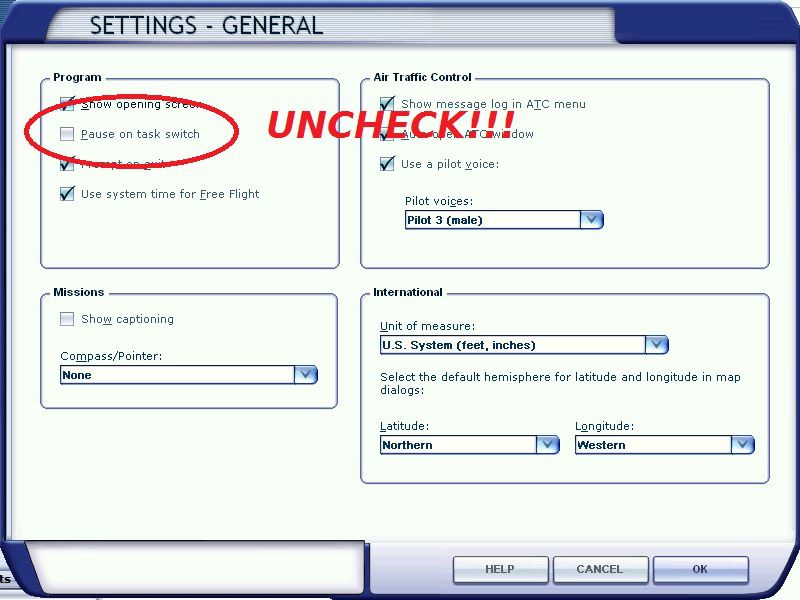
FSX only: In case SimConnect is not installed, and CameraPosition X does
not start up, giving you an error message instead, you will have to install
the SimConnect Client manually:
   – FSX boxed users can find the “SimConnect.msi” installation file
      either online or in the FSX SDK folder “..\Microsoft Flight Simulator
      X SDK\SDK\Core Utilities Kit\SimConnect SDK\lib”
   – FSX SE users find it here:

      “..\Steam\steamapps\common\FSX\SDK\Core Utilities
      Kit\SimConnect SDK\LegacyInterfaces\FSX-SP1\SimConnect.msi “

     2.5     Pause on Task Switch

CameraPosition X is a separate application, a task independent from your
simulator.

It is therefore extremely important, that you switch the “Pause On Task
Switch” option OFF in your simulator. If you leave it on, the
CameraPosition X cannot work correctly!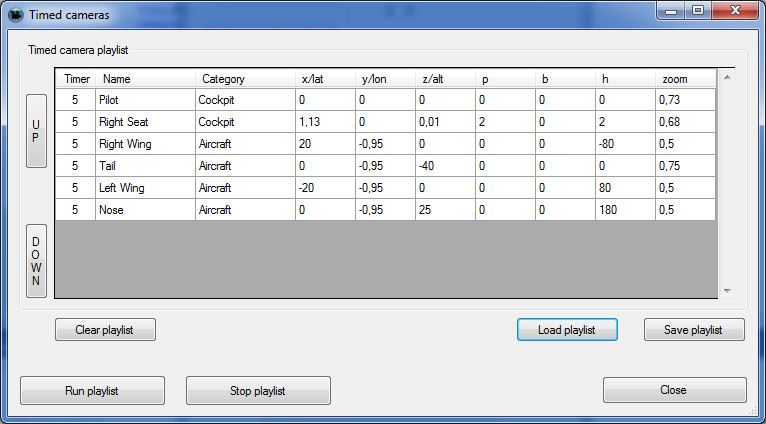
2.6 Run as Administrator

CameraPosition X needs to change files inside your simulator's main
directory. If that directory is inside the standard installation path (“Program
Files” or “Program Files (x86)”, then the standard UAC (user access
control) mechanism of Windows 7 and above may interfere with this,
causing errors when you try to save cameras. To avoid this, please run this
application as Administrator.
2.7 EZDOK compatibility

Starting with version 1.14, CameraPosition X is largely compatible with
EZDOK.

One thing needs to set up in advance: the global definition 203 "EZCA
Aircraft cam" is hidden from the view cycle (parameter
“CycleHidden=Yes”. This prevents the app from calling up aircraft
cameras. Please change this parameter to “No”, either by using the
CameraPosition X or by editing the “cameras.cfg” file with Notepad.

There will still be interference, but generally all features worked in our
tests.

  •   To move the camera with CPX, EZDOK has to be disabled
      temporarily in the simulator Add-ons menu
      (Add-ons\EZdok camera addon\global disable).

  •   On occasion the camera switching mechanism will get out of sync. In
      that case, please restart the CameraPosition X, connect to the sim
      and then switch to the “EZCA VC cam” manually before proceeding.
3. Main Window
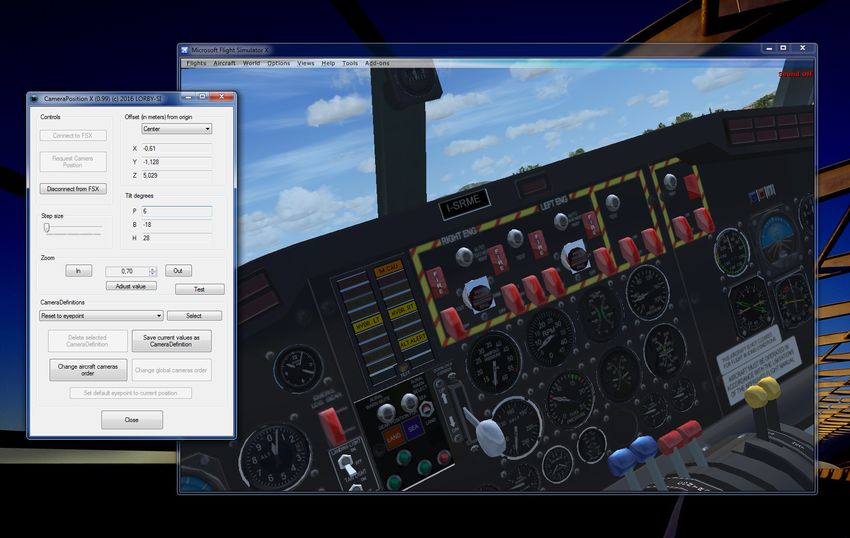
3.1 DescriptionThe Elements explained:
– Button “Connect to FSX/P3D” initializes SimConnect and starts the
polling mechanism
– Button “Disconnect from FSX/P3D” terminates SimConnect
– Checkbox “Connect automatically” will try to connect to the
simulator automatically when CameraPosition X is started (for
example if you choose to start it with your simulator)
– Checkbox “Minimize automatically” will minimize the
CameraPosition X window when it loses focus.
– Slider “Step Size” controls the amount of movement when you shift
the camera around
– DropDown “Offset (in meters) from origin” displays the camera
definition origin – the X/Y/Z values below are always relative to this
point
– X/Y/Z: the position of the camera as offset from the origin
– P/B/H: pitch, bank and heading of the camera
– Buttons Zoom “In” “Out”: control the camera zoom in the sim
– Button “Adjust value”: the zoom function can get out of sync and
display a different value than the simulator window is set. Press this
button and nudge the value to the correct zoom setting.
– CameraDefinitions: This dropdown list contains all camera
definitions from your aircraft.cfg and your cameras.cfg that can be
edited with the tool
– Button “Select” loads the selected camera definition.
– Button “Deleted selected CameraDefinition” removes the selected
definition from the .cfg file.
– Button “Save current values as CameraDefinition” opens the Save
Camera dialog where you can either replace the selected camera or
save a new one.
– Buttons “Change aircraft cameras order / Change global cameras
order” opens a dialog where you can can change the camera
definition sequence.
– Button “Transfer cameras” Opens a dialog to transfer camera
definitions and their hotkeys to another aircraft.cfg
– Button “Set default eyepoint to current position” will change the
eyepoint setting of your aircraft to the current camera position. Use
this with caution!– Button “Dynamic head movement” opens a dialog to change the
DHM parameters of the simulator in fsx.cfg/prepar3D.cfg
– Checkbox “Show all Camera Definitions”: activate this if you want
to see aircraft and global camera defintions in the selection drop
down list
– Buttons “Previous View” and “Next View” cycle through the camera
definitions in the drop down list.
– Button “Add current camera” adds the currently selected camera to
the playlist
– Button “Play timed cameras” opens the Timed Cameras dialog
– Button “Hotkeys” opens the hotkey definition dialog
– Checkbox “Automatic reload” deselect this checkbox to temporarily
disable the automatic reload process.
Note: if you do this, your new or changed cameras will be saved, but
the positions are not available in the sim until you click the “Manual
reload” button.
This feature is intended to make defining cameras faster when you
are using aircraft (like PMDG's) that take a while to re-initialize after
every reload
– Button “Reload Aircraft” will reload your current aircraft in the sim.
– Button “Close” ends the program3.2 Connecting to the simulator
To connect the application to your simulator, there are two options:
– Fully automatic:
If the checkbox “Connect automatically” is activated, the app will try
to connect to the simulator on its own. The attempt is stopped if the
simulator doesn't react after 2 minutes.
This is useful if you decide to start the app with your simulator by
adding it to the exe.xml, to make use of the hotkey feature.
– Manually:
– First start the sim and load your aircraft.
– Wait until the loading process is complete, then select the Virtual
Cockpit view
– Now you can start the CameraPosition X and press “Connect to
FSX/P3D”.
– Now the X/Y/Z/P/B/H field should all show the value “0”, as the
camera is positioned at the default eyepoint of your aircraft.
IMPORTANT:
CameraPosition X assumes that your standard VC view is at
the simulator default – looking forward and level, at the
eyepoint position of the aircraft, with a zoom factor of 0.70.
Please make sure that your view matches this position before
you proceed, or your camera definitions will be offset to what
you are seeing.
The application switches to this position automatically, but
depending on your simulator setup and other addons there
might be interference.3.3 Camera Control The following keyboard commands move the camera either in the simulator or when the CameraPosition X window has the focus. The movement is being accelerated as long as you keep on holding down the keys. – Ctrl & NumPad 4 = pan left – Ctrl & NumPad 6 = pan right – Ctrl & NumPad 8 = pan down – Ctrl & NumPad 2 = pan up – Ctrl & NumPad 9 = tilt left – Ctrl & NumPad 3 = tilt right – Ctrl & “+” = zoom in – Ctrl & “-” = zoom out – Ctrl & Enter = reset view – Shift & Ctrl & NumPad 4 = move left – Shift & Ctrl & NumPad 6 = move right – Shift & Ctrl & NumPad 8 = move forward – Shift & Ctrl & NumPad 2 = move back – Shift & Ctrl & NumPad 9 = move up – Shift & Ctrl & NumPad 3 = move down The CameraPosition X will only track these exact viewing system events, any other way of moving the camera or the viewpoint will not be processed! When using these keys in the simulator, the CameraPosition X will override all native simulator events that are associated with the above keys.
3.4 Selecting existing cameras

Existing cameras are read on startup from your aircraft.cfg and
cameras.cfg. The cameras that you can select are limited to those that can
be edited with the application.
Select a camera from the dropdown list and press “Select” - the camera
values will be loaded and the simulator view is shifted to the camera
position.

“Reset to eyepoint”: Reset the camera display to the default eyepoint.

Notes:
As the simulator viewing system does not allow the reading of values, the
shifting of the camera is asynchronous and it can fail. In that case please
use the controls in the simulator to load the intended camera position.

Zoom is especially critical and it will happen rather often, that the zoom
setting in the sim will not correspond to the zoom setting in the app. In that
case, please use the “Adjust value” button of the zoom section to adjust the
value to the actual zoom in the simulator.

Sometimes it helps to use the “Reset to eyepoint” value, then switch back
to the camera.

Some camera types may require you to switch to another view mode first
(outside view, tower view).
3.4 Selecting cameras in the simulator

Once a camera definition has been saved, the application resets the
viewpoint to the VC default. You can immideately select the new camera
with the view system in the sim, either by using the main menu or the view
context menu that you get when right-clicking on you simulator view.
3.5 Camera switching getting out of sync

Sometimes the simulator will decide that it doesn't want to switch to the
camera that you are selecting, and that it will show you a different one
instead. This can be resolved by reloading your aircraft with the “Reload
Aircraft” button on the main CameraPosition X window.

Note that this reloads your aircraft in the simulator, which may take a little
while depending on the model.
4.       Save Camera Window
With this dialog, all parameters that can be edited in cfg files can be
altered.

Note that you can create any type of camera defintion that you want,
but the CameraPosition X app can only read, work with and display
Virtual Cockpit, Aircraft and Fixed position cameras.

After the camera has been saved, the aircraft is reloaded in the simulator to
make the camera available. Depending on the aircraft model, this may take
a while.
4.1.    Add a new camera

–   The “Add” buttons are inactive until you type in a unique “Title”
    string.
–   The GUID is calculated when the camera is saved
4.2. Replace an existing camera
– By default, the “Replace” button is active – the values will be saved
to the existing camera.
– If you change the “Title”, then the buttons “Add...” will become
active, and you can save the camera as an additional new definition.
A new GUID is calculated when you press the button.4.3. Adding a fixed camera
Fixed cameras can be saved either globally (=to the cameras.cfg) or
individually for the current aircraft (=to the aircraft.cfg).
To position a fixed camera:
– Switch to the standard Virtual Cockpit view (“Reset to eyepoint”)
– Select “Fixed” from the origin drop down
– move your aircraft close to the desired location
– then fine tune the camera position and orientation with the control
keys.
– Save the camera. On the save dialog, make sure that the Origin is
“Fixed” and the Category is “Custom”.
– Fixed cameras can be saved as “Global” cameras to your cameras.cfg
file, making them available in every aircraft. When saving a fixed
camera, the appropriate button “Add Global” will be visible on the
save dialog.
4.4. Editing a fixed camera
Unfortunately, fine tuning an existing fixed camera's lat/lon/alt position is
next to impossible. The reason is, that the simulator overrides the camera
control input with accelerated movements of its own, making the camera
move wildly off it's intended track – and thus invalidating the lat/lon/alt
readout on the main dialog (you never know if these values are correct or
not).
Your only option is to delete the fixed camera and create a new one as
described in the previous chapter.
P, B, H values on the other hand can be adjusted normally.4.5. File backups
The CameraPosition X creates two types of backup files:
– When the application is first run and used to alter an existing
aircraft.cfg or cameras.cfg, a backup file ending with “_orig” is
created, containing the initial content of the file
– When the same config file is altered again at a later date, the last
configuration is saved in a backup file ending with “_CPXBAK”
In case you want to revert to the original cfg or to the previous state, just
delete the current cfg and rename the backup file to it's original name.
4.6. Change camera order
On this dialog you can change the order in
which the cameras are loaded by the
simulator. This also influences the order
when using the “S” or “A” sequence keys
in the simulator.
4.7. Transfer cameras
First browse to the aircraft.cfg or sim.cfg
of the model that you want to transfer the
cameras to with the “Browse” button.
Then select the desired cameras with the
checkboxes and press “Transfer”.
The selected cameras will be added to the
target craft, including their hotkey
definitions.4.8. Camera parameters
The following is an excerpt of the official FSX SDK documentation.
Parameters that cannot be set with cfg changes have been abbreviated or
removed. Values in bold print are the default settings.
Notes:
– The values “True/False” are translated to “Yes/No” in the
CameraPosition X.
– Some Parameters that are not set in the dialog and keep their default
values are not written to the config file (the simulator will use the
default anyway).
Camera Definitions
Property Type Range Description
Camera title; appears in the upper-right corner
title String
of the view window when changing cameras.
Camera definition’s unique identifier. This
guid GUID
GUID must be unique.
Camera description. This is not used by the
description string system, but can be used to provide a
descriptive string in the configuration file.
origin list Cockpit Every camera definition must have an origin
Virtual Cockpit that defines the object or point on which the
Center camera is oriented:
Pilot
Tower • Cockpit – Camera is locked at fixed position
Fixed in the 2D cockpit. Forward views include 2D
instrument panel. Oblique view angle show
virtual cockpit interior.
• Virtual Cockpit – Camera is mounted at the
eye point defined in the aircraft’s CFG file.
• Center – External (spot plane) camera that
points at the center of the aircraft’s visual
model.
• Pilot – External (spot plane) camera that
points at the pilot position inside the aircraft’s
visual model.
• Tower – External camera mounted at a
control tower defined via the facilities
(BGLCOMP) database.
• Fixed – External camera at a fixed position.
Fixed camera definitions must includeFixedLatitude, FixedLongitude and
FixedAltitude values.
Note that this does not affect the View menu
that the camera title appears in, the menu is set
by the category parameter.
Determines whether the 2D instrument panel is
showpanel bool Yes/No
shown.
These settings control how camera movement
is handled when the camera system receives a
view pan or “snap to” command.
• None – Commands are ignored (position
None
remains fixed).
Ordinal
snappbhadjust list • Ordinal – Camera moves to the next ordinal
Swivel
compass position in the direction of the
Orthogonal
command.
• Swivel – Camera moves incrementally in the
direction of the command.
• Orthogonal – Camera rotates in the direction
of the command (used in top-down view).
None
Ordinal
panpbhadjust list Same range of options as snappbhadjust.
Swivel
Orthogonal
If true, camera position returns to its initial
snappbhreturn bool True/False position when the snap movement command
key is released.
If true, camera position returns to its initial
panpbhreturn bool True/False position when the pan movement command
key is released.
track list None External cameras have the ability to track a
FlyBy user or AI object. The Track parameter
Track controls this behavior:
TrackBank
FlatChase • None – No tracking behavior. User has
FlatChaseLocked manual control over the camera.
• FlyBy – Fly-by mode; the camera is
positioned away from the user aircraft (at a
location given by ChaseDistance,
ChaseAltitude and ChaseHeading values) and
tracks the aircraft for ChaseTime seconds
before computing a new position.
• Track – Camera tracks the object while
maintaining its position.
• TrackBank – Camera tracks the object while
maintaining its position.
• FlatChase – Camera moves with the object,
maintaining a fixed distance from it. Camera
movements are dampened.• FlatChaseLocked – Camera moves with the
object, maintaining a fixed distance from it.
Camera movements are rigid.
Yes
No Determines whether the axis indicator is
showaxis list
FrontOnly shown.
Controls whether the camera responds to zoom
allowzoom bool Yes/No
commands.
0.0 to 512.0
initialzoom float Sets the initial zoom.
Default: 1.0
The zoom time in seconds. By default,
zooming in and out is “smoothed” by changing
0.0 to 30.0 between old and new zoom levels over a small
smoothzoomtime float
Default: 5.0 time period (5 seconds). This setting enables
you to control this effect on a per-camera
basis.
Determines whether weather visuals are
showweather bool Yes/No
shown.
-500.0 to 500.0
XYZ (see (for each of the Camera XYZ position offset from the default
InitialXyz
notes) three) location in meters.
Defaults: 0.0
-90 to 90.0
(pitch) Camera pitch, bank and heading orientation
XYZ (see -180 to 180.0 offset from the default in degrees. Note that
InitialPbh
notes) (bank and positive pitches give a downward view.
heading) Positive headings are to the right.
Defaults: 0.0
Controls whether the camera responds to
xyzAdjust bool True/False
position change commands.
The desired speed of the camera in meters per
second. The direction of movement is
xyzRate float Default: 0.25
determined by the camera control keys that are
pressed.
The time in seconds it will take for the camera
to reach the speed set by xyzRate. A value of 0
xyzAccelleratorTime float Default: 5.0 will disable acceleration. Note that xyzAdjust
must be set to True for this feature to be
enabled.
Controls whether the camera responds to pitch,
AllowPbhAdjust bool Yes/No
bank and heading change commands.
Determines whether lens flare effect can be
showlensflare bool True/False
shown (based on user setting).Aircraft Every camera definition must include a
AirTraffic category that defines how the camera is
Cockpit exposed in the user interface. Categories
Custom define the view cycling behavior (S and A
category list Outside keys) as well as the menu structure. Some
Multiplayer categories (AirTraffic, Runway, Multiplayer
Runway and Tower) can also be instance-based,
Scenery meaning new cameras are created
Tower automatically based on the object type.
Controls whether the camera exhibits
momentum effect. This is determined by the
momentumeffect bool Yes/No
settings in the Dynamic Head Movement
section.
One side effect of zooming in on an object is
that it becomes difficult to make fine camera
panning adjustments because the absolute
movement of the camera around its position
remains constant. The ZoomPanScalar setting
compensates for this by adjusting panning
movements by the given factor in relation to
0.0 to 100.0
zoompanscalar float zoom level. Movement is scaled by dividing
Default: 0.0
the ZoomPanScalar value by the zoom level.
For example, with a ZoomPanScalar setting of
1, camera panning is reduced by half at 2x
zoom (1 / 2). A setting of 2, on the other hand,
accelerates panning to twice the normal rate at
1x zoom (2 / 1) and is exactly the normal rate
at 2x zoom (2 / 2).
0.0 to 100.0 Controls the rate at which pitch is changed in
pitchpanrate float
Default: 10.0 degrees per second.
0.0 to 100.0 Controls the rate at which heading is changed
headingpanrate float
Default: 30.0 in degrees per second.
Pan acceleration time in seconds. When
panning the camera, an
acceleration/deceleration effect is added over a
period of time. The larger this value is the
0.0 to 30.0
panacceleratortime float longer it takes for the pan movement to reach
Default: 5.0
its full rate (as controlled by PitchPanRate and
HeadingPanRate), thus yielding smoother
panning movement. Lower numbers yield
more abrupt panning.
Links the camera to one of the 10 pre-defined
1 to 10
hotkeyselect integer key events for activating cameras; see the
No default.
Control Assignments dialog.
When switching between camera views a
“smooth” transition is obtained by moving the
camera in real time from its old location to the
transition bool Yes/No new one. Note that this behavior is only
applied if the Transition settings for both
cameras are set to yes. If either or both are set
to No then the view switch is instantaneous.This setting is used to control how the clip
planes are computed. Clip planes are used to
set the minimum and maximum distances for
rendering in a 3D graphics program. The
relative location of these planes determines
how precise the graphics engine can maintain
the Z-order of objects. A discussion of clip
plane management is beyond the scope of this
document. However, the concept is relevant to
the camera system because it determines
whether the camera favors near or far objects
in the view:
• Normal – The near clip plane is scaled along
Normal
with the zoom level. Useful for most views.
Minimum
clipmode string • Minimum – Clamps the near clip plane at its
Spot
absolute minimum value (1 meter). Useful for
Tower
cameras where the camera is placed close to
object geometry (e.g., aircraft cameras).
• Spot – Favors distant objects by scaling the
near clip plane with altitude and distance.
Useful when the camera is positioned a
reasonable distance away from the target
object (e.g., spot view).
• Tower – Favors near objects by scaling the
near clip plane by one-half the zoom level and
clamping the far plane based on visibility
settings with an absolute limit of 20km. Useful
when objects at the limits of visibility aren’t
important.
0.0 to 3000.0 Initial distance in meters of the camera from
chasedistance float
Default: 0.0 the target object in external views.
-180.0 to 180.0 Initial angular offset in degrees of the camera
chaseheading float
Default: 0.0 relative to the target object in external views.
-1000.0 to 3000.0
Initial altitude in feet of the camera relative to
chasealtitude float
the target object in external views.
Default: 0.0
Length of time in seconds an aircraft is kept in
0.0 to 200.0
chasetime float Fly-By view before a new position is
Default: 0.0
computed.
If Yes, a new instance of the camera is created
instancedbased Bool Yes/No for each instance of the object referenced by
the TargetCategory setting.
For instance based cameras, sets the distance
0.0 to 100.0
cyclehideradius float (in nautical miles) beyond which the camera is
Default: 0.0
skipped in the cycling order.
None Determines which object class, when a new
targetcategory list AI Planes instance is created, triggers the creation of a
Fixed new InstanceBased camera.If Yes, the camera is hidden from view cycling
cyclehidden bool Yes/No —it does not appear when cycling through
views using the keyboard.
-90.0 to 90.0
Latitude values
can be expressed
in decimal (-90 to For Fixed camera types, the latitude of the
FixedLatitude latitude
+90) or cameras position.
hemispheric (N90
to S90) notation.
Default: 0.0
-180.0 to 180.0
Longitude values
can be expressed
in decimal (-180
For Fixed camera types, the longitude of the
FixedLongitude longitude to +180) or
cameras position.
hemispheric
(W180 to E180)
notation.
Default: 0.0
-500.0 to
30,000,000.0 For Fixed camera types, the altitude of the
FixedAltitude float
cameras position in meters.
Default: 0.05. Virtual Hotkeys
5.1. Functionality
With CameraPosition X it is possible to assign virtual hotkeys to cameras
in addition the simulators own mechanism. The movement between the
camera positions depends on how their “transition” parameters have been
set up (see chapter 4). The camera view will “float” between two positions
that have “transition=true”, otherwise the switch is instantaneous.
Note: CPX virtual hotkeys will only work as long as the app is running
alongside the sim.
5.2. Assigning hotkeys to cameras
Hotkeys can be assigned with the following dialog:
It will show a list of available cameras according to your selection on the
main page (“Show all Camera Definitions” activated or not).
You can assign any Joystick button or the following keyboard
combinations:To assign a key to a camera either click on the “Modify” button or click
directly into the appropriate cell (the blue one).
• Joystick buttons are assigned simply by pressing them
• Keyboard combos have to be entered one key after the other.
Example: to assign “Shift&Ctrl&A” you would press “Shift”, release
it, then press “Ctrl”, release it, then press “A”
When you have finished assigning hotkeys, press the “Save” button.
Pressing “Del” while assigning will delete the selected hotkey.
A note about keyboard keys:
Many keyboard keys are already assigned to simulator events and cannot
be used as hotkeys. If you want to override the simulator key because you
need a specific assignment that is blocked by the sim, you can change an
assigned key to attach to the simulator key event
– Right-click on a key assignment: a context menu appears– Select “Simulator Key” to attach to the key event.
– Press “Save”
– From now on, CPX will use the simulator key in addition to the
global hotkey.
To revert a “(Sim)” key back to normal, right-click it again, and select
“Normal key” from the context menu.5.3. Cycling through cameras
Special hotkeys can be defined for cycling through a list of cameras that
you have marked with “X” on the dialog. To add or remove a camera
to/from the cycle, click on the appropriate cell last column:
“-” turns to “X”: camera has been added to the cycle
“X” turns to “-”: camera has been removed from the cycle
5.4. Global hotkey preset
The top 4 “special” hotkey assignments can be selected as a global preset.
This preset can be applied to any aircraft by clicking “Apply preset”, so
you can keep these global keys consistent for all your models.
You can overwrite those keys in a specific model any time, so they will
take precedence over the global preset. This is useful if you have a
different key layout for a specific aircraft.6. Dynamic Head Movement The simulator has a built-in dynamic head movement (DHM) feature, that moves the camera view in sync with the aircraft acceleration and movement vectors – if you have set the “Momentum Effect” parameter to “Yes” when saving a camera. The parameters of this feature can only be changed globally (= for every aircraft) in the simulators cfg file (fsx.cfg, prepar3d.cfg). With the button “Dynamic head movement” on the main Windows, you can open a helper dialog to tweak these parameters: Please note that if you change these parameters, you will have to restart your simulator for them to take effect. This is what the specification has to say about the DHM parameters: The simulation uses these settings to compute how much camera acceleration (pitch, roll, side-to-side, and fore-to-aft) is generated in relation to aircraft accelerations. The table below describes each setting. Note that negative numbers move the camera in the opposite direction to the acceleration.
Property               Default   Description

                                 Computes the camera’s longitudinal (fore-to-back) change
LonAccelOnHeadLon      -0.02
                                 generated by longitudinal acceleration of the aircraft.
                                 Computes the camera’s pitch change generated by
LonAccelOnHeadPitch    -0.01
                                 longitudinal acceleration of the aircraft.
                                 Computes the camera’s lateral (side-to-side) change
RollAccelOnHeadLat     0.01
                                 generated by rolling acceleration of the aircraft.
                                 Computes the camera’s lateral (side-to-side) change
YawAccelOnHeadLat      -0.1
                                 generated by yawing acceleration of the aircraft.
                                 Computes the camera’s rolling motion generated by
RollAccelOnHeadRoll    0.1
                                 rolling acceleration of the aircraft.
MaxHeadAngle           5.0       Maximum allowed angular change in degrees.
MaxHeadOffset          0.3       Maximum allowed lateral change in feet.
                                 Acceleration multiplier (higher numbers increase
HeadMoveTimeConstant   1.0
                                 responsiveness).
7. Timed Cameras
7.1. Overview
The “Timed Cameras” feature makes it possible to run an automated cycle
of camera definitions indefinitely at pre-defined times. This can be useful
for demo applications or YouTube videos.
Note: the CameraDefinitionX application has to be running alongside your
sim to used the timer feature.
7.2. Add a camera to the playlist
On the main window, after you have selected a camera and it is displayed
in the sim, you can user the “Add current camera” in the “Timed cameras”
section to add that camera to the playlist.
7.3. Show Playlist
On the main window, use the “Play timed cameras” button to open the
playlist dialog:This dialog displays a list of all cameras, that you have added to the play
list.
7.4. Change timing
The column “Timer” contains the number of seconds that the app will wait
before it displays the next camera.
The timer value can be changed like this:
– left click on the number reduces it by one second
– right click on the number adds one second
7.5. Change camera order
To change the order of the playlist, highlight the desired row with the
mouse and use the “UP” / “DOWN” buttons to shift it's position in the list.
7.6. Remove camera from the playlist
To remove a camera from the list, right-click on any column other than the
“Timer”. A context menu with “Delete” appears – click on it, to remove
the row from the list.
7.7. Run playlist / Stop playlistThe button “Run playlist” starts the camera sequence. It will be cycling
through the camera positions in the playlist until either the playlist window
is closed or until you press the button “Stop playlist”.
7.8. Save playlist
The button “Save playlist” opens the save dialog:
Add a description to identify the playlist, then the button “Save playlist”
will save the current playlist.
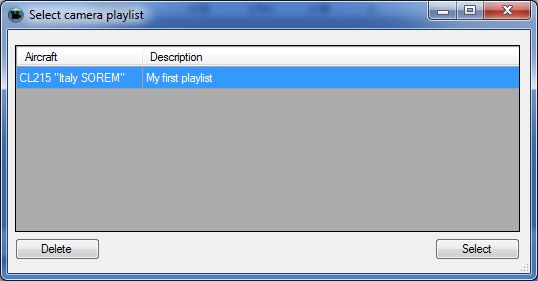
7.9. Load playlist
The button “Load playlist” opens the selection dialog:
Highlight a row and choose “Select” to load the playlist.
Clicking on “Delete” removes the selected playlist from the database.7.10. Clear playlist
Pressing the button “Clear playlist” will reset the currently displayed list
and remove all camera definitions.
8. Starting CPX with the simulator
Setting up your simulator so that it starts CameraPosition X automatically
is a little different for the various simulator versions.
For FSX, FSX:SE and Prepar3D 2,x, 3,x the app has to be added to
the “exe.xml” file of the simulator.
This file is located in the local users appdata folder:
C:\Users\\AppData\Roaming\Microsoft\FSX
C:\Users\\AppData\Roaming\Lockheed Martin\Prepar3D V2
C:\Users\\AppData\Roaming\Lockheed Martin\Prepar3D V3
Open the exe.xml with notepad and make the end of the file look like this:
FALSE
Camera Position X
CPX pathThe CPX path is different for every version of CameraPosition X:
FSX:
C:\Program Files (x86)\CameraPositionX\CameraPositionX.exe
FSX:SE:
C:\Program Files (x86)\CameraPositionX_SE\CameraPositionX_SE.exe
P3D V2:
C:\Program Files (x86)\CameraPositionX_P3D\CameraPositionX_P3D.exe
P3D V3:
C:\Program Files (x86)\CameraPositionX_P3D_V3\
CameraPositionX_P3D_V3.exe
For Prepar3D V4.x, the procedure is much simpler:
– Go to the folder “\Documents\Prepar3D v4 Add-ons\Lorby-SI
CameraPositionX_P3D_V4”
– Rename the file “add-on.xml.off” to “add-on.xml”9. Disclaimer
CameraPosition X is licensed for private, non-commercial use only. It is
not sold, any property rights remain with the author.
You may not distribute this package or parts of it.
Disassembling, refactoring or changes of any kind to code and models are
prohibited.
Disclaimer of Warranties. The author disclaims to the fullest extent
authorized by law any and all other warranties, whether express or
implied, including, without limitation, any implied warranties of title,
non-infringement, merchantability or fitness for a particular purpose.
Without limitation of the foregoing, the author expressly does not warrant
that:
• the software will meet your requirements or expectations
• the software or the software content will be free of bugs, errors,
viruses or other defects;
• any results, output, or data provided through or generated by the
software will be accurate, up-to-date, complete or reliable;
• the software will be compatible with third party software;
• any errors in the software will be corrected.
• the software will not cause errors or damage to the computer system
where it is installed.
©2018 Lorby-SI
Oliver Binder
Project Management – Development - Consulting
lorby-si@outlook.de
http://www.lorby-si.comYou can also read