CAMPERVAN USER GUIDE - WWW.HOWCAMPERS.COM - HOW Campers
←
→
Page content transcription
If your browser does not render page correctly, please read the page content below

CAMPERVAN
                                USER GUIDE

       WWW.HOWCAMPERS.COM                RUA FERNANDO LOPES GRAÇA 28 C
INFO@HOWCAMPERS.COM / +351 967 572 400         1600-067 LISBOA
IMPORTANT INFORMATION

                              2,75 m

       2,05 m                                            5,41 m

                              Portugal’s Speed Limits
                              (unless otherwise indications)

                  Urban Roads

                Non-Urban Roads

                    Freeways

                   Highways

                                    Useful Contacts
          National Emergency Number                            112
                 Health Line 24/7                        808 24 24 24
                 American Express               707 50 40 50 / 21 427 82 05 02
                   Mastercard                            800 811 272
                       Visa                              800 811 107
           SEF-Immigration and Border
                                                         808 202 653
                    Services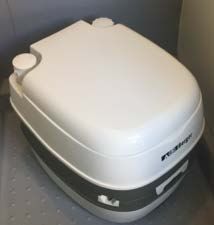
MAIN RRECOMMENDATIONS
 BEFORE YOU START
   •   Check if handbrake position is adequate
   •   Close back and lateral caravan windows and skylights
   •   Check if the boiler is switched off
   •   Remove and store the dining table

 WHILE DRIVING
   •   Do not open back and lateral caravan windows and skylights;
   •   It´s a large van, not a car, so open the angle when cornering;
   •   On bumpy roads and sidewalks, beware of the bottom of the
       vehicle, it may damage the dark water tank;
   •   Remember that the height of the campervan is 2,75m;

 WHEN PARKED
   •   Switch off the lights and boiler and make sure that the control panel
       is switched off
   •   Keep the campervan as levelled as possible

 OVERNIGHT
   •   Keep the campervan as levelled as possible;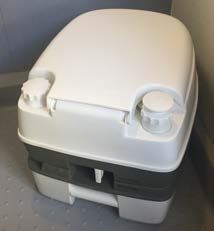
HOW TO OPERATE
   SAFETY
• Fire extinguisher is under the sink
• Fire blanket and first aid kit are on the top shelf, over the rear passenger´s seats
• Hazard triangle and battery cables can be found under the driver’s seat. Wheel wrench and jack can be found under
  the front passenger seat

   CONTROL PANEL
        Power on – Push button to switch on the energy supply, for the campervan shell
        No function – Leave it off
        Turns on water pump – Push button to switch on water circulation on the taps
        Battery level meter (engine) – Pressing the button indicates the charge level of the engine’s battery
        Battery level meter (campervan shell) – Pressing the button indicates the charge level of the battery in
        the campervan shell
        Clean water – Indicates the clean water level
        Grey water – Lights up when the grey water deposit is full
        Power generator – Lights up while driving, when its charging the campervan shell battery
        220V - Lights up when the campervan shell is being powered by the external power cord (220V)

   DINING AREA
Seats Rotation
1. Engage in first gear, pull the handbrake lever down
2. Rotate the font passenger´s seat to 90º degrees
3. Rotate the driver’s seat (it might be needed longitudinal adjustments or changes on the driver’s seat back
   inclination during the process)
4. Fully rotate the front passenger´s seat
Dining Table

1. Assemble the table’s foot (it´s under the sink);

2. Lock the table on the silver bar, below the campervan lateral window, in a 45º angle;
FRIDGE
• Control Panel has to be turned ON
• To control the intensity of the fridge, use the switch that can be found inside the fridge.

     BOILER
                                                                                          img. 1     img. 2
1. Remove the external protection for gas exhaustion (img. 1);
2. Park the campervan in a way that prevents lateral wind on the gas
   exhauster;
3. Turn on the boiler on the 70º position (img.2); the switch is under the rear
   passenger´s seat;
4. Switch on the water pump on the control panel and wait 10 minutes
   before using hot water

    ATTENTION: if a red light appears on the switch, it means that the boiler automatically switched off
    for safety reasons. Please check that the external protection is removed and that the gas exhauster
                     is not getting lateral wind. If there is wind, the boiler won´t work.

     CAMPERVAN WINDOWS AND SKYLIGHTS
                                                                                          img. 3    img. 4
• The campervan window on the rear passenger´s seat has 3 handles and the
  campervan windows in the rear door has 2. To open them, press the button
  (img. 3) and rotate. To close, repeat the process backwards.
• To open the main skylight, press the button and pull the handle. To close,
  repeat the process backwards.
• To open the WC skylight, press and rotate the handle clockwise (img.7). To
  close, repeat the process backwards.

        ATTENTION: while driving, all the windows and skylights MUST BE CLOSED, to avoid serious
                                                hazards.

      CLEAN AND GREY WATER DEPOSITS
                                                                                        img. 5     img. 6
•      The clean water deposit access is on the left side of the Campervan (img.
       5), next to the gas exhaustion exit. The key is on the key ring and the hose
       under the bottom bed, on the right side of the storage area.
•      The grey water deposit must be emptied regularly or whenever the red
       light appears in the control panel. The valve (img. 6) is located under the
       slide lateral door.

      ATTENTION: to dump the chemical toilet content, you MUST USE proper facilities for that matter,
                   such as campsites, service stations and campervan parking facilities;
CHEMICAL TOILET img. 7
• Preparation – Pull the handle (B – Fig.11) to open the reservoir. Fill in with
3liters of water and 1 tablet. To fill in the flushing system, open the cover (C-
Fig.11) and fill in with water.
• Utilization – Pull the handle (B – Fig.11) to open the reservoir. To flush, use
the manual water pump (D-Fig.11) doing up and down movements. When
you’re done, push the handle to close the reservoir.
• Disposal – Push the lever (A – Fig.10) on the back of the toilet, sideways,
and lift up the top section. Rotate the disposal pipe sideways, remove the lid img. 8
and empty its content. Wash the toilet with water until it´s fully clean. Close
the pipe, put it in the original position and place back the top section of the
toilet.
ATTENTION: to dump the chemical toilet content, you MUST USE
proper facilities for that matter, such as campsites, service
stations and campervan parking facilities
STOVE
• Press the button, rotate it and light the stove using the lighter. Keep it pressed for a few more seconds.
EXTERNAL ELECTRICITY
• 2 cable converters and 1 15 meter extension cord, are under the bottom bed on the left side of the storage area.
GAS BOTTLES
• The Campervan is equipped with 2 gas bottles (REPSOL K6), one in use and the second as a sealed spare.
• The gas bottle in use is under the bottom bed, next to the refrigerator. To replace it, remove the mattress and lift
the bed frame. Rotate the handle to the “green” position, and pull up the black ring around the reducer. After
replacing the gas bottle, repeat the process backwards.
• The spare gas bottle is sealed. In case of use, you should also replace the old one for a new.
When returning the Campervan, there MUST be 2 gas bottles, one in use and one sealed.
SAFE BOX
• There is a small safe box inside the storage compartment of the bottom bed; the code is 9876B.
LANTERN
• There is a lantern under the bottom bed, on the right side of the storage area.You can also read