Compass Remote Deposit Online - User Guide
←
→
Page content transcription
If your browser does not render page correctly, please read the page content below
TREASURY MANAGEMENT

User Guide

Compass Remote
Deposit Online
             ®
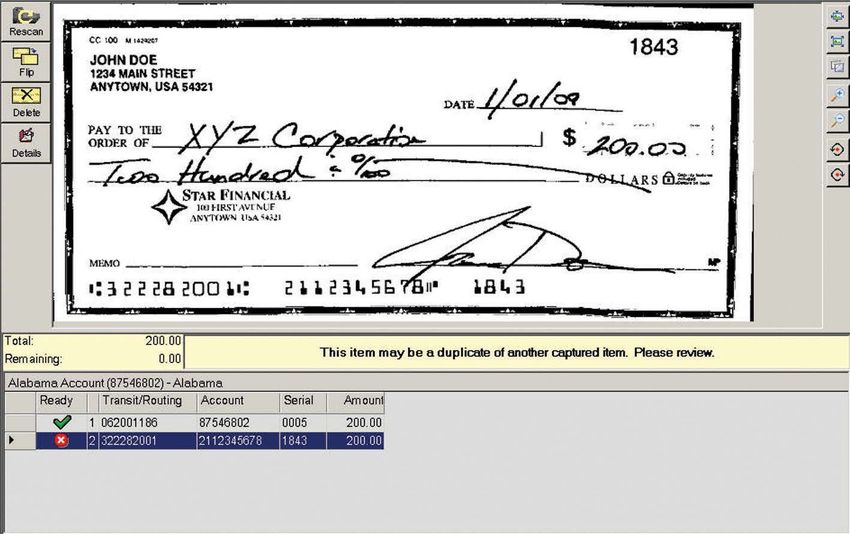
Table of Contents
Welcome to Compass Remote Deposit                       Capture Deposits	                              13
Online® Services	                             2
                                                        Common Error Messages and Action Required	 16
                                                    Exceptions Which May Occur Prior to Releasing a
Technical Requirements of Your PC	2                Deposit	                                           17
                                                        Checking for Duplicate Items	                  17
Compass Remote Deposit Online
Installation Steps	                            3       Rescanning Items with Poor Image Quality and/or
                                                        Image Usability	                               18
Establish a Trust to the Web Server	           3
                                                        Deleting a Single Item or an Entire Deposit	19
Verify ActiveX Controls for Microsoft .NET	    5
                                                        Recovering from Jams	                         20
Download Security Policy	                     6
                                                        Ineligible and Non-Scanable Items	            20
Authenticate your PC	                          7
                                                    Transmit Deposit	                                 20
Install Scanner Driver	                       8
                                                    Deferring a Deposit	                               21
Disable Power Management (if running Windows XP)
9                                                  Processing Reports	                                21
                                                    Researching Deposit Tickets and Deposited Items	23
Compass Remote Deposit Online
Application	                                  10   Export	                                           23

Access	                                       10   Messages	                                         24

    Logging In	                               10   Application Security and FFIEC Guidance	          25

    Logging Out	                              10
                                                    User Tool Kit	                                    26
    Changing Your Password	                   11
                                                    Contact Information	                              26
    Create Users and Assign Rights	           11
                                                    System Availability	                              26
    Generating a Computer Activation Key for
    Additional PCs	                           12
                                                    Frequently Asked Questions (FAQs)	26
Scanning Checks	                              13
    Test Batch	                               13   Glossary	                                         28

TM-02-1201C Rev. 06/14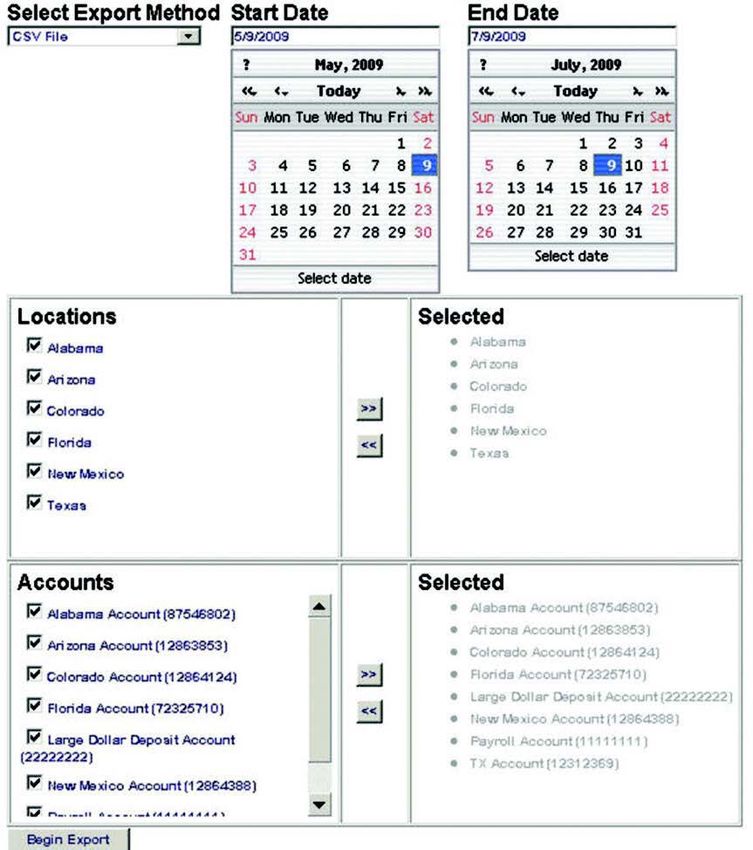
Welcome to Compass Remote Deposit Online® Services
Thank you for choosing Compass Remote Deposit Online. We welcome this opportunity to bring you an exceptional
product backed by the support of our entire Business Relationship Services team. We hope you find Compass Remote
Deposit Online to be a valuable addition to your business. Compass Remote Deposit Online lets you capture check
images at the back office and send an electronic deposit to BBVA Compass, thereby eliminating the cost of transporting
paper check deposits to us. It uses advanced optical recognition processes to read and interpret the information that
is on a check as it is scanned on a small table-top scanner. The information is validated to ensure that the correct
information is included in your deposit. The system identifies the items for which information cannot be accurately
determined using the optical recognition processes. The operator views the image of those suspects and manually keys
in the missing information as needed.

Technical Requirements of Your PC
Perform a pre-assessment inventory of your PC to ensure it has enough hard drive space and memory available,
the proper third-party applications and patches are installed, and all other necessary components are verified before
beginning installation.

Compass Remote Deposit Online’s home page contains a system check that you can run to validate whether your PC
meets the minimum requirements outlined below or you can use this list to verify the PC requirements.

                                                                         Required
 Workstation      Processor       Memory Disk               NIC          Adapters     OS            Display
                  Dual Core 2.4   2GB        160GB HD       (1)          N/A          Workstation   256 Colors; 1024 x 768
                  GHz or Better                             100/1000                                Resolution
 Deposit 24/7                     *1 GB      *5GB           NIC –
 Workstation      * Intel                    available      Min 256K                                (Greater than 1MB of
                  Pentium 3 or               Hard Drive                                             Video RAM)
                  compatible                 Space

• Operating System: Windows 2000 Professional with Service Pack 4, Windows 2003 with Service Pack 1, Microsoft
  Vista-32 and 64 bit, Microsoft Windows 7, or Windows 8.
• Scanner Connections / Ports: One available USB 2.0 port
• Software Dependencies: The following software components are necessary for the application to operate correctly
  and should be loaded or installed prior to the remote capture installation process.
    • Microsoft .NET 1.1 with Service Pack 1 or .NET 2.0 (NOTE: Beta versions of .NET 2.0 are not supported – if you
      have a beta version installed, you must uninstall and install the release version of .NET 2.0.) .NET 2.0 and .NET 3.0
      are supported, but require .NET 1.1 SP1 to also be resident on the PC
    • Adobe Reader 5.0 or higher (required to display reports in .PDF)
    • WinZip 9.0 or higher (required to download images in a .tiff format).
• QuickBooks® (only required if you wish to import your Compass Remote Deposit Online data into your QuickBooks
  software)
    Please Note: In order for QuickBooks to import your data from Compass Remote Deposit Online, at least one custom
    field must be enabled within Compass Remote Deposit Online.

• Windows Login Rights: The following Windows rights are required to access the relevant functions of the Compass
  Remote Deposit Online web application.
• Administrator Rights: Users will require local administrator access to the PC to install the security policy.
• Power User Rights: Users will require power user rights to operate the Compass Remote Deposit Online web
  application and allow the system to cache information during capture.

2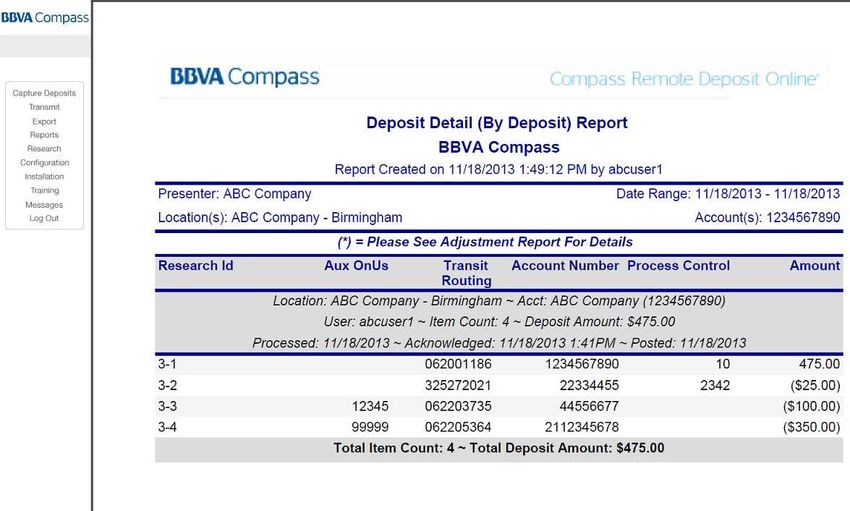
If any of the above requirements are not met, STOP the installation process. Either establish the required
   components on the PC or load the web application on a different PC that meets the requirements listed above.

Compass Remote Deposit Online Installation Steps
1. Ensure your scanner is NOT connected to your PC.

2. Open Internet Explorer and enter web address https://remotedeposit.bbvacompass.com.

Establish a Trust to the Web Server
You will want to establish a trust to the web server so that Internet Explorer can verify the identity of the Compass
Remote Deposit Online web application and know that the program comes from a known, reliable source.

1. Open Internet Explorer.

2. Go to Tools - Internet Options.

3. In the Internet Options window, click the Security tab.

                                                                                                                        3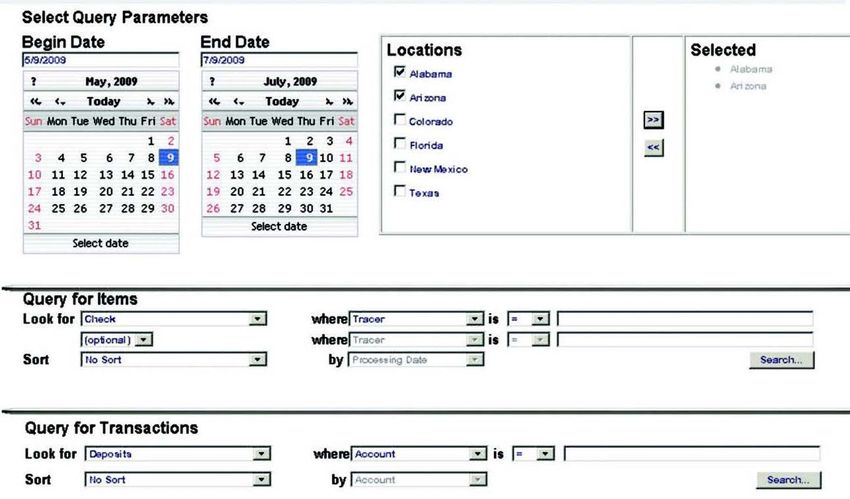
4. Click Trusted Sites from the web content zones at the top.

5. Click the Sites button.

6. Enter “https://remotedeposit.bbvacompass.com”

    Note: Compass Remote Deposit Online uses HTTPS (server verification). If the checkbox to “Require server
    verification” is checked, it may remain checked. If it is unchecked, this will not reduce the security of the Compass
    Remote Deposit Online web application.

7. Click the Add button. The URL will display as a trusted site at the bottom of the screen.

8. Click OK to save the trusted site and close the window.

    Tip: To validate the site is now a trusted site, check the bottom of your screen for the check box (see above).

4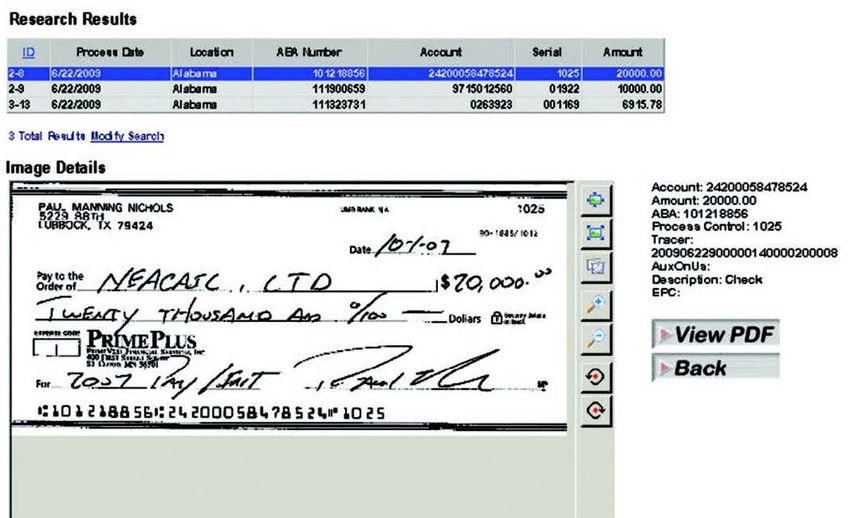
Verify ActiveX Controls for Microsoft .NET
To further enhance the security settings of the Compass Remote Deposit Online web application, enable the relevant
ActiveX components.

1. While still in the Internet Options - Security screen, click Custom Level.

2. For the following .NET Framework Reliant Components and ActiveX Controls, ensure the Security Settings are set to
   Enable:

   • .NET Framework-reliant Components:
      • Run components not signed with Authenticode – ENABLE
   • ActiveX Controls and Plug-ins:
      • Run ActiveX controls and plug-ins – ENABLE
      • Script ActiveX controls marked safe for scripting – ENABLE

3. Click OK to save your changes and close the window.

4. Click OK to close the Internet Options window.

                                                                                                                     5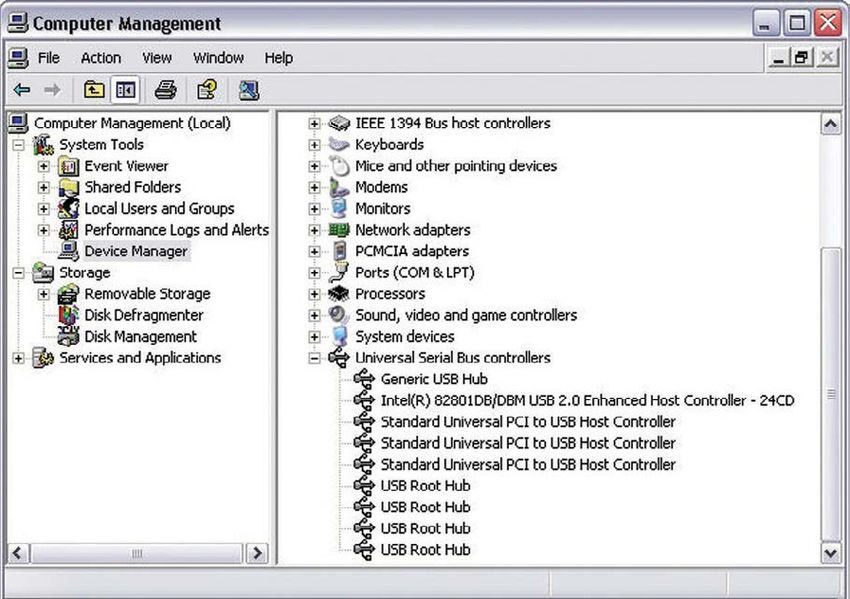
Download Security Policy
1. At the login screen, click the Help with Security Setup link

2. Click the Download link

3. When asked if you want to run or save the file, click Run. (If you receive an error message that software publisher
   could not be verified, click Run to clear the error and continue the download).

4. Security Policy information will automatically be downloaded and the Wizard displays. Click Next to continue.

5. The system will install the necessary CAS Security files to the client PC and display an Installation Complete message.
   Click Close to complete the installation.

6. Close Internet Explorer.

7. Open Internet Explorer and enter web address https://remotedeposit.bbvacompass.com.

6
Authenticate your PC
1. The login screen will contain a new section below the login fields for Computer Activation.

2. Click the Activate Computer button.

3. Enter the Computer Activation Key provided in your customer welcome e-mail.

4. Click Submit.

5. The main login screen displays confirmation once the computer is activated.

6. Click Close.

7. Log in to Compass Remote Deposit Online as the administrative user to continue installation.

8. Enter your Login, Password, and Access Code. Please note that your Password and Access Code are case-sensitive.
   Here, you will be prompted to change your Password.

   Tip: Your new Password must be 8 to 32 characters in length with at least one number and one special character
   ($, @, /, *) when selecting a Password. Passwords expire every 60 days.

   You will be locked out of the application after 3 unsuccessful login attempts.

                                                                                                                     7
Install Scanner Driver
Once you have conducted your pre-installation preparation, you are ready to install the scanner drivers. The InstallShield
intelligently progresses through much of the installation without the need for user interaction.

1. Ensure your scanner is NOT connected to the PC.

2. Click Installation from the main menu.

3. Select the relevant scanner and click the Install… button.

4. When prompted, click Run to launch the appropriate scanner driver file.

5. If you receive an Unknown Publisher Security Warning, click Run to proceed.

6. When the InstallShield Wizard opens, click Next to continue. Progress screens will display as the Installshield
   continues to run.

7. You may see a Hardware Update Wizard during the installation. This screen notifies you as the scanner drivers are
   installed. Click Finish to close the window and continue the installation process.

8
8. When the installation process is complete, click Finish to close the Installshield.

9. Click Logout from the main menu to exit Compass Remote Deposit Online.

   Tip: Alternatively, closing Internet Explorer will log you out of Compass Remote Deposit Online and close the
   browser window.

Disable Power Management (if running Windows XP)
If you are running a Windows XP operating system, you will need to ensure that the Power Management option is
deactivated so that your scanner does not get powered off in the event of power management by the computer.

1. Right-click My Computer and click Manage.

2. In Computer Management, click Device Manager.

   Tip: If you are unable to access Device Manager, please contact your system administrator as you may need to be
   set up with Administrator or Power User Rights.

3. Expand Universal Serial Bus controllers.

4. Right-click on USB Root Hub and click Properties.

5. Click the Power Management tab, ensure that the checkbox for Allow the computer to turn off… is unchecked.

6. Repeat this process for all USB Root Hub listings.

                                                                                                                     9
7. To verify the scanner driver is installed (be sure the scanner is plugged in before verification process):
a. Right-click My Computer and click Manage.
b. Highlight Device Manager at the left.
c. Expand Universal Serial Bus Controllers. The scanner should list as one of the USB devices
Compass Remote Deposit Online Application
Access
Logging In
1. Open Internet Explorer and enter web address https://remotedeposit.bbvacompass.com.
2. Enter your Login, Password, and Access Code. You should have received welcome e-mail that includes your
access code to access Compass Remote Deposit Online. You should receive your Login and Password during your
installation call. Please note that your Password and access code are case-sensitive. If this is your first time logging
into Compass Remote Deposit Online, you should change your Password to something you define. Please see
Changing Your Password below for more details.
Tip: Your new Password must be 8 to 32 characters in length with at least one number and one special character
($, @, /, *) when selecting a Password. Passwords expire every 60 days.
Logging Out
1. To exit Compass Remote Deposit Online, click Logout from the main menu. This will return you to the log in screen.
2. Close the Log In screen window to close the application.
Tip: Alternatively, closing Internet Explorer will log you out of Compass Remote Deposit Online and close the
browser window.
10Changing Your Password
Your initial Password will be established by your system administrator. For security reasons, you must change your
Password upon logging into Compass Remote Deposit Online the first time. Thereafter, you can change your Password
at any time and as often as you like.
1. On the log in screen, enter your Login and Password.
2. Click Change Password to display the Change Password screen.
3. Enter your new Password (what you’re changing your Password to) in the New Password field.
4. Enter your new Password again in the Confirm New Password field.
Tip: Your new Password must be 8 to 32 characters in length with at least one number and one special character
($, @, /, *) when selecting a Password. Passwords expire every 60 days.
5. Click Submit to save the Password change.
Create Users and Assign Rights
Create new users that can access the application and perform capture and other processing functions. Assign rights to
these users to allow system access and account availability.
1. Click Configuration from the main menu.
2. Click the New User button to add a new user.
3. Enter the login parameters for the new user.
a. User name (first and last)
b. Description (optional)
c. Login name (8 to 16 alphanumeric characters)
d. Initials (this field is not optional)
e. Password (8 to 32 alphanumeric characters in length with at least one number and one special character)
114. Once you have finished this basic setup, click the OK button.
5. Select the new user in the User list.
6. Select a Role for this User.
a. Click the View Details for selected role radio button to display the role
tasks associated with each role and determine the best role suited to the
responsibilities of the new user.
i. Administrator - has access to all features and functions
ii. User - capture only
iii. Capture user - capture, transmit and reports
iv. Transmit user - transmit only
7. Highlight the Remote Capture Task.
8. Click the Edit Access Rights button to determine the locations and accounts available.
Tip: Administrators can change the access rights for other administrators within the application.
9. The available locations and accounts should display in a new screen. Select those which apply.
Tip: Adding or removing access to accounts or locations can increase security and control.
Select the Future added accounts if you would like to have access to any accounts that will be added to that
location in the future.
10. Click OK.
11. Highlight the Remote Capture Task and the User Task Access Rights will display at the far right for the selected User
Task.
12. Repeat steps 6 - 9 to assign location and account access rights to this user.
13. Repeat steps 1 - 11 for each new User who will access the Compass Remote Deposit Online web application.
Generating a Computer Activation Key for Additional PCs
The computer activation key sent in the original welcome e-mail can only be used to authenticate one PC. If other PCs
are going to access Compass Remote Deposit Online, the system administrator should generate a computer activation
key for each PC.
1. From the Configuration Screen, click the Computers tab.
122. Click the Add Computer button.
3. Enter a name you select to identify the computer.
4. Enter a description (optional).
5. Ignore the Activated checkbox. and the Key box. Select the checkbox beside the Computer Role. Click OK.
6. The Activation Key is automatically generated for this computer and the code is displayed. While this activation key
can be viewed until it has been activated, it is recommended that you make a note of it.
Tip: The Activated checkbox will be marked once the computer has been activated.
Scanning Checks
Test Batch
BBVA Compass highly recommends that you send a test batch to ensure connectivity and receipt of your deposit. The
test batch may consist of one check or multiple checks.
Tip: Your test check(s) can be a check written off one of your accounts for $0.01.
Capture Deposits
When scanning checks, Compass Remote Deposit Online allows you to scan checks without stopping to enter dollar
amounts for checks that Compass Remote Deposit Online could not read. However, before you begin scanning checks,
you must total the checks and enter that dollar amount for these checks.
1. Before you access the Capture Deposit screen, first ensure your scanner is plugged in to prepare for capture.
2. Click Capture Deposit from the main menu.
3. If there are multiple locations to choose from, select the relevant Location for which you are capturing this deposit.
134. Select the correct Account Number for this deposit from the dropdown list provided or type in the account numbers/
names to filter the account you desire.
5. In the Amount field enter the total dollar amount of the checks you will be scanning.
6. Verify today’s date is selected as the Processing Date in the calendar.
7. Prepare the batch of checks to be scanned by removing all rubber bands, staples, paper clips, pins, etc.
8. Click Create Deposit.
9. The virtual deposit ticket displays. Place the checks into the hopper of the tabletop scanner.
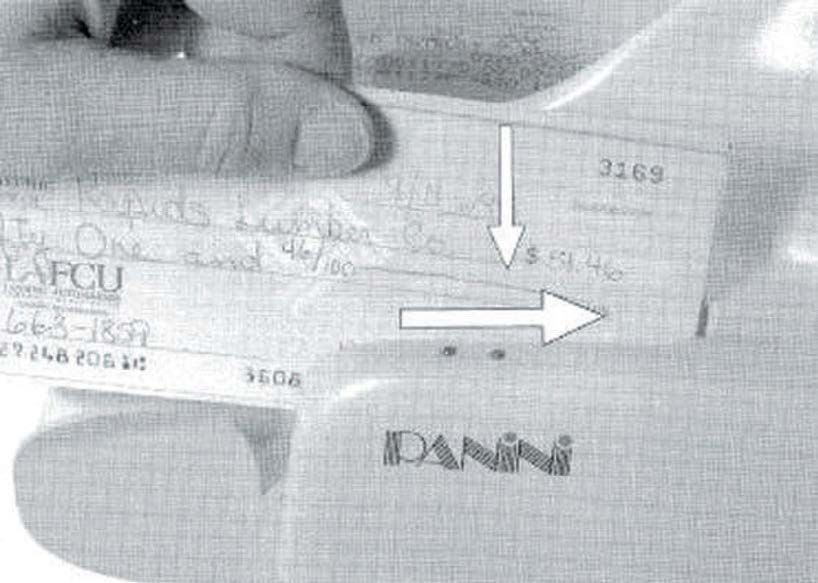
Tip: You may feed checks one at a time or in batches by inserting the documents into the feeder all the way. The
checks must be inserted into the feeder so that the leading edge fits between the two black lines as shown below.
The feeder is designed so that checks can be loaded continuously, while the scanner is processing.
10. Click the Scanner Info button and conduct the following:
a. Pick your scanner type from the drop down menu
b. Deselect the Spray Tracer Check box
c. Select Start in Scanning Mode*
d. Select Switch to Keying mode automatically after document(s) are scanned* if the scanner is NOT a single feed
scanner
14e. Select Use Double Feed Detection
f. Select Use Auto Clean Mode
*If using a single document scanner, “Start in Scanning Mode” and “Switch to Keying mode automatically after document(s) are scanned” does not
have to be selected.
Tip: As long as you don’t switch scanner types, you only have to select these parameters upon your
initial scanning.
11. Click the Scanning button.
12. As each check is successfully scanned: If the amount of the check is recognized, the Remaining field decreases by
the amount of the last check successfully scanned. If the amount of the check is not recognized, the Remaining field
will not decrease.
Once capture is complete, you will be prompted with any items that need attention.
Tip: Before releasing the deposit, be sure to review each item and make sure the amount scanned matches the
amount entered (from step 5).
13. When a field is highlighted, enter the correct value for that field, using the image displayed.
14. If you are using custom data fields, enter the applicable information for the item. These fields require text entry (20
character limit per field) before you can close the batch for transmission. In the example below, the user has keyed in
the apartment number, city, state and month.
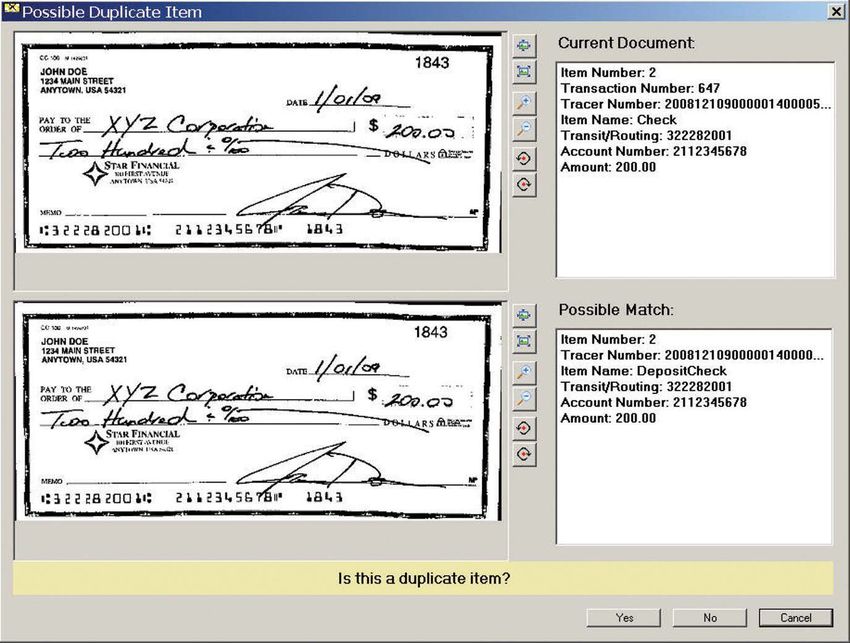
15. Press Enter when finished to move on to any additional items that need attention. Once all deposit items have been
captured, corrected, and the deposit is in balance, you are ready to release the deposit for transmission to BBVA
Compass.
16. Click the Close button.
1517. You are prompted to Release the transaction. Ensure Release is selected.
18. Click OK. Releasing the transaction will move it to the Transmit screen where it is ready for transmission.
19. Highlight the batches to be transmitted and click Transmit to transmit batch.
Common Error Messages and Action Required
Error Message Definition Action Required
No ABA The item does not have a ABA (routing number) and Key in the routing number
cannot be accepted
No amount No amount was read Key in the amount
No MICR Line The item has no MICR line and cannot be accepted. Delete item from the batch and
deposit it at a branch or mail item
No Account Number The item has no account number and Delete item from the batch and
cannot be accepted deposit it at a branch or mail item
IRD The item is a replacement check Delete item from the batch and
deposit it at a branch or mail item
IRD Return Item The item is a return item Delete item from the batch and
deposit it at a branch or mail item
16Error Message Definition Action Required
Return Item The item is a return item Delete item from the batch and
deposit it at a branch or mail item
Canadian Item The item is a Canadian item and cannot be accepted Delete item from the batch and
deposit it at a branch or mail item
Savings Bond The item is a savings bond and cannot be accepted Delete item from the batch and
deposit it at a branch or mail item
Exceptions Which May Occur Prior to Releasing a Deposit
Checking for Duplicate Items
The Compass Remote Deposit Online web application will help you to maintain the integrity of your deposits by
automatically checking for duplicate items as they are captured. This feature will review specific criteria of items currently
being captured to items previously captured and/or processed. Duplicate checking can help protect you from fraudulent
practices and from accidentally including the same item in multiple deposits.
When the duplicate checking feature detects an item that matches a previously processed item, it will alert you and the
following screen will display.
1. Press Enter and the following screen will ask you to compare the current item (top image) to the possible match
(bottom image) and decide if the item is a duplicate.
172. Review the images on the left and the item detail on the right.
3. Click Yes if the item is a duplicate. The item will be removed from the deposit. Click No if you do not think the item is a
duplicate. The item will remain in the deposit. If you click No the item remains in the deposit and is flagged for review
by BBVA Compass.
Rescanning Items with Poor Image Quality and/or Image Usability
If one or more of the items you have captured has failed any of our image quality and/or image usability tests, you will
receive an onscreen message indicator explaining the error.
1. Click on the item in the deposit list at the bottom of the screen, and then click the Rescan button at the top left or
double-click the item.
In the Rescan Item window, information will display regarding the poor image quality and/or image usability.
• Click Delete to remove the item from the deposit.
• If you wish to rescan the item to attempt to improve the quality and/or readability of the image,
place it back in the input hopper of the scanner and click Rescan.
• The new image will display. You can choose to Apply the new image if it is improved.
• If the image still is not valid, you may again choose to Delete or Rescan the item.
• If you click “Ignore” the item remains in the deposit and is flagged for review by BBVA
Compass. If the item is deemed ineligible, it could be returned later as an adjustment made
to your account.
18Deleting a Single Item or an Entire Deposit
Deleting a Single Item
During capture, you may decide to delete a specific item from the deposit.
1. Click the item in the list at the bottom of the Capture Deposit screen.
2. Click the Delete button to the left of the displayed image.
3. Click Yes to confirm that you wish to delete the item.
4. Remember to remove the physical item from the deposit.
Deleting an Entire Deposit
At any time during capture, you may opt to delete the entire deposit if you decide you no longer want that deposit in
Compass Remote Deposit Online.
1. Click the Close button from the bottom of the Capture Deposit screen.
2. Click the option to Delete the entire deposit.
3. Confirm that you truly wish to delete the entire deposit. Click Yes.
All references to this deposit will be removed and deleted so it will not be available for research. It will also not be
available for transmission to BBVA Compass.
19Recovering from Jams
If a check jams in the scanner, Compass Remote Deposit Online stops the scanner and displays the last successfully
scanned check. Clear all unscanned checks that are in the scanner path and place them in the front of the feeder.
Resume scanning by clicking the Scanning button on the bottom of the Capture Deposit screen.
Ineligible and Non-Scanable Items
Only checks created by an authorized signer on the account records of the payor bank and payable to our customer (no
payable to “cash” or third party checks) can be deposited through Compass Remote Deposit Online (no remotely created
checks).
Foreign and Canadian checks and savings bonds are ineligible to be converted to substitute checks, therefore they
cannot be sent to BBVA Compass using Compass Remote Deposit Online. Also, please note that returned items and
returned IRD’s cannot be deposited using Compass Remote Deposit Online.
Ineligible items and damaged/non-scanable checks can be mailed to BBVA Compass at the following location:
Compass Remote Deposit
P.O. Box 2324
MSC 251
Birmingham, AL 35201-2324
Tip: It is important to include a deposit slip with any checks mailed to the address above to ensure they are
credited to the correct account.
Transmit Deposit
Once you have captured and released your deposits, you need to transmit them to BBVA Compass to complete the
deposit. If you have just completed a deposit from the Capture Deposit screen, you will be taken to the Transmit screen
automatically to transmit the deposit.
1. Click Transmit from the main menu.
2. All deposits that have been Released will be displayed in the Transmission screen. Click to highlight (in blue) the
deposit you wish to Transmit.
Note: Multiple batches can be selected and released at the same time.
3. Click the Transmit button.
20The deposit is Acknowledged by BBVA Compass. If a deposit is transmitted after the cutoff time, it will be posted on
the next available date. Click View Report to view the deposit detail report of the individual batch. Click View Images to
access link to view the images.
Deferring a Deposit
During the capture process, you have the option to defer deposits to complete them at a later time. Deferring a deposit
allows you to save what you have captured or completed so far, and then come back to finish it later.
1. While in the Capture Deposit screen, click the Close button.
2. The Close Transaction window provides the option to defer, release, or delete the deposit. Click Defer.
3. Click OK.
4. The deferred deposit will be listed as an Existing Deposit on the main Capture Deposit screen. Click to highlight the
existing deposit.
5. Click Edit Deposit. You will be returned to the deposit in the Capture Deposit screen where you can complete
processing and balancing the deposit and release it for transmission.
Processing Reports
211. To access, view, and print reports, click Reports from the main menu.
2. Click a Report from the dropdown list provided. This list may vary depending on your access rights.
3. Select a Start Date and End Date for your report.
4. Depending on the report you selected, you may be prompted to select additional parameters for your report. Select
the relevant parameters to generate the output you desire.
5. Once all your parameters have been selected, click Generate Report. The report displays in PDF version (you must
have Adobe Acrobat loaded to view the PDF).
Report Type Definition
CAR/LAR Provides optical recognition statistics for the selected presenter(s) and location(s)
Deposit Adjustment This report will not be available online as adjustments will be displayed on your DDA
statement. Please contact Business Relationship Services if you have any questions
Deposit Detail Details of capture deposit data showing each item individually along with its amount
Deposit Detail with Details of capture deposit data that includes the deposit detail information with the
Custom Fields custom data fields
Deposit Summary Summary of capture deposit data for a given processing date, or range of dates
Login Audit Broken down by Presenter and User ID, this report shows a history of the login
activity for one or more selected Users
QuickBooks Resolved Details any items that were resolved or assigned when the QuickBooks
export was performed
QuickBooks Unresolved Details any items that the QuickBooks export was unable to assign
Transaction Status Information on the current status of items within the capture system, whether they
are in progress, released, or acknowledged
Transaction Status The transaction status report broken down by individual location
Location
Transaction Status The transaction status report broken down by individual location which includes items
Aux on Us aux on us field
22Report Type Definition
Workflow Audit Provides a history of various actions taken by users within the application
Please Note: In order for QuickBooks to import your data from Compass Remote Deposit Online, at least one custom
field must be enabled within Compass Remote Deposit Online.
Researching Deposit Tickets and Deposited Items
You can research deposit ticket and deposit item information within the Compass Remote Deposit Online web
application. The query features allow you to look for information from a deposit ticket or single deposit item.
1. Click Research from the main menu.
2. Select the Begin Date and End Date for your search.
3. Select the Location(s) to include in the query.
4. You can Query for Items or Query for Transactions. Enter the relevant query parameters, such as item type, MICR field
value, sort parameters, or transaction type.
5. Once all your query parameters are set, click the relevant Search button to begin the query.
• Single-click an item to view an image of the item.
• You can print the item by clicking the Print
button next to the image.
• View the back of the item by clicking the Back
button next to the image.
• Double-click the item to view the entire deposit
the item was processed in.
• When you query for transactions, you have the
option to print your images in the following
formats: 2 items per page, 3 per page, 8 per page
and 15 per page
Export
23You can export deposit item information within the Compass Remote Deposit Online web application. The export feature allows you to create a CSV, QuickBooks, or Image Archive (CSV data and TIF images) file for integration into your account software. If you’re using QuickBooks, ensure your QuickBooks application is open before you start. Contact your QuickBooks representative if you experience issues importing the file. Please Note: In order for QuickBooks to import your data from Compass Remote Deposit Online, at least one custom field must be enabled within Compass Remote Deposit Online. 1. Click Export from the main menu. 2. Select the file type for export. 3. Select the Begin Date and End Date for your search. 4. Select the Location(s) to include in the export. 5. Select the Account(s) to include in the export. 6. Once all your parameters are set, click the Begin Export button to begin the data pull. 7. Once the file is generated, a dialog box will prompt the user to open, save or cancel the export file. Messages 24
Within the messages feature, you will receive alerts (defined by the exclamation point symbol) or notifications (defined
by the “i” symbol) from BBVA Compass.

Application Security and FFIEC Guidance
In January 2010, The FFIEC published guidance (http://www.ffiec.gov/press/pr011409.htm) titled “Risk Management
of Remote Deposit Capture” highlighting areas in which financial institutions and remote deposit users should take
extra care in ensuring they have proper controls in place in order to avoid losses. Please be sure your institution has
procedures in place such as:

1. Access Control

   It is necessary to limit access of Compass Remote Deposit Online so that only trained, qualified personnel are using
   the system. As inadequate controls may lead to the intentional or unintentional alteration of deposit item information,
   re-submission of an electronic file, or re-deposit of physical items, it is recommended that access is limited to users
   who understand how to properly use the application. It is also recommended that there is some separation of duties
   for your users as inadequate separation of duties at a customer location can afford an individual end-to-end access to
   the Remote Deposit Capture (RDC) process and the ability to alter logical and physical information without detection.

2. Item retention and safeguarding

   As original deposit items are not submitted to the financial institution but are retained by the customer, it is important
   that you implement appropriate document management procedures to ensure the safety and integrity of deposited
   items from the time of receipt until the time of destruction or other voiding. Please be sure to keep deposit items in
   a secure locked place as well as create procedures for the handling of such items. When you are ready to destroy
   the items, please ensure the items are securely disposed of so they will not be re-deposited and the non-public
   information contained on the items is not compromised. It is imperative that you ensure the RDC processes
   and procedures employed at your site and the RDC confidential information are secure. If you or one of your
   employees breaches the security or even inadvertently allows the breach of the security of the RDC process, you
   will be liable for any damages sustained by you, BBVA Compass and any third party who suffers damages as a
   result of such security breach.

                                                                                                                           25
User Tool Kit Contact Information If you have any questions about Compass Remote Deposit Online, please contact our technical support team. We look forward to serving you. Technical Support (866) 488-1858, option 2 Our technical support team is available to assist you Monday through Friday from 8:00 a.m. to 6:00 p.m. CT. System Availability You may transmit your check deposit file to BBVA Compass 24 hours a day, 7 days a week. Deposits submitted Monday through Friday (except on Federal Reserve holidays) by 9:00 p.m. CT will be processed that day for same day ledger credit. Deposits submitted Monday through Friday after 9:00 p.m. CT or on weekends will be processed for ledger credit the next business day. Frequently Asked Questions (FAQs) Listed below are some typical questions we receive about Compass Remote Deposit Online. If you do not find the answer below or if you would like additional information, please contact your local Business Relationship Services team. Can I delete an image that was just scanned? You cannot delete images while scanning checks from the scanning screen. If you would like to delete an item, wait until the checks have finished scanning and highlight the item. Click the “Delete” icon located in the top left of your screen and the item will be deleted from the batch. Do I have to enter a decimal point when entering a check amount? No, you do not have to enter a decimal point when entering check amounts; however, you have to enter a decimal point when entering a deposit amount on the Capture Deposits screen. Do I need a deposit slip? No. The system will create a virtual deposit slip. The system states my login is locked. What should I do? Contact someone who has administrative rights. Your system administrator can unlock your login and create a new password for you. How do I establish additional users on the system? A user with administrative rights must set up a new user. Refer to the Create Users section of this guide. I cannot remember my login. What should I do? Contact the person who has administrator rights for the system. That user can access the system to obtain your login. 26
What if I have forgotten my password?

If you have forgotten your password, the system administrator (or someone who has been given administrative rights
to the system) must reset your password by accessing Edit the User within the Configuration screen and changing your
password. The system administrator will tell you the password to use to log in. When you log in, you may be prompted to
change your password.

What do I do when the pop-up box reminding me to change my password appears?

You must manually reset your password by logging out of the application and accessing the login screen again. At the
login screen, enter your user name and password and click Change Password. Enter your new password and click save.
If you do not change it before the expiration date, you will have to contact your administrator for reset. Passwords expire
every 60 days.

I placed checks in the scanner’s feeder, clicked the Scanning button to begin scanning and nothing happened. What
should I do?

Verify that the scanner is properly plugged into the USB port on your PC and that it is turned on. Also, try turning the
scanner off and then back on, or unplugging the scanner from the USB port and then plugging it in again. This may
resolve the issue. If this does not resolve the issue, rebooting the PC may also re-initialize the scanner. You may also want
to click the Scanner Info button on the Capture Deposits screen to ensure your correct scanner type is selected.

One of the scanned checks does not have a clear image. What should I do?

The system will tell you if it detects an image that is not adequate. If you would like a better image, delete the current
check image and scan the check again. If other checks are being imaged without any issues, you may wish to pull the
check and deposit it manually.

We received a deposit return item notification for a check we processed. Are returns processed the same as in the
past?

Yes. Procedures for returned items will remain the same.

Can I export my images to a file?

Yes. Click export on the menu to access the export feature. Select your export file type and enter a start date and end
date. Next, select the locations and accounts. For image archive, you will be prompted to enter a ZIP file password
(requires at least 4 characters). For CSV and QuickBooks, no password is required. Click Generate Report.

Note: If you are exporting to QuickBooks, ensure you have QuickBooks open prior to starting the file export process.
Contact your QuickBooks representative if you experience issues importing the file. In order for QuickBooks to import
your data from Compass Remote Deposit Online, at least one custom field must be enabled within Compass Remote
Deposit Online.

I cannot view the amount on the check image clearly.

Left-click on the check image and hold the mouse button down to create a box around the area you want to magnify. If
you still cannot see the amount, it will be necessary to obtain the original (paper) check to view the amount.

What if, during transmission, the system fails or I lose my connection?

During transmission, if you lose your connection, the system displays a message that the transmission has failed. Use
normal procedures to transmit the deposit again. Batches that have a status of acknowledged have been transmitted
successfully (before the interruption) and will not be transmitted again. Batches that have not been transmitted (and
have a status of Released) can be transmitted.

                                                                                                                             27
Glossary Acknowledged date Date when a deposit is received by the bank for processing. Administrator For this application, the Administrator has system rights to use all system functions. This includes scanning checks, balancing batches, transmitting deposits, setting up users, generating an activation key for a computer, and resetting a user who is locked out of the system. Batch A group of checks bundled together with a dollar total amount assigned. Batch Number Number assigned to the batch by the system. You cannot change the assigned batch number. Check A document used to withdraw money from a personal or commercial bank account. Encoding Inscribing or imprinting MICR data on checks, deposit slips, debit and credit tickets or other bank documents. Location A DDA account in which items are deposited into. MICR (Magnetic Ink Character Recognition) MICR is a character recognition system that uses special ink and characters. When a document that contains this ink needs to be read, it passes through a machine, which magnetizes the ink and then translates the magnetic information into characters. MICR technology is used by banks. Numbers and characters found on the bottom of checks (usually containing the check number, sorter number, and account number) are printed using magnetic ink. To print magnetic ink, you need a laser printer that accepts MICR toner. MICR provides a secure, high-speed method of scanning and processing information. MICR Line The line of characters along the bottom of a check, which are printed with a magnetic ink that is read by the high speed sorters or table-top scanners. Process control Check number. Processing date Date when a deposit is available to be captured. 28
Posting date

Based on the cutoff times, it is the actual date your items will be deposited.

Serial number
The number that is located between the account and amount field on a personal check and is located on the left end of
a commercial item. This number is typically the check number.

Transaction
A deposit.

Transit Routing Number (ABA)
A unique number assigned to each bank/financial institution. The first four digits indicate the local Federal Reserve
District. Digits five through eight are unique within that district and the ninth digit is a mod 11 check digit.

                                                                                                                        29
TM-02-1201C Rev. 06/14 BBVA Compass is a trade name of Compass Bank, a member
of the BBVA Group. Compass Bank, Member FDIC.You can also read