COMPASSAIR WEB BASIC USER GUIDE VOLUME ONE MAY 2021 - THINKCOMPASS SOFTWARE LIMITED
←
→
Page content transcription
If your browser does not render page correctly, please read the page content below

CompassAir Web Basic User Guide
Volume One
May 2021

© ThinkCompass Software Limited
©ThinkCompass Software 2021
COMPASSAIR WEB BASIC USER GUIDE VOLUME 1- INDEX

INTRODUCTION

           CompassAir Messages Window (Home)                             1   This guide is intended to serve as an
           CompassAir Settings – General                                 2   introduction to CompassAir (web
           Message Overview                                              3   version). It is one of a series that show
           Message Views                                                 4   the many useful features of
           Composing Messages                                            5   CompassAir (web version).
           Searching and Filtering Messages                              6
           Message Templates                                             7   Where it is felt that additional training
           Contacts Overview                                             8   would be beneficial, bespoke
           Document Folders and the Filing Tray                          9   packages can be provided for both
           Circulars                                                    10   individual users as well as groups.
           Calendar                                                     11   Please contact
           Notifications (alerts when sending/receiving messages)       12   solutions@thinkcompass.io for more
           Discussions                                                  13   information.
           Translation                                                  14

                                                     mycompassair.com                                             Vol1May21.01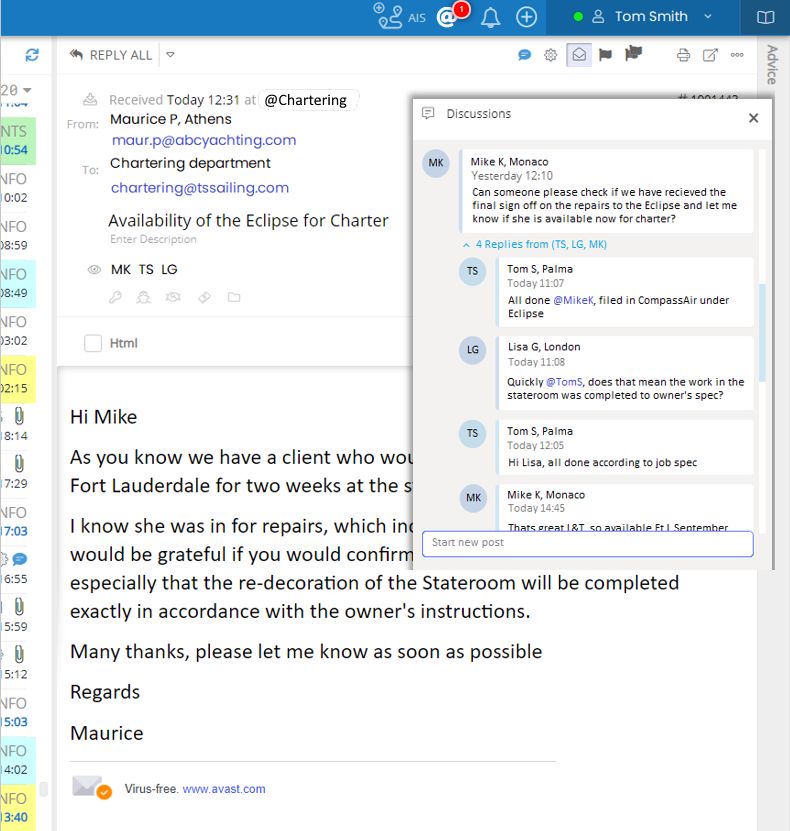
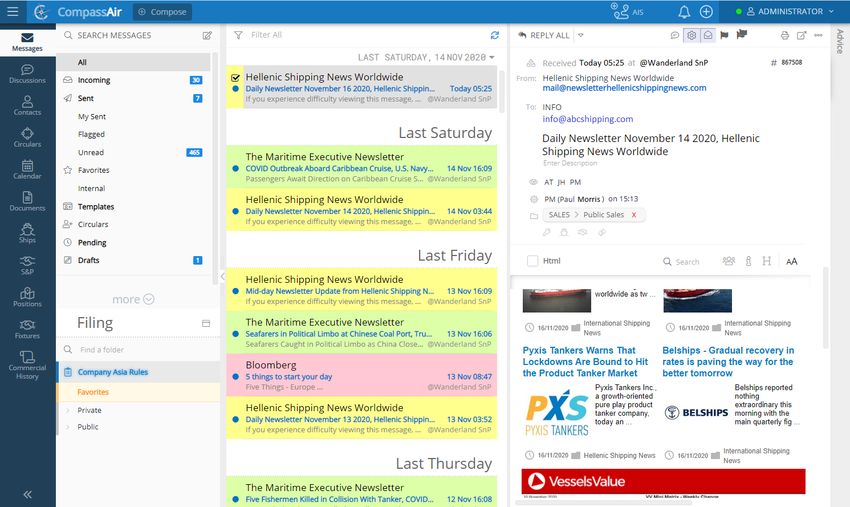
1 COMPASSAIR – MESSAGES WINDOW (HOME)

                                                               Message
                                                              Header Pane

                                   Message
                                                                            Viewing
                                     List
                 Views                                                       Pane
   Toolbar
   Buttons

                                                         Message
                                                       Preview Pane

 Toolbar
                 Filing
                 Tray

                                    mycompassair.com                                  Vol1May21.01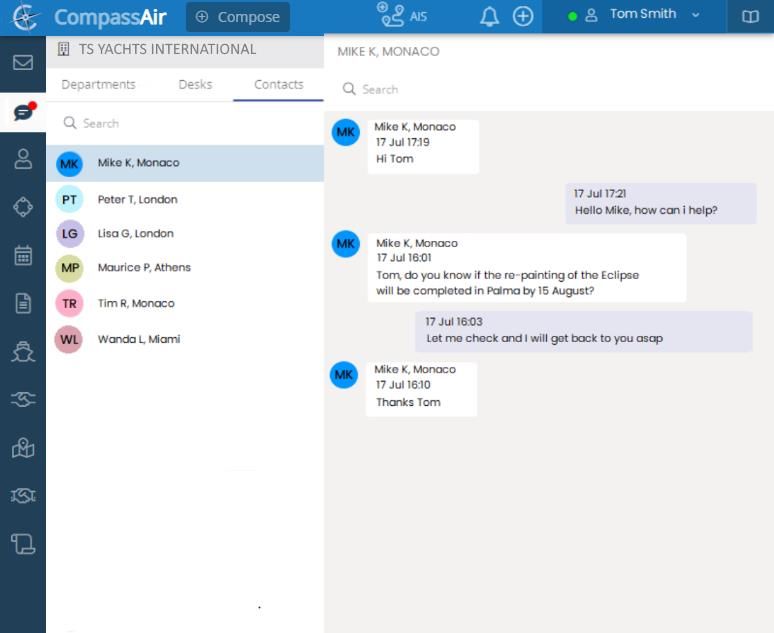
2 COMPASSAIR SETTINGS - GENERAL

    1. Access to the settings for each toolbar button is available   2. By clicking on the appropriate item in the list, the related
       from the dropdown menu. It also shows the number of              settings are made available
       current connections to the account (i.e. web, IOS and/or      3. Any changes made to an individual setting are automatically
       Android) with the option to end each by clicking on it and       saved and synchronised across all connections where
       then selecting “Terminate”                                       applicable (i.e. IOS, Android and web)

                                                          mycompassair.com                                               Vol1May21.01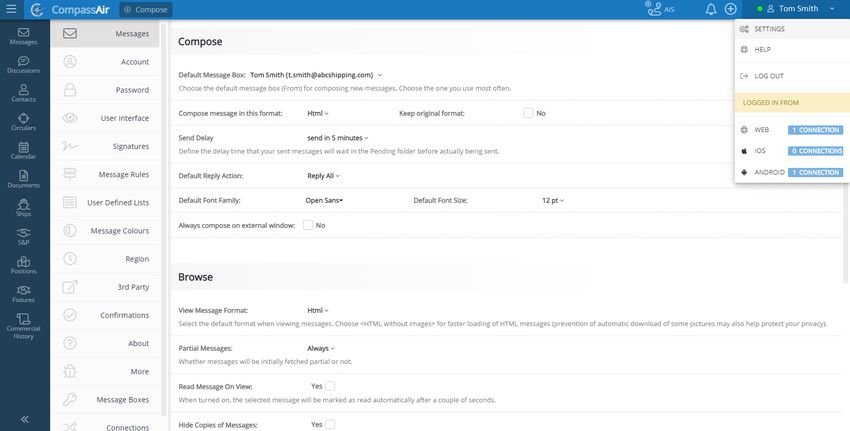
3 MESSAGE OVERVIEW

                                              Message
                                                List
                                                                                                        Viewing
                            Views                                                                        Pane

 1. In order to write a new message, select the “Compose” button from         space bar (whether up or down is chosen via
    the title bar (for next steps see 5 below)                                Settings/Messages/Browse – see 2 above)
 2. To read a message, select a particular View (see 4 below) and then     4. The message Viewing Pane displays both the message
    click on it to see in the Message List all messages within that View      header and a preview of the text
 3. Clicking on an individual message displays the content of that         5. To each message can be added Keywords, Vessel Names,
    message within the Viewing Pane. Having highlighted a message,            Fixtures and Deal information for future reference
    the user can navigate up and down the list using the                   6. As each recipient opens the message their initials are
                                                                              displayed in the message header in alphabetical order

                                                          mycompassair.com                                             Vol1May21.01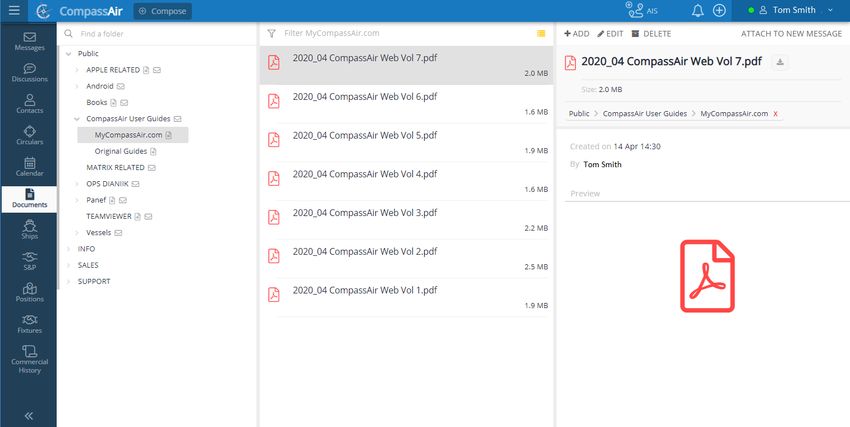
3 MESSAGE OVERVIEW (continued)

  7. Each recipient can mark a message as processed, read/unread, as well         9. By clicking on “…”, the selected message can be attached to a
     as flag (user or all) and/or print it (also using ctrl+P). The message can       new message, marked as spam or deleted
     also be viewed in a new window, if preferred                                 10. For future reference, a unique serial number is allocated to every
  8. The initials of the last user who “processed” the message, i.e. added            message, both sent and received
     keywords, vessel name, replied etc. are displayed. Where there are           11. Reply, reply all or forward from the dropdown menu
     numerous “processors” each can be seen in the message audit trail,           12. When filed, the name of the folder is displayed. Deleting that
     accessible from “i” in the message header                                        same folder “keyword” removes the message from that folder

                                                                  mycompassair.com                                                      Vol1May21.01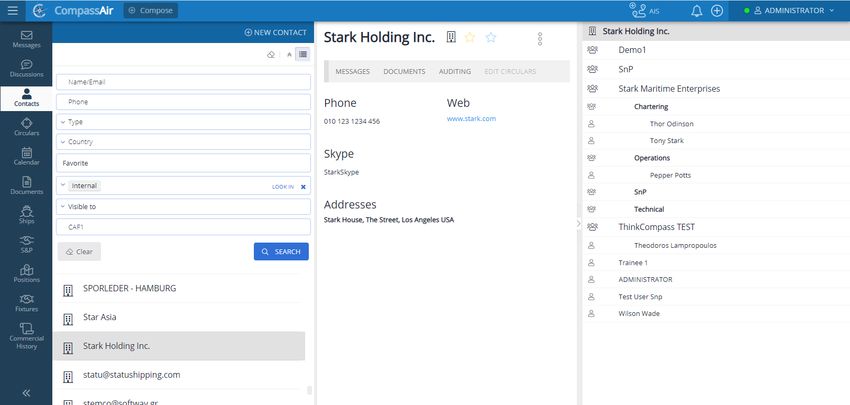
4 MESSAGE VIEWS

                          1. The System Administrator will, in advance, allow each user access to departmental
                             and individual addresses for which they have been authorised as well as apply any
                             restrictions (such as “Cannot Send”). The associated messages are then available
                             in customisable Views. Customisation can be by sent/received, read/unread as well
                             as by mailbox, whether flagged etc
                          2. After Views have been created, by clicking “More”, particular Views (i.e. a user’s
                             favourites) can be selected/filtered for display. This is achieved by toggling each
                             one, on or off. Their order can also be changed by dragging each up or down
                          3. New Views can be created using the drop down selections pane, starting by editing
                             an existing View and then saving it with a new name. Each is defined by preferred
                             characteristics such as sender, keywords, etc and, for ease of reference, can be
                             colour coded
                  Views

                                 mycompassair.com                                                 Vol1May21.01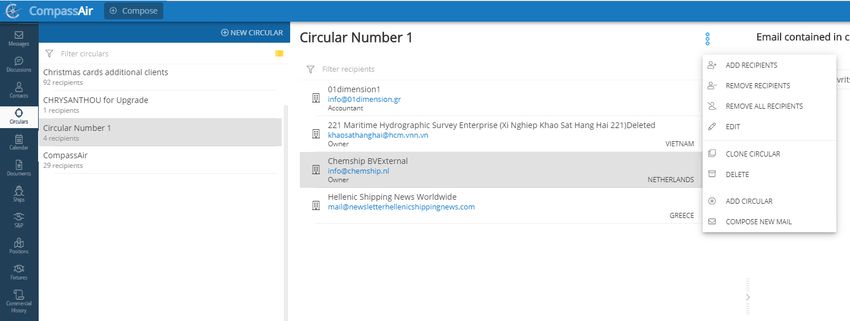
5 COMPOSING MESSAGES
1. When composing messages, a
   user can choose from whichever
   addresses (mailboxes) have been
   made available by the System
   Administrator (e.g. “Chartering”
   department) from the drop down
   menu
2. Options include delivery and/or
   read receipts, each from the
   dropdown menu (effective only if
   the recipient allows this in their own
   settings)
3. Messages can be sent as either
   HTML or Plain Text, via external
   mail or kept internal to the
   organisation
4. Messages can be created within a
   new window if preferred, and/or
   printed (also using ctrl+P)
5. In addition to a range of formatting
   options, images can be inserted
   from files, tables created, links
   added and colours of text and
   background changed
6. Keywords, Vessel names and Deal
   details can be associated with each
   message for future reference and
   ease of searching (none of which
   are visible to the recipient)
7. Hovering over a recipient in the
   message editor allows the option to
   copy the email address to the
   clipboard

                                            mycompassair.com   Vol1May21.01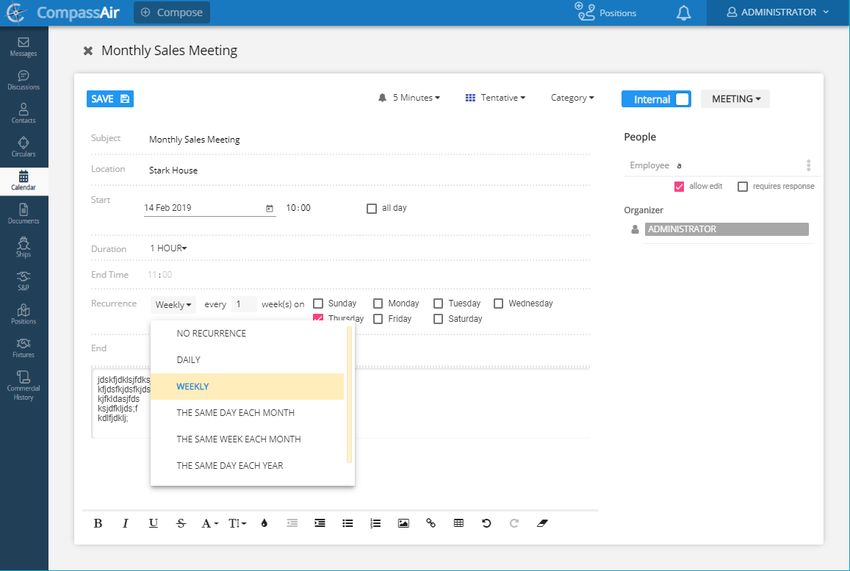
5 COMPOSING MESSAGES (continued)

8. “Circulars” inserts a pre-prepared
   list of bcc recipients (see 10
   CIRCULARS)

9. Documents can be inserted from
   Google Drive or DropBox and
   message signatures added if
   required

10. The completed message can be
    sent either immediately or its
    despatch delayed, the default timing
    being selected from Settings

                                           mycompassair.com   Vol1May21.01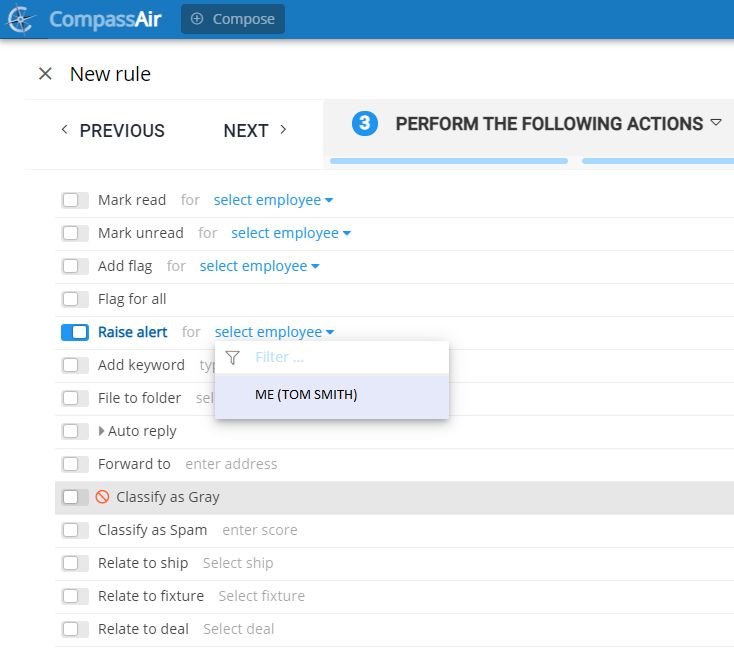
6 SEARCHING AND FILTERING MESSAGES
                                                        1. Within a selected View, messages can quickly be
                                                           filtered by read or unread, incoming or outgoing,
                                                           with or without attachments, as well as flagged or
                                                           unflagged
                                                        2. At the same time, a quick search can be made
                                                           within a selected View
                                                        3. If required, more comprehensive searches are
                                                           available, i.e. covering all Views, in either a quick
                                                           or advanced form
                                                        4. For advanced searches, additional parameters are
                                                           available such as Keywords, Vessel Names and
                                                           Fixture details, thereby refining the search.
                                                           Searches can also be made in other than the
                                                           regular message Views, for example, in Spam and
                                                           Drafts. (Note that more search parameters are
                                                           available than shown in the image, accessible by
                                                           scrolling down the list). To save the search, click
                                                           on the disc drop down menu (next to “New
                                                           Search”), a window appears into which you enter
                                                           the name of your search. It is then saved in views
                                                           and can be edited or deleted in the normal way
                                                           (see 4 above)
                                                        5. Using the drop down menu, it is possible to search
                                                           on from, to, cc or bcc
                                                        6. Searches can contain multiple keywords. To enter
                                                           more than one keyword they should be separated
                                                           by use of a semi-colon, “;”
                                                        7. For a text search, the words that have been found
                                                           are highlighted in the body of the message
                                                        8. The search logic is such that the letters a user
                                                           types results in suggestions that contain those
                                                           letters rather than start with those letters

                                     mycompassair.com                                            Vol1May21.01
7 MESSAGE TEMPLATES
1. When composing a message, a drop down menu provides for the current
message to be saved as a Template for future use, if required (also available
using ctrl+S)
2. All Templates are filed in a separate View that can be searched and filtered in
the same way as all other Views
3. Having identified the appropriate Template, by clicking “Use”, it then becomes
a draft message to be edited in the same way as in 5 above
4. Template Views can be customised in the same way as other Views, see 6
SEARCHING AND FILTERING MESSAGES above
5. All templates created in a particular mailbox will be visible to all users of that
mailbox, for example, all created using chartering@abc.com will be accessible
by everyone who has access to that mailbox
mycompassair.com Vol1May21.018 CONTACTS OVERVIEW
1. Contacts can be found 2. Having clicked on the Contact, 3. Each Contact can be edited or 5. Where an organisation has
either through a quick or information that has already deleted by a user numerous contacts, these
advanced search (via a been saved for that Contact is 4. Previous messages to or from are displayed in the right
drop down search box) displayed in the viewing pane that Contact together with any hand pane. By clicking on a
associated documents are name, the relevant contact
accessible quickly from the details are then displayed in
menu bar the viewing pane
mycompassair.com Vol1May21.019 DOCUMENT FOLDERS AND THE FILING TRAY
1. Folders containing filed messages can be accessed from the 3. Documents can be added directly to folders by clicking on “add”.
Filing Tray on the main Messages screen. After the System Existing documents can also be edited or deleted
Administrator has allowed a user access to root folders (none 4. Files can also be saved from elsewhere, for example
of which cannot be edited by users), subfolders can be added, (a) Attachments to messages can either be dragged or
as well as renamed or deleted. saved to folders
2. Filed documents ( but not messages) are viewed via the (b) Individual messages can be dragged to folders from the
“Documents” button message list within “Messages”
mycompassair.com Vol1May21.0110 CIRCULARS
1. When composing a message there is an option to bcc 3. New circular lists are created by clicking on “+ New Circular”
recipients from a pre-prepared circular list (see 5 point 8 and then adding recipients from a new window that displays
above) the user’s address book. This can then be searched, with
2. Pre-prepared lists of addresses to be bcc’d are viewed either selected addresses being saved to the circular
by typing in the search box or alternatively by scrolling, and 4. A user can edit existing circular lists by either deleting or
then selecting one from the alphabetical list adding new addresses, selected as from the drop down list
access by clicking on the three dots
mycompassair.com Vol1May21.0111 CALENDAR
1. The Calendar is accessed from the Toolbar and can be viewed by day,
week or month
2. In this example we are organising an internal sales meeting (also
available are Events and Appointments) to then be held each week. Start
by highlighting the day on which the first meeting will be held, then click
on the red button
3. Enter the subject of the meeting, its location, the start time and duration.
Information about the meeting can be added in the message box
4. The recurrence can then be set. In this case the meeting is to be held on
14 February and then every Thursday thereafter
5. Attendees are then selected – “Employee” when internal,
“Email” when external. After Optional or Required
attendance is selected and the meeting saved (“Save”
becomes “Send”), a message is sent to each invitee (and
internal message for internal, an email for external)
together with any accompanying message (see 3 above)
and the options to respond with Yes, Maybe or No
6. Other options include setting alarms, colour
coding and marking appointments as free,
busy, out of the office or tentative
mycompassair.com Vol1May21.0112 NOTIFICATIONS (alerts when sending and receiving messages)
1. If a user needs to know when a reply
arrives in response to an email they
are sending, a notification can be set
up using the “Options” drop down
mention when composing the
message. Providing “Show
notifications” has been ticked under
your phone’s Application Settings for
CompassAir, and CompassAir is
running minimised, a pop-up message
will appear on your phone upon
receipt
2. Alternatively, if the message has
already been sent, the same option
appears in the drop down menu that
appears after clicking the ellipsis at
the top right hand corner of the
message
3. If the same option is selected as for 2
above for an incoming message, a
pop up notification will again appear
on your phone when a reply is sent
from within your own organisation (i.e.
from mailbox that you share). If a
reply is sent by the user who selected
the “Notify Me” on the incoming
message, then a notification will not
be generated
mycompassair.com Vol1May21.0112 NOTIFICATIONS (continued)
1. Notifications can also be turned on for
all or selected emails by setting up a
new rule (see volume 5, section 3).
2. Choose for which message box(es)
notifications are required (this can be all
or any for which you have access)
together with any other parameters you
require to customise the alerts.
3. At stage 3 toggle on “Raise Alert”,
selecting yourself.
4. The next step, stage 4, allows the
option to use the rule for a defined
period. For notifications required going
forward the default starts with today’s
date. Once set, the rule is summarised
with the option either to edit or save.
5. As with other rules, notifications can be
suspended without deleting the rule,
achieved by toggling the completed rule
from “Active” to “Inactive”.
mycompassair.com Vol1May21.0113 DISCUSSIONS
1. Discussions is a chat-like feature
that enables users with access to
a shared mailbox (in this example
“Solutions”) to communicate between
each other with respect to emails that
appear in that inbox. Discussions are not
applicable to emails sent from a single, or
private email address – they only apply to
shared emails. As an example, if a user
were to send an email from their own
address, copying it to a shared mailbox,
only the email received into the shared
mailbox can have discussions attached to
it. To commence a discussion, view or add
to an existing discussion, click on the
speech balloon.
2. Emails with Discussions have a speech
balloon icon displayed next to the message
as it appears in the message list.
3. Inserting an “@” in a discussion reveals
a drop down menu showing the names of
users with access to the shared mailbox in
which the email appears. Selecting a user
will send an alert to that individual,
notifying them that they have been
mentioned in a Discussion.
4. The alert will appear at the top of the user’s
message window in red, disappearing once
the Discussion has been viewed or after 7
days.
mycompassair.com Vol1May21.0113 DISCUSSIONS (continued)
1. As well as being attached to specific emails,
discussions, or integrated chat, can take
place amongst team members who have
access to the same shared inbox, in the
example aside the department is Operations.
The format will be familiar and is similar to
that used by WhatsApp. The feature is
accessed from the “Discussions” tab on the
side menu bar.
2. As with Discussions attached to emails,
inserting an “@” in a discussion reveals a
drop down menu showing the names of users
with access to the same shared mailbox.
Selecting a user will send an alert to that
individual, notifying them that they have been
mentioned in a Discussion. As before, the
alert will appear at the top of the user’s
message window in red.
3. In the final example, Tom Smith has been
mentioned in a number of discussions and
this is brought to his attention via the red
alert at the top of the CompassAir home
screen. As he has access to both the
Chartering and Accounts shared mailboxes,
he will also be alerted when these
departments are mentioned in discussions.
Clicking on a reminder opens that message,
together with the associated discussion, in a
separate tab.
mycompassair.com Vol1May21.0114 TRANSLATION
1. Installing the Google Translate extension in the
Chrome browser allows foreign language text to
be translated with ease. To install, from the
browser search for the “Chrome Web Store”,
search “Google Translate”, then click on “Add to
Chrome”.
2. Having installed the extension, highlight the text
that you would like to translate and click on the
Google Translate icon.
3. A Google Translate window then opens showing
the translation into the users primary language
(which can be changed after clicking on
“Extension Options”).
4. Clicking on “More” opens Google Translate in a
new tab in the browser
mycompassair.com Vol1May21.01You can also read


