Creating a Custom Speedtest Web Page - 2021-01-13 Published
←
→
Page content transcription
If your browser does not render page correctly, please read the page content below
Creating a Custom Speedtest Web Page

 Published

2021-01-13
ii

Table of Contents
    Executive Summary

    Overview

    Speedtest Web Page Implementation

    Setup and Initialization

    Starting and Stopping the Test

    Test Results

    Troubleshooting
1
Executive Summary
This document describes how to set up a customizable web page user interface for Speedtest.
Overview
This document describes how to set up a customizable web page user interface for Speedtest. The web
page uses the Speedtest feature in Paragon Active Assurance via the product's REST API.
The Speedtest web page can be hosted on any web server (that is, not necessarily where Control Center
resides), as long as the REST API and access to the Test Agents are configured correctly.
Paragon Active Assurance provides an example web page implementation which is referred to in this
document.
Document version: 1.0
Speedtest Web Page Implementation
IN THIS SECTION
Speedtest Files | 2
Custom User Interface | 2
Below is an overview of the files contained in the Speedtest web page implementation. All of these files
need to be hosted on a web server.
The files are included in the Control Center installation and can be accessed at
http:///static/speedtest_demo/example.html2 In the file system, they are located at /usr/lib/python2.7/dist-packages/netrounds/static/speedtest_demo NOTE: If you edit these files in place, they will be overwritten during the next upgrade of Control Center. Therefore, for production use, it is strongly recommended that you make copies of the files and host them under a different path. Speedtest Files These files should not be changed by the end user. • Speedtest.js − Speedtest implementation. • SpeedtestWorker.js − Internal Speedtest worker implementation. • SpeedtestLib.js − Library exposing the functionality of Speedtest.js and the REST API communication to the end user. Custom User Interface The following files constitute the example web page implementation. They exemplify how to use the SpeedtestLib.js library and how to connect it to the user interface in example.html. • example.html − Speedtest web page. • static/js/script.js − Connector between SpeedtestLib.js and the HTML. • static/js/gauge.js − User interface meter showing the data transfer speed in real time. • static/style.css − User interface styling. • static/logo.png − Logotype used on the web page.
3

Setup and Initialization

   IN THIS SECTION

        Speedtest-enabled Test Agent | 3

        ALLOWED_ORIGINS Setting for REST API | 3

        Web Server Redirection from HTTPS to HTTP | 4

        Hosting the Custom Speedtest Web Page with Control Center | 4

        Hosting the Custom Speedtest Web Page on a Separate Web Server | 5

        Including the Speedtest Library | 5

        Initializing Speedtest | 6

Speedtest-enabled Test Agent

The Test Agent that is to be used for the Speedtest measurements must be accessible from the web client
performing the Speedtest. In most cases, this means it must be accessible over the internet.

ALLOWED_ORIGINS Setting for REST API

In order for Speedtest to work, the Speedtest web page needs to be able to access the REST API. This
means we must add the hostname at which the Speedtest web page is hosted to the ALLOWED_ORIGINS
settings. If this is not done, the web browser will deny access to the REST API.

On your Control Center instance, open the file /etc/netrounds/restol.conf and add this setting:

  ALLOWED_ORIGINS=https://

where  is the Fully Qualified Domain Name (FQDN) where the Speedtest web page is hosted.

To learn about how the ALLOWED_ORIGINS setting works, read this article: https://
developer.mozilla.org/en-US/docs/Web/HTTP/Headers/Access-Control-Allow-Origin
4
To understand the big picture regarding Cross-Origin Resource Sharing (CORS), you will find this article
helpful: https://developer.mozilla.org/en-US/docs/Web/HTTP/CORS
Web Server Redirection from HTTPS to HTTP
Since the Speedtest feature in Paragon Active Assurance uses the unencrypted HTTP protocol for
maximum performance, it is important that any web client loading the page uses http:// in the URL.
However, when linking to this page, or when the protocol http:// is omitted by the user in the address bar,
web browsers will default to https://, which will cause issues with the Speedtest page.
For this reason, the built-in Speedtest feature in Paragon Active Assurance has a rewrite rule in the Apache
config to redirect any https:// requests to http:// for the Speedtest page.
It is recommended that you add such a rewrite rule for your custom Speedtest web page as well. See the
following subsections.
Hosting the Custom Speedtest Web Page with
Control Center
If you are hosting your custom Speedtest web page on the same web server as Control Center, you can
edit the file /etc/apache2/sites-available/netrounds-ssl.conf.
Below is the rewrite rule for the built-in Speedtest page:
## Rewrite rules
RewriteEngine On
RewriteRule ^/[^/]+/speedtest(?:-flash|-websocket)?/?$ http://%{HTTP_HOST}%
{REQUEST_URI} [R]
So to add a similar rule for the example web page you would write:
RewriteRule ^/static/speedtest_demo/example.html$ http://%{HTTP_HOST}%
{REQUEST_URI} [R]5
NOTE: If you upgrade Control Center to a new version, this file will be overwritten, so you will have
to re-add this rule after the upgrade.
Hosting the Custom Speedtest Web Page on a
Separate Web Server
If you are hosting the custom Speedtest web page on a different web server than the one where Control
Center is hosted, please refer to your web server documentation on how to add a similar rewrite rule.
Including the Speedtest Library
The Speedtest library needs to be included and initialized in the HTML file. In example.html this is done as
follows:
var account = 'dev';
var apiUrl = 'https:///rest';
var workerScriptPath = 'static/js/SpeedtestWorker.js';
initSpeedtest(apiUrl, workerScriptPath, account);
Explanations:
• var account = 'dev' − Short name of the account in Paragon Active Assurance.
• var apiUrl = 'https:///rest' − Replace this with the URL to the Paragon Active
Assurance REST API.
• var workerScriptPath = 'static/js/SpeedtestWorker.js' − Path where the worker script will be
accessible.6
Initializing Speedtest
In the file static/js/script.js, initSpeedtest sets up the callback functions, which will handle the Speedtest
responses.
function initSpeedtest(apiUrl, workerScriptPath, account) {
speedtest = new SpeedtestLib(apiUrl, workerScriptPath, account);
speedtest.setSnapshotResponse(resultSpeed);
speedtest.setResultResponse(resultDelay);
speedtest.setFailureResponse(failureHandler);
speedtest.setSuccessResponse(successHandler);
speedtest.getServers(setServerDropdown);
speedtest.getCategories(setCategoryDropdown);
The argument for each speedtest. function should be a callback function which handles the data sent by
SpeedtestLib.
• speedtest.setSnapshotResponse(resultSpeed) − partial results for the upload/download part of the
test; sent during the test run
• speedtest.setResultResponse(resultDelay) − partial results for the TCP/ICMP Ping part of the test; sent
during the test run
• speedtest.setFailureResponse(failureHandler) − sending the report to NCC failed
• speedtest.setSuccessResponse(successHandler) − sending the report to NCC succeeded
• speedtest.getServers(setServerDropdown) − list of available servers was fetched
• speedtest.getCategories(setCategoryDropdown) − list of available Speedtest categories was fetched
For example, the setServerDropdown callback function populates the available servers in the user
interface:
function setServerDropdown(serverList) {
serverList['items'].forEach(function(server) {
var option = document.createElement('option');
option.text = server['name'];
var serverString = server['test_agent_id'] + ':' + server['interface'] + '
' +
server['ip'] + ' ' + server['port'] + ' ' + server['test_length'] + '
' +7
server['tcp_sessions'];
option.value = serverString;
document.getElementById('dropdown-server').add(option);
});
}
Here, serverList is provided by SpeedtestLib.
For the other callback functions, please refer to static/js/script.js.
Starting and Stopping the Test
Starting and stopping a test is as simple as calling start and stop on the SpeedtestLib instance:
speedtest.start(server, category['id'], comment);
speedtest.stop()
This can be done from the web page by clicking the start and stop buttons. (The latter becomes visible
after you click start.)
The blue bar shows the progress of the test.
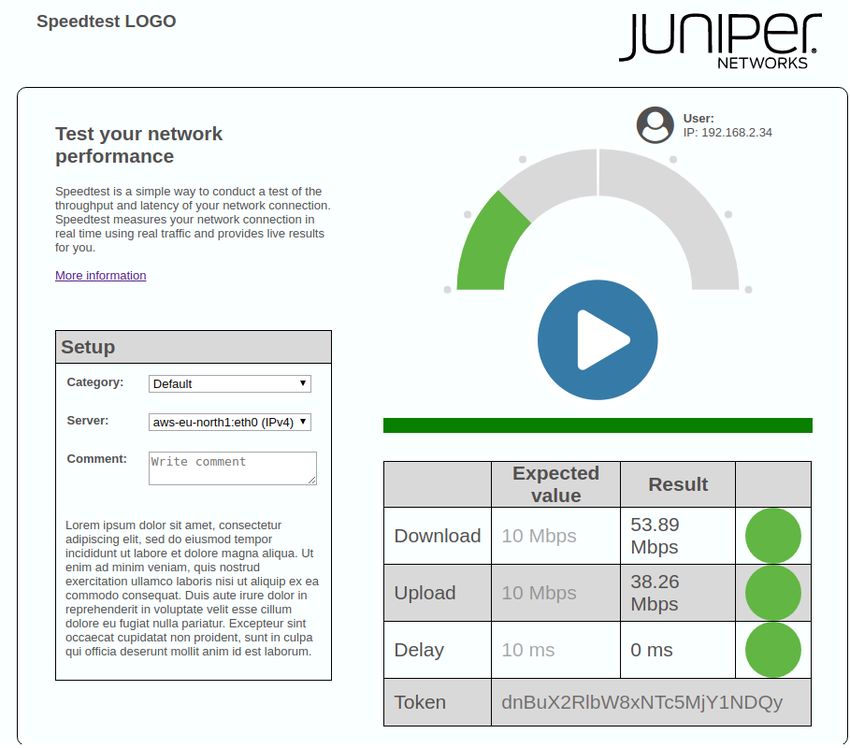
Test Results
The example GUI shows metrics and SLA indicators according to the screenshot below. The meter at the
top shows the current data transfer speed.
After the test has finished, full results are posted to the Paragon Active Assurance REST API automatically
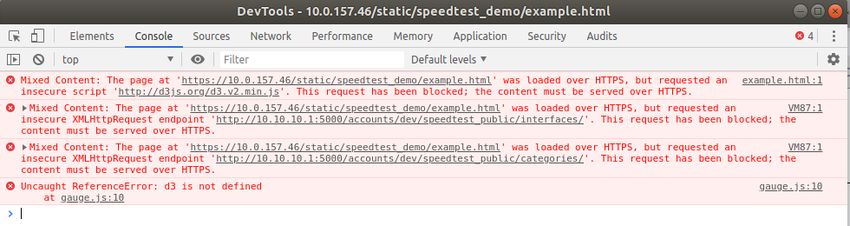
by SpeedtestLib, and either setSuccessResponse or setFailureResponse is called.8 Troubleshooting It is generally helpful to navigate to the Javascript console (“Developer tools” in Chrome) from the Speedtest page and check for error messages. • For example, if apiUrl is set incorrectly, you will see a “connection refused” message: • If the URL contains https://, you will get these messages:
9

• If ALLOWED_ORIGIN is wrongly configured, messages like these will appear:

  Access to XMLHttpRequest at
  'http:///rest/accounts/demo/speedtest_public/interfaces/' from origin
  'http://' has been blocked by CORS policy: No 'Access-Control-Allow-
  Origin'
  header is present on the requested resource.
  Access to XMLHttpRequest at
  'http:///rest/accounts/demo/speedtest_public/categories/' from origin
  'http://' has been blocked by CORS policy: No 'Access-Control-Allow-
  Origin'
  header is present on the requested resource.

• Something else to keep in mind if you are hosting your Speedtest web page on the same web server as
  Control Center is to avoid making inappropriate changes to the Apache configuration files. For example,
  it is crucial that ServerName be set identically in the files /etc/apache2/sites-available/netrounds.conf
  and /etc/apache2/sites-available/netrounds-ssl.conf. If these settings differ, the Speedtest page will
  not work.
You can also read