STONE project development case sharing STONE LCD + Arduino + Display Heart Rate
←
→
Page content transcription
If your browser does not render page correctly, please read the page content below
STONE project development case sharing

STONE LCD + Arduino + Display Heart Rate
Click to see the original:

https://www.instructables.com/id/How-to-Display-Heart-Rate-on-the-STONE-LCD-With-Ar/

https://www.hackster.io/yaruliuamy/how-to-display-heart-rate-on-the-lcd-with-arduino-2119a8

Before starting this project, I thought about some simple features:

     Heart rate data and blood oxygen data were collected
     Heart rate and blood oxygen data are displayed through an LCD screen These are the only two features, but if we
     want to implement it, we need to do more thinking:
     What master MCU is used?
     What kind of lcd displayer?

Then the basic electronic materials are determined as follows:

 1. Arduino Mini Pro development board
 2. MAX30100 heart rate and blood oxygen sensor module

3. STONE STVI070WT-01 LCD serial port display module

 4. MAX3232 module

Compile the code, download it to the Arduino development board, and begin testing.

We can see that when the finger leaves the MAX30100, the heart rate and blood oxygen show up as 0.Place your finger
on the MAX30100 collector to see your heart rate and oxygen levels in real time.

The effect is shown in the following figure:

STONE TOOL | Creates a Project Using STONE Display                                                   14 video
tutorials
Click to see the original:

https://www.instructables.com/id/STONE-TOOL-Creates-a-Project-Using-STONE-Display/

Step 1: Create New Project on TFT LCD Module With STONE Tool Box

Step 2: Basic Button Function Instruction on STONE TFT Touch Screen Module

Step 3: Animation Picture/Slides Function Instruction on STONE TFT LCD Module

Step 4: Keyboard Setting Instruction on STONE TFT Display With Touch Screen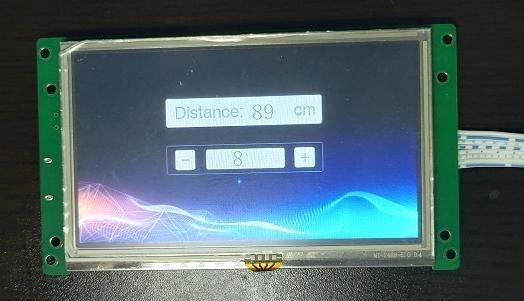
Step 5: RTC Setting on TFT LCD Display Module With Touch Screen on STONE Tool Box

Step 6: STONE Intelligent TFT LCD Module Tool Box Hardware Setting-1

Step 7: STONE Intelligent TFT LCD Module Tool Box Hardware Setting-2

Step 8: ASC II Input Instruction on TFT Screen Module Touch LCD With STONE Tool Box

Step 9: Variable & Animation Icon Instruction on TFT Touch Module With STONE Tool Box

Step 10: Art Word Variable Instruction on TFT Display Module With STONE Tool Box

Step 11: Icon Rotation Instruction on TFT Display Module With Touch Screen STONE Tool Box

Step 12: Command Set and Serial Port Communication on TFT Module With STONE Tool Box

Step 13: Real-Time Curve Instruction on TFT Screen Module With STONE Tool Box

Step 14: Basic Graphic Instruction on TFT Module Display With STONE Tool Box

use the STONE STVC050WT-01 touch display module to make a simple
household appliance control system
Click to see the original:

https://www.instructables.com/id/Tutorial-Make-a-Home-Appliance-Control-System-on-S/

Function:

When the light button is pressed, the page jumps to 2 to display the on-off status of the three lights.When the on-off/off-
light button is pressed, the serial port of the screen module emits the switch signal protocol, and the external MCU can
directly send data to the screen module through the serial port.Let the screen display the light's on-off status directly.

Use STONE Screen Create Refrigerator Controls
Click to see the original:

https://www.instructables.com/id/Use-STONE-Screen-Create-Refrigerator-Controls/

The effect is as follows:

There are few controls, just the digital text display control and the incremental adjustment control, but these two
controls are enough to do what is needed.

 1. The upper part of the UI interface is the relevant control of the refrigerator, showing the current temperature, the
    working power supply of the refrigerator and the key operation for adjusting the power supply.The "quick" button
    means you can set the power to the maximum with one click.
 2. In the middle of the UI interface is the relevant control of the refrigerator, which shows the current temperature of
    the refrigerator, the working power supply of the refrigerator and the key operation used to adjust the power
    supply.The "quick" button means you can set the power to the maximum with one click.
 3. At the bottom of the UI interface are some status displays, through which users can visually check the operating
    days of the refrigerator, filter life, outdoor temperature and indoor temperature.

Operation status includes: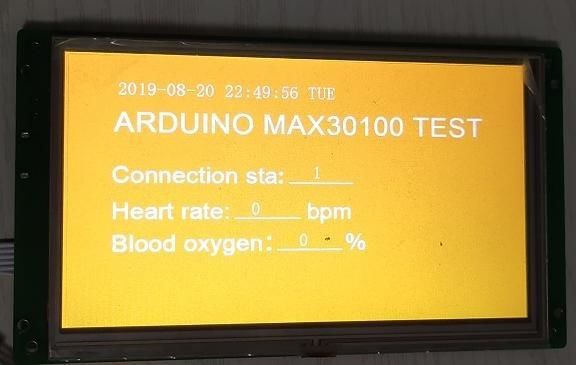
1. business day
2. Filter life
3. Outdoor temperature
4. Room temperature
In order to obtain these data, the other three, in addition to the first one, also need corresponding sensors to collect
these data.The filter life acquisition sensor and temperature sensor are required respectively.When the SCM collects
the data, it sends the data to the specified display control address through the serial port, and the value of the display
control changes accordingly.
The runtime can be achieved in two ways:
1. Use the RTC of the display screen in the serial port of STONE STVC050WT-01to display data directly on the
screen.
2. The RTC of SCM is used to transmit data to the serial port screen for display. The serial port display of STONE
STVC050WT-01is provided randomly.RTC, can be found in STONE's development guide.
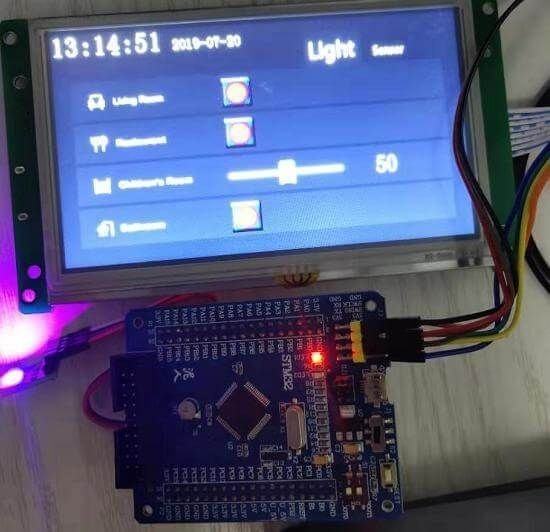
STONE LCD + STM32 LCD Light control
Click to see the original:
https://www.instructables.com/id/STONE-LCD-STM32-LCD-Light-Control/
This project consists of the above two pages.The "Light" and "Sensor" in the upper right corner are the on-off buttons
for these two pages.On the "Light" page, you can control the lighting in your home.In the sensors page, you can
examine the values detected by various sensors.
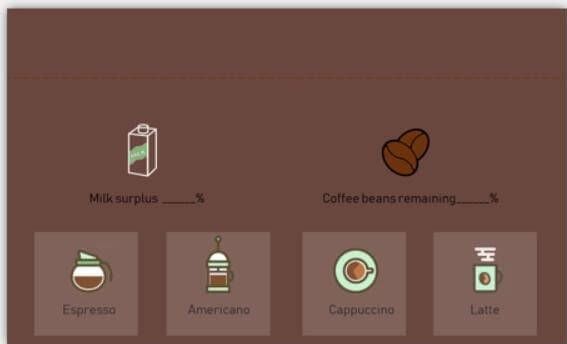
STONE Display +STM32 +Coffee Maker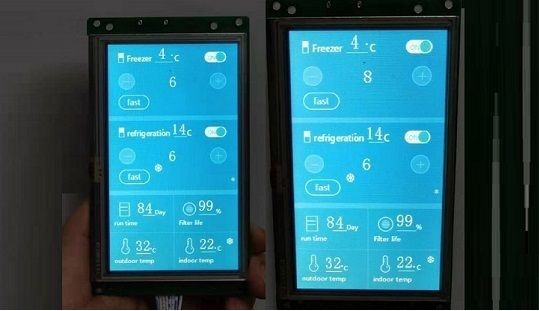
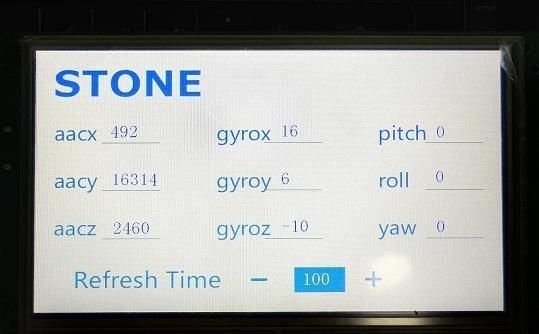
Click to see the original:

https://www.instructables.com/id/STONE-Display-STM32-Coffee-Maker/

This project has the following functions:

Displays the current time and date

There are four buttons on the display for americano, latte, cappuccino and espresso.)

Displays the current amount of remaining coffee beans, milk, and coffee sugar

A text display box displays the current state With these concepts in mind, you can design a UI interface.

STONE LCD Module Acceleration Gyroscope Sensor
Click to see the original:

https://www.instructables.com/id/STONE-LCD-Module-Acceleration-Gyroscope-Sensor/

Following Picture for the Operation Effect:

Ultrasonic module test with STONE lcd Module
Click to see the original:

https://www.instructables.com/id/UltrasonicmoduletestwithSTONElcd-Module/

The distance measured by the ultrasonic module can be seen in the STONE display screen. In addition, the distance
refresh time can be adjusted through the "+" and "-" buttons above the motor display module.
Fingerprint Module Test With STONE TFT LCD

Click to see the original:

https://www.instructables.com/id/Fingerprint-Module-Test-With-STONE-TFT-LCD/

A total of three hardware modules are used:

     STM32 development board
     The fingerprint module
     STONE stvc050wt-01 LCD display

Function

1) sensitive fingerprint sensing and fast identification speed: the fingerprint module adopts high-precision optical path
and imaging components, so it only needs to be used with hands

The finger lightly presses, can recognize quickly.

2) first, stability: this module adopts the advanced digital processing chip imported from ST company STM32F205 as
the processor, which has the characteristics of low power consumption and fast speed and stability, followed by the
domestic chip, and the stability of other platform chips is at least 30%.

3) scientific structure: the module adopts split structure, fingerprint sensor + processing board + algorithm platform,
and the board is stable.Adopt standard 16P universal interface;Sensors can be independently selected and replaced
with optical and semiconductor sensors.Use business algorithms.

4) easy to develop: serial port UART operation (with serial port directly connected to any SCM), the operation is very
simple, and equipped with PC Demo software, learning software, MCU routines and related tools.

5) openness: it can input and output fingerprint pictures, fingerprint eigenvalue files and various fingerprint operations
freely.

Application solutions

Fingerprint product development: fingerprint lock, fingerprint safe, fingerprint access control, fingerprint attendance
development

Fingerprint integration applications: integrated in a variety of security products, such as intercom, switches, personnel
identification, permission management.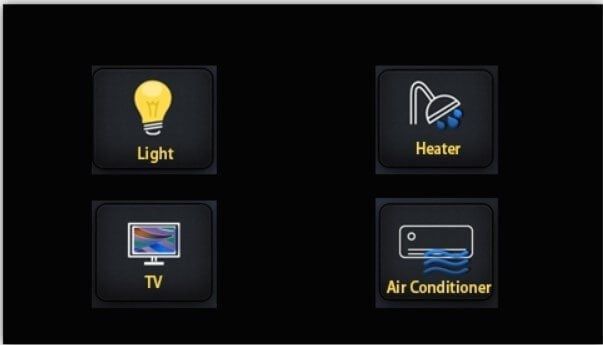
You can also read