Creating Sony AVC/AAC Video Using Vegas
←
→
Page content transcription
If your browser does not render page correctly, please read the page content below
Page 1

Creating Sony AVC/AAC Video Using Vegas®

Author: Sony Media Software
Date: 8 March 2006
Contact email: md-Feeds@sonyconnect.com
Contact address:
      Sony Media Software
      Attn: Engineering, PSP Team
      1617 Sherman Ave
      Madison WI 53704
      USA

        Copyright 2006 Madison Media Software, a division of Sony Corporation of America.
                      Do not distribute without permission from the author.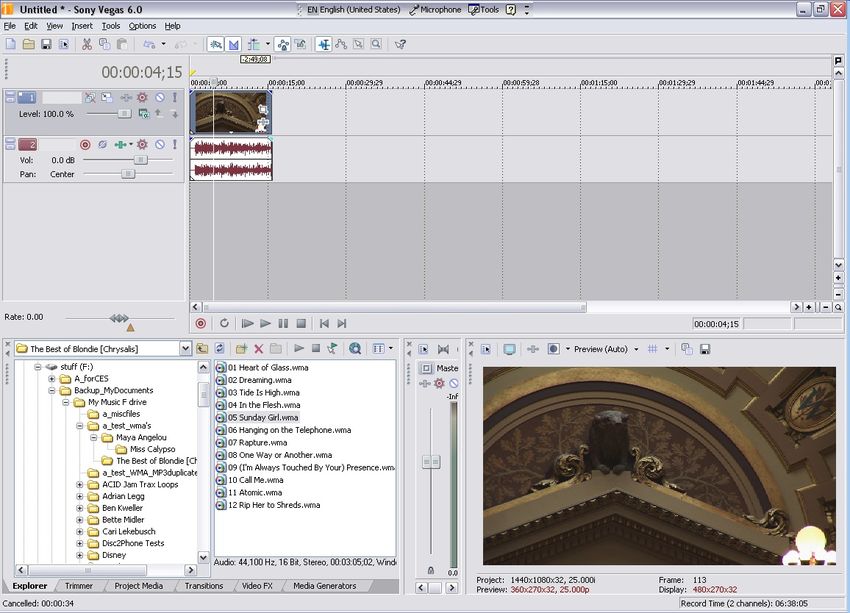
Page 2

Introduction
This document describes how to create MPEG-4 videos that are ready for PSP™ playback. The
document is organized into these sections.
   •   Exporting a Movie to a PSP™
   •   Distributing Video
   •   Tips
   •   Screenshots

The software used to create MPEG-4 video is called Sony Vegas, created by Sony Media
Software.
Sony Media Software manages the following media creation software titles: Sound Forge®
software, Vegas® software, CD Architect™ software, DVD Architect™ software, ACID® PRO
software, Sony Sound Series™ music and sound effects libraries, Sony Vision Series™
graphics, animations and stock footage libraries, Noise Reduction™ Plug-In, Vegas Movie
Studio™ software, ACID Music Studio™ software and Sound Forge Audio Studio™ software.
The team also runs the ACIDplanet™ online service (www.ACIDplanet.com), a worldwide
community for progressive musicians.
You can learn more about Vegas and other products here: www.sonymediasoftware.com

Exporting a Movie to a PSP™
At the end of these steps, two files are created and copied to the PSP™: one file that is the
movie file, and one file that is the thumbnail that appears in the PSP™ navigation.
From the Tools menu, choose Export to PSP™ (PlayStation®Portable) to convert your
project to Sony AVC/AAC (*.mp4) format and transfer it to a USB-connected PSP™.
Notes:
   •   PSP™ firmware version 2.0 is required to use this feature. To check your firmware
       version, choose Settings > System Settings > System Information on the PSP™. For
       the latest firmware, go to http://us.playstation.com (in the United States) or
       http://www.playstation.com (outside the United States).
   •   If you're using high-resolution video, choosing Best from the Full-resolution
       rendering quality drop-down list on the Video tab of the Project Properties dialog
       before exporting your movie can prevent resizing artifacts.

This feature is available only in the full version of Vegas software.

1. Click in the timeline to position your cursor on the frame you want to use to represent your
   movie. This image will be displayed as a thumbnail on the PSP™ device.
2. Connect the USB cable and AC adapter to the PSP™ and place it in USB mode.
3. From the Tools menu, choose Export to PSP™ (PlayStation®Portable). The Export to
   PSP™ (PlayStation®Portable) dialog is displayed.
       TIP: If you want to render an AVC video without transferring to a PSP™, use the
       Render As dialog and choose Sony AVC/AAC (*.mp4) from the Save as Type drop-

          Copyright 2006 Madison Media Software, a division of Sony Corporation of America.
                        Do not distribute without permission from the author.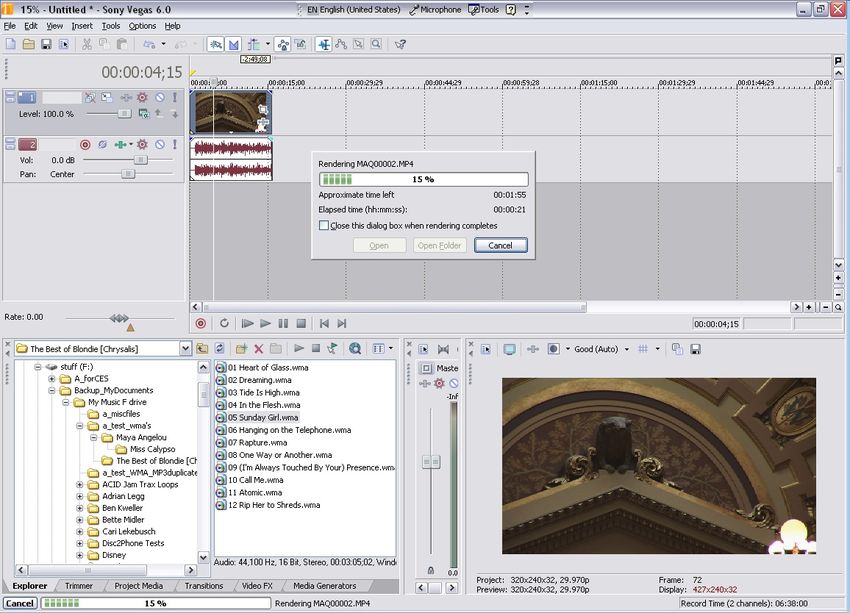
Page 3
       down list. Name the rendered file in the format MAQ0nnnn.MP4 (where nnnn is a
       number) to conform to the file-naming convention.
4. The Title box displays the title of your project from the Summary tab of the Project
   Properties dialog. This title will be displayed on the PSP. Editing the title in the Export to
   PSP™ (PlayStation®Portable) dialog will also update the Project Properties dialog.
5. The File path box displays the folder and file name that will be used to render your movie.
       TIP: If you want to replace an existing movie, choose its name from the File path
       drop-down list.
       Click the Refresh button if you need to rescan the device.
6. Choose a setting from the Template drop-down list to specify the settings that will be
   used to save your file.
       TIP: The settings for the selected template are displayed in the Description box.
7. Select the Render loop region only check box if you only want to render a portion of
   your project. If the check box is cleared, the entire project will be rendered to a new file.
8. Select the Stretch video to fill output frame size (do not letterbox) check box if you
   want to reformat your video so it fills the output frame size listed in the Description box.
   When the check box is cleared, the current aspect ratio is maintained and black borders
   are added to fill the extra frame area (letterboxing). This option is useful when the desired
   output format does not match the frame aspect ratio of your project.
9. Click OK. Your movie file is created and transferred to the PSP™ using the correct folder
   structure and file names.

          Copyright 2006 Madison Media Software, a division of Sony Corporation of America.
                        Do not distribute without permission from the author.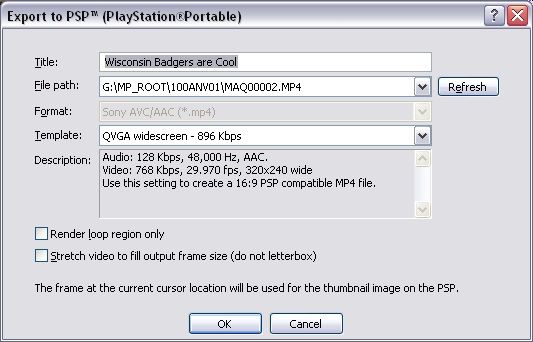
Page 4

Distributing Video
Vegas creates two files during every Export to PSP™ task: one file is the movie file, and one
file is the thumbnail that appears in the PSP™ navigation system.
A common method for distributing a video clip is to put the two files into a single ZIP file.
Once in a ZIP file, the video can be easily distributed via a Web download or an web feed
using the RSS 2.0 specification with enclosures.
You can find the two files on the Memory Stick Duo within the PSP™. Look for the folder you
specified during export, ie "G:\MP_ROOT\xxxANV01."
The video file has this format: "MAQ0xxxx.MP4". The thumbnail file has this format:
"MAQ0xxxx.THM"
Select the pair of files, and copy them to a work folder on the PC. With Windows XP, you can
right-click them, then choose Send To and then choose Compressed (zipped) folder to
create a single ZIP file.
Tips:
1. Put only one video per ZIP file.
2. Change the numbering on the MP4/THM if you need to, as long as you keep them
   matching.
3. You can rename the ZIP file to anything; it doesn't have to be called MAQ0xxxx.ZIP.
4. Sony PSP™ (PlayStation® Portable) Media Manager is a consumer software product for the
   PC. The software provides the easiest way to move movies, music and more to your PSP™
   system. When the software detects a ZIP file that contains video, it automatically unzips
   the ZIP file and puts the video and thumbnail into the correct location on the PSP™.
5. For more information about web feeds and RSS 2.0, visit this URL:
   http://blogs.law.harvard.edu/tech/rss
Alternatively, if you know your target audience will be using PSP™ firmware version 2.80 or
later, you can rename the .MP4 file with a descriptive name and make it available to download
using the Internet Browser in the PSP™, or link to the file from an RSS feed to be handled
by the RSS Channel feature in the PSP™. When downloaded into the “\VIDEO” folder (or a
sub--folder below that) the PSP™ shows the filename in the Video viewer. The custom
thumbnail is not shown.

          Copyright 2006 Madison Media Software, a division of Sony Corporation of America.
                        Do not distribute without permission from the author.
Page 5
Tips
For everyone:
1. Because Vegas creates AVC/AAC files, the MP4 files created by Vegas require PSP™
firmware 2.0 or higher. The video will not play on lower versions of the firmware.
2. Use Sony Vegas version 6.0d or higher. Earlier versions of Vegas had a problem with
colors in MP4 files. Version 6.0d fixes the problem.
3. Always play your clip on a PSP™ before distributing. This ensures that you have the
expected playback experience. We also recommend testing in all playback sizes (Normal,
Zoom etc)
4. Start with the best quality source material. If you have access to the video-sized clip, it
will work better than the Web-downloadable clip. 16:9 content looks better on a PSP™
than 4:3 content since it takes better advantage of the device’s screen shape.
5. Step 8 of the “Exporting a Movie to a PSP™” procedure explains how to use the Stretch
video to fill output framesize check box. This feature is great for individual users, but
not recommended for content publishers (ie. SCEA, Sony Pictures).
6. There are two bit rates to choose from: 512 Kbps and 896 Kbps. The selection 512 Kbps is
a good choice if you want to minimize storage space or download time. The selection 896
Kbps displays less macroblocking on scenes with lots of movement.
7. There are two frame aspects to choose from: QVGA or QVGA widescreen. Both are
encoded to 320x240 pixels. QVGA widescreen uses anamorphic widescreen encoding,
which is properly decoded on the PSP™.
8. Use the Automatic frame size templates with caution. Current firmware versions (2.6
and earlier) have no problem playing video encoded with these templates. However, the
concern is that the video files may not play on other devices, or future PSP™ system
firmware.
The Automatic frame size templates automatically choose between 320x240 encoding
for 4:3 projects and 368x208 encoding for 16:9 projects. There is a fair amount of content
that uses 368x208 instead of 320x240 widescreen for 16:9 content.
For advanced users: tips for people experienced with video-editing tools
1. From the File menu, choose Properties, click the Video tab, and set Full-resolution
rendering quality to Best. This will use the best scaling quality in Vegas for scaling down
your source material. This is absolutely required if you're using high-definition sources
(e.g., HDV).
2. Do not distribute 16:9 content letterboxed with a 4:3 video because the PSP™ will add
pillarboxes during playback. The end result will have black bars all the way around the
video. Here is how to avoid this problem: if your source is widescreen with letterboxing,
use the Pan/Crop feature in Vegas to remove it. Right-click the video event, choose Video
Event Pan/Crop, and then choose 16:9 Widescreen TV aspect ratio from the Preset
drop-down list.
One way you can tell if you need to Pan/Crop is to change the preview window to Simulate
Device Aspect Ratio. Right-click the preview window and select Simulate Device Aspect
Ratio. If you see black bars all around the image, consider using Pan/Crop.
Copyright 2006 Madison Media Software, a division of Sony Corporation of America.
Do not distribute without permission from the author.Page 6
3. Be mindful of source pixel aspect ratio if your source clip doesn't encode it, and Vegas
doesn't figure it out automatically. This isn't a problem with DV, HDV, or standard "video"
resolutions (such as 720x480), but could be a problem with odd-sized sources (such as
360x240). You can manually set a clip's pixel aspect ratio in the Media Properties.
4. If you need to adjust the color range used, you can use the "Levels" plug-in, perhaps with
the Studio RGB to Computer RGB preset. While this will increase contrast, be aware
that the PSP™ device’s LCD screen has a higher latency with lower levels, and this might
cause smearing during playback. Staying with "video levels" (black = 16) prevents this.
5. The “Automatic frame size” templates use the project frame aspect ratio, not the clip’s. If
you choose to use these templates, set your project format to "DV" for 4:3 output and "DV
widescreen" for 16:9 output.
6. If you don't want to tie up a physical PSP™ for rendering using the "Export to PSP™"
feature, create a "\PSP" folder on any mounted flash drive (Memory Stick, USB drive, card
reader, etc.). Vegas will treat the removable drive like a PSP™.
7. If you want to maintain a consistent numbering scheme (i.e, not reusing MAQ0xxxx
numbers), but don't have enough room to store every rendered file, simply leave just the
last file, the “Export to PSP™” feature will pick the "next" number after it. This can also be
used to start out with numbering other than 0001: rename your first rendered file to the
new scheme, and Vegas will pick up the number after that.
Copyright 2006 Madison Media Software, a division of Sony Corporation of America.
Do not distribute without permission from the author.Page 7
Screenshots
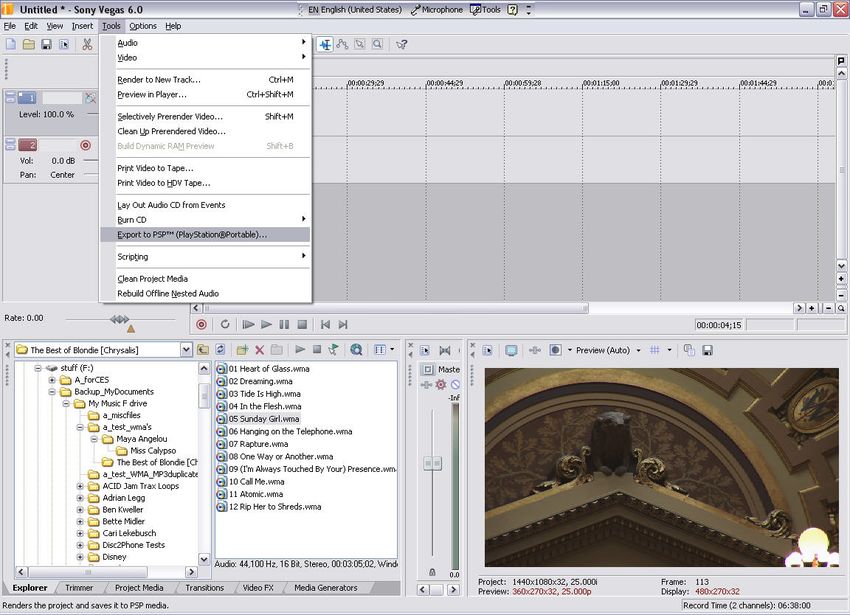
These screenshots are reference points for working in Vegas. The video sample is from HD
source, and the preview window is set to Simulate Device Aspect Ratio.
1. Create the video you want to export as a Vegas project.
Copyright 2006 Madison Media Software, a division of Sony Corporation of America.
Do not distribute without permission from the author.Page 8
2. From the Tools menu, choose Export to PSP™ (PlayStation®Portable)
Copyright 2006 Madison Media Software, a division of Sony Corporation of America.
Do not distribute without permission from the author.Page 9
3. The Export to PSP™ (PlayStation®Portable) dialog displays.
Copyright 2006 Madison Media Software, a division of Sony Corporation of America.
Do not distribute without permission from the author.Page 10
4. Vegas renders the file to the PSP™, using the correct folder structure and filenames.
Copyright 2006 Madison Media Software, a division of Sony Corporation of America.
Do not distribute without permission from the author.You can also read