Debian Container User Guide - September 10, 2021
←
→
Page content transcription
If your browser does not render page correctly, please read the page content below
Debian Container
   User Guide

  September 10, 2021
Contents
1 Introduction                                                                                                                           3

2 Container Access via SSH                                                                                                               4

3 Security Configuration                                                                                                                 5

4 Basic Container Development                                                                                                            7
  4.1 Install Debian Packages . . . . . . . . . . . . . . . . . . . . . . . . . . . . . . .                                              7
  4.2 Copy Your Own Code . . . . . . . . . . . . . . . . . . . . . . . . . . . . . . . .                                                 7

5 Create Your own Customized Web Application                                                                                             8
  5.1 Current Implementation . . . . . . . . . . .      .   .   .   .   .   .   .   .   .   .   .   .   .   .   .   .   .   .   .   .    8
  5.2 Setup Go Environment - Linux . . . . . . .        .   .   .   .   .   .   .   .   .   .   .   .   .   .   .   .   .   .   .   .    8
  5.3 Setup Go Environment - Windows . . . . .          .   .   .   .   .   .   .   .   .   .   .   .   .   .   .   .   .   .   .   .    9
  5.4 Create a New gRPC Method . . . . . . . . .        .   .   .   .   .   .   .   .   .   .   .   .   .   .   .   .   .   .   .   .   10
  5.5 Create a New REST Path in HTTPS Server            .   .   .   .   .   .   .   .   .   .   .   .   .   .   .   .   .   .   .   .   11
  5.6 Build and Deploy Web Application . . . . .        .   .   .   .   .   .   .   .   .   .   .   .   .   .   .   .   .   .   .   .   12
  5.7 Add Frontend Client Call . . . . . . . . . . .    .   .   .   .   .   .   .   .   .   .   .   .   .   .   .   .   .   .   .   .   13

6 Deploy Application                                                                        14
  6.1 Export via Web UI . . . . . . . . . . . . . . . . . . . . . . . . . . . . . . . . . . 14
  6.2 Create Customized Universal Tar . . . . . . . . . . . . . . . . . . . . . . . . . . 15

7 Contact & Support                                                                                                                     17
September 10, 2021
1 Introduction
This guide explains how to deploy your own application with the Debian container for peri-
MICA. The container can be downloaded from https://downloads.perinet.io/ and can
be installed via the install menu of the periMICA.
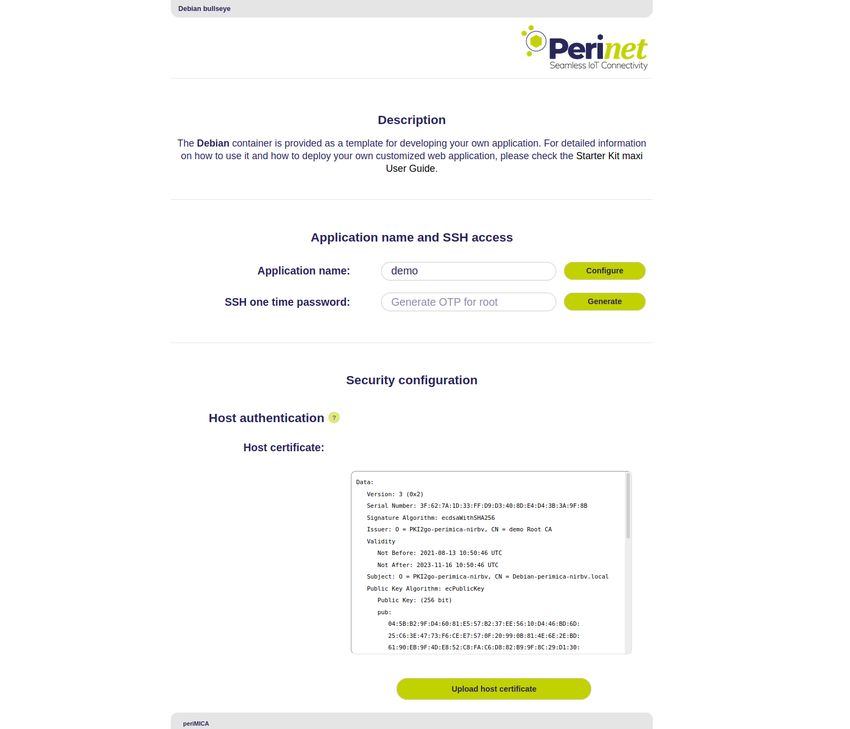
You can access the container Web UI (Figure 1) by clicking on the container icon on the
home page:
Figure 1: Web UI of debian bullseye container
Debian Container User Guide - 1.0 Page 3
September 10, 2021
2 Container Access via SSH
The container can be accessed via SSH (e.g. ssh root@bullseye-mica-abcde.local ). The
necessary password can be generated as one time password on the web UI of the container.
It is also possible to use public-private-key authentication to prevent generating a password
every time, by adding your public key to the authorized_keys file of the container.
Under Linux the ssh-copy-id script can be used:
$ ssh −copy − i d root@Debian − p e r i m i c a − n i r b v . l o c a l
The a u t h e n t i c i t y of host ’ debian − p e r i m i c a − n i r b v . l o c a l ( fe80 : : a : eddd : cd59:8005% eth0 ) ’ can ’ t be e s t a b l i s h e d .
ECDSA key f i n g e r p r i n t i s SHA256 : v7M03mC+Rg4mKWusSuf0hJNyD1EvAs83EHXYKU1wrCY .
Are you s u r e you want to c o n t i n u e c o n n e c t i n g ( yes /no / [ f i n g e r p r i n t ] ) ? yes
/ u s r / b i n / ssh −copy − i d : INFO : a t t e m p t i n g to l o g i n with the new key ( s ) , to f i l t e r out any t h a t a r e a l r e a d y i n s t a l l e d
/ u s r / b i n / ssh −copy − i d : INFO : 2 key ( s ) remain to be i n s t a l l e d −− i f you a r e prompted now i t i s to i n s t a l l the new keys
root@debian − p e r i m i c a − n i r b v . l o c a l ’ s password :
Number of key ( s ) added : 2
Now t r y l o g g i n g i n t o the machine , with : " ssh ’ root@Debian − pe r i m i c a − n i r b v . l o c a l ’ "
and check to make s u r e t h a t o n l y the key ( s ) you wanted were added .
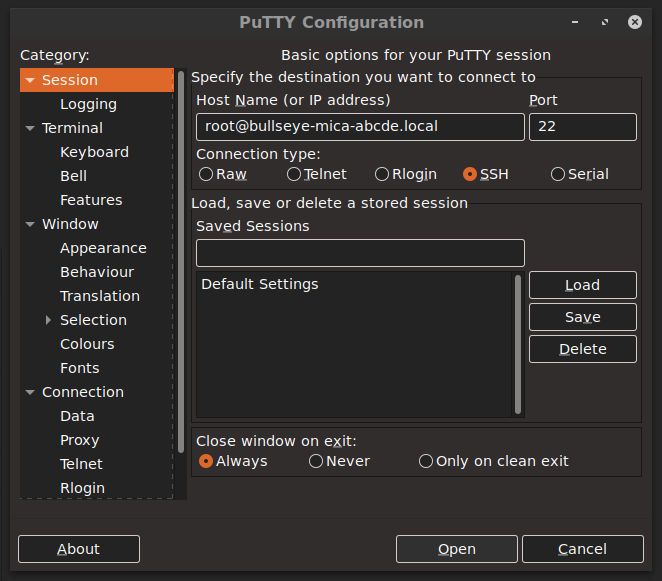
Windows users can download the SSH client PuTTY from www.chiark.greenend.org.uk.
Figure 2: Connect to container with SSH client
Debian Container User Guide - 1.0 Page 4September 10, 2021 3 Security Configuration The security configuration is usually done automatically when using the PKI2go container. Please refer to the PKI2go Container User Guide [1] for a detailed explanation of the secu- rity features and the certificates needed. However, the security configuration can also be done separately or manually, using the provided web-based user interface. Initial Self Signed Certificate During the container installation, an initial self-signed certificate is created automatically. The first access to a new container will be authenticated by this new certificate and security warnings are expected on client side. Before configuring the security in the container, the security warnings can be ignored. Certificates Configuration The Web UI provides input sections for the two certificates, the Host certificate and the Root certificate, that can be configured in the container. The certificate encoded and visible in the text area of each certificate is the current stored certificate. If the text area is empty, no certificate has been stored. The container accepts X.509 certificates, which have been encoded with the PEM format (Base64 ASCII). Usually, the encoding scheme is reflected in the extension .pem , but .crt , .cer and .key have also been observed using this scheme. The Host certificate is expected to be uploaded with concatenated corresponding private key at the end. A Root certificate is expected to be uploaded without the private key. Enforce mTLS access Enabling the mTLS feature forces any remote client to authenticate towards the periMICA container with a valid Client certificate. The Client certificate will be validated with the stored Root certificate. Note: Before enabling ’Enforce mTLS access’ ensure that a valid Root certificate has been stored. Debian Container User Guide - 1.0 Page 5
September 10, 2021

With mTLS enabled in the container, only clients with valid certificates will be allowed the
access, according to the encoded user role.

For more details on how to generate certificates, please refer to https://docs.perinet.io.

Security Reset
The Reset security button provides the option to reset the security configuration.

This operation will create a new self-signed host certificate and remove any other certifi-
cates. The previously configured Root certificate will be lost.

The mTLS will be disabled after a security reset, which means that the access to the con-
tainer is not protected anymore.

Note: Make sure to have a backup of important information before resetting security.

Debian Container User Guide - 1.0                                                      Page 6
September 10, 2021

4    Basic Container Development
4.1 Install Debian Packages
To install application and libraries for your needs, the debian apt-get utility can be used.
For example installing an MQTT broker:

# update package index
apt-get update
# search for mqtt broker mosquitto
apt-cache search mosquitto
# install mosquitto
apt-get install mosquitto

For further debian documentation please visit https://www.debian.org/doc/.

4.2 Copy Your Own Code
Already written code (e.g. python scripts) can be deployed to the container via scp, e.g.
scp example_script.py root@bullseye-mica-abcde.local:/root/example_script.py

Debian Container User Guide - 1.0                                                   Page 7
September 10, 2021

5     Create Your own Customized Web Application
5.1 Current Implementation
All debian-based containers use an https server with REST interface which is connected to
a grpc server running on the loopback network interface. The https server is running as
‘web‘ user, whereas the grpc server has full permission. Basically, client requests will be
forwarded to the grpc backend, which is then performing the actual functionality.

As security is fundamental in IoT, the default container web server provides the possibility
to enable client certificate authentication. With this, the container https server requires
clients to pass, on each request, a trusted client certificate with an encoded user-role. The
server then decodes the certificate and its corresponding user-role, granting/denying per-
mission on the respective operation.

The following REST calls represent the necessary commands to setup a secure container
web service:

    • /security - GET and PATCH, JSON ( {"enable_user_role":} ) to en-
      able/disable client certificate authentication.

    • /security/host-cert - GET and PATCH the host certificate of the container web
      server. The host certificate must be passed with the private key appended or prepended.

    • /security/root-cert - GET and PATCH the root certificate of the container web
      server.

    • /security/reset - PATCH the security parameters to default configuration.

5.2 Setup Go Environment - Linux
The https server and attached grpc server of periMICA containers is written in Go. It is
recommended to use the existing web server implementation by just extending it with new
REST calls, to make direct use of security features instead of reimplementing them. As com-
piling Go code on the container itself is time consuming, cross-development is presented
in the following chapter. In order to install Go under Linux (Ubuntu 18.04 was used in the
example) on your host, call via command line:

curl -O https://dl.google.com/go/go1.12.7.linux-amd64.tar.gz
tar xvf go1.12.7.linux-amd64.tar.gz
chown -R root:root ./go
sudo mv go /usr/local/
echo "export GOROOT=/usr/local/go" >> ~/.profile

Debian Container User Guide - 1.0                                                   Page 8
September 10, 2021 echo "export GOPATH=$HOME/work" >> ~/.profile echo "export GOBIN=$HOME/work/bin" >> ~/.profile echo "export PATH=$PATH:/usr/local/go/bin:$HOME/work/bin" >> ~/.profile source ~/.profile Next, install necessary Go packages and dependencies: WORK=$HOME/work # adapt this to your needs mkdir $WORK git clone -b v1.35.0 https://github.com/grpc/grpc-go $WORK/grpc-go export PATH="$PATH:$(go env GOPATH)/bin" RELEASE_HTTPS="https://github.com/protocolbuffers/protobuf/releases" curl -LO $RELEASE_HTTPS/v3.15.8/protoc-3.15.8-linux-x86_64.zip go get -u github.com/golang/protobuf/protoc-gen-go go get -u google.golang.org/grpc/cmd/protoc-gen-go-grpc unzip protoc-3.15.8-linux-x86_64.zip -d $HOME/.local export PATH="$PATH:$HOME/.local/bin" git clone https://github.com/googleapis/googleapis.git $WORK/googleapis In order to test your installation, copy the containerservice folder residing in /var/www/ of your Debian development container to your host machine via scp. Initialize your service: cd (your-host-containerservice-path)/containerservice go mod init containerservice And finally build https server and gRPC server: protoc --go_out=./proto -I$WORK/googleapis/ -Iproto/ --go_opt=paths=\... source_relative --go-grpc_out=./proto --go-grpc_opt=paths=\... source_relative proto/*.proto GOOS=linux GOARCH=arm go build -o go_webserver webserver/main.go GOOS=linux GOARCH=arm go build -o go_grpc_server grpc_server/main.go 5.3 Setup Go Environment - Windows Install Go by using the Windows installer file from https://golang.org/dl/. Make sure to add the bin folder of the GOPATH Environment variable (you can get the GOPATH variable from command line via go env GOPATH ). After that, go to https://github.com/protocolbuffers/protobuf/releases/ and down- load the precompiled protobuf-compiler, named after the pattern protoc--win64.zip. Debian Container User Guide - 1.0 Page 9
September 10, 2021

Unpack the contents to a path of your choice. Make sure to add the bin path of the unpacked
directories to your environment PATH.

Download the git repository .zip file from https://github.com/googleapis/googleapis
and unpack it as well to a directory of your choice. Next, call via Windows cmd :

go get -u github.com/golang/protobuf/protoc-gen-go
go get -u google.golang.org/grpc/cmd/protoc-gen-go-grpc

Now test your installation by copying the containerservice folder residing under /var/www
inside your Debian development container to your host.

cd (your-host-containerservice-path)\containerservice
go mod init containerservice
go mod tidy

And finally build https server and gRPC server:

 protoc --go_out=./proto -I/gooleapis-master/\...
-Iproto/ --go_opt=paths=source_relative --go-grpc_out=./proto\...
--go-grpc_opt=paths= source_relative proto/*.proto

set GOOS=linux
set GOARCH=arm
go build -o go_webserver webserver/main.go
go build -o go_grpc_server grpc_server/main.go

5.4 Create a New gRPC Method
Note: In the following chapters, commands will be used from Linux OS perspective, they will dif-
fer slightly on Windows OS when it comes to finally building the application. Given file and folder
paths will be assumed relative to (your-host-containerservice-path)/containerservice

Inside the proto folder, create a new file named custom.proto with the following content:

syntax = "proto3";
import "google/protobuf/empty.proto";
import "google/api/annotations.proto";
option go_package = "containerservice/proto";
package perinet.api.periCONTAINER.custom;

service PeriContainerCustom {
    rpc GetCustom (google.protobuf.Empty) returns ( Custom ){

Debian Container User Guide - 1.0                                                       Page 10
September 10, 2021
option (google.api.http) = {
get: "/custom"
};
};
}
message Custom {
string custom_var = 1;
}
Implement the registered GetCustom method inside grpc_server/main.go by adding:
func (s *customServer) GetCustom(ctx context.Context, in *pb.Empty)\...
(*pb.Custom, error) {
return &pb.Custom{CustomVar:"my custom string"}, nil
}
Add a typedef after the header in this file and also add context package to the imports:
type customServer struct {
pb.UnimplementedPeriContainerCustomServer
}
And finally, register your service in the main by adding:
pb.RegisterPeriContainerCustomServer(s, &customServer{})
5.5 Create a New REST Path in HTTPS Server
Although a new gRPC method was added in the chapter before, the user actually has no
access to it, because it is not yet registered on the https server REST interface. Therefore,
create a file helper/rest_custom.go with the following content:
package containerservice
import (
"net/http"
"containerservice/helper/api"
pb "containerservice/proto"
)
func AddCustomEndpoints(em *api.EndpointManager) {
Debian Container User Guide - 1.0 Page 11September 10, 2021
e := api.New("/custom")
e.Get = api.RestMethod { api.READER, func(env api.ReqEnv) {
w := env.Resp
c:= pb.NewPeriContainerCustomClient(env.GrpcConn)
m, _:= c.GetCustom(env.GrpcContext, &pb.Empty{})
w.Header().Set("Content-type", "application/json; charset=utf-8;")
w.WriteHeader(http.StatusOK)
w.Write([]byte("{\"custom_var\":\"" + m.CustomVar + "\"}"))
}}
*em = em.AddEndpoints([]api.Endpoint{e})
}
Now call the newly created function inside webservice/main.go by adding
containerservice.AddCustomEndpoints(&endpointManager)
to the main function. This will enforce the https server to listen on /custom URL as well
as existing URL paths. In case a client request is received on /custom , the https server re-
quests the gRPC method GetCustom and returns the response as JSON to the client. When
client certificate authentication is enabled, the REST call also validates that only users with
at least reader privileges can access this method.
Note: The endpoint implementation ( helper/api/endpoint.go ) allows adding new REST routes
comfortably. Other http methods like POST or PATCH can be used with the same signature like
it was done in the example for http GET. The required user role needs to be passed as first pa-
rameter, whereas the second one defines the callback when the request was received on this very
URL. The request payload can be accessed inside the function by env.Payload.
5.6 Build and Deploy Web Application
Rebuild your project by calling:
protoc --go_out=./proto -I$WORK/googleapis/ -Iproto/ --go_opt=paths=\...
source_relative --go-grpc_out=./proto --go-grpc_opt=paths=\...
source_relative proto/*.proto
GOOS=linux GOARCH=arm go build -o go_webserver webserver/main.go
GOOS=linux GOARCH=arm go build -o go_grpc_server grpc_server/main.go
Now scp the web applications go_webserver and go_grpc_server to /usr/bin folder of your
container. Make sure to stop the running web applications by calling:
systemctl stop webservice # representing https Server
systemctl stop containerservice # representing gRPC Server
Debian Container User Guide - 1.0 Page 12September 10, 2021
After copying, restart the container or manually call on container shell:
systemctl start webservice
systemctl start containerservice
5.7 Add Frontend Client Call
The next step is to create a Javascript function requesting the new REST URL and log it
to console. Inside your Debian container, open /var/www/html/index.html and add the
following code to the Javascript code section:
function show_custom_var() {
$.get( "/custom", function( data ) {
console.log(data.custom_var);
}, "json");
}
setTimeout(show_custom_var, 1000);
At last, go to the container web UI ( https://-.local/ ) and open
the browser console to check if the correct string is shown (my custom string).
Debian Container User Guide - 1.0 Page 13September 10, 2021
6 Deploy Application
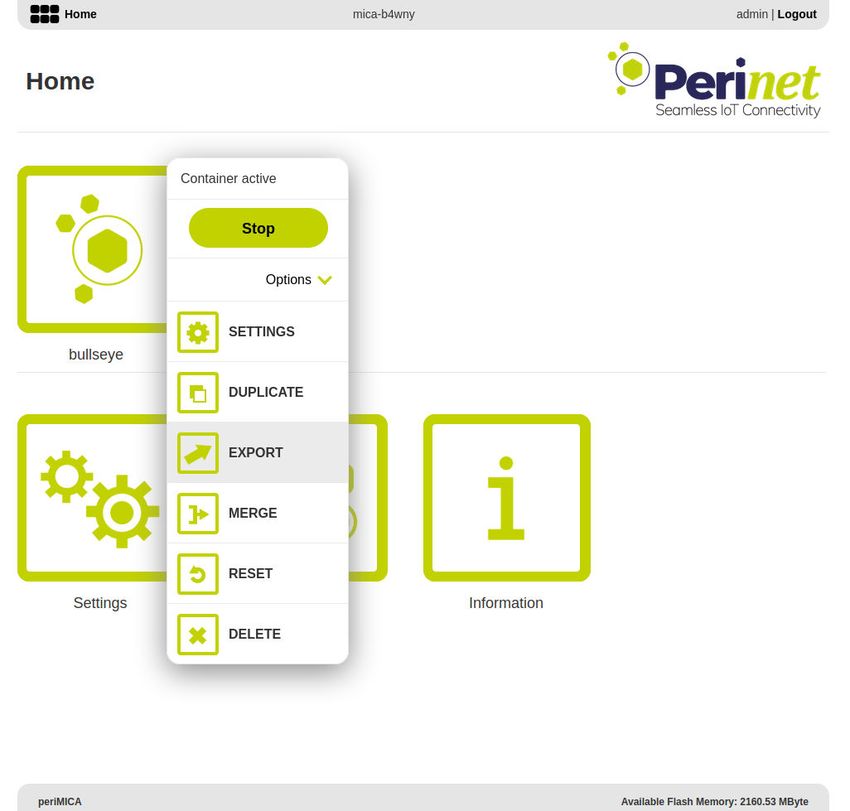
6.1 Export via Web UI
The ready-to-use container can be deployed to other periMICA edge computers by export-
ing it via the periMICA Web UI:
Figure 3: Export of debian bullseye container
Debian Container User Guide - 1.0 Page 14September 10, 2021
6.2 Create Customized Universal Tar
The Container Export allows to snapshot single containers. However, since periMICA con-
tainers are representing microservices, real applications usually consist of more than one
container.
The Universal Tar Format allows to define all periMICA base system commands, as well as
to deploy multiple containers in one file. Universal tar files can be uploaded by going to
periMICA home GUI, navigating to Install. Installing a container or performing a firmware
update are examples of using universal tar files.
Examining the file contents of an exported or downloaded periMICA container, gives more
or less the following files:
• container.tar.gz and for exported containers also container_overlay.tar.gz as root file
systems of the container to be installed
• licenses, README.md and metadata.json meta information
• script.json contains the command routines for the Universal Tar interpreter
In the following example, we adapt the script.json in order to install multiple containers.
Let’s assume that the application is made of two containers (one Debian bullseye and one
MQTT container).
After exporting/downloading the desired containers, extract both universal tar files of each
container and rename the container.tar.gz to mqtt.tar.gz and debian.tar.gz respectively (e.g.
for Debian container under Linux):
tar xf .tar; mv container.tar.gz debian.tar.gz
Now create a script.json file with the following content:
[
["upload", "mqtt.tar.gz"],
["install_container", ["mqtt", "mqtt.tar.gz"]],
["set_container", [".start", "mqtt"]],
["upload", "debian.tar.gz"],
["install_container", ["debian", "debian.tar.gz"]],
["set_container", [".start", "debian"]]
]
Note: For exported containers, make sure to merge the container before exporting it or upload
the overlay file system (container_overlay.tar.gz), separately.
Debian Container User Guide - 1.0 Page 15September 10, 2021 Triggering the universal tar will automatically install two containers named debian and mqtt and start them after install. The container names can be adapted accordingly. Now create the universal tar file (e.g., under Linux): tar cf app.tar debian.tar.gz mqtt.tar.gz script.json and install the file app.tar as usually via periMICA Web UI. Debian Container User Guide - 1.0 Page 16
September 10, 2021

7    Contact & Support
For customer support, please call us at +49 30 863 206 701 or send an e-mail to
support@perinet.io.

For complete contact information visit us at www.perinet.io

Debian Container User Guide - 1.0                                                 Page 17
September 10, 2021

References
[1] PKI2go Container User Guide

Debian Container User Guide - 1.0             Page 18
September 10, 2021

Revision History

Revision   Date                 Author(s)   Description
1.0        September 10, 2021   Christian   Initial release
                                Koehler

Debian Container User Guide - 1.0                                       Page 19
You can also read