Dual Power COOL 12"/30 cm Stand Fan - with DC Motor User manual - NSA UK
←
→
Page content transcription
If your browser does not render page correctly, please read the page content below
Dual Power COOL
12"/30 cm Stand Fan
with DC Motor

User manual

                      SFDC-30128RC

www.nsauk.com
Welcome
With a clear focus on new technologies, innovation and design, NSAUK has
played a leading role in the Air Improvement industry for over 20 years.

NSAUK uses the latest technologies to maximise consumer benefits with
energy saving DC motors and cordless rechargeability at the forefront.

Boasting 8 Quiet Mark accreditations, NSAUK are the leading brand for
build quality & exceptionally quiet performance.

                                                         www.nsauk.com
Contents
Thank you for purchasing this 12”/30cm Stand Fan with Energy Efficient DC motor,
with lots of new features and new technologies. This elegant, height adjustable
tabletop / pedestal fan is ideal for any location ~ home or office. Combining design,
quality, performance and safety with significantly reduced running costs (when
compared to traditional 12”/ 30cm pedestal fan with AC motor).
Introduction 4
Box contents 5
Parts description 6
Assembly 8
Operation guide 11
Remote Operation 20
Cleaning & Care 22
Maintenance & Storage 23
Recycling & Disposal 24
Troubleshooting 25
Safety 26
Technical Data 28
Keep safe for future reference.
3Introduction
• Cord-Free Portability / Dual Power w. 3-pin adapter or USB PowerPack
• Energy Saving DC Motor
• Ultra-Quiet 7-Blade 12”/30cm Stand Fan
• Remote Control w. 3V battery (CR2032)
• Multi position tilt – Vertical to Horizontal
• Oscillation - 30° / 60° / 90° / 120°
• 32 Speeds
• 3 Modes w. 5 Speed Levels
• 1 to 15 hr Timer (Off)
• 1 to 15 hr Timer (On)
• Carry Handle
Mains Power IN USB Power IN
4What’s included
2 3
4 5
1 6
Included in the box you will find:
1. Stand Fan (see page 6 for details)
2. Power Adapter & Cord
3. USB Cable
4. Remote Control
5. User Guide
6. CR2032 Cell Battery for Remote Control
Unpack all items from the box, assemble the fan according to the sequence
detailed on pages 8 - 10 and page 21 (Remote Control).
5Parts Description
9. 10.
8.
11
12.
7.
13.
14.
15.
4. 16.
5. 6.
17.
2.
3.
18.
19.
1.
1. Front Grille
2. Blade Cap 10. Carry Handle
3. Fan Blade 11. Motor Casing 20.
4. Clamping Nut 12. Tilt Point 21.
5. Rear Grill 13. Display Panel
6. Guard Ring 14. Function Icons (OSC, Modes,Timer) 18. Riser Pipe
7. Axle Pin 15. Manual Control Buttons 19. Weighted Fan Base
8. Motor Shaft 16. Power Adaptor w. 3-pin Plug 20. Large Washer
9. Motor Shell 17. Power “IN” Toggle Switch (Page 4) 21. “L” Bolt
6Controls
1
Manual controls & Icons
1. Digital Display 6
2. Oscillation Icons (30° / 60° / 90° / 120°) 7
3. “+” / “–” Speed / Timer 2
8
4. Oscillation control 9
5. On / Off
6. Timer/Pre-set Timer Icon
7. Eco/AI Mode Icon
3
8. Sleep Mode Icon
9. Natural Breeze Mode Icon
4
5
10. 13.
Remote control
10. On / Off
11. 14.
11. Decrease – Speed / Timer
12. Timer / Pre-Set Timer
12. 15. 13. Oscillation
14. Increase – Speed / Timer
15. Mode – Breeze / Sleep / Eco-AI
7Assembly Please assemble correctly according to the following sequence. Refer to parts description on page 6. Please keep the original packaging for future storage. Foot plate assembly: • Unscrew the L-shaped bolt and metal washer from the riser pipe. • Insert the vertical pipe into the center hole of the foot plate assembly. • Then secure in place with L-shaped screw and tighten firmly. • Loosen the screw at the back of the riser pipe. • Connect the upper fan body to the riser pipe and refix it with screw. 8
Unpack Motor:
• Before installing the rear grille – remove the blade
  cap turning clockwise (as indicated).
• Remove the protective plastic tube from the motor
  shaft. This tube is to prevent motor shaft from rusting
  during storage – so retain for future use if dismantling
  your fan for winter storage or discard.
• Remove the grille clamping nut, turning
  anti-clockwise.

Assemble Rear Grille:
• Align the rear grille with the two lugs at
  the top of the motor housing (close to
  carry handle) and the single lug at the
  bottom.
• Secure the rear grille firmly in place with
  the clamping nut rotating it clockwise.
  Do not over-tighten.

NOTE: The clamping nut should move freely
- if there is any resistance, make a half-turn
anti-clockwise to realign the thread, then
rotate clockwise to secure firmly in place.                  9
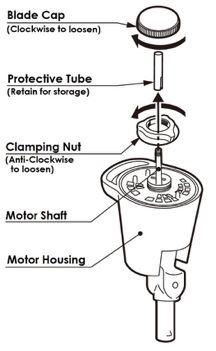
Attaching Fan Blade:
 • Place fan blade on the motor shaft and align the
   axle pin with the recess on the reverse side of the
   fan blade.
 • Turn the spinner to the left, so that there is no
   looseness and the axle pin fits comfortably into the
   fan blade recess.
 • NOTE: Don’t forget to remove protective tube
   before attaching the grilles & fan blade.
 • Secure in place with the blade cap turning anti-
   clockwise (as indicated).

 NOTE: The blade cap should move freely - if there is
 any resistance, make a half-turn clockwise to realign
 the thread, then rotate anti-clockwise to secure firmly
 in place.

 Attaching the Front Grille:
 • Loosen the screw on the guard ring closest to
   you. If possible, do not remove completely.
 • Place the front grille on the guard ring fitting
   the notches into the recesses along the
   edges, twist to secure in place as indicated
   by the arrows on the fan grille.                        Guard Ring
 • Finally, re-tighten the fixing screw.                   Fixing Screw

10
Operation guide

The fan can be operated manually by the control panel on the front of the fan or by
the remote control. NB: Certain features (eg: Timer ON or Timer OFF, Mode functions)
can only be operated via the remote control supplied with the product.

                                          On/Off

Once the unit is connected to the power supply, press the “On/Off” button using the
manual control panel or the       key on the remote control to turn on the fan. The fan
will beep to indicate the fan is ready and it will initially start at Speed 12. Subsequent
re-starts will remember the previous setting, until turned off and unplugged from the
power supply.

To switch off the unit, press the  button on the manual controls or on the remote
control to stop the fan from running.

The display lights will turn off automatically after c. 45secs.

                                                                                         11
Speed/Airflow
When the fan is first plugged into the electrical supply, the fan speed will be set at
speed 12 and one beep will sound. Subsequent uses will remember the previous
setting, unless physically unplugged from the power supply.
To increase the speed/airflow use the “ ” button on the remote control or the
manual buttons on the front of the fan. Speed/airflow level is indicated on the
display from speed 1 to speed 32.
To decrease the speed/airflow use the “ ” on the remote control or manual buttons
on the front of the fan until you reach your preferred speed setting.
1 2 3 4 5 6 .... 31 32
NOTE: Under USB power supply: there are only 1-16 speeds.
The power bank output port needs to be 5V 1.6A, otherwise the power bank may not
work normally.
(Please make sure to use a power bank that meets national standards)
12Timer/Preset
To set the timer - with the fan powered ON, press the TIMER/PRESET button on the
remote control and then press “ ”to increase or “ ” to decrease timer to set the
length of operation or having pressed the TIMER/PRESET on the remote control, use
the “ ”or “ ” buttons on the manual controls.
Continuous
The digital display on the front of the fan will flash during the selection process. When
no button is pressed for 3 secs the selection will be set.
The fan will operate normally and automatically turn off at the selected time.
Use in conjunction with the oscillation + fan modes – see page 15 - 18.
The display lights will turn off automatically after c. 45secs.
TIP: Our suggestion is to always use the timer function - even for 1 or 2 hours - that
way, you have peace of mind if you leave the room or your house - the fan will
automatically turn off when the set time is reached.
13Timer/Preset
(Delayed Start)
To use PRESET timer for delayed start – the unit must be OFF.
Press the TIMER/PRESET button on the remote control and then press “ ”to increase
or “ ” to decrease timer to set the length of delayed start between 1hr and 15hrs –
this will be displayed at the top of the main panel. It is possible to use the “ ”or “ ”
buttons on the manual control once you have selected TIMER/PRESET via the remote
control.
Continuous
The fan will start when the desired time is reached. It is also possible to set required
fan speed, oscillation & mode settings while the fan is off.
The Timer/Preset icon will be lit on the front of the fan to indicate Preset timer is set.
If the Power button is pressed, this will cancel the Delayed Timer and recommence
operation at the previous settings.
14Oscillation (OSC)
• Press OSC on remote control to select oscillation function – horizontal swing -
30° / 60° / 90° / 120°. Keep pressing until the desired angle of oscillation is reached.
The selected angle will be lit on the front of the fan.
• One beep will sound each time the OSC button is pressed and two beeps will
sound when de-selecting oscillation function.
NOTE: When changing the oscillation angle, allow time for the motor to adjust to the
new setting. It will take a couple of left & right swings to settle into its new rhythm and
angle of oscillation.
For the optimum 120° swing the fan head needs to be central to the manual control
panel. If the fan head has been manually adjusted to one side or the other, the
oscillation swing may be reduced.
Do not manually adjust the fan head position when the fan is operating as this may
damage the oscillation function.
15Modes
This is the air selection button. Press the mode button once to operate the NATURAL
BREEZE mode. Press again to operate the SLEEP mode; Press for a third time to operate
ECO/AI mode; press a fourth time to turn-off the wind mode functions and return to
normal 32 speeds.
In MODE settings there are five fan speeds within each level (instead of 32) which vary
according to the set fan speed.
Under USB power supply: Mode settings only operate within levels 1 – 3 (Speed 16).
These are summarised as follows:
1 2 3 4 5
• Level 1 = speed 1 – 6 [USB: speed 1 – 5]
• Level 2 = speed 6 – 12 [USB: speed 5 – 11]
• Level 3 = speed 12 – 19 [USB: speed 11 – 16]
• Level 4 = speed 19 – 26
• Level 5 = speed 26 – 32
16BREEZE Mode simulates natural breezes and rhythms and varies according to the
fan speed set - press the MODE button once and use the “ ”or “ ” buttons on the
remote control or manual controls to increase or to decrease to the required setting.
• Use in conjunction with Timer or Preset and OSC functions. The natural breeze will
continue to fluctuate according to the speed level set until the timer duration is
reached.
• The digital display tree icon will flash during the selection process. When no button
is pressed for 3 secs the selection will be set. The digital display will show Preset/
Timer and Speed sequentially.
For SLEEP MODE ~ press the MODE button twice and then use the “ ”or “ ” buttons
on the remote control or manual controls to make the preferred selection ~ see
above for details. Use in conjunction with Timer, Preset or Osc.
• Whatever speed is chosen the fan will operate at the highest level, then it will step
down through each level to the lowest in the range and finally to a halt; it will then
return to the chosen speed and repeat this circle continuously or until the timer
duration is reached.
17To select ECO/AI mode – press the MODE button three times on the remote control. Use in conjunction with PRESET; TIMER and OSC. Under the ECO MODE, the stand fan will adjust the fan speed automatically according to the room temperature. When the temperature drops or increases by 1ºC, the fan will correspondingly decrease or increase by 2 speeds. As the temperature rises, the speed will no longer increase once it has reached the highest setting. As the temperature drops the speed will reduce, once the lowest speed is reached the fan will continue operating until it is manually turned off or automatically turned off by the timer. When exiting the ECO/AI mode, the fan reverts to the current real-time working speed. Under USB power supply: ECO/AI mode only has 16 speeds at most. 18
Tilt Adjustment
• Gently tilt the fan head up or down to the desired angle – there are six tilt positions
  from vertical to horizontal.
• NB: Only adjust tilt when the fan is turned off. Adjusting tilt when the fan is
  operating may damage the tilt mechanism.

Oscillation Adjustment
• Gently swivel the fan head to the preferred position and angle of swing.
• For the optimum 120° swing the fan head needs to be central to the manual
  control panel. If the fan head has been manually adjusted to one side or the other,
  the oscillation swing may be reduced.
• NB: Only adjust the oscillation angle when the fan is turned off. Adjusting
  the oscillation angle when the fan is moving, may damage the oscillation
  mechanism.
                                                                                        19
Remote Operation • Be sure to direct the remote control toward the receiver on the control panel. • Use the remote control within 5 metres from the receiver. • If the remote control is not directed towards the receiver; the effectiveness will be reduced. • Do not place any obstacle between the receiver and remote control. • Please treat your remote control with care. Knocking or dropping will reduce its reliability. • Please store the remote control safely when not in use or in the special recess in the carry handle. IMPORTANT: This remote control contains a button battery. If swallowed, it could cause severe injury or death in just 2 hours. Seek medical attention immediately. 20
Replacing the Remote Control Battery
(1pc x Lithium 3V CR2032)

                   Lock

   Turn over the remote        Install the battery into the    Close the battery cover.
 control. Open the cover         battery compartment.           Ensure it clicks closed.
 of battery compartment         Take care of the polarity
 ~ squeeze lock towards           of the battery, which       NB Please dispose of used
     centre to release           is indicated inside the        batteries responsibly.
                                 battery compartment.

WARNING:
Keep Batteries Out of Reach of Children
1. Swallowing may lead to serious injury in as little as 2 hours or death, due to
   chemical burns and potential perforation of the oesophagus.
2. If you suspect your child has swallowed or inserted a button battery, immediately
   seek urgent medical assistance.
3. Examine the devices and make sure the battery compartment is correctly
   secured – eg: that the screw or other mechanical fastener is tightened or locked.
   Do not use if the compartment is not secure.
4. Dispose of button batteries immediately and safely. Flat/dead batteries can still
   be dangerous.
                                                                                       21
Cleaning & Care • Always turn off the power supply and unplug the appliance from the mains socket or disconnect from the USB device before cleaning. • Do not use any chemical-based solutions for cleaning fan surfaces. • Slightly moisten a cloth and then wipe off the surfaces of the fan. • In order to remove the dust from the protective fan grille use a vacuum cleaner upholstery attachment. To access the fan blade - reverse the assembly instructions on Page • Ensure fan is completely dry before storage or reconnecting to electrical supply. • Never immerse the fan or fan motor in water or other liquid. • If the fan is not used for long periods, protect with a suitable cover after cleaning, then store in a dry place or dismantle and return to retail carton for winter storage. • Remove battery from remote control before storage. 22
Maintenance & Storage

Before cleaning or carrying out routine maintenance on your fan please always
ensure the product is removed from the power supply.
• Clean the fan body and fan blade to avoid colour change or damage.
• For details on how to remove the front grille for cleaning purposes – reverse the
  assembly process detailed on Pages 9 & 10.
• Do not let water get into the motor housing during cleaning.
• Use a soft damp cloth to clean the fan blade, grilles, pedestal and base, dry
  them completely before re-assembly or storage.

Storage ~ after cleaning your fan, please follow the guidelines below to store your
product.
• Apply a few drops of lubricant on motor shaft to prevent corrosion.
• Replace the plastic protection tube and reverse the unpacking process detailed
  on page 9.
• Wherever possible we suggest you keep the original packaging for storing the
  fan.
• Store the fan in a dry place.

                                                                                      23
Recycling & Disposal
The packaging of your new fan has a recycle mark on it.
Please dispose of it as recycled paper or by using the “Dual System”.
Please recycle
The symbol on the product or on its packaging indicates that this product may
not be treated as general household waste. Instead it should be handed over to the
applicable collection point for the recycling of electrical and electronic equipment.
By ensuring this product is disposed of correctly, you will help prevent potential
negative consequences for the environment and human health, which could
otherwise be caused by inappropriate waste handling of this product. For more
detailed information about the recycling of this product, please contact your
local council office, your household waste disposal service or the store where you
purchased the product.
UK Guarantee
24 months warranty valid only in respect of defects found to be due to faulty
workmanship or material. Proof of purchase is required to validate the guarantee.
This guarantee is no longer valid if the damage has been caused by a fall, alteration
or repair by any unauthorised persons or if the product has been resold.
This guarantee in no way affects your statutory rights.
Compliance
For your safety, this appliance complies with the applicable standards and
regulations (Low Voltage Directive, Electromagnetic Compatibility, Environmental
directives). We reserve the right to make technical changes without prior notice.
24Troubleshooting
If any problems occur during use, please check the following:
The fan blade does not run when the power is on:
• Check if the adapter is correctly plugged into the mains socket & the power is on.
• Check if the fan grille is deformed or touching the fan blade.
• Check if you have selected Pre-Set Timer (eg: Countdown Timer / Delayed Start)
by mistake. Press On/Off button to override Pre-Set Timer setting.
There is an abnormal sound when starting up:
• Check if the fan blade is inserted correctly onto the motor shaft and the back of
the fan blade is completely aligned with the axle pin.
• Check if there are fine burn marks around the fan blade. Check if the fan grilles
are deformed or touching the blade. If so, disassemble and reassemble grilles &
fan blade – Pages 9-10.
• Any operating queries experienced when using this fan, please email
sales@nsauk.com.
25Safety Keep safe for future reference.
1. Check the household voltage to ensure it matches 13. Always place your fan on a firm, dry, level surface,
the fan’s rated specification before using. away from curtains & blinds.
2. Always use this device in accordance with the 14. This fan is intended for indoor, domestic & light
instructions. commercial use only and is not to be operated
outside.
3. Close supervision is necessary when this fan is used
near children and pets. 15. Do not hang anything from the fan grille.
4. Do not allow children to play with the product or 16. Disconnect the unit from the electrical outlet
product packaging, such as plastic bags. before cleaning.
5. Repairs may only be carried out by a recognised 17. To disconnect from the power supply, grip the plug
repair centre, incorrect handling and faulty repairs and pull from the power socket. Never pull by the
may lead to danger and invalidate warranty. cord.
6. This fan is not intended for use in wet or damp 18. Arrange the power cord away from an area
locations. where it may be tripped over.
7. Never position the fan in an area where it may fall 19. Never place the power cord under a carpet or
into a bath or other water container. rug.
8. Do not use this fan if it has any damaged parts 20. Do not direct the fan towards babies or the elderly
or it has fallen into water. Return the product to for extended periods.
a recognised repair centre for examination and
21. If the power cord is damaged, it must be replaced
repair.
by the manufacturer, its service agent or similarly
9. Do not insert any object into the grille whilst the qualified persons in order to avoid a hazard.
fan is operating. It may cause damage to persons
22. Do not operate if the fan grille is removed or
or property.
damaged.
10. Always turn off the power supply before
23. This appliance is not intended for use by persons
unplugging the product to move, store or clean it.
(including children) with reduced physical, sensory
11. Always use both hands to carry this product. Do or mental capabilities, or lack of experience
not lift by the carry handle alone – please support and knowledge, unless they have been given
the fan base. supervision or instruction concerning use of the
appliance by a person responsible for their safety.
12. Do not operate the fan near an open flame,
Children should be supervised to ensure that they
cooking or heating appliance or hot surface
do not play with the appliance.
2627
Technical Data
Model No:		      SFDC-30128RC (12in/30cm DC fan)
EAN No:		        5 060301 912117
Rated Power:     20W
Voltage: 		      220-240V ~ 50Hz
Ref: 			IM/SFDC30128/2102/GU86AA
Product Dims:    1150 (H) x 370 (W) x 350 (D) mm
Ctn. Dimensions: 380 (H) x 660 (W) x 190 (D) mm
			N.W. 5.4kg
 			             G.W. 6.8kg
			Class II Product

                  © 2021 Newton Stovold Assocs Ltd GU8 6AA
                              www.nsauk.com
You can also read