EBIKE OWNER'S MANUAL This manual contains important safety information. Please read and keep for future reference - TUOTEG
←
→
Page content transcription
If your browser does not render page correctly, please read the page content below
EBIKE OWNER'S MANUAL

  This manual contains important
  safety information. Please read
   and keep for future reference.
TOUTEG

 Motorized bicycles are new to most riders so in the interest of safe cycling make
 sure you read, understand, and follow the instructions in this manual.
 This manual contains important safety, signal words such as DANGER, WARNING,
 CAUTION, IMPORTANT, and NOTE or NOTICE. These are important signal
 words telling you to pay special attention to that text as rider safety is involved.
    This symbol will appear in areas of critical rider safety.
   DANGER and WARNING: Pay special attention to these since failure to do so
 could result in serious injury or death to the rider or others.
 CAUTION: If not followed these instructions could result in injury or mechanical
 failure or damage to the bicycle.
 NOTE or NOTICE or IMPORTANT: These specify something that is of special interest.
 Read and pay close attention as your safety and that of your bicycle are involved.

 IMPORTANT: Read the BEFORE RIDING section and check that all parts are
 installed and working as per this manual. If you understand how the bicycle
 operates, you will get the best performance. When you read this manual, compare
 the illustrations to the bicycle. Learn the location of all the controls and parts as well
 as how they work. KEEP THIS BOOK FOR FUTURE REFERENCE.
 CAUTION Before you ride the bicycle, check the brakes and other parts of the
 bike. Make sure all parts are assembled correctly, securely tightened and working
 properly. Take your first ride in a large, open, level area away from traffic. If you have
 a problem, call the TUOTEG Technical Support Team at 800-538-0029 or email
 TechSupport@TUOTEG.com.

2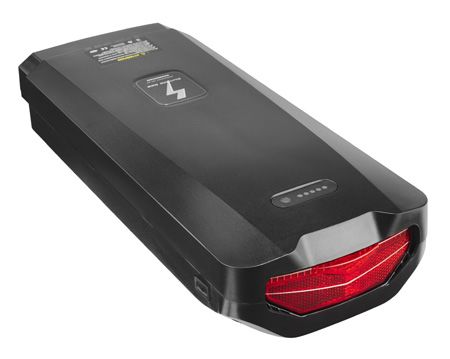
EBIKE OWNER’S MANUAL

                       CONTENTS
PREFACE.................................................................... 4–6

PARTS IDENTIFICATION CHART................................. 7

BEFORE RIDING...................................................... 8–13

ASSEMBLING YOUR BIKE.................................... 14-30

LCD OPERATING PROCEDURES........................ 31-33

OPERATING PROCEDURES................................. 34-36

MAINTENANCE/REPAIR...................................... 37-51

TROUBLESHOOTING........................................... 52-55

LIMITED WARRANTY............................................ 56-58

IMPORTANT INFORMATION.....................................59

                                                                                   3
TOUTEG
PREFACE
Congratulations on the purchase of your new bike! With proper assembly and
maintenance it will offer you years of enjoyable riding!
IMPORTANT: Carefully read and follow this manual (and any other materials
included with this bike) before riding. Please retain this manual for future use. If this
bike was purchased for a child, it is the responsibility of the purchaser to verify the
bike has been properly assembled, and that the user has been properly trained and
instructed in use of the bike.
This manual is provided to assist you and is not intended to be a comprehensive
manual covering all aspects of maintaining and repairing your bicycle. The bicycle
you have purchased is a complex piece of equipment that must be properly
assembled and maintained in order to be ridden safely. If you have any doubts
about the assembly or your ability to properly assemble and maintain the
bicycle, you must have it assembled and maintained by a professional bicycle
mechanic.
WARNING: Electric bikes are fun to ride but can be dangerous to use. The
user or consumer assumes all risk of personal injuries, damage, or failure of
the bicycle or system and all other losses or damages to themselves and others
and to any property arising as a result of using the bicycle.
DO NOT DISASSEMBLE, MODIFY OR REPLACE ELECTRICAL PARTS.
If you need to change any parts, please consult a professional
bicycle mechanic or contact customer service for additional help.
NOTE: YOUR INSURANCE POLICIES MAY NOT PROVIDE COVERAGE FOR
ACCIDENTS INVOLVING THE USE OF THIS BICYCLE. TO DETERMINE IF
COVERAGE IS PROVIDED YOU SHOULD CONTACT YOUR INSURANCE
COMPANY OR AGENT.
DANGER Failure to properly assemble and maintain your bicycle could result in
serious injury or death to the rider.
This manual contains important safety, performance and service information.
The purpose of this Owner’s Manual is to help you use your bike safely in the
manner it is intended and allow you to enjoy the benefits it offers for many years
to come. Please read it before you take the first ride on your new bicycle, and
keep it for reference.
If you have any questions or do not understand something, take responsibility for
your safety and call the TUOTEG Technical Support Team at 800-538-0029 or email
TechSupport@TUOTEG.com.
LWAYS WEAR A PROPERLY FITTED HELMET WHEN YOU RIDE YOUR
A
BICYCLE. DO NOT RIDE AT NIGHT. AVOID RIDING IN WET CONDITIONS.
4EBIKE OWNER’S MANUAL
PREFACE
RESPONSIBILITY OF THE OWNER!
IMPORTANT: Reading and following the information and instructions in this manual
are essential to the ability of the owner or any other persons allowed to use this
bicycle in order to ride safely.
1. It is the responsibility of the owner or in the case of a younger rider the parents
of the rider to be certain all assembly instructions have been followed, even if
the bike has been assembled by the seller or a professional assembly company.
2. Brakes are essential to safety. Be sure they are checked and working properly
before each use. Remember that any mechanical system changes condition
during use and must be maintained and checked before each use.
3. Rules for bicycle use (bicycle laws) vary from location to location so be certain
the rider knows and understands the rules that apply to bicycle usage in all
areas where the bicycle will be used. Wearing a helmet, light or reflective
clothing, using lights and reflectors are examples of rules which may exist and
which make sense as rider safety precautions at all times.
4. Know how to operate the bicycle and all equipment on it before first use and be
certain anyone allowed to use the bike knows how to properly and safely use
the bike as well.
5. There are many different types of bicycles and often these types are designed
for different uses. Make sure you know what type you have and do not
exceed its service limitations. Be sure you check and understand the bicycle
classifications set in this manual, including size of the unit that is proper for the
rider to insure good control during use. Riders who are too small or large may
have control problems. Do not overload a unit with a rider that is too heavy or
too large, and do not attempt to carry extra passengers, packages or loads on
the bicycle. Do not use street bikes for off-road riding.
6. Your electric bike is water-resistant, but must be properly maintained to preserve
this condition. Do not submerge the bicycle or any electric components in water.
Water entering electric components can cause a short circuit and damage the
electric components with possible injury to the rider and others.
7. The battery’s performance can be affected by its environment. Generally
speaking, battery’s discharge performance is better in a higher temperature.
Electric power will drop by more than 1/3 when the temperature is below 32ºF
(0ºC). Thus, this ebike’s riding distance per charge will become shorter in winter
or cold areas. It returns to normal / optimal when the temperature is higher than
68ºF (20ºC).
8. Do not put any metal objects in charge hole or battery circuit, it may cause a
short circuit, start a fire, or cause an explosion with personal injury or property
damage.
NOTE: Max weight of rider + luggage + bike = 220 lb/100kg
5TOUTEG
PREFACE
CAUTION: For your safety you must carefully read this manual and follow its
instructions. Your bicycle may come with additional instruction sheets that cover
features unique to your bike. Please ensure that you read and become familiar with
their contents and retain them with this manual for future reference. Remember
bicycles, in most areas, are subject to the same laws, rules, and regulations as motor
vehicles.
Always wear a CPSC approved helmet when riding your bike.
Learn and follow local and state traffic use laws.
Any major service or adjustments on your bike not covered in this manual should
be carried out by a professional bicycle mechanic. If you wish to make adjustments
yourself, this manual contains important tips on how to do it.
CAUTION: Any adjustments you make are entirely at your own risk. Do NOT use
your bike for freestyle and stunt riding, jumping or competitive events. Even if you
are riding a mountain bike, you should know that off-road use or any similar activities
can be dangerous, and you assume the risk for personal injury, damages or losses
incurred from such use. Do not ride your bike when any part is damaged or not
working properly. You must, for your safety and the safety of other users, consult
a professional bicycle mechanic for any questions on repairs or maintenance.
WARNING: As with all mechanical components, the bicycle is subjected to
wear and high stresses. Different materials and components react to wear or
stress fatigue in different ways. As your bicycle ages, you should inspect it
more frequently to look for deformed, cracked, bent, or loose components.
Such conditions may lead to sudden failure. This may possibly cause injuries to
the rider. If something is cracked or broken, do not ride until repairs have been
made.
NOTE: BEFORE TRANSPORTING THE BIKE AND/OR BATTERY, CALL THE TUOTEG
TECHNICAL SUPPORT TEAM AT 800-538-0029 OR EMAIL
TECHSUPPORT@TUOTEG.COM.
ALWAYS WEAR A HELMET-IT COULD SAVE YOUR LIFE!
A properly fitting, CPSC approved, bicycle
helmet should be worn at all times when
riding your bicycle.
The correct helmet should:
– be lightweight and comfortable
– have good ventilation
– cover the forehead and fit correctly
CORRECT INCORRECT – be securely fastened on the rider
Forehead Covered Forehead Exposed
6EBIKE OWNER’S MANUAL
PARTS IDENTIFICATION
TUOTEGTM CNQR
1. Handlebar
2. Handlebar Stem
3. Monitor Display
4. Headset
5. Fork
6. Front Brake
7. Pedal
8. Pedal Crank Arm
9. Cadence Sensor
10. Chain
11. Rear Derailleur
12. Motor
13. Wheel
14. Tire
15. Rear Brake
16. Saddle
17. Frame
18. Battery (rack mount)
3
2
1
16
4
18 15
5
13 17
14
6
7
8
12 9
10
11
7TOUTEG
BEFORE RIDING
1. WARNING - ON- AND OFF-ROAD CONDITIONS: The condition of the
riding surface is very important to your safety. If the surface is wet, or has sand,
leaves, small rocks or other loose debris on the surface where you plan to ride,
carefully decrease the speed of the bicycle and ride with extra caution. It will
take a longer time and more distance to stop. Apply the brakes sooner and
with less force. Always apply the rear brake first allowing time and distance for
it to take effect. Then follow by cautiously applying the front brake, in order to
maintain control of the bicycle. Rapid front brake application first may cause
a front pitch over or fall. Learn to use your brakes properly under controlled
conditions until you learn proper braking under all road conditions.
2. NOTICE: State and federal regulations require a full set of reflectors. Some
state and local laws may require that your bike be equipped with a warning
device, such as a horn or bell and most states require a light. The manufacturer
and many legal authorities DO NOT approve or encourage riding at night.
Vision is quite limited at dawn, dusk and at night for bike riders, motorists and
by-standers. If you must ride at night, take extra precautions, use front and rear
lights, wear flashers on your arms, wear light-colored clothing, and plan your
route to ride in well-lit areas avoiding heavy traffic areas.
3. NOTE: Always wear shoes when riding a bicycle and avoid loose fitting
clothes. Wear a cuff band or trouser clip to keep pants or other loose clothing
from getting caught in the chain wheel. Long sleeves, long pants, gloves, eye
protection, a CPSC approved helmet, elbow and knee pads are recommended.
Helmet use is required by law in many states and is always a good idea
for your safety.
4. CAUTION: WET WEATHER WARNING: Check your brakes frequently.
The ability to stop is critical to your safety. Roads are slippery in wet weather
so avoid sharp turns and allow more distance for stopping. Brakes become
less efficient when wet. Leaves, loose gravel and other debris on the road can
also lengthen stopping distance. If at all possible, do not ride in wet weather.
Vision and control are impaired, creating a greater risk of accidents and injury.
5. CAUTION: A bicycle rider’s best defense against accidents is to be alert to road
conditions and traffic in the area. Do not wear anything that restricts your vision
or your hearing.
6. When riding, ALWAYS WEAR A CPSC-APPROVED BIKE HELMET. It may save
your life.
7. Obey all traffic regulations. Most traffic regulations apply to bike riders as well as
automobile operators. Observe all state and local traffic regulations, signs and
signals. Check with your local police station on bicycle licensing and inspection,
and where it is legal to ride your bike.
8EBIKE OWNER’S MANUAL
BEFORE RIDING
8. Keep to the RIGHT SIDE of the road. Follow the traffic flow in a straight line
close to the curb. Watch out for opening car doors and cars moving in and out
of traffic. Use caution at intersections.
9. Never carry passengers. This is dangerous and it makes the bicycle harder to
control. Never carry anything that can inhibit your ability to control the bicycle
or see the road.
10. When riding in pairs or in larger groups, form a single line along the right side
of the road. Set up a sensible distance between riders. Don’t follow too closely.
11. Always be alert. Animals or people may dart in front of you. Give pedestrians
the right-of-way. Don’t ride too close to pedestrians, and don’t park your bicycle
where it can get in the way of foot/vehicle traffic.
12. Be careful at all intersections. Slow down and look both ways before crossing.
13. Use hand signals. Always let other drivers and pedestrians know what you are
going to do. Signal 100 ft before turning unless your hand is needed to control
the bike.
14. WARNING: NIGHT TIME OPERATION: We do NOT recommend riding your
bike at night. If you have an emergency that requires you to ride at night you
must have proper lights and reflectors. NEVER ride at night without a helmet,
taillight, a white front reflector, a red rear reflector, pedal reflectors and white
wheel reflectors. You must be able to clearly see the surface where you are
riding and be seen by others.
15. Never hitch rides. Never hold onto moving vehicles while riding. Never stunt
ride or jump on your bike.
16. ON- AND OFF-ROAD OPERATION: Avoid the following road hazards: drain
grates, pot holes, ruts, soft road edges, gravel, leaves (especially when they
are wet), uneven pavement, railroad crossings, manhole covers, curbs, speed
bumps, puddles, and debris as all have an effect on your riding and may result
in loss of control. Adjust your speed and the way you use your brakes if you
must ride in such areas.
17. If any components becomes loose while riding, STOP IMMEDIATELY and
tighten, or bring to a mechanic for repair.
9TOUTEG
BEFORE RIDING
Your new bicycle was assembled and tuned in the factory and then partially
disassembled for shipping. The following instructions will enable you to prepare
your bicycle for years of enjoyable cycling. For more details on inspection,
lubrication, maintenance and adjustment of any area please refer to the relevant
sections in this manual. If you have questions about your ability to properly
assemble this bicycle, please consult a professional bicycle mechanic
before riding.
TO AVOID INJURY, THIS PRODUCT MUST BE PROPERLY
ASSEMBLED BEFORE USE. WE STRONGLY RECOMMEND THAT
YOU REVIEW THE COMPLETE ASSEMBLY GUIDE AND PERFORM
CHECKS SPECIFIED IN THE OWNER’S MANUAL BEFORE RIDING.
Tools required for assembly:
• 13 & 15mm open (combination) wrenches
• 4, 5, 6mm hex wrenches
• Torque wrench with 4, 5, 6mm hex bits and 13 & 15mm sockets
• Bicycle hand pump and tire pressure gauge
• Bicycle-specific grease
• Phillips & standard screwdrivers
• Cable cutters
RECORD SERIAL NUMBER
Each bicycle has a serial number stamped into the
head tube of the frame (See Illustration). Record
this number HERE to keep for future reference.
This number can be helpful to reclaim your
bike if ever lost or stolen. THIS INFORMATION
Serial
IS ONLY AVAILABLE ON THE BIKE ITSELF. Number
There is no record of your serial number at the
store purchased or with our company. It is your
responsibility to record this information.
Serial Number: __________________________
10EBIKE OWNER’S MANUAL
BEFORE RIDING
PRE-RIDE SAFETY CHECKLIST:
Just a minute spent before each ride can significantly improve your safety and the
enjoyment of your ride. So, EACH TIME before you ride make a habit of performing
the following safety checks:
• Stand in front of the bicycle facing rearward and hold the front wheel
securely between your legs. Try to twist the handlebar and verify that they do
not move. Then pull the handlebars up, trying to lift the bike. There should
be no movement.
• Try to push the front wheel from side to side and confirm that it feels tight
and will not wobble. Lift the front wheel up by the handlebars and strike the
wheel downward with the heel of your hand to confirm that it is securely
attached to the wheel. Spin the front wheel and confirm that it does not
wobble or contact the fork or brake pads.
• Try to lift/push down on and twist the seat to confirm it is tight.
• Look at the connection of the pedals to the crank arm. You should not see
pedal screw threads and the pedal should feel firm and be parallel to the
ground.
• Apply your brake(s) and make sure they feel firm to the touch, and then spin
the wheel(s). Apply the brakes. The brakes should stop the wheel(s).
• Check to be sure that the fenders and accessories (if equipped) are firmly
attached and will not contact any moving parts. Make sure all reflectors are
in position and not broken.
Now, put on your BICYCLE SAFETY HELMET and enjoy your ride. Your safety is well
worth just a minute. Also, be sure to read and follow the warnings and instructions
in this manual.
11TOUTEG
BEFORE RIDING
CORRECT FRAME SIZING:
When selecting a new bicycle, the correct choice of frame size is a very important
safety consideration. The ideal clearance will vary between types of bicycles and
rider preference. This makes straddling the frame when off the saddle easier and
safer in situations such as sudden traffic stops. Women can use a man’s bicycle to
determine the correct size women’s model.
THERE SHOULD BE A CLEARANCE OF NO LESS
THAN 1–2 INCHES BETWEEN THE GROIN AREA
OF THE INTENDED RIDER AND THE TOP TUBE OF
THE BICYCLE, WHILE THE RIDER STRADDLES THE
1–2” BICYCLE WITH BOTH FEET FLAT ON THE GROUND.
THE SEAT POST “MINIMUM INSERTION” /
“MAXIMUM HEIGHT” MARK SHOULD NOT BE
VISIBLE WHEN THE SEAT POST IS INSERTED INTO
THE SEAT MAST OF THE BIKE. DO NOT RAISE THE
SEAT POST BEYOND THIS MARK. THE SEAT POST
OR FRAME MAY BREAK CAUSING YOU TO LOSE
CONTROL AND FALL. ALWAYS CHECK TO MAKE
SURE THE SEAT POST ADJUSTING MECHANISM IS
TIGHTENED SECURELY BEFORE RIDING.
12EBIKE OWNER’S MANUAL
BEFORE RIDING
RIDING POSITION:
Arms not
SADDLE HEIGHT overextended
Handlebar stem
In order to obtain the most comfortable riding height
position and offer the best possible pedaling, about the
correct saddle height should not allow leg strain same as
seat height
from over-extension, and the hips should not rock
from side to side when pedaling. While sitting
on the bicycle with one pedal at it’s lowest point,
place the ball of your foot on the pedal. The
correct saddle height will allow the knee to be Pedal
slightly bent in this position. bottom position
REACH
To obtain maximum comfort, the rider should not over extend his or her reach when
riding. There should be a slight bend in the rider’s elbows. Refer to the section
regarding seat and seat posts to learn how to adjust the seat post height.
13TOUTEG
ASSEMBLING YOUR BIKE
PREPARATION
It is important that you read this owner’s manual before you start to assemble your
bicycle. WE RECOMMEND THAT YOU CONSULT A PROFESSIONAL BICYCLE
MECHANIC IF YOU HAVE DOUBTS OR CONCERNS AS TO YOUR ABILITY TO
PROPERLY ASSEMBLE, REPAIR, OR MAINTAIN YOUR BICYCLE. Remove all parts
from the shipping carton. Check to make sure no parts are loose on the bottom of
the carton. Carefully remove the front wheel which is attached to the side of the
bicycle for shipping. Carefully remove all other packing material from the bicycle.
This includes zip ties, axle caps and material protecting the frame.
FRONT WHEEL
1. Remove the nuts, washers and
wheel retainers from the front
wheel.
2. Slide the wheel onto the open
ends of the fork. Slip an axle
retainer onto each end of the
axle, and hook the retainers into
the holes in the fork end. Loosely
install the washer onto each end of
the axle (serrated end toward the
retainer), then install the hex nut.
(Note: there may be a washer head
nut in place of the washer and
hex nut).
3. Center the wheel in the fork and
tighten the axle nuts securely,
alternating from one side to the
other to center the wheel.
4. Spin the wheel to make sure that
it is centered in the fork and does
not wobble. If the wheel is not
centered, loosen the nuts and
try again.
Torque requirement: 16–20 ft-lb.
14EBIKE OWNER’S MANUAL
ASSEMBLING YOUR BIKE
KICKSTAND INSTALLATION
If your bike is equipped with a kickstand, please follow the instructions below.
1. Place the bicycle in an upright position.
2. Remove the two bolts from the kickstand.
3. From the left side of the bicycle (opposite side from chainring), line the
kickstand up with the mounting holes on the chainstay. Thread in the bolts.
4. Tighten the kickstand bolts using the 5mm hex wrench. Torque 8–9 ft-lb.
15TOUTEG
ASSEMBLING YOUR BIKE
PEDAL INSTALLATION
1. Apply a small amount of grease to the threads of each pedal. Look for the letter
“L” or “R” on the side or end of each pedal spindle (picture). Turning the spindle
clockwise by hand (Picture), thread the pedal marked “R” into the crank arm on
the right (drive) side of the bicycle. Make sure that you are not “cross-threading”,
which can strip the threads in the crank arm. If the threads do not turn easily,
don’t force them. Back the spindle out and start over. Once the pedal is
threaded into the crank arm, tighten the spindle securely to the crank arm
with a 15mm open end or an adjustable wrench.
2. Turning the spindle counterclockwise by hand, thread the pedal marked “L”
into the crank arm on the left side of the bike. Make sure that you are not
“cross-threading”, which can strip the threads in the crank arm. If the threads do
not turn easily, don’t force them. Back the spindle out and start over. Once the
pedal is threaded into the crank arm, tighten the spindle securely to the crank
arm with a 15mm pedal wrench or open ended wrench.
WARNING! IMPROPERLY INSTALLED AND TIGHTENED PEDALS CAN WORK
LOOSE, DAMAGING THE BICYCLE AND CAUSING POSSIBLE SERIOUS INJURY
OR DEATH TO THE RIDER.
Torque Requirement: 20-24 Nm (15–18 ft-lb).
16EBIKE OWNER’S MANUAL
ASSEMBLING YOUR BIKE
HANDLEBAR INSTALLATION & ALIGNMENT
1. Loosen the stem clamp faceplate bolts and remove the faceplate.
2. Place the handlebar on the stem and loosely tighten the faceplate bolts just
enough to hold the bars in place.
3. Make certain the handlebar is centered left-to-right in the stem and is rotated to
the desired position.
4. Tighten the stem faceplate bolts gradually and evenly by a using an “X” pattern.
The gap between the faceplate and the stem body should be even on top
and bottom. Recommended torque for these bolts is 5Nm (44 in-lb) Check
handlebar tightness by trying to rotate the bars forward and back. If they turn,
the faceplate is too loose. Realign and tighten further.
Faceplate Bolt Tightening Pattern
5. Verify that the stem faces forward directly in line with the front wheel. If not, use
a 5mm hex wrench to loosen, realighn and re-tighten the two Allen screws on
the stem steerer tube clamp to a torque of 8-9 Nm (70-80 in-lb).
6. Check steering by straddling the front wheel and trying to turn the handlebar.
If you can turn the handlebar without turning the front wheel. The stem is too
loose. Realign an tighten further.
7. FOR BIKES WITH ADJUSTABLE STEMS: the adjustment screw is located on the
left (non-drive-side) of the stem. Use a 6mm hex wrench to loosen the bolt but
DO NOT remove—loosen it only enough to allow angle adjustment. Adjust to
the desired angle and tighten bolt securely. Check the stem for tightness before
riding.
17TOUTEG
ASSEMBLING YOUR BIKE
THREADLESS STEM ASSEMBLY
(IF APPLICABLE)
WARNING! ALWAYS
TIGHTEN FASTENERS TO THE
CORRECT TORQUE. BOLTS
THAT ARE TOO TIGHT CAN
DEFORM. BOLTS THAT ARE
TOO LOOSE CAN MOVE AND
FATIGUE. EITHER MISTAKE
CAN LEAD TO LOSS OF
CONTROL, SERIOUS INJURY
OR DEATH. IF YOU DO NOT
Fork Steerer tube
should be aligned above
FEEL COMFORTABLE WITH
the top allen screw
but below the top
YOUR SKILLS IN ASSEMBLING of the stem
OR ADJUSTING THE
BIKE, PLEASE TAKE IT TO
A PROFESSIONAL BIKE
MECHANIC.
1. Make sure the front
fork is facing forward
(see illustration).
2. Insert the stem onto the fork
steerer tube. Align the steerer
tube so that it sits ABOVE the
top hex screw, but BELOW
the top of the stem.
3. Tighten the 5mm head set
top cap bolt to a torque of 15 ft-lb. Do Not Overtighten!
4. Face the handlebar stem forward directly in line with the front wheel. Tighten
the two 5mm Allen screws on the handlebar stem to a torque of 8-9 Nm (70-80
in-lb).
5. FOR BIKES WITH ADJUSTABLE STEMS: The stem angle can be adjusted from
90 to 145 degree angle. The adjustment screw is located on the left (non-drive-
side) of the stem.
Use a 6mm hex wrench to loosen the bolt but DO NOT remove the bolt.
Loosen it only enough to allow angle adjustment.) Adjust to the desired angle
and tighten bolt securely. Check the stem for tightness before riding.
18EBIKE OWNER’S MANUAL
ASSEMBLING YOUR BIKE
SEAT & SEAT POST ASSEMBLY
1. Loosen the seat clamp nuts.
2. Insert the top portion of the seat post into the seat clamp. Be sure the seat
post is completely inserted into the seat clamp and butted tightly against the
underside of the seat.
3. Using the 13mm wrench, tighten seat clamp nuts securely.
4. Lightly grease the inside of the seat tube. Insert the seat post (with seat
attached) into the bike frame. Be sure that the seat post is inserted past the
minimum insertion line.
5. Tighten the seat post binder bolt securely at the desired height.
6. Adjust the angle of the seat so that the top of the seat is parallel to the ground
or comfortable to the rider.
7. Retighten the seat clamp nuts securely (torque requirement 15–20 ft-lb). Check
for tightness by attempting to twist the seat along with rocking it up and down.
If the seat is loose, be sure to tighten the clamp nuts and binder bolt securely.
THE SEAT POST “MINIMUM INSERTION” / “MAXIMUM HEIGHT” MARK
SHOULD NOT BE VISIBLE WHEN THE SEAT POST IS INSERTED INTO THE SEAT
MAST OF THE BIKE. DO NOT RAISE THE SEAT POST BEYOND THIS MARK.
THE SEAT POST OR FRAME MAY BREAK CAUSING YOU TO LOSE CONTROL
AND FALL.
ALWAYS CHECK TO MAKE SURE SEAT POST ADJUSTING MECHANISM IS
TIGHTENED SECURELY BEFORE RIDING. RIDING WITH AN IMPROPERLY
TIGHTENED SEAT POST CAN ALLOW THE SEAT TO TURN OR MOVE AND
CAUSE THE RIDER TO LOSE CONTROL
SADDLE HEIGHT
In order to obtain the most comfortable riding position and relation to the rider’s
leg length. The correct saddle height should not allow leg strain from over-
extension, and the hips should not rock from side to side when pedaling. While
sitting on the bicycle with one pedal at it’s lowest point, place the ball of your foot
on the pedal. The correct saddle height will allow the knee to be slightly bent in this
position. To obtain maximum comfort, the rider should not over extend his or her
reach when riding. There should be a slight bend in the rider’s elbows.
19TOUTEG
ASSEMBLING YOUR BIKE
DISC BRAKES
We suggest that if your bike comes equipped with a disc
brake that you consult a professional bicycle mechanic for any
adjustments or repair needed for this brake.
SAFETY PRECAUTIONS
1. Adjust the inner cable so that the protruding length is less
than 20mm. If the protruding length is any longer, the end of
the cable may become stuck in the rotor, which could cause
the wheel to lock and the bicycle could fall forward causing
injuries.
2. The calipers and rotor will become hot when the brakes are
operated, so do not touch them while riding or immediately
after dismounting from the bicycle, you may get burned.
Check that the brake components have cooled down before
attempting to adjust the brakes.
3. Always make sure that the front and rear brakes are working
correctly before you ride the bicycle.
4. Before riding the bicycle, check that the pad thicknesses are
0.5mm or more.
5. If noise occurs when the brakes are operated, it may indicate
that the brake pads have worn down to their usage limit. After
checking that the brake system has cooled down sufficiently,
check the brake pad thickness. Replace the brake pads if the
wear indicators are visible.
6. Be careful not to allow any oil or grease to get onto the rotor
and brake pads, otherwise the brakes may not work correctly.
7. Check the brake cable for rust and fraying, and replace the
cable immediately if such problems are found. If this is not done, the brakes
may not work correctly.
8. The required braking distance will be longer during wet weather. Reduce your
speed and apply the brakes early and gently.
9. If the road surface is wet, the tires will skid more easily. If the tires skid, you
may lose control of the bicycle. To avoid this, reduce your speed and apply the
brakes gently.
20EBIKE OWNER’S MANUAL
ASSEMBLING YOUR BIKE
DISC BRAKES continued
10. It is important to completely understand the operation of your bicycle’s brake
system. Improper use of your brake system may result in loss of control or an
accident, which could lead to severe injury. Because each bicycle may handle
differently be sure to learn proper braking technique (including brake lever
pressure and bicycle control characteristics) and operation of your bicycle.
This can be done by consulting a professional bicycle mechanic and referring
to the disk brake instruction sheet included with your bike. This can also be
done by practicing your braking technique in a safe area before hitting the trails.
CAUTION: Disc brakes have a burn-in period, and the braking force will
gradually increase as the burn-in period progresses. Make sure that you are
aware of any such increases in braking force when using the brakes during
the burn-in period. The same thing will happen when the brake pads or
rotor are replaced.
If the brake cable is not connected at the brake
lever, line up brake barrel slot with brake lever slot
before installing the cable. Slide the head of the
brake cable into the brake lever per the diagram.
Thread the cable through the slot in the brake lever
so the cable end rests squarely in the adjusting
barrel. Turn the adjusting barrel to close.
If the brake cable is disconnected at the disc caliper,
thread the brake wire through the adjustment barrel,
loosen the cable anchor bolt until you can see a hole
through the anchor bolt for the cable wire to attach.
Thread the cable wire through the cable anchor and
tighten by hand.
Centering brake - First determine if the wheel is
centered. Look at the space between the tire and
the frame on either side. If it is not even, loosen the
wheel axle nuts and center the wheel, then proceed
to center the brake.
If the brake is not centered, look at the disc brake
caliper for centering adjustment screws at the center
of the brake pad on either side. Looking down into
the brake where the brake pads contact the disc
rotor, determine which side needs to move away
or towards the disc. Turn the centering adjustment
screws so that there is about 1/32 of an inch of
clearance on either side of the disc rotor. Spin the
front wheel and listen for any rubbing noise or excess
friction. Repeat the steps until the brake is centered.
21TOUTEG
ASSEMBLING YOUR BIKE
DISC BRAKES continued
Brake is adjusted correctly when the brake pads do not drag on the rotor when the
brake is open and when applied, the brake pads contact the rim before the brake
lever reaches about 1/3 of the way to the handlebar.
After adjusting the brake, reinspect the brake pads, centering, and brake lever
travel. If the brake pads are no longer square to the rim, repeat brake pad
adjustments. Be sure that the brake pads return to a centered position by spinning
the wheel and listening for the brake pad rubbing the rotor on either side. Readjust
as needed. Check that the brake cable tension allows the brake lever about 1/3
of the travel before the brake pads contact the rotor. If the cable has stretched
or slipped, readjust brake cable tension by loosening the cable anchor bolt and
pulling more cable through the anchor or use the brake adjustment barrel for fine
tuning the brake cable tension.
WARNING! DISC GETS HOT! SEVERE INJURY COULD RESULT FROM
CONTACT WITH THE HOT DISC. ALLOW DISC TO COOL COMPLETELY
BEFORE TOUCHING.
22EBIKE OWNER’S MANUAL
ASSEMBLING YOUR BIKE
TIRES AND TUBES
After assembling your bike, it will be necessary to inflate the tires. Check the side
wall of the tire for the correct tire pressure (PSI) and inflate tires accordingly with
a MANUAL BICYCLE PUMP. Improper inflation is the biggest cause of tire failure.
Due to the slightly porous nature of bicycle inner tubes, it is normal for your
bike tires to lose pressure over time. For this reason it is critically important to
maintain the proper tire inflation on your bike.
1. Your bicycle has been equipped with tires which the bike’s manufacturer felt
were the best balance of performance and value for the use for which the bike
was intended. The tire size and pressure rating are marked on the sidewall
of the tire. CAUTION: Pencil type automotive tire gauges and gas station air
hose pressure settings can be inaccurate and should not be relied upon for
consistent, accurate pressure readings. Instead, use a high quality dial gauge.
WARNING: NEVER INFLATE A TIRE BEYOND THE MAXIMUM PRESSURE
MARKED ON THE TIRE’S SIDEWALL. EXCEEDING THE RECOMMENDED
MAXIMUM PRESSURE MAY BLOW THE TIRE OFF THE RIM, WHICH COULD
CAUSE DAMAGE TO THE BIKE AND INJURY TO THE RIDER AND OTHERS.
THE BEST WAY TO INFLATE A BICYCLE TIRE TO THE CORRECT PRESSURE IS
WITH A BICYCLE PUMP. NEVER USE A SERVICE STATION AIR HOSE TO INFLATE
A BICYCLE TIRE. IT IS DESIGNED FOR LARGER TIRES AND IT CAN EXCEED
THE RECOMMENDED MAXIMUM PRESSURE AND IT MAY BLOW THE TIRE
OFF THE RIM.
Tire pressure is given either as maximum pressure or as a pressure range.
How a tire performs under different terrain or weather conditions depends
largely on tire pressure. Inflating the tire to near its maximum recommended
pressure gives the lowest rolling resistance; but also produces the harshest ride.
High pressures work best on smooth, dry pavement. Very low pressures, at the
bottom of the recommended pressure range, give the best performance on
smooth, slick terrain such as hard-packed clay, and on deep, loose surfaces such
as deep, dry sand. Tire pressure that is too low for your weight and the riding
conditions can cause a puncture of the tube by allowing the tire to deform
sufficiently to pinch the inner tube between the rim and the riding surface.
Some special high-performance tires have unidirectional treads: their tread
pattern is designed to work better in one direction than in the other. The sidewall
marking of a unidirectional tire will have an arrow showing the correct rotation
direction. If your bike has unidirectional tires, be sure that they are mounted to
rotate in the correct direction.
23TOUTEG
ASSEMBLING YOUR BIKE
TIRES AND TUBES continued
2. The tire valve allows air to enter the tire’s inner tube
under pressure, but doesn’t let it back out unless you
want it to. There are primarily two kids of bicycle tube
valves: the Schraeder valve and the Presta valve. The bicycle pump you
use must have the fitting appropriate to the valve stems on your bicycle.
The Schraeder is like the valve on a car tire. This is the type of valve stem you
should have on your bike. To inflate a Schraeder valve tube, remove the valve
cap and push the air hose or pump fitting onto the end of the valve stem. To let
air out of a Schraeder valve, depress the pin in the end of the valve stem with
the end of a key or other appropriate object.
24EBIKE OWNER’S MANUAL
ASSEMBLING YOUR BIKE
REFLECTORS
Your bike is supplied with one front reflector (white), one rear reflector (red), two
wheel reflectors (white) and four pedal reflectors (orange). These are an important
safety and legal requirement, and should remain securely fitted and in good
condition at all times. Periodically, inspect all reflectors, brackets and mounting
hardware for signs of wear or damage. Replace immediately if damage is found.
Some bicycles will require you to install your reflectors onto your bicycle. Please
refer to the following section for instructions on all types of bicycle reflectors.
WARNING! REFLECTORS ARE IMPORTANT SAFETY DEVICES WHICH ARE
DESIGNED AS AN INTEGRAL PART OF YOUR BICYCLE. FEDERAL REGULATIONS
REQUIRE EVERY BICYCLE TO BE EQUIPPED WITH FRONT, REAR, WHEEL, AND
PEDAL REFLECTORS. THESE REFLECTORS ARE DESIGNED TO PICK UP AND
REFLECT STREET LIGHTS AND CAR LIGHTS IN A WAY THAT HELPS YOU TO BE
SEEN AND RECOGNIZED AS A MOVING BICYCLIST. CHECK REFLECTORS AND
THEIR MOUNTING BRACKETS REGULARLY TO MAKE SURE THEY ARE CLEAN,
STRAIGHT, UNBROKEN AND SECURELY MOUNTED. REPLACE DAMAGED
REFLECTORS AND STRAIGHTEN OR TIGHTEN ANY THAT ARE BENT OR LOOSE.
25TOUTEG
ASSEMBLING YOUR BIKE
FORK MOUNT REFLECTORS
First insert one washer onto the hex bolt and insert hex
bolt through the reflector bracket and then through
the fork. Next, insert a second washer onto the bolt
and thread a hex nut onto the bolt behind the fork.
Tighten bolts until snug, making sure the reflector
is in an upright position. Screw
CAUTION: Be sure the reflector is vertical to the
ground. If the reflector is aimed up or down,
oncoming headlights may not reflect properly
in the reflector.
Hex Washer Washer Hex
Nut Bolt
Fork
26EBIKE OWNER’S MANUAL
ASSEMBLING YOUR BIKE
REAR REFLECTOR MOUNT ON SEAT POST
First attach the reflector to the bracket with
the reflector screw. Next, remove the clamp
screw and open the clamping reflector
bracket. Place clamping reflector bracket
around the seat post. If the clamp is too
loose, insert the shim inside the clamp.
Tighten the clamp screw to hold the reflector
assembly in place. Finally adjust the reflector
assembly in place and ensure that it is
upright and facing away from the bike.
CAUTION: Be sure the reflector is
vertical to the ground. If the reflector is
aimed up or down, oncoming headlights
may not reflect properly in the reflector.
27TOUTEG
ASSEMBLING YOUR BIKE
SHIFTING GEARS
If your bike is a multi-speed bike, please read the information below to familiarize
yourself with the basics of shifting gears.
Your multi-speed bicycle will have a derailleur drivetrain (see 1. below), an internal
gear hub drivetrain (see 2. below) or, in some special cases, a combination of
the two.
1. How a Derailleur Drivetrain Works
If your bicycle has a derailleur drivetrain, the gear-changing mechanism will have:
– a rear cassette or freewheel sprocket cluster
– a rear derailleur
– usually a front derailleur
– one or two shifters
– one, two or three front sprockets called chainrings
– a chain
A. A Brief Note About Shifting Gears
There are several different types and styles of shifting controls: levers, twist grips,
triggers, combination shift/brake controls, pushbuttons, and so on. If you are
not comfortable shifting gears, ask your local bike mechanic to explain the type
of shifting controls that are on your bike, and to show you how they work. The
vocabulary of shifting can be pretty confusing. A downshift is a shift to a “lower”
or “slower” gear, one which is easier to pedal. An upshift is a shift to a “higher” or
“faster”, harder to pedal gear. What’s confusing is that what’s happening at the front
derailleur is the opposite of what’s happening at the rear derailleur (for details, read
the instructions on Shifting the Rear Derailleur and Shifting the Front Derailleur
below). For example, you can select a gear which will make pedaling easier on a hill
(make a downshift) in one of two ways: shift the chain down the gear “steps” to a
smaller gear at the front, or up the gear “steps” to a larger gear at the rear. So, at the
rear gear cluster, what is called a downshift looks like an upshift. The way to keep
things straight is to remember that shifting the chain in towards the centerline of the
bike is for accelerating and climbing and is called a downshift. Moving the chain out
or away from the centerline of the bike is for speed and is called an upshift. Whether
upshifting or downshifting, the bicycle derailleur system design requires that the
drive chain be moving forward and be under at least some tension. A derailleur will
shift only if you are pedaling forward.
CAUTION: Never move the shifter while pedaling backward, nor pedal
backward immediately after having moved the shifter. This could jam the
chain and cause damage to the bicycle.
28EBIKE OWNER’S MANUAL
ASSEMBLING YOUR BIKE
B. Shifting the Rear Derailleur
The rear derailleur is controlled by the right shifter. The function of the rear derailleur
is to move the drive chain from one gear sprocket to another. The smaller sprockets
on the gear cluster produce higher gear ratios. Pedaling in the higher gears requires
greater pedaling effort, but takes you a greater distance with each revolution of the
pedal cranks. The larger sprockets produce lower gear ratios. Using them requires less
pedaling effort, but takes you a shorter distance with each pedal crank revolution.
Moving the chain from a smaller sprocket of the gear cluster to a larger sprocket
results in a downshift. Moving the chain from a larger sprocket to a smaller sprocket
results in an upshift. In order for the derailleur to move the chain from one sprocket
to another, the rider must be pedaling forward.
C. Shifting the Front Derailleur
The front derailleur, which is controlled by the left shifter, shifts the chain between
the larger and smaller chainrings. Shifting the chain onto a smaller chainring makes
pedaling easier (a downshift). Shifting to a larger chainring makes pedaling harder
(an upshift).
29TOUTEG
ASSEMBLING YOUR BIKE
D. Which Gear Should I Be In?
The combination of largest rear and smallest front gears is for the
steepest hills; the smallest rear and largest front combination is for
the greatest speed. It is not necessary to shift gears in sequence.
Instead, find the “starting gear” which is right for your level of
ability (a gear which is hard enough for quick acceleration but
easy enough to let you start from a stop without wobbling) and
experiment with upshifting and downshifting to get a feel for the
different gear combinations. At first, practice shifting where there
are no obstacles, hazards or other traffic, until you’ve built up your
confidence. Learn to anticipate the need to shift, and shift to a
lower gear before the hill gets too steep. If you have difficulties with
shifting, the problem could be mechanical adjustment. See your
local bike mechanic for help.
WARNING! NEVER SHIFT A DERAILLEUR TO THE LARGEST
OR THE SMALLEST SPROCKET IF THE DERAILLEUR IS NOT
SHIFTING SMOOTHLY. THE DERAILLEUR MAY BE OUT OF
ADJUSTMENT AND THE CHAIN COULD JAM, CAUSING YOU
TO LOSE CONTROL AND FALL.
WARNING! DO NOT FORCE THE SHIFT LEVERS. SHIFT ONLY WHEN
PEDALING FORWARD AND WITHOUT STRONG FORCE. DO NOT BACKPEDAL.
BACKPEDALING AND SHIFTING WHILE NOT PEDALING CAN DAMAGE THE
SPROCKETS AND STRETCH THE CABLE WIRE.
E. What If It Won’t Shift Gears?
If moving the shift control one click repeatedly fails to result in a smooth shift to the
next gear chances are that the mechanism is out of adjustment. Take the bike to
your bike mechanic to have it adjusted.
30EBIKE OWNER’S MANUAL
TUOTEGTM LCD DISPLAY
OPERATING INSTRUCTIONS
POWER ON/OFF
To turn the system on, press the Power button for three seconds. The screen
will display all contents then switch normal working mode and the system controller
will be activated. Press and hold again to power the system down. The system will
automatically turn off after 10 minutes of idle time.
SPEED DISPLAY
By default, the system will show the current speed of the bike (SPEED).
To view the Maximum Speed (MAX) or Average Speed (AVG), long-press
and .
Current Speed
Average Speed Max Speed
31TOUTEG
TUOTEGTM LCD DISPLAY
OPERATING INSTRUCTIONS
DATA DISPLAY
With the system on, pressing the Power Button repeatedly will toggle between
which data is displayed.
Odometer (ODO) and Trip Distance (TRIP) display your total mileage logged on the
system and the distance traveled for the current trip.
Odometer Trip Distance
Ride Time (TM) displays the total amount of time for the current trip.
Error Code (REE) displays when something is wrong with the system.
See Table 1 below.
Ride Time Error
Table 1: Error Code Definition
Code (Decimal) Signification
0 Normal
6 Low Battery Level
7 Motor Error
8 Throttle Error
9 Controller Error
10 UART Receive Error
11 UART Receive Error
32EBIKE OWNER’S MANUAL
TUOTEGTM LCD DISPLAY
OPERATING INSTRUCTIONS
If you have an error code displayed on your system, please contact the TUOTEG
Technical Support Team at 1-800-538-0029.
PEDAL ASSIST LEVEL
The Up or Down Button / changes the level of assistance provided by the
system from 1–5.
Level 1 Level 5
33TOUTEG
OPERATING PROCEDURES
START YOUR E-BIKE:
1. Turn the battery on.
For CNQR and XPLR models, this is near the top of the battery / front of the
bike.
For CVRT, turn the key into the ‘On’ position.
For CRZR, the on switch is located at the rear on the bottom of the battery case.
2. Turn on the display by holding the power button for 3 seconds
3. Hold the brake lever when not on the bike to ensure the system does not
engage.
WARNING: Do not push the throttle lever or spin the pedals while not on
the bike.
4. Once you begin riding, increase or decrease the motor assist by pressing the up
and down arrows / . There are 5 total levels of assist. The assistance will
stop at lower speeds at lower levels. The maximum speed the system will assist
to is 20 MPH.
NOTES DURING RIDING:
Frequent braking and again accelerating will deplete the battery faster. The motor
will stop assisting once you stop pedaling. Your ebike’s rated maximum load is
220 lb (100kg) including the rider, do not overload.
WARNING: When stopped, reduce the assist level to ‘0’ or turn off the
battery in case the crank arm keeps turning while you push the bike. The motor
would start suddenly which may lead to an accident.
FOR YOUR SAFETY, PLEASE MAINTAIN AND CLEAN YOUR EBIKE REGULARLY.
34EBIKE OWNER’S MANUAL
OPERATING PROCEDURES
HOW TO CHARGE THE BATTERY:
Park the ebike where an electric socket is available. With the battery off, insert the
round charging plug of the charger into the charging hole on your ebike frame, and
then plug the other end into a standard 100–240 volt AC outlet. When the light on
charger turns red, the battery is charging. When the charging light turns green, the
charging is finished and the battery is fully charged.
It takes about 5–6 hours to fully charge an empty battery. When the charging is
finished, unplug the electrical plug first, then unplug the charging plug connected
to the ebike, in that sequence.
This is a lithium battery, it has no memory effect, so you can charge or discharge
anytime. In normal circumstances, the battery can be used for more than 2 years.
NOTES FOR CHARGING:
• Make sure to charge your bike before rides. Do not attempt to ride with too little
power available.
• Please charge the battery in a dry, well-ventilated area with adequate power
supply.
• To protect the battery, only use the original charger. Please do not use this
charger to charge other ebike batteries.
• The charger contains high-voltage circuit. Do not dismantle it.
• Only charge the battery while it is switched off.
• Please avoid any liquid or foreign substance from entering the charger. Please
protect the charger from impact. Never let it drop or drop objects onto it.
• Do not cover the charger when it is charging.
• Please keep and use our charger in a dry and ventilated area.
• During charging, if the charger emits any smell or it becomes excessively hot,
please stop charging and call the TUOTEG Technical Support Team at
800-538-0029 or email TechSupport@TUOTEG.com.
35TOUTEG
OPERATING PROCEDURES
SHIFTING GEARS:
Your bike is equipped with multiple speeds. The first gear is for easier and uphill
pedaling, and the last gear is for maximum speed on level or downhill terrain.
Change gears only while pedaling. The rear wheel contains seven chain sprockets.
When the chain is around the largest sprocket, you are in 1st gear, or the lowest
gear. The high gear will have the derailleur positioned so that the chain is directed
around the smallest gear. Every position on the gear selector should cause a gear
change. Adjustments require fine tuning and should only be made by a qualified
technician.
NOTE: Avoid changing gears very rapidly from first gear to the last gear or vice
versa. If you change multiple gears too quickly, you could have the chain come off
the front sprocket.
WARNING: ONLY SHIFT GEARS WHILE PEDALING! Shifting gears while
using only the motor assist can cause the chain to become loose or come off
the bike.
36EBIKE OWNER’S MANUAL
MAINTENANCE/REPAIR
Correct routine maintenance of your new bike will ensure a longer life for your
bike and a safer ride for you.
Every time you ride your bike, its condition changes. The more you ride, the more
frequently maintenance will be required. We recommend you spend a little time
on regular maintenance tasks. The following schedules will assist you in knowing
what tasks need to be performed and how often. If you have any doubts about
your abilities to accomplish these tasks, we recommend you take your bike to a
professional bicycle mechanic periodically to have them done.
Schedule 1 - Lubrication
Frequency Component Lubricant How to Lubricate
Weekly Chain Chain lube or light oil Brush on or squirt
Derailleur wheels Chain lube or light oil Brush on or squirt
Monthly Derailleurs Oil Oil can
Brake calipers Oil 3 drops from oil can
Brake levers Oil 2 drops from oil can
Shift levers Lithium based grease Disassemble
Every Six Freewheel Oil 2 drops from oil can
Months Brake cables Lithium based grease Disassemble
Yearly Bottom bracket Lithium based grease Bicycle Mechanic
Pedals Lithium based grease Disassemble
Derailleur cables Lithium based grease Disassemble
Wheel bearings Lithium based grease Bicycle Mechanic
Headset Lithium based grease Bicycle Mechanic
Seat pillar Lithium based grease Disassemble
Lithium based grease
Note: The frequency of maintenance should increase with use in wet or dusty
conditions.
Do not over lubricate - remove excess lubricant to prevent dirt build up.
Never use a degreaser to lubricate your chain (WD-40™)
CAUTION: CALL THE TUOTEG TECHNICAL SUPPORT TEAM
AT 800-538-0029 OR EMAIL TECHSUPPORT@TUOTEG.COM
OR CONSULT A PROFESSIONAL BICYCLE MECHANIC WITH ANY
QUESTIONS ON REPAIRS OR MAINTENANCE.
37TOUTEG
MAINTENANCE/REPAIR
SERVICE CHECKLIST:
Frequency Task
Before every ride Check wheel and pedal tightness
Check tire pressure
Check brake operation
Check wheels for loose spokes, loose axle nuts or quick release
Make sure all fasteners are tightened securely
After every ride Quick wipe down with damp cloth
Weekly Lubrication as per schedule 1
Monthly Lubrication as per schedule 1
Check derailleur adjustment
Check brake adjustment
Check brake and gear cable adjustment
Check tire wear and pressure
Check wheels are true and spokes tight
Check hub, head set and crank bearings for looseness
Check pedals are tight
Check handlebars are tight
Check seat and seat post are tight and comfortably adjusted
Check frame and fork for trueness
Check all nuts and bolts are tight
Every six months Lubrication as per schedule 1
Check all points as per monthly service
Check and replace brake pads, if required
Check chain for excess play or wear
Yearly Lubrication as per schedule 1
CAUTION: CALL THE TUOTEG TECHNICAL SUPPORT TEAM
AT 800-538-0029 OR EMAIL TECHSUPPORT@TUOTEG.COM
OR CONSULT A PROFESSIONAL BICYCLE MECHANIC WITH ANY
QUESTIONS ON REPAIRS OR MAINTENANCE.
38EBIKE OWNER’S MANUAL
MAINTENANCE/REPAIR
TOOLS REQUIRED FOR MAINTENANCE:
1. Open ended wrench or box wrenches: 8mm, 9mm,
10mm, 12mm, 13mm, 14mm, 15mm
2. Open end or pedal wrench 15mm
3. Allen key wrenches: 4mm, 5mm, 6mm, 8mm
4. Adjustable wrench
6. Standard Phillips head screwdriver
7. Standard slip joint pliers
8. Tire pump
9. Tube repair kit
10. Tire levers
TRAVEL TOOLS:
We suggest you take the following items
with you when going on a long bike ride.
Tools should be fully secured in a sturdy bag
or container attached to the seat or frame
of the unit during travel:
1. Spare tube
2. Patch kit
3. Pump
4. Tire levers
5. Multi-tool
6. Cell phone
CAUTION: CALL THE TUOTEG TECHNICAL SUPPORT TEAM
AT 800-538-0029 OR EMAIL TECHSUPPORT@TUOTEG.COM
OR CONSULT A PROFESSIONAL BICYCLE MECHANIC WITH ANY
QUESTIONS ON REPAIRS OR MAINTENANCE.
39TOUTEG
MAINTENANCE/REPAIR
WHEEL INSPECTION:
It is most important that wheels are kept in top condition. Properly maintaining your
bicycle’s wheels will help braking performance and stability when riding. Be aware
of the following potential problems:
• Dirty or greasy rims:
Caution: These can render your brakes ineffective. Do not clean them with oily
or greasy materials. When cleaning, use a clean rag or wash with soapy water,
rinse and air dry. Don’t ride while they’re wet. When lubricating your bicycle,
don’t get oil on the rim braking surfaces.
• Wheels not straight:
Lift each wheel off the ground and spin them to see if they are crooked or out
of true. If wheels are not straight, they will need to be adjusted. This is quite
difficult and is best left to a professional bicycle mechanic.
• Broken or loose spokes:
Check that all spokes are tight and that none are missing or damaged.
Caution: Such damage can result in severe instability and possibly
an accident if not corrected. Again, spoke repairs are best handled
by a mechanic.
• Loose hub bearings:
Lift each wheel off the ground and try to move the wheel from side to side.
Caution: If there is movement between the axle and the hub, do not ride the
bicycle. Adjustment is required.
• Axle nuts:
Check that these are tight before each ride.
CAUTION: CALL THE TUOTEG TECHNICAL SUPPORT TEAM
AT 800-538-0029 OR EMAIL TECHSUPPORT@TUOTEG.COM
OR CONSULT A PROFESSIONAL BICYCLE MECHANIC WITH ANY
QUESTIONS ON REPAIRS OR MAINTENANCE.
40EBIKE OWNER’S MANUAL
MAINTENANCE/REPAIR
TIRE INSPECTION:
Tires must be maintained properly to ensure road holding and stability. Check the
following areas:
• Inflation:
Ensure tires are inflated to the pressure indicated on the sidewall of the tire.
Improper inflation is the biggest cause of tire failure. Due to the slightly porous
nature of bicycle inner tubes, it is normal for your tires to lose pressure over
time. For this reason, it is critically important to maintain the proper tire inflation
on your bike. Caution: Use a hand or foot pump to inflate tires. NEVER
inflate tires with an air compressor at a gas station. This can cause the
tubes to over inflate and blowout.
• Bead Seating:
When inflating or refitting the tire, make sure that the bead is properly seated in
the rim.
• Tread:
Check that the tread shows no signs of excessive wear or flat spots, and that
there are no cuts or other damage.
CAUTION: Excessively worn or damaged tires should be replaced.
• Valves:
Make sure valve caps are fitted and that valves are free from dirt. A slow leak
caused by the entry of dirt can lead to a flat tire and possibly a dangerous
situation.
RECOMMENDED TIRE PRESSURES:
The recommended pressure is molded on the sidewall of your bicycle tires.
CAUTION: CALL THE TUOTEG TECHNICAL SUPPORT TEAM
AT 800-538-0029 OR EMAIL TECHSUPPORT@TUOTEG.COM
OR CONSULT A PROFESSIONAL BICYCLE MECHANIC WITH ANY
QUESTIONS ON REPAIRS OR MAINTENANCE.
41TOUTEG
MAINTENANCE/REPAIR
HOW TO FIX A FLAT TIRE: If you need to repair a tire, follow these steps:
1. Remove the wheel from the bicycle.
2. Deflate the tire completely via the valve. Loosen the tire bead by pushing it
inward all the way around.
3. Press one side of the tire bead up over the edge of the rim. Note: Use tire
levers, not a screwdriver, otherwise you may damage the rim.
4. Remove the tube, leaving the tire on the rim.
5. Locate the leaks and patch using a tube repair kit or replace the tube. Note:
Ensure that the replacement tube size matches the size stated on the tire
sidewall and that the valve is the correct type for your bicycle.
6. Match the position of the leak in the tube with the tire to locate the possible
cause and mark the location on the tire.
7. Remove the tire completely and inspect for a nail, glass, etc. and remove if
located. Also inspect the inside of the rim to ensure there are no protruding
spokes, rust or other potential causes. Replace the rim tape which covers the
spoke ends.
8. Remount one side of the tire onto the rim.
9. Using a hand pump, inflate the tube just enough to give it some shape.
10. Place the valve stem through the hole in the rim and work the tube into the tire.
NOTE: Do not let it twist.
11. Using your hands only, remount the other side of the tire by pushing the edge
toward the center of the rim. Start on either side of the valve and work around
the rim.
12. Before the tire is completely mounted, push the valve up into the rim to make
sure the tire can sit squarely in position.
13. Fit the rest of the tire, rolling the last, most difficult part on using your thumbs.
NOTE: Avoid using tire levers as these can easily puncture the tube or damage
the tire.
14. Check that the tube is not caught between the rim and the tire bead at any point.
15. Using a hand pump, inflate the tube until the tire begins to take shape. Check
that the tire bead is evenly seated all the way around the rim. When properly
seated, fully inflate the tire to the pressure marked on the sidewall.
16. Replace the wheel into the frame checking that all gears, brakes and quick
release levers are properly adjusted.
CAUTION: CALL THE TUOTEG TECHNICAL SUPPORT TEAM
AT 800-538-0029 OR EMAIL TECHSUPPORT@TUOTEG.COM
OR CONSULT A PROFESSIONAL BICYCLE MECHANIC WITH ANY
QUESTIONS ON REPAIRS OR MAINTENANCE.
42You can also read