Maintaining and Troubleshooting Avaya Solutions Platform 130 Appliance - Release 4.0 Issue 3 April 2020
←
→
Page content transcription
If your browser does not render page correctly, please read the page content below
Maintaining and Troubleshooting Avaya
Solutions Platform 130 Appliance

                                 Release 4.0
                                     Issue 3
                                  April 2020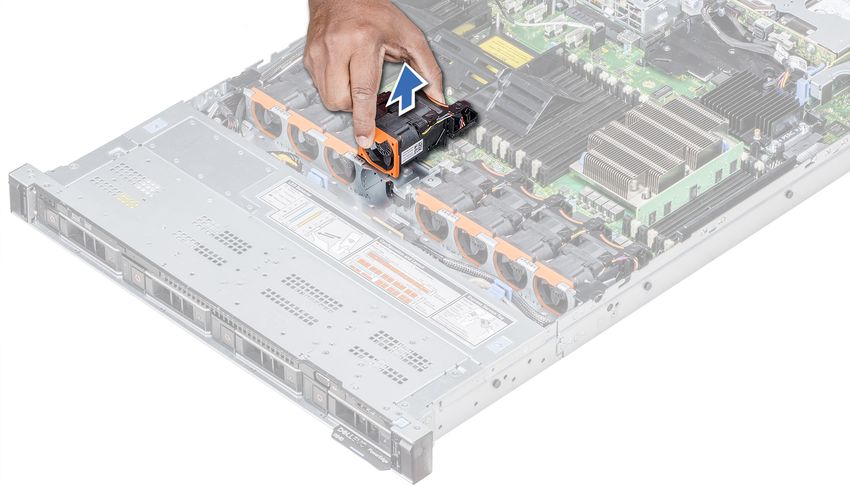
© 2020, Avaya Inc.                                                         YOU DO NOT WISH TO ACCEPT THESE TERMS OF USE, YOU
All Rights Reserved.                                                       MUST NOT ACCESS OR USE THE HOSTED SERVICE OR
                                                                           AUTHORIZE ANYONE TO ACCESS OR USE THE HOSTED
Notice                                                                     SERVICE.
While reasonable efforts have been made to ensure that the                 Licenses
information in this document is complete and accurate at the time of
printing, Avaya assumes no liability for any errors. Avaya reserves        THE SOFTWARE LICENSE TERMS AVAILABLE ON THE AVAYA
the right to make changes and corrections to the information in this       WEBSITE, HTTPS://SUPPORT.AVAYA.COM/LICENSEINFO,
document without the obligation to notify any person or organization       UNDER THE LINK “AVAYA SOFTWARE LICENSE TERMS (Avaya
of such changes.                                                           Products)” OR SUCH SUCCESSOR SITE AS DESIGNATED BY
                                                                           AVAYA, ARE APPLICABLE TO ANYONE WHO DOWNLOADS,
Documentation disclaimer                                                   USES AND/OR INSTALLS AVAYA SOFTWARE, PURCHASED
“Documentation” means information published in varying mediums             FROM AVAYA INC., ANY AVAYA AFFILIATE, OR AN AVAYA
which may include product information, operating instructions and          CHANNEL PARTNER (AS APPLICABLE) UNDER A COMMERCIAL
performance specifications that are generally made available to users      AGREEMENT WITH AVAYA OR AN AVAYA CHANNEL PARTNER.
of products. Documentation does not include marketing materials.           UNLESS OTHERWISE AGREED TO BY AVAYA IN WRITING,
Avaya shall not be responsible for any modifications, additions, or        AVAYA DOES NOT EXTEND THIS LICENSE IF THE SOFTWARE
deletions to the original published version of Documentation unless        WAS OBTAINED FROM ANYONE OTHER THAN AVAYA, AN AVAYA
such modifications, additions, or deletions were performed by or on        AFFILIATE OR AN AVAYA CHANNEL PARTNER; AVAYA
the express behalf of Avaya. End User agrees to indemnify and hold         RESERVES THE RIGHT TO TAKE LEGAL ACTION AGAINST YOU
harmless Avaya, Avaya's agents, servants and employees against all         AND ANYONE ELSE USING OR SELLING THE SOFTWARE
claims, lawsuits, demands and judgments arising out of, or in              WITHOUT A LICENSE. BY INSTALLING, DOWNLOADING OR
connection with, subsequent modifications, additions or deletions to       USING THE SOFTWARE, OR AUTHORIZING OTHERS TO DO SO,
this documentation, to the extent made by End User.                        YOU, ON BEHALF OF YOURSELF AND THE ENTITY FOR WHOM
                                                                           YOU ARE INSTALLING, DOWNLOADING OR USING THE
Link disclaimer                                                            SOFTWARE (HEREINAFTER REFERRED TO
Avaya is not responsible for the contents or reliability of any linked     INTERCHANGEABLY AS “YOU” AND “END USER”), AGREE TO
websites referenced within this site or Documentation provided by          THESE TERMS AND CONDITIONS AND CREATE A BINDING
Avaya. Avaya is not responsible for the accuracy of any information,       CONTRACT BETWEEN YOU AND AVAYA INC. OR THE
statement or content provided on these sites and does not                  APPLICABLE AVAYA AFFILIATE (“AVAYA”).
necessarily endorse the products, services, or information described       Avaya grants You a license within the scope of the license types
or offered within them. Avaya does not guarantee that these links will     described below, with the exception of Heritage Nortel Software, for
work all the time and has no control over the availability of the linked   which the scope of the license is detailed below. Where the order
pages.                                                                     documentation does not expressly identify a license type, the
Warranty                                                                   applicable license will be a Designated System License as set forth
                                                                           below in the Designated System(s) License (DS) section as
Avaya provides a limited warranty on Avaya hardware and software.          applicable. The applicable number of licenses and units of capacity
Refer to your sales agreement to establish the terms of the limited        for which the license is granted will be one (1), unless a different
warranty. In addition, Avaya’s standard warranty language, as well as      number of licenses or units of capacity is specified in the
information regarding support for this product while under warranty is     documentation or other materials available to You. “Software” means
available to Avaya customers and other parties through the Avaya           computer programs in object code, provided by Avaya or an Avaya
Support website: https://support.avaya.com/helpcenter/                     Channel Partner, whether as stand-alone products, pre-installed on
getGenericDetails?detailId=C20091120112456651010 under the link            hardware products, and any upgrades, updates, patches, bug fixes,
“Warranty & Product Lifecycle” or such successor site as designated        or modified versions thereto. “Designated Processor” means a single
by Avaya. Please note that if You acquired the product(s) from an          stand-alone computing device. “Server” means a set of Designated
authorized Avaya Channel Partner outside of the United States and          Processors that hosts (physically or virtually) a software application
Canada, the warranty is provided to You by said Avaya Channel              to be accessed by multiple users. “Instance” means a single copy of
Partner and not by Avaya.                                                  the Software executing at a particular time: (i) on one physical
“Hosted Service” means an Avaya hosted service subscription that           machine; or (ii) on one deployed software virtual machine (“VM”) or
You acquire from either Avaya or an authorized Avaya Channel               similar deployment.
Partner (as applicable) and which is described further in Hosted SAS       License types
or other service description documentation regarding the applicable
hosted service. If You purchase a Hosted Service subscription, the         Designated System(s) License (DS). End User may install and use
foregoing limited warranty may not apply but You may be entitled to        each copy or an Instance of the Software only: 1) on a number of
support services in connection with the Hosted Service as described        Designated Processors up to the number indicated in the order; or 2)
further in your service description documents for the applicable           up to the number of Instances of the Software as indicated in the
Hosted Service. Contact Avaya or Avaya Channel Partner (as                 order, Documentation, or as authorized by Avaya in writing. Avaya
applicable) for more information.                                          may require the Designated Processor(s) to be identified in the order
                                                                           by type, serial number, feature key, Instance, location or other
Hosted Service                                                             specific designation, or to be provided by End User to Avaya through
THE FOLLOWING APPLIES ONLY IF YOU PURCHASE AN AVAYA                        electronic means established by Avaya specifically for this purpose.
HOSTED SERVICE SUBSCRIPTION FROM AVAYA OR AN AVAYA                         Heritage Nortel Software
CHANNEL PARTNER (AS APPLICABLE), THE TERMS OF USE
FOR HOSTED SERVICES ARE AVAILABLE ON THE AVAYA                             “Heritage Nortel Software” means the software that was acquired by
WEBSITE, HTTPS://SUPPORT.AVAYA.COM/LICENSEINFO UNDER                       Avaya as part of its purchase of the Nortel Enterprise Solutions
THE LINK “Avaya Terms of Use for Hosted Services” OR SUCH                  Business in December 2009. The Heritage Nortel Software is the
SUCCESSOR SITE AS DESIGNATED BY AVAYA, AND ARE                             software contained within the list of Heritage Nortel Products located
APPLICABLE TO ANYONE WHO ACCESSES OR USES THE                              at https://support.avaya.com/LicenseInfo under the link “Heritage
HOSTED SERVICE. BY ACCESSING OR USING THE HOSTED                           Nortel Products” or such successor site as designated by Avaya. For
SERVICE, OR AUTHORIZING OTHERS TO DO SO, YOU, ON                           Heritage Nortel Software, Avaya grants Customer a license to use
BEHALF OF YOURSELF AND THE ENTITY FOR WHOM YOU ARE                         Heritage Nortel Software provided hereunder solely to the extent of
DOING SO (HEREINAFTER REFERRED TO INTERCHANGEABLY                          the authorized activation or authorized usage level, solely for the
AS “YOU” AND “END USER”), AGREE TO THE TERMS OF USE. IF                    purpose specified in the Documentation, and solely as embedded in,
YOU ARE ACCEPTING THE TERMS OF USE ON BEHALF A                             for execution on, or for communication with Avaya equipment.
COMPANY OR OTHER LEGAL ENTITY, YOU REPRESENT THAT                          Charges for Heritage Nortel Software may be based on extent of
YOU HAVE THE AUTHORITY TO BIND SUCH ENTITY TO THESE                        activation or use authorized as specified in an order or invoice.
TERMS OF USE. IF YOU DO NOT HAVE SUCH AUTHORITY, OR IF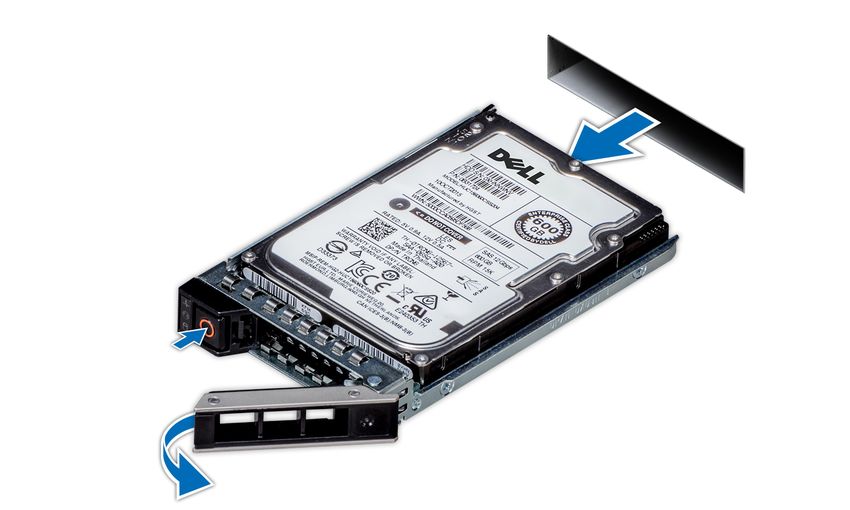
Copyright                                                                 PARTNER ACKNOWLEDGES AND AGREES THE AVAYA
                                                                          CHANNEL PARTNER IS RESPONSIBLE FOR ANY AND ALL
Except where expressly stated otherwise, no use should be made of         RELATED FEES AND/OR ROYALTIES. THE H.264 (AVC) CODEC
materials on this site, the Documentation, Software, Hosted Service,      IS LICENSED UNDER THE AVC PATENT PORTFOLIO LICENSE
or hardware provided by Avaya. All content on this site, the              FOR THE PERSONAL USE OF A CONSUMER OR OTHER USES
documentation, Hosted Service, and the product provided by Avaya          IN WHICH IT DOES NOT RECEIVE REMUNERATION TO: (I)
including the selection, arrangement and design of the content is         ENCODE VIDEO IN COMPLIANCE WITH THE AVC STANDARD
owned either by Avaya or its licensors and is protected by copyright      (“AVC VIDEO”) AND/OR (II) DECODE AVC VIDEO THAT WAS
and other intellectual property laws including the sui generis rights     ENCODED BY A CONSUMER ENGAGED IN A PERSONAL
relating to the protection of databases. You may not modify, copy,        ACTIVITY AND/OR WAS OBTAINED FROM A VIDEO PROVIDER
reproduce, republish, upload, post, transmit or distribute in any way     LICENSED TO PROVIDE AVC VIDEO. NO LICENSE IS GRANTED
any content, in whole or in part, including any code and software         OR SHALL BE IMPLIED FOR ANY OTHER USE. ADDITIONAL
unless expressly authorized by Avaya. Unauthorized reproduction,          INFORMATION FOR H.264 (AVC) AND H.265 (HEVC) CODECS
transmission, dissemination, storage, and or use without the express      MAY BE OBTAINED FROM MPEG LA, L.L.C. SEE HTTP://
written consent of Avaya can be a criminal, as well as a civil offense
                                                                          WWW.MPEGLA.COM.
under the applicable law.
                                                                          Compliance with Laws
Virtualization
                                                                          You acknowledge and agree that it is Your responsibility for
The following applies if the product is deployed on a virtual machine.
                                                                          complying with any applicable laws and regulations, including, but not
Each product has its own ordering code and license types. Unless
                                                                          limited to laws and regulations related to call recording, data privacy,
otherwise stated, each Instance of a product must be separately
                                                                          intellectual property, trade secret, fraud, and music performance
licensed and ordered. For example, if the end user customer or
                                                                          rights, in the country or territory where the Avaya product is used.
Avaya Channel Partner would like to install two Instances of the
same type of products, then two products of that type must be             Preventing Toll Fraud
ordered.
                                                                          “Toll Fraud” is the unauthorized use of your telecommunications
Third Party Components                                                    system by an unauthorized party (for example, a person who is not a
                                                                          corporate employee, agent, subcontractor, or is not working on your
“Third Party Components” mean certain software programs or
                                                                          company's behalf). Be aware that there can be a risk of Toll Fraud
portions thereof included in the Software or Hosted Service may
                                                                          associated with your system and that, if Toll Fraud occurs, it can
contain software (including open source software) distributed under
                                                                          result in substantial additional charges for your telecommunications
third party agreements (“Third Party Components”), which contain
                                                                          services.
terms regarding the rights to use certain portions of the Software
(“Third Party Terms”). As required, information regarding distributed     Avaya Toll Fraud intervention
Linux OS source code (for those products that have distributed Linux
OS source code) and identifying the copyright holders of the Third        If You suspect that You are being victimized by Toll Fraud and You
Party Components and the Third Party Terms that apply is available        need technical assistance or support, call Technical Service Center
in the products, Documentation or on Avaya’s website at: https://         Toll Fraud Intervention Hotline at +1-800-643-2353 for the United
support.avaya.com/Copyright or such successor site as designated          States and Canada. For additional support telephone numbers, see
by Avaya. The open source software license terms provided as Third        the Avaya Support website: https://support.avaya.com or such
                                                                          successor site as designated by Avaya.
Party Terms are consistent with the license rights granted in these
Software License Terms, and may contain additional rights benefiting      Security Vulnerabilities
You, such as modification and distribution of the open source
software. The Third Party Terms shall take precedence over these          Information about Avaya’s security support policies can be found in
Software License Terms, solely with respect to the applicable Third       the Security Policies and Support section of https://
Party Components to the extent that these Software License Terms          support.avaya.com/security.
impose greater restrictions on You than the applicable Third Party        Suspected Avaya product security vulnerabilities are handled per the
Terms.                                                                    Avaya Product Security Support Flow (https://
The following applies only if the H.264 (AVC) codec is distributed with   support.avaya.com/css/P8/documents/100161515).
the product. THIS PRODUCT IS LICENSED UNDER THE AVC                       Downloading Documentation
PATENT PORTFOLIO LICENSE FOR THE PERSONAL USE OF A
CONSUMER OR OTHER USES IN WHICH IT DOES NOT RECEIVE                       For the most current versions of Documentation, see the Avaya
REMUNERATION TO (i) ENCODE VIDEO IN COMPLIANCE WITH                       Support website: https://support.avaya.com, or such successor site
THE AVC STANDARD (“AVC VIDEO”) AND/OR (ii) DECODE AVC                     as designated by Avaya.
VIDEO THAT WAS ENCODED BY A CONSUMER ENGAGED IN A                         Contact Avaya Support
PERSONAL ACTIVITY AND/OR WAS OBTAINED FROM A VIDEO
PROVIDER LICENSED TO PROVIDE AVC VIDEO. NO LICENSE IS                     See the Avaya Support website: https://support.avaya.com for
GRANTED OR SHALL BE IMPLIED FOR ANY OTHER USE.                            product or Hosted Service notices and articles, or to report a problem
ADDITIONAL INFORMATION MAY BE OBTAINED FROM MPEG LA,                      with your Avaya product or Hosted Service. For a list of support
L.L.C. SEE HTTP://WWW.MPEGLA.COM.                                         telephone numbers and contact addresses, go to the Avaya Support
                                                                          website: https://support.avaya.com (or such successor site as
Service Provider                                                          designated by Avaya), scroll to the bottom of the page, and select
THE FOLLOWING APPLIES TO AVAYA CHANNEL PARTNER’S                          Contact Avaya Support.
HOSTING OF AVAYA PRODUCTS OR SERVICES. THE PRODUCT                        Trademarks
OR HOSTED SERVICE MAY USE THIRD PARTY COMPONENTS
SUBJECT TO THIRD PARTY TERMS AND REQUIRE A SERVICE                        The trademarks, logos and service marks (“Marks”) displayed in this
PROVIDER TO BE INDEPENDENTLY LICENSED DIRECTLY FROM                       site, the Documentation, Hosted Service(s), and product(s) provided
THE THIRD PARTY SUPPLIER. AN AVAYA CHANNEL PARTNER’S                      by Avaya are the registered or unregistered Marks of Avaya, its
HOSTING OF AVAYA PRODUCTS MUST BE AUTHORIZED IN                           affiliates, its licensors, its suppliers, or other third parties. Users are
WRITING BY AVAYA AND IF THOSE HOSTED PRODUCTS USE                         not permitted to use such Marks without prior written consent from
OR EMBED CERTAIN THIRD PARTY SOFTWARE, INCLUDING                          Avaya or such third party which may own the Mark. Nothing
BUT NOT LIMITED TO MICROSOFT SOFTWARE OR CODECS,                          contained in this site, the Documentation, Hosted Service(s) and
THE AVAYA CHANNEL PARTNER IS REQUIRED TO                                  product(s) should be construed as granting, by implication, estoppel,
INDEPENDENTLY OBTAIN ANY APPLICABLE LICENSE                               or otherwise, any license or right in and to the Marks without the
AGREEMENTS, AT THE AVAYA CHANNEL PARTNER’S EXPENSE,                       express written permission of Avaya or the applicable third party.
DIRECTLY FROM THE APPLICABLE THIRD PARTY SUPPLIER.                        Avaya is a registered trademark of Avaya Inc.
WITH RESPECT TO CODECS, IF THE AVAYA CHANNEL
PARTNER IS HOSTING ANY PRODUCTS THAT USE OR EMBED
THE H.264 CODEC OR H.265 CODEC, THE AVAYA CHANNEL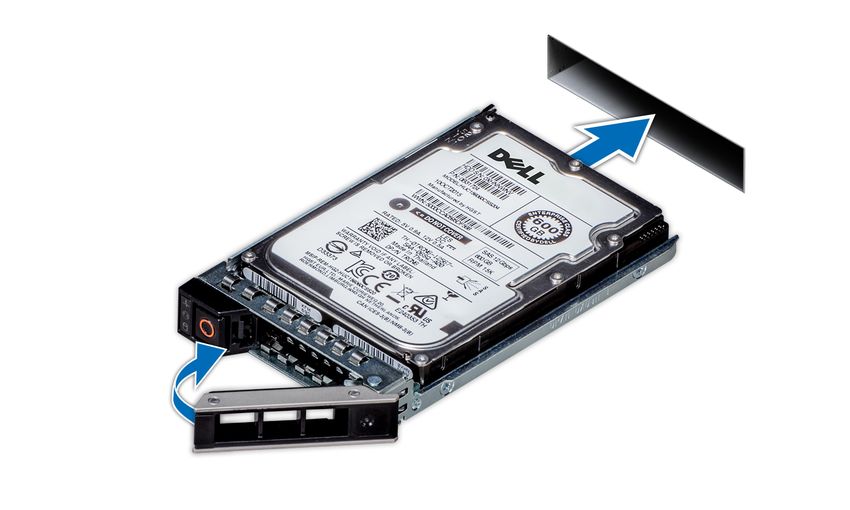
All non-Avaya trademarks are the property of their respective owners.
Linux® is the registered trademark of Linus Torvalds in the U.S. and
other countries.
Contents
Chapter 1: Introduction............................................................................................................ 7
Purpose.................................................................................................................................. 7
Change history........................................................................................................................ 7
Dell server overview................................................................................................................ 7
About this document................................................................................................................ 9
Downloading Dell documentation.............................................................................................. 9
Chapter 2: Overview............................................................................................................... 10
Avaya Solutions Platform overview......................................................................................... 10
Avaya Solutions Platform Server specifications........................................................................ 10
Front view of Dell™ PowerEdge™ R640 Server........................................................................ 12
Left control panel view........................................................................................................... 13
Back view of Dell™ PowerEdge™ R640 Server........................................................................ 14
Front LCD panel.................................................................................................................... 15
LCD screen........................................................................................................................... 16
Status LED indicators............................................................................................................ 17
Chapter 3: Maintaining and Troubleshooting the Avaya Converged Platform 130
Appliance................................................................................................................................. 18
External maintenance field replacement units.......................................................................... 18
Internal field replacement units............................................................................................... 18
Server Field Replaceable Unit................................................................................................ 19
Electrostatic discharge safety................................................................................................. 19
Hard disk drive problems....................................................................................................... 20
Hard drive indicator patterns............................................................................................. 20
Troubleshooting a hard disk drive..................................................................................... 21
Replacing a hard disk drive.............................................................................................. 23
Power supply problems.......................................................................................................... 25
Troubleshooting a power supply....................................................................................... 27
Replacing a power supply................................................................................................ 29
Cooling problems.................................................................................................................. 30
Troubleshooting cooling problems..................................................................................... 30
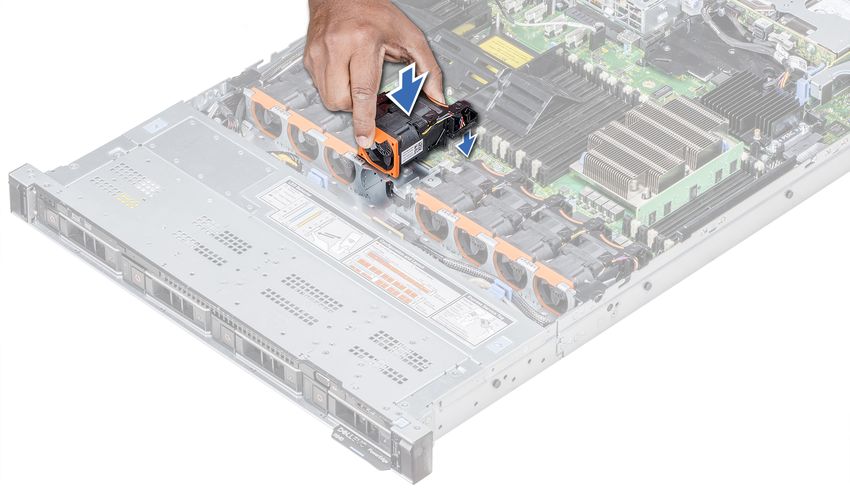
Replacing cooling fans..................................................................................................... 32
System memory.................................................................................................................... 33
Sample memory configurations........................................................................................ 34
General memory module guidelines.................................................................................. 34
Removing the cooling shroud to gain access for system memory replacement..................... 35
Mode-specific guidelines.................................................................................................. 36
DIMM problems............................................................................................................... 36
Troubleshooting memory DIMMs...................................................................................... 37
Replacing memory DIMMs............................................................................................... 38
April 2020 Maintaining and Troubleshooting Avaya Solutions Platform 130 Appliance 5
Comments on this document? infodev@avaya.com
Contents
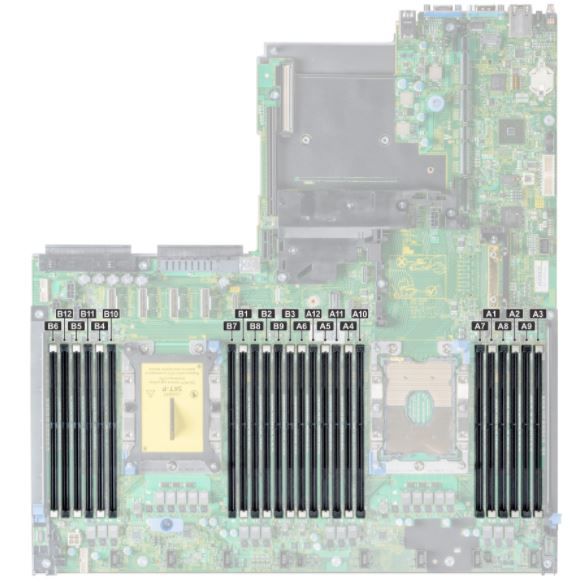
Memory socket locations.................................................................................................. 40
NIC problems........................................................................................................................ 41
Troubleshooting a NIC..................................................................................................... 42
Replacing a network daughter card................................................................................... 43
RAID battery problems........................................................................................................... 44
Troubleshooting RAID batteries........................................................................................ 44
Checking the RAID battery health using the iDRAC ........................................................... 45
Checking the RAID battery health using system setup menu............................................... 46
Checking the RAID battery health from Lifecycle Controller menu....................................... 48
Replacing RAID batteries................................................................................................. 49
RAID Battery ordering information.................................................................................... 52
DVD-ROM problems.............................................................................................................. 52
Troubleshooting a DVD-ROM drive................................................................................... 53
Removing optical drive..................................................................................................... 54
Installing the optical drive................................................................................................. 55
Dell Embedded System Diagnostics........................................................................................ 55
Running system diagnostics from Boot Manager................................................................ 56
Avaya Solutions Platform 130 component MIBs and OIDs........................................................ 56
Collection of ESXi logs........................................................................................................... 56
Chapter 4: Dell R640 FRU replacement................................................................................ 57
Overview.............................................................................................................................. 57
Prerequisites......................................................................................................................... 58
Procedures........................................................................................................................... 59
HDD import steps ................................................................................................................. 60
ACP 130/120 FRU rebuild sequential steps............................................................................. 79
How to install ESXi license .................................................................................................... 80
Additional steps required to ensure graceful shutdown and startup of VMs................................. 82
Chapter 5: Resources............................................................................................................. 84
Documentation...................................................................................................................... 84
Finding documents on the Avaya Support website............................................................. 85
Avaya Documentation Center navigation........................................................................... 85
Viewing Avaya Mentor videos................................................................................................. 86
Support................................................................................................................................ 87
April 2020 Maintaining and Troubleshooting Avaya Solutions Platform 130 Appliance 6
Comments on this document? infodev@avaya.com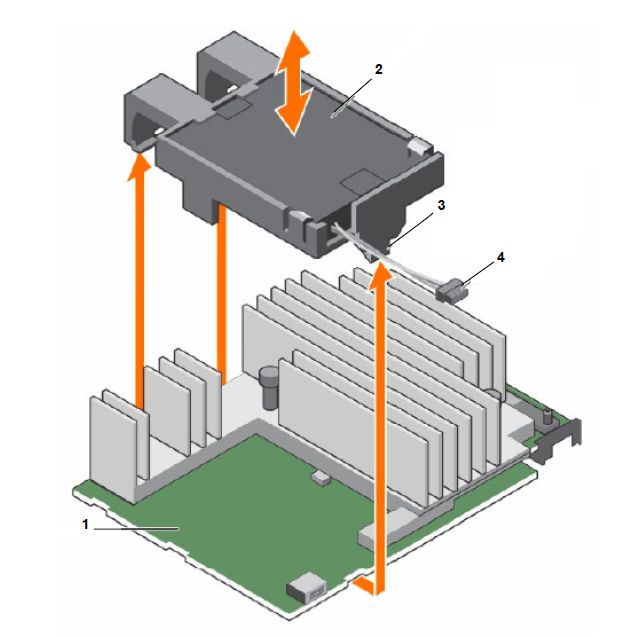
Chapter 1: Introduction

Purpose
     This document provides general maintenance and troubleshooting information for the Avaya
     Solutions Platform servers.
     This document is intended for the professional who is involved in the maintenance and
     troubleshooting activities of the Avaya Solutions Platform servers.
     Avaya Solutions Platform was formerly called Avaya Converged Platform (ACP). This document
     might still refer to Avaya Solutions Platform as Avaya Converged Platform or ACP in some places.

Change history

      Issue     Date                   Summary of changes
      1         August 2018            Initial release
      2         February 2020          Updated the following sections:
                                       • Dell server overview
                                       • Avaya Solutions Platform overview
                                       • Avaya Solutions Platform Server specifications
                                       • Back view of Dell™ PowerEdge™ R640 Server
                                       Added the following sections:
                                       • Avaya Solutions Platform 130 component MIBs and OIDs
                                       • Collection of ESXi logs
      3         May 2020               Added a new Chapter Dell R640 FRU replacement

Dell server overview
     The Avaya Solutions Platform servers category includes Dell servers that support Avaya software
     solutions, some requiring additional hardware and memory requirements beyond the standard

April 2020             Maintaining and Troubleshooting Avaya Solutions Platform 130 Appliance          7
                                     Comments on this document? infodev@avaya.com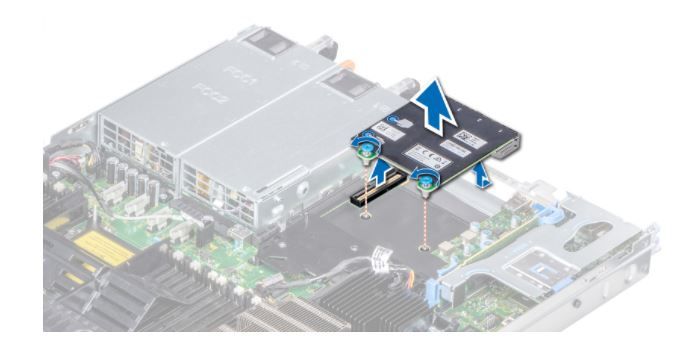
Introduction

     configuration. This book covers the standard configuration only—consult specific Avaya product
     documentation for application-specific or solution-specific server configurations.
         • Avaya Solutions Platform servers are supplied under an OEM relationship and Avaya servers
           are treated differently than commercially available servers from the vendors.
         • Neither customers, business partners, distributors, nor Avaya Associates interacting with
           customers and business partners, should get BIOS or other firmware updates for any third
           party OEM servers forming part of Avaya’s turnkey appliance offers from any source except
           the Avaya support site. Only consult Avaya-provided downloads, information and support.
           Send questions to the Server Product Management mailbox at acpprodmgt@avaya.com.
         • Avaya Solutions Platform servers are turnkey appliances. No servers designed for a
           particular application can be repurposed for use with another application. The only exception
           to this is when an application has provided an upgrade or migration path from an existing
           server state to a different server state with the appropriate kits, tools, documentation, and
           training materials.
         • Neither customers, business partners, distributors, nor Avaya Associates interacting with
           customers and business partners, should get BIOS or other firmware updates for any third
           party OEM servers forming part of Avaya’s turnkey appliance offers from any source except
           the Avaya support site. Only consult Avaya provided downloads, information and support. All
           BIOS or firmware updates are provided through Avaya. Go to the Avaya Support website at
           http://support.avaya.com for additional information.
         • Avaya Solutions Platform 130 servers must not be updated with BIOS or firmware updates
           from the vendor’s website. Only Avaya provided BIOS/Firmware updates can be used.
           Updating directly from the vendor’s website will result in an unsupported configuration. BIOS/
           Firmware updates are made available on http://plds.avaya.com and are customer installable.
         • Avaya Solutions Platform 130 ESXi updates should only be obtained from Avaya. Updating
           directly from the hardware vendor or VMware’s websites will result in an unsupported
           configuration. Note that the OEM server vendor (in this case Dell) provides Avaya with their
           latest certified package of the ESXi software. This ensures that any updates will be
           compatible with the underlying hardware, drivers, etc. Once Avaya has an update from the
           vendor, the new image is fully vetted with the Avaya solutions to assess any potential
           performance or capacity impacts. This image is then made available on http://plds.avaya.com
           and is customer installable.
         • Do not contact Dell for Service; all support, warranty, repair, and maintenance are through
           the Avaya processes.
         • Avaya strongly recommends that all servers are protected with an uninterrupted Power
           Supply for power surge and interruption protection. Avaya is not responsible for servers
           damaged by power surges, brown outs, black outs etc. when the server is connected to
           standard power mains and has no protection.
         • Dell’s RAID battery is a consumable item that can be purchased as a part without a Service
           ticket. Customers are responsible for installing them, the procedure for which is in the
           Maintaining and troubleshooting document or in appropriate OEM vendor documentation.
         • Quality assurance - product integrity testing or environmental international restrictions/ has
           been completed by Dell and verified with Avaya through the use of Design for Environmental

April 2020              Maintaining and Troubleshooting Avaya Solutions Platform 130 Appliance           8
                                       Comments on this document? infodev@avaya.com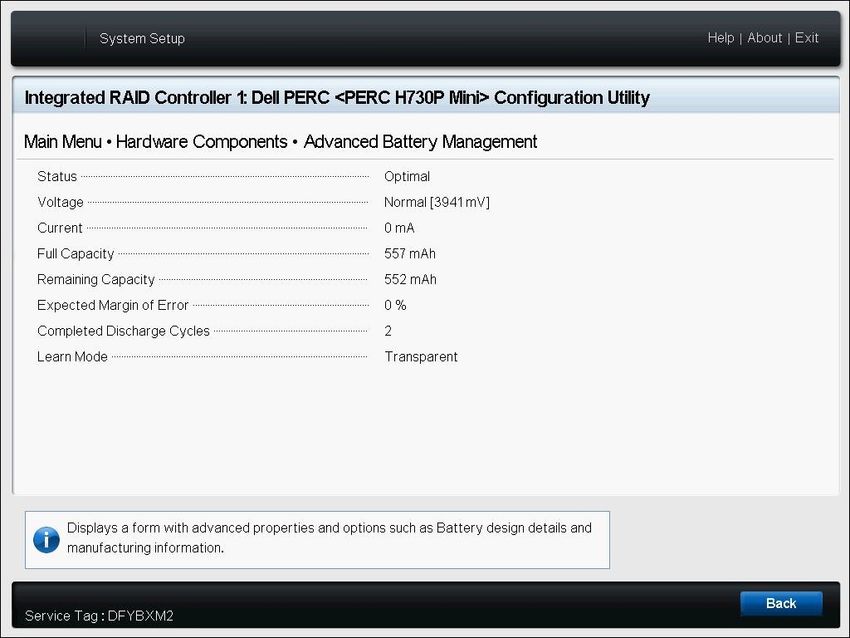
About this document

             Checklists. These lists include: batteries, printed wiring boards, plastic parts, product
             packaging, RoHS, green requirements, and energy efficiency.

About this document
     This document contains information on maintaining and troubleshooting Avaya Solutions Platform
     servers. This document provides:
         • Instructions to maintain and troubleshoot Avaya Solutions Platform servers.
         • Suggested changes, details, and notes to assist the user in interpreting the manufacturer’s
           documentation and to clarify Avaya's recommended implementation of the equipment.
         • Guidelines to diagnose server problems, the user might require a Monitor, USB keyboard,
           and mouse to connect to the server.

Downloading Dell documentation
     About this task
     Use this procedure to find and download the Dell™ PowerEdge™ R640 documentation from Dell.
     Procedure
             1. Open a browser and to go http://www.support.dell.com.
             2. On the Support page, scroll to the Product support section and click View products
                under Browse for a product.
             3. Click Servers, Storage, & Networking in the “select a product” section.
             4. Click PowerEdge.
             5. Click PowerEdge R640.
             6. Click Manuals.
             7. Click the link that corresponds to the document that you want to download.

April 2020                 Maintaining and Troubleshooting Avaya Solutions Platform 130 Appliance           9
                                          Comments on this document? infodev@avaya.com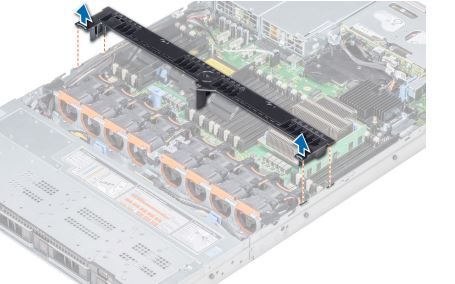
Chapter 2: Overview

Avaya Solutions Platform overview
     Avaya Solutions Platform (ACP) is a turnkey hardware solution that is available for many Avaya
     applications. Refer to your product application specific documentation. Avaya Solutions Platform
     100 series offers a single virtualized or bare metal server delivering Avaya unified communication
     and contact center applications.
     The Avaya Solutions Platform 100 series is comprised of three Models:
             1. ACP 110: This is a bare metal server used by a few applications. The applications
                determine if the Operating System (OS) is preloaded at Avnet.
             2. ACP 120: The is the Dell R640 shipped from Avnet with Avaya Virtualized Platform
                preloaded. The ACP 120 is synonymous with AVP. AVP 7.1.3.3 or greater, or AVP 8.0.1 or
                greater is required.
             3. ACP 130: This is the Dell R640 shipped from Avnet with ESXi 6.5 preloaded and with a
                standard VMware license.
         Note:
         This document focuses on Avaya Solutions Platform 130 (ACP 130).
     Avaya Solutions Platform 130 Appliance utilizes VMware vSphere ESXi 6.5 U2 with a Standard
     License.
         Note:
         On the Avaya Solutions Platform 130 Appliance, VMware Vsphere 6.5 Standard is loaded and
         the license key is installed.
         The license key label is located on the lid of the Avaya Solutions Platform 130 Appliance
         server.

Avaya Solutions Platform Server specifications
     Server Specifications
     The following table provides Avaya Solutions Platform server specifications:

April 2020                 Maintaining and Troubleshooting Avaya Solutions Platform 130 Appliance      10
                                         Comments on this document? infodev@avaya.com
Avaya Solutions Platform Server specifications
Note:
Profile 1 currently supports Common Server 3. Profile 1 servers are not covered in this
document. See the appropriate application-specific documentation for information.
Construct Profile #2 Profile #3 Profile #4 Profile #5 Profile #51 for
Avaya Solutions
Platform 130
Appliance Only
RMU 1U 1U 1U 1U 1U
Intel Skylake CPU S-4114 S-4114 G-6132 G-6132 G-6132
Number of CPU 1 2 1 2 2
sockets
Number of Cores 10 10 14 14 28
per CPU
Number of Cores 10 20 14 28 28
per Server
Core Frequency 2.2 2.2 2.6 2.6 2.6
(GHz)
Number of 8GB 31 62 — — —
RDIMMs
Number of 16GB — — 6 12 12
RDIMMs
Memory per 24 48 96 192 192
Server in GB
Number of HDDs 3 4 4 6 8
2.5" 10K SAS
10K 2.5” SAS 600 600 600 600 600
HDD Size in GB
Network 1Gb ports 6 6 6 6 6
RAID options 5 (1.2 TB) 1, 5, and 6 1, 5, and 6 1, 5, and 6 6
(1.2, 1.8, and (1.2, 1.8, and (1.8, 3, 2.4
1.2 TB) 1.2 TB) TB)
Usable virtual disk 1.2 TB 1.2 TB 1.2 TB 2.4 TB 3.6 TB
capacity
Power Supplies 2 2 2 2 2
Rail Kit Y Y Y Y Y
1 3 additional RDIMMs may be added to fully balance CPU memory.
2 6 additional RDIMMs may be added to fully balance CPU memory.
April 2020 Maintaining and Troubleshooting Avaya Solutions Platform 130 Appliance 11
Comments on this document? infodev@avaya.comOverview
Front view of Dell™ PowerEdge™ R640 Server
Figure 1: Front view of Dell PowerEdge R640 server
No. Item Icon Description
1 Left control panel NA Displays the system health, system ID, and status LED indicators.
• Status LED: Enables you to identify failed hardware components.
There are up to five status LEDs and an overall system health LED
(Chassis health and system ID) bar.
2 Optical drive N/A One slim SATA DVD-ROM drive.
Note:
DVD devices are data only.
3 USB port The USB port is USB 3.0 compliant.
4 VGA port Enables you to connect a display device to the system.
5 Right control panel NA Contains the power button, USB port, iDRAC Direct micro port, and the
iDRAC Direct status LED.
6 Drive slots NA Enable you to install hard drives that are supported on your system.
April 2020 Maintaining and Troubleshooting Avaya Solutions Platform 130 Appliance 12
Comments on this document? infodev@avaya.comLeft control panel view
Left control panel view
Item Button Description
1 Status LED Indicate the status of the system.
indicators
2 System health Indicates the system health.
and system ID
indicator
3 iDRAC Quick Indicates if the iDRAC Quick Sync 2 wireless option is activated. The
Sync 2 Quick Sync 2 feature allows management of the system using mobile
wireless devices. This feature aggregates hardware/firmware inventory and
indicator various system level diagnostic/error information that can be used in
troubleshooting the system.
The iDRAC
Quick Sync 2 Note:
wireless
options is not iDRAC Quick Sync 2 wireless indicator is available only on certain
available on configurations.
Avaya servers.
April 2020 Maintaining and Troubleshooting Avaya Solutions Platform 130 Appliance 13
Comments on this document? infodev@avaya.comOverview
Back view of Dell™ PowerEdge™ R640 Server
Figure 2: Back view of Dell PowerEdge R640 single CPU server
Figure 3: Back view of Dell PowerEdge R640 dual CPU server
No. Item Icon Description
1 PCIe expansion N/A Enables you to install PCI Express expansion cards.
card slot(s)
Note:
Avaya Solutions Platform profiles 2, 3, 4, 5, and 51 are provided
with six 1GbE NICs. Avaya does not support the addition of NICs
in the field no matter if the server was originally shipped with 4 or 6
NICs in an Avaya Solutions Platform 130 at this time.
2 Drive slots N/A Enables you to install hard drives that are supported on your system.
3 Power supply unit N/A Wattage and voltage type depends on configuration.
(2)
4 NIC port (4) The NIC ports that are integrated on the network daughter card (NDC)
provide network connectivity.
5 USB 3.0 port The USB ports are of 9-pin and 3.0-compliant. These ports enable you
to connect USB devices to the system.
6 VGA port Enables you to connect a display device to the system.
7 USB Connectors Allows you to connect USB devices to the system. These ports are USB
(2) 3.0-compliant.
8 Serial port Enables you to connect a serial device to the system.
Table continues…
April 2020 Maintaining and Troubleshooting Avaya Solutions Platform 130 Appliance 14
Comments on this document? infodev@avaya.comFront LCD panel
No. Item Icon Description
9 iDRAC9 Enterprise Enables you to remotely access iDRAC.
port
10 CMA power port N/A The Cable Management Arm (CMA) power port enables you to connect
to the CMA.
11 System The System Identification (ID) button is available on the front and back
identification button panel of the systems. Press the button to identify a system in a rack by
turning on the system ID button. You can also use the system ID button
to reset iDRAC and to access BIOS using the Step Through mode.
Front LCD panel
Use Front LCD panel to identify hardware status and problems with the server.
LCD panel provides system information, status, and error messages, to indicate if the system is
operating correctly.
• The LCD backlight is white during normal operating condition
• When the system needs attention, the LCD backlight turns amber, and displays an error code
followed by descriptive text.
• When the system turns off and there are no errors, LCD enters the standby mode after five
minutes of inactivity. Press any button on the LCD to turn it on.
• If the LCD panel stops responding, remove the bezel and reinstall it.
• The LCD backlight remains turned off if LCD messaging is turned off using the iDRAC utility,
the LCD panel, or other tools.
Note:
If the system is connected to a power source and an error is detected, the LCD turns amber
regardless of whether the system is turned on or off.
Figure 4: Front LCD panel
April 2020 Maintaining and Troubleshooting Avaya Solutions Platform 130 Appliance 15
Comments on this document? infodev@avaya.comOverview
Item Button Description
1 Left Move the cursor back in one-step increments
2 Select Select the menu item highlighted by the cursor
3 Right Move the cursor forward in one-step increments.
During message scrolling:
• Press once to increase scrolling speed
• Press again to stop
• Press again to return to default scrolling speed
• Press again to repeat the cycle
• The display stops scrolling when the button is released. After 45
seconds of inactivity, the display starts scrolling.
4 LCD display Displays system information, status, and error messages or iDRAC IP
address.
LCD screen
The LCD screen is used to display hardware system errors and alarms. The LCD screen displays
user-configurable information about the system. This screen is also displayed during normal
system operation when there are no status messages or errors. When the system is in standby
mode, the LCD backlight turns off after five minutes of inactivity if there are no error messages.
Press one of the three navigation buttons (Select, Left, or Right) to view the Home screen.
To navigate to the Home screen from another menu, select the Home icon.
From the Home screen, press the Select button to enter the main menu.
Option Description
MAC Displays the MAC addresses for iDRAC, iSCSI, or Network devices.
Name Displays the name of the Host, Model, or User String for the system.
Number Displays the Asset tag or the Service tag for the system
Power Displays the power output of the system in BTU/hr or Watts. The display format can be
configured in the Set home submenu of the Setup menu.
Temperature Displays the temperature of the system in Celsius or Fahrenheit.
The display format can be configured in the Set home submenu of the Setup menu.
iDRAC IP Most Avaya Applications do not administer or use the iDRAC interface
Note:
For iDRAC support and implementation, refer to your product release notes.
April 2020 Maintaining and Troubleshooting Avaya Solutions Platform 130 Appliance 16
Comments on this document? infodev@avaya.comStatus LED indicators
Status LED indicators
Note:
The status LED indicators are always off and only turns on to a solid amber if any error
occurs.
Icon Button Condition Resolution
Drive indicator The indicator turns solid • Check the System Event Log to
amber if there is a drive determine if the drive has an error.
error.
• Run the appropriate online
diagnostics test and restart the
system and run embedded
diagnostics (ePSA).
• If the drives are congured in a
RAID array, restart the system,
and enter the host adapter
conguration utility program.
Temperature indicator The indicator turns solid Ensure that none of the following
amber if the system conditions exist:
experiences a thermal error
• A cooling fan has been removed
(for example, the ambient
or has failed.
temperature is out of range
or there is a fan failure). • System cover, air shroud, memory
module blank, or back filler
bracket is removed.
• Ambient temperature is too high.
• External airflow is obstructed.
Electrical indicator The indicator turns solid Check the System Event Log or
amber if the system system messages for the specific
experiences an electrical issue. If it is due to a problem with
error (for example, voltage the PSU, check the LED on the
out of range, or a failed PSU. Reseat the PSU.
power supply unit (PSU) or
voltage regulator).
Memory indicator The indicator turns solid Check the System Event Log or
amber if a memory error system messages for the location of
occurs. the failed memory. Reseat the
memory module.
PCIe indicator The indicator turns solid Restart the system. Update any
amber if a PCIe card required drivers from Avaya for the
experiences an error. PCIe card. Reinstall the card.
April 2020 Maintaining and Troubleshooting Avaya Solutions Platform 130 Appliance 17
Comments on this document? infodev@avaya.comChapter 3: Maintaining and
Troubleshooting the Avaya
Converged Platform 130
Appliance
External maintenance field replacement units
Hard Disk Drive (HDD) Field Replaceable Units (FRUs) are Hot Swappable.
Description Hot-swappable?
R640 600 GB 10K SAS 2.5” HDD Y
R640 1.2 TB 10K SAS 2.5” HDD Y
R640 Power Supply Unit Y
Internal field replacement units
Internal Field Replaceable Units (FRUs) require the server to be shutdown and the cover removed
to access and replace the FRU.
Internal field replacement units
R640 1GbE QUAD PT NIC DAUGR CRD
R640 H830 RAID CNTRLR
R640 ADDN 1GbE PCIE DUAL PT NIC
R640 DVD-ROM DRIVE W/BRKT
R640 CHASSIS FAN
R640 Memory DIMM
R640 RAID battery
April 2020 Maintaining and Troubleshooting Avaya Solutions Platform 130 Appliance 18
Comments on this document? infodev@avaya.comServer Field Replaceable Unit
Server Field Replaceable Unit
A server field replaceable unit is based on the server profile core components. A server FRU will
have the appropriate number (1 or 2) and type of CPU (High or Low). It will have 3 DIMMs and the
4 embedded NIC ports.
The following components are sourced from the existing server:
• HDDs
• Power Supply Unit (PSU)
• PCIe Cards
• Additional DIMMs over (1 or 3)
Server FRUs will be shipped with 1 hard drive and 1 power supply. During the troubleshooting
process, if HDD or PSU fails, you must replace the appropriate parts.
When server FRU is ordered, Avaya ships only the base server to the customer location.
For more information, refer to the corresponding knowledge base article on the Avaya Knowledge
Base website.
Electrostatic discharge safety
Electrostatic discharge (ESD) is the transfer of an electrostatic charge between objects at different
electrical potentials. ESD can change the electrical characteristics and degrade or destroy a
semiconductor device. ESD can also disrupt the normal operation of an electronic system by
causing equipment malfunction or failure.
To dissipate or neutralize electrostatic charges, use proper grounding and conductive or
dissipative materials.
Caution:
Risk of equipment damage
To prevent damage from electrostatic discharge, always wear an antistatic wrist strap
connected to an electrostatic discharge (ESD) jack.
Proper antistatic packaging effectively shields products from electrostatic charges and reduces the
charge generation caused by product movement within the container.
April 2020 Maintaining and Troubleshooting Avaya Solutions Platform 130 Appliance 19
Comments on this document? infodev@avaya.comMaintaining and Troubleshooting the Avaya Converged Platform 130 Appliance
Hard disk drive problems
Symptoms
The following indicate hard drive problems:
• Server status LED indicator patterns indicate that drives failed, alarmed by Avaya application,
or reported by the iDRAC.
• An Avaya application alarm indicates an active disk drive failure.
• An Avaya application does not process the drives.
• Data is inaccessible.
• Server response time is slower than usual.
Hard drive indicator patterns
Each hard drive carrier has an activity LED indicator and a status LED indicator. The indicators
provide information about the current status of the hard drive. The activity LED indicator indicates
whether the hard drive is currently in use or not. The status LED indicator indicates the power
condition of the hard drive.
Indicator ID Description
1 Hard drive activity indicator
2 Hard drive status LED indicator
3 Hard drive
April 2020 Maintaining and Troubleshooting Avaya Solutions Platform 130 Appliance 20
Comments on this document? infodev@avaya.comHard disk drive problems
HDD LED indicator patterns
Sr. No. LED Pattern Condition
1 Flashes green twice per second. Identifying drive or preparing for removal.
2 Off Drive ready for insertion or removal.
Note:
The drive status indicator remains off until all hard
drives are initialized after the system is turned on.
Drives are not ready for removal during this time.
3 Flashes green, amber, and then Predicted drive failure.
turns off.
4 Flashes amber four times per Drive failed.
second.
5 Flashes green slowly. Drive rebuilding.
6 Steady green. Drive online.
7 Flashes green for three seconds, Rebuild stopped.
amber for three seconds, and then
turns off after six seconds.
Troubleshooting a hard disk drive
About this task
Use this procedure to troubleshoot hard disk drive (HDD) problems on one of the following drives:
• R640 SRVR 600 GB 10K SAS 2.5” HDD
• R640 SRVR 1.2 TB 10K SAS 2.5” HDD
Caution:
This troubleshooting procedure can erase data stored on the hard drive. Before you proceed,
back up files from the hard drives if practical.
Procedure
1. Check the loose connections if any and ensure that there are no loose connections, and all
the drives are fully seated.
2. Check hard drive LED indicator patterns for indication of problems. For more information,
see Status LED indicators on page 17 and Hard drive indicator patterns on page 20.
3. View LCD display for any HDD error messages.
4. Ensure drive blanks are installed properly when the server is operating. Drives may
overheat and cause sluggish response or drive failure.
5. Ensure the replacement drives within an array are the same capacity size or larger.
April 2020 Maintaining and Troubleshooting Avaya Solutions Platform 130 Appliance 21
Comments on this document? infodev@avaya.comMaintaining and Troubleshooting the Avaya Converged Platform 130 Appliance
6. Ensure the replacement drives within an array are the same drive type, such as, SAS,
SATA, or SSD.
7. If you can access the iDRAC interface, log in to the iDRAC web interface and view the
status from Storage tab:
a. Check summary of disks and view virtual and physical disk status. Ensure that
physical disks are online and reporting no errors.
b. Ensure virtual disk is online and reporting no errors.
c. If error persists, replace failed or failing drive. See, Replacing a hard disk drive on
page 23.
d. If no errors are observed from iDRAC storage, observe logs reported on the iDRAC
dashboard. If no errors are reported go to Maintenance/System Event logs. View logs
for any HDDs events or errors reported.
e. If no HDD errors can be detected go to step 9.
8. If you are not using iDRAC and running diagnostics is required, reboot the server
according to Avaya application procedures:
This step is affects service, so perform when appropriate.
a. Connect a monitor, USB keyboard, and mouse to Dell R640 server.
b. Reboot server. From the Dell splash screen, press F2 to go to System Setup >
iDRAC Settings > System Event Log.
c. View the event log for any errors pertaining to an HDD failure or HDD predictive
failure. If HDD is identified as bad, replace the HDD as per Replacing a hard disk
drive on page 23.
d. If no failure can be isolated, back out of System Setup menu and reboot system, and
go to next step.
9. If running diagnostic or further HDD debugging is required, reboot server according to
Avaya application procedures:
This step is affects service, so perform when appropriate.
a. Connect a monitor, USB keyboard, and mouse to Dell R640 server.
b. Reboot server. From the Dell splash screen, press F10 to go to Lifecycle Controller,
and cancel out of Setup Wizard if prompted.
c. Select Hardware Diagnostics > Run Hardware Diagnostics.
Testing of the server begins. You can abort the testing to select specific component
testing by pressing Esc. Select + to run individual tests. Select help to see testing
options.
d. Select appropriate HDDs to be tested by selecting Hard Drive Icons. You can select
thorough testing if desired. The Results tab can be used to view pass or failure of a
device.
April 2020 Maintaining and Troubleshooting Avaya Solutions Platform 130 Appliance 22
Comments on this document? infodev@avaya.comHard disk drive problems
e. If failed or failing HDD is detected, replace the HDD as per the procedure. For
additional information, see Dell EMC PowerEdge R640 Installation and Service
Manual.
Replacing a hard disk drive
About this task
Use this procedure to replace one of the following drives:
• R640 SRVR 600 GB 10K SAS 2.5” HDD
• R640 SRVR 1.2 TB 10K SAS 2.5” HDD
The following are some helpful guidelines for replacing a hard disk drive:
• Drives must be the same capacity to provide the greatest storage space efficiency when
drives are grouped together into the same drive array. Larger drives can be used, but size will
be limited to the smallest capacity drives.
• Drives in the same logical volume must be of the same type. Avaya does not support mixing
SAS, SATA, and SSD drives in the same logical volume.
• Only use hard drives that have been tested and approved by Avaya for use with the hard-
drive backplane.
• When installing a hard drive, ensure that the adjacent drives are fully installed. Inserting a
hard-drive carrier and attempting to lock its handle next to a partially installed carrier can
damage the partially installed carrier's shield spring and make it unusable.
• All hard drives connect to the system board through the hard-drive backplane. Hard drives
are supplied in hot-swappable hard-drive carriers that fit in the hard-drive slots.
• When you install a hard drive, allow enough time for the array to rebuild. Be aware that high
capacity hard drives can take a number of hours to rebuild.
• You can also use hard drive LED indicators to know the status.
Caution:
• When a replacement hot-swappable hard drive is installed and the system is turned on,
the hard drive automatically begins to rebuild. Ensure that the replacement hard drive is
blank or contains data that can be over-written. Any data on the replacement hard drive
is lost after the hard drive is installed.
• Do not turn off or reboot your system while the hard drive is being rebuilt. Rebooting the
system can cause a hard drive failure.
Caution:
This troubleshooting procedure can erase data stored on the hard drive. Before you proceed,
back up files from the hard drives if practical.
April 2020 Maintaining and Troubleshooting Avaya Solutions Platform 130 Appliance 23
Comments on this document? infodev@avaya.comMaintaining and Troubleshooting the Avaya Converged Platform 130 Appliance
Important:
Drives are hot-swappable, so power down of a server is not required or recommended.
However, you must replace only one drive at a time allowing for full rebuild between
replacement of drives.
If you are replacing all the HDDs, power down of the server is required.
Procedure
1. Remove failed or failing hard drive as indicated by HDD LEDs, application alarms, iDRAC,
logs or diagnostics.
A single hard drive can be removed and replaced from RAID 1, RAID 5, RAID 6, or RAID
10 configuration in the Dell R640. The Avaya application will continue to run. The RAID
controller will run in a degraded mode until a replacement HDD is installed and rebuilt.
a. Remove the front bezel if applicable and locate the failed or failing HDD.
b. Press the release button to open the drive carrier release handle.
c. Holding the handle, slide the drive carrier out of the drive slot.
2. Install the replacement HDD using the following steps:
a. Press the release button on the front of the drive carrier to open the release handle.
b. Insert the drive carrier into the drive slot and slide until the drive connects with the
backplane.
c. Close the drive carrier release handle to lock the drive in place.
April 2020 Maintaining and Troubleshooting Avaya Solutions Platform 130 Appliance 24
Comments on this document? infodev@avaya.comPower supply problems
d. Drive should start to rebuild as indicated by appropriate LEDs. For more information,
see Status LED indicators on page 17 and Hard drive indicator patterns on page 20.
e. View RAID status from iDRAC interface or view hard drive LED indicator patterns to
see drive rebuild status. For more information, see Status LED indicators on page 17
and Hard drive indicator patterns on page 20.
The typical drive rebuild time is 30 minutes to 2 hours depending upon the size of
HDD and the system load.
Power supply problems
Problems
Refer following points to prevent basic power supply problems:
• Avoid loose connections. For example, loose power cables.
• Check the power supply handle LED and ensure it indicates that the power supply is working
properly.
• If you have recently upgraded your system, ensure that the power supply unit has enough
power to support the new system.
• If you have a redundant power supply configuration, ensure that both the power supply units
are of the same type and wattage. If required, upgrade to a higher wattage power supply unit.
• Use only power supply units with the Extended Power Performance (EPP) label on the back
to avoid common problems.
• After installing a power supply unit, allow some time for the system to recognize the power
supply unit and determine if it is working properly.
April 2020 Maintaining and Troubleshooting Avaya Solutions Platform 130 Appliance 25
Comments on this document? infodev@avaya.comYou can also read