OUT IS IN - woollybear owner's manual 2021 - TAXA Outdoors
←
→
Page content transcription
If your browser does not render page correctly, please read the page content below

woollybear owner’s manual

2021

  OUT IS IN                                                         ™

W OOL LY BEA R www.taxaoutdoors.com
7930 blankenship drive houston, tx 77055 usa   (rev.03302021)   1

HEADS UP!

1 The smaller your trailer is the more important proper loading becomes. Ensure
that between 10 – 15% of the loaded trailers weight is on the tongue for best
handling. Further, the lower the total center of gravity is the less likely it is that you
might roll your trailer. It is your responsibility to drive safely, especially when off of
paved surfaces.

(Don’t forget you can switch up any rooftop tent from front to back, high to low,
use your loading to create the best situation for yourself.)

( your tow vehicle may have sophisticated programming to adjust for different road
conditions. Your trailer is simply along for the ride. The combination of your tow
vehicle plus a trailer is a DIFFERENT safety equation. Please drive safely, slowly and
in control when off a paved road, use spotters when in any doubt. BE SAFE in your
adventures.)

2 Check Wheel Lugs: On your first trip tighten wheel lugs at start and
at 10, 25, and 50 miles. Thereafter, check wheel lugs before each trip, after excessive breaking
and following winter. Always tighten to the manufacturer’s specification of 90 ft. lbs.

3 Before driving, make a habit of locking all compartment doors, checking straps and load
hold downs.

4 Keep an eye out – make a habit of walking around your trailer before you set out, when
filling up at a service station, when hitching up at the campground. Preventative maintenance
is always the best.

5 Have fun!

W OOL LY BEA R www.taxaoutdoors.com
7930 blankenship drive houston, tx 77055 usa   (rev.03302021)    2

WELCOME TO the 2021 Woolly Bear!
Congratulations on your new Woolly Bear!

We want you to go on adventures.
This one is not an RV (you cannot get inside it. Please do not try to get inside it!).
How about AV (adventure vehicle)?
How about Mobile Human Habitat?
How about stop talking and hit the road!

Please have a great time. Please support our nations’ park systems. It takes work to keep things wild. Please find a National
Forest and say hi to nature.

Please take what you need and leave nothing behind! Keep everyone else’s adventures pristine. We wholeheartedly support the
teachings of Leave No Trace.

Please be safe!

This year’s Woolly Bear has been improved height adjustable towers to let you load what you want how you want.

It is important that you thoroughly review this Owner’s Manual. Please also consult it anytime you have a question regarding the
use, operation and maintenance of your trailer, and its systems and components. Your Woolly Bear trailer has multiple systems,
parts, and components, and understanding how they work is an important part of having a fun, safe travel experience.

We want your first and every adventure to be great. Have a practice session in your driveway. Hitch that trailer up and drive it
around the block. Get comfortable. Ask questions! Get answers to any questions, issues or problems that arise during your
practice. Get answers from your friends at your dealer or taxa, or maybe your neighbor. Visit www.taxaoutdoors.com/support
and ask us what you need to know. Many questions can be answered quickly and easily and save you a lot of hassle.

We hope you enjoy many years of great memories and outdoor adventure.

Sincerely,

Garrett Finney,
TAXA Founder

W OOL LY BEA R www.taxaoutdoors.com
7930 blankenship drive houston, tx 77055 usa                   (rev.03302021)            3
YOUR OWNER’S MANUAL

Make this Owner’s Manual a permanent part of your habitat, download it to a smart device you carry with you or print
it out to keep it with the habitat at all times. Keep the manuals, stickers and tags associated with your habitat’s items,
add-ons, appliances and equipment in the habitat as well for easy reference. All manuals including components with
pass thru warranties etc are available on our website on the MANUALS page - https://taxaoutdoors.com/manuals/

This manual is not intended to be inclusive of every operational aspect of your unit. It should be utilized and referenced
by you in conjunction with the separate, additional manuals provided by the manufacturers of the different components,
component parts, appliances, add-ons, systems, and accessories in your unit. Your unit will contain any such manuals
provided to Taxa Inc. by the specific component part, appliance, add-on, system, and accessory manufacturer. Please
read them to gain a more complete understanding of the operation and maintenance of the products and appliances
installed in your habitat.

READ THE ENTIRE MANUAL AND OBEY ALL CAUTION, WARNING, DANGER AND OTHER SAFETY-RELATED
STATEMENTS PRIOR TO OPERATING YOUR HABITAT.

please note

This Owner’s Manual contains the most up-to-date product information available at the time of publication.
However, due to continuous product development, innovation and improvements, Taxa Inc. reserves the right
to make changes in production techniques/processes, product materials, product specifications and
components. Such changes may be made without prior notice or any obligation upon Taxa Inc. to make
corresponding changes or improvements in or upon its already manufactured, installed and/or sold habitats
and/or products. Please visit our website at www.taxaoutdoors.com, https://taxaoutdoors.com/manuals/ to
check for manual updates and our current manual.

W OOL LY BEA R www.taxaoutdoors.com
7930 blankenship drive houston, tx 77055 usa            (rev.03302021)            4

W OOL LY BEA R www.taxaoutdoors.com
7930 blankenship drive houston, tx 77055 usa   (rev.03302021)   5
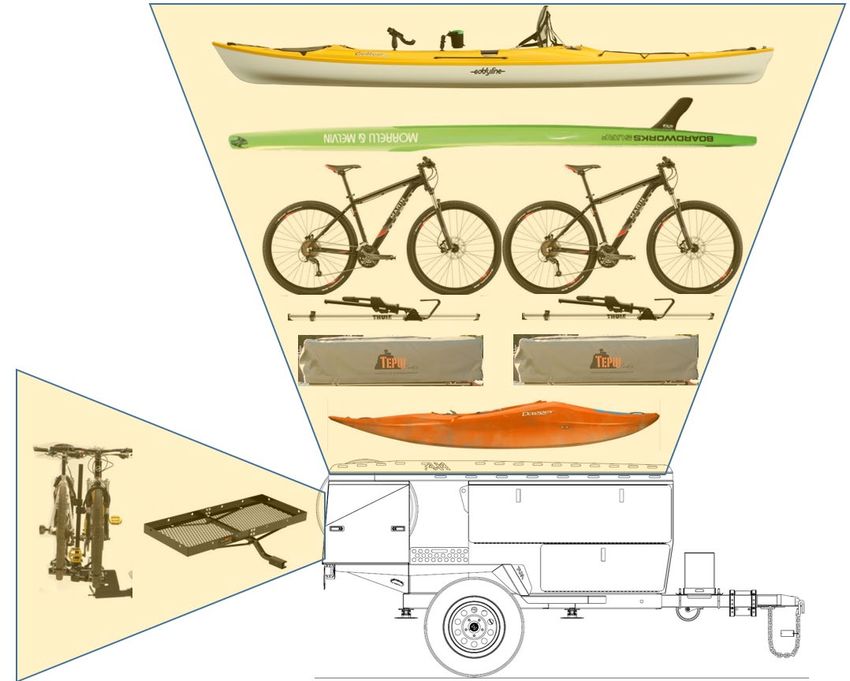
Table of Contents
WELCOME TO the 2021 Woolly Bear! .......................................................................................................... 3
YOUR OWNER’S MANUAL ................................................................................................................................. 4
SAFETY TERMS ..................................................................................................................................................... 7
OVERVIEW OF SAFETY PRECAUTIONS........................................................................................................ 8
HITCHING ................................................................................................................................................................. 9
LOADING ............................................................................................................................................................... 11
TOWING ................................................................................................................................................................. 13
BRAKES .................................................................................................................................................................. 15
TIRES....................................................................................................................................................................... 15
WOOLLYBEAR DESCRIPTION ...................................................................................................................... 16
ELECTRICAL SYSTEM ....................................................................................................................................... 28
BATTERY ............................................................................................................................................................... 32
PRE-TRAVEL CHECKLIST ............................................................................................................................... 33
SITE SELECTION AND SET UP ...................................................................................................................... 34
FOUR SEASON USE / EXTREME WEATHER ............................................................................................ 35
GENERAL CARE AND MAINTENANCE ....................................................................................................... 35
STORAGE, WINTERIZATION & BRINGING OUT OF STORAGE ......................................................... 37
TROUBLESHOOTING ........................................................................................................................................ 38
LIST OF AUTHORIZED DEALERS ................................................................................................................. 38
your LIMITED WARRANTY ........................................................................................................................... 39

W OOL LY BEA R www.taxaoutdoors.com
7930 blankenship drive houston, tx 77055 usa                                     (rev.03302021)                       6

SAFETY TERMS
We have included various safety messages in this manual, all of which are important. Please read and obey them. The following
are safety-related terms and symbols referred to in this manual and their corresponding meanings/definitions:

DANGER indicates an imminently hazardous situation that, if not avoided, will result in death or serious injury.

WARNING indicates a potentially hazardous situation that, if not avoided, could result in death or serious injury.

CAUTION indicates a potentially hazardous situation that, if not avoided, may result in minor or moderate injury.

 NOTICE is used to address practices not related to personal injury. This applies to hazardous situations involving property
damage or important information regarding the maintenance of your vehicle.

W OOL LY BEA R www.taxaoutdoors.com
7930 blankenship drive houston, tx 77055 usa               (rev.03302021)             7
OVERVIEW OF SAFETY PRECAUTIONS

You’ll find various safety-related references, discussions and instructions throughout this owner’s manual, and all of them are
important. This overview is not an exhaustive list of the safety issues discussed or contemplated in this manual. Please carefully
read and follow all safety issues discussed in this manual. If you have any questions regarding trailer safety issues, please contact
your dealer and/or Taxa Inc.

The following is a broader snapshot of a few of the more common safety instructions/discussions/issues in the use and operation
of your new trailer:

- Be sure load/cargo weight does not exceed your GVWR and that weight is distributed properly before travel. Please refer to
the “Loading” section.

- fully close-up and lock your trailer before towing … to ensure efficient and safe transportation.

- Be sure safety chains have been properly attached and secured as part of your hitching up process.

- tires … be vigilant in your tire inspection and maintenance. Properly maintained tires improve the steering, stopping, traction,
and load-carrying capability of your trailer and tow vehicle. Under-inflated tires and over-loaded vehicles are major causes of
tire failure. Please refer to “Tires” section for a more detailed discussion on your tires and tire safety.

- Be sure all electrical uses and activities involve proper grounding.

- reduce fishtailing & sway … excessive sway of your habitat can lead to the rollover of the trailer and tow vehicle resulting in
serious injury or death. This usually due to incorrectly loading the trailer but can also indicate road conditions or trailer damage.
Please also refer to the sway and fishtailing discussion in the “Towing” section.

- lug nut torque … be sure wheel mounting nuts (lug nuts) on trailer wheels are tight and properly torqued. Inadequate
and/or improper wheel nut torque (tightness) is a major reason that lug nuts loosen. Loose lug nuts can rapidly lead to a
wheel separation with potentially serious safety consequences. Refer to a qualified technician before travel if you have any
questions regarding your wheel nut torque. See also “Tires” section.

- appliances and equipment … some camping equipment (portable stove, portable furnace, etc.) operate on propane.
Propane is highly flammable and contained under high pressure. Improper use may result in a fire and/or explosion. Be sure
to follow the instructions and warnings provided by the manufacturer of such appliances, if any.

W OOL LY BEA R www.taxaoutdoors.com
7930 blankenship drive houston, tx 77055 usa                   (rev.03302021)              8
HITCHING
Your Woolly Bear is outfitted with a Lock And Roll coupler including both the trailer side and the tow vehicle side..

pre-hitch/coupling/trip considerations and inspection …. be sure your hitch and tow vehicle are rated for the Gross
Vehicle Weight Rating (GVWR) of your habitat. Remember that the hitch load rating must be equal to or greater than
the coupler load ( the hitch is attached to the car, the coupler to the habitat).

Examine all hitch components before hitching, looking for wear, corrosion, deformations, stripping and cracks. Replace
worn, corroded or cracked hitch components before coupling the habitat to the tow vehicle. Be sure the hitch
components are tight and work freely before coupling the habitat to the tow vehicle. Remember to also Inspect the
safety chains. Be sure to correct any noted problems or defects before towing the habitat.

Important Note: be sure to raise all habitat jacks and close the habitat fully before driving off after hitching. One of the
most common mistakes is to forget to raise a stabilizer jack and bending it..

Your habitat is equipped with a 7-pin connector, which synchronizes the lights of your tow vehicle and habitat. It can
also connect their respective braking systems. Your habitat is equipped with electric brakes. Use of electric brakes are
not required in every State, however, we strongly recommend that you use them.

WARNING: THE PROPER SELECTION AND CONDITION OF THE COUPLER AND HITCH IS ESSENTIAL TO THE
SAFE TOWING OF YOUR HABITAT. A LOSS OF COUPLING MAY RESULT IN DEATH OR SERIOUS INJURY.

WARNING: AN IMPROPERLY COUPLED HABITAT CAN RESULT IN DEATH OR SERIOUS INJURY.

WARNING: USE OF A TOW VEHICLE WITH A TOWING CAPACITY LESS THAN THE LOAD RATING OF THE
HABITAT CAN RESULT IN LOSS OF CONTROL, AND MAY LEAD TO DEATH OR SERIOUS INJURY.

Hitching up your habitat will get easier with practice. The hitching steps described below are typical. However, we highly
recommend that you also consult the hitching and unhitching instructions associated with your particular tow vehicle
and hitching configuration.

hitching steps:

 - for Lock and Roll (Overland and Woolly Bear):

(1) crank the tongue of the habitat jack until the hitch coupler is raised enough to clear the tow vehicle;

(2) back the tow vehicle to the habitat until the hitch ball or ‘pin’ is directly under the habitat coupler. The use of a

W OOL LY BEA R www.taxaoutdoors.com
7930 blankenship drive houston, tx 77055 usa             (rev.03302021)             9

backing aid mirror may be helpful, especially if you are hitching alone;

(3) set the parking brake in the tow vehicle;

(4) be sure the coupler latch-locking lever is fully open, and then lower the tongue jack until the ball is firmly seated;

(5) close the coupler latch and secure it with a locking pin;

(6) securely attach the safety chains in a crossing pattern to the tow vehicle and confirm that they are properly
connected to the habitat. Do not fasten chains to any part of the hitch unless the hitch has holes or loops designed
specifically for that purpose, be sure the chains do not drag during towing;

WARNING: IMPROPER RIGGING OF THE SAFETY CHAINS CAN RESULT IN LOSS OF CONTROL OF THE
HABITAT AND TOW VEHICLE, LEADING TO DEATH OR SERIOUS INJURY, IF THE HABITAT UNCOUPLES
FROM THE TOW VEHICLE.

(7) The electric brakes need to be controlled with a proportional brake controller. Some tow vehicles have these pre-
integrated. There are wired and wireless versions available online, at towing centers, etc.

(8) connect the power cord between the tow vehicle and the habitat, leaving enough slack for the tow vehicle to turn
without disconnecting the power cord;

(9) adjust side mirrors;

(10) check all lights on habitat and tow vehicle, ensuring that they are working properly.

(11) confirm the brakes are working properly prior to towing the habitat on a public road. You can, for example, check
the operation of the habitat brakes by pulling forward and using your brake controller to test the function.

W OOL LY BEA R www.taxaoutdoors.com
7930 blankenship drive houston, tx 77055 usa              (rev.03302021)            10
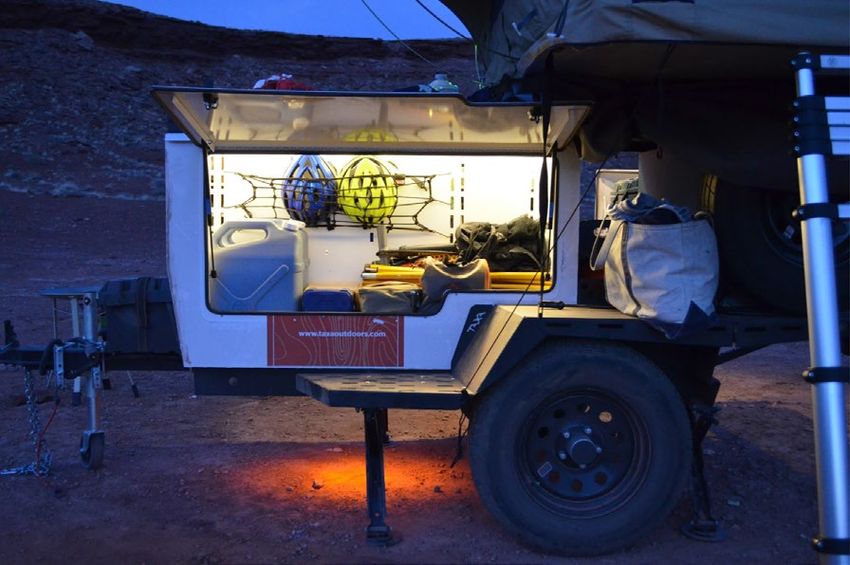
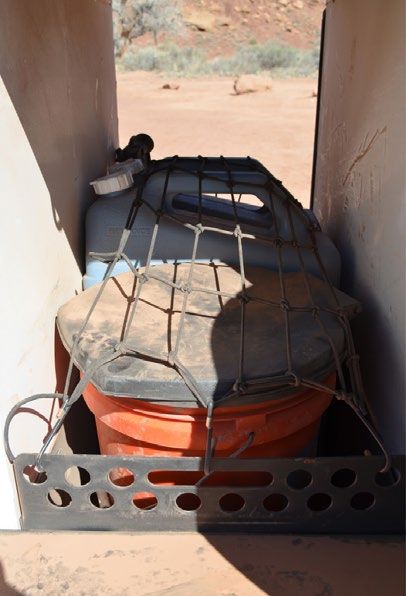
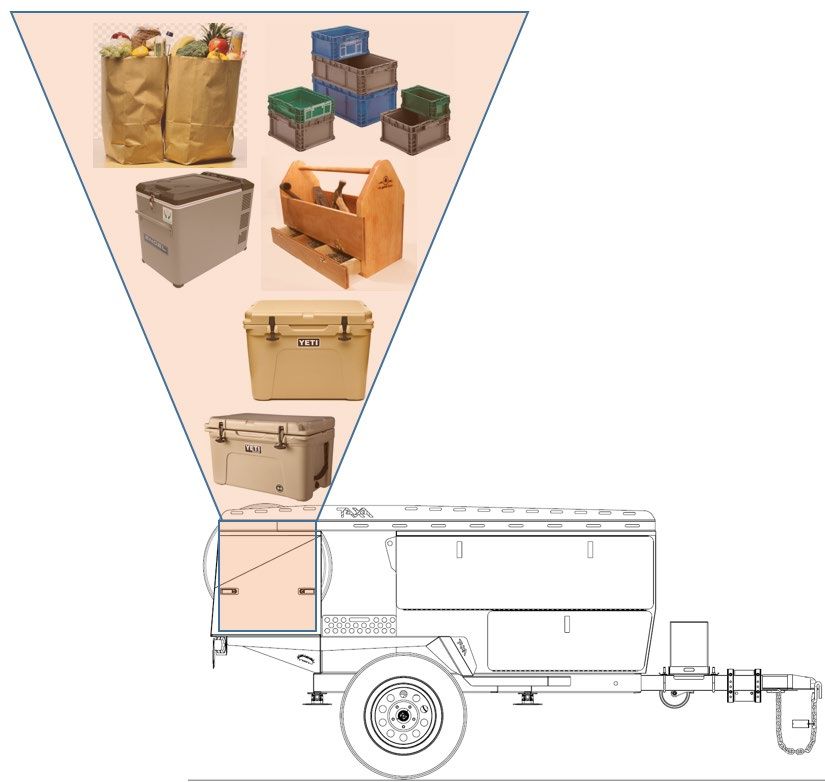
LOADING

The process of safely and properly loading your habitat should become easier with practice and experience. Please
first get familiar with and understand the following terms related to your habitat’s weight, carrying capacity, and rating:

gross vehicle weight rating (GVWR) is the maximum permissible weight of the habitat when fully loaded and
equipped/outfitted. It includes but is not limited to all weight at the habitat axle(s) and tongue or pin as well as all add-
ons, appliances, accessories, potable water, etc. Your habitat’s GVWR is 2100 for the Woolly Bear. This number is
recorded on the permanent label on the tongue your habitat.

Dry weight or unloaded vehicle weight (UVW) is the weight of the habitat as manufactured at the factory (typical weight
without loading, no options). It includes all weight at the habitat axle(s) and tongue or pin. Your Woolly Bear’s standard
UVW (‘dry’ weight) is approximately 1270 lbs. However, you will need to account for the weight or third-party installed
add-ons, options and accessories, if any, in determining your actual UVW. In sum, your actual UVW will vary (and
increase) to the extent you have outfitted your habitat with additional items. Note: Your cargo carrying capacity
(discussed below) will vary (and decrease) to the extent of the weight of dealer or third-party installed add-ons, options
and accessories, if any.

cargo carrying capacity (CCC) is equal to GVWR minus UVW and potable water weight. Your Woolly Bear’s CCC is
approximately 830 lbs. However, remember that your actual CCC will vary (and decrease) to the extent you have
outfitted your habitat with additional items. Please refer to the stickers located at the front exterior of your habitat for
CCC.

gross axle weight rating (GAWR) is the value specified as the load carrying capacity of a single axle system, as
measured at the tire-ground interfaces. Your Woolly Bear’s GAWR is 2000 lbs. Please refer to the sticker located at
the front exterior of your habitat for GAWR.

gross trailer (habitat) weight (GTW) is the weight of the habitat with all the items and supplies that are loaded into the
unit at any point in time and must be less than the allowed GVWR.

WEIGHT GENERALLY

Before towing, you must choose the items you will load onto your habitat and then determine whether the loaded weight
is safe and proper. Of course, the best way (highly recommended) to calculate the loaded weight of your habitat is to
have it weighed while loaded, and then compare it with the GVWR. Otherwise, you will need to do some calculations
on your own in order to make an appropriate determination. If the loaded weight of your habitat exceeds the GVWR,
your habitat is overloaded and should not be towed. You will need to remove items from, and reduce the loaded weight
of, the habitat until it’s at or below the GVWR before towing. Note: remember to include in your calculations the weight
of dealer or third-party installed equipment, options, add-ons, accessories and any other non-standard items. As an
additional safety precaution, we recommend that you take a conservative approach when doing your own weight
calculations.

WEIGHT/LOAD DISTRIBUTION AND TONGUE WEIGHT

Proper weight and load distribution is essential to safe towing. Load the habitat evenly (front to back and side to side)
and securely, keeping heavier items as low as possible. Be sure to secure the load. A firmly secured load will be less
prone to shifting and should help maintain load balance during travel.

Tongue (the habitat arm extension that couples with the tow vehicle receiver) weight is the amount of weight borne by
the habitat hitch and another important consideration when loading your habitat. Generally, the actual tongue weight
should equal approximately 10-15% of the gross habitat weight. Excessive tongue weight will make your tow vehicle’s
steering and braking less responsive. Insufficient tongue weight may cause your habitat to sway.

You could weigh your loaded habitat's tongue to determine the actual tongue weight. However, you may also observe
the actual tongue weight and determine if it is too light or too heavy. For example, a habitat with a proper tongue weight
will form a straight line from front to back between the tow vehicle and the habitat. A habitat with the weight improperly
distributed (i.e. a light tongue weight) will cause the coupling between the tow vehicle and habitat to rise, with the weight
pressing down at the rear of the habitat and the front of the tow vehicle. Excessive tongue weight will do just the
opposite.

If you notice a rise or fall in your tow coupling, you will need to redistribute the weight of the load before getting on the

W OOL LY BEA R www.taxaoutdoors.com
7930 blankenship drive houston, tx 77055 usa              (rev.03302021)            11
road. If you have trouble estimating the combined weight of your habitat plus cargo, take your loaded habitat to a
vehicle scale at a nearby weigh station or truck stop. Important Note: you need to also refer to your tow vehicle’s towing
capacity and other towing and load capacity-related definitions and instructions before getting on the road. Please also
consult your supplying dealer or Taxa Inc. if you have any questions regarding these terms and/or loading your habitat.

     example of poor weight distribution                              proper ~10 to 15% of loaded trailer on tongue

W OOL LY BEA R www.taxaoutdoors.com
7930 blankenship drive houston, tx 77055 usa            (rev.03302021)            12
TOWING We want your towing experiences and practices to be safe and enjoyable. Please take your time, avoid being in a rush and give special attention to all safety matters prior to and during the towing of your habitat. As previously indicated, we recommend that you practice towing your Woolly Bear in, for example, an empty parking lot before going on your first camping trip. This initial trial and practice is fun and will help you get accustomed to and familiar with Woolly Bear’s systems and operation. Please also make note of any questions, issues or problems that arise during your pre-travel towing practice, and then inquire with your dealer or email us hello@taxaoutdoors.com. You can also visit our website (www.taxaoutdoors.com) for current contact information. Please also refer to the “Overview of Safety Precautions” and “Pre- Travel Checklist” sections before towing your habitat. safety chains … We have equipped your habitat with safety chains. Make use of them. Safety chains serve to maintain the connection between your habitat and the tow vehicle in the event of separation of the ball and habitat coupling. Be sure to hook the safety chains to the frame of the tow vehicle (not the hitch), crossing them under the habitat’s tongue. Also, remember to inspect the length of the chains once they are attached to the tow vehicle frame. A proper chain length will allow turns and prevent the chains from dragging on the road. tire pressure … you are responsible for maintaining proper tire pressure in the tires of your habitat and tow vehicle. Thus, always check your tire pressure and refer to the “Tires” discussion herein before traveling. brakes … you are responsible for inspecting and maintaining both your habitat and tow vehicle brakes before towing. Do not tow your habitat unless you have confirmed your brakes are in good condition and operating properly. Be sure to have a qualified technician perform all brake adjustments, service and maintenance. Please also refer to the “Brakes” discussion herein before traveling. lights … be sure to check all electrical connections to ensure all lights on the tow vehicle and habitat are functioning properly before traveling. The brake lights, and hazard and turn signals should be in synchronization with the tow vehicle. stay level … the habitat and tow vehicle must be level when hitched. Dragging may occur if the hitch is too low. Conversely, if the hitch is too high, the rear of the habitat is exposed to striking higher points in the road. general towing/driving … drive defensively, anticipating stops, braking early, and never following closely. We recommend maintaining a length of at least three cars and a habitat (approximately 65 ft.) between you and the car in front of you for every 10 mph of speed you are traveling (for example, at 60mph, you should maintain approximately 390 ft. of distance between your vehicle and the vehicle in front of you). This should give you adequate time to safely complete a proper avoidance maneuver (i.e. come to a safe stop, change lanes, etc.) in the event of, for example, an abrupt stop or emergency. Longer stopping distances are required when towing a habitat so remember to start braking sooner than you would if driving without your habitat. Begin slowing down well in advance of anticipated street/road dips and depressions. It also takes longer to accelerate when towing a habitat. Thus, remember to account for both the slower acceleration rate and the combined length of your tow vehicle and habitat when passing another vehicle and then safely returning to your lane. In sum, always pass, allow others to pass, and change lanes with care. We also do not recommend using cruise control or overdrive when towing/travelling. SWAY AND FISHTAILING … excessive sway or fishtailing of your habitat can lead to the rollover of the habitat and tow vehicle, and thus, serious injury or death. The tendency for the vehicle to sway increases with speed. Thus, reduce speed as needed and in inclement or harsh weather conditions (i.e. high winds, rainstorms, slippery roads, etc.). The following are a few tips for reducing sway or fishtailing if and when they occur and are not exhaustive: (1) slow down gradually …. do not jam/slam on the brakes or press on the accelerator, both of which may make the situation worse and result in severe injury or death. Instead, remove your foot from the accelerator and reduce your speed gradually whenever possible; (2) minimize and avoid quick steering movements …. Quick steering movements will actually cause increased sway and loss of control; Keep both hands on the wheel, and hold the wheel as straight as possible until stability is regained; and As soon as practicable after regaining control … pull over and check tire pressures and cargo weight distribution, and inspect the habitat and tow vehicle for any signs of failure or defect. If you suspect a mechanical failure, recommend that you not tow until the problem is identified and remedied. If you choose to travel, do so at reduced speeds and with heightened caution until the problem can be identified and remedied. W OOL LY BEA R www.taxaoutdoors.com 7930 blankenship drive houston, tx 77055 usa (rev.03302021) 13
WARNING: Side to side motion (sway) that begins as you reach a certain speed will likely become whipping at higher
speeds. As soon as you notice sway, slow your vehicle by letting off the gas pedal. Then stop to check the habitat and tow
vehicle as soon as it is safe to do so.

OTHER IMPORTANT TOWING SCENARIOS

winding, narrow roads … stay in the center of the lane. This reduces the likelihood of the tires/wheels dropping onto the shoulder,
another potential cause of hazardous sway. Do not cross the center-line unless safely changing lanes.

WARNING: If a wheel goes off the paved roadway, do not steer sharply and do not brake. Let off the gas pedal, slow down
below 25 mph and then steer gradually back onto the roadway. Proceed with caution entering traffic.

sharp turns …. minimize the suddenness of sharp turns by anticipating them, slowing down well in advance of them, and taking
them at low, substantially reduced speeds.

steep, long grades … like sharp turns, be sure to anticipate steep grades. Down-shift into a lower gear or range in advance to assist
your braking on a descent and to add power on a climb.

Note: avoid situations that require excessive and prolonged use of the brakes. If unavoidable, apply and release brakes at short
intervals to give them a chance to cool. Downshift your tow vehicle to reduce breaking needs on long down grades of highway.

slippery, icy pavement … reduce speed and drive slowly. Remember that skidding/hydroplaning can occur with minimal moisture
on the road. If skidding occurs, remove your foot from the accelerator and then gently apply the habitat brakes only.

freeways and highways … try to pick and stay in the far right hand slow(er) lane.

corner turns … habitat wheels do not follow the path of your tow vehicle’s wheels during corner turns. The habitat will make a
closer, tighter turn than the tow vehicle. Compensate by moving further into the intersection before turning so that the habitat
clears any objects in or near the road such as but not limited to the curb and parked vehicles. Left turns require a wider than
normal turn to help prevent the habitat from edging into an opposing lane. Use turn signals early for the traffic behind you and
begin slowing down well in advance of your turn.

mud and sand … when going through mud or sand, accelerate gently, if at all, and try to remain In the path of the previous
vehicles. Let the momentum of the tow vehicle and habitat carry you through the problem area. If stuck, the habitat and tow
vehicle should be towed out while hitched.
dirt, gravel, washboard roads … go slow, use caution, your habitat will move an vibrate more than the tow vehicle, a good rule
of thumb is 25 mph or less, MUCH less on severely rutted roads.

parking … Whenever possible, avoid parking on a grade. If unavoidable, turn the front wheels of your tow vehicle into the curb
and set the parking brake. For added safety, place wheel chocks under the habitat wheels.

additional towing safety information … can be found on the National Highway Traffic Safety Administration’s web site:
http://www.nhtsa.dot.gov/Cars/problems/Equipment/towing/Towing.pdf

W OOL LY BEA R www.taxaoutdoors.com
7930 blankenship drive houston, tx 77055 usa                  (rev.03302021)              14
BRAKES

overview …. your Woolly Bear is equipped with electric brakes. Under normal driving/towing conditions, the habitat brakes will
operate only in conjunction with a properly installed brake controller (which is also discussed below). Please also obtain and read
the separate manual of the brake controller.

Important Note: in an emergency uncoupling of your tow vehicle and habitat, your habitat electric brakes will automatically
engage even without a brake controller. This assumes, of course, that you have properly attached and secured the provided
breakaway switch. See also “Hitching” and “Towing” sections herein.

brake controller, breaking-in your brakes and synchronization …we recommend that you break-in your habitat brakes in, for
example, an empty, paved parking lot, not on a public road, when practicable. To break-in your brakes, apply the brakes at least
twenty (20) times, decreasing your speed approximately 20 mph in each application. Allow a few minutes for the brakes to cool
between each application so that the brake shoes and magnets "wear-in" to the drum surfaces.

When a brake control or controller is properly installed, your habitat electric brakes will work in synchronization with your tow
vehicle brakes. If you sense lock-up, “grabbiness,” or your habitat “jerking” or “pushing” the tow vehicle when braking, your
braking systems are not properly synchronized. You may need to have small adjustments made periodically because of, for
example, changing loads and driving conditions. Brake Controllers are proportionally adjustable and small adjustments are
easily made. Brake Controllers are proportionally adjustable and small adjustments are easily made. Important Note: be sure to
refer to and follow your brake controller manual for instructions on synchronization, use, maintenance and adjustments.

CAUTION: Minimum vehicle stopping distances are achieved when wheels approach lock up. Brake lock up should be avoided
as it results in poor vehicle stability and control.

connector … your provided 7-pin cord connector located at the front of the habitat transfers electrical power from the tow vehicle
battery to the habitat brakes, lighting system, and battery.

braking tip … do NOT use the habitat brakes only. They were designed to provide braking for your habitat, not the tow vehicle.
As previously indicated, habitat brakes are not required in every State. Thus, some States may allow you to solely use your tow
vehicle’s brakes when towing your habitat. However, remember that the added weight of both the habitat itself and the cargo
you are carrying puts additional load pressures on your tow vehicle brakes. It also may, under some conditions (i.e. slippery
pavement, loose gravel, etc.), impact overall stability and control of your tow vehicle and habitat. Thus, be sure that you have
all the information you need to make an informed decision regarding your brakes before getting on the road.

brake adjustments … generally, brakes should be adjusted after the first 200 miles, every 3,000 miles thereafter, and/or as use
and performance requires. We recommend that you have a qualified technician perform all brake adjustments, service and
maintenance.

W OOL LY BEA R www.taxaoutdoors.com
7930 blankenship drive houston, tx 77055 usa                 (rev.03302021)             15
TIRES
size:          ST 235/75 R 15 pressure: max 50psi cold,

overview… Properly maintained tires improve the steering, stopping, traction, and load-carrying capability of your
vehicle. Under-inflated tires and overloaded vehicles are a major cause of tire failure. Maintaining proper tire
pressure, tire and vehicle load limits, avoiding road hazards, and regularly inspecting tires for cuts, slashes,
and other irregularities are important steps in avoiding tire failure, such as tread separation or blowout and
flat tires. These steps, along with other care and maintenance activities, may improve vehicle handling, help protect
you and others from avoidable breakdowns and accidents, improve fuel economy and increase the life of your tires. In
sum, you are responsible for making tire safety a regular part of your tow vehicle and habitat maintenance routine.
Remember that the time you spend is minimal compared with the inconvenience and safety consequences of tire
failure.

proper wheel nut torque is essential to safe towing. The wheel and axle systems used in habitats are similar in many
ways to those found in motor vehicles. However, they differ in several important ways. First, habitat wheels do not
steer, and are subjected to high side load stress when making tight turns around corners. This tends to flex the wheel
and loosen the wheel nuts. Wheel nut torque requirements vary depending on the size and manufacturer of the wheel.

TIRE FUNDAMENTALS
Federal law requires tire manufacturers to place standardized information on the sidewall of all tires. This information
identifies and describes the fundamental characteristics of the tire and also provides a tire identification number for
safety standard certification and recall matters.

Sidewall markings and important terms … your habitat tires should be marked with either a designation of “ST” (i.e.
ST235/75/ R15). The “ST” indicates Standard Habitat Service and designed for habitat use only.

maximum load rating …. Is the maximum load in kilograms and pounds that each tire can carry.

maximum permissible inflation pressure … is the greatest amount of air pressure that should be put in the tire under
normal driving conditions.

max. load single kg (lbs) at kPa (psi) cold -This information indicates the maximum load and tire pressure when the tire
is used as a single.

load range …. identifies the tire’s load-carrying capabilities and its inflation limits.

TIRE TREAD

The tire tread provides the gripping action and traction that helps prevent your vehicle from slipping or sliding, especially
when the road is wet or icy. Generally, tires are not safe and should be replaced when the tread is worn down to 1/16
of an inch. The following chart is a general guide for determining the condition of and maintenance action for your
habitat tires:

replacement … please refer to the tire sidewall on your habitat’s standard tires for information regarding proper tire
replacement. Be sure to replace your standard habitat tires with “ST” or “LT”designated tires. Note: replacing your
habitat tires with non-ST designated tires will void the Limited Warranty. See Limited Warranty section herein. If you
have any doubt about the correct size/type to choose, consult with a tire dealer. Please also refer to the manual provided
by your specific tire manufacturer for care and use instructions.

repair …. the proper repair of a punctured tire requires a plug for the hole and a patch for the area inside the tire that
surrounds the puncture hole. Punctures through the tread may be repaired if they are not too large, but punctures to
the sidewall should NOT be repaired. Tires must be removed from the rim to be properly inspected before being plugged
and patched.

ALL TIRE REPAIRS SHOULD BE PERFORMED BY A QUALIFIED TECHNICIAN.

TIRE PRESSURE AND LOAD LIMITS

Tire inflation pressure is the level of air in the tire that provides it with load-carrying capacity and affects the overall
performance of the vehicle. Because tires may naturally lose air over time, or when driven over objects such as potholes

W OOL LY BEA R www.taxaoutdoors.com
7930 blankenship drive houston, tx 77055 usa               (rev.03302021)              16
or curbs, it is important to check tire pressure monthly and before every trip.

The tire inflation pressure number indicates the amount of air pressure– measured in pounds per square inch (psi)–a
tire requires to be properly inflated. Vehicle manufacturers determine this number based on the vehicle’s design load
limit, that is, the greatest amount of weight a vehicle can safely carry and the vehicle’s tire size. Excessive loads may
lead to abnormal tire flex, tire overheating, and ultimately, tire failure. As travel habitats may be set up and loaded in
varying ways, proper air pressure should be determined by referencing the information on your tire. Please also refer
to the Tire and Loading Information sticker located at the front exterior of your habitat.

The proper tire pressure for your vehicle is referred to as the “recommended cold inflation pressure.” Proper pressure
depends on many conditions – terrain, temperatures, altitude, etc. A “cold” tire in this sense is one that has not been
driven on for at least three hours. When you drive, your tires get warmer, causing the air pressure within them to
increase. Therefore, to get an accurate tire pressure reading, you must measure tire pressure when the tires are cold
or account for the extra pressure in warm tires.

WARNING: Improper tire pressure can quickly lead to excessive wear and dangerous situations.

tire pressure steps:
- Locate the recommended tire pressure on the vehicle’s tire.
- Record the tire pressure of all tires.
- If the tire pressure is too high in any of the tires, slowly release air by gently pressing on the tire valve stem with the
edge of your tire gauge until you get to the correct pressure.
- If the tire pressure is too low, note the difference between the measured tire pressure and the correct tire pressure.
These “missing” pounds of pressure are what you will need to add.
At a service station, add the missing pounds of air pressure to each tire that is under-inflated.
- Check all the tires to make sure they have the same air pressure (except in cases in which the front and rear tires are
supposed to have different amounts of pressure).

remember:
Do not exceed the maximum recommended pressure.
The air pressure recommended on the tire information placard is for the original standard equipment tires only. Your
habitat may be equipped with optional-sized tires. Always follow the pressure recommendations stamped in the tire
sidewall for any replacement tire.
Rotate tires every 5,000 miles or as recommended by the tire manufacturer.

WHEEL NUT TORQUE ADJUSTMENTS

setting torque value on a dial indicator wrench:
Make sure your indicator needle is set to “0”.
As you apply clockwise pressure to the wheel nut, both needles will show the current amount of torque being applied.
When you reach your desired torque value, stop applying pressure and your indicator needle will stay at the highest
torque value reached.

setting torque value of adjustable dial wrench:
Unlock the handle and set the dial to your desired torque value.
Lock the handle back in place.
As you apply clockwise pressure to the lug nut, you will hear and audible “click” when the desired torque wrench value
is reached.
Do not apply further pressure once you hear the “click”.

pre-trip torqueing procedure:
Be sure to tighten the wheel nuts and torque to 90 lbs. Follow the torque sequence and torque table provided next:

Wheel Nut Torque Table
                                                            Wheel

W OOL LY BEA R www.taxaoutdoors.com
7930 blankenship drive houston, tx 77055 usa              (rev.03302021)            17
1st Stage 20-25 ft./lb.
2nd Stage 55-60 ft./lb.
3rd Stage 85-90 ft./lb
stage 1 Set your torque wrench to the 1st stage value on the Wheel Nut Torque Table. Begin with the appropriate bolt
for your wheel (12 o’clock position for 8 and 6 hole wheels and 2 o’clock position for 5 hole wheels) and apply
torque to all wheel nuts following the star pattern as shown in the Wheel Nut Torqueing Sequence illustration
shown here.
stage 2 Increase your torque wrench setting to the 2nd Stage value on the Wheel Nut Torque Table. Begin with the
appropriate bolt for your wheel and apply torque to all wheel nuts following the star pattern. Following stage
2, the wheel can support the weight of the habitat and may be lowered off of the jack stands.
stage 3 Increase your torque wrench setting to Final Torque value on the Wheel Nut Torque Table. Begin with the
appropriate bolt for your wheel and apply torque to all wheel nuts following the star pattern.
follow-up If the wheel was replaced, check the torque again at every 50 miles for the first 500 miles and prior to each
trip thereafter.
If you notice a wheel wobbling or hear a rattling sound coming from a wheel, especially at low speeds, a wheel lug may
have come loose. This problem is usually caused by improper tightening or by faulty or damaged lug bolt threads. If
you have reason to believe a lug nut has come loose, safely stop the vehicle at the side of the road as soon as possible.
Put up warning devices. Remove the lug caps and check the tightness of all the lug nuts. If lug bolt threads are
damaged or faulty, get professional services help. Do NOT tow the habitat with missing lug nuts or faulty lug bolts.
BALANCING, ALIGNMENT AND LUBRICATION
To avoid vibration or shaking of the vehicle when a tire rotates, the tire must be properly balanced. This balance is
achieved by positioning weights on the wheel to counterbalance heavy spots on the wheel-and-tire assembly. A wheel
alignment adjusts the angles of the wheels so that they are positioned correctly relative to the vehicle’s frame. This
adjustment maximizes the life of your tires. These adjustments require special equipment and should be performed by
a qualified technician.
Wheel bearings should be repacked every 6000 miles or every 6 months. Every time the wheel hub is removed, the
wheel bearings must be adjusted. Please refer to manufacturer instructions or schedule maintenance with a qualified
technician to repack wheel bearings.
TIRE SAFETY CHECKLIST
(1) check tire pressure regularly (at least once a month and before any extended trip/travelling), including the spare
tires, if any… Note: When checking air pressure, be sure that all tires have both the correct and identical pressure
before getting on the road; (2) check and torque wheel lug nuts regularly; (3) inspect tires for cuts, slashes, punctures
and other irregularities at least on a monthly basis and before every extended trip/travelling; (4) remove any foreign
objects (i.e. pieces of glass or metal, etc.) wedged in the tread; (5) confirm all tire valves have valve caps; (6) do not
overload your tow vehicle or habitat; (7) slow down when having to go over a pothole or other object in the road, and
avoid running over curbs and other foreign objects in the road and when parking if you can safely do so; (8) Replace
tires when tread depth approaches and/or reaches 1/16 of an inch; and (9) have a qualified technician perform tire
service, maintenance and adjustments as needed.
W OOL LY BEA R www.taxaoutdoors.com
7930 blankenship drive houston, tx 77055 usa (rev.03302021) 18WOOLLYBEAR DESCRIPTION W OOL LY BEA R www.taxaoutdoors.com 7930 blankenship drive houston, tx 77055 usa (rev.03302021) 19
W OOL LY BEA R www.taxaoutdoors.com
7930 blankenship drive houston, tx 77055 usa   (rev.03302021)   20
W OOL LY BEA R www.taxaoutdoors.com
7930 blankenship drive houston, tx 77055 usa   (rev.03302021)   21
W OOL LY BEA R www.taxaoutdoors.com
7930 blankenship drive houston, tx 77055 usa   (rev.03302021)   22
W OOL LY BEA R www.taxaoutdoors.com
7930 blankenship drive houston, tx 77055 usa   (rev.03302021)   23
W OOL LY BEA R www.taxaoutdoors.com
7930 blankenship drive houston, tx 77055 usa   (rev.03302021)   24
W OOL LY BEA R www.taxaoutdoors.com
7930 blankenship drive houston, tx 77055 usa   (rev.03302021)   25
W OOL LY BEA R www.taxaoutdoors.com
7930 blankenship drive houston, tx 77055 usa   (rev.03302021)   26
W OOL LY BEA R www.taxaoutdoors.com
7930 blankenship drive houston, tx 77055 usa   (rev.03302021)   27
ELECTRICAL SYSTEM
Your WoollyBear’s electrical system is a 12 Volt Direct Current (DC) system. This is explained as follows:

12V DC OVERVIEW

Your trailer 12 Volt system is powered by a 12V battery (see “Battery” section).

7-pin connector … use your 7-pin connector plug to connect your tow vehicle and trailer electrical systems. This cord is located
at the front of your trailer and plugs into a receptacle provided in your tow vehicle’s hitch package. In addition to charging your
trailer battery while driving, this connection powers your trailer lights. If your tow vehicle is not equipped with a 7 pin connection
an adapter from 7 to 4 pins cane be readily acquired. The trailer’s driving lights will function. However, the trailer’s battery will
not be charged while driving. BE SURE TO PLUG THE 7 PIN CONNECTOR WITH THE PROPER HOLES AT TOP AND
BOTTOM. FAILURE TO DO SO MAY DAMAGE YOUR TRAILER WIRING AND ELECTRIC BRAKE SYSTEM.

We recommend disconnecting the 7 pin connector from the tow vehicle when camping

When hitching and unhitching, be sure to move the 7-pin connector cord so it does not get damaged by, for example, the hitch
and/or pin box. Do not allow the cord to drag on the ground and cover with a rag or soft cloth when not in use. Keep the
connector clean and dry, and follow manufacturer instructions for cleaning if necessary. See also “Hitching “ section for further
discussion regarding your 7-pin connector.

Important Note: you must refer to the manuals and other instructions of any and all aftermarket appliances, add-ons and/or
accessories regarding their respective electrical requirements.

   WARNING: NEVER REPLACE INSTALLED CIRCUIT BREAKERS OR FUSES WITH CIRCUIT BREAKERS OR FUSES OF
   HIGHER AMPERAGE RATING THAN THOSE ORIGINALLY INSTALLED. THIS COULD OVERHEAT THE WIRING AND
                                        START A FIRE. NSTL

W OOL LY BEA R www.taxaoutdoors.com
7930 blankenship drive houston, tx 77055 usa                      (rev.03302021)          28
FUSE IN THE CIRCUIT BETWEEN THE TOW VEHICLE BATTERY AND AN ELECTRIC OR ELECTRONICRAKE T W OOL LY BEA R www.taxaoutdoors.com 7930 blankenship drive houston, tx 77055 usa (rev.03302021) 29
W OOL LY BEA R www.taxaoutdoors.com
7930 blankenship drive houston, tx 77055 usa   (rev.03302021)   30
W OOL LY BEA R www.taxaoutdoors.com
7930 blankenship drive houston, tx 77055 usa   (rev.03302021)   31
BATTERY

overview … a single Group 24 DEEP CELL 12-volt battery may be supplied with your WoollyBear.. See below battery
specifications and technical information as well as such information provided by the manufacturers of any additional and/or
replacement batteries you purchase.

WARNING: BATTERIES CONTAIN SULFURIC ACID, WHICH IS HIGHLY CORROSIVE, FLAMMABLE AND EXTREMELY
DANGEROUS. THUS, WE STRONGLY RECOMMEND THAT YOU HAVE ALL BATTERY MAINTENANCE, SERVICING AND
INSTALLATION PERFORMED BY A QUALIFIED TECHNICIAN.

The battery is the heart of the 12-volt DC system. Thus, it is important that you keep the battery fully charged and monitor its
charge state. Low battery charge and/or bad batteries are common causes of poor appliance and other component part
performance. Fuses and circuit breakers can fail even without a short circuit under low voltage. Your battery is charged when
driving while wired to a 7 pin connector, by a solar panel wired to the battery (we recommend using a charge controller!), or by
a trickle charger.

Your trailer will generally be in one (1) of the following three (3) power states when in use: (1) dry camping (not connected to shore
power) … you will be using battery power only to operate lights and other DC components, and thus, discharging the batteries.
Exercise constant vigilance in keeping your battery charged when dry camping. Make every reasonable effort to conserve your
battery power (i.e. turn off lights and appliances when not being used);

(2) being towed … if your tow vehicle has been wired properly, and is equipped with a 7 pin connector, your trailer’s battery will
charge while being towed (the rate of charge varies depending on the tow vehicle); and

 (3) connected to other 12v source … Connected to solar panels when off the grid, or to t trickle charge when being stored. The
rate of charge will vary based on the panels and solar exposure. We recommend using a charge controller between panels and
battery to prevent overcharging.

installation … proper battery installation is critical. Thus, please see a qualified technician for the installation and/or replacement
of your trailer batteries.

inspection and monitoring . . . we recommend that you inspect and monitor the charge of the battery at least once a month and
prior to any trip. During your inspection, look for cracks in the cover and case. Confirm that the hold-down hardware is tightly
secured, that the battery box, tray or compartment is clean and free of corrosion, and that the vent caps and terminals are secure
and tight. Note: Do not store anything in the trailer battery compartment, box or tray other than the battery and its various
components.

charging and storing … keep the battery fully charged but be sure not to overcharge the battery.

Here are three ways to charge your battery:
1. Attach 12V trickle charger to the poles of the battery inside the battery box.
2. Plug the trailer’s 7-pin connector into an appropriately wired tow vehicle while the vehicle’s engine is running.
3. Attach compatible solar panels to the solar inlet.

WHEN CAMPING, DETACH 7-PIN CONNECTOR FROM TOW VEHICLE. OTHERWISE IT IS POSSIBLE THAT THE TRAILER MAY
DRAIN THE TOW VEHICLE’S BATTERY.

dead batteries …. If your battery is dead you may connect a 12V trickle charger to the battery and plug the other into a 120V
receptacle, or the 7-way connector to your tow vehicle and run the engine at idle. If your tow vehicle battery is dead or
discharged, an external jumper battery or battery charger must be used to either start your tow vehicle engine, or generator, if
any.

W OOL LY BEA R www.taxaoutdoors.com
7930 blankenship drive houston, tx 77055 usa                   (rev.03302021)              32
PRE-TRAVEL CHECKLIST
             Turn off all switches at kitchen switch panel.

             Be sure your cargo doors are secured.

             Be sure 7-pin connector is secured.

             Be sure the stabilizer jacks are fully raised and secured.

             Check tire pressure and the tires generally for any punctures, cuts, and other problems.

             Be sure wheel lug nuts are tight and secure.

             Check that all tow vehicle and trailer lights and brakes are working in synchronization.

             Be sure hitch assembly is secure, and that safety chains have been properly attached.

             Check underneath trailer for any damage or displacement.

Important Note: This is not an exhaustive list nor is it intended to be. Use common sense when preparing for a trip and all
other helpful resources available to you.

interior …
             - You may keep the refrigerator on while driving.
             - be sure your cargo is secured
             - be sure all doors are closed and latched properly.
             - be sure 7-pin connector is secured
             - be sure the stabilizer jacks.

exterior …
          - check tire pressure and the tires generally for any punctures, cuts, and other problems.
          - be sure wheel lug nuts are tight and secure.
          - check that all tow vehicle and habitat lights and brakes are working in synchronization.
          - check brakes
          - confirm brake controller, if any, is operating properly.
          - be sure hitch assembly is secure, and that safety chains and breakaway switch have been properly attached.
          - check underneath habitat for any damage. .

WARNING: DO NOT ALLOW ANYONE TO RIDE IN HABITAT WHILE IT IS BEING TOWED.

Important Note: This is not an exhaustive list nor is it intended to be. Use common sense when preparing for a trip and all
other helpful resources available to you.

OTHER IMPORTANT PRE-TRAVEL CONSIDERATIONS

             - be sure to pack wheel chocks and blocks.
             - be sure roof rack cargo, if any, is secure.
             - be sure to monitor your battery’s charge before and during your trip. Charge battery before travelling, if necessary.
             - tow vehicle … read and follow the manual and all pertinent instructions provided to you by your tow vehicle
             manufacturer.
             - be sure tow vehicle is operating fully before any trip, correcting any problems before travel.
             - bring flashlight and batteries.
             - make sure your cell phones are charged and that you have phone chargers.
             - bring extension cords, if necessary.
             - Take spare tire.
             - check for any potential fire hazards, and eliminate them, if any.
             - weigh your load before trip, making sure it does not exceed your GVWR.

W OOL LY BEA R www.taxaoutdoors.com
7930 blankenship drive houston, tx 77055 usa                     (rev.03302021)            33
SITE SELECTION AND SET UP With time and experience, you will get better at spotting and identifying good camping sites. Although they will vary to some degree, all good sites will (a) be level and (b) have a firm, not soft, ground that will support the weight of jacks and/or other support devices. There are also many public camping sites that provide electrical and other useful hook-ups or services. Once you have chosen your site, we suggest that you refer to the following important tips for your set-up: level and stable …. (1) Before uncoupling, level the unit from side to side if desired with wood or plastic leveling blocks. Place the blocks on the ground forward of the wheels and tow the unit onto the blocks. Use wheel chocks to be sure the unit cannot roll; (2) Lower the jack onto blocks or pad, if necessary; (3) Once the unit is level, use wheel chocks or blocks to prevent the trailer from moving; (4) Uncouple the trailer from the tow vehicle, unplug 7 pin connector from vehicle; and (5) Lower the stabilizing jacks until they firmly engage. Be sure all jacks have about the same pressure on them. Note: Before resuming travel, be sure that the stabilizer jacks are fully retracted/raised and that the trailer has been fully closed. WARNING: DO NOT ATTEMPT TO USE JACKS STANDS OR STABILIZER JACKS TO JACK UP THE TRAILER OR SUPPORT THE FULL WEIGHT OF THE TRAILER. DO NOT ATTEMPT TO LEVEL, RAISE OR OTHERWISE PLACE ALL OF THE WEIGHT OF THE TRAILER ON THE STABILIZER JACKS. STABILIZER JACKS ARE NOT DESIGNED TO BEAR WEIGHT. set-up cont. … once the unit is safely leveled and stabilized, continue with set-up: W OOL LY BEA R www.taxaoutdoors.com 7930 blankenship drive houston, tx 77055 usa (rev.03302021) 34
FOUR SEASON USE / EXTREME WEATHER
Your habitat was NOT designed for use in extreme climates or weather situations. It WAS designed to be used any
season you wish. Some conditions require special consideration or preparations.

            If conditions are extreme due to weather or other natural or unnatural causes BE SAFE!
                  Get yourselves to safety. Get your vehicles to safety as a secondary concern.

Your habitat was designed for short-term use (typically seven days or less) in normal, moderate temperature and
climate conditions. Normal, moderate temperatures are between 32 degrees F and 100 degrees F. Climates falling
outside of this range are considered extreme for purposes of this manual and your habitat. Be advised that some of
your habitat’s systems and components are not appropriate for use in extreme climates (see further notes below).
Please be advised that some damages, losses or injury arising out of use of your habitat in extreme climate conditions
may not be covered under the Limited Warranty. See Limited Warranty section herein. Thus, before you consider
using your habitat in extreme conditions, please read the following:

water … You can comfortably camp in winter! However, your drinking water should come from portable water
containers that you can keep unfrozen or do not care if they freeze.

battery and electrical systems … Be sure to keep the battery charged and conserve available energy when possible.
Remember that there is no substitute for common sense when camping in extreme weather conditions. Please also
refer to the “Battery” and “Electrical System” sections herein.

EXTREME HEAT and COLD

Please use common sense when camping. Extreme heat and extreme cold can cause injury and or death, especially
to the elderly and young. Take all necessary precautions when camping.

Here are some notes for camping in:

WINTER:
- bring bottled water for drinking, washing, brushing teeth etc.
- have a good sleeping bag, zip two together

SPRING:
- no special considerations unless you are up high or far north where temps may drop below zero at night.

SUMMER:
- get a clip on 12v fan or two!
- some climates support swamp cooler use.

FALL:
- no special considerations unless you are up high or far north where temps may drop below zero at night.

W OOL LY BEA R www.taxaoutdoors.com
7930 blankenship drive houston, tx 77055 usa             (rev.03302021)        35
You can also read