Edible Mars Maps Postvisit Activity for Solar System - Grades K-3 CDE Standards Science: 4.4a, 4.4d
←
→
Page content transcription
If your browser does not render page correctly, please read the page content below
Edible Mars Maps
       Postvisit Activity for Solar System

Courtesy Philip James (University of Toledo), Steven Lee (University of
                          Colorado), NASA

                        Grades K–3
                      CDE Standards
                     Science: 4.4a, 4.4d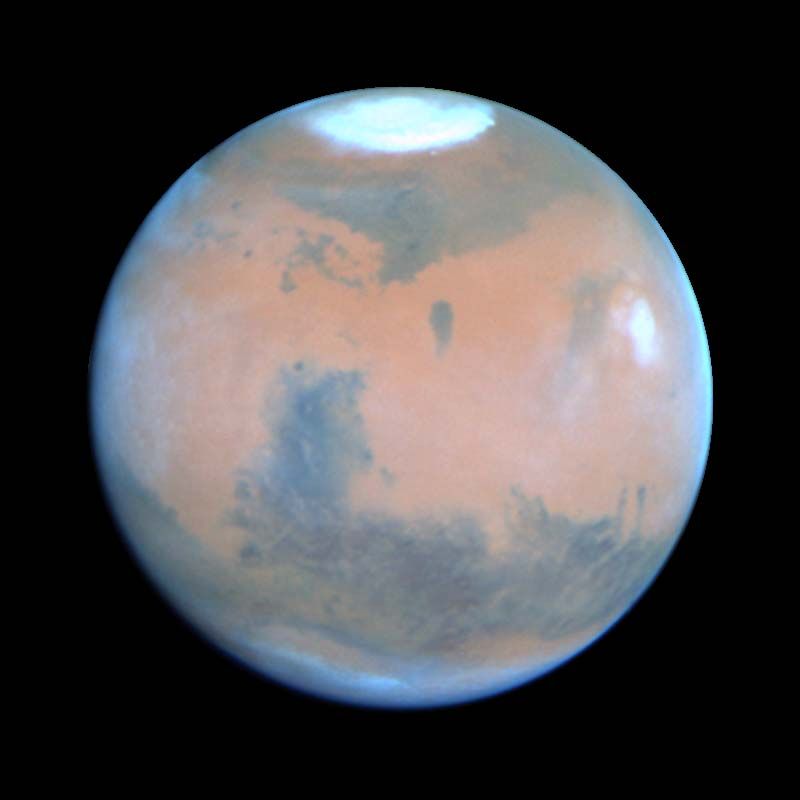
Preparation and Materials
Estimated Preparation Time: 90 minutes
Estimated Activity Time: 45–60 minutes

Materials
Refrigerated cookie dough to make large sugar cookies (one per student)
Two cans vanilla frosting
Red and orange food coloring
Hershey kisses
Chocolate chips
Paper plates
Plastic knives
Red sugar sprinkles or cinnamon
Mars maps
Toothpicks
Napkins
Chart paper
White paper
Pencils
Copies of Mars map activity sheet

Learning Goals/Objectives
Students will
   • Identify and label the major physical features on a map of the
      surface of Mars
   • Compare geologic features of Mars with those of Earth

Connection to Space Odyssey
Your trip to Space Odyssey will be centered on Mars, at the Candor Chasma
diorama, designed to be your Visitor Center to the Universe. Here, you may
see an astronaut performing experiments on the surface of Mars. You may
decide to experiment yourself at the Experiment Bar. You may also want to
learn about how different landscapes on Mars were formed at the Carving
Landscapes and Cratering interactives. Don’t forget to find out about those
awesome dust storms at the Martian Dust Devil exhibit!

Advanced Preparation
1. Make one sugar cookie for each student in your class. Using the
refrigerated sugar cookie dough available at grocery stores, cut slices
of dough at least ¼ to ½ inch thick. Follow baking directions on the
package. Give the cookies enough room to spread out on the cookie
sheet so that they will be round.
2. Use food coloring to tint one can of vanilla frosting so that it is
reddish orange in color. Don’t tint the other can of frosting.
3. Obtain a copy of one or more of the Mars books on the resource list
below to share with your class.
Classroom Activity
1. View pictures of Mars surface maps and point out important landforms
on Mars, including Valles Marineris, Olympus Mons, and the polar ice
caps. Discuss how these surface features are similar to surface
features on Earth.
2. Inform students that they will be making their very own maps of Mars
that they will be able to eat!
3. Using information from books and maps available on the Internet, help
students re-create the Mars map on a large piece of chart paper.
Students will use this map (similar to the one included at the end of
the lesson) to create their own cookie maps. Keep in mind that the
map provided for this activity is not to scale; it is a representation to
aid students in learning the geologic features.
4. Ask students to wash their hands and review important rules about
sharing food. Ask students not to lick their fingers or plastic frosting
utensils so that they do not spread germs.
5. Provide each student with a paper plate and a cookie. Each student will
also need one Hershey kiss, three chocolate chips, a plastic knife for
spreading frosting, a toothpick for carving, and a napkin.
6. For each group of students, provide a paper plate with enough reddish
orange and white frosting for students to share.
7. Have students shave the top “pointy” parts off of their Hershey kiss
and chocolate chips. At this point, you could discuss how the volcanoes
on Mars are similar to the volcanoes in Hawaii. They are not tall peaks,
but rather gentle slopes. You may wish to show students examples of
this. One great picture is located at the following website:
http://www.lpi.usra.edu/images/shaw/shaw_S32.gif8. Allow students to eat the discarded chocolate shavings. They may also
use their toothpicks to carve a crater in the Hershey kiss.
9. Now students have the materials they need to create their cookie
maps. Have them spread the reddish orange frosting on first. At this
point it might be helpful to have a brief discussion on how much
frosting is appropriate to spread on one cookie.
10. Once their entire cookie is frosted in reddish orange, they may use
the white frosting to create the polar ice caps.
11. Then students may place their Hershey kiss to represent Olympus
Mons and the three chocolate chips to represent the Tharsis
volcanoes; Arsia Mons, Pavonis Mons, and Ascraeus Mons.
12. Students may then use their toothpicks to create Valles Marineris in
the center of their cookie. Here you might discuss how this feature
can be compared to the Grand Canyon, but that the two were formed
in different ways. The Grand Canyon was carved by the Colorado
River, whereas Valles Marineris was formed as the crust of Mars split
apart, much like a fault line here on Earth.
13. Allow students to sprinkle cinnamon or red sugar sprinkles on their
cookies to represent the dust on Mars.
14. Let students display their cookies to the rest of their group before
eating.
15. Finally, allow students to eat their map creations!
Variations/Extensions
1. Have students label the map of Mars after completing their cookie
maps. Students may color the map when they’re finished.
2. Create a Venn diagram with students to compare geologic features of
Mars with those of Earth.
3. Have students research Mars further and create mini-reports of
interesting facts they learn about the planet.
4. Ask students to create similar surface maps of other planets. For
instance, a Mercury cookie map might be frosted a grayish brown and
marked with tons of craters made by dropping objects onto the
surface.
Resources
Books
Meachen Rau, Dana. Mars. Minneapolis, Minn.: Compass Point Books, 2002.Ride, Sally and Tam O’Shaughnessy. The Mystery of Mars. New York: Crown Publishers, 1999. Simon, Seymour. Destination: Mars. New York: William Morrow, 1987. Sumners, Carolyn. An Earthling’s Guide to Mars. New York: McGraw Hill, 1999. Web sites http://www.the-planet-mars.com/volcanoes/mars-volcanoes-map.html http://www.the-planet-mars.com/map-of-mars/map-mars.html http://www.the-planet-mars.com/map-mars.html http://www.gsfc.nasa.gov/gsfc/spacesci/pictures/mola/mars3d.htm http://mars.jpl.nasa.gov/ http://mars.jpl.nasa.gov/funzone_flash.html http://mars.jpl.nasa.gov/kids/ http://athena.cornell.edu/kids/index.html
Name: _____________________

     Label the geologic features of Mars on the map below.

                                 1.

      2.

                                3.

                                4.

5.

                                      6.

                           7.

     South Polar Ice Cap                        North Polar Ice Cap
     Pavonis Mons                               Valles Marineris
     Olympus Mons                               Arsia Mons
     Ascraeus Mons
North Polar Ice Cap
Olympus Mons
Ascraeus Mons
Pavonis Mons
Arsia Mons
Valles Marineris
South Polar Ice CapYou can also read