Banner Faculty Self Service 01-01-2020 - psmchs
←
→
Page content transcription
If your browser does not render page correctly, please read the page content below

Banner Faculty Self Service
         01-01-2020
           Ver 2.0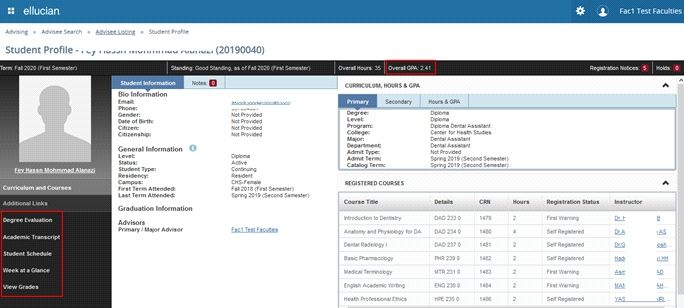
INDEX
                                       TOPICS       PAGE NO.
Login to Banner Faculty Self Service                   1

Change the language to Arabic                          3

View / Update Personal Information                     6

Maintain Emails                                        7

Maintain Phone numbers                                 9

View Class List                                        10

Attendance Tracking                                    14

Cancel a class                                         19

View Schedule                                          22

Grade Entry                                            25

Copy Gradebook from Course Template                    26

Enter scores for students                              30

Import Grades                                          36

View the composite Grades                              45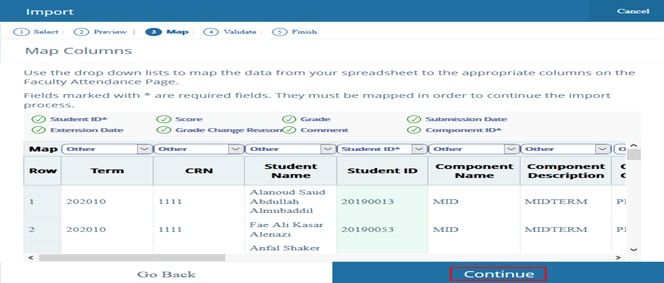
TOPICS   PAGE NO.
Submit Grades for Approval                         47

View Student Profile                                49

Student Transcript                                 53

Student Degree Evaluation                          56

View Student Schedule                              61

View Student Grades                                62

Enter Office Hours                                   64

Advise Students in Registration (If Required)      67
Login to Banner Faculty Self Service

You can Access Banner Faculty Self Service using the below URL:
      https://sis-xess.msd.edu.sa/FacultySelfService
You will be invited to enter a username and a password to login.
The Faculty landing page is displayed upon a successful login:

                                                                   1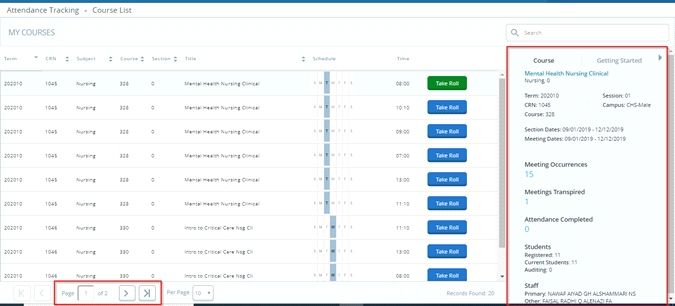
To access your services select the links in the landing page or use the Banner menu on the header
of the page

Signing Out:
To log out from banner Faculty Self Service, click the profile icon     and choose sign Out.

  2
Change the language to Arabic

If you prefer the interface to be in Arabic for all Banner faculty services , you can change it as
follows:
   1 - Click the Tools menu       and choose Language Settings:

                                                                                                     3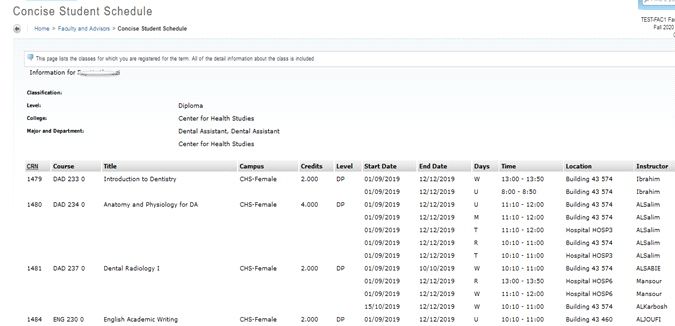
2 - Choose Arabic (Saudi Arabia) from the drop down list and click Save:

 4
3 - Sign out and sign in again for the changes to take effect.
    The interface is shown in Arabic:

                                                                5
View / Update Personal Information To view and update your personal information click View / Update Personal Information from the landing page. The Personal information page is displayed: 6
r Your emails are displayed under the Email section.
r Your phone numbers are displayed under the Phone Number section.

  Maintain Emails

To add an email, click the            button in the Email section. In the popup window, enter
the following:

r The email type (Personal, Official)
r The email address.
r Check the Preferred indicator to set the email as preferred. Only one email address can set as
  preferred. The preferred email address is used to send you emails.
r Click Add.

                                                                                             7
Please notice the following: r To edit an email, click the Edit button next to it. r To delete an email, click the Delete button next to it. 8
Maintain Phone numbers
To add a phone number, click the button         in the Phone Number section. In the popup
window, enter the following:
r The Phone type (Mobile, Work…)
r The Phone number. You may enter a region code and an extension for a work phone.
r Click Add.

                                                                                       9
Please notice the following: r To edit a phone number, click the Edit button next to it. r To delete a phone number, click the Delete button next to it. View Class List To view your class list, click Class List from the landing page or use the Banner menu on the header of the page navigate to Faculty and Advisors sub menu and select Class List. The Class List page is displayed, where all your sections are listed.Pay attention to the number of records retrieved: 10
To view a class list, click a section. The list of registered students is displayed:

                                                                                       11
12
Please notice:
r You can export the class list to Excel by clicking the Export button
r You can print a class list by clicking the Print button
r If you click a student, his program details are displayed (Degree, Major…)
r You can select one student, multiple students or all students and click the Email icon
   if you need to send them an email.

                                                                                           13
Attendance Tracking To view and track Attendance, click Faculty Attendance Tracking from the landing page or use Banner menu on the header of the page navigate to Faculty and Advisors sub menu and select Attendance Tracking. You can see a listing of all the meeting times of the sections assigned to you. Notice the navigation buttons at the bottom of the page. 1 - Click a course to see its information in the right panel. 2 - To track attendance, click (Take Roll). 14
r You will get a listing of all students enrolled in the class.
r You need to select the day you want to track. You can select any day to view the previous
   attendance, However, you cannot change the attendance after 3 working days.

                                                                                              15
r You can click on the circle next to each student to track attendance. Every time you click on this indicator it changes: t An empty circle means that no attendance has been tracked. t A check mark in a circle means that the student was present. t A minus sign in a circle means that the student was absent. t A minus sign with a note means that the absence was notified. Note: The records tracked as Absent or Absent Notified will be used to calculate the absence percentage. r If you select a student, you can view his percentage of absence for all the course in the Attendance tab (Cumulative Absence Percentage) 16
Note:
This is the percentage of absence to be considered in the denial decision.

Notice the options available to help you track attendance easily, under the Update All drop down
list:

                                                                                             17
r Mark All Present: Mark all students as present r Mark All Absent: Mark all students as Absent r Update empty Records to Present: All records not tracked yet will be marked as Present. r Update empty Records to Absent: All records not tracked yet will be marked as Absent. 18
Cancel a class

You can mark a class as canceled. This usually can be done if you were yourself absent.
To cancel a class, choose Cancel this Class Meeting from the Class menu:

                                                                                          19
Note: The canceled class is not included in the absence calculation. 20
To reinstate the class, choose Reinstate the Class Meeting
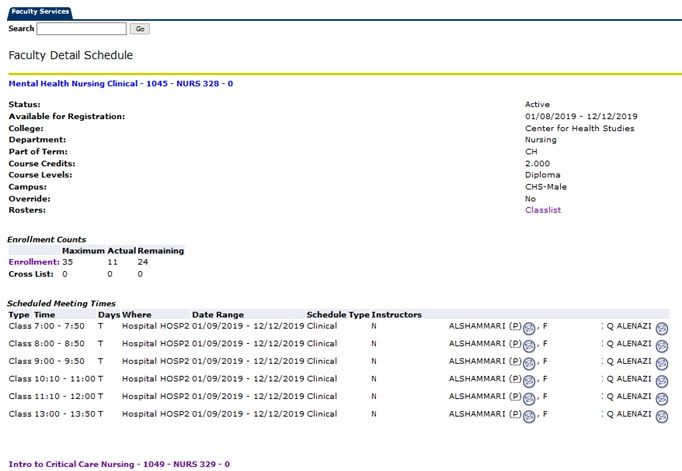
21View Schedule 1 - Access Banner Faculty Self Service: 2 - Using the Banner menu on the header of the page navigate to Faculty and Advisors sub menu and select Week Schedule: 22
You will get your weekly schedule.

                                     23
3 - To view the detail schedule select Faculty Detail Week Schedule: Note: The primary instructor of the section is suffixed by (P). 24
Grade Entry

Access Banner Faculty Self Service Landing page using this URL:
To view enter grades, click Faculty Grade Entry from the landing page or use the Banner menu
on the header of the page     navigate to Faculty and Advisors sub menu and select Faculty
Grade Entry.

                                                                                         25
Copy Gradebook from Course Template Before being able to enter scores for students, you need to copy the gradebook from the course template to your sections. In the landing page, click the link: Gradebook Copy from Course Template. 26
1 - Select one section from the drop down list. The course gradebook template appears in the
  bottom of the page.
2 - In the Template Components section, check the components defined. If you click a
  component which has sub components, its sub components will appear in the Template Sub
  Components section.
3 - Check the sub components (if any) in the Template Sub Components section.
4 - Click the Copy from Template button to copy the components and sub components (if any)
   to your section. The components will appear on the Components and sub components
   sections:

                                                                                               27
Repeat the copy for all your sections. 28
Notes:
r If you have any comments about a template (incorrect weight, number of components…),
   report it before copying.
r If a change have been made to the template, make the copy again to update the components
   at the level of the section.
r If you enter any score for any student in the section, you cannot copy the template again.
r You only need to make the copy one time. If the components are already copied, by another
   instructor for instance, It is enough.

                                                                                               29
Enter scores for students
To enter scores for students, access the Faculty Grade Entry application. You have two options
to access this application:
r From the landing page, click the link: Faculty Grade Entry.
r Using the Banner menu on the header of the page navigate to Faculty and Advisors sub
menu and select Faculty Grade Entry.
Sections with gradebook will be displayed in the Gradebook tab.
30Notes:
r If you can't find one of your sections, it's probably because you didn't copy its gradebook
from the course gradebook template.
r Notice the Grading Status of the sections:
t Completed: all the scores were entered for all students.
t Not Started: No scores were entered yet.
t In Progress: The section is graded partially.
To enter scores, proceed as follows:
1 - Select a section and click the Components button at the bottom of the page to access its
components. A list of components is displayed. If you select a component, the registered
students is displayed at the bottom.
312 - Enter the score in the score field next to each student. 3 - When you are done, click Save. 4 - If you click Reset, the system will revert back to the last saved scores. 32
Notes:
r The only scores allowed are scores between 0 and the maximum score allowed (Out of).
r You can enter decimals up to two digits.
r If the component has sub components, you can not enter scores directly. You should enter its
   sub components first.
r If the student was absent in any component, enter the mark 0 and select Absent from the
   Comment drop down list.

To enter sub components, proceed as follows:
1 - Select a component and click the Sub Components button at the bottom of the page to access
  its sub compomnents. A list of sub components is displayed. If you select a sub component,
  the registered students is displayed at the bottom.

                                                                                               33
1 - Enter the score in the score field next to each student. 2 - When you are done, click Save. Or Reset to cancel and revert back. 3 - If the student was absent in any sub component, enter the mark 0 and select Absent from the Comment drop down list. 34
35
Import Grades
You can enter your scores in Excel and then import them in Banner.
To import grades proceed as follows:
  1 - Select the component (or sub component) you want to import.
  2 - Click Export Template from the Tools menu.

 36
3 - Select the Excel file format and click Export.

4 - Edit the exported Excel file. Focus only on two columns:
  t Score: Enter the score of the component or sub component.
  t Grade Change Reason: enter OE.
5 - Save your file.

                                                                37
6 - Select the component and Click Import from the Tools menu 38
7 - Click Browse to select your file:

                                       39
8 - Click Upload , then Continue: 40
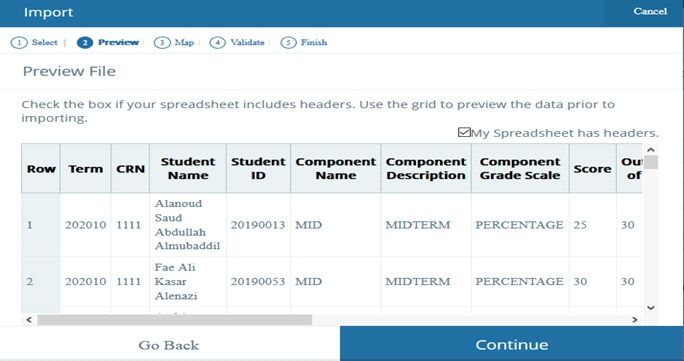
9 - A preview of your file is displayed. Click Continue:

                                                          41
10 - The Map Columns window is displayed. Click Continue: 42
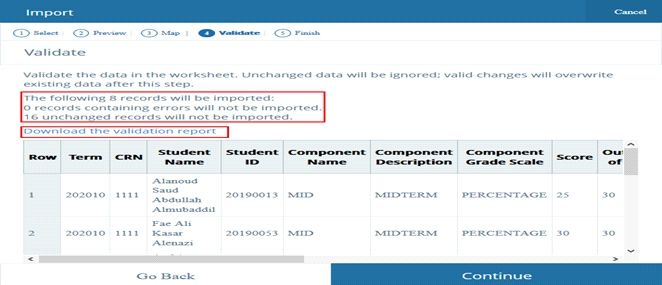
11 - In the Validate window, only records to be imported are displayed. Download the validation
    report in case of errors. Click Continue:

                                                                                            43
12 - Click Finish in the last window. 44
View the composite Grades

Once you are done with the components and sub components, you can check the totals calculated
by Banner by clicking the button Composite Grades button at the bottom of the page:

                                                                                          45
Notes:
r You can check the final grade from here or from the Final Grade tab.
r The final grade cannot be modified directly. If you need to modify it, you need to modify its
components.
r To print the page, click the Print button
46Submit Grades for Approval
Once you completed all the grading for a section, you can submit it for approval to the
Department Head.
In the landing page, click the link: Submit Grades for Approval. You can also access this link
from Banner menu on the header of the page
47Notes:
r You can only submit sections which their grading is completed. A partially graded section
cannot be submitted.
r Once you submit a section, its grading is closed.
r If the section was rejected by the Department Head or the Vice Dean, the grading will open
automatically for you.
r Only primary instructor can submit a section for approval. Check your detailed schedule to
see who the primary instructor is.
r You can see the status of the approval in the column Last Status.
48View Student Profile
You can view the full profile of the students under your advising using Student Profile page.
In the landing page, click the link: Advising Student Profile. You can also access this link from
Banner menu on the header of the page
1 - The Advisee Search page is displayed:
493 - Click the student name to view his profile:
You can see in the student profile the following information and more:
512 - Click View My Advisee Listing to view students under your advising. Move the horizontal scroll bar to see many information about the advisees: Major, Academic Standing, Admit Term … 50
r The Registered Courses, The CGPA, The Academic Standing, Biographical information
      (Email, Phone…)…
You have also access to many other pages available through the left side panel.

Note:
The student profile is also available for instructors. As instructor, you can click the name of your
students in the following pages to view their profiles:
   r Attendance Tracking page.
   r Grade Entry page
   r Class List page.

 52
Student Transcript
To view the full transcript of the student:
1 - Choose Academic Transcript from the left side panel of his profile:
532 - Click Display Transcript to view the detailed transcript: 54
3 - Scroll down the page to view all the semesters.

                                                      55
Student Degree Evaluation Degree evaluation is a report that shows the progress of the student towards his study plan. To view the degree evaluation report of the student: 1 - Choose Degree Evaluation from the left side panel: 56
2 - Click the program name to view the most recent Degree Evaluation:

                                                                        57
3 - Scroll down the page to view all the study plan requirements 58
Focus on the Met indicator next to each requirement to see if it is met or not.

                                                                                  59
2 - To view the concise student schedule, choose Student Schedule from the left side panel: 60
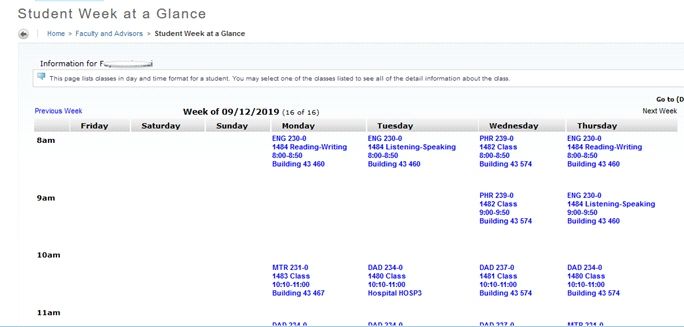
View Student Schedule

1 - To view the student schedule as a matrix, choose Week at a Glance from the left side panel:

                                                                                             61
View Student Grades To view the student grades rolled to history, choose View Grades from the left side panel: 62
In addition to the grades, you can see here also in the GPA Summary section:
  r The Term GPA
  r The Cummulative GPA

                                                                               63
Enter Office Hours
You can enter your office Hours in Banner. These hours can be seen by students to let them know
when you are available for them.
1 - Access Banner Faculty Self Service:
2 - Using the Banner menu on the header of the page navigate to Faculty and Advisors
sub menu and select Office Hours:
643 - Choose a section from the CRN drop down list, then click Submit to view the Office hours
page.
4 - Enter the following :
t From Time and to Time
t From Date and To Date
t The Days
t The location
t The contact number if available
t Check the display indicator if you want students to view it.
655 - Click Submit.
Notes:
r To delete an Office Hour, clear out From/To Times or From/To Dates and click Submit.
r You can copy your office hours from one CRN to another by selecting the target CRN
from the Copy to drop down list and clicking Submit.
66Advise Students in Registration (If Required)
In some cases, students are required to contact their advisors to be able to add some extra courses
offered in the semester.
If solicitated by your advisees for that, proceed as follows:
1 - Access Banner Faculty Self Service:
2 - Using the Banner menu on the header of the page navigate to Academic Services sub
menu and select Request a Service:
673 - Select the Service: Add Courses for Advisees from the Service drop down list, then click Continue. 68
69
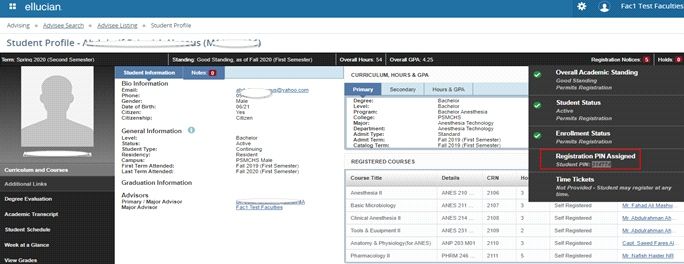
4 - Select an advisee from the drop down list and click Save.

5 - You can see the list of service requests you submitted. Notice the status of the service
   request. Wait few seconds and refresh the page, you will notice the status is changed from
   Open to Complete.
6 - Completed means that the courses were projected for the students and a registration PIN was
   assigned.
7 - You can see the registration PIN in the profile of the students under Registration Notices.
   This PIN is required for the student to add courses.

 70
71
اﻟﻤﻤﻠﻜﺔ اﻟﻌﺮﺑﻴﺔ اﻟﺴﻌﻮدﻳﺔ
اﻟﻈﻬﺮان -ص .ب ٣٣٠٤٨ .رﻣﺰ ﺑﺮﻳﺪي ٣١٤٤٨
ﻫﺎﺗﻒ ٠١٣-٨٤٤٠٠٠٠:ﻓﺎﻛﺲ ٠١٣-٨٤٠٥٥٧٧ :
www.psmchs.edu.sa
pr@psmchs.edu.saYou can also read