Streaming Manual for the Aircam, Unifi Video Camera or Unifi Pro Video Camera
←
→
Page content transcription
If your browser does not render page correctly, please read the page content below
Streaming Manual for the Aircam, Unifi Video
Camera or Unifi Pro Video Camera
   Intro
   Uplink speed
   Configuration of Aircam
   Dynamic IP address/ Dynamic DNS service
       Configure Port Forwarding in DSL router (Example: AVM FritzBox!)
   Streaming service
   Configure Dyn DNS Update in Router

Intro
The Aircam, Unifi Video Camera or Unifi Pro Video Camera generates a live video stream.
Windfinder does not provide any support for video streaming. However here is a
comprehensive guide to help you set up your video stream on your website.

The Aircam generates video streams in 4 different resolutions:
rtsp:///live/ch00_0 1280x720 px (HD)
rtsp:///live/ch01_0 640x368 px
rtsp:///live/ch02_0 320x176 px
rtsp:///live/ch03_0 160x96 px

By default the Aircam produces 25 frames per second.

If you want to provide a live video stream on your website you need to consider several
aspects:
    ● Uplink speed
    ● Dynamic IP address /Dynamic Donain Name Service (DNS)
    ● Port forwarding
    ● Streaming provider

Uplink speed
Go to http://www.speedtest.net/ and check your uplink speed. In order to upload a HD (1280 x
720 px) video stream with a frame rate of 25 per second from your local internet access to
the world wide web your internet connection needs to provide at least 1 Mbit/second uplink
bandwidth. If your uplink speed is lower than 1 Mbps select one of the lower resolution
streams mentioned above or lower the frame rate. If the video stream generates fewer frames
per second the data volume will be lower and this might allow you to upload the HD stream
(1280x720 px). In order to lower the frame rate you need to install the Unifi video controller.

                                              1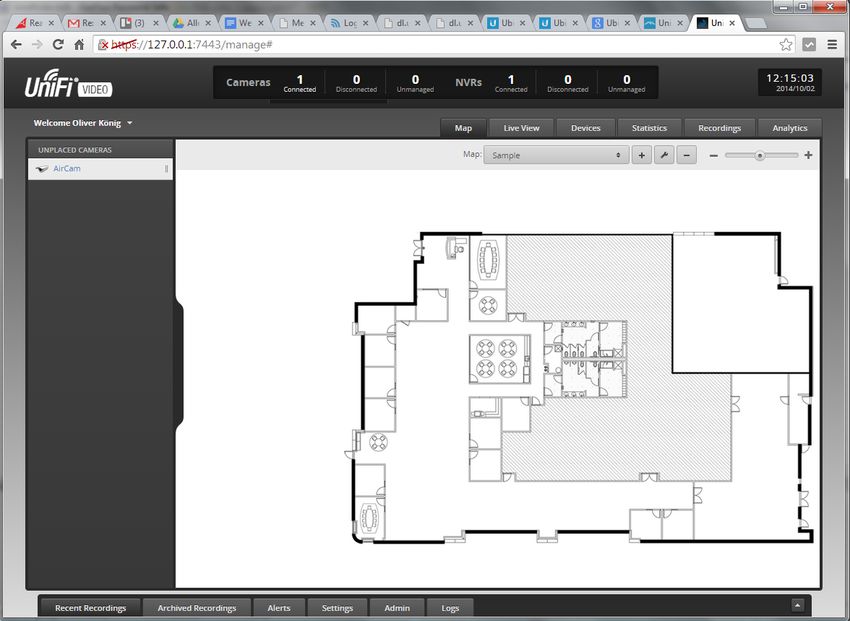
Configuration of Aircam
Download Unifi AirVision from http://www.ubnt.com/download/airvision/ for Windows 7, 8 or
8.1 (64 bit) or Linux (64 bit) and install the software. The software is only needed for
configuration. A software for MacOS is not yet available. In the last step of the installation
process select “Start Ubiquiti Unifi after installation”. The Unifi video controller will appear as
an icon in the system tray. Click on this icon “Unifi Video: Running” and select “Open in
Browser”.

The following screen will appear:

Click on “Advanced” and then on “Proceed to 127.0.0.1 (unsafe)”.

   ● Accept the license agreement

                                                 2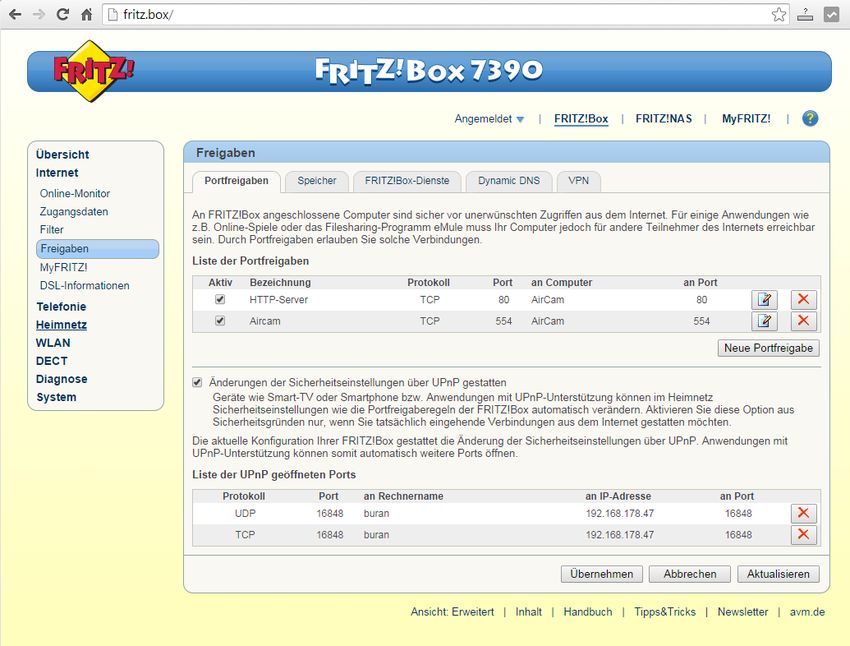
● Welcome: Enter the system name “e.g. Peters aircam controller”, select language and
time zone.
● Account: Enter your email address, your name and a password
● Mode: Create as new controller
● Finish the setup wizard
● Login into the Unifi Video interface
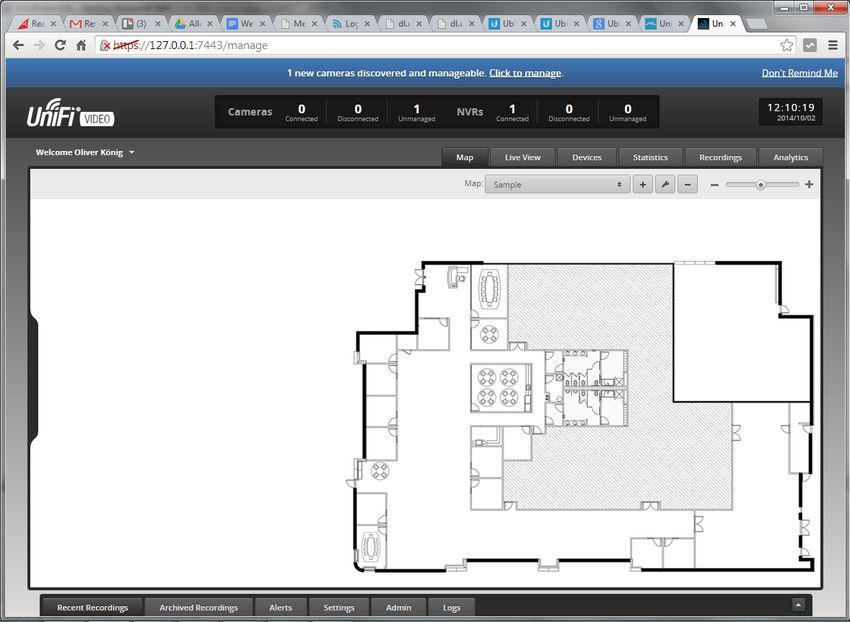
The following sceen appears:
Click on “Click to manage”. In the box “authentication / assignment” enter:
User name: ubnt
password: ubnt
The cam should be displayed as “Connected”, see below:
3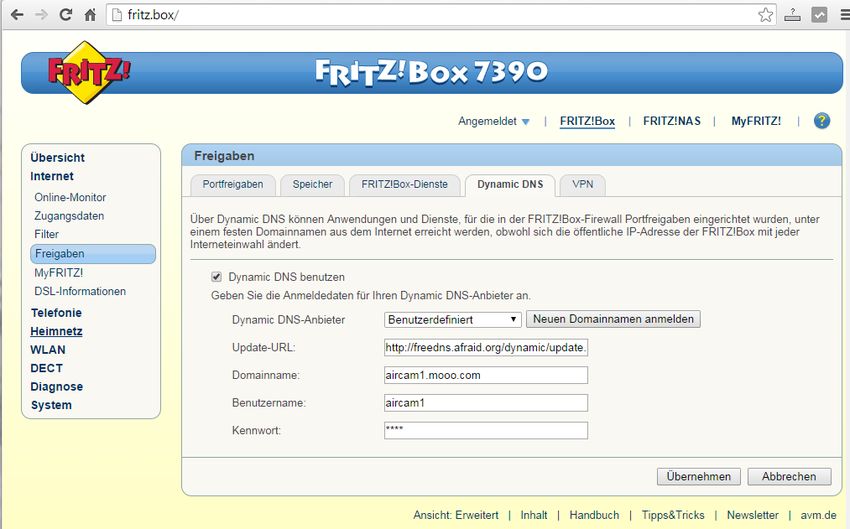
Move the mouse on “1 connected” and click “Aircam”. In the box click “configuration” and then
“video settings”. Select another frame rate (if your uplink speed requires a lower frame rate).

                                              4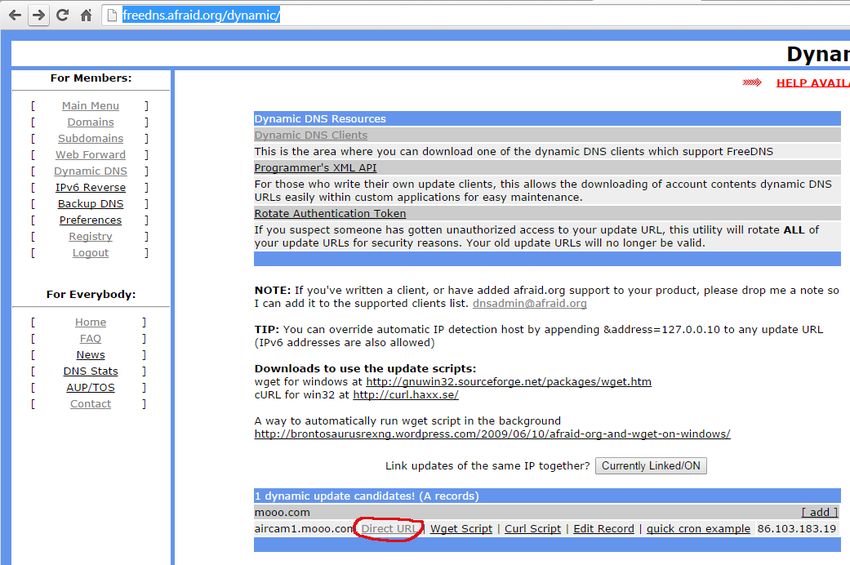
Dynamic IP address/ Dynamic DNS service
Most internet connections have a (external) dynamic IP address (versus static IP address)..
This means that each time you connect to the internet from the computer, tablet (via
WLAN/WIFI), smartphone (via WLAN/WIFI) or webcam your internet access provider will
assign a new IP address to your internet connection. If you have such a dynamic IP address
you cannot simply put the live stream (for example rtsp://100.200.300.400//live/ch00_0
1280x720) onto your website because the external IP address which is assigend to you
changes every time you connect to the internet.

Therefore you will need to use a service which identifies your ever changing IP address and
connects it to a static domain. To learn more about this please read:
http://en.wikipedia.org/wiki/Dynamic_DNS

You will need to register at a dynamic domain name service (DNS):

                                             5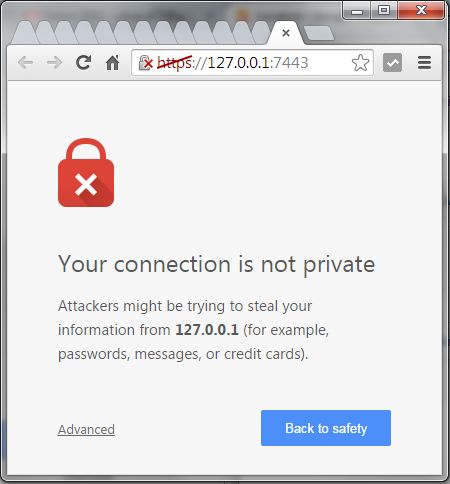
● http://www.noip.com/remoteaccess (free service but requires manual reactivation
every 30 days; alternatively 19.95 US$/year)
● http://dyn.com/standarddns/ (35 US$/year)
● http://freedns.afraid.org/ (free service, recommended)
Go to http://freedns.afraid.org/signup/ and fill in the sign up form:
Click the activation link in the registration mail from FreeDNS.Afraid.org. Click on “add a
subdomain” and fill in the form:
In the field “Type:” select “A” from the drop down menu, in the field “Subdomain:” type for
example “aircamhawaii”, and in the field “Domain:” select a domain of your choice, e.g.
“mooo.com (public)”. Click “Save”
6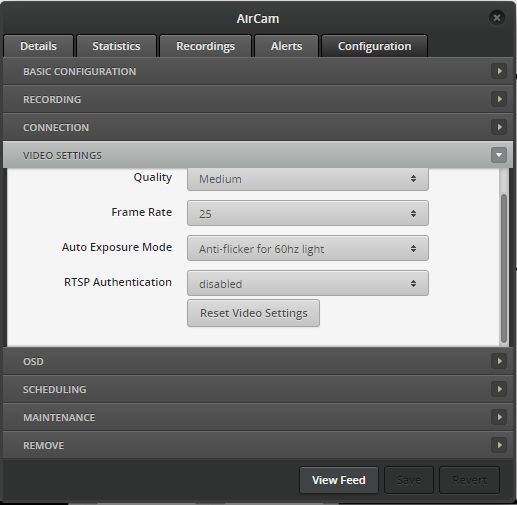
Afer registration you need to install a little program to frequently inform FreeDNS.Afraid.org of
your current IP address. Go to http://freedns.afraid.org/scripts/freedns.clients.php and scroll
down to download a program for your operating system. In this example we choose
“FreeDNS Update” for Windows and download it from http://www.techknowpro.com/freedns/
and download “FreeDNS Update v1.8.4 Setup”.

If you cannot install the program to automatically report your IP address to
FreeDNS.afraid.org please read the chapter “Configure Dyn DNS Update in Router”

Now you will have a domain like http://aircam1.mooo.com. When you open this domain in
your browser you will probably not see anything or a message like “This webpage is not
available.” This is because the DNS service is connecting to the first device behind your
internet access and this is usually the DSL router. In order to access your Aircam from outside
with the Dyn DNS service you need to configure “Port forwarding” in your internet router in
order to forward the address http://aircam1.afraid.org from your router to your Aircam.

Configure Port Forwarding in DSL router (Example: AVM FritzBox!)
Log into your router (in this example the Fritzbox) by typing the following URL in the address
line of your browser: http://fritz.box/
In the menu bar on the left click “Internet”, then “Freigaben” (English: “Port Forwarding”):

                                                7
Then create 2 port forwarding rules:
1) Check the check box and select “Portfreigabe aktiv für: HTTP Server”. (English: “Port
forwarding active for: HTTP server”). In the field “An Computer:” select “Aircam”
(English: At computer: “Aircam”). The field “IP Adresse” (English: IP address is filled in
automatically). Press “OK” to save.
This port forwarding rule will cause your Aircam web interface to be accessible from anywhere
on the internet at the address: http://aircam.mooo.com with user name and password. (Please
keep user name and password secret.) However the live stream is not yet accessible from
outside. We need a 2nd port forwarding rule for this:
2) Check the check box and select “Portfreigabe aktiv für: Andere Anwendung”. (English:
“Port forwarding active for: Other Application”). In the field “Bezeichnung” enter:
“Aircam” (English: “Designation: Aircam”). For Protokoll (English: Protocol”) select
“TCP”. In the fields “Von Port” / Bis Port enter both “554” (English: “From Port 554 / to
Port: 554”). In the drop down field “An Computer” (English: “At Computer”) select
8“Aircam”. The field “IP Adresse” (English: IP address is filled in automatically). Finally
in the field “An Port” (English: “At port”) enter 554 and then click “OK” to save.
The 2nd rule causes your video stream to become available from the internet at:
Streaming URL (Example) Resolution (pixel)
rtsp://aircam1.mooo.com/live/ch00_0 1280x720 px (HD)
rtsp://aircam1.mooo.com/live/ch01_0 640x368 px
rtsp://aircam1.mooo.com/live/ch02_0 320x176 px
rtsp://aircam1.mooo.com/live/ch03_0 160x96 px
Depending on the uplink speed of your internet connection choose the type of stream that you
want to make available to the public (on your website). You can check if the stream is working
by running VLC media player. If this program is not installed you can download it from
https://www.videolan.org/ . Start VLC, then click on “media” in the drop down menu and select
“Open network stream”. Copy and paste one of the streaming URLs (see above) into the field
“Enter a network address”. If you have setup everything correctly the live video stream from
your cam will be served.
Streaming service
You could now publish your stream on your website with the help of a video player. However
this is not recommeded at all. If you publish the HD stream
rtsp://windfinder.mooo.com/live/ch00_0 on your website and your uplink speed at the site of
the aircam is 1 Mbit/s then only 1 person will be able to watch the stream on the internet at
the same time. As soon as 2 people want to watch the stream online at the same time the
stream will sputter or break down because 2 users will require 2 times 1 Mbit/second. This is
where a streaming service comes in. A streaming service will mutliply your own uplink stream
to thousands of users on the internet. Because a permanent live video stream watched by
many people around the world generates an enormous data volume these services are
usually not free. There might be some services which are free of charge but then the video
stream is hosted on the website of the streaming provider exclusively (which means you
cannot embed it into your own website) OR the stream is interrupted by video ads (which are
served by the streaming provider).
You need to sign up with a streaming service. We recommend Streamdays starting from 29 £
per month. They offer a free trial and have good support via email. Register your cam at:
http://www.streamdays.com/hostedwebcams/pricing
9Once you have registered with Streamdays they will provide you with a URLstring or HTML
code which you can embed into your website to serve the live stream of your webcam.
There are some other free but unsuitable streaming services because they only support built
in cameras from your PC, notebook, tablet or PC and they host the stream exclusively on their
website. If you are a system administrator you can also set up your own streaming server.
This requires a lot of know how and work. A well know streaming server software is:
http://www.wowza.com/
Configure Dyn DNS Update in Router
(Read this chapter only if you could not install and run the DNS Update program.)
Log into Fritz box by typing the following URL in the address line of your browser:
http://fritz.box/. Scroll to the bottom of the screen and select “Ansicht: Erweitert” (English:
“View: Extended”). Click on the tab “Dynamic DNS”. Check the box “Dynamic DNS benutzen”
(English: “Use dynamic DNS”). Enter the following data:
Enter the following values into the router configuration:
Dynamic DNSAnbieter: Benutzerdefiniert (English: DNS provider: User defined)
UpdateURL: Go to http://freedns.afraid.org/dynamic/ and click on “Direct URL”
10Copy the Direct URL address (see example below):
into the field UpdateURL in your router.
Domain name: , e.g.:
aircam1.mooo.com
Benutzername: (English: “user name”)
Password:
Click “Übernehmen” (English: “Accept” or “Save”)
11You can also read