Electric convection steam oven 4x GN 2/3 - Hendi
←
→
Page content transcription
If your browser does not render page correctly, please read the page content below
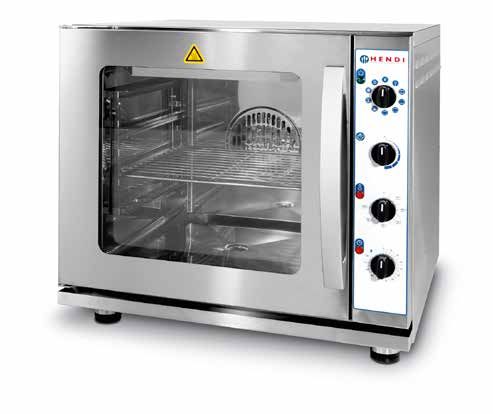
Electric convection steam oven
           4x GN 2/3
Piec konwekcyjno-parowy 4x GN 2/3 -
           elektryczny
                                                      227954

           User manual | Gebrauchsanweisung | Instrukcja obsługi | Mode d’emploi | Istruzioni per l’utente

 You should read this user manual carefully before            Lisez attentivement ce mode d’emploi avant d’utiliser
 using the appliance                                          l’appareil .

 Bevor Sie das Gerät in Betrieb nehmen, sollten               Prima di utilizzare l’apparecchio in funzione leggere
 Sie diese Gebrauchsanweisung aufmerksam lesen                attentamente le istruzioni per l’uso.

 Przed uruchomieniem urządzenia należy koniecznie
 dokładnie przeczytać niniejszą instrukcję obsługi.
Keep this manual with the appliance.
Zachowaj instrukcję urządzenia.
For indoor use only.
Do użytku wewnątrz pomieszczeń.
EN
CONTENTS
1. IMPORTANT SAFETY REGULATIONS....................... 3
2. GENERAL NOTICES.................................................. 4
3. TECHNICAL FEATURES............................................ 4
4. INSTRUCTIONS FOR FITTER.................................... 5
5. INSTRUCTION FOR USERS....................................... 7
6. MAINTENANCE AND CLEANING ............................. 8
8. DISCARDING & ENVIRONMENT ............................ 10
9. WARRANTY............................................................. 10
2Dear Customer,
Thank you for purchasing this Hendi appliance. Before using the appliance for the first time, please read
this manual carefully, paying particular attention to the safety regulations outlined below.
1. IMPORTANT SAFETY REGULATIONS
• This appliance is intended for commercial use only and must not be used for
household use.
• The appliance must only be used for the purpose for which it was intended and
designed. The manufacturer is not liable for any damage caused by incorrect oper-
ation and improper use.
• Keep the appliance and electrical plug away from water and any other liquids. In
the event that the appliance should fall into water, immediately remove plug from
the socket and do not use until the appliance has been checked by a certified tech-
nician. Failure to follow these instructions could cause a risk to lives.
• Never attempt to open the casing of the appliance yourself.
• Do not insert any objects in the casing of the appliance.
• Do not touch the plug with wet or damp hands.
• Danger of electric shock! Do not attempt to repair the appliance yourself. In case
of malfunctions, repairs are to be conducted by qualified personnel only. EN
• Never use a damaged appliance! Disconnect the appliance from the electrical
outlet and contact the retailer if it is damaged.
• Warning! Do not immerse the electrical parts of the appliance in water or other
liquids. Never hold the appliance under running water.
• Regularly check the power plug and cord for any damage. If the power plug or
power cord is damaged, it must be replaced by a service agent or similarly qualified
persons in order to avoid danger or injury.
• Make sure the cord does not come in contact with sharp or hot objects and keep it
away from open fire. To pull the plug out of the socket, always pull on the plug and
not on the cord.
• Ensure that the cord (or extension cord) is positioned so that it will not cause a
trip hazard.
• Always keep an eye on the appliance when in use.
• Warning! As long as the plug is in the socket the appliance is connected to the
power source.
• Turn off the appliance before pulling the plug out of the socket.
• Never carry the appliance by the cord.
• Do not use any extra devices that are not supplied along with the appliance.
• Only connect the appliance to an electrical outlet with the voltage and frequency
3mentioned on the appliance label.
• Connect the power plug to an easily accessible electrical outlet so that in case of
emergency the appliance can be unplugged immediately. To completely switch off
the appliance pull the power plug out of the electrical outlet.
• Always turn the appliance off before disconnecting the plug.
•Never use accessories other than those recommended by the manufacturer. Fail-
ure to do so could pose a safety risk to the user and could damage the appliance.
Only use original parts and accessories.
• This appliance is not intended for use by persons (including children) with reduced
physical, sensory or mental capabilities, or lack of experience and knowledge.
• This appliance must not be used by children under any circumstances.
• Keep the appliance and its cord out of reach of children.
• Always disconnect the appliance from the mains if it is left unattended or is not in
use, and before assembly, disassembly or cleaning.
• Never leave the appliance unattended during use.
2. GENERAL NOTICES
EN This instruction manual must be kept carefully near supply by qualifi ed persons.
the appliance for future reference. • The appliance must never be cleaned with direct
These notices have been drawn up for your safety and powerful jets of water.
and the safety of others. • Before performing maintenance or cleaning, dis-
Please read this manual carefully before installing connect the appliance from the mains power supply.
and using your appliance. • Contact the After Sales Service for repairs or
• The appliance is intended for professional use and maintenance.
must be used by qualifi ed personnel. It conforms to • Improper or incorrect use or failure to comply with
directives: 2006/95/EC (Safety) 2004/108/EC (EMC) the installation instructions absolve the manufac-
CE: 90/396. turer from any liability.
• The appliance must be wired to the mains power
3. TECHNICAL FEATURES
Gas
Dimensions Round Ceiling+Grill Grill Bottom Max Power
Burner
Heating El. Heating El. Heating El. Heating El.
Model
(cm) (W) (W) (W) (W) (W)
(kW)
Gas Oven 62x60x58,5H 4,0 1.800 1.800
El. Oven 62x54x58,5H 3.000 700+1.800 1.600 3.000
44. INSTRUCTIONS FOR FITTER
The following instructions are written for a qualifi tions. Before using the appliance, remove the spe-
ed fitter to ensure that he performs installation, cial protective film from the stainless steel parts,
adjustment and maintenance in the most correct and do not leave glue residue on the surfaces.
manner and in compliance with current regula-
POSITIONING
The oven must be positioned on its support or at in order to enable the appliance to be connected to
the same height as a work surface. The side and the electricity and water supplies and for normal
rear surfaces of the appliance must be accessible maintenance.
EXTRACTION OF COOKING FUMES AND/OR STEAM
The appliance must be positioned below an extrac- the extractor device does not need to be connected
tor hood or equivalent system, in compliance with directly to the exterior. Nevertheless an air exchange
current installation regulations. of approximately 150 m3/h is required for correct
The extraction of fumes of gas ovens is type A2, i.e. ventilation of the premises.
WIRING
The appliance must be wired to the mains power When the appliance is operating the supply voltage EN
supply in compliance with current regulations. must not deviate from nominal voltage by ± 10 %.
Before carrying out the wiring, make sure that:
• the voltage corresponds to the voltage specifi ed NOMINAL VOLTAGE = 230 VAC 50 Hz
on the rating plate affi xed to the rear panel of the
appliance and indicated in this manual The appliance has an equipotential terminal to en-
• the supply system has been effectively earthed in sure equal power compared to adjacent appliances,
compliance with current regulations. if any.
• if there is a direct connection to the line there is
an automatic circuit breaker of appropriate capacity The terminal is marked by the symbol .
upstream of the appliance that has a contact
opening that is greater than 3 mm. N.B.: do not connect the earth conductor to this
terminal.
5CONNECTING THE POWER CABLE
• The appliance has a terminal block located on cable only for the earth connection.
the rear wall. • Make sure that the power cable does not
• Open the cover of the terminal block at the come into contact with hot surfaces.
bottom using a screwdriver to gain purchase. • The appliance must be connected to the net-
• Pass the cable through the cable press, con- work by means of a standardised plug on a 16
necting the live conductor to the terminal A socket; the plug socket must be in a clearly
marked “ L “, the neutral conductor to the visible position and must be easily accessible
terminal marked “N” and the earth conduc- so that it can be disconnected from the power
tor to the terminal marked by the symbol . supply.
The earth conductor must be longer than the • If a fi xed installation is used, as previously
others so that in the event of pulling it is the said, the cable must be connected to a circuit
last to become detached. breaker that is appropriate to the load (16A)
• Reclose the cover of the terminal block. and the minimum distance between the con-
• An H05VV-F fl exible power cable should be tacts must be than 3 mm.; remember that
used and the section of the conductors must the yellow-green conductor (earth conductor)
be at least 3x1.5mm². Use the yellow/green must never be disconnected.
CONNECTING TO THE WATER SUPPLY – WATER INLET
EN Ovens that are designed for this must be connected French degrees.
to the drinking water supply via the solenoid valve A water softener should always be installed up-
located on the rear part of the appliance, always in- stream of the appliance in order to maintain the
terposing a stopcock with a pressure reducer set at hardness of the water within the above values. If the
1.5 bar and with a cartridge fi lter. oven is operated at higher levels of hardness scale
The oven must always be connected to a cold water will form on the walls of the cooking chamber.
supply that is transformed into steam inside the Any requests for technical assistance to repair
heated oven. damage caused by scale are not covered by the
The supplied water must be drinking water and warranty.
must meet the following conditions: Regulations in some countries require a check valve
• temperature between 15º and 25º C to be fi tted at the mains supply inlet.
• total hardness comprised between 4º and 8º
CONNECTING TO WATER SUPPLY – WATER DRAINAGE
The ovens have a water drain located at the back of The diameter of the drainage pipes must not be re-
the appliance. The connection to the water supply duced and/or constricted under any circumstances
must be made directly to the end of the stainless and the end of the pipe must lead into a collecting
steel drainage pipe. funnel connected to a direct drainage siphon.
The drainage system must consist of stiff pipes and If the drainage pipe becomes clogged steam may
withstand temperatures above 100 °C. escape from the door and unpleasant smells may
If pipes are supplied with the appliance they must enter the cooking chamber.
be used.
6SAFETY DEVICES
Gas ovens are fi tted with an ignition and fl ame con- The safety device sometimes intervenes by chance
trol electronic safety system: if switch 8 remains but if it intervenes repeatedly contact the After-Sales
lighted the appliance has been stopped for reasons Service.
of safety; to reset the safety device, press switch 8; N. B.: the doors of all steam models are provided
after the warning light disappears the appliance can with a microswitch that stops operations when the
be used again. door is open.
5. INSTRUCTIONS FOR USER
1 Switch
1a Oven lamp
1b Roof and fl oor
1c Floor
1d Roof
1e Grill
1f Ventilated roof
1g Ventilated roof/fl oor
1h Ventilated
1l Defrosting/Cooling function EN
2 Operation lamp
3 Steam regulator
4 Oven thermostat
5 Thermostat lamp
6 Timer, 120’
7 Timer lamp
7WARNING
The appliance must not be used by persons, in- The appliance must be kept out of the reach of chil-
cluding children, with reduced physical, mental and dren.
sensory capacity and with inadequate experience or No more than a total of 4 kg of food may be cooked
knowledge of basic safety regulations. The appli- in the oven divided into the required cooking pans.
ances must be placed in suitable environments and
under supervision.
COOKING PROGRAMMER – TIMER
This enables the appliance to be started up. The automatically and an alarm sounds.
maximum programmable time is 120’. The appliance can also be used without selecting
Turn the dial 6 to set the desired cooking time; from cooking time. It is suffi cient to rotate the dial 6 to
this moment the timer is operating. the manual position.
When cooking comes to an end the oven switches off
COOKING CHAMBER DEFROSTING/COOLING FUNCTION
Start the oven by rotating the dial 6 (timer) to the 1 to start the cooking chamber fan.
manual position. Select the position 1l with the dial
STARTING THE APPLIANCE
To start, turn the dial 6 (timer) to the manual/undefi For other steam and/or humidity requirements, set
ned position or set cooking time. the dial 3 accordingly.
Use the dial 1 to select a function between 1a and 1l The quantity of steam in the chamber is constant
according to required cooking method and turn the due to a preset quantity of water. To operate the oven
EN
dial 4 (oven thermostat) to the desired position. without steam being supplied, leave the dial 3 at
For steam cooking, the dial 4 (oven thermostat) must “0”.
be positioned at a temperature between 100° and
120°.
6. MAINTENANCE AND CLEANING
Warning: before performing any task disconnect the appliance from the electric
power supply!
GENERAL CLEANING
Carry out cleaning when the oven is cold. Do not Rinse well with water, without using direct jets, and
use products containing chlorine to clean steel dry with a soft cloth.
(sodium hypochlorite, hydrochloric acid, etc) even if Clean the glass door of the oven with hot water and
they are diluted. Use specifi c commercial products do not use coarse cloths.
and a little hot vinegar.
CLEANING INSIDE THE OVEN
The inside of the oven should be cleaned at the end the next time the oven is used.
of each day’s work. In this way it will be easier to When the oven is cold, clean it thoroughly with the
remove cooking residue so as to prevent it burning appropriate commercially available products.
8REPLACING THE OVEN LAMP
Disconnect the appliance electrically; remove the Unscrew the lamp and replace it with another one
lateral support for cooking vessels by lifting the having these features:
support upwards. Wait for the cover and the lamp Voltage: 230/240 V, power: 15 W, attachment: E14
to cool and then unscrew the protecting glass cov- Refi t the glass cover and the lateral cooking vessel
er without using tools so as to avoid breakages. support and connect the power supply.
MAINTENANCE
Our appliance does not require scheduled mainte- • electrical part – checking power cable, lamps and
nance but an annual maintenance contract should pilot lights, checking electrical resistances, fan and
nevertheless be drawn up in order to keep the appli- safety systems, etc.
ance safe and in perfect working order. • hydraulic part – checking seal of water system, jet
For information purposes, maintenance must apply of humidifi er, water pressure, etc
to: • internal cleaning – removal of residue from cook-
• gas part – pressure adjustment, checking seal, ing chamber, including fan blades (after removal
correct operation, status of switch-on electrode, of fan cover), removal of residues from discharge
fume discharge, etc. routes, etc.
Electrical data table
Terminal block fitting for 3 x 1.5 mm cable, voltage connection for cables up to 3 mm2 EN
230 VAC 50 HZ class 1 Fitting for circuit breaker
Water data table
Water inlet fitting = ¾ inch thread with seal washer
Drainage fitting = stainless steel pipe, 25 mm diameter.
7. DISCARDING & ENVIRONMENT
When decommissioning the appliance, the prod- sources and ensure that it is recycled in a manner
uct must not be disposed of with other household that protects human health and the environment.
waste. Instead, it is your responsibility to dispose to For more information about where you can drop off
your waste equipment by handing it over to a des- your waste for recycling, please contact your local
ignated collection point. Failure to follow this rule waste collection company. The manufacturers and
may be penalized in accordance with applicable importers do not take responsibility for recycling,
regulations on waste disposal. The separate col- treatment and ecological disposal, either directly
lection and recycling of your waste equipment at or through a public system.
the time of disposal will help conserve natural re-
98. WARRANTY
Any defect affecting the functionality of the appli- when it was bought and include proof of purchase
ance that becomes apparent within one year after (f.e. receipt).
purchase will be corrected by free repair or re-
placement provided the appliance has been used In line with our policy of continuous product devel-
and maintained in accordance with the instructions opment we reserve the right to change the product,
and has not been abused or misused in any way. packaging and documentation specifications with-
Your statutory rights are not affected. If the appli- out notice.
ance is claimed under warranty, state where and
EN
10DE
INHALT
1. SICHERHEITSREGELN............................................ 12
2. ALLGEMEINE INFORMATIONEN............................ 13
3. TECHNISCHE DATEN.............................................. 14
4. INSTALLATIONSANWEISUNGEN........................... 14
5. BEDIENUNGSANLEITUNG..................................... 16
6. WARTUNG UND REINIGUNG ................................. 17
7. ENTSORGUNG UND UMWELTSCHUTZ .................. 19
9. GARANTIE.............................................................. 19
11Sehr geehrte Kundin, sehr geehrter Kunde,
wir danken Ihnen für den Kauf des Gerätes Hendi. Machen Sie sich bitte mit dieser Anleitung noch vor der
Inbetriebnahme des Gerätes vertraut, um Schäden durch die unsachgemäße Bedienung zu vermeiden. Den
Sicherheitsregeln ist besondere Aufmerksamkeit zu widmen.
1. SICHERHEITSREGELN
• Die unsachgemäße Bedienung des Geräts kann zur schweren Beschädigung des Geräts
sowie zu Verletzungen führen.
• Dieses Gerät ist nur für den gewerblichen Gebrauch bestim.
• Das Gerät ist ausschließlich zu dem Zweck zu benutzen, zu dem es hergestellt wurde.
Der Hersteller haftet nicht für Schäden, die auf unsachgemäße Bedienung des Geräts
zurückzuführen sind.
• Den Kontakt des Gerätes und des Steckers mit Wasser oder einer anderen Flüssigkeit
vermeiden. Den Stecker unverzüglich aus dem Stecker ziehen und das Gerät von einem
anerkannten Fachmann prüfen lassen, wenn das Gerät unbeabsichtigterweise ins Was-
ser fällt. Bei Nichteinhaltung dieser Sicherheitsvorschriften besteht Lebensgefahr.
• Nie eigenständig das Gehäuse des Gerätes zu öffnen versuchen.
• In das Gehäuse des Gerätes keine Gegenstände einführen.
• Den Stecker nicht mit nassen oder feuchten Händen berühren.
DE • Gefahr eines Stromschlags! Das Gerät darf nicht selbstständig repariert werden. Sämt-
liche Mängel und Unzulänglichkeiten sind ausschließlich durch qualifiziertes Personal
zu beseitigen.
• Niemals ein beschädigtes Gerät benutzen! Das beschädigte Gerät vom Netz trennen
und sich mit dem Verkäufer in Verbindung setzen.
• Warnung: Die Elektroteile des Gerätes dürfen weder in Wasser noch in andere Flüssig-
keiten getaucht werden. Ebenso ist das Gerät nicht unter fließendes Wasser zu halten.
• Der Stecker und die Stromversorgungsleitung sind regelmäßig auf Beschädigungen zu
prüfen. Der beschädigte Stecker oder Leitung sind an eine Servicestelle oder einer an-
deren qualifizierten Person zur Reparatur zu übergeben, um eventuellen Gefahren und
Verletzungen des Körpers vorzubeugen.
• Man muss sich davon überzeugen, ob die Stromversorgungsleitung weder mit scharf-
kantigen noch mit heißen Gegenständen in Berührung kommt; halten Sie die Leitung
weit entfernt von einer offenen Flamme. Um den Stecker aus der Netzsteckdose zu neh-
men, muss man immer am Stecker und nicht an der Leitung ziehen.
• Die Stromversorgungsleitung (oder Verlängerungsleitung) ist vor dem zufälligen Heraus-
ziehen aus der Steckdose zu schützen. Die Stromversorgungsleitung muss so geführt
werden, dass niemand zufällig darüber stolpern kann.
• Das Gerät muss während seiner Anwendung ständig kontrolliert werden.
• Warnung! Wenn der Stecker in der Netzsteckdose ist, muss man das Gerät als an die
Stromversorgung angeschlossen betrachten.
12• Bevor der Stecker aus der Netzsteckdose genommen wird, ist das Gerät auszuschalten.
• Das Gerät darf beim Tragen nicht an der Leitung gehalten werden.
• Benutzen Sie kein Zubehör, das nicht mit diesem Gerät mitgeliefert wurde.
• Das Gerät muss man ausschließlich an die Steckdose mit solch einer Spannung und
Frequenz anschließen, wie auf dem Typenschild angegeben wird.
• Stecken Sie den Stecker in die Steckdose, die an einem leicht und bequem zugänglichen
Ort angeordnet ist, und zwar so, dass das Gerät bei einer Störung sofort abgeschaltet
werden kann. Um das Gerät vollständig auszuschalten, muss man es von der Stromquel-
le trennen. Zu diesem Zweck muss man den Stecker, der sich am Ende der vom Gerät
getrennten Leitung befindet, aus der Netzsteckdose ziehen.
• Vor dem Abtrennen des Steckers ist das Gerät auszuschalten!
• Benutzen Sie kein Zubehör, das nicht vom Hersteller empfohlen wird. Die Anwendung
vom nicht empfohlenen Zubehör stellt eine Gefahr für den Nutzer dar und kann zur Be-
schädigung des Gerätes führen. Benutzen Sie ausschließlich Ersatzteile und Zubehör im
Original.
• Dieses Gerät eignet sich nicht für den Gebrauch durch Personen (gilt auch für Kinder)
mit geringerer Motorik, Sensorik oder geistiger Fähigkeit oder mangelhafter Erfahrung
und Wissen.
• Auf keinen Fall darf das Bedienen des Gerätes durch Kinder zugelassen werden.
• Das Gerät mit Stromversorgungsleitung ist außerhalb der Reichweite von Kindern zu
lagern.
• Ebenso muss dafür gesorgt werden, dass die Kinder das Gerät nicht zum Spielen be- DE
nutzen.
• Das Gerät ist immer dann von der Stromversorgung zu trennen, wenn es ohne Aufsicht
bleiben soll bzw. auch vor der Montage, Demontage und Reinigung.
• Während der Nutzung darf das Gerät nicht ohne Aufsicht gelassen werden.
2. ALLGEMEINE INFORMATIONEN
Die Gebrauchsanweisung muss zusammen mit dem • Der Anschluss des Geräts an das Stromnetz darf
Gerät aufbewahrt werden, damit jederzeit ein Nach- nur von einem qualifi zierten Elektriker durch-
schlagen möglich ist. Die Gebrauchsanweisung di- geführt werden.
ent der Sicherheit des Benutzers und der anderer • Das Gerät auf keinen Fall mit direkten und starken
Personen. Wasserstrahlen sauber machen.
Wir bitten Sie deshalb, vor Installation und Gebrauch • Vor Wartungs- und Reinigungsarbeiten gleich
des Geräts die Gebrauchsanweisung aufmerksam welcher Art muss der Strom am Gerät abgeschaltet
zu lesen, werden.
• Das Gerät ist für den professionellen Gebrauch • Reparaturen und Wartungsarbeiten dürfen nur
bestimmt und darf daher nur von Fachpersonal vom Kundendienst durchgeführt werden.
benützt werden. Das Gerät entspricht den Vorgaben • Bei unsachgemäßem oder falschem Gebrauch
folgender Richtlinien: 2006/95/EG (Niederspan- sowie bei Nichtbeachtung der Installations-
nungsrichtlinie), 2004/108/EWG (EMV), 93/68/ EG, vorschriften wird der Hersteller von jeder Haftung
90/396/EG, 89/339/EG und 73/23/EG. entbunden.
133. TECHNICAL FEATURES
Gasbren- Rohrheiz- Heizwiderst. Heizwiderst. max.
Heizwiderst.
Abmessungen ner körper Oberhitze + Unterhitze Leistung
Modell Grill
(cm) (kW)) (W) Grill (W) (W)
(W)
(W)
Gasbackofen 62x60x58,5H 4,0 1.800 1.800
Elektrischer
62x54x58,5H 3.000 700+1.800 1.600 3.000
Backofen
4. INSTALLATIONSANWEISUNGEN
Die folgenden Anweisungen sind für den qualifi setzgebung durchführt. Vor Gebrauch des Geräts
zierten Installateur bestimmt, damit dieser die In- muss die Schutzfolie von den Edelstahlteilen ab-
stallation, Einstellung und Wartung so korrekt wie gezogen werden. Eventuelle Klebstoffreste von der
möglich und unter Beachtung der geltenden Ge- Geräteoberfl äche entfernen.
STANDORT
Der Backofen muss auf einer Halterung oder auf zugänglich sein, um den Wasser- und Stroman-
Höhe der Arbeitsfl äche aufgestellt werden. Die schluss sowie die normalen Wartungsarbeiten
DE Seiten und die Rückseite vom Backofen müssen durchführen zu können.
ABLEITEN VON RAUCH U/O ESSENSDÄMPFEN
Das Gerät muss in Übereinstimmung mit der gel- A2 und macht daher keine direkte Ableitung nach
tenden Gesetzgebung unter einer Abzugshaube draußen erforderlich. Für eine korrekte Belüftung
oder einem gleichwertigen Absaugsystem auf- vom Gerätestandort ist aber in jedem Fall eine
gestellt werden. Luftumwälzung von 150 m3/h erforderlich.
Die Ableitung der Dämpfe vom Gasherd ist vom Typ
STROMANSCHLUSS
Der Anschluss an das Stromnetz muss unter Beach- eschaltet vor das Gerät eine Schutzschalter mit
tung der vor Ort geltenden Gesetzgebung erfolgen. angemessener Leistung installiert ist, wobei dafür
Vor Durchführung vom Stromanschluss sicherstel- garantiert sein muss, dass sich die Kontakte mehr
len, dass: als 3 mm öffnen.
• die Netzspannung mit dem Wert auf dem “Typen-
schild” übereinstimmt, das sich an der Rückseite Die Speisespannung darf bei eingeschaltetem Gerät
vom Gerät befi ndet und im vorliegenden Handbuch nicht mehr als ± 10 % vom Wert der Nennspannung
angegeben ist. abweichen.
• das Stromnetz über eine korrekte Erdung nach
Vorgabe der vor Ort geltenden Gesetzgebung NENNSPANNUNG = 230 VAC / 50 Hz
verfügt.
• bei direktem Anschluss an die Stromleitung vorg- Das Gerät verfügt über eine Potentialausgleichsk-
14lemme für den Anschluss bei Reihenschaltung von Bitte beachten: Den Erdungsleiter nicht an die Po-
angrenzenden Geräten. Die Klemme ist durch das tentialausgleichsklemme anschließen!
Symbol gekennzeichnet.
ANSCHLUSS VOM STROMKABEL
• Das Gerät verfügt über eine Klemmleiste, die det werden.
sich an der Geräterückseite befindet. • Sicherstellen, dass das Stromkabel nicht mit
• Den Deckel der Klemmleiste vom unteren heißen Oberfl ächen in Berührung kommt.
Rand aus mit einem Schraubendreher auf- • Das Gerät muss über einen Normstecker
hebeln. Das Kabel durch die Kabelklemme und eine für 16A geeignete Steckdose an das
führen. Den Phasenleiter an die mit “L” gek- Stromnetz angeschlossen werden. Der Steck-
ennzeichnete Klemme anschließen. Den er muss an einer gut sichtbaren und problem-
Mittelleiter an die mit “N” gekennzeichnete los zugänglichen Stelle positioniert werden,
Klemme anschließen. Den Erdungsleiter an damit er ggf. umgehend ausgesteckt werden
die Klemme mit dem Symbol anschließen. kann.
Der Erdungsleiter muss länger als die ander- • Bei einer festen Installation muss das Ka-
en Leiter sein, damit er sich zuletzt ablöst, bel (siehe oben) an einen Schutzschalter mit
sollte am Kabel gezogen werden. geeigneter Last (16 A) und einem Mindestab-
• Den Deckel der Klemmleiste wieder schließen. stand der Kontakte von 3 mm angeschlossen
• Es muss ein Stromkabel vom Typ H05VV-F werden. Es wird ausdrücklich darauf hingewi-
mit einem Mindestschnitt der Leiter von 3x1,5 esen, dass der gelb-grüne Leiter (Erdung) auf
mm² verwendet werden. Der gelb-grüne Leit- keinen Fall unterbrochen werden darf. DE
er darf ausschließlich für die Erdung verwen-
WASSERANSCHLUSS - WASSERZUFLUSS
Falls vorgesehen, werden die Backöfen an die wird dazu geraten, vorgeschaltet vor das Gerät
Trinkwasserleitung angeschlossen, und zwar über in jedem Fall einen Entkalker zu installieren, der
ein Elektroventil, das sich an der Geräterückseite dafür garantiert, dass der Härtegrad vom Wasser
befi ndet. In jedem Fall muss ein Hahn mit einem innerhalb der vorgegebenen Wertspanne liegt. Bei
Druckminderventil eingesetzt werden, der auf 1,5 Betrieb vom Backofen mit Wasser, das einen höher-
bar eingestellt wird und mit einem Filter mit Filter- en Härtegrad hat, kommt es zur Bildung von Kalk-
kartusche ausgerüstet ist. ablagerungen an den Wänden vom Garraum.
Der Wasseranschluss muss in jedem Fall mit Kalt- Eventuell erforderliche Eingriffe durch den Kun-
wasser erfolgen, das bei eingeschaltetem Backofen dendienst zur Reparatur von Schäden, die durch
im Garraum verdampft. Kalk verursacht werden sind, fallen nicht unter
Es muss Trinkwasser mit folgenden Eigenschaften die Garantie!
zugeführt werden: In einigen Ländern wird von der geltenden Ge-
• Temperatur 15°C - 25°C; setzgebung die Installation eines Rückschlagventils
• Wasserhärte 4 - 8 französische Härtegrade. Es vor der Wasserleitung verlangt.
15WASSERANSCHLUSS - WASSERABFLUSS
Die Backöfen verfügen über einen Abfl uss an der en Fall verringert u/o verengt werden.
Geräterückseite. Der Anschluss muss direkt am Das Leitungsende muss zu einem Sammeltrichter
Ende der Abfl ussleitung aus Edelstahl erfolgen. führen, der an einen Siphon mit direktem Ablauf an-
Der Abfl uss muss mit temperaturbeständigen geschlossen ist.
Rohrleitungen (über 100°C) ausgeführt werden. Das Verstopfen der Abfl ussleitung kann dazu
Falls Rohrleitungen mitgeliefert werden, müssen führen, dass Dampf aus der Backofentür austritt
diese verwendet werden. und sich unangenehme Gerüche im Garraum bilden.
Der Durchmesser der Abfl ussleitung darf auf kein-
SICHERHEITSVORRICHTUNGEN
Die gasbetriebenen Backöfen verfügen über eine el-
ektronischen Zünd- und Flammenkontrolle.
Wenn die Kontrollleuchte der Taste 8 eingeschaltet
bleibt, wurde eine Sicherheitsblockierung am
Gerät ausgelöst.
Zur Rückstellung der Sicherung muss die Taste 8
gedrückt werden. Die Kontrollleuchte schaltet sich
aus und das Gerät kann benützt werden.
Es kann zwar vorkommen, dass die Sicherheits-
blockierung rein zufällig ausgelöst wird, bei wie-
DE derholtem Auslösen muss aber der Kundendienst
kontaktiert werden.
Hinweis: Alle Modelle Dampf sind mit einer Back-
ofentür mit Mikroschalter ausgestattet, der den
Backofenbetrieb bei offener Tür blockiert.
5. BEDIENUNGSANLEITUNG
1 Schalten 1l Auftauen / Kühlen
1a Ofenlampe Funktion
1b Dach und Boden 2 Operation lamp
1c Boden 3 Betriebslampe
1d Dach 4 Ofenthermostat
1e Grill 5 Thermostatlampe
1f Belüftetes Dach 6 Timer, 120’
1g Belüftetes Dach / Boden 7 Timer Lampe
1h Belüftet
16WICHTIGER HINWEIS
Das Gerät darf nicht von Personen einschließlich werden. Das Gerät außerhalb der Reichweite von
Kindern benützt werden, die hilfsbedürftig sind oder Kindern aufstellen!
denen die erforderliche Erfahrung und die Kenntnis Verteilt auf die verschiedenen Schalen dürfen max-
der grundlegenden Sicherheitsvorschriften fehlen. imal 4,00 kg Speisen in den Garraum vom Backofen
Die Geräte müssen an einem geeigneten Stan- gefüllt werden.
dort aufgestellt und unter Beobachtung gehalten
PROGRAMMIERER GARZEITENDE - ZEITSCHALTUHR
Zum Einschalten vom Gerät. Maximal programmi- Ende der Garzeit erreicht ist, schaltet sich das Gerät
erbarer Zeitraum: 120 Minuten. Den Knebel drehen, automatisch ab und der Summer schaltet sich ein.
bis die Markierung auf die gewünschte Garzeit zeigt. Das Gerät kann auch ohne Zeitschaltuhr verwendet
Jetzt ist die Zeitschaltuhr eingeschaltet. Wenn das werden. Dazu den Knebel 6 auf “Manuell” stellen.
AUFTAUEN / ABKÜHLEN VOM GARRAUM
Zum Einschalten den Knebel 6 (Zeitschaltuhr) auf um das Gebläse im Garraum einzuschalten.
“Manuell” stellen. Dann den Knebel 1 auf 1l stellen,
EINSCHALTEN VOM GERÄT
Zum Einschalten vom Backofen den Knebel 6 Wenn andere Dampfstärken u/o das Befeuchten
(Zeitschaltuhr) auf “Manuell” bzw. “Unendlich” stel- gewünscht wird, am Knebel 3 die entsprechende
len. Dampfmenge einstellen.
Den Knebel 1 auf 1c (Zünden und Einschalten vom Die Dampfmenge im Garraum ist konstant und erg-
DE
Gasbrenner) stellen und am Knebel 4 (Backofen- ibt sich durch die vorgegebene Wassermenge.
thermostat) die gewünschte Temperatur einstellen. Das Gerät kann auch ohne Dampf benützt werden.
Für das Garen mit Dampf den Knebel 4 (Backofen- Zum Ausschließen der Dampffunktion den Knebel 3
thermostat) auf eine Temperatur zwischen 100°C auf 0 lassen.
und 120°C stellen.
6. WARTUNG UND REINIGUNG
Achtung! Vor Eingriffen gleich welcher Art muss der Strom am Gerät abgeschaltet
werden!
ALLGEMEINE REINIGUNG
Den Backofen nur dann sauber machen, wenn er Gut mit Wasser abspülen. Achtung! Keinen direk-
kalt ist. Zum Reinigen vom Stahl keine chlorhal- ten Wasserstrahl verwenden! Mit einem weichen
tigen Produkte verwenden (Natriumhypochlorit, Lappen abtrocknen.
Salzsäure, usw.), auch nicht in verdünnter Form. Die Glasteile vom Backofen nur mit warmem Was-
Im Handel erhältliche Stahlreiniger oder etwas ser sauber machen. Keine Scheuerlappen ver-
warmen Essig verwenden. wenden.
17REINIGUNG VOM BACKOFEN
Am Ende von jedem Arbeitstag sollte der Garraum können. Den abgekühlten Garraum gründlich mit
sauber gemacht werden. Dadurch ist das Entfer- im Handel erhältlichen Spezialreinigern sauber
nen von Speiseresten einfacher, die sich sonst beim machen.
nächsten Einschalten vom Backofen festsetzen
AUSWECHSELN DER BACKOFENBELEUCHTUNG
Den Strom am Gerät abschalten (Sicherung raus ignete Birne mit den gleichen Eigenschaften er-
machen). Die seitliche Backblechhalterung her- setzen.
ausnehmen und dazu nach oben heben. Abwarten, Spannung: 230/240 V, Leistung: 15 W, Sockel: E14
bis sich die Lampe vollständig abgekühlt hat. Dann Das Schutzglas der Lampe wieder aufschrauben.
das Schutzglas der Lampe ohne Werkzeuge ab- Die seitliche Backblechhalterung wieder einset-
schrauben, um eine Beschädigung zu vermeiden. zen. Den Strom wieder einschalten.
Die Birne herausschrauben und durch eine gee-
WARTUNG
Das Gerät macht keine Wartung nach Wartungsplan • Strom – Kontrolle vom Stromkabel, Überprüfung
erforderlich. Es wird aber in jedem Fall dazu ger- von Lampen und Kontrollleuchten, Prüfung von
DE aten, einen Vertrag über eine jährliche Wartung mit Heizschlangen, Gebläse und Sicherheitsvorrichtun-
dem Kundendienst abzuschließen, damit stets für gen, usw..
die Sicherheit und Funktionstüchtigkeit des Geräts • Wasser – Prüfung der Dichtigkeit der Wasserlei-
garantiert ist. tungen, Kontrolle vom Strahl vom Befeuchter und
Allgemeine Wartungshinweise (unverbindlich): vom Wasserdruck, usw..
• Gas – Einstellung vom Gasdruck, Prüfung der • Reinigung vom Garraum – Entfernung von Spei-
Dichtigkeit, Prüfung der Funktionstüchtigkeit, Kon- seresten aus dem Garraum, auch vom Gebläse
trolle vom Zustand der Zündelektrode, Kontrolle (dazu die Gebläseabdeckung abnehmen), Entfer-
vom Abzug, usw.. nung eventueller Rückstände aus Abfl üssen usw.
TABELLE TECHNISCHE DATEN STROMANSCHLUSS
Anschluss Klemmleiste für Kabel 3x1,5 mm Span- tialausgleich für Kabel bis Schnitt 3 mm2.
nung 230 VAC 50 Hz Klasse 1 Anschluss für Poten-
18TABELLE TECHNISCHE DATEN WASSERANSCHLUSS
Anschluss Wasserzuleitung = 3/4 Zoll Gewinde mit Dichtung
Anschluss Wasserabfl uss = Edelstahlleitung Durchmesser 25 mm
7. ENTSORGUNG UND UMWELTSCHUTZ
Wird das Gerät außer Betrieb genommen, darf es umwelt- und gesundheitsschonende Verwertungs-
nicht über den Hausmüll entsorgt werden. Der Be- weise. Weitere Informationen darüber, wo Sie
nutzer ist für die Übergabe des Gerätes an eine ge- Ihre Altgeräte entsorgen können, erhalten Sie bei
eignete Sammelstelle für Altgeräte verantwortlich. Ihrem örtlichen Entsorgungsunternehmen. Der
Die Nichteinhaltung dieser Regel kann gemäß den Hersteller und der Importeur übernehmen keine
geltenden Vorschriften über die Abfallentsorgung Verantwortung für das Recycling sowie die um-
bestraft werden. Die getrennte Sammlung und weltfreundliche Verwertung von Abfällen, weder
das Recycling der Altgeräte trägt zur Schonung direkt noch über ein öffentliches System.
der natürlichen Ressourcen bei und sorgt für eine
8. GARANTIE
Alle innerhalb von einem Jahr nach dem Kaufdatum unberührt. Eine in der Garantiefrist einzureichende
festgestellten Defekte oder Mängel, die die Funk- Beanstandung hat die Angabe des Kaufortes und DE
tionalität des Gerätes beeinträchtigen, werden auf Kaufdatums und in der Anlage einen Kaufbeleg (z.B.
dem Wege der unentgeltlichen Reparatur bzw. des Kassenzettel) zu enthalten.
Austausches unter der Voraussetzung beseitigt,
dass das Gerät in einer der Bedienungsanleitung Gemäß unserer Politik der ständigen Weiterent-
gemäßen Art und Weise betrieben und gewartet wicklung unserer Produkte behalten wir uns vor,
wird und weder vorsätzlich vernichtet noch nicht Änderungen am Produkt, an seiner Verpackung
bestimmungsgemäß genutzt wurde. Ihre Rechte und an den dokumentierten technischen Daten
aus den entsprechenden Gesetzen bleiben davon ohne vorherige Ankündigung vorzunehmen.
19PL
SPIS TREŚCI
1. WAŻNE ZASADY BEZPIECZEŃSTWA...................... 21
2. INFORMACJE OGÓLNE........................................... 22
3. DANE TECHNICZNE............................................... 23
4. INSTRUKCJE DLA INSTALATORA........................... 23
5. INSTRUKCJE DLA UŻYTKOWNIKÓW...................... 25
6. KONSERWACJA I CZYSZCZENIE............................ 26
7. WYCOFANIE Z UŻYCIA I OCHRONA ŚRODOWISKA.27
8. GWARANCJA .......................................................... 28
20Szanowny Kliencie,
Dziękujemy za zakup urządzenia firmy Hendi. Prosimy o uważne zapoznanie się z niniejszą instrukcją przed
podłączeniem urządzenia, aby uniknąć uszkodzeń spowodowanych niewłaściwą obsługą. Należy zwrócić
szczególną uwagę na zasady bezpieczeństwa.
1. WAŻNE ZASADY BEZPIECZEŃSTWA
• Nieprawidłowa obsługa i niewłaściwe użycie mogą spowodować poważne usz-
kodzenie urządzenia lub zranienie osób.
• Urządzenie stosuj wyłącznie zgodnie z przeznaczeniem. Producent i/lub
Sprzedawca nie ponosi żadnej odpowiedzialności za szkody spowodowane niepraw-
idłową obsługą i niewłaściwym użytkowaniem urządzenia.
• W czasie użycia zabezpiecz urządzenie i wtyczkę kabla zasilającego przed kon-
taktem z wodą lub innymi płynami. W mało prawdopodobnym przypadku zanurze-
nia urządzenia w wodzie, natychmiast wyciągnij wtyczkę z kontaktu, a następnie
zleć kontrolę urządzenia specjaliście. Nieprzestrzeganie tej instrukcji może spow-
odować zagrożenie życia.
• Nigdy nie otwieraj samodzielnie obudowy urządzenia.
• Nie wtykaj żadnych przedmiotów w obudowę urządzenia.
PL
• Nie dotykaj wtyczki kabla zasilającego wilgotnymi rękami.
• Ryzyko porażenia prądem! Regularnie kontroluj stan wtyczki i kabla. W przypadku
wykrycia uszkodzenia wtyczki lub kabla, zleć naprawę w wyspecjalizowanym punk-
cie naprawczym.
• Nigdy nie używaj uszkodzonego urządzenia! W przypadku, gdy urządzenie spad-
nie lub ulegnie uszkodzeniu w inny sposób, przed dalszym użyciem zawsze zleć
przeprowadzenie kontroli i ewentualną naprawę w wyspecjalizowanym punkcie
naprawczym.
• Ostrzeżenie! Nie zanurzaj elektrycznych części urządzenia w wodzie lub w innych
płynach. Nigdy nie trzymaj urządzenia pod bieżącą wodą.
• Nigdy nie naprawiaj urządzenia samodzielnie może to spowodować zagrożenie
życia.
• Chroń kabel zasilający przed kontaktem z ostrymi lub gorącymi przedmiotami i
chroń go przed otwartym ogniem. Jeżeli chcesz odłączyć urządzenie z kontaktu,
zawsze chwytaj za wtyczkę, nigdy nie ciągnij za kabel.
• Zabezpiecz kabel (lub przedłużacz), aby nikt przez omyłkę nie wyciągnął go z kon-
taktu ani się o niego nie potknął.
• Urządzenie powinno być używane tylko do celów, dla których zostały pierwotnie
zaprojektowane.
21• Kontroluj funkcjonowanie urządzenia w czasie użytkowania.
• Dzieci nie uświadamiają sobie zagrożeń, jakie może spowodować użycie urządzeń
elektrycznych. Nigdy nie pozwalaj dzieciom posługiwać się elektrycznymi urządze-
niami gospodarstwa domowego bez nadzoru.
• Gdy urządzenie nie jest używane oraz zawsze przed czyszczeniem, odłącz je od
źródła zasilania, wyciągając wtyczkę z kontaktu.
• Uwaga! Jeżeli wtyczka kabla zasilającego jest podłączona do kontaktu, urządzenie
cały czas pozostaje pod napięciem.
• Wyłącz urządzenie, zanim wyciągniesz wtyczkę z kontaktu.
• Nigdy nie przenoś urządzenia za kabel zasilający.
• Nie używaj akcesoriów innych niż dostarczone z urządzeniem.
• Urządzenie można podłączać wyłącznie do gniazda o napięciu i częstotliwości
zgodnej z danymi znajdującymi się na tabliczce znamionowej.
• Unikaj przeciążenia.
• Po użyciu wyłącz urządzenie wyjmując wtyczkę z gniazda.
• Instalacja elektryczna musi odpowiadać krajowym i lokalnym przepisom.
• Z urządzenia nie mogą korzystać osoby (także dzieci), u których stwierdzono
osłabione zdolności fizyczne, sensoryczne lub umysłowe, albo którym brakuje od-
powiedniej wiedzy i doświadczenia, chyba że odbywa się to pod nadzorem lub zgod-
PL
nie z instrukcjami osoby odpowiedzialnej za ich bezpieczeństwo.
2. INFORMACJE OGÓLNE
Niniejszą instrukcję obsługi należy zachować wraz • Urządzenia nie wolno czyścić bezpośrednim, sil-
z urządzeniem do późniejszego wglądu. Instrukcja nym strumieniem wody.
została sporządzona w celu zapewnienia bezpiec- • Przed przeprowadzeniem konserwacji albo
zeństwa użytkownika i innych osób. czyszczenia należy odłączyć urządzenie od zasilania
Przed rozpoczęciem korzystania z urządzenia należy sieciowego.
zapoznać się z instrukcją. • W celu naprawy lub konserwacji należy skontak-
• Urządzenie przeznaczone jest do użytku przez tować się z serwisem posprzedażowym.
profesjonalistów i może być użytkowane wyłącznie • Niewłaściwe i nieprawidłowe użytkowanie oraz
przez wykwalifi kowane osoby. Urządzenie zgodne nieprzestrzeganie instrukcji instalacji zwalnia pro-
jest z dyrektywami: 2006/95/W (niskonapięciowa) ducenta z wszelkiego rodzaju odpowiedzialności.
2004/108/WE (elektromagnetyczna) CE: 90/396.
• Podłączenie urządzenia do sieci elektrycznej
muszą wykonać wykwalifi kowane osoby.
223. DANE TECHNICZNE
Obwodowy Górny Dolny
Palnik Element
Wymiary element element element Maks. moc
Model gazowy grzejny grilla
(cm) grzejny grzejny i grill grzejny (W)
(kW) (W)
(W) (W) (W)
Piec
62x60x58,5H 4,0 1.800 1.800
gazowy
Piec
62x54x58,5H 3.000 700+1.800 1.600 3.000
elektryczny
4. INSTRUKCJA DLA INSTALATORA
Poniższe instrukcje przeznaczone są dla wyk- mi przepisami. Przed rozpoczęciem użytkowania
walifi kowanego instalatora i pozwalają wykonać urządzenia należy zdjąć specjalną folię ochronną
czynności instalacyjne, regulacyjne i konserwacy- znajdującą się na częściach ze stali nierdzewnej,
jne w poprawny sposób i zgodnie z obowiązujący- nie pozostawiając śladów kleju na powierzchni.
USTAWIENIE
Piec należy ustawić na podstawie albo na takiej umożliwić podłączenie do instalacji elektrycznej i
samej wysokości, co blat roboczy. Należy zapewnić wodno-kanalizacyjnej oraz wykonywanie czynności
dostęp do powierzchni bocznych i tylnej pieca, aby konserwacyjnych. PL
ODPROWADZANIE SPALIN LUB PARY
Urządzenie należy umieścić pod wyciągiem lub urządzenie wyciągowe nie musi być wyprowadzone
podobnym systemem, zgodnie z obowiązującymi bezpośrednio na zewnątrz. Niemniej jednak, w celu
przepisami dotyczącymi instalacji. zapewnienia odpowiedniej wentylacji pomieszcze-
Typ systemu odprowadzania spalin to A2 tzn., że nia wymiana powietrza powinna wynosić 150 m3/h.
POŁĄCZENIE ELEKTRYCZNE
Podłączenie urządzenia do sieci elektrycznej musi Podczas pracy urządzenia dostarczane napięcie nie
być wykonane zgodnie z obowiązującymi przepis- może odchylać się od wartości napięcia nominalne-
ami. Przed podłączeniem urządzenia do instalacji go o ± 10 %.
elektrycznej należy sprawdzić, czy:
• napięcie odpowiada wartościom określonym na NAPIĘCIE ZNAMIONOWE = 230 VAC 50 Hz
tabliczce znamionowej znajdującej się na tylnym
panelu urządzenia i oznaczonej w instrukcji, Urządzenie wyposażone jest w zacisk ekwipotenc-
• instalacja jest poprawnie uziemiona, zgodnie z jalny zapewniający wyrównanie mocy względem ew-
obowiązującymi przepisami, entualnych sąsiednich urządzeń.
• w przypadku bezpośredniego połączenia - czy
przed urządzeniem zainstalowany jest automatyczny Zacisk oznaczony jest symbolem .
wyłącznik o odpowiednich parametrach, o odległoś- Uwaga: nie podłączać do tego zacisku przewodu
ci między stykami ponad 3 mm. uziemienia.
23PODŁĄCZANIE KABLA ZASILANIA
• Urządzenie wyposażone jest w tablicę za- wód stosować wyłącznie do uziemienia.
ciskową znajdującą się z tyłu. • Upewnić się, że przewód zasilania nie ma
• Używając śrubokrętu jako dźwigni otworzyć styczności z gorącymi powierzchniami.
osłonę tablicy zaciskowej od dołu. Przeprow- • Urządzenie należy podłączyć do sieci za po-
adzić kabel przez zacisk kablowy podłączając mocą standardowej wtyczki i gniazdka 16A,
przewód pod napięciem do zacisku oznaczon- wtyczka musi znajdować się w łatwo dostęp-
ego „L”, przewód zerowy do zacisku oznaczo- nym miejscu, aby umożliwić odłączenie od
nego „N” i przewód uziemienia do zacisku źródła zasilania.
oznaczonego symbolem Przewód uzie- • W przypadku stałej instalacji kabel należy
mienia musi być dłuższy od pozostałych, aby podłączyć do wyłącznika odpowiedniego do
w przypadku pociągnięcia odłączony został obciążenia (16A), a minimalna odległość
jako ostatni. pomiędzy stykami musi być większa lub rów-
• Zamknąć ponownie osłonę tablicy zaciskowej. na 3 mm. Należy pamiętać, że wolno odłączać
• Należy zastosować elastyczny kabel zasilania żółtozielonego przewodu (przewodu uziemie-
05VV-F, a przekrój przewodów musi wynosić nia).
przynajmniej 3x1,5 mm2. Zielonożółty prze-
PODŁĄCZENIE DO INSTALACJI WODNO-KANALIZACYJNEJ - DOPŁYW WODY
PL Piece należy podłączyć do przyłącza wody pitnej • twardość w zakresie od 4º do 8º stopni francus-
za pomocą elektrozaworu znajdującego się z tyłu kich.
urządzenia, zawsze należy też instalować reduktor Przed urządzeniem należy zawsze instalować
ciśnienia ustawiony na 1,5 bara wraz z wkładem fil- zmiękczacz wody, aby utrzymać twardość wody w
tracyjnym. powyższym przedziale. Jeśli piec używany jest przy
Piec należy zawsze podłączać do ujęcia zimnej wody, wyższych stopniach twardości, na ściankach komory
która przetwarzana jest na parę wewnątrz rozgrza- pieczenia odkładać się będzie kamień.
nego pieca. Naprawy serwisowe uszkodzeń spowodowanych
Piec należy podłączać do ujęcia pitnej wody, która kamieniem nie są objęte gwarancją.
musi spełniać następujące warunki: Przepisy w niektórych krajach wymagają zainsta-
• temperatura między 15º a 25ºC lowania zaworu jednokierunkowego na ujęciu wody.
PODŁĄCZENIE DO INSTALACJI WODNO-KANALIZACYJNEJ - ODPROWADZENIE WODY
Piec wyposażony jest w odpływ wody znajdujący się rury, należy je zastosować.
z tyłu urządzenia. Podłączenie do instalacji wodno- Średnicy rur spustowych nie wolno zmieniać ani
kanalizacyjnej należy wykonać bezpośrednio do rury zmniejszać, a końcówka rury musi prowadzić do leja
odpływowej ze stali nierdzewnej. zbiorczego połączonego z syfonem.
Instalacja odprowadzania wody musi składać się W przypadku zatkania rury może dojść do przedost-
ze sztywnych rur o wytrzymałości na temperaturę awania się pary przez drzwi i przeniknięcia nieprzy-
powyżej 100 °C. Jeśli z urządzeniem dostarczono jemnych zapachów do komory pieczenia.
24ZABEZPIECZENIA
Piece gazowe wyposażone są w elektroniczny sys- Zabezpieczenie jest czasem uruchamiane przypad-
tem bezpieczeństwa i kontroli zapłonu i płomienia: kowo, jeśli się to powtarza, należy skontaktować
zapalony przełącznik 8 oznacza, że urządzenie się z serwisem posprzedażowym.
zostało zatrzymane ze względów bezpieczeńst-
wa; aby zresetować zabezpieczenie, należy na- Uwaga: drzwi wszystkich modeli parowych wy-
cisnąć przełącznik 8, po zgaśnięciu lampki ostrze- posażone są w mikroprzełącznik, który zatrzy-
gawczej można wznowić użytkowanie urządzenia. muje pracę, jeśli drzwi są otwarte.
5. INSTRUKCJE DLA UŻYTKOWNIKÓW
1 Przełącznik
1a Oświetlenie komory
1b Grzałka górna i dolna
1c Grzałka dolna
1d Grzałka górna
1e Grill
1f Grzałka górna + termoobieg
1g Grzałka górna i dolna + termoobieg
1h Termoobieg
1i Funkcja rozmrażania/chłodzenia
2 Kontrolka działania PL
3 Regulator wody/pary
4 Termostat pieca
5 Kontrolka termostatu
6 Zegar, 120 min.
7 Kontrolka zegara
25OSTRZEŻENIE
Z urządzenia nie mogą korzystać osoby, w tym dzieci nim miejscu i pozostawić pod nadzorem.
o obniżonych zdolnościach fi zycznych, umysłowych Do urządzenia nie wolno dopuszczać dzieci. W piecu
i zmysłowych, które nie posiadają doświadczenia ani nie należy przygotowywać więcej niż 4 kg żywności,
wiedzy na temat podstawowych przepisów bezpiec- podzielone na odpowiednie blachy.
zeństwa. Urządzenia należy umieścić w odpowied-
PROGRAMATOR PIECZENIA - ZEGAR
Umożliwia uruchomienie urządzenia. Maksymalny nia piec wyłączy się automatycznie i wyemitowany
czas do zaprogramowania to 120 minut. Obrócić zostanie alarm dźwiękowy. Urządzenie można także
pokrętło 6 do pożądanego czasu pieczenia, spow- używać bez wybierania czasu pieczenia. Wystarczy
oduje to włączenie zegara. Po zakończeniu piecze- obrócić pokrętło 6 do położenia ręcznego.
FUNKCJA ROZMRAŻANIA/CHŁODZENIA KOMORY PIECZENIA
Uruchomić piec obracając pokrętło 6 do położenia aby uruchomić wentylator komory pieczenia.
ęcznego. Za pomocą pokrętła 1 wybrać położenie 1i,
URUCHAMIANIE PIECA
Aby uruchomić, obrócić pokrętło 6 (zegar) do temperatury między 100 a 120°. Dla innych wy-
położenia ręcznego/niezdefi niowanego lub wybrać mogów dotyczących pieczenia parowego lub para-
czas pieczenia. Za pomocą pokrętła 1 wybrać funkc- metrów wilgotności ustawić odpowiednio pokrętło 3.
ję 1a albo 1l zgodnie z wymaganą metodą pieczenia Ilość pary w komorze jest stała z uwagi na wstępnie
i obrócić pokrętło 4 (termostat pieca) do pożądanego skonfi gurowaną ilość wody. Aby używać pieca bez
PL
położenia. dostarczanej pary, należy pozostawić pokrętło 3 w
W przypadku pieczenia parowego, pokrętło 4 (ter- położeniu „0”.
mostat pieca) należy obrócić do położenia w zakresie
6. KONSERWACJA I CZYSZCZENIE
Ostrzeżenie: przed przystąpieniem do wykonywania jakichkolwiek czynności odłącz
urządzenie od sieci elektrycznej!
MYCIE OGÓLNE
Czynności mycia przeprowadzać wyłącznie na zim- ku lub niewielkiej ilości gorącego octu.
nym piecu. Do czyszczenia stali nie używać produk- Dokładnie spłukać, nie używając bezpośrednich
tów zawierających chlor (podchloryn sodu, kwas strumieni wody i wysuszyć miękką szmatką. Sz-
solny itp.), nawet w postaci rozcieńczonej. Należy klane drzwiczki pieca należy czyścić wyłącznie
używać specjalnych produktów dostępnych na ryn- gorącą wodą, nie używać szorstkich szmatek.
MYCIE PIECA
Wnętrze pieca należy myć dokładnie po zakończe- niu pieca. Po ostygnięciu pieca należy dokładnie
niu każdego dnia roboczego. Ułatwi to usunięcie go wyczyścić używając produktów dostępnych na
resztek i ich przypalanie przy kolejnym użytkowa- rynku.
26WYMIANA OŚWIETLENIA PIECA
Odłączyć oświetlenie od źródła zasilania, zdjąć następujących parametrach:
boczne ruszty podnosząc je do góry. Odczekać, aż Napięcie: 230/240 V Moc: 15 W Złącze: E14
osłona i żarówka ostygną, a następnie odkręcić sz- Założyć z powrotem szklaną osłonę i boczne ruszty
klaną osłonę nie używając narzędzi, aby jej nie usz- i podłączyć urządzenie do zasilania.
kodzić. Wykręcić żarówkę i wymienić ją na nową, o
KONSERWACJA
Urządzenie nie wymaga planowanych działań kon- sprawdzenie mocy elektrycznej, układów wentylato-
serwacyjnych, zalecamy jednak zawarcie rocznej ra i zabezpieczeń itp.
umowy serwisowej, aby zapewnić bezpieczną pracę • części hydrauliczne – sprawdzenie szczelności
urządzenia i dobry stan techniczny. instalacji wodnej, strumienia wilgoci, ciśnienia itp.
Czynności konserwacyjne obejmują: • mycie wewnątrz – usuwanie osadów z pieczenia,
• części elektryczne – sprawdzenie stanu kab- w tym z łopat wentylatora (po zdjęciu osłony wen-
la zasilającego, żarówek i płomienia kontrolnego, tylatora), usuwanie osadów z dysz spustowych itp.
DODATKOWE PARAMETRY ELEKTRYCZNE DLA INSTALATORA
Złącze zaciskowe kabla 3 x 1,5 mm, napięcie 230 VAC 50 Hz, klasa I.
Złącze do podłączenia wyłącznika dla kabli do 3 mm2
DODATKOWE PARAMETRY WODNO-KANALIZACYJNE DLA INSTALATORA
Złącze wody = ¾ cala gwintowane z uszczelką
Złącze kanalizacyjne = rura ze stali nierdzewnej, średnica 25 mm PL
7. WYCOFANIE Z UŻYCIA I OCHRONA ŚRODOWISKA
Pamiętaj! przetworzone i zutylizowane w sposób przyjazny
Nie wyrzucaj zużytego sprzętu łącznie z innymi dla środowiska, co zmniejsza negatywny wpływ na
odpadami środowisko i zdrowie ludzi. Aby uzyskać więcej in-
Nie demontuj zużytych urządzeń zawierających formacji dotyczących dostępnych usług w zakresie
niebezpieczne składniki na własną rękę! odbioru odpadów, należy skontaktować się z lokal-
Grożą Ci za to kary grzywny! ną firmą odbierającą odpady.
Po zakończeniu eksploatacji produktu nie wolno Symbol przekreślonego kosza na
gromadzić razem z odpadami komunalnymi, tylko śmieci oznacza, że tego produktu nie
należy odstawić do punktu odbioru odpadów elek- wolno wyrzucać do zwykłych pojemni-
trycznych i elektronicznych. Użytkownik ponosi od- ków na odpady.
powiedzialność za przekazanie wycofanego z użyt-
kowania urządzenia do punktu gospodarowania Zużyte urządzenia elektryczne i elektronicznie
odpadami. Nieprzestrzeganie tej zasady może być mogą zawierać niebezpieczne składniki np. rtęć,
karane zgodnie z lokalnie obowiązującymi prze- ołów, kadm lub freon. Jeśli tego typu substancje
pisami dotyczącymi gospodarowania odpadami. przedostaną się w sposób niekontrolowany do śro-
Jeśli urządzenie wycofane z użytkowania jest po- dowiska, spowodują skażenie wody i gleby, a także
prawnie odebrane jako osobny odpad, może zostać wpłyną niekorzystnie na zdrowie ludzi i zwierząt.
27You can also read