ENVO E-Bike Users' Manual - ENVO E-bike User's Manual - EbikeBC
←
→
Page content transcription
If your browser does not render page correctly, please read the page content below
ENVO E-bike User’s Manual

ENVO E-Bike Users’ Manual

                   1
ENVO E-bike User’s Manual

INTRODUCTION .......................................................................................................................................................................................... 3
General description.................................................................................................................................................................................... 3
INSTALLATION ............................................................................................................................................................................................ 4
   1.     Unboxing ....................................................................................................................................................................................... 4
   2.     Front wheel mounting .................................................................................................................................................................. 6
   3.     Handlebar mounting (Allen key required) .................................................................................................................................... 7
   4.     Lamp and fender mounting (Allen key and spanner required) ..................................................................................................... 8
   5.     Pedal mounting (spanner required).............................................................................................................................................. 9
   6.     Saddle Mounting (No tools required) ......................................................................................................................................... 10
   7.     Battery ........................................................................................................................................................................................ 10
WARNINGS AND CAUTION STATEMENTS ................................................................................................................................................ 10
Battery ..................................................................................................................................................................................................... 17
   8.     Charging Your Battery ................................................................................................................................................................. 17
   9.     Battery Position on the Bike: ...................................................................................................................................................... 18
   10.         Battery and Charger Care ....................................................................................................................................................... 20
   11.         Battery Range: ........................................................................................................................................................................ 20
   12.         Battery Maintenance & Safety: .............................................................................................................................................. 21
   13.         Battery Transport: .................................................................................................................................................................. 21
   14.         Battery Disposal: .................................................................................................................................................................... 22
   15.         Fuse: ....................................................................................................................................................................................... 22
Interface 2020 Version:............................................................................................................................................................................ 22
   1. Quick Start Guidelines for Using Pedal Assist: ............................................................................................................................ 22
   2.     Activating Head and Taillights: ................................................................................................................................................... 22
   3.     Pedal Assist Mode – Detailed Instructions for Use: .................................................................................................................... 23
   4.     Hand Throttle Control: ................................................................................................................................................................ 23
Brakes ...................................................................................................................................................................................................... 23
   1.     Brake Check: ............................................................................................................................................................................... 24
   2.     Disc Brakes: ................................................................................................................................................................................. 24
   3.     Brake Controls and Features:...................................................................................................................................................... 24
   4.     Brake Disconnect Switch:............................................................................................................................................................ 25
   5.     TEKTRO HYDRAULIC DISC BRAKE ASSEMBLEY and MAINTENANCE with sensor control and design: ........................................ 25
   6.     Disk Brake Pad Replacement Types: ........................................................................................................................................... 28
   7.     ASSEMBLY ................................................................................................................................................................................... 29
Fork: ......................................................................................................................................................................................................... 33
Motor: ...................................................................................................................................................................................................... 33
Gears: ....................................................................................................................................................................................................... 34
Cassette sprocket: .................................................................................................................................................................................... 34
Tire and Wheel Safety: ............................................................................................................................................................................. 34
Bike Fit: .................................................................................................................................................................................................... 36
Stem, Handle Bars, Ends and Grips: ......................................................................................................................................................... 36
Bolts and Nuts: ......................................................................................................................................................................................... 37
Saddle: ..................................................................................................................................................................................................... 37
Pedals: ...................................................................................................................................................................................................... 38
Kickstand: ................................................................................................................................................................................................. 39
Keys: ......................................................................................................................................................................................................... 39
General: ................................................................................................................................................................................................... 39
TROUBLESHOOTING ................................................................................................................................................................................. 41
ELECTRIC BIKE FAQS ................................................................................................................................................................................. 42
THE LIFESPAN OF YOUR ELECTRIC BIKE AND ITS COMPONENTS ............................................................................................................. 43
Warranty .................................................................................................................................................................................................. 43
Warranty Terms ....................................................................................................................................................................................... 44

                                                                                                        2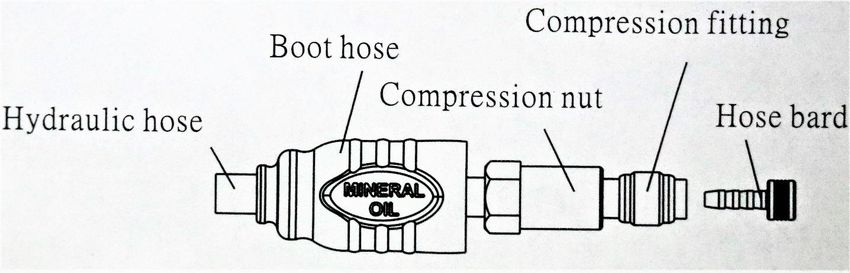
ENVO E-bike User’s Manual

INTRODUCTION

Thank-you for choosing an ENVO Electric Bike. Our number one focus is to make you aware of the dangers of riding a
bicycle and especially an electric bicycle so you can ensure you have safe and enjoyable riding experiences for years to
come.

IMPORTANT: Please read this manual in its entirety before riding your bike or allowing anyone else to ride your bike. All
others should read this manual before you allow them to ride your bike without your supervision.

If you have any concerns, questions or suggestions about your electric bike, please contact us at info@EbikeBC.com
Again, thanks for choosing ENVO Electric Bike!

General description

                                                            3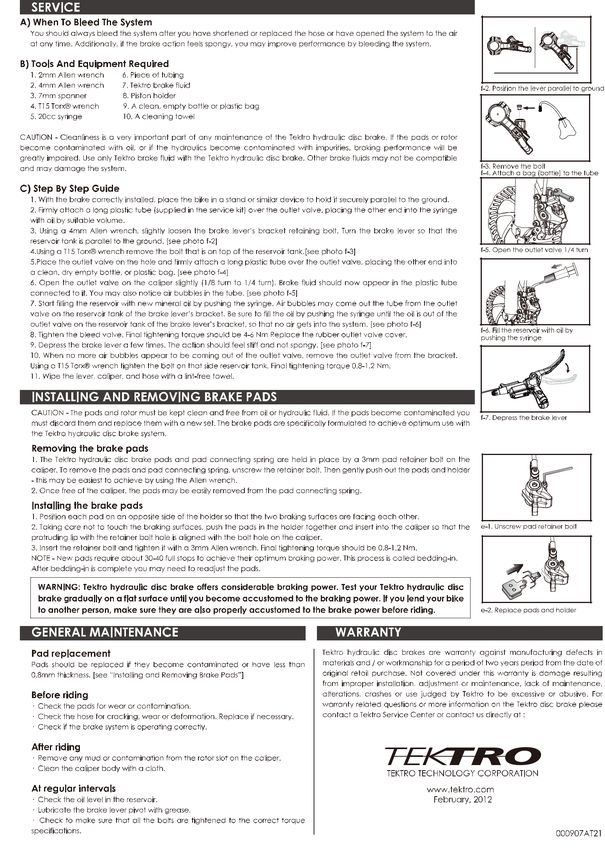
ENVO E-bike User’s Manual

INSTALLATION
    1. Unboxing

        Open box from top:

        Be carefull about the metal pins used for packing.

        Take out the bike assembly out of the box. Two person are recomonded to lift the bike assembly.

There are 6 pieces in your package as shown in below pictures:
    -   Main body, wire-attached handlebar, mounted rear wheel, mounted headlight,
                                                               4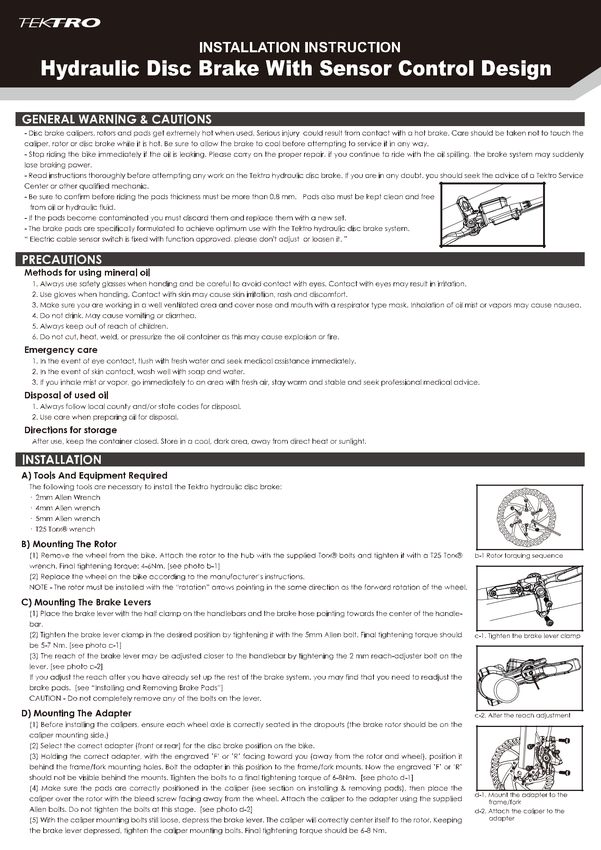
ENVO E-bike User’s Manual
    -    Front Wheel,
    -    Saddle,
    -    Charger and Pedals in separate carton box,
    -    Quick release for front wheel
    -    Small box containing – charger, clamps and pedals
    -    Keys (Quantity -two)

Please take the necessary measure when you want to pull out the main frame, it is the heaviest part and the handlebar is attached
just by some wires and you need to protect the connections.

For representation purpose the bike assembly is kept upside down.
The above pictures show right and left side view of assembly.

Cut all the zip ties and take out the wheel as show in picture.
Caution: While cutting zip ties, don’t scratch or damage your bike or tires.
Cut other zip ties for handlebar and quick release.
Caution: while cutting zip ties don’t cut wire connections.
Caution: do not damage battery, it is mounted with bike frame.

Turn the bike frame fork 180 degree so that disc brake with the fork is on left side of the bike.

                                                                    5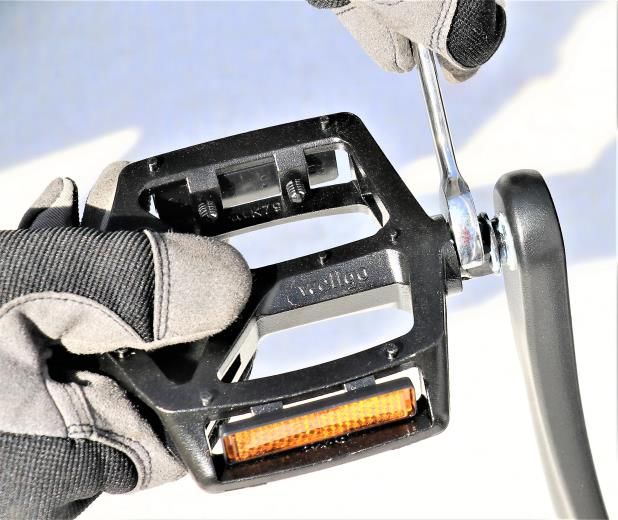
ENVO E-bike User’s Manual

    2. Front wheel mounting

Remove the stud provided between the fork. Note: You may need spanners of size 13 mm and 15 mm.

Remove the spacer provided in hydraulic disk brake shoes.

        Mount the front wheel in the direction where the disc brakes can fit inside. (No tools needed)
        Insert the “Quick release” in center of the wheel such that one spring is on left side and another on right. The narrow side
        of the spring should face towards wheel.
        Tighten up the “Quick release” and lock it.

Do not squeeze the brake during unboxing or any time before you mount the front wheel, otherwise refer to “Brake part 5” of the
manual.

                                                                  6
ENVO E-bike User’s Manual

    3. Handlebar mounting (Allen key required)

Release four Allen bolts as shown in picture and take out the upper clamp.

Put the handle bar in the center of the clamp such that the gear shifter is on the right side of the bike.
Put the removed clamp and tighten all four allen bolts one by one gradually.
Before tightining the allen bolts, adjust the angle of handle bar by rotating it.
Adjust the display angle as per your convinience.

Adjust the handle bar height by loosining and tightning the allen bolt provided in center of the stem.

                                                                    7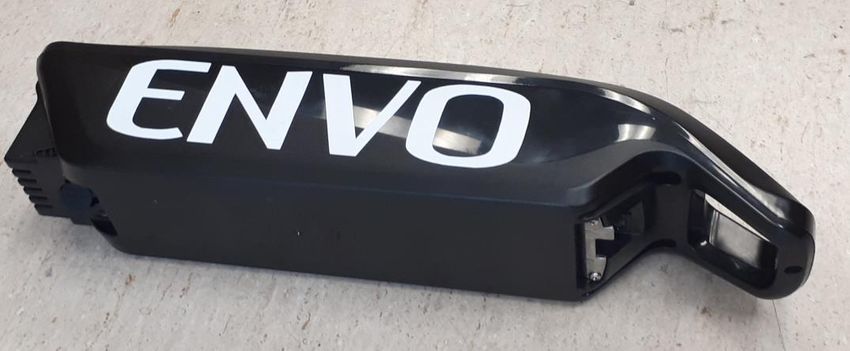
ENVO E-bike User’s Manual

    4. Lamp and fender mounting (Allen key and spanner required)

Remove the allen bolt as shown in picture.

Put fender hook and lamp aligned and pass the allen bolt (with washer) through and tighten same as shown in picture.
Adjust the height of fender by the play provided in the fender hook.

Take out the clamps provided in the other box.
Remove the bolt and nut.

Put the clamp on the fork and fender support in between the clamp.
Align the holes and pass the bolt through.
Put nut with washer on the bolt and tighten same.
You my need spanner of size 8 mm to hold the nut for tightening.
Repeat same process for other side of the fender support.

                                                               8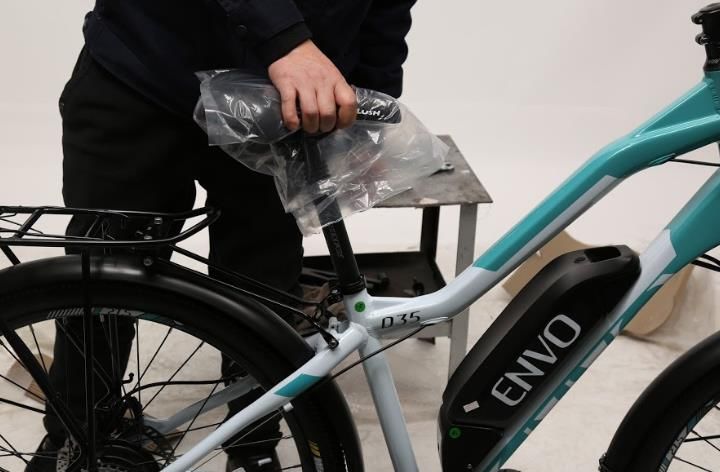
ENVO E-bike User’s Manual

    5. Pedal mounting (spanner required)
Take out the pedals provided in the box.

Read the alphabet provided on the threaded side of the pedal

                                                         “L” indicates pedal for left side of the bike
                                                         “R” indicates pedal for right side of the bike

                                                         You must apply some grease on the pedal screw to get the
                                                         best performance and durability.

Tighten both pedals using spanner size 15 mm as shown in picture.
Direction for tightening
Right side pedal – clockwise
Left side pedal – anti clockwise

                                                           9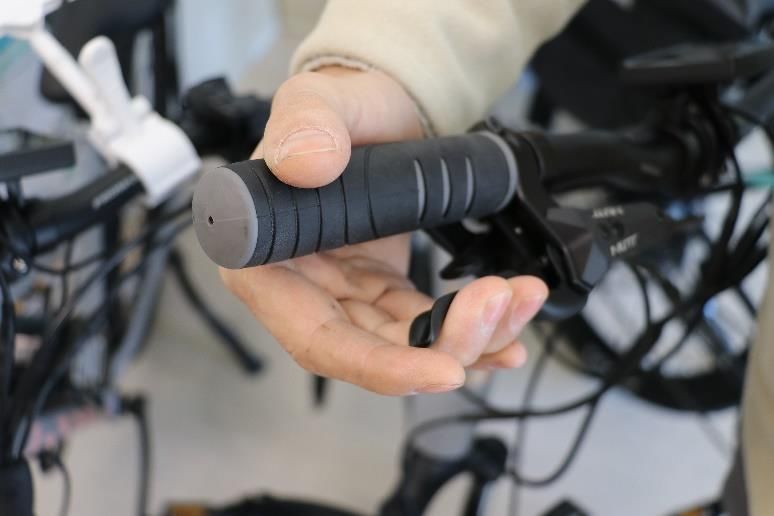
ENVO E-bike User’s Manual

    6. Saddle Mounting (No tools required)

        Mount the saddle on its position and fasten the seat clamp just when you adjust the seat to the desired height and
        direction.

    7. Battery
        Initially the battery is switched off.
        Put the key into the battery and (turn right) unlock the same. (keys are provided with main frame)
        Take out the battery.
        One rear side of the battery a small toggle switch is provided which indicates “I” and “0”.
        “I” stands for “Battery ON”
        “0” stands for “Battery OFF”
        Turn the switch position to “I” and put it back on the bike.
        Lock the battery by turning (left side) the key to lock position.

       When you mount the full charged battery (read the battery topic first), check the display, headlight, Pedal Assist
       levels and the throttle before you ride your bike.
Make sure that the rear wheel is not on ground when you want to check the throttle.

WARNINGS AND CAUTION STATEMENTS

Electric Bikes can be dangerous to use. The user or consumer assumes all risk of personal injuries, damage, or
failure of the bicycle or system and all other losses or damages to themselves and others and to any property
arising out of or as a result of using the bicycle.

As with all mechanical components, your bicycle is subjected to wear and high stresses. Different materials and
components may react to wear or stress fatigue in different ways. If the design life of a component has been exceeded, it
may suddenly fail, possibly causing injuries to the rider. Any form of crack, scratches or change of coloring in highly
stressed areas indicate the life of the component has been reached and should be replaced.

If you have an impairment or disability such as visual impairment, hearing impairment, physical impairment, cognitive
impairment, and/or a seizure disorder, consult your physician before riding our bikes.

                                                            10
ENVO E-bike User’s Manual
For replacement parts, technical information and warranty assistance, please contact:
info@EbikeBC.com
PLEASE NOTE: THIS MANUAL IS NOT INTENDED AS A DETAILED USER, SERVICE, REPAIR OR MAINTENANCE
MANUAL. PLEASE SEEK ASSISTANCE FROM A QUALIFIED TECHNICIAN FOR SERVICE, REPAIRS OR
MAINTENANCE. YOUR INSURANCE POLICIES MAY NOT PROVIDE COVERAGE FOR ACCIDENTS INVOLVING THE
USE OF THIS BICYCLE. TO DETERMINE IF COVERAGE IS PROVIDED YOU SHOULD CONTACT YOUR
INSURANCE COMPANY OR AGENT. DO NOT DISASSEMBLE, MODIFY OR REPLACE ELECTRICAL PARTS.
This manual contains many “Warnings” and “Cautions” concerning the consequences of failure to maintain or
inspect your bicycle and of failure to follow safe cycling practices.
The Caution symbol (above) can be seen throughout this Manual, and indicates a potentially hazardous situation
which, if not avoided, could result in serious injury or death, or is an alert against unsafe practices.
Many of the Warnings and Cautions say, “You may lose control and fall.” Because any fall can result in serious
injury or even death, we do not always repeat the warning of possible injury or death, and if we do not, please
assume this is the case, as all bicycles, including electric bikes, are dangerous and their safe use requires
constant and consistent maintenance and care.
Please ensure that prior to each and every ride (without exception), each electric bike rider reviews the safety
requirements enumerated throughout this Manual, and if any problems are observed, they should be resolved
prior to use.
Because it is impossible to anticipate every situation or condition which can occur while riding, this Manual
makes no representation about the safe use of this Electric Bike under all conditions. There are risks associated
with the use of any bicycle which cannot be predicted or avoided, and which may be caused and/or prevented
through the actions of the rider, and which are the sole responsibility of the rider.
You should save this Manual along with any other documents that were included with your bicycle purchase for
future reference, including the manuals provided by the manufacturers of the motor, battery and any other
components. You should read and become familiar with the contents of these additional manuals as well before
riding your bicycle.
All content in this Manual is subject to change or withdrawal without notice.
Visit https://EbikeBC.com to download the latest version.
ENVO assumes no responsibility or liability for any errors or inaccuracies that may inadvertently appear herein.
LEGALITY
In Canada, electric bikes are defined as “a two- or three wheeled vehicles with fully operable pedals and an electric
motor of less than 500 watts (0.67hp) whose maximum speed of 32Km/hr.
Local, provinces and country regulations may vary. It is your responsibility to ensure your bike is legal in your
particular area before riding it on public roads. If you’re unsure, ask your bicycle bike mechanic for more information
about local laws and regulations.
11ENVO E-bike User’s Manual
GENERAL SAFETY
When operating your bike, it is critical that you know how to properly care for each part or your bike as well as
your bike as a whole. Please ensure you have familiarized yourself with all aspects of your bike functions and
operations before riding it – ESPECIALLY on the open road with other traffic.
Since Electric Bikes are VERY different from regular bikes please be sure to read the section on “RIDING
ELECTRIC BIKES” as well as this entire manual.
NEVER operate your bicycle when you are under the influence of alcohol or drugs, including prescribed or
over the counter medications.
Always Ride at a speed appropriate for the conditions. High speed means higher risk.
It is your responsibility to educate yourself and comply with the applicable rules within the country, state, county, province
and/or city where you will be riding.
Be careful to keep your body parts and other objects away from the sharp teeth of the chain rings, the moving chain, the
turning pedals and the crank, and the spinning wheels of your bicycle.
USE – BEACH CRUISER:
ENVO Electric bikes are designed to be ridden on paved roads or light trails only. The bike is not designed to withstand
off-road conditions or downhill terrain. EBIKEBC assumes no liability for any accident, injuries, or property damage
incurred as a result of rider’s use or misuse of EBIKEBC bicycles, including any damages resulting from or arising out of
off-road usage.
An Electric Bike is not a mountain bike, racing bike, or BMX bike – Riders who do jumping, stunts, wheelies, and bike
tricks should never be on this bike and can cause harm to themselves and others
- and putting undue, unintended or unnecessary stress on the bike parts, frame, brakes handlebars, stem, or forks can
cause these components and/or the bike to fail, causing serious injury or death. DO NOT USE THIS BIKE FOR
JUMPING over curbs, riding on mountainous or off-road trails, or any use other than for commuting and cruising in a
relaxed, safe manner. Never exceed 20 miles or 32Km per hour on this bike.
SINGLE RIDER ONLY:
ENVO Electric bikes are designed for one passenger only. DO NOT carry any additional passengers on the front or rear
of the bike. The rear rack holding the battery is not designed to carry the weight of any additional passengers, except a
baby carrier with maximum load of 40 pounds. Standing, kneeling, or sitting backwards or sideways (both legs on the
same side of the bike) on the carrier seat while the bike is moving or stopped can easily result in broken limbs, loss of
control of the bike, destroyed rims, a destroyed bike frame, or worse.
WEIGHT CAPACITY:
ENVO Electric Bike is designed with a maximum weight capacity of 120KG or 265 pounds for all models. The rear rack
maximum weight capacity of a is 20KG or 44 pounds.
Exceeding the maximum weight capacity can result in damage to the bike, which can lead to serious injury or death.
12ENVO E-bike User’s Manual
CARRYING CARGO:
Carrying a load require getting accustomed to. Practice maneuvering and braking on a flat, hazard and traffic free street
with and without a load before going out into the road. Carrying a seated passenger or heavy load involves risks,
foremost of which can be decreased braking power and increased stopping distance. The maximum weight capacity is
310lbs (140 kg) shared between the rider and cargo.
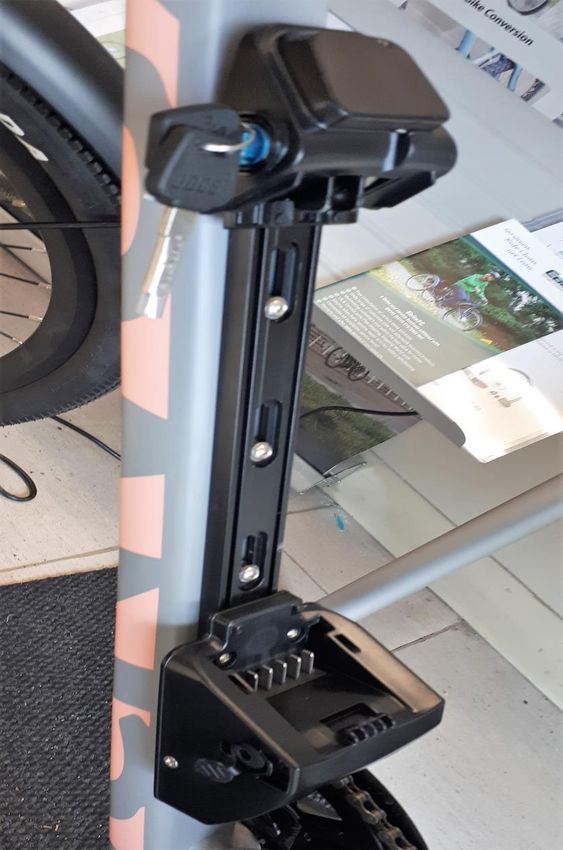
VEHICLE RACKS:
Misuse of vehicle racks could result in a potential hazardous situation which, if not avoided, could result in serious
injury or death. Be sure to read and follow the instructions provided by the rack manufacturer for more complete
information.
Always remove battery from bike frame when using a vehicle rack.
PEDAL ASSIST:
When you are in PAS mode – Do not pedal around corners – you will get a boost and your pedal will hit the ground
and can cause injury or death!
Do not use pedal assist on level and downhill grades if people are visible on the path or boardwalk.
Do not use pedal assist if small children or pets are within 100 feet.
HELMET USAGE:
Always wear an approved helmet and ensure it fits according to the manufacturers’ instructions.
Ensure your helmet meets the latest certification standards and is appropriate for the type of
riding you do – and if there are any special requirements for riding an electric bike.
Most serious bicycle injuries involve head injuries, which might have been avoided if the rider had worn an
appropriate helmet. FAILURE to wear a helmet when riding may result in serious injury or death.
MECHANICAL SAFETY CHECK:
Check the condition of your Electric Bike before every ride.
Make sure no nuts, bolts or fixings are loose, and pay attention to the axle, nuts and handlebar stem.
Make sure the tires are correctly inflated with the recommended air pressure, which can be found on the rim of
every tire.
Check the brakes for proper operation.
SMALL BICYCLE ACCESSORIES AND CHOKING HAZARD:
Some Bicycle accessories may present a choking hazard and other hazard to small children. Keep any bike parts
accessories, tools away from small children.
TECHNICAL SUPPORT: It is important to your safety, performance and enjoyment to understand how things work on
your bike. We urge you to ask your bike mechanic how to fix the things described in this section before you attempt them
yourself, and that you have your bike mechanic check your work before you ride the bike. If you have even the slightest
doubt as to whether you understand something in this section of the Manual, talk to your bike mechanic or qualified
mechanic- or do not ride your bike!
USING GOOD JUDGMENT:
Make sure no straps are dangling where they could get caught in the wheels – No bags, boxes or any items should be
placed in a position where they could get caught in the spokes Double check your load for security and stability. Check
to see that your wheels are securely fastened and that no components or frame members are cracked or broken (in
general, if at any time you notice a crack or bend in your bike, stem, forks, or bars of your bicycle, stop riding
immediately; take your bike to your local bike shop and have them inspect it).
13ENVO E-bike User’s Manual
]
WARNING: A SPECIAL NOTE TO PARENTS
IN CANADA, ELECTRIC BIKES MAY ONLY BE RIDDEN BY PERSONS 16 YEARS OLD AND OLDER!!!
IT IS ILLEGAL FOR INDIVIDUALS YOUNGER THAN 16 TO RIDE ELECTRIC BICYCLES.
As a parent or guardian, you are responsible for the safety of your adolescent when riding a bicycle.
To maximize the safe use of the bicycle by an adolescent, EBIKEBC strongly advises you to read this
Manual in its entirety, and practice the following precautionary guidelines (1):
Understand and obey not only the applicable local motor vehicle, bicycle and traffic laws, but also adhere to
common sense rules of safe and responsible bicycling.
Make sure the bicycle is properly fitted to the adolescent.
Make sure the bicycle is always in good repair and safe to operate.
Make sure that you and your adolescent have learned and understand how to safely operate an electric bicycle
and are familiar with the roads and/or other terrain upon which the bike will be ridden.
Make sure your adolescent always wears an approved bicycle helmet when riding (2).
Failure to follow the aforementioned warnings could result in serious injury or death.
1 EBIKEBC assumes no liability for failure to comply with the stated guidelines.
2 Make sure your adolescent understands that a bicycle helmet is for bicycling only and must be removed when not
riding. A helmet must not be worn while playing in play areas, including playground equipment, etc.
Highlighted Safety Rules:
1. Obey the Rules of the Road and all traffic Laws.
2. Remember that you are sharing the road or path with others – motorists, pedestrians and other cyclists.
Respect their rights.
3. Ride defensively. Always assume that others do not see you.
4. Look ahead, and be ready to avoid the following:
Vehicles slowing or turning, entering the road or lane ahead of you, or coming behind you
Parked car doors opening
Pedestrians stepping onto the road or path
Children or pets playing near the road
Potholes, sewer grating, railroad tracks, expansion joints, road or sidewalk construction, debris and other
obstructions that could cause you to swerve into traffic, catch your wheel or cause you to have an accident
Miscellaneous other hazards and distractions which can occur on a bicycle ride
14ENVO E-bike User’s Manual
5. Ride in the designated bike lane, on designated bike paths or as close to the edge of the road as possible, in the
direction or traffic flow or as directed by the local governing law.
6. Stop at the stop signs and traffic lights, slow down and look both ways at intersections. Remember that a bicycle
always loses in a collision with a motor vehicle, so be prepared to yield even if you have the right of way.
7. Use approved hand signals for turning and stopping.
8. Wear proper attire, including bright clothing, protective glasses and sturdy shoes. Never wear a loose-fitting dress or
long dress when riding – it can get caught in the moving parts of the bike and cause serious injury or even death.
9. Never ride with headphones. They mask traffic sounds and emergency vehicles sirens, distract you from
concentrating on what is going on around you, and their wires can tangle in the moving parts of the bicycle, causing
you to lose control.
10. Never carry a passenger, unless it is a small child weighing less than 40 pounds whom you feel comfortable carrying
on a bike, can maintain head control and absorb the stresses felt on a bike ride. Ensure the child is wearing an
approved helmet, appropriate clothing for the ride and is secured in a correctly mounted child carrier or a child carrier
trailer. The child seat that attaches to the EBIKEBC bikes is for sidewalk and board walk riding only and should never
be used on the open road where there is a chance or an accident with a car or other moving vehicles. Never exceed
15 miles per hour when you are carrying a child on the back seat, or 20 miles (32Km.) per hour when having a child in
an approved child trailer.
11. Never carry anything that obstructs your vision or your complete control of the bicycle, or which could become
entangled in the moving parts of the bike.
12. Never hitch a ride by holding on to another vehicle or bike.
13. Do not weave through traffic or make any moves that may surprise people with whom you are sharing the road.
14. Observe the right of way.
15. Avoid riding in bad weather, when visibility is obscured, at dawn, dusk or in the dark, or when extremely tired.
Each of these conditions increases the risk of accident.
16. Always bring some form of identification when riding.
17. Yield right of way to pedestrians and animals.
18. Signal with voice or bell when passing.
19. Walk your bike up or down access ramps or whenever you feel uneasy, unsure or unsafe.
20. Maintain a minimum of 10 feet behind the bike in front of you.
21. Be aware that your extra speed, and extra weight of the bike mean you must be more careful, especially around other
trail users.
22. Wet weather impairs traction, braking and visibility, both for the bicyclist and for other vehicles sharing the road.
The risk of an accident is dramatically increased in wet conditions.
23. Wet weather may lessen the grip of the rider’s feet on the pedals. If your feet slip off the pedals, it could lead you to
fall.
24. Night Riding – Riding your bike at night is much more dangerous than riding during the day. Adolescents or
inexperienced bike riders should never ride at dawn, at dusk or at night. Adults who choose to accept the increased
risk of riding at these times need to take extra care both riding and choosing specialized equipment, which can help
to reduce that risk. When riding at night or in other hazardous conditions – RIDE SLOWLY – no more than 10 miles
per hour.
25. Consult your local authorized bike shop or bike mechanic about night riding and safety equipment.
26. Reflectors are not a substitute for required lights. Riding at dawn, at dusk or at night or at other times of poor
visibility without adequate bicycle lighting systems and without reflectors is dangerous and may result in serious
injury.
15ENVO E-bike User’s Manual
27. Check reflectors and their mounting brackets regularly to make sure that they are clean, straight, unbroken and
securely mounted. Have your bike mechanic replace damaged reflectors and straighten or tighten any that are bent or
loose.
28. Do not remove the front or rear reflectors or reflector brackets from your bike. They are an integral part of the
bicycle safety system. Removing the reflectors reduces your visibility to others using the roadway.
29. Make sure your bicycle has and always is equipped with correctly positioned and securely mounted
reflectors.
30. ALWAYS wear a helmet, closed toe shoes and eye protection when riding.
31. Electric bikes are considerably heavier than normal bicycles. For this reason, parking, pushing, lifting and carrying
the bike is more difficult. Bear this in mind when loading your bike into a car and unloading it, or when mounting in
ton a bicycle carrier system.
32. Never ride at a speed outside your comfort zone, or that you feel may be unsafe for the given conditions.
33. When mounting your bike, make sure not to step on the pedals until you are sitting on the saddle and gripping
the handlebars firmly.
34. Keep your hands on the brake levers – or at least two fingers and remember that they will always slow or stop the
bike if pulled. Even on bikes without brake inhibit switches.
35. Get used to riding your EBIKEBC bike without power or use of throttle or PAS (peddle assist) – only once you are
comfortable riding the bike as a regular bike then slowly introduce the PAS on lowest level and work your way up.
After you are 100% comfortable with PAS then start using the throttle – very gently at first until you are comfortable
with the settings, speed and acceleration.
36. When you’re ready to introduce power, use the lowest assist setting until you feel confident controlling the
electric assist.
37. Heavy electric bikes take longer to slow down; leave extra space for stopping safely.
38. Remember that all the information in this manual referring to bicycle safety also applies to your electric bike.
16ENVO E-bike User’s Manual
Battery
8. Charging Your Battery
Your bike comes with an On-Board Charging System accessed by the pull-out ZIP CORD on the
below side of the battery pack.
This can be plugged into any 110-volt outlet from your home or when you're out and about.
When the battery is charging you will see the RED charging light will be on the charger.
When the battery is done charging the light will turn GREEN.
In this case you can change the master battery power switch from 0 to 1 and you must see all the 4
lights turns to Green when you push the bottom on the Top.
Battery Can be charges even when it is mounted on the rack through the pull-out ZIP CORD on the
left side of the rack.
17ENVO E-bike User’s Manual
9. Battery Position on the Bike:
To be able to use the electric motor, the battery must be mounted by sliding the battery
forward into the battery holder.
Lock the battery when fully inserted in the battery holder. The battery must be locked when riding or it
may fall out. The key does not have to be in to operate the bike.
Your battery comes with a Master ON/OFF Switch located on the bottom of the battery pack.
18ENVO E-bike User’s Manual
Make sure the switch is on (meaning that the “I” is pressed) to start the bike.
Note: If you are riding frequently you can leave the switch in the ON or “I” position.
When the bike is not being used for several days, it is best to turn the switch to the OFF or to the "O"
position.
Our EBIKEBC batteries are of the highest quality. They are equipped with Smart Chargers
and Smart BMS (battery management system) to ensure the battery will last as long as
possible. You can expect your EBIKEBC battery to last at least 3 years, but closer to 5-8
years, depending on extent of use.
WARNING:
Failure to properly use, charge, and store your battery as instructed will void the warranty
and could cause a hazardous situation. Before using your battery for the first time, read
this section of the manual in its entirety.
If you have any questions about your EBIKEBC battery or its usage, please contact:
info@ebikebc.com for additional instructions and guidance.
What to Do When You First Purchase Your New ENVO battery:
Batteries are not shipped with a full charge. You should charge your battery for at least 4-5
hours.
The EBIKEBC battery is equipped with a five-minute sleep function. If no activity is detected,
the bike will go into “static” mode to conserve battery power. Simply cycle the bike off then on
again to reactivate the battery.
The rated output capacity of the battery is measured at 77 degrees Fahrenheit. Any variations
in this temperature will alter the performance of the battery. Keep your battery away from high
temperatures especially; heat will reduce overall battery life and run time.
No “break in” period is necessary for our batteries – simply fully charge the battery before first
use.
Safety Guidelines for Charging:
Charge your bike indoors whenever possible. Charge your battery during the day in a room which
has a smoke or fire detector. Do not charge in your bedroom.
19ENVO E-bike User’s Manual
During the charging process, place the battery on a non-flammable surface or leave in the
main sleeve.
Charge in a well-ventilated area. Keep away from flames and sparks.
Avoid any contact with water of other fluids while charging. If the battery, charger or any
connections become wet, immediately unplug the charger and thoroughly dry all
components.
10.Battery and Charger Care
Avoid subjecting the battery to high temperatures, such as directly under the sun, for prolonged
periods of time. Recharge the battery before it becomes completely discharged. Completely
discharging will reduce the numbers of recharging cycles during the battery's life and limit the
capacity.
Never store the battery in the discharged state. After much use, your battery's charge-holding
capacity will decrease. If you find that your battery does not hold a sufficient charge, you should
contact EbikeBC to order a replacement.
If the battery will not be used for an extended period of time, charge it fully and recharge it every 2
months. Store it in a cool, dry place.
Your ENVO Electric Bike battery is engineered with precision for high capacity and a long, useful
life. Do not use it to power other electrical devices. Improper use of the battery will damage the
battery and shorten its useful life and may cause fire or an explosion. If you experience unusual
sounds or odors coming from the charger or the battery, unplug charger immediately and contact
ENVO Electric Bike customer service.
11.Battery Range:
Know that riding your bike with full throttle or in “5 mode” in Pedal Assist will use up the battery
more quickly than if you apply less throttle or ride in a lower pedal assist speed mode.
If you are riding over 40 Kilometers in one round trip, use a lower pedal assist mode. This will
assist the battery and extend your range.
If you are on a long trip and the battery gets low and cuts off as you are riding, ease off on the
throttle and it will come back on after a few seconds. If you ease off on the throttle or move
down to 1 mode in pedal assist, you will get a few more miles of riding out of the battery.
Factors that Affect Range:
State of your Battery Charge
Mode Setting: the bike will use less power in pedal assist mode due to the required contribution of
the rider
Tire inflation pressure
Adjustment of the wheel bearings and brakes: tight bearings or a dragging brake will adversely
affect range
Rider Weight
The speed at which you travel, and local wind conditions.
Terrain (road surface and hills): traveling on a soft surface, such as dirt or gravel, or climbing a hill
uses energy faster
Many starts and stops full power from a standing start draws the most amperage from the
battery
How to Maximize Your Range:
Fully Charge your battery before each ride
Ride in pedal assist mode and pedal as much as you feel comfortable doing – the more you
pedal the further the battery will take you. Check your tire pressure regularly and inflate the tires
to not more than the maximum pressure printed on the tire sidewalls
20ENVO E-bike User’s Manual
Have your bicycle serviced periodically to ensure that the bearings run freely, and the brakes do
not rub the rims (or the rotors for the disc brakes) when they are not applied
Minimize the weight that you carry
Ride at slower speeds
Accelerate gently. Assist the system by pedaling as you accelerate to your cruising speed
IMPORTANT NOTE: As your battery ages, it will gradually lose capacity. With proper care and
maintenance, your lithium ion battery will retain up to 70% of its capacity for at about 500 full
discharge/recharge cycles. As capacity diminishes, you will notice a gradual drop off in max
range capability. When range falls to an unacceptable level, contact your EBIKEBC dealer for
information regarding purchasing a new battery.
12.Battery Maintenance & Safety:
Improper use of the battery charger can cause a fire resulting in severe injury or death and
property damage. Please review the following instructions and guidelines carefully to ensure safe
battery use and maintenance.
If you are not going to use your battery for a while, fully charge the battery prior to turning it
off. Be sure to turn on and charge your battery every 2 months to ensure it never completely
loses its charge.
The battery will get hot to the touch when charging, which is normal; however, if you smell or
see any smoke – turn the battery and charger off and unplug anything attached to the battery.
Call EbikeBC to obtain a diagnosis or a replacement.
After a ride, fully recharge your battery as soon as it has cooled to room temperature. If battery is
left in a discharged condition it will deteriorate much faster than a fully charged battery.
Do not block the fan vent on the battery pack or external charger. This can cause
overheating and fire.
You should protect the battery from water and other moisture at all times. Never
submerge your bike or battery in water, or even spray battery with water.
DO NOT use this battery with any other vehicle or appliance. Use of this battery with any other
product will void the warranty and may create a hazardous condition that could cause a fire,
resulting in severe injury, death and/or property damage.
Never disassemble the battery or open the battery case. There is a significant risk of
electric shock and damage to the battery. This will also void the warranty.
Never short - circuit the discharge terminals of the battery. A short circuit will damage the
battery and could cause a fire resulting in severe injury death, and/or property damage. When
handling the battery, be aware of conductive materials that may short the battery terminals such
as coins, nails etc.
Never crush or puncture the battery. A punctured or crushed battery could catch fire
causing a fire or explosion with could lead to serious injury, death and/or property damage.
Keep battery away from excessive heat (104 degrees F or higher) or open flames. Avoid long-
term exposure to direct rays from the sun.
Protect the battery from materials that may contaminate the charge port or the output port,
such as dirt and sand; the ports may be difficult or impossible to clean out.
Never subject the battery to intense physical shock or severe vibrations.
13.Battery Transport:
Lithium Ion batteries are subject to many regulations and are often considered dangerous or
hazardous materials by carriers. Be sure to check for relevant laws and ask the carrier for
approval prior to shipping a lithium-ion battery or transporting it by air.
21ENVO E-bike User’s Manual
14.Battery Disposal:
Be friendly to the environment. Be sure to recycle your old batteries at a local battery-recycle
center.
Do not throw them in the garbage.
We cannot provide any shipping label, return facility or shipping means from any departure to our
premises.
15.Fuse:
The fuse is located on the bottom of the battery, between the charging port and the On/Off switch.
The fuse is designed to protect the battery. If the fuse blows, there will be no power to any of the
electrical components powered by the battery. You can replace the fuse with a standard
automotive 40-amp fuse or contact ENVO Electric Bike customer service at info@EbikeBC.com
Interface 2020 Version:
Please refer to:
https://ebikebc.com/wp-content/uploads/2019/12/ENVO-2020-750C-display-manual.pdf
1. Quick Start Guidelines for Using Pedal Assist:
With the display ON you are ready to ride in THROTTLE or Pedal Assist mode.
The throttle will be active and will power the motor if the assist level is 1 or higher.
Pedal Assist mode is also operative.
Using the UP and DOWN arrows you can set Pedal Assist from ZERO through 5 speed modes.
One (1) is the lowest and (5) is the higher boost.
With non-zero Pedal Assist mode, the motor will now turn on when you begin pedaling, and you will
not need to use the throttle. You do have the ability, however, to increase your speed with throttle
application while using Pedal Assist mode. Full throttle will be comparable to use the system on
level 5 of assist; hence the throttle will not have any noticeable effect on level 5.
Note that it takes about a quarter of pedal rotation before Pedal Assist kicks in and turns on the
motor.
Important Note: In the beginning, when you are getting used to the bike, it is always best to start out
in 1 or 2 mode and move up to the faster modes as you are riding. If you start out in the higher modes
3, 4 or 5, the motor kick might cause panic. In 0 mode the pedal assist and the throttle are NOT
active.
2. Activating Head and Taillights:
To turn ON and OFF the head and screen lights simply press and hold the UP arrow on the LCD
display for about two seconds until you see the display light up.
22ENVO E-bike User’s Manual
3. Pedal Assist Mode – Detailed Instructions for Use:
EBIKEBC bikes are equipped with a Pedal Assist Sensor, which is installed on the bottom
bracket, and senses pedal crank rotation electronically.
Your ENVO Electric Bike LCD meter monitors pedal assist, speed, odometer, trip distance, riding
time, and battery energy level. To turn the meter on, make sure the battery is fully inserted into the
ENVO Electric Bike and the on/off switch is “ON”.
Meter Programming & Use
The LCD meter on your Electric Bike can be programmed to change various functions.
See LCD3 setting manual.
You do not need to change any of those parameters. Please do not do so if not necessary. Wrong
settings may stop the system from functioning or loss of some functionalities.
4. Hand Throttle Control:
EBIKEBC bikes are equipped with a thumb throttle, which is located on the right side of the
handlebar. Like on a motorcycle, a bike throttle is designed to let the user apply 0-100% of the
motor’s power at will. The throttle can act independently or in tandem with or without
PAS.
When the pedal assist mode is set to "1 or higher", the throttle will accelerate the bike
forward. You control the throttle by pushing on the thumb attachment. The farther the
throttle switch is from its resting position, the more power is delivered to the motor to
accelerate the ENVO Electric Bike. When you want to slow down, you simply release the
throttle and let it return to its resting position and simultaneously apply the brakes. The
ENVO Electric Bike also comes with a Throttle Override function, which allows the
throttle to work in pedal assist modes.
Thumb Attachment
Brakes
Your Electric Bike is equipped with Hydraulic disc brakes for maximum reliability. Applying hand
pressure to the brake levers will cause the wheel brake to cause friction against the brake disc,
slowing the wheel. The more hand pressure applied to the brake lever, the faster the Electric Bike will
come to a stop.
ENVO ebikes brakes are equipped with microswitches which cut-off the motor power whenever either
of brake levers are squeezed.
A circular brake sign will show up the screen whenever you brake.
The rear brake should always be applied before and while the front brake is applied. Applying only the
front brake to slow or stop at high speeds may result in the rider being ejected from the saddle and
continuing forward over the handlebars. It is best to apply even pressure to both brake levers when
slowing or stopping.
Bicycles equipped with disc brakes will occasionally make a slight scraping noise when the wheels
are turning without the brakes being applied. This is normal.
23ENVO E-bike User’s Manual
Make sure that the brake lever does not contact the handlebar when full hand pressure is applied. If
so, then the brakes must be adjusted by increasing the tension on the cable.
With Hydraulic Brakes is it vital they are bled properly and by a certified bike mechanic – please
service and maintain your brakes every 1000 Kilometers or every 6 months or whenever necessary.
Brakes are a critical part of the bike and it is essential that both are working 100%.
Warning:
Disc brake rotors become hot during use. Do not touch or come in contact with the disc rotor
shortly after use.
Wet weather will require a longer distance to stop. Brake earlier and avoid sudden stops when
riding in wet conditions.
1. Brake Check:
Ensure both brakes work prior to going on every single ride.
Familiarize yourself with the braking actions of the bike.
Test the brakes at slow speed, putting your weight towards the rear and gently applying the
brakes, rear brake first.
Check the quick releases are closed. Check all control cables are seated and securely engaged.
Sudden or excessive application of the front brake could pitch you over the handlebars.
Applying brakes too hard can result in locking up the wheel, which could cause a loss of control
and injuries.
Skidding is an example of what can happen when a wheel locks up.
Ensure you can fully engage the brakes without them having touch (bottom out) the handlebars.
Do not ride the bike unless the brakes are working well and adjusted by a professional bike
mechanic.
2. Disc Brakes:
Riding with improperly adjusted brakes, worn brake pads, or wheels on which the rim ware marks
are visible, is dangerous and can result in serious injury or death
Your EBIKEBC Bike is fitted with disc brakes. Disc brakes are extremely powerful. Take extra
care in becoming familiar with the brakes.
Exercise care in touching the rotator or the calipers. Disc rotors have sharp edges, and both
rotors and calipers can get VERY hot.
Your EBIKEBC bike is equipped with Hydraulic Disc brakes – to maintain the warranty and safety
of the bike, a qualified mechanic must repair, replace and maintain your brakes. Please ensure
you take your bike to your bike mechanic at least every 300 miles or when you observe that your
brakes are weak, scraping or generally not working well.
Be careful not to damage the rotor, calipers or brake pads when re-inserting the rotor into the
caliper. Never activate a disc brake’s control lever unless the rotor is correctly inserted in the
caliper.
See the brake manufacturer’s instructions for operation and care of your brakes, and to determine
when brake pads must be replaced. If you do not have the manufacturer’s instructions, see your
bike mechanic or contact the brake manufacturer directly.
If replacing worn or damaged parts, use only manufacture’s approved genuine replacement parts.
3. Brake Controls and Features:
24ENVO E-bike User’s Manual
For your safety you should know which brake lever controls the front and which controls the rear
brake on your bike. Typically, the right brake lever controls the rear brake and the left lever
controls the front brake. To confirm, squeeze one brake lever and look to see which brake (front
or rear) engages. Next, do the same with the other brake lever.
Make sure your hands can reach and squeeze the brake levers comfortably. The lever reach is
adjustable. If you are unable to reach the brakes, you may need a different brake lever design.
If at any time, for any reason, you need the stop the bike or stop the bike motor from turning –
simply squeeze the brake levers.
4. Brake Disconnect Switch:
ENVO Bike brakes include an electronic disconnect switch which is activated when the lever
is depressed. Depressing this switch will disconnect the power to the motor.
You should check the operation of your brake disconnect switch before every ride: While riding
slowly in a controlled environment (like your driveway), engage the motor then squeeze each
brake separately. The motor should lose power immediately and remain off as long as a brake
lever is depressed.
Caution: The cable switch can be disconnected, come loose or malfunction – so always perform
a check before you ride. Be sure to depress both brakes in an emergency or when you need the
motor to disengage.
5. TEKTRO HYDRAULIC DISC BRAKE ASSEMBLEY and MAINTENANCE with
sensor control and design:
25ENVO E-bike User’s Manual
26ENVO E-bike User’s Manual
27ENVO E-bike User’s Manual
6. Disk Brake Pad Replacement Types:
Electric Bike Model Brake Pad Type
AVID ELIXIR type
ENVO 2019 model
Tektro E10.11 or A10.11 or equivalent
ENVO 2020 model
AVID ELIXIR type
ENVO ultra light 16inch foldable ebike
28ENVO E-bike User’s Manual
7. ASSEMBLY
*Warning:
As the disc pads are self-adjusting. DO NOT pull the brake lever before it is fully assembled with the rotor in the caliper
slot. The more pulls on brake lever without the rotor in the caliper slot makes the gap between disc pads becomes too
narrow. If the disc pad space is too small, insert Spacer between disc pads to increase gap and push them back to attain
the ideal gap.
I. Use the 6 rotor screws (T25 Torque key, Torque 50~60 kgf-cm) to tighten the disc rotor onto the disc hub.
*Caution:
1. Wear gloves first to avoid contamination to rotor by bare hands.
2. The 6 rotor screws must be tightened before riding.
3. The 6 rotor screws should be tightened in a diagonal sequence.
4. The 6 rotor screws should be replaced after disassembly for 3-4 times as the Nylok will not function correctly.
5. Use cleaning naphtha to remove contamination on rotor.
II. Assemble the wheel onto the front fork or rear dropout and tighten the screws or QR.
III. Assemble the caliper onto the front fork or rear dropout.
1. International standard fork:
Tighten the front or rear adaptor bracket onto the front fork or dropout. (Use 2 pcs M6 x 18mm bolts + Torque 90 ± 5 kgf-
cm).
Mount the caliper to the adaptor bracket with 2 pcs M6X18 bolts. (DO NOT TIGHTEN THE BOLTS, so that the caliper can
move freely on the bracket)
2. MANITOU fork:
Mount the caliper to the MANITOU fork with 2 pcs M6 18 bolts. (DO NOT TIGHTEN THE BOLTS, so that the caliper can
move freely on bracket)
IV. Pull the brake lever to make the disc pads clamp to the disc rotor. (Torque 30~35 kgf-cm)
V. Pump brake lever 5~8 times then pump and hold brake lever. And then alternatively gradually tighten the M6 screws.
(Torque 90 ± 5 kgf-cm)
VI. Spin the wheel to make sure the disc rotor is clear to disc pads. If it is not clear, then slack the bolts and redo step V
above.
VII. To adjust reach of brake lever's push rod, use 2mm Allen key to adjust reach, (Clockwise for larger angle; Anti-
clockwise for smaller angle.)
VIII. Test riding:
Braking force on the first 10~30 pulls is not as powerful. (New disc pads need to be bedded in)
(*Warning: Do not ride at high speed when doing test riding, keep safe distance.)
MAINTENANCE
I. Changing disc pads
A2 hydraulic caliper is designed with self-adjustment disc pad function, No pad adjustment is required before the disc
pads are worn out. It is required to stop riding and change new disc pads when the brake lever needs to be pulled with a
large travel to stop the bike or there is noise between the disc pads and rotor.
*Warning: Keep the disc pads free from oil or grease; otherwise it will cause no braking.
1. Remove the disc pad pin.
2. Remove used disc pads and use flat screwdriver to push caliper pistons fully back.
29ENVO E-bike User’s Manual
3. Place new disc pads with disc pad spring in position, insert disc pad pin through the hose on caliper. Bend the open
end of pin to keep the pin from moving out.
4. Spin the wheel and make sure it is clear between the rotor and disc pads. IF it doesn’t clear, redo the step VI Assembly
as above.
* Caution:
1. Braking force on the first 10~30 pulls is not as powerful (New disc pads need to be bedded in).
Do not ride at high speed when doing test riding, keep a safe distance.
2. It is normal that there might be braking noise in the wet. The noise will disappear after the disc pads become dry.
II. Changing brake fluid:
A2 hydraulic disc brake uses Mineral oil. Other branded Mineral oil is compatible.
*Warning: Never add or mix with DOT brake fluid or any mineral oil not for hydraulic brake use.
1. Tools:
- Empty container (for used fluid)
- Mineral oil 30CC
- T 10 Torque key (BMC screw)
- Cleaning Naphtha clean cloth
- Bleed kit
30You can also read