EPOS Manual Merlin Software Ltd - Version 5.0.54 Produced by: B.B.I.C. Innovation Way - Merlinsoft
←
→
Page content transcription
If your browser does not render page correctly, please read the page content below
EPOS Manual
                                      Version 5.0.54

                                       Produced by:

                                    Merlin Software Ltd
                                  B.B.I.C. Innovation Way
                                   BARNSLEY, S75 1JL

                            Telephone: (01226) 321213
                               Fax: (01226) 321284
                         Web: http://www.merlinsoft.co.uk
                          E-Mail: support@merlinsoft.co.uk

“ Copyright of Merlin Software Ltd.                          Page 1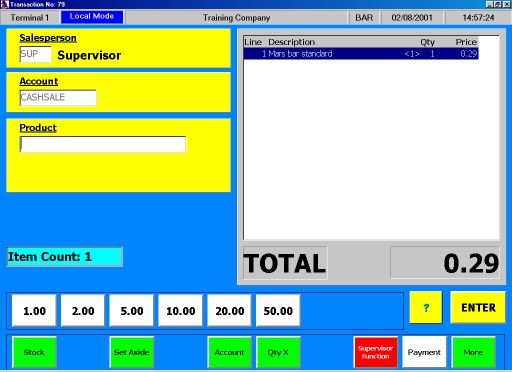
TABLE OF CONTENTS
INTRODUCTION....................................................................................................................4

USING THE MERLIN EPOS HELP FILE..............................................................................5

 INSTALLATION AND SETUP..............................................................................................8
Initial Setup............................................................................................................................8
Printer Setup..........................................................................................................................9
POS Terminal Setup............................................................................................................10
Terminal Details...................................................................................................................11
Salesperson Setup...............................................................................................................14

OPERATIONAL TERMS.....................................................................................................16
Training Company................................................................................................................16
Keyboard Icon......................................................................................................................17
Main Point of Sale Screen...................................................................................................18
Main Transaction Window....................................................................................................19
Key Colours..........................................................................................................................20
Function Keys......................................................................................................................21
Passwords............................................................................................................................22
Login Screen........................................................................................................................23

POINT OF SALE OPERATIONS.........................................................................................25
Selecting a Product..............................................................................................................25
Hot Keys...............................................................................................................................27
Quantities.............................................................................................................................28
Taking Payment...................................................................................................................29
Taking Payment in Different Currencies..............................................................................30
Quick Payment.....................................................................................................................31
Selecting Pack Sizes............................................................................................................32
Products Sold By Weight, Volume, Length Or Area............................................................33
Printing & Reprinting Receipts.............................................................................................34
Viewing Transactions...........................................................................................................36
F2 Datasearch Key..............................................................................................................37
Setting Aside a Transaction.................................................................................................39
Stock Enquiry.......................................................................................................................41
Logging Out & Exiting the Point of Sale...............................................................................42

CUSTOMER ACCOUNTS...................................................................................................43
Account Setup & Maintenance.............................................................................................43
Account Sales......................................................................................................................46
Account Payments...............................................................................................................48
Account Enquiry...................................................................................................................50

SUPERVISOR FUNCTIONS...............................................................................................52
General Notes on Supervisor Functions..............................................................................52
Banking................................................................................................................................53
Returns.................................................................................................................................54
Till Reconciliation.................................................................................................................56
Voids....................................................................................................................................58
Price Changes......................................................................................................................59

“ Copyright of Merlin Software Ltd.                                                                                         Page 2

No Sales...............................................................................................................................60
Till Setup..............................................................................................................................61
Discounts..............................................................................................................................62

“ Copyright of Merlin Software Ltd.                                                                                        Page 3
INTRODUCTION
Merlin EPOS is a fully functional, easy-to-use Electronic Point of Sale program. It is the
'front end' to the Merlin suite of programs, and is responsible for all the Point of Sale
operations that take place in your business.

Merlin EPOS is the program that most users will see most of the time. Because of this, it
has been designed to offer maximum flexibility and the maximum possible range of
features.

It is integrated with the Merlin Back Office program through the Merlin Net polling
program. This provides a fully featured system for complete control of any retail operation.

Click here to view the Initial Setup section if you are configuring Merlin EPOS to use for
the first time.

“ Copyright of Merlin Software Ltd.                                                Page 4
USING THE MERLIN EPOS HELP FILE
The Merlin Help Files are designed to guide you through each of the programs that make
up Merlin suite of retail software.

Each program - Merlin EPOS, Merlin Back Office and Merlin Net - has its own individual
Help File, which covers the features and functions available within that particular program.
Screen shots and examples are also included wherever possible, to make following the
instructions and operating the Merlin programs as easy as possible.

The Help Files are not linked together, because the installation wizard gives you the
opportunity to install either the Merlin EPOS or Merlin Back Office program
independently, and you might not have the Merlin Net polling program installed at all if it is
not appropriate. Therefore, you may encounter references in one Help File that apply to
another Help File, but a link will not be provided in case the other file has not been
installed.
                                  Accessing Merlin Help

(a) Context-sensitive help within the Merlin programs
The most convenient way to access any of the Merlin Help Files is by pressing the F1 key
while you are using any of the Merlin programs. If you are using a touch screen terminal at
the point of sale, the equivalent of the F1 key is the special Help key on the screen
(denoted by a question mark).

The Help Files have been carefully integrated with all the Merlin programs to provide
context-sensitive help. This means that the help you receive when you press the F1 key is
always appropriate to the function you are performing at that time.

Once the Help File is displayed, you are able to use the links that appear on the page to
reach other relevant topics, or flick through the pages using the forward (>>) and back (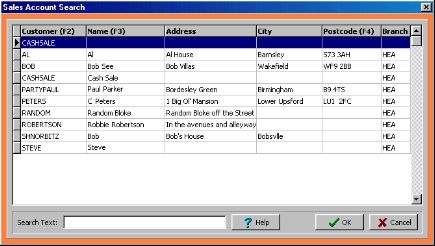
the relevant page, rather than having to search for that page in a large manual.

Links to other pages are characterised by different coloured, underlined text - the colours
of this text may differ depending upon your Windows configuration. Your mouse cursor will
change from the usual arrow into a hand with a pointing finger as it moves over the link.
This demonstrates that the text is an active link, and not simply text that has been
underlined. Clicking on any link with the mouse cursor will move you directly to the page
that the link relates to.

(b) Toolbar Functions
The toolbar at the top of each page also provides access to other functions. The button
functions are listed below, along with their alternative keyboard commands.

        BUTTON                  KEY        FUNCTION
        >>                      >          Page forward
                       Page forward
        <               Page backwards
        C               Access the Contents Page
        I               Access the Index function
        B               Return to the previous page that you viewed

“ Copyright of Merlin Software Ltd.                                                 Page 6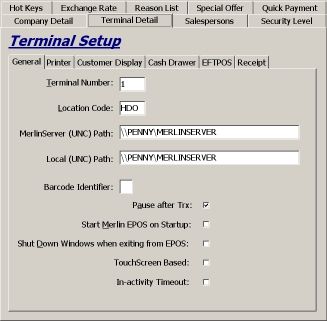
Note: there is no guarantee that all EPOS keyboards function in the same
way, and these keys may not work on all keyboards. Also, if your EPOS keyboard does
not have  keys, you will not be able to page through the Help File.

(b) Touch Screen Terminals
If you are running the Merlin EPOS program on a touch screen terminal, you are still able
to operate the Merlin Help. It is accessed by pressing the special Help key at the main
point of sale screen. The links between pages are then operated by by simply touching the
underlined text on the screen.

In the same way, the functions of the toolbar at the top of each page can be accessed by
simply touching the relevant buttons on the toolbar.

The only function that you will not be able to operate fully is the Index function, unless you
also have access to a keyboard so that you can type in the term or key word that you are
looking for.

“ Copyright of Merlin Software Ltd.                                                  Page 7
INSTALLATION AND SETUP

                                      Initial Setup
When you first install the Merlin EPOS program on a terminal, you will be presented with
the following dialogue.

After pressing  you are asked to type in the UNC Path that the EPOS will use. This
will point to the directory where the Merlin Data is stored and will usually be
\\\MERLINSERVER. Please refer to the install instructions provided
with the Installation software for more details.

Once the UNC path has been accepted you will be presented with the Select Company
screen similar to the following :

When you select the company, the following dialogue is displayed.

You are then taken into the POS Terminal Setup screen to allow you to configure the
terminal. You must make sure that you enter a unique Terminal Number and the Printer
that you are going to use at the Point of Sale before you can use Merlin EPOS. See
Printer Setup for more details.

The first step is to enter a Terminal Number.

“ Copyright of Merlin Software Ltd.                                             Page 8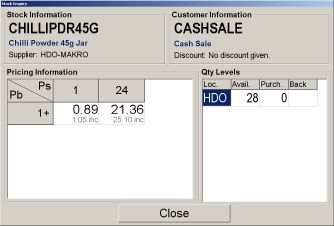
Printer Setup
As part of the initial setup for the Merlin EPOS program, you must also configure the
printer that you are going to use for your Point of Sale operations.

                                      From Windows
Click on the 'Start' button in the left hand corner of the toolbar at the bottom of the screen.
From the list that appears, choose 'Settings', then 'Control Panel'. From the Control Panel
screen, double click on the 'Printers' icon to open a screen resembling the following:

Double click on the 'Add Printer' icon to open the Wizard that will guide you through the
installation procedure. Click 'Next' to begin installing the printer, and on the next screen
select 'Local Printer', then 'Next' again.

Scroll down the list of printer manufacturers at the left hand side of the next screen until
you find GENERIC. Click on this option and the description 'Generic/Text Only' should
appear in the left hand window. Click 'Next' to move on to the following screen.

Select the 'Keep Existing Driver' option, then click 'Next'. From the following screen, select
LPT1 from the list, then click 'Next' again. In the next screen the 'Printer Name' field should
read 'Generic/Text Only' and Windows will default to 'No' in answer to the question below.
Do not change this - simply click 'Next' to move on. Windows will then ask whether you
want to print out a test page or not. The choice here is up to you, but a test page will
demonstrate that your printer is working correctly.

Click 'Finish' to complete the setup. You will notice that a new icon has appeared in the
'Printer' screen to represent your new addition.

                                  From the Point of Sale
You now need to go into the Merlin EPOS program and access the Till Setup from the
main Point of Sale screen. Choose 'Terminal Details' and then click on the 'Printer' tab.

From here, click on the down arrow to the right of the first field (labeled 'Printer') and select
your newly-added Generic/Text Only printer from the drop-down list that appears. Click
'OK' to save your changes, and you have completed the Printer Setup.

“ Copyright of Merlin Software Ltd.                                                    Page 9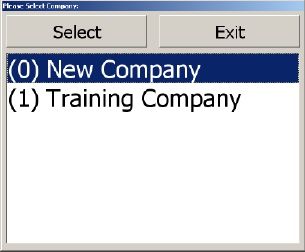
POS Terminal Setup
The POS Terminal Setup must be completed before you can use the Merlin EPOS system
properly.

However, there are a number of functions that must be performed from the Back Office
computer using the Merlin Back Office program. An operator at the Point of Sale would
only be able to alter details of these screens if the terminal was not on-line to the Server
for any reason. At any other time, these functions can be viewed using the Till Setup
button at the Point of Sale, but will carry a red marker to show that you can only view the
data.

The options that you can change from the Point of Sale are as follows:

                  Terminal Details       Salesperson Setup
                  Hot Key Setup          Quick Payment

The options that you can only view from the Point of Sale are as follows:

                  Company Details   Security Levels
                  Reason List Setup Special Offer Setup
                  Exchange Rate Setup

The Hot Key option is unique in that you can alter the Hot Key settings for your particular
till, but these alterations will not affect any terminal other than your own. For more
information on Hot Keys, and the Local and Global aspects of this function, click on the
above link.

Note: the POS Terminal Setup can also be accessed at any time from the main Point of
Sale screen, provided that you have Administrator status on the system. This can be done
by pressing the Till Setup key from the row of buttons at the bottom of the screen. If you do
not have Administrator status, the Till Setup key will not appear on your screen.

“ Copyright of Merlin Software Ltd.                                                 Page 10
Terminal Details
This screen holds all the details relating to the setup of the terminal on which you are
running the Merlin EPOS program. It can be accessed and altered from the Point of Sale
using the Till Setup button.
General
The General tab contains details of the Terminal Number and Location Code of the
terminal. The Terminal Number defines a particular terminal on a network. The Location
Code tells the system where that terminal is located - you may have different branches of
the same company operating in what is effectively the same system.
There is also a field which contains the path details for the Back Office Server Drive that
your terminal draws information from.
The first check box at the bottom of the General tab allows you to choose whether the
Merlin EPOS system will pause after payment is taken for each transaction. This will have
the advantage that the amount of change to be given will be held on the screen until the
operator presses ENTER to begin the next transaction. This box should be ticked if you
are using a Cash Drawer.
Another two other check boxes at the bottom of the General tab allow you to choose to
have the Merlin EPOS program start up automatically when you turn on the till or
computer, and to automatically shut down Microsoft Windows when you exit the Merlin
EPOS program. This is particularly useful for terminals where no other Windows programs
are used except Merlin EPOS – for example, tills that are only used for Point of Sale
operations.
Checking the first box ensures that once Microsoft Windows has started, the Merlin EPOS
program will load automatically and open at the Operator Login Screen. Checking the
“ Copyright of Merlin Software Ltd. Page 11second box ensures that closing the Merlin EPOS program will also shut down the
operating system, making it safe to turn off the terminal.
Towards the bottom of the tab is a check box that allows you to tell the Merlin system
whether you are using a touch screen for point of sale operations. Checking this box will
mean that the keyboard icon will appear on the main Point of Sale screen, allowing you
access to the special pop-up keyboard (see Keyboard Icon for further details).
The final check box allows you to set the system's Inactivity Time-Out. If this box is
checked, the terminal will automatically revert to the Login Screen after three minutes of
inactivity. This is designed to safeguard the security of the Merlin system, so that
terminals are not left 'open' unnecessarily.
Printer
The Printer tab contains the settings details for the Printer that is linked to your terminal.
You can also use this screen to choose to have the terminal print out a receipt for every
transaction if necessary.
To specify a printer, click on the down arrow to the right of the 'Printer' field and select from
the drop-down list that appears. For details of setting up your printer to work with the
Merlin EPOS program for the first time, see the Printer Setup section.
You should not need to change any of the other settings in this tab.
Customer Display
The Customer Display tab contains the settings for the Customer Display. There is a check
box at the top of the tab that you can use to tell the system whether you are actually using
a Customer Display or not.
You should not need to change any of the other settings in this tab.
Cash Drawer
The Cash Drawer tab contains the settings for the Cash Drawer. There is a check box at
the top of the tab that you can use to tell the system whether you are actually using a Cash
Drawer or not.
You should not need to change any of the other settings in this tab.
EFTPOS
The EFTPOS (Electronic Funds Transfer at Point of Sale) tab relates to any Credit or Debit
Card settings that your terminal may have. There is a check box at the top of the tab that
you can use to tell the system whether you are actually using an EFTPOS facility or not.
You should not need to change any of the other settings in this tab.
“ Copyright of Merlin Software Ltd. Page 12Receipt The Receipt tab contains the settings for format of the Till Receipts that your terminal will print. This tab allows you to specify either a 40 column or an 80 column printer for your receipts. It also contains a check box which will determine whether or not your company address prints out on each receipt. There is also a field for you to enter a message which will also appear on every receipt. This may be a 'Welcome' message, or a 'Please call again' message. You can then preview your message to see exactly how it will look on your company receipts. “ Copyright of Merlin Software Ltd. Page 13
Salesperson Setup
This screen allows you to set up, and maintain, the details of the people who will be
operating the Merlin EPOS system. It can be accessed from the Point of Sale using the
Till Setup button.

You will need to enter a different code for each Salesperson (or operator) who will be
using the system. This code can be up to 3 characters long, and usually consists of the
initials of the Salesperson – something easy to remember.

This screen also allows you to set up, and maintain, the details of any Supervisors or
Administrators on the system. For the difference between a Supervisor and an
Administrator, see General Notes on Supervisor Functions.

                                 To set up a Salesperson

To create a new Salesperson on the Merlin EPOS system, click the New button. This will
empty all fields so that you can enter your new data.

Enter a code to represent the Salesperson (up to 3 characters). This usually consists of
the person's initials - something easy to remember.

Enter the name of the Salesperson that the code relates to (up to 30 characters).

Select the Access Level for this particular Salesperson - note that you must select 1, 2 or 3
to proceed. These relate to the way that you have set up the Access Levels using the
Merlin Back Office program.

If the person does not need to have access to supervisory functions within the system,
then this is all you need to do. Simply click the Save button to store the information and
proceed.

If you make a mistake at any point in the setup, you can start again by clicking Clear.

“ Copyright of Merlin Software Ltd.                                                 Page 14
To set up a Supervisor/Administrator To create a new Supervisor or Administrator on the Merlin EPOS system, click the New button. This will empty all fields so that you can enter your new data. Enter a code to represent the person (up to 3 characters). Enter the name of the person that the code relates to (up to 30 characters). Select the Access Level for this particular person. Note that you must select 1, 2 or 3 to proceed. Check the Supervisor and/or Administrator box (see General Notes on Supervisor Functions for details). Enter a password (up to 8 characters). This is the same whether the person has Supervisor or Administrator access rights on the system. Once you have completed the setup, click Save. “ Copyright of Merlin Software Ltd. Page 15
OPERATIONAL TERMS

                                      Training Company
When you load the Merlin EPOS program, you will be presented with a small screen
prompting you to select a Company. It should resemble the following:

At this screen, you have the option of choosing either the 'real' Company or the Training
Company. Your company name will appear in the 'real' Company box, once the system is
configured correctly. The system will default to the 'real' Company.

The Training Company is something that users of our systems have found exceptionally
useful over the years.

The Training Company program is identical in every way to the 'real' Company mode -
except that using it does not alter any of the 'live' company data that you depend upon for
your business information.

This means that users are able to 'practice' using all aspects of the system without ever
affecting any of the vital trading data of the business.

It is especially suitable for use when training new members of staff in the use of the
system, or when you need to give yourself a 'refresher' course on certain system functions.

“ Copyright of Merlin Software Ltd.                                                Page 16
Keyboard Icon
Note: the keyboard icon will only appear if you have set up the system for touch
screen operation in the Terminal Details tab of the POS Terminal Setup program.
Throughout the Merlin EPOS system, you will encounter the following icon:
The reason for this is that Merlin is a fully flexible Electronic Point of Sale program. It has
been designed to operate on any hardware - standard PC, PC-based till or Touch-Screen.
Although the keyboard can be accessed by clicking the mouse cursor on this keyboard
icon, it has been included specifically for users of Touch-Screen terminals.
Touch-Screen terminals make operation very easy, until you have to input text or numbers
quickly. However, the Merlin EPOS system is different.
If you are using a Touch-Screen terminal at the Point of Sale, this icon gives you access to
the special on-screen keyboard shown below:
This keyboard can be accessed at any point where you need to input text. It is the
equivalent of a standard QWERTY keyboard, except that the keys are large enough for
easy and quick Touch-Screen use. It even has cursor keys and Function Keys, and can be
cancelled at any point using its ESCAPE key.
If you only need to input numbers (when performing a Price Change, for example), then
the Merlin EPOS system realises this, and keyboard will resemble the smaller one shown
below:
This smaller keyboard is based on the number pad on a standard
QWERTY keyboard, and is designed to make number input easy
and fast on a Touch-Screen terminal. It has its own ENTER key to
input the numbers, and can be cancelled at any point using its
ESCAPE key.
Note: the keyboard icon will only appear if you have set up the
system for touch screen operation in the Terminal Details tab of
the POS Terminal Setup program.
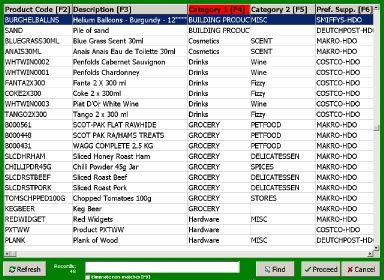
“ Copyright of Merlin Software Ltd. Page 17Main Point of Sale Screen A term that you will frequently encounter when using the Merlin EPOS help file is 'the main Point of Sale screen'. This term literally refers to the screen from which all the Point of Sale operations take place. It is the screen that most operators will see most of the time, and is pictured below. Note that the screen you see may differ slightly from the one shown. There may be less buttons in the row at the bottom of the screen. This is because the Merlin EPOS system is completely flexible, and allows you to set up different Access Levels for different users of the system. A user who did not have access to the Customer Account and Set Aside functions, therefore, would have spaces in this row of buttons. Only the buttons representing the functions that the user can access will appear on the main Point of Sale screen. Wherever possible, the Merlin EPOS help file will guide you through operational procedures starting from this screen. It will also tell you the colour of the keys that you need to press, to make them easier to spot. Note: for more information on colours relating to the different types of keys, see the Key Colours section. “ Copyright of Merlin Software Ltd. Page 18
Main Transaction Window
A term that you will frequently encounter when using the Merlin EPOS help file is 'the
main Transaction Window'.

This term refers to the large area within the main Point of Sale screen which displays all
the details of the current transaction.

Upon commencing Point of Sale operations, the main Transaction Window will be empty,
as below:

All details of the transaction currently in progress are contained in the main Transaction
Window. This includes details of all the products that make up the sale, including the
quantities and Pack Sizes relating to those products, any Discounts or Special Offers that
the customer is entitled to, any Voided lines, etc., etc.

The area at the bottom of the window reflects the current total value of the transaction.

It is the on-screen equivalent of the customer's receipt.

It also displays details of the amounts allocated to each payment type when you are taking
a multi-media Payment (see Taking Payment).

Note: the Merlin EPOS system works using 'accumulative invoicing'. This means that a
customer purchasing five of the same item will not see five separate lines on their receipt,
but rather one line with '5' in the quantity field. This also relates to the main Transaction
Window, as the operator sees what will eventually appear on the customer receipt.

“ Copyright of Merlin Software Ltd.                                                 Page 19
Key Colours
The Merlin EPOS system uses different coloured keys to denote different types of
functions.

As a general rule, the following colour scheme applies:

                        General functions, & Function Keys.

                        Payment keys.

                        Supervisor Functions.

                ENTER and EXIT keys.

You may encounter other colours of keys when using the Merlin EPOS system, but as a
general rule, the above scheme applies.

“ Copyright of Merlin Software Ltd.                                            Page 20
Function Keys
Throughout the Merlin EPOS system, and the help file, you will see references to the use
of the Function Keys.
These are the keys at the very top of a standard QWERTY keyboard, or at the top of the
special Electronic Point of Sale keyboards designed by Merlin Software Ltd.
Use of these Function Keys remains standard throughout the system, and the rules are as
follows:
F1: Help key. Press this at any time, and you will
receive context-sensitive help on whatever system
function you are performing.
F2: Datasearch key (see F2 Datasearch key for
further details). Pressing this key will allow you to
select a record from the list presented. This works
for stock, customer records, etc.
F3: Clear Record key. This key clears the field
you are currently using to enter data.
F4: Delete Record key.
F5: First Record key. Pressing this key while
searching for stock or customer records will jump
to the first record in the database.
F6: Last Record key. Pressing this key while
searching for stock or customer records will jump
to the last record in the database.
F7: Previous Record key. Pressing this key while
searching for stock or customer records will move
back to the previous record in the database.
F8: Next Record key. Pressing this key while
searching for stock or customer details will move
on to the next record in the database.
F9: Find Record key.
F10: Save Record key.
“ Copyright of Merlin Software Ltd. Page 21Passwords
Passwords are an important part of the Merlin EPOS system, as they provide protection
against the abuse or misuse of Supervisor and/or Administrator Functions. For further
details of these functions, see General Notes on Supervisor Functions.
Passwords for Supervisors
If you are a Supervisor, a box will appear every time you Log In to the system, prompting
you to enter your Supervisor Password.
This box will appear whether you simply Log In from the main Login Screen, or by
scanning a Supervisor Card.
Passwords for Everyone
The Merlin system can also be set up so that each Salesperson enters a Password as
they Log In. This is done simply by entering a Password (up to 10 characters) in the
Password field of the Salesperson Setup screen. The person does not need to have
Supervisor or Administrator privileges, but the system will still ask for a Password each
time they Log In.
“ Copyright of Merlin Software Ltd. Page 22Login Screen This is the main Login Screen, which will appear each time the Merlin EPOS program is loaded. The system will also revert to this screen whenever an operator Logs Out of the Point of Sale (see Logging Out & Shutting Down). You can choose to have the Merlin EPOS system start up at this screen automatically when you turn on the till or computer (see Terminal Details). To begin Point of Sale operations, you need to enter a Salesperson Code in the box provided. This is an individual code which is set up for each Salesperson by a system Administrator (see Salesperson Setup). Note: the system is set up with an initial Salesperson Code of SUP and Password of SUPER. This allows you to get into the system initially, but needs to be changed once users are set up, for security reasons. Entering your Salesperson Code will prompt the system to display your name in the Salesperson Field alongside the code. This name will be linked to each transaction performed on the system, allowing mistakes and/or abuses to be tracked. Depending upon your status, the system may ask you for a password. If it does, enter your password in the box, then proceed. Note: both of these procedures can be performed using the keyboard icon if you are using a touch screen terminal at the point of sale. “ Copyright of Merlin Software Ltd. Page 23
The system will then display the main Point of Sale screen:

You are then ready to commence Point of Sale operations. See Selecting a Product for
details of how to do this.

“ Copyright of Merlin Software Ltd.                                           Page 24
POINT OF SALE OPERATIONS

                                      Selecting a Product
Once you have Logged In, and you are in the main Point of Sale screen, the cursor
defaults to the Product Field (shown below) ready for a sales transaction.

From here, there are several ways to select a product using the Merlin EPOS system.

                                      Scanning Barcodes

The easiest way to select a product is to scan its barcode.

The system is designed to be used predominantly with barcodes, so this will probably be
the most common method you use for product selection. The system recognises the
barcode and enters the appropriate product in the main Transaction Window so that you
can check the details of the sale.

Once you have scanned the barcodes of all the products that the customer wants to buy,
press the Payment key to take payment (see Taking Payment).

                                       Using Hot Keys

Another quick way to select a product is by using a Hot Key.

Simply press the appropriate key on the keyboard, and the product will be entered into the
main Transaction Window so that you can check the details of the sale. The Hot Key
function is designed for use with your fastest moving product lines, and is especially useful
for items such as Daily Newspapers, Cigarettes or popular confectionery items.

To take payment for the sale, press the Payment key (see Taking Payment) and proceed
as normal.

                               Entering the Product Code

If you know it, you can also type in the Product Code in the Product Field.

“ Copyright of Merlin Software Ltd.                                                Page 25
The Product Code is the code that you give to each product on your system so that you
can identify it. Entering the Product Code at the Point of Sale will only be an option for
frequently sold items or items with obvious codes. Staff may remember the codes for
frequently sold items, whereas obvious codes (such as MARS for a standard Mars Bar)
are easy to remember.
If you choose this method of product selection, then you must press the ENTER key to
activate the sale. The product will then be entered into the main Transaction Window so
that you can check the details of the sale. To take payment, press the Payment key (see
Taking Payment).
Using the Stock Button
If you do not know the Product Code, or do not have the barcode available, you can also
use the Stock button.
The Stock button is green, and is located in the bottom left hand corner of the main Point
of Sale screen. Pressing this button will bring up a further row of buttons - the Stock
Search buttons:
These buttons perform the following functions:
FIRST STOCK: Shows the first item in the stock file.
PREV. STOCK: Shows the previous item in the stock file.
NEXT STOCK: Shows the next item in the stock file.
LAST STOCK: Shows the last item in the stock file.
FIND NEAREST: Shows the Product Code nearest to the
data currently entered in the Product Field.
SEARCH STOCK: Shows the Select a Stock screen - the
equivalent of pressing the F2 Datasearch key.
CLEAR STOCK: Clears all the data currently entered in the
Product Field.
STOCK ENQUIRY: Shows information about the product specified.
See Stock Enquiry for details.
Using the F2 Datasearch Key
If you do not know the product code or do not have the barcode available, you can also
use the F2 Datasearch key to find the product you need (see F2 Datasearch Key).
“ Copyright of Merlin Software Ltd. Page 26Hot Keys
The Merlin EPOS system allows you to set up special Hot Keys, which make it as easy as
possible for you to sell your fastest-moving items.
The system allows you to allocate a stock item to each of the alphabet keys on the
keyboard that you are using (this works for both standard PC keyboards and dedicated
EPOS keyboards).
At busy times, you can then sell that product by simply pressing the relevant key, rather
than having to handle the product and scan in its barcode.
Note : if your system is Touch-screen enabled, the hot keys can be
accessed by the 'Show Selector' button.
This will display a grid of 36 buttons with the Product Codes displayed on the 'live' buttons.
The grid can be hidden again by pressing the 'Hide Selector' button.
Local & Global
The Merlin system provides two settings for Hot Keys - Local and Global, and these can
be selected at the point of sale using the 'Change Mode' key. A blue or red marker will
appear at the top of the point of sale screen to remind you which mode you are currently
using.
Local mode allows you to set up Hot Keys that will only apply to one
particular till. This must be done at the point of sale through the Hot Key tab of the Till
Setup function, and the till must be set to 'Local' mode for the settings to take effect. This
can be useful when one particular till is responsible for sales of a particular typeof fast-
moving product - such as cigarettes. The Hot Keys on this till can be set up independently
of those that apply to other tills.
Global mode allows you to set up Hot Keys that will apply to all the tills on
your system. This must be done in the Back Office using the Hot Key Setup option from
the EPOS Menu. Using this mode, all the tills on a system will have exactly the same Hot
Keys, which can be useful in multi-till stores.
Note: for Hot Key changes made in the Back Office (Global) to take effect, the user at the
point of sale will need to log out and then re-log in to the system. Changes will not take
effect until this has taken place.
Note: the Hot Key function will only work if the system is set to either the Local or Global
Hot Key Mode. You can alternate between Normal, Local and Global Modes on the system
by pressing Ctrl+Y, or using the 'Change Mode' key on the special EPOS keyboards
designed by Merlin Software Ltd.
When set to Normal Mode, the marker box will disappear, and the box will simply appear
as a normal part of the grey bar at the top of the screen. Normal Mode allows you to sell
items by typing in their Product Codes (see Selecting a Product).
“ Copyright of Merlin Software Ltd. Page 27Quantities To sell a quantity of the same item at the Point of Sale, you do not need to scan the barcode of every single product. Press the Qty X key from the row of buttons at the bottom of the main Point of Sale screen. A box will appear prompting you to enter the appropriate quantity of items: Simply type the quantity in the box and press either OK or ENTER. The system will return you to the main Point of Sale screen. You will notice that an orange box has appeared below the Product field containing the quantity that you specified. The next item entered at the Point of Sale will be automatically multiplied by that amount. This is true regardless of the method that you use to select the product (see Selecting a Product). You will notice that the quantity appears in the main Transaction Window - it will also appear on the customer's receipt. Note: if the customer has a number of items that are the same but are not entered at the Point of Sale at the same time, the Merlin EPOS system will add these items to the quantity field in the main Transaction Window. It will not add another product line for an item which has already appeared. The main Transaction Window, therefore, resembles the receipt that the customer will receive after they pay for their goods. “ Copyright of Merlin Software Ltd. Page 28
Taking Payment
When the sale is complete, and you are ready to take payment for the goods, press the
white Payment button in the row of buttons at the bottom of the main Point of Sale screen.
This will bring up the Payment Screen, and you will be required to select a payment type
for the transaction.

The different payment options are listed across the bottom of the Payment Screen: CASH,
CHEQUE, CREDIT CARD, VOUCHER/COUPON, CREDIT NOTE and CURRENCY.

Depending upon the type of transaction you are currently processing, there may also be
an option to charge the transaction to a Customer Account (see Account Sales).

Selecting a payment type is as simple as pressing the appropriate button. Enter the
amount tendered, then press the ENTER Key. If the Merlin EPOS system is set up to
pause after each transaction (see Terminal Details), the screen will pause. This will have
the effect of holding the change total on the screen for you to check. You will then press
the ENTER key again to begin the next transaction.

If the system is set up not to pause after each transaction, it will revert to the main Point of
Sale screen ready for the next transaction.

In both cases, the system requires the Cash Drawer to be closed before another
transaction can be started.

The Merlin system allows you to take 'multi-media' payments for any transaction. This
means that customers can pay by any combination of the payment options available.
Simply press the appropriate Payment Key, then enter the amount tendered in that form
and press the ENTER Key. The system will register the amount paid and the form of
payment in the main Transaction Window, and will wait for payment for the remaining
balance. Perform the same routine for each method of payment, until the balance is paid.

If you have set up different exchange rates (see Exchange Rate Setup), the system also
allows you to take payment for the goods in other currencies. Press the CURRENCY key
on your EPOS keyboard or Ctrl + Q on your standard PC keyboard and a screen will be
displayed containing all the currencies that are available to use. See the section on taking
payment in Different Currencies for more details.

Select the currency required and the system will return you to the main Transaction
Window. You will still have to specify a payment method (CASH, CHEQUE, etc.), but the
value of the transaction will appear in the selected currency. Change will be given in the
normal operating currency - usually Sterling.

Note: to return to the sale from the payment screen, press the Return to Sale button
located in the bottom right hand corner of the screen.

“ Copyright of Merlin Software Ltd.                                                   Page 29
Taking Payment in Different Currencies
When the sale is complete, and you are ready to take payment for the goods, press the
white Payment button in the row of buttons at the bottom of the main Point of Sale screen.
This will bring up the Payment Screen, and you will be required to select a payment type
for the transaction.

You will notice that one of the Payment keys is marked Currency. The Merlin EPOS
system allows you to set up different Currencies and Exchange Rates, so that you can
take payment in whatever Currency you choose. For details of how to set up Currencies
and Exchange Rates, see the Exchange Rate Setup section.

To take payment in a Currency which is different to the one you usually use, press the
Currency button when you are ready to take Payment. This will bring up a screen
resembling the following:

From this screen you can select the Currency in which the customer wishes to pay for their
goods. You can select the required Currency using the cursor keys or pressing the
appropriate letter key on the keyboard. You can also click on the required Currency with
the mouse cursor.

This will return you to the main Point of Sale screen, and you will notice that a flag
representing the chosen Currency appears alongside the main Transaction Window.

This shows that the system is ready to take payment for the sale in that particular
Currency, at the Exchange Rate that you have set (see Exchange Rate Setup in
BackOffice). You will still have to specify a Payment type (Cash, Cheque etc.), and then
proceed to take payment for the goods in the normal way.

“ Copyright of Merlin Software Ltd.                                                Page 30
Quick Payment
This screen allows you to set up buttons for certain cash amounts that appear on the
Merlin EPOS screen. Although this feature is based mostly for use with a touch screen, if
the till has a mouse attached this functionality can be quite useful. The set up screen can
be accessed from the Point of Sale by clicking on the Supervisor Functions button followed
by Till Setup.

For the new buttons to appear on the Point of Sale the box has to be ticked. As you can
see you can have up to eight different values set up. These values are added in pence.
When you are happy with the way they are set up click Ok at the bottom of the Till Setup
window. This will then take you back to the main Point of Sale window. You will notice that
the buttons have not appeared anywhere. These will become visible when a product is
entered into the Sale Window. Your screen will then look like this.

This buttons are designed to speed up transactions on a touch screen. The values here
are shown in pounds are generally the amount of the main bank notes in circulation or
large coin amounts such as the £2 coin. To sell the item simply click on the amount and
the change is shown just as you would normally enter the amount received from the
customer.

“ Copyright of Merlin Software Ltd.                                               Page 31
Selecting Pack Sizes
The Merlin EPOS system allows you to set up Stock items to have different Pack Sizes.
This means that if you buy a Product in bulk, you can then split it up for sale as different
sized packs of the same Product.

An example would be 330ml cans of fizzy drinks that you buy in crates of 24 cans. The
Merlin EPOS system will allow you to sell these cans as single units, or in packs of
whatever quantities you choose. In this example, you might sell the cans in packs of 4, 6,
12, 18 and 24 - as well as singly.

Pack Sizes also relate to Products such as seed or pet food, that you can divide up into
packs of differing weight. Pack Sizes have been included in the Merlin EPOS system to
make it as flexible as possible, so that you can configure the system to truly suit your
business.

For further details on Pack Sizes as they relate to Back Office functions, see the Pack
Sizes section of the Merlin Back Office Help File.

                            Selling Products by Pack Size

If you are selling a Product that has different Pack Sizes, a screen resembling the
following will appear once you have selected the Product (see Selecting a Product).

You can select the Pack Size that you require by using the cursor keys or the tab key, or
by clicking on the one you require with the mouse cursor. This will return you to the main
Point of Sale screen, and the sale continues as normal. You will notice that the Pack Size
you selected appears in the main Transaction Window alongside the product's EPOS
description.
                              Pack Sizes in Special Offers

You will also encounter Pack Sizes when setting up Special Offers, because the Merlin
system allows you to choose whether to include in the offer all the different Pack Sizes that
exist for that Product, or just certain ones. For more information, see the Special Offers
section of the Merlin Back Office Help File.

“ Copyright of Merlin Software Ltd.                                                  Page 32
Products Sold By Weight, Volume, Length Or Area The Merlin EPOS system allows you to sell products not only as individual units, but also by Weight, Volume, Length or Area. Merlin will cope with all of these, and will even allow you to set Pack Sizes to more easily sell standard quantities. For details of setting up products to sell by Weight, Volume, Length or Area, consult the Merlin Back Office Help File. If a product is sold by any of these measurements, an extra step is needed to process the transaction at the Point of Sale. The product is entered in the normal way (see Selecting a Product), but once it has been selected, a box will appear prompting you to enter the quantity of the product that is being sold. The above example is for a product sold by weight. The user needs to input the actual weight that is being sold, and the box notifies them of the item's price. Alternatively you can enter by price and the box will notify you of the weight being sold. You can pick the relevent pack size or measurement. This principle applies to all products sold by Weight, as well as those sold by Volume, Length or Area. Instead of the Pack Size, the main Transaction Window will show the quantity bought, and the price per unit of the product. “ Copyright of Merlin Software Ltd. Page 33
Printing & Reprinting Receipts
These two functions are grouped together for convenience, and both are very simple to
operate.
Printing a receipt
To print a receipt for the customer after taking payment for a sale, simply wait until you
have completed the sale, then press the Print Receipt button when the system reverts
back to the main Point of Sale screen. The system will print a receipt for the last
transaction performed on that terminal.
The system can be configured to automatically print a receipt for every transaction. To set
the system to do this, see Terminal Details.
Reprinting a Receipt
To reprint a receipt at any time, press the More key located in the bottom right hand corner
of the main Point of Sale screen. This will display a further selection of buttons - the
Reprint button is located in the bottom left hand corner of this screen.
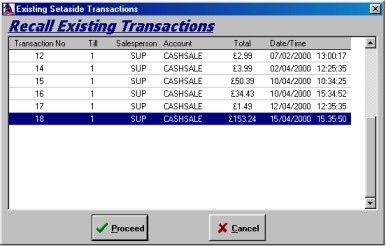
Pressing the Reprint button will bring up a screen allowing you to select the transaction for
which a receipt is required.
You can search for the appropriate transaction by the Transaction Number, the Till
Number, the Salesperson responsible for the sale, the name of the Account that the sale
was allocated to, the Total of the sale, and the Date and Time of the sale.
Once the transaction is selected, press Proceed. The system will ask whether you want to
print the transaction to the screen. Pressing Yes will bring up on the screen an exact copy
of the receipt for the transaction.
“ Copyright of Merlin Software Ltd. Page 34You can scroll down this and find the information required - just as you would look down a printed receipt. If you are only looking for a particular detail, this can save you having to waste paper each time you need to check a past receipt. Pressing No will send the reprinted receipt to the printer. “ Copyright of Merlin Software Ltd. Page 35
Viewing Transactions
With its powerful use of graphics, the Merlin EPOS system allows you to view details of
certain transactions on the screen exactly as though you had printed them out and were
reading a receipt or report.
This feature can be used when looking at the receipt for a previous transaction (see
Printing & Reprinting Receipts), or when using the Till Reconciliation function.
It is particularly useful for viewing long reports (such as Till Reconciliations) that you may
not need to print out at the time. If you are searching for a particular detail, and do not
need to print out the full report, then you can access the information you require quickly
and easily - and without wasting paper.
When viewing the receipt for a previous transaction, the screen will resemble the following.
This box enables you to see an exact on-screen copy
of the receipt that the customer received, and lets you
scroll down the receipt to view all of it.
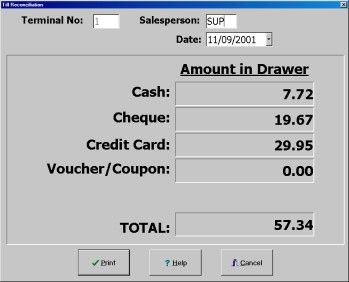
When printing a Till Reconciliation to the screen rather
than the printer, the box that you see will resemble the
following.
This box allows you to see the contents of the
Cash Drawer for that particular terminal in as much
detail as you require. It is an exact replica of the
Till Reconciliation report that you would have
printed out, and you can scroll down the report to
view all of it.
“ Copyright of Merlin Software Ltd. Page 36F2 Datasearch Key
The F2 Datasearch key is one of the most useful keys in the entire Merlin EPOS system.
If at any point within the program you need to search for a record (either a stock item, or a
customer record), then this key will prove to be very valuable.
Having this key at your disposal will mean that you can always sell every product that
exists on your system - regardless of whether the barcode exists or not, whether you are
not sure what the product is, or any other reason.
Pressing the F2 Datasearch key brings up a fully customisable screen from which you can
select any item of stock that exists on your system.
Customising the Search
You can configure the Stock Search screen to change the order in which the information is
displayed. This can be done by clicking with the mouse in the header of the column that
you wish to move and, with the mouse button pressed, dragging it to the position where
you would like to have it. You can also expand and contract the width of the columns by
placing your cursor on the right hand edge of the header where it will change to a double
arrow. You can then click and drag to change the width.
Finding a Product
In the Stock Search screen, you can choose to search for the product in a number of
different ways. The first of these is by using the Function Keys.
Because you can configure the screen as described above, the contents of the columns
Each of the different columns have a Function Key stated next door to the title. For
example you can sort on the Product Code by pressing F2 and on Category 1 by pressing
F4.
“ Copyright of Merlin Software Ltd. Page 37You can also select any of these by clicking the mouse cursor on the appropriate tab at the top of the screen (the selected tab will be red in colour). Once you have chosen one of the above methods to search the stock database, you can quickly jump to the item you are looking for by typing the first few letters into the Search Text box at the bottom of this screen. Alternatively, you can simply scroll down the screen until you reach the item you are looking for. Once you have found the item you are looking for, press the Proceed key. The system will return you to wherever you were in the Merlin EPOS program before you pressed the key, and the item that you selected will appear in the appropriate field. Note: in certain fields, pressing the F2 Datasearch key will bring up the Customer screen. This allows you to search through all the Customer records held in the database. The Customer screen works in exactly the same way to the Select a Stock screen. “ Copyright of Merlin Software Ltd. Page 38
Setting Aside a Transaction
The Merlin EPOS system allows you to easily set a transaction aside for completion at a
later time. This is especially useful if a customer realises that they have forgotten
something just as you are ready to take payment for the sale, or if they realise that they do
not quite have enough money to afford the goods, and need to return for them when they
do.

The Set Aside function allows you to place the sale to one side, and continue serving other
customers.

Transactions that have been Set Aside are held on the Back Office Server. This makes the
facility more convenient, because Set Aside transactions can be accessed by any
operator using any terminal on the system, meaning that customers can complete their
transactions at any till.

Note: Set Aside is a 'Real-Time' system function, and is only available when the
Back Office Server is on-line to the network. The mechanics of the function mean
that transactions cannot be Set Aside or recalled when the Server is off-line for any
reason.

Transactions that have been Set Aside are kept indefinitely within the system. It therefore
does not matter how long the customer takes to return for their goods, though it is good
practice to clear out these Set Aside transactions on a regular basis. Doing this makes it
easier to find current transactions when recalling them to complete the sale.

Note: if there are transactions that have been Set Aside on your system,
the Set Aside button in the row at the bottom of the main Point of Sale
screen will change to show you this.

                               To Set Aside a Transaction

It is very easy to Set Aside any transaction. Simply select Set Aside from the row of
buttons at the bottom of the main Point of Sale screen. The system will ask you for
confirmation that you truly wish to set the transaction aside. Pressing Yes will return you to
the main Point of Sale screen ready to begin the next transaction.

If you find that you need to set a transaction aside when you have reached the Payment
screen, press the Return to Sale key located in the bottom right hand corner of the
payment screen. This will return you to the main Point of Sale screen, which will still show
the details of the current transaction. then, simply press Set Aside, and proceed as above.

                         To Recall a Set Aside Transaction

To recall any transaction that has been Set Aside, make sure that there is no data in the
Product field of the main Point of Sale screen. Press the Set Aside button, and a screen
will appear containing the details of all the transactions that have previously been Set

“ Copyright of Merlin Software Ltd.                                                 Page 39
You can also read