Employer Services Online (ESO) Training Notes - CSS and PSS - ETN CSS/PSS01 04/12
←
→
Page content transcription
If your browser does not render page correctly, please read the page content below
ETN CSS/PSS01
04/12

  Employer Services Online (ESO)
   Training Notes – CSS and PSS

                March 2012

                                   1 of 61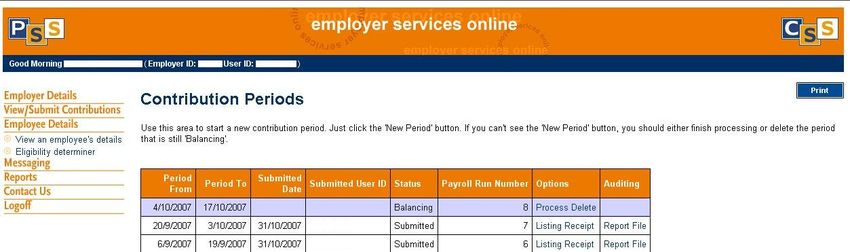
EMPLOYER TRAINING NOTES

Table of contents
TABLE OF CONTENTS............................................................................................................... 2
1       INTRODUCTION................................................................................................................... 4
     1.1    What is ESO?............................................................................................................................... 4
     1.2    How does ESO work? .................................................................................................................. 4
     1.3    About this training guide............................................................................................................... 5
       1.3.1    Symbols................................................................................................................................ 6
2       START USING ESO ............................................................................................................. 7
     2.1        How secure is ESO? .................................................................................................................... 7
     2.2        Registration .................................................................................................................................. 7
     2.3        Logging on.................................................................................................................................... 8
     2.4        How to get a new access number ................................................................................................ 9
     2.5        Getting around ESO ................................................................................................................... 10
     2.6        Logging off when you’re finished................................................................................................ 10
3       WHAT TO DO WHEN A NEW EMPLOYEE STARTS........................................................ 11
     3.1        Using the Eligibility Determiner .................................................................................................. 11
     3.2        Adding a new PSS or CSS member........................................................................................... 15
4.      VIEWING EMPLOYEE DETAILS ....................................................................................... 16
     4.1        How to search for an employee.................................................................................................. 16
     4.3        What sort of membership does an employee have? .................................................................. 18
CONTRIBUTIONS...................................................................................................................... 21
     5.1     Creating a new contribution pay period via a PIF....................................................................... 23
     5.2     How to create a new contribution pay period for a non-PIF agency........................................... 25
     5.3     Navigating through the grid ........................................................................................................ 27
       5.3.1      Menu buttons...................................................................................................................... 27
       5.3.2 Moving from page to page ........................................................................................................ 28
       5.3.3      Searching ........................................................................................................................... 28
       5.3.4 Grid buttons.............................................................................................................................. 29
       5.3.5      Sorting grid results ............................................................................................................. 29
     5.4     Saving ........................................................................................................................................ 30
       5.4.1      To save a contribution pay period ...................................................................................... 30
       5.4.2      Continue working on a contribution you have saved.......................................................... 32
       5.4.3      If you make some mistakes................................................................................................ 32
     5.5     Adding a new employee to the grid ............................................................................................ 32
       5.5.1      Adding a returning PSS member or CSS member to the grid for non-PIF agencies ......... 33
     Finalising (ceasing) employees.............................................................................................................. 34
       5.6.1      Re-activating an employee................................................................................................. 36
     5.7     Deleting an employee................................................................................................................. 36
       5.7.1      If you delete a member by accident ................................................................................... 37
     5.8     Updating employee details and fixing errors .............................................................................. 37
       5.8.1      Correcting a membership number...................................................................................... 39
     5.9     Calculate .................................................................................................................................... 39
     5.10 Submitting your contribution....................................................................................................... 40
     5.11 Sending money to CSC via ComSuper ...................................................................................... 42
       5.11.1     Payment by direct credit..................................................................................................... 42
       5.11.2         Payment by Cheque ....................................................................................................... 42
     5.12 Listings for previous contributions .............................................................................................. 42
     5.13 Receipts for previous contributions ............................................................................................ 43
     5.14 Auditing Report/File.................................................................................................................... 43

                                                                                                                         March 2012 | Page 2 of 61

                                                                                                                                                              2 of 61
EMPLOYER TRAINING NOTES

6      INTERACTING WITH CSC AND COMSUPER .................................................................. 45
    6.1    Messaging .................................................................................................................................. 45
      6.1.1    Reading old messages....................................................................................................... 45
      6.1.2    Sending a message............................................................................................................ 46
    6.2    Email .......................................................................................................................................... 46
7      CHANGING HOW EMPLOYER CONTRIBUTION PAYMENTS ARE MADE .................... 47
APPENDIX 1—ERRORS ........................................................................................................... 48
    ‘Import’ errors and how to fix them......................................................................................................... 48
    ‘Import’ errors ......................................................................................................................................... 49
    ‘Submit’ and ‘Save’ errors and how to fix them ...................................................................................... 54
APPENDIX 2—SYSTEM REQUIREMENTS.............................................................................. 55
APPENDIX 3 - ESO ACCESS - RESPONSIBILITIES AND USEFUL INFORMATION ............ 56
APPENDIX 4—ELIGIBILITY DETERMINER ............................................................................. 58
APPENDIX 5—PIF SPECIFICATION ........................................................................................ 59
5—GLOSSARY OF ABBREVIATIONS ..................................................................................... 60

                                                                                                                        March 2012 | Page 3 of 61

                                                                                                                                                             3 of 61
EMPLOYER TRAINING NOTES
1 Introduction
1.1 What is ESO?
ESO is a simple and efficient way for you to work with CSC and ComSuper. It is a secure, easy-
to-navigate online environment that enables us to give you a high level of support for important
and complex superannuation matters. It also assists you to:
determine which scheme employees should join
view your employees’ superannuation details
quickly submit and correct member information and contributions
ESO allows you to validate your data before you send it to us: the system will let you know if
you have made any errors and tell you what you need to do to fix them. This will speed up the
process of getting your money and data to us on time.
If you are starting new employees, ESO greatly simplifies the process of deciding which scheme
they should join. ESO's online Eligibility Determiner asks you to enter some basic information
about your new employee, then searches the ComSuper internal databases to find out whether
they should be in the PSS or CSS. Using the Eligibility Determiner will help you to put new
employees into the right scheme or plan, and will save you a lot of work restarting members
who may have been wrongly assigned memberships.
By using ESO, you can be sure you give us the correct information so we can provide services
and benefits for your employees.
Note that employers will only be able to access the data they need to maintain correct records
and submit contributions. Employers will not have access to their employees’ insurance or
investment choice options.
Please Note: As of 11 February 2012 ComSuper no longer administers the PSSap. All enquiries
relating to the PSSap will need to be forwarded to Pillar Administration at
employers@pssap.com.au. You can also contact Pillar on 1300 308 806.
1.2 How does ESO work?
This training package will tell you how to use this facility to submit employer data for the PSS
and CSS schemes to ComSuper.
Data can be loaded onto ESO in two ways:
March 2012 | Page 4 of 61
4 of 61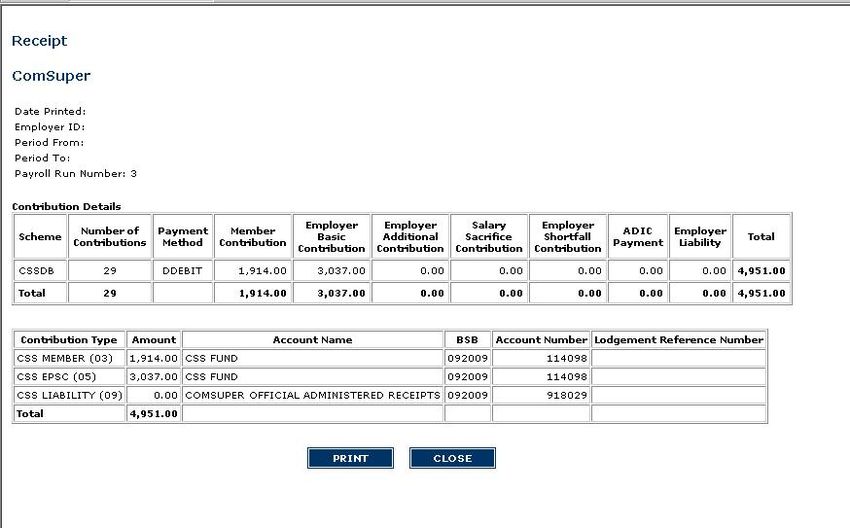
EMPLOYER TRAINING NOTES
1. through the Payroll Interface File (PIF) (generated from your payroll system) or
2. through the contributions grid (manual update).
If your agency has implemented the PIF, information will be extracted directly from your payroll
system and loaded into the contributions grid. If your agency has not implemented a PIF, you
will need to enter data manually into the contributions grid using ESO.
If, at any time, your agency chooses to move from manually updating data, to a PIF, please
notify the Data Administration Officer via the Employer Support Desk on 1300 338 240 or email
dataadmin@comsuper.gov.au .
Fig 1: The data submission process
1.3 About this training guide
This document should be used as your reference when you begin using ESO. This guide gives
a step-by-step instruction on how to use the online facility as well as detailing the processes to
follow.
If you need any additional information or assistance at any time:
– ring the Employer Support Desk on 1300 338 240
– email ComSuper dataadmin@comsuper.gov.au
– visit http://employer.pss-css.gov.au.
These training notes tell you how to:
determine which scheme employees should join
report contributions and employment data
fix errors and warnings
cease employees
March 2012 | Page 5 of 61
5 of 61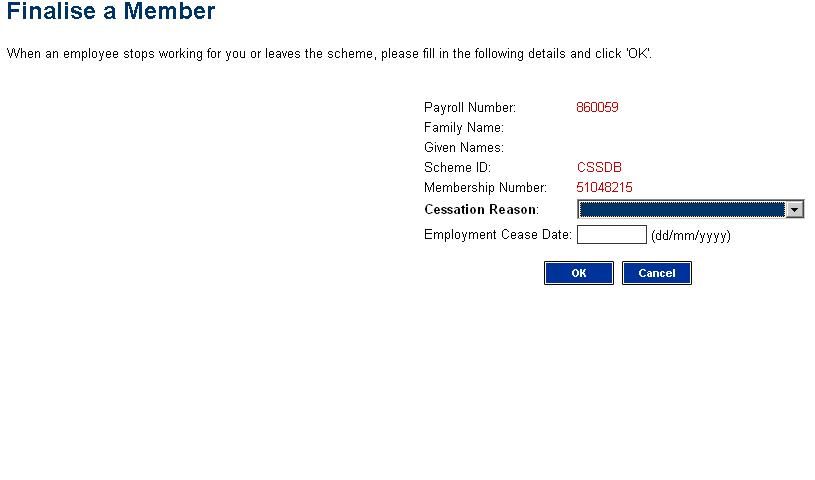
EMPLOYER TRAINING NOTES
1.3.1 Symbols
steps for you to follow
directions for users to update directly onto the contributions grid (no PIF)
useful hints
March 2012 | Page 6 of 61
6 of 61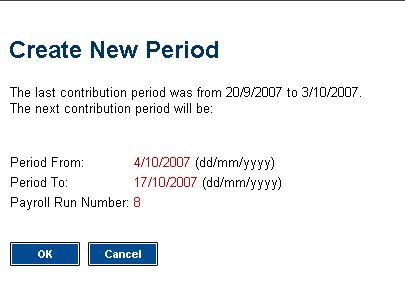
EMPLOYER TRAINING NOTES
2 Start using ESO
2.1 How secure is ESO?
ESO is a web-based system which lets you transfer data and money to ComSuper. Security is
built in to the system to safeguard both the user and the system itself. To maintain ESO’s
security, you must abide by certain conditions and have certain system requirements in place.
You must comply with all of the security requirements stipulated in the “Responsibilities and
Useful Information” that appears when first logging on to ESO (see Appendix 3 to this
document). This information can also be accessed on our website at any time.
While ComSuper has put in place suitable security systems on its Internet site, it is unable to
guarantee in all circumstances that the site or the information contained on the site will not be
subject to unauthorised access. ComSuper will not be liable for any loss, damage, claims and
expenses arising from unauthorised access to the site or the information retained on the site.
We are giving your agency access to the site, so all contributions data should be lodged from
your agency’s computer systems. Access from unauthorised locations, such as a person’s
home, is not acceptable and will not be allowed, as you may be held accountable for breaches
of the Privacy Act 1988.
Website use will be logged on an audit file, together with the specific logon identification and
activities.
ComSuper may remove access if the user fails to use the site or has not used the site for more
than six months. An ESO user access audit is also performed on an annual basis however if a
user(s) no longer requires access to ESO, please forward a completed ESO Registration - User
Access Request/Amendment to User Details form to ComSuper via the following link
http://employer.pss-css.gov.au/documents/forms/esor.pdf.
See Appendix 2 for details of the technical systems requirements for running ESO.
2.2 Registration
Before employers can begin using the online facility they must register their personnel,
identifying needs to be able to:
determine which scheme/plan new employees should join
input new employee data
input/submit fortnightly payroll information
process superannuation contribution payments
correct errors or
Employers have to nominate those personnel who require access to these online services. In
addition, employers must indicate what access a person requires on ESO to do their job.. If the
user requires access to multiple agencies ID’s (e.g payroll provider) then a separate form will be
required for each agency ID.
March 2012 | Page 7 of 61
7 of 61EMPLOYER TRAINING NOTES
The registration form must be completed and signed by your agencies Authorised Approving
Officer then returned to ComSuper before the nominated person(s) can use ESO. The
registration form is available from the Employer Services website at http://employer.pss-
css.gov.au/documents/forms/esor.pdf.
We will initially email the user ID and 5 digit employer ID to the user directly. Shortly afterwards
we will contact the user directly or mail the user their access number (password) by post if
ComSuper are unable to make contact with them by phone.
2.3 Logging on
When you have your employer ID, user ID and access number you can begin using ESO.
To log on to ESO
1. Log on to ESO through your agencies’ Internet facility using the address
http://employer.pss-css.gov.au and follow the link to ESO.
2. Type in your employer ID, user ID, date of birth and access number in the relevant
fields.
The user ID will be made up of the first six letters of the user’s surname (or the full surname if
less than six letters) followed by the first letter of their first given name; for example, David
Johnson’s user ID would be johnsod. If your agency has two users with the same name, the
user IDs will be slightly different.
3. The first time you log on to ESO you will be prompted to change your access number
to something you can easily remember. You will also be required to complete two
secret questions and answers. This will help you get a new access number if you
should forget it (see 2.4).
4. Once you have successfully changed your access number you will need to exit that
screen and log on to ESO again. When you log in, you will see a disclaimer window
which lists responsibilities when using the service (see 2.1).
Read the “Responsibilities and Useful Information” and click ‘Accept’. If you click ‘Cancel’ you
cannot use ESO.
When you have successfully logged on, you will see the Main Menu (see 2.5)
March 2012 | Page 8 of 61
8 of 61EMPLOYER TRAINING NOTES
2.4 How to get a new access number
If you forget your access number you will need to enter your reference number at the link on the
‘Employer Access” screen in ESO.
Fig 2: Entering your reference number
Your reference number is your employer ID and user ID entered as one string of characters with
no spaces eg.12345JOHNSOD. You will also need to enter your Date of Birth in a separate
field.
You will then be prompted to provide answers for your two secret questions you created when
first logging on to ESO. You will also be required to enter a new access number.
Once your access number has been changed you will logged out and you will need to log in to
ESO again.
March 2012 | Page 9 of 61
9 of 61EMPLOYER TRAINING NOTES
2.5 Getting around ESO
You can access all areas in ESO from the menu on the left-hand side of the Main Menu
window.
This menu will be visible on every window in ESO. You can select menu items at any time from
wherever you are in the system, unless you are in the contributions grid. The contributions grid
and reports are opened as separate windows on top of the ESO window, but you can still
access the menu through the original browser window.
2.6 Logging off when you’re finished
To finish using ESO
1. Click ‘Logoff’ in the left-hand menu.
If you log off any other way (such as using the ‘X’ button on the top right hand corner), you will
still be logged on to ESO.
If you stop working in ESO, but don’t log off correctly (such as using the ‘X’ button on the top
right hand corner), you will be automatically logged off after thirty minutes and this includes the
contributions grid.
March 2012 | Page 10 of 61
10 of 61EMPLOYER TRAINING NOTES
3 What to do when a new employee starts
ESO assists you in working out what scheme a new employee can join.
You must provide a copy of the PSS or CSS Product Disclosure Statement to people with an
interest in PSS or CSS. Therefore, before commencing a new member you must determine
which superannuation scheme the employee should join. This should always be done by using
the ESO Eligibility Determiner.
For manual/non-PIF agencies. You should always start new employees before opening
a new period in the contribution grid (see section 5); if you open the grid first, new
employees will not show up on the grid.
By selecting the ‘Employee Details’ button from the Main Menu you can use the sub-menus to:
find out what scheme a new employee joins by using the Eligibility Determiner.
view employees’ details.
3.1 Using the Eligibility Determiner
To use the Eligibility Determiner, so you can find out what scheme a new
employee must join:
1. Go to ‘Employee Details’ in the left-hand menu and click “Eligibility Determiner’. The
Eligibility Determiner window will now be open.
March 2012 | Page 11 of 61
11 of 61EMPLOYER TRAINING NOTES
Fig 3: Eligibility Determiner
If you want to see how the Eligibility Determiner actually works, a link to the determiner is
available at Appendix 4.
2. Fill in as many of the Eligibility Determiner search fields as you can. You must fill in
the Family Name field.
3. Click ‘Search’.
The search function looks for:
an exact match on family name
a match based on the first initial of the given name (if you have provided this)
an exact match on the date of birth (if you have provided this)
a match on sex (if you have provided this).
This function searches all current PSS and CSS members held in ComSuper’s administration
systems, whether or not they are contributing.
If results are found they will be displayed. If no results are returned you will receive a ‘no
matches found’ message—this could mean that the new employee has no previous
membership or that you may need to check and adjust your search criteria.
March 2012 | Page 12 of 61
12 of 61EMPLOYER TRAINING NOTES
PSS and CSS age pensioners are not considered to hold an existing interest in the fund and will
not return a result in the eligibility determiner.
Search tips
This is an exact match search – if the employee is entered as ‘MacDonald’ the
system will not retrieve ‘McDonald’.
If you are aware the employee had a previous name, try running a search using
that name.
Make sure you use the employee’s legal name in the ‘first name’ field; for
example, don’t use ‘L’ for Liz if the employee’s full name is Elizabeth.
If you get too many results, try adding the date of birth to your search.
Fig 4: Results of a member inquiry
4. If you do get a result, click on the relevant employee’s membership number. Their details
will now be displayed.
5. Enter the employee’s employment status with your agency in the field ‘What type of
employment will this member have?’
March 2012 | Page 13 of 61
13 of 61EMPLOYER TRAINING NOTES
The employment status options offered will vary depending on what scheme or
plan the person has an interest in and the status of their membership. Please
note that for PSS members, the options in the drop down box do not change
whether the person is a contributor or a preserved benefit member. If a
member’s benefit is preserved, the drop down box will still include Permanent
Continuous Service and Temporary Continuous Service even though these are not
applicable to preserved benefit members; you can ignore those options if dealing with a
known preserved benefit member.
Fig 5: Entering a member’s employment status
6. Click ‘Submit’.
7. ESO will then tell you which scheme the employee must or may join and which
membership number to use.
If the employee still cannot be found and you have attempted different search parameters, they
may need to be entered into the PSSap if no choice of fund is made. If this is the case you will
need to contact Pillar at employers@pssap.com.au or phone 1300 308 806
March 2012 | Page 14 of 61
14 of 61EMPLOYER TRAINING NOTES
3.2 Adding a new PSS or CSS member
If you have to start a new PSS or CSS membership for an employee you will need an
AGS number. You can get an AGS number from the Australian Public Service
Commission (contact them on 02 6272 3609 or at employmentadvice@apsc.gov.au.
If you are using a PIF
Once the AGS number is allocated you can enter directly to your payroll system.
If you are not using a PIF
Add the new PSS or CSS member through ESO, directly onto the contributions grid (for
complete step-by-step instruction go to 5.5 Adding a new employee to the grid).
March 2012 | Page 15 of 61
15 of 61EMPLOYER TRAINING NOTES
4. Viewing employee details
ESO gives you the ability to view superannuation information for your current employees. You
can look at an employee’s payroll number, family name, given name, date of birth, membership
number, scheme ID and employment status.
You cannot edit any details in these screens – they are view only.
4.1 How to search for an employee
To search for an employee:
1. Go to the Main Menu window.
2. Click ‘Employee Details’.
The “Employees Look-up” table will appear. This is a view of all the employees (past and
present) in your agency who may be members of the CSS and PSS.
3. In the fields provided, enter a payroll number and/or family name to search for.
4. Click the down-pointing arrow at the right hand side of the ‘Sort By’ field and select the
order you want results displayed from the list of available sort options.
5. Click the ‘Search’ button.
The results will be displayed in a table.
Fig 9: Employees Look-up results
If you want to see the full table again, clear the data from the “Payroll Number” or the “Family
Name” field and click “Search”.
March 2012 | Page 16 of 61
16 of 61EMPLOYER TRAINING NOTES
4.2 How to find out more about an employee
To look up an employee’s details:
1. Click the employee’s payroll number on the Employee Look-up window to view an
employee’s details.
Fig 10: View Employee Details
If you click the ‘Close’ button at the bottom of the screen you will be returned to the Employees
Look-up window.
March 2012 | Page 17 of 61
17 of 61EMPLOYER TRAINING NOTES
4.3 What sort of membership does an employee have?
From the View Employee Details window you can see an employee’s membership information.
To view an employee’s membership information
1. Click the ‘Memberships’ button at the bottom of the window to view the memberships
that the employee has.
The Membership Details screen will show you the member’s name, the scheme they are
participating in, their membership number, the date they commenced in the scheme, whether
they are contributing or preserved, when they ceased employment (if they have done so) and
the reason for cessation.
Fig 12: Membership details
March 2012 | Page 18 of 61
18 of 61EMPLOYER TRAINING NOTES
2. Click the ‘Close’ button to go back to the Employees Look-up window.
If multiple memberships exist, the Membership Look-up window will be displayed. The Look Up
will list the memberships that the employee has with your agency (for example, if an employee
has a PSS casual and PSS part-time membership, two memberships will be displayed).
Select the membership you wish to view.
1. Click the ‘Membership’ number to see the details of that particular membership.
Fig 11: Employees Look-up
March 2012 | Page 19 of 61
19 of 61EMPLOYER TRAINING NOTES
Fig 12: Employees Look-up
2. Click the ‘Close’ button to go back to the Employees Look-up window.
March 2012 | Page 20 of 61
20 of 61EMPLOYER TRAINING NOTES
Contributions
ESO is a tool that is designed to make submitting correct data and contributions as quick and as
easy as possible.
It is very important that money and data are received by ComSuper reconciled and on time. You
can send data through ESO on or before each payday.
ESO also analyses your data as you submit it, so if there is an error you can fix it straight away.
A PIF agency should be fixing any errors in your payroll system and the re-import the PIF into
ESO. This is to ensure the same errors are not recurring each fortnight.
Contributions can be entered via two methods:
1. uploading a PIF generated from your payroll system; or
2. updating data directly into the contribution grid on ESO.
Fig 13: Contributions processing
March 2012 | Page 21 of 61
21 of 61EMPLOYER TRAINING NOTES
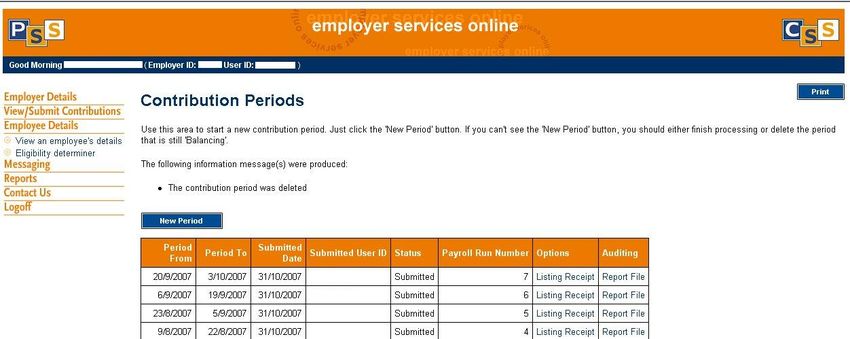
From the ESO Contributions window you can create a new contribution pay period, resume
processing of a contribution pay period in progress, view past contribution pay periods and
receipts, auditing function and delete contribution pay periods not yet submitted. You can also
see which user submitted past pay periods.
Fig 14: Contribution periods listing
March 2012 | Page 22 of 61
22 of 61EMPLOYER TRAINING NOTES
To view contributions
1. Click ‘View/Submit Contributions’ in the left-hand menu.
You will see a window which lists all of the contributions your agency has already made. Each
contribution item has a status of either ‘BALANCING’ or ‘SUBMITTED’.
A SUBMITTED return has been submitted to ComSuper via ESO.
A BALANCING return is one that is still being processed and which you haven’t yet
submitted.
Once submitted, the contribution return cannot be reversed, so care needs to be taken with
regards to reconciliations.
5.1 Creating a new contribution pay period via a PIF
To import the PIF
1. Click the ‘View/Submit Contributions’ button on the Main Menu. This will open the
Contribution Period window. Click the ‘New Period’ button.
If you cannot see the ‘New Period’ button, you may have a
contribution that you are still balancing: it will be listed as the first
contribution and to the right of it will be a ‘Process’ link and a
‘Delete’ link. You must finish processing and submit this
contribution, or you must delete it, before you can create a new period. For
information on the “Process” and “Delete” links see 5.4.2.
2. The pay period dates will be automatically filled. Check that they are correct.
3. Check that the ‘Import from payroll?’ tick box is enabled (please note: if this tick box is
not enabled and you are a PIF agency please contact the Employer Support Desk). This
will allow the relevant file from your payroll system to be uploaded into the ESO
contribution grid.
4. Click ‘OK’.
The Contribution Import window will now be open.
Fig 15: Selecting a file to import
March 2012 | Page 23 of 61
23 of 61EMPLOYER TRAINING NOTES
5. To search for the file you want to import, click on the ‘Browse’ button to the right of the
Upload File field. The file you choose must correlate to the same payday as the
contribution period you are processing.
6. Select the file you wish to import. You will be returned to the Contribution Import
window.
7. Click the ‘Import’ button.
An import meter will be displayed showing you how long it will take to import the file and how far
you have progressed.
You will be told if there were any errors during the importing
process. If there are errors, the import will stop. You will have to
correct the errors in the file you are importing, and then re-import
the file. See “Appendix 1 - Errors” for more information on the
errors that can occur and action that you must take to correct them.
These import errors make sure that the file is in the correct format
for you to continue processing it.
Fig 16: Importing in progress
Once the file has been successfully imported, a Summary message box will appear with some
statistics about the import. The statistics displayed are Rows In File, Rows Imported and Rows
Merged. Rows in the file are merged on the grid where the Payroll ID and Scheme ID are the
same for each record. This could occur if you are sending two contribution records for the same
person onto the same membership.
8. Click ‘OK’ to confirm.
The contribution grid will now be displayed.
9. You can now fix errors and warnings and submit the
contribution (see 5.10 Submitting your contribution).
Fig 17: Import statistics
March 2012 | Page 24 of 61
24 of 61EMPLOYER TRAINING NOTES
Fig 17: Imported contribution grid
5.2 How to create a new contribution pay period for a non-PIF
agency
To create a new contribution period
1. Click the ‘View/Submit Contributions’ button in the left hand menu.
2. Click the ‘New Period’ button.
If you cannot see the ‘New Period’ button, you may have a contribution that
you are still balancing: it will be listed as the first contribution and to the right of
it will be a ‘Process’ link and a ‘Delete’ link. You must finish processing and
submit this contribution, or you must delete it, before you can create a new
period. For information on the “Process” and “Delete” links see 5.4.2.
Fig 18: Creating a new contribution
When you click the ‘New Period’ button the Create New Period window will be displayed.
March 2012 | Page 25 of 61
25 of 61EMPLOYER TRAINING NOTES
Fig 19: Creating a new period
The window will display the last contribution period submitted and automatically populate the
new pay period dates.
3. Click ‘OK’.
A contribution grid will now be displayed in a new window.
Fig 20: Contribution grid
The contribution grid is made up of columns and rows, similar to a spreadsheet. There is one
row on the grid for each membership an employee has with a fund: if an employee has more
than one membership, they will have more than one row.
Totals for the various contribution types are always displayed on the bottom row of the grid in
the ‘Grand Total’ row regardless of which window of the contributions grid you are looking at.
Information about updating individual members’ details is covered in sections 5.6–5.8.
March 2012 | Page 26 of 61
26 of 61EMPLOYER TRAINING NOTES
5.3 Navigating through the grid
5.3.1 Menu buttons
Across the top of the grid you will find a series of buttons that allow you to perform a variety of
functions. The buttons and the function they perform are provided below:
Save Validates any changes or updates made to the open contribution grid. Data is
saved automatically once clicking out of the field that has been updated.
Submit Submit a contribution return to ComSuper. This function also automatically
validates data before submission.
Calculate Automatically calculates employer basic/member contributions for PSS and
CSS: PIF agencies should not use this function as all contribution data is
imported via the PIF.
New employee Add a new employee directly onto the contribution grid: this is for non-PIF
agencies only however PIF agencies can still use this function if required
e.g a data adjustment is required for a ceased member.
Revert to saved Return to the last successfully saved version of the grid being worked on (the
last time you saved with no errors) – this function will not retain updates as
referred to in the instruction on the ‘Close’ or ‘Save’ buttons
Import Import a Payroll Interface File: this is for PIF agencies only
Print Prints the entire contribution grid
Report Provides a summary of the contribution data you are required to pay to
ComSuper for the contribution period displayed on the open contribution grid.
You should compare this to your payroll deductions report
Print messages Print or download error messages to work on offline
Close Close the open contribution grid (the grid will retain error corrections made
during the session if you save these updates). You must use this button to
close the grid or your changes will not be retained
March 2012 | Page 27 of 61
27 of 61EMPLOYER TRAINING NOTES
5.3.2 Moving from page to page
The contribution grid shows 20 members per page. If you are making contributions for more
than 20 members, your grid will have several pages. The tools to navigate from page to page
are at the top left of the screen, just below the menu buttons.
You can move through the grid pages in two ways:
Use the arrow buttons
go forward one page
>> go to the last page.
Use the drop-down menu next to “Showing” and select which page you want to see.
5.3.3 Searching
You can use the search fields above the grid to find a particular contribution.
To search for a member or group of members in the contribution grid
1. Click the down pointing arrow at the right hand side of the ‘Search where’ field on the
contribution grid.
2. Choose the type of item you want to search for. You can choose from payroll number,
family name, given names, scheme ID and membership number.
3. Type the text you are looking for in the ‘Starts with’ field.
4. Click the ‘Search-Now’ link.
If your search terms are found, they will be displayed. Otherwise, you will get a message to say
‘no results found’.
5. Click the ‘Show-All’ link on the top, left-hand side of the window to return to the full listing
of contributions.
March 2012 | Page 28 of 61
28 of 61EMPLOYER TRAINING NOTES
5.3.4 Grid buttons
To the left of each member’s payroll number on the contribution grid you will see three buttons
marked F D and I. These buttons allow you to:
F cease (finalise) a member
D delete a member from the grid for one pay period only
I show all information about a member. This information can also be viewed
by clicking on the ‘details’ tab in the grid
There is more information on these buttons at 5.6 Finalising (ceasing) employees,
5.7 Deleting an employee and 5.8 Updating employee details and fixing errors.
5.3.5 Sorting grid results
By default, rows are sorted alphabetically by family name.
To sort by a different category (such as numerically by membership number)
1. Click on the heading of the column you want to sort by. The column will sort in
ascending order; if you want to sort in descending order, click on the heading again (an
arrow in the column heading will tell you which way the column is sorted). You can sort
the grid by any of the column headings in the grid.
March 2012 | Page 29 of 61
29 of 61EMPLOYER TRAINING NOTES
5.4 Saving
You can save a contribution while you are still working on it. You can then reopen it
later and continue your work. You should save every time you close an un-
submitted contribution.
Although you may receive a message advising that there are still errors on the grid after
you have saved it, if you click the ‘Close’ button, your updates will be retained.
Remember, the contribution grid must be closed using the ‘Close’ button to save
updates.
5.4.1 To save a contribution pay period
To save a contribution pay period
1. Click the ‘Save’ button at the top of the contribution grid. A status meter will show you
what is happening.
Fig 21: Save in progress
If there are errors, ESO will let you know immediately
Fig 22: Errors while saving
2. Click the ‘Download’ button on the bottom right of the Processing window to display
these errors as a text file in Notepad (which can then be saved) or to print them. If you
would rather see the errors in the grid, just click ‘OK’.
March 2012 | Page 30 of 61
30 of 61EMPLOYER TRAINING NOTES
3. If you open errors in the grid, the errors for each member will be displayed below the
member’s name.
Fig 23: Details of the error and warning messages are displayed below each member
4. Click the ‘Print Messages’ button in the top menu to print or download any errors to
review off-line.
5. You need to fix all errors before a submission will be successful.
For non-PIF agencies, errors can be fixed by simply clicking the ‘I’ button next to a
Member’s name and updating the employee’s information, or by adjusting the contribution
amounts and/or details on the grid.
For PIF agencies, you should go back to your payroll system to fix errors and then re-
import the updated PIF.
6. If you have employees that are in receipt of a PSS or CSS partial invalidity pension a
manual adjustment to the employees’ EPSC may need to be made in the Employer
Basic Contribution column.
7. Click ‘Save’ if you have made changes and close the grid.
If you do save, ESO will again validate your data and check for any errors or any warning
messages. If you click ‘Close’ instead, your changes will be retained and you can process them
later.
March 2012 | Page 31 of 61
31 of 61EMPLOYER TRAINING NOTES
5.4.2 Continue working on a contribution you have saved
To re-open a saved contribution period
1. From the Main menu, select ‘View/Submit Contributions’.
This will open the Contribution Periods window.
Fig 24: Contribution Periods
Any unsubmitted (balancing) contribution will have two options next to it: Process and Delete.
Process: This option will open the unsubmitted grid for further processing.
Delete: Because the contribution has not yet been submitted to the fund, you can
delete it altogether. Once you have submitted a contribution, you can no
longer delete it.
2. Select ‘Process’.
The last saved version of the contribution grid will now re-open.
5.4.3 If you make some mistakes
To revert to saved
1. Click the ‘Revert to Saved’ button in the top menu and the grid will return to the last
successfully saved version of the grid being worked on – this means the last time you
saved the grid with no errors. If you have never been able to successfully save this
grid, when you click the ‘Revert to Saved’ button you will lose any updates made on the
grid and return to the originally imported version.
5.5 Adding a new employee to the grid
Check that the new employee is already in your agency payroll system before you add them as
a new member directly into the contribution grid. If your agency has implemented the PIF, your
new member will automatically be added to the contribution grid when you import the
contribution file.
March 2012 | Page 32 of 61
32 of 61EMPLOYER TRAINING NOTES
5.5.1 Adding a returning PSS member or CSS member to the grid for non-
PIF agencies
1. This is the process to follow if the Eligibility Determiner (see 3 What to do when a new
employee starts) tells you that your new employee needs to join PSS or CSS.
2. If your new employee needs a new AGS number, make sure you have one before
beginning this process.
3. Go to the Main menu.
4. Click ‘View/Submit Contributions’.
5. Open the current contribution file.
6. Click the ‘New Employee’ button in the top menu bar. This opens the “Employee
Search” page.
Fig 25: Employee Search
6. Click on the “New Employee” button.
7. You will be presented with a list of funds: choose the one the member will be joining.
The Duplicate Checking window will now open. This check searches all ComSuper’s
records of present and previous contributors to PSS and CSS to make sure you’re not
duplicating a membership record.
March 2012 | Page 33 of 61
33 of 61EMPLOYER TRAINING NOTES
Fig 26: Duplicate Checking
8. Enter in the details. The family name and payroll number must be filled in. If the person
is already your employee, many of these fields will be automatically filled in. Click ‘OK’. If
matches are found they will be listed. This is a useful tool if the person is transferring
from another agency.
9. If any of the records is your new employee and the membership shown is the
membership you intend to enrol them in, click ‘Select’ to add them to the grid.
10. If none of those presented are your employee, click the ‘New Membership’ button. This
will take you to the New Employee Details window.
Note: If there are no matches the New Employee Details window will automatically open.
11. Enter the new employee’s details: you must enter a membership number, date of birth,
sex, employment start date and a scheme commencement date.
Entering the employee’s address details will enable CSC to send all member
communications directly to the member, rather than to you.
12. Click ‘OK’.
You will be returned to the grid, which will now display your new employee.
Finalising (ceasing) employees
Agencies that have implemented the PIF can cease employees via their payroll system. The
cessation data is then extracted from payroll and imported via the PIF to the contributions grid.
If an employee stops working for you, and you have not implemented the PIF,
you should let ComSuper know by ceasing the employee on the contribution
grid. Once the cessation details are submitted, ComSuper will advise the
member what entitlement they may have.
You must also complete a Departmental Report for ceasing PSS and CSS members,
and supply the member with the appropriate benefit application form.
From 1 July 2008, you must also complete a Departmental Report for any PSS
members who have elected to opt out of the PSS.
March 2012 | Page 34 of 61
34 of 61EMPLOYER TRAINING NOTES
To remove (cease) an employee
1. From the Main menu, click the ‘View/Submit Contributions’ button. Select the current
contribution period to open the relevant contributions grid. Find the employee who has
ceased employment (you can use the Search feature; see 5.3.3 Searching).
2. Click the ‘F’ button to the left of that employee. The Finalise a Member window will
open.
Fig 27: Ceasing an employee
3. Choose a reason from the listing provided in the ‘Cessation Reason’ drop-down menu.
4. Enter a date in the ‘Employment Cease Date’ field. This will be the effective date of the
cessation and cannot be a date further into the future than a date within that contribution
pay period range.
5. Click ‘OK’ to cease the employee or ‘Cancel’ to cancel the process.
When ceased, the employee will be highlighted on the grid with a red background and will have
a ‘U’ to the left of their name.
Please note: Agencies that process their data submission’s on a manual basis will
need to ensure that they follow this process. If this process is not followed the
ceased member will continue to re-appear for future submissions.
March 2012 | Page 35 of 61
35 of 61EMPLOYER TRAINING NOTES
5.6.1 Re-activating an employee
If you ceased an employee by accident, you can re-activate them before the
contribution is submitted. If the contribution has been submitted, you will need
to restart the employee as a new member.
To reactivate an employee
1. Open the relevant contribution grid (select ‘View/Submit Contributions’ from the Main
menu, then click the current contribution period).
2. Locate the member to be reactivated. Click the ‘U’ (un-finalise) button next to the
employee’s record on the grid. The red highlighting will be removed indicating that the
member is once again active.
5.7 Deleting an employee
Deleting an employee removes them from the current grid but not from the database:
they will therefore they will re-appear next time you create a new pay period. You can
use the delete function to remove an employee who is not contributing in this period.
March 2012 | Page 36 of 61
36 of 61EMPLOYER TRAINING NOTES
To delete a member from the grid:
1. Open the current contribution grid.
2. Select ‘View/Submit Contributions’ from the Main menu, then click the current
contribution period. Find the employee you want to delete (see 5.3.3 Searching).
3. Click the ‘D’ button to the left of their name. You will be asked if you are sure you want to
delete the selected row.
4. Click ‘OK’ to delete, ‘Cancel’ to cancel.
5.7.1 If you delete a member by accident
If you accidentally delete a member and need to return them to the grid, use the following steps.
Restoring a deleted member:
1. Open the current contribution grid (select ‘View/Submit Contributions’ from the Main
menu, then click the current contribution period).
2. Click the ‘New Employee’ button.
3. Enter the employee’s family and given names.
4. Click ‘Search’.
5. The member should display with their payroll number and date of birth.
6. Click ‘select’.
7. The member will display with their Scheme ID (PSS or CSS) and membership number.
8. Click ‘select’.
9. The member is returned to the grid. However, you will need to re-enter their details:
press the ‘I’ button next to their name (see 5.8 Updating employee details and fixing
errors).
5.8 Updating employee details and fixing errors
When you attempt to save or submit a contribution period you will immediately be advised if
there are any errors or warnings in relation to the data you have entered or imported.
A contribution file cannot be submitted to ComSuper if the file has errors – these must be
corrected. A contribution may be submitted to ComSuper with outstanding warning messages;
however, these should also be checked and corrected as soon as possible. Potentially,
warning messages could become error messages if continually overlooked.
To see the description of what data should be entered in each field, see the PIF specifications
at Appendix 5.
March 2012 | Page 37 of 61
37 of 61EMPLOYER TRAINING NOTES
This is also where you will update an employee’s leave details where contributions are not
payable. You should not enter a LWOP start date for a PSS member who has reached
their maximum benefit limit (MBL). Once you receive an MBL notification from ComSuper
you should cease contributions and continue to update the member’s salary for super.
The Member Details window is also the place to update salary details.
To update an employee’s details and fix errors
For PIF agencies, you will need to update employee details or correct errors by making those
changes in your payroll and then re-importing the appropriate file.
1. For non-PIF agencies, open the current contribution grid (select ‘View/Submit
Contributions’ from the Main menu, then click the current contribution period).
2. Find the employee whose details you want to change (see 5.3.3 Searching).
3. Click on the ‘I’ button to the left of their name.
You will be presented with the Member Details window. Some fields cannot be changed: there
will be no boxes next to these and the data is highlighted in red.
Fig 28: Member Details
March 2012 | Page 38 of 61
38 of 61EMPLOYER TRAINING NOTES
4. Fill in any details you want to change.
5. Click ‘Save’ to save the changes.
Only one person per pay centre can correct errors in the grid at a time.
5.8.1 Correcting a membership number
To correct a PSS or CSS membership number
1. Find the member you want in the grid (see 5.3.3 Search).
2. Click on the members’ membership number.
3. You will be shown the Update Membership Details page. Fill in the correct AGS number.
5.9 Calculate
For manual agencies ESO will automatically copy the information from the last pay you
submitted.
Please note: As the data is copied over from your previously submitted pay, when a birthday
review is performed or a percentage rate change ensure that the data populating is either
deleted or zeroed out so when the calculate button is used the updated contribution data
populates.
If you have manually entered data into the employer basic contributions or member
contributions columns, your data will not be overwritten when you click ‘Calculate’.
Employer basic contributions are:
in PSS and CSS, the EPSC.
The employer liability column is also zero-filled. This column displays the employer PAYG
contributions. The fields will populate when you click on the “Save” or “Submit” buttons. The
employer liability column cannot be changed or amended, it is automatically populated.
It is important that non-PIF agencies manually input data for birthday reviews before clicking the
‘Calculate’ button to calculate the correct contributions amounts.
Once you have finished updating your employee’s details, but before you submit the
contribution return, ESO must run several calculations to work out the contributions for the
period.
To calculate the contributions
March 2012 | Page 39 of 61
39 of 61EMPLOYER TRAINING NOTES
1. Open the current contribution grid.
(select ‘View/Submit Contributions’ from the Main menu, then click the current
contribution period).
2. Click the ‘Calculate’ button in the top menu after actioning any birthday reviews and
remove the data (delete or zero out) populating from the pay period prior or other
changes.
If, after you click ‘Calculate’, you alter any of the following data (for example, to fix an error):
annual salary for superannuation full-time hours
notional salary for superannuation part-time hours
casual salary payment (PSS casual percentage rate
members only)employment status
you will need to recalculate the contributions for the affected member(s) because changing
these values will affect the amount of contributions payable. To do this, enter zero into the
specific member(s) contributions and employer basic contributions fields. You can then click
‘Calculate’ again.
3. Click ‘Save’ to save the changes or ‘Cancel’ to not save them.
The calculate button should be used by non-PIF agencies ONLY.
5.10 Submitting your contribution
Once you have finished working on a contribution period by (amending and errors/warnings
applicable and reconciliation) you can then proceed to submit the data to the fund.
Submitting a contribution return
1. Open the current contribution grid.
(select ‘View/Submit Contributions’ from the Main menu, then click the current
contribution period).
2. Click the ‘Submit’ button in the top menu.
You may get errors or warnings. Errors must be corrected before you submit (see 5.8 Updating
employee details and fixing errors, and Appendix 1 Errors).
March 2012 | Page 40 of 61
40 of 61EMPLOYER TRAINING NOTES
If you get no errors or warnings, you will go directly to the Contribution Totals window. The
screen shot below represents what you will get if you are using direct debit to pay your account.
Fig 29: Contribution Totals
3. If your contribution totals do not balance with your payroll deduction report, click ‘Cancel’.
You will have to submit once you have worked out why the totals aren’t balancing and
corrected any errors. This step is very important as you do not want to be overpaying or
underpaying your members. Should you make a reconciliation error, you will need to
email reconciliations@comsuper.gov.au providing an explanation of what has occurred
and you may also be required to perform an adjustment in the following pay period.
4. If the totals are correct, click the ‘Continue’ button.
You will be presented with the Contribution Submitted window, which lists the funds to which
you are contributing, and the amount for each fund. The screen shot below represents what you
will get if you are using direct debit to pay your account.
Fig 30: Contribution Submitted
5. Click the ‘OK’ button.
You will be presented with the Contribution receipt. The screen shot below represents what
you will get if you are using direct debit to pay your account.
March 2012 | Page 41 of 61
41 of 61EMPLOYER TRAINING NOTES
Fig 31: Contribution receipt
6. Click the ‘Print’ button to print the receipt.
7. Click the ‘Close’ button to close the receipt.
The contribution has now successfully been submitted to the administrator, ComSuper.
5.11 Sending money to CSC via ComSuper
5.11.1 Payment by direct credit
If your agency pays by Direct Credit you can arrange payment through your payroll system
5.11.2 Payment by Cheque
Print out the contributions receipt and attach to your cheque payment and forward to
ComSuper.
5.12 Listings for previous contributions
To get a list of the contributions for a period.
1. Go to the ESO Main Menu.
2. Click ‘View/Submit Contributions’ in the left-hand menu. The Contribution Periods
window will now be open.
March 2012 | Page 42 of 61
42 of 61EMPLOYER TRAINING NOTES
3. Click the ‘Listing’ link for the period you are interested in.
You will get a pop-up asking if you would like your listings ordered by payroll number, name,
scheme ID or membership number.
4. Choose an option and click ‘OK’. The listing will appear.
5. If you want to print the listing, click the ‘Print’ button.
5.13 Receipts for previous contributions
You can view receipts for previous contributions at any time.
To view contribution receipts
1. Go to the ESO Main Menu.
2. Click ‘View/Submit Contributions’ in the left-hand menu.
3. Click the ‘Receipt’ link for the period you are interested in to view the contribution receipts
for each of the payments relevant to your agency’s employees (ie.PSS member
contributions, CSS member contributions, PSS EPSC, CSS EPSC, PSS additional death
and invalidity benefit payments , PSS employer PAYG contributions and CSS employer
PAYG contributions).
5.14 Auditing Report/File
If you want a record of any changes you have made to the contribution grid during a
contributions period, you can generate a file from ESO. Some payroll systems will allow you to
download updates from the contributions grid directly onto your payroll system—check with
your payroll provider to see if this is possible in your agency. This file can be either printed or
downloaded as a .csv file. You can open a .csv file in Microsoft Excel.
To save a list of the changes for a period to your computer you must generate an audit report.
To generate the audit report
1. Go to the ESO Main Menu.
2. Click ‘View/Submit Contributions’ in the left-hand menu and click the ‘File’ link for the
period you are interested in.
3. Choose the ‘Save’ option, and select a location to save to.
You may want to see the changes before deciding whether to save them.
To see changes before saving:
March 2012 | Page 43 of 61
43 of 61You can also read