Face Recognition Terminal User's Guide
←
→
Page content transcription
If your browser does not render page correctly, please read the page content below
Face Recognition Terminal

      User’s Guide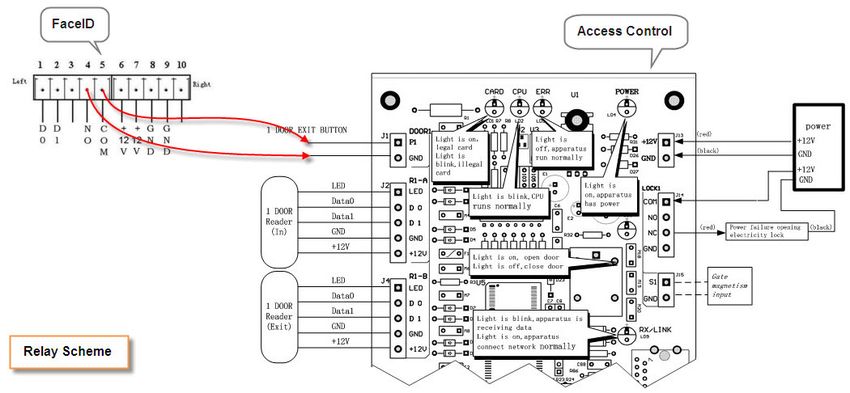
THIS EQUIPMENT COMPLIES WITH FCC REQUIREMENTS
                 PURSUANT OF PART-15

This device complies with Part 15 of the FCC Rules. Operation is subject to
the following two conditions: (1) this device may not cause harmful
interference, and (2) this device must accept any interference received,
including interference that may cause undesired operation.
WARNING: Changes or modifications to this product not expressly approved by
the party responsible for compliance could void the user’s authority to operate this
equipment.

NOTE: This equipment has been tested and found to comply with the limits,
pursuant to Part 15 of the FCC Rules. These limits are designed to provide
reasonable protection against harmful interference in a business installation. This
equipment generates, uses, and can radiate radio frequency energy and, if not
installed and used in accordance with the instructions, may cause harmful
interference to radio communications. However, there is no guarantee that
interference will not occur in a particular installation. If this equipment does cause
harmful interference to radio or television reception, which can be determined by
turning the equipment off and on, the user is encouraged to try to correct the
interference by one or more of the following measures:
   - Reorient or relocate the receiving antenna.
   - Increase the separation between the equipment and receiver.
   - Connect the equipment into an outlet on a circuit different from that to which
     the receiver is connected.
   - Consult the dealer or an experienced radio TV technician for help.

     This Class A digital apparatus complies with Canadian ICES-003.
Cet appariel numerique de la classe A est conforme a la norme NMB-003 du
                                  Canada.

                           Lathem Time Corporation
                             200 Selig Drive, SW,
                              Atlanta, GA 30336
                                404-691-0405
                                www.lathem.com
    Copyright © 2010 Lathem Time Corporation. All rights reserved.
                        Revised 08-17-2011
                 Document number: USG0098 Rev. C
One-Year Limited Warranty
Lathem warrants the hardware products described in this guide against
defects in material and workmanship for a period of one year from date of
original purchase from Lathem or from an authorized Lathem reseller. The
conditions of this warranty and the extent of the responsibility of Lathem
                                                                                       Contents
Time Corporation (“Lathem”) under this warranty are listed below.
1. This warranty will become void when service performed by anyone
     other than an approved Lathem warranty service dealer results in                  Welcome                                                                                          1
     damage to the product.
2.   This warranty does not apply to any product which has been subject to                Package Contents ......................................................................... 4
     abuse, neglect, or accident, or which has had the serial number altered              Install the FaceIN Terminal ........................................................... 5
     or removed, or which has been connected, installed, adjusted, or
     repaired other than in accordance with instructions furnished by Lathem.          Terminal Startup                                                                                 7
3.   This warranty does not cover dealer labor cost for removing and                      Set up the Network Communications ............................................ 7
     reinstalling the machine for repair, or any expendable parts that are                Set up an Administrator ................................................................. 8
     readily replaced due to normal use.
4.   The sole responsibility of Lathem under this warranty shall be limited to         Terminal Setup                                                                                 10
     repair of this product, or replacement thereof, at the sole discretion of            Changing settings at the Terminal............................................... 10
     Lathem.                                                                               How do I disable daylight savings?........................................... 11
5.   If it becomes necessary to send the product or any defective part to                  How do I change the displays time format?.............................. 11
     Lathem or any authorized service dealer, the product must be shipped
                                                                                           How do I change the displays date format? ............................. 12
     in its original carton or equivalent, fully insured with shipping charges
     prepaid. Lathem will not assume any responsibility for any loss or                    How do I activate the tamper alarm on the terminal? ............... 12
     damage incurred in shipping.                                                          How do I change the terminal’s volume?.................................. 13
6.   WARRANTY DISCLAIMER AND LIMITATION OF LIABILITY: Except
     only the limited express warranty set forth above, the products are sold
                                                                                       Add the Terminal                                                                               14
     with no expressed or implied warranties of any kind, and the implied                 Add the terminal in PayClock ...................................................... 14
     warranties of merchantability and fitness for a particular purpose are                How do I add a FaceIN terminal? ............................................. 14
     hereby expressly disclaimed. No warranties are given with respect to
     products purchased other than from Lathem or an authorized Lathem                 Updating the FaceIN Terminal                                                                   15
     reseller and any such products are purchased "as is, with all faults." In            Updating the FaceIN Terminal .................................................... 15
     no event will Lathem be liable for any direct, indirect, special, incidental
                                                                                           How do I update a single terminal? .......................................... 15
     or consequential damages arising out of or in connection with the
     delivery, use or inability to use, or performance of this product. In the             How do I update all terminals? ................................................. 15
     event any limited remedy given herein shall be deemed to have failed of
     its essential purpose, Lathem's maximum liability shall be to refund the
                                                                                       Enrolling Employee Faces                                                                       16
     purchase price upon return of the product.                                           Guidelines.................................................................................... 16
7.   Proof of date of purchase from Lathem or an authorized Lathem reseller                How do I enroll an employee? .................................................. 17
     is required for warranty service on this product.                                     Verification Methods ................................................................. 17
8.   This Warranty grants specific legal rights. Additional legal rights, which
     may vary by locale, may also apply.                                               Using the FaceIN Terminal                                                                      21
9. Should any difficulties arise with the performance of this product                     Punching In / Out......................................................................... 22
   during warranty, or with any Lathem authorized service centers,                         Punching IN/Out - Face Verification ......................................... 22
   contact Lathem Time for information.                                                    Punching IN/Out - PIN & Face Verification ............................... 22
                                                                                           Punching IN/Out - Card & Face Verification ............................. 23
                                                                                           Punching IN/Out - Card Verification.......................................... 24

                                                                                    FaceIN User's Guide                                                               Contents • iii
Polling the FaceIN Terminal                                                                25      S
   Polling the FaceIN Terminal........................................................ 25          Set up an Administrator 8
    How do I poll a terminal?.......................................................... 25         Set up Network Communications 7
    How do I poll all terminals? ...................................................... 25         System Information 44
   Auto - Polling the PayClock Terminals ....................................... 26                T
    How do I set up automatic polling? .......................................... 26               Terminal Setup 10
Troubleshooting the FaceIN                                                                 28      Terminal Specifications 46
                                                                                                   Terminal Startup 7
   General Troubleshooting ............................................................ 28         Terminal’s 26-Bit and 34-Bit Wiegand Formats 34
   FaceIN Troubleshooting.............................................................. 28         Terminals Access Control Relay Connector Configuration 32
Appendix A - Enrollment Guide                                                              30      Troubleshooting 28
                                                                                                   U
Appendix B - Access Control                                                                32      Updating the FaceIN 15
   Terminal Access Control Relay Connector Configuration .......... 32                             Using the FaceIN 21
   Connecting the Terminal to an Electromagnetic Lock ................ 33
   Connecting the Terminal to an Electromagnetic Lock using a
   Wiegand Signal ........................................................................... 33
   Terminal 26-Bit and 34-Bit Wiegand Formats............................. 34
Appendix C - Exporting Punches to a USB Drive                                              35
   Export the data to USB Thumb Drive ......................................... 35
   Import the data into PayClock..................................................... 36
Appendix D - Add Employees at the Terminal                                                 37
   Adding an Employee at the FaceIN Terminal ............................. 37
    Verification Methods ................................................................. 38
Appendix E - Record Management                                                             42
   Reviewing Punch Records.......................................................... 42
   Clearing Punch Records ............................................................. 42
Appendix F - System Information                                                            44
Appendix G - Terminal Specifications                                                       46
Glossary of Terms                                                                          47
Index                                                                                      47

iv • Contents
Index
A
Access Control 32
                                                             Welcome
Add the terminal from PayClock 14
Adding Employees at the FaceIN Terminal 37
Auto Poll 26
                                                             Reliability, functionality and ease of use are trademarks of the
C                                                            PayClock terminals. The FaceIN terminal connects to your network
Changing settings at the terminal 10                         (LAN - PayClock software and FaceIN terminal have to be on the
Clearing Punches at the FaceIN 43
                                                             same subnet) for communications with the PayClock software. The
Connecting the Terminal to an Electromagnetic Lock 33
                                                             terminal utilizes an “embedded facial recognition” system meaning
Connecting the Terminal to an Electromagnetic Lock using a   that employees will punch in and out by presenting their face in front
    Wiegand Signal 33                                        of the terminal’s “Dual Camera System”. The FaceIN terminal
E                                                            validates the face image and records the punch.
Enrolling Employees 16
Enrollment Guide 30
Export the data to a USB Thumb Drive 35
Exporting Punches to a USB Drive 35
F
FaceIN Record Management 42
FaceIN Troubleshooting 28
Features & Specifications 1
G
Getting Help 2                                               The FaceIN terminal offers a large color LCD display that displays
                                                             employee information along with an audio prompt. Upon a
H                                                            successful validation the display will show the employee’s name,
How do I disable daylight savings? 11                        time of punch and an audio prompt identifying a successful punch.
How do I enroll an employee? 17
                                                             Terminal Features and Specifications
I
Importing the data into PayClock 36
Install the FaceIN Terminal 5
P
Package Contents 4
Polling the FaceIN Terminal 25
Punching In & Out 22
R
Reviewing Capacity Information 44
Reviewing Product Information 45
Reviewing Punches on the FaceIN 42
Index • 48                                                                                                            Welcome • 1
• Embedded facial recognition system - Advanced DSP
technology keeps the image processing and matching on the
terminal.
• Accurate and fast identification - The industries leading “Dual
Sensor” facial recognition technology.
Glossary
• Reliable performance under different light environments -
The terminal can work in different light conditions even in the
of Terms
dark. Over one year of market testing.
• Flexible I/O interfaces - Internet Protocol (TCP/IP) enables
communications over the LAN. USB allows for employee Administrator
data upload or punch download using a USB flash drive. The The FaceIN can have up to five administrators, the administrator
Ethernet Network Port is located on the back of the terminal function allows you review the device information, set up the network
and the USB Flash Drive Port is located on the bottom of the communications, set the time / date and reset the terminal to the
terminal. factory defaults
• User friendly design - 3.5 inch color LCD screen for face
positioning with voice prompt. No-touch authentication for
the ultimate in hygiene.
Auto Poll
Note: The proximity badge reader and access control relay are not When a terminal is automatically polled, punch data is gathered and
available on the FR650 model. automatically added to the database allowing you to edit, export and
report on the data.
Accessories
A number of accessories are offered to further enhance your Buddy Punching
PayClock system. Visit http://shop.lathem.com to purchase
additional accessories. When late or absent employees have co-workers punch the time
clock for them.
Getting Help
You can access the help desk and answers to your issues in a
number of different ways. In addition to resources within the
User
PayClock software assistance may be accessed online, via email, An employee.
via telephone, or through your dealer. Don’t forget annual support
contracts are also offered.
PayClock Help
The Online Help allows you to search through an index of help topics
to locate the answer you need. To launch the Help click the Help
button on the ribbon bar.
Troubleshooting
For answers to Frequently Asked Questions refer to the
Troubleshooting section of this User Guide.
2 • Welcome Glossary of Terms • 47Online and Email Support
Lathem.com provides access to numerous support resources that
Appendix G - will allow you maximize your use of PayClock. Help may be
accessed by visiting the following link: http://support.lathem.com
Terminal On the Support page you may also submit a question through our
online knowledgebase and one of our technicians will respond to
your inquiry within 24 hours. Email support is free to all registered
Specifications users.
Telephone Support
The help desk is available between the hours of 8am and 7pm
Monday through Friday. Please call (800) 241-4990 to speak with
Employee Capacity 500: our help desk. You will receive free technical support for the first 30
:
• days after your initial call. After that period you may purchase an
Record Capacity 150,000 Annual Support Agreement which will cover all calls for one year or
:
•
Image Capacity 70,000 Images you may pay a per-call fee.
:
•
Security Image Capacity 4GB SD Card (FR700)
:
• Annual Support Agreements
TM
Recognition Algorithm Dual Sensor V2.0
:
•
Annual support contracts are designed to keep your terminal and
Lens Specialized double lens
:
•
PayClock software working seamlessly. For a single annual fee
• Verification Method Face Recognition; Pin & Face your Support Agreement offers the following advantages:
Recognition; Card Recognition (FR700); Card & Face
Recognition (FR700) Unlimited toll-free telephone support (versus a per-call fee)
:
•
Card Recognition ID/IC card (FR700) and priority status for calls
: ( )
•
Verification Speed Less than 1 Second 500 Users
:
• • Unlimited access to the extensive library of web-based tips
Keyboard 4 x 4 Touch Keyboard
: ,
• and FAQs
LCD 3.5 inch TFT Color Screen 65,000 Bright
,
•
• Quick exchanges for damaged or broken terminal thereby
Color 320 x 240 Resolution
• :
Communication Method Standard TCP/IP & USB Flash
reducing downtime
Drive • Extended parts and labor warranty helps you to save money
:
Terminal Security Alarm Yes on repairs needed after the regular product warranty has
:
•
Power 12V DC, Working Current 500mA expired
:
•
Environment Light 0-5000Lux
:
• To learn more about annual support contracts and to make a
Working Distance 12 - 32 inches purchase, contact us at (800) 241-4990 or visit
:
•
Working Temperature 32°F - 104°F http://www.lathem.com/support/support-plans.aspx
:
•
Working Humidity 20% - 80%
:
•
Size 7.87 x 3.74 x 4.53 inches
:
•
• Weight 1.11 lbs
• Installation Method Wall Hanging
46 • Appendix G – Terminal Specifications Welcome • 3At the FaceIN terminal press the MENU key. Administrator
Package Contents •
verification is required.
Please verify that your package includes ALL of the following items. • The administrator should present and position their face for a
If your package is missing an item, please call our help desk at (800) facial scan. The Functions Menu will display upon a
241-4990. successful verification.
• Press 5 or select the System Info. menu and press OK.
• Press 2 or select the Product Info. menu and press OK.
o IP - Displays the IP address configured for the terminal.
o Mask - Displays the subnet mask address configured for
the terminal.
o Gate - Displays the gateway address configured for the
terminal.
o MAC - Displays the terminal’s MAC address.
o SN - Displays the terminal’s serial number.
o Version - Displays the terminal’s firmware version.
o Res Num - Displays the firmware resource number. (Not
currently used.)
• Press ESC, ESC and ESC again to return to the normal
Recommended Installation Tools time/date screen.
4 • Package Contents Appendix F – System Information • 45Install the FaceIN Terminal
Appendix F - System Step 1: Select a site to install your FaceIN terminal that will be
Information convenient to employees clocking in and out. When deciding where
the terminal will be installed, keep in mind that an 115vAC power
outlet should be within 6 feet of the mounting location as well as a
connection to the network (LAN).
Note about Direct Sunlight - It is not recommended to have the
terminal mounted in a location where it is exposed to direct sunlight.
The System Info function allows you review the terminal’s capacity This could be troublesome during the registration process.
and product information.
Step 2: After selecting the appropriate installation site, use the
Reviewing Capacity Information terminal to determine the appropriate height. Have the shortest
• At the FaceIN terminal press the MENU key. Administrator employee stand in from of the terminal. Hold the terminal on the wall
verification is required. so that this employee can comfortably center their face in the LCD
display window. Mark the height of the terminal on the wall. Note:
• The administrator should present and position their face for a Taller employees can easily adjust their stance to center their face in
facial scan. The Functions Menu will display upon a the LCD display window.
successful verification.
• Press 5 or select the System Info. menu and press OK.
• Press 1 or select the Capacity Info. menu and press OK.
o Registered User - Displays how many employees have
been updated to the terminal.
o User Cap. - Displays how many employees are
supported on the terminal.
o Record Num. - Displays how many punches are in
memory from facial recognition punches.
o Record Cap. - Displays how many facial recognition
punches the terminal will hold in memory.
o Photo Num. - Displays how many punches are in
memory from the card verification method.
o Photo Cap. - Displays how many punches from the card
verification method the terminal will hold in memory.
• Press ESC, ESC and ESC again to return to the normal Install the mounting-plate to the wall using the supplied screws. For
time/date screen. sheetrock walls, drill a 3/16” diameter hole through each of the four
screw locations; each approx 1-1/2” deep. Install the plastic
“anchors” included in the mounting screw packet.
Reviewing Product Information
44 • Appendix F – System Information Install the FaceIN Terminal • 5Step 3: Plug the RJ45 network cable into the Ethernet port and the Clearing Punch Records
Power Adapter plug into the Power Adapter port which is located in
the compartment on the back of the terminal. The Record Management function allows you review punch data and
clear records in the terminals memory.
Warning: Use extreme caution when clearing records. Once the
records are cleared they can not be restored!
• At the FaceIN terminal press the MENU key. Administrator
verification is required.
• The administrator should present and position their face for a
facial scan. The Functions Menu will display upon a
successful verification.
• Press 3 or select the Record Management menu and press
OK.
• Press 2 or select the Clear Record menu and press OK.
Warning: Use extreme caution when clearing records. Once
Step 4: Align the FaceIN terminal with the pins on the mounting-
the records are cleared they can not be restored!
plate and secure the two together with the 2 Philips head screws. Be
careful not to pinch the AC cord or network cable. • Proceed with caution, all data and settings will be lost!
• If you are sure press OK to continue. This will delete all
punch records in the terminal.
• The screen will display “Clearing…Please Wait…”, next
“Records Cleared!” will display and the terminal will return to
the Record Management menu.
• Press ESC and ESC again to return to the normal time/date
screen.
When finished, plug the power adapter into an AC wall outlet.
6 • Install the FaceIN Terminal Appendix E – Record Management • 43Appendix E - Record Terminal Startup
Management
After completing the installation and power-up the terminal will
display the normal screen with the date, day of week and time.
The Record Management function allows you review punch data and
clear records in the terminals memory.
Warning: Use extreme caution when clearing records. Once the
records are cleared they can not be restored!
Reviewing Punch Records You are now ready to set up the network communications and define
the initial administrator. Note: You must set up at least one
• At the FaceIN terminal press the MENU key. Administrator administrator.
verification is required.
• The administrator should present and position their face for a
facial scan. The Functions Menu will display upon a Set up the Network
successful verification.
Communications
• Press 3 or select the Record Management menu and press
OK. The FaceIN terminal must be configured to communicate with the
PayClock software over the network. You may have to contact your
• Press 1 or select the Record Inquiry menu and press OK. network administrator if you are unsure how to set up the network
• At the Input User No. field enter the PIN for the desired communications.
employee or leave the field at ALL. • Press the MENU key. The Functions Menu will open.
• Press the down arrow key to move the cursor to the Start • Press 4. The System Setting menu will open.
Time field.
• From the System Setting menu press 2 - Set Network.
• Using the index/numeric keys enter the year, month and
date where you wish to start the review. The cursor will • Enter the IP Address for the terminal and press OK.
automatically move to the End Time field.
• Enter the Mask Code and press OK.
• Using the index/numeric keys enter the year, month and
• Enter the Gateway Address and press OK.
date where you wish to end the review.
• Enter the Host computers IP address and press OK. (FR650
• Press OK. The punch records will display for the selected
only)
employee and time period. Use the up/down arrows to scroll
through the list of punches. • The FaceIN terminal will restart automatically.
42 • Appendix E – Record Management Terminal Startup • 7Note: You may have to enter leading zeros when entering the • Resume small head circles to the right (if adjust positioning
message is still displaying).
addresses. For example the address 10.0.0.1 would be entered
as 010.000.000.001 at the terminal. • The progress bar at the bottom of screen will display the
process of the imaging.
When the face is enrolled the terminal will display, “Permit
Set up an Administrator •
Open Door?” press ESC.
After setting up the network communications you will need to set up • When “Permit Attendance?” displays, press OK. Note: You
at least one administrator. Note: You can have up to 5 must press OK; otherwise punches will not be recorded for
administrators. polling.
• Press the MENU key. The Functions Menu will open. • The screen will display “Finished” and will return to the “Input
• Press 1. The Set Admin menu will open. User No” screen. Continue with the next employee or press
ESC, ESC and ESC again to return to the normal time/date
• From the Set Admin menu press 1 - Admin 1. screen.
• The image collecting screen will display.
• Position the face in the middle of the two cameras with 9 to
25 inches between the face and the terminal.
• The image collecting screen will start the face recognition
enrollment.
• Perform 2 small head circles to the right.
• Perform 2 small head circles to the left.
• Move the face closer to the terminal until the white dashed
square appears.
• Move the face back until there is 9 to 25 inches between the
face and the terminal.
• Turn the head fully to the right.
• Turn the head fully to the left.
• Raise the head up slightly.
• Lower the head down slightly.
• Move the face back from the terminal until there is 9 to 25
inches between the face and the terminal (if adjust position
message is still displaying).
• Resume small head circles to the right (if adjust position
message is still displaying).
• The progress bar at the bottom of the screen will display the
process of the imaging.
8 • Terminal Startup Appendix D – Add Employees at the Terminal • 41• The screen will display “Finished” and will return to the “Input When the face is successfully enrolled the terminal will display, “Add
User No” screen. Continue with the next employee or press as User?”.
ESC, ESC and ESC again to return to the normal time/date
Ask yourself this question.
screen.
Will the administrator be using the door access function or punching
Card and Face Verification Method Selected In and Out on the terminal?
(FR700 only) Yes - The administrator will be using the door access function or
punching In and Out at the terminal.
When enrolling employee faces, take the following into
consideration: • If the administrator will be punching In and Out or using the
door access function at the terminal, press the OK key. The
Eye Glasses - It is recommended for the employee to enroll with the Input User No screen will display.
eye glasses on for half the process, then remove the eye glasses
and complete the registration. • Use the numeric keys to enter the user number and press
OK. This should be the same as the PIN number you will
Hair Style - If the employee has a hair style that has their hair enter into the PayClock software. The user number can be
covering or blocking their eyes, move the hair away from the eyes from 1 to 9999.
during the registration process.
• Using the index/numeric keys enter a name. This should be
• When “Please Swipe Card” displays, present the card at the the same as the first name you will enter into the PayClock
terminal. software. After pressing the desired index/numeric key, use
• Position the employee so the face is in the middle of the two the ↑/↓ to move through the available letters. To change to
cameras with 9 to 25 inches between the face and the caps press the index/numeric key with the desired letter and
terminal. press the ESC key. The letter group will change to caps.
After entering the name press the OK key.
• The image collecting screen will display, start the face
recognition enrollment. • Select the verification method to use for this user.
No - The administrator will not be using the door access function or
• Perform 2 small head circles to the right.
punching In and Out at the terminal.
• Perform 2 small head circles to the left.
• If the administrator will not be punching In and Out or using
• Move the face closer to the terminal until the white dashed the door access function at the terminal press the ESC key.
square appears.
• The screen will display “Register Finished” and will return to
• Move the face back until there is 9 to 25 inches between the “Set Admin” menu. Press ESC and ESC again to return
their face and the terminal. to the normal time/date screen.
• Turn the head fully to the right.
• Turn the head fully to the left.
• Raise the head up slightly.
• Lower the head down slightly.
• Move the face back from the terminal until there is 9 to 25
inches between the face and the terminal (if adjust
positioning message is still displaying).
40 • Appendix D – Add Employees at the Terminal Terminal Startup • 9• Perform 2 small head circles to the left.
• Move the face closer to the terminal until the white dashed
Terminal Setup •
square appears.
Move the face back until there is 9 to 25 inches between
their face and the terminal.
• Turn the head fully to the right.
The FaceIN terminal is designed with default settings so that it will be • Turn the head fully to the left.
ready for use after being updated with the employees. While these • Raise the head up slightly.
default settings allow you to get up and running faster, you can make
changes to the settings if desired. • Lower the head down slightly.
These default settings are: • Move the face back from the terminal until there is 9 to 25
inches between the face and the terminal (if adjust
• Daylight Savings Time: Daylight savings is enabled. positioning message is still displaying).
• Time Format: The display will show the hours in a 24 hour • Resume small head circles to the right (if adjust positioning
(0-23) format. message is still displaying).
• Date Format: The display will show the date in the MM-DD- • The progress bar at the bottom of screen will display the
YYYY format. process of the imaging.
• Tamper Alarm: The alarm that will sound if the terminal is • When the face is enrolled the terminal will display, “Permit
removed from the wall is enabled. (FR700 only) Open Door?” press ESC.
• Volume: The sound level is set to medium. • When “Permit Attendance?” displays, press OK. Note: You
must press OK; otherwise punches will not be recorded for
polling.
Changing settings at the Terminal • The screen will display “Finished” and will return to the “Input
The default settings that can be changed by the administrator at the User No” screen. Continue with the next employee or press
terminal are: ESC, ESC and ESC again to return to the normal time/date
screen.
• Daylight Savings Time: Daylight savings is enabled.
• Time Format: The display will show the hours in a 24 hour Card Verification Method Selected
(0-23) format. (FR700 only)
• Date Format: The display will show the date in the MM-DD-
• When “Please Swipe Card” displays. Present the card at the
YYYY format.
terminal.
• Tamper Alarm: The alarm that will sound if the terminal is
• When the card is enrolled the terminal will display, “Permit
removed from the wall is enabled.
Open Door?” press ESC.
• Volume: The sound level is set to medium.
• When “Permit Attendance?” displays, press OK. Note: You
must press OK; otherwise punches will not be recorded for
polling.
10 • Terminal Setup Appendix D – Add Employees at the Terminal • 39• Press 1 or select the Register User menu and press OK to
add a new employee at the terminal.
How do I disable daylight savings?
• The Input User No. screen will display.
By default day light savings is enabled and is set to change on the
• Using the index/numeric keys enter the User Number and nd st
2 Sunday in March and the 1 Sunday in November. You will have
press OK. Note: This is the number that will be entered into to disable the function if your region doesn’t observe day light
the PayClock software as the employees PIN number. The savings. Note: Open or Close will display to the right of Set DST.
number has to be unique. Open identifies DST is enabled, Close identifies DST is disabled.
• The Input Name screen will display. • At the FaceIN terminal press the MENU key. Administrator
• Using the index/numeric keys enter a name. This should be verification is required.
the same as the first name you will enter into the PayClock • The administrator should present and position the face for a
software. After pressing the desired index/numeric key, use facial scan. The Functions Menu will display upon a
the ↑/↓ to move through the available letters. To change to successful verification.
caps press the index/numeric key with the desired letter and
press the ESC key. The letter group will change to caps. • Press 4 or select the System Setting menu and press OK.
After entering the name, press the OK key. FR650 Model - Press 5 or select the Set Date and Time menu
• With the employee standing at the ready select the and press OK.
verification method to use for the employee. FR700 Model - Press 6 or select the Set Date and Time menu
and press OK.
Verification Methods • Press 2 or select the Set DST menu and press OK.
Typically for a normal employee you would select Face recognition, • The screen will display “Use DST?” press ESC. This will
for a temporary employee select Card recognition. For higher disable the daylight savings function.
security select either Pin and Face or Card and Face recognition.
• After a few seconds the system will return to the “Set Date
and Time” screen. Continue making changes to the
Face / Pin and Face Verification Method Selected terminals system settings or press ESC, ESC and ESC
When enrolling employee faces take the following into consideration: again to return to the normal time/date screen.
Eye Glasses - It is recommended for the employee to enroll with the
eye glasses on for half the process, then remove the eye glasses How do I change the displays time format?
and complete the registration.
The time format selection will determine how the hours will show on
Hair Style - If the employee has a hair style that has their hair the terminal display.
covering or blocking their eyes, move the hair away from the eyes
during the registration process. • At the FaceIN terminal, press the MENU key, administrator
verification is required.
• Position the employee so the face is in the middle of the two
cameras with 9 to 25 inches between the face and the • The administrator should present and position the face for a
terminal. facial scan. The Functions Menu will display upon a
successful verification.
• The image collecting screen will display. Start the face
recognition enrollment. • Press 4 or select the System Setting menu and press OK.
• Perform 2 small head circles to the right. FR650 Model - Press 5 or select the Set Date and Time menu
and press OK.
38 • Appendix D – Add Employees at the Terminal Terminal Setup • 11FR700 Model - Press 6 or select the Set Date and Time menu
and press OK.
•
•
Press 3 or select the Set Time Format menu and press OK.
Press 1 for 12 hour (AM/PM) or 2 for 24 hour (0-23). Appendix D - Add
• After a few seconds the system will return to the “Set Date
and Time” screen. Continue making changes to the
terminals system settings or press ESC, ESC and ESC
Employees at the
again to return to the normal time/date screen.
Terminal
How do I change the displays date format?
The date format selection will determine how the date will show on
the terminal display.
Employees can be added at the FaceIN terminal first and then added
• At the FaceIN terminal press the MENU key. Administrator in the PayClock software later. This could be useful when a new
verification is required. employee starts work before having a chance to add them to the
PayClock software.
• The administrator should present and position the face for a
facial scan. The Functions Menu will display upon a Important Note: The number you enter for the User No. at the
successful verification. FaceIN terminal has to match what is entered for the Employee PIN
Number in the PayClock software. These numbers are how the
• Press 4 or select the System Setting menu and press OK.
software identifies which punches go with which employee.
FR650 Model - Press 5 or select the Set Date and Time menu
You should follow these recommended steps if adding the
and press OK.
employees at the FaceIN terminal.
FR700 Model - Press 6 or select the Set Date and Time menu
1. Add and enroll the employee’s face at the FaceIN terminal.
and press OK.
2. Have the employee punch In and Out.
• Press 4 or select the Set Date Format menu and press OK.
3. Add the employee in the PayClock software before polling
• Press 1 for YYYY-MM-DD (2011-03-01) or 2 for MM-DD- and processing payroll.
YYYY (03-02-2011). Note: March 01, 2011 was used in the
example above.
• After a few seconds the system will return to the “Set Date Adding an Employee at the FaceIN
and Time” screen. Continue making changes to the
terminals system settings or press ESC, ESC and ESC Terminal
again to return to the normal time/date screen.
• At the FaceIN terminal press the MENU key. Administrator
verification is required.
How do I activate the tamper alarm on the • The administrator should present and position their face for a
terminal? facial scan. The Functions Menu will display upon a
successful verification.
The terminal has a feature where if it were removed from the wall
mounting-plate an alarm can sound. The alarm is turned off by • Press 2 or select the User Management menu and press
default. (FR700 only) OK.
12 • Terminal Setup Appendix D – Add Employees at the Terminal • 37• Press 1 or select the Export Records menu and press OK. • At the FaceIN terminal press the MENU key. Administrator
verification is required.
• When the export is complete the data will be saved to a file
named TIME .TXT (there are 3 spaces between TIME and • The administrator should present and position their face for a
.TXT) on the root of the USB Flash drive. facial scan. The Functions Menu will display upon a
successful verification.
• After a few seconds the system will return to the “Functions
Menu” screen. • Press 4 or select the System Setting menu and press OK.
• Press the ESC key. The terminal will return to the normal • Press 7 or select the Set Remove Alarm menu and press
time/date display. OK.
• Unplug the USB Flash drive. • Press 1 for Open. This will enable the alarm to sound if the
terminal if removed from the mounting-plate.
Press 2 for Close. This will disable the alarm. If the terminal
Import the data into PayClock •
is removed from the mounting-plate the alarm will not sound.
• Plug the USB Flash Drive into a USB port on your computer. • After a few seconds the system will return to the “System
Setting” screen. Continue making changes to the terminals
• Open PayClock and select the Terminal Manager tab on the system settings or press ESC and ESC again to return to the
ribbon bar. The Terminal Manager window will open.
normal time/date screen.
• Click on a FaceIN terminal in the list. The Import Punches
button will become active.
How do I change the terminal’s volume?
• Click the Import Punches button. The Open window will
display. The terminals sound level is set to medium (middle) by default; it can
be set to low, medium or high.
• Navigate to the location of the TIME .TXT file. Typically
located on the USB Flash Drive plugged into your computer. • At the FaceIN terminal press the MENU key. Administrator
verification is required.
• Click the Open button, the punch data will be imported into
the PayClock database. • The administrator should present and position the face for a
facial scan. The Functions Menu will display upon a
successful verification.
• Press 4 or select the System Setting menu and press OK.
• Press 1 or select the Set Volume menu and press OK.
• Press 1 for high, 2 for medium (middle) or 3 for low.
• Press 1 for 12 hour (AM/PM) or 2 for 24 hour (0-23).
• After a few seconds the system will return to the “System
Setting” screen. Continue making changes to the terminal’s
system settings or press ESC, ESC and ESC again to return
to the normal time/date screen.
36 • Appendix C – Exporting Punches to a USB Drive Terminal Setup • 13Add the Terminal Appendix C -
Exporting Punches
After setting up the FaceIN add it to your PayClock system. Once the
terminal is added to the PayClock system employees can be added.
After adding the employees update the terminal and the employee
to a USB Drive
face’s can be enrolled.
Add the terminal in PayClock The USB Functions menu allows you to export punch data to a USB
thumb drive and then import the data into the PayClock database
The Maintenance button group under the Terminal Manager tab is using the PayClock software.
used to add or delete FaceIN terminals that are connected to the Important Note: If you don’t have an Ethernet connection you can
PayClock system.
transfer punch data from the terminal to the PayClock software using
a standard USB thumb drive.
How do I add a FaceIN terminal?
• Open PayClock and select the Terminal Manager tab on the
ribbon bar.
Export the data to USB Thumb
• Click the Add Terminal button. The Select Terminal Type
Drive
window will open. The Poll button group is used to poll or retrieve data from a single
• Select FaceIN from the drop down list and click OK. terminal or all terminals. When a terminal is polled punch data will be
added to the database allowing you to edit, export and report on the
• The FaceIN terminal properties will display on the right. data.
• From the Connection tab enter the name for the terminal • Press the ESC key to force the terminal to the normal
under Device Nickname. time/date screen.
• Enter the terminals IP Address in the IP Address field; this is • Insert the USB Flash drive into the USB port on the bottom
the address that was set up for the terminal at the FaceIN of the terminal. Administrator verification is required.
terminal.
• The administrator should present and position their face for a
• Click Save. facial scan. The Functions Menu will display upon a
• Click the Test Connection button to verify communications successful verification.
with the FaceIN terminal. • The Functions Menu will display after administrator
verification.
Note: Due to compatibility issues not all USB Flash drives are
compatible and may not work with the terminal. It is not
recommended to use a USB Flash drive formatted as NTFS
14 • Add the Terminal Appendix C – Exporting Punches to a USB Drive • 35Terminal 26-Bit and 34-Bit Wiegand
Formats
Wiegand 26: Updating the FaceIN
0 1- Site Code -8 9---
X 01100100 XXXXXXXXXXXXXXXX X
User ID ---24 25bit
Terminal
Site Code for Terminal : 100 (8 bits)
User ID: 1-65536 (16 bits)
Wiegand 34: The PayClock software is used to manage the FaceIN terminal(s)
which includes polling and updating the terminal(s). This is done
0 1- Site Code -8 9--- User ID ---32 33-bit
from the Terminal Manager tab within the PayClock software.
X 01100100 XXXXXXXXXXXXXXXXXXXXXXXX X
When you add an employee in PayClock they are automatically
Site Code for FaceIN : 100 (8 bits) assigned to the FaceIN terminal(s). But before you can enroll the
employee faces at the terminal you will have to update the terminal
UserID: 1-16777216 (24 bits) with the changes.
Updating the FaceIN Terminal
The Update button group is used to update a single terminal or all
terminals. After making changes to employees make sure to update
the terminal(s) with the changes.
How do I update a single terminal?
• Open PayClock and select the Terminal Manager tab on the
ribbon bar. The Terminal Manager window will open.
• Select the desired terminal from the list and click Update
Selected Terminal.
• Any changes will be sent to the selected terminal.
How do I update all terminals?
• Open PayClock and select the Terminal Manager tab on the
ribbon bar. The Terminal Manager window will open.
• Click the Update All Terminals button.
• Any changes will be sent to all of the terminals.
34 • Appendix B – Access Control Updating the FaceIN Terminal • 15Connecting the Terminal to an
Electromagnetic Lock
Enrolling Employee FaceIN
Faces
The FaceIN terminal utilizes an “embedded facial recognition”
system. This means that employees will punch in and out by
presenting their face in front of the terminal’s “Dual Sensors”. The
FaceIN terminal verifies the face image and records the punch.
When you’re ready you simply poll the terminal to add the punches
to the database.
See Appendix A - Enrollment Guide for a detailed pictorial.
Guidelines
• The FaceIN terminal is for use indoors; do not position the Connecting the Terminal to an
terminal in direct sunlight.
Electromagnetic Lock using a
• Use normal facial expressions and avoid wearing
sunglasses. Wiegand Signal
• If glasses or a hat is worn, please take the glasses and/or FaceIN
hat off halfway through the enrollment process for better face
recognition.
• Bend into the camera, keeping the distance between the
face and screen at 9 to 25 inches for best results.
• Keep the face centered between the 2 cameras.
• If the green lined frame displays when the employees face is
successfully being detected.
• If the white dashed frame appears, the employees face can
not be recognized, so please have the employee adjust their
positioning.
16 • Enrolling Employee Faces Appendix B – Access Control • 33How do I enroll an employee?
• At the FaceIN terminal press the MENU key. Administrator
Appendix B - Access •
verification is required.
The administrator should present and position themselves
Control for a facial scan. The Functions Menu will display upon a
successful verification. Note: The FaceIN terminal requires
administrator verification in order to enroll employee faces.
• Press 2 or select User Management and press OK, the User
Management menu will display.
Access control is only available in the FR700 model. Use the • Press 2 or select the Modify User menu and press OK.
FR700’s internal access control relay to integrate with a facilities
entry access control system. • Use the numeric keys to enter the user number and press
Important Note: When enrolling an employee make sure to select OK. The user number is the same as the badge number that
OK at the Permit Open Door? prompt. was set up in the PayClock software.
• The employee’s first name will display. Press OK to
continue.
Terminal Access Control Relay
• With the employee standing at the ready select the
Connector Configuration verification method to use for the employee.
Verification Methods
Typically for a normal employee you would select Face recognition,
for a temporary employee select Card recognition, for higher security
select either Pin and Face or Card and Face recognition.
Face / Pin and Face Verification Method Selected
When enrolling employee faces take the following into consideration:
Eye Glasses - It is recommended for the employee to enroll with the
eye glasses on for half the process, then remove the eye glasses
and complete the registration.
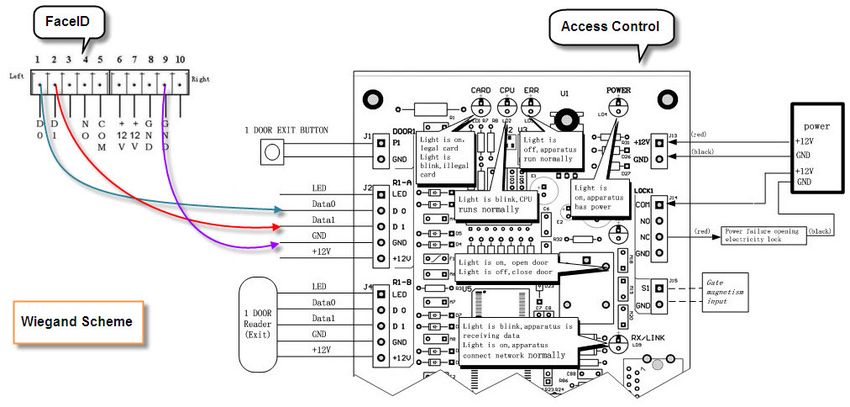
6 = +12V - 12 volt output to external Hair Style - If the employee has a hair style that has their hair
1 = D0 - Output to Wiegand Controller
device covering or blocking their eyes, move the hair away from the eyes
7 = +12V - 12 volt output to external during the registration process.
2 = D1 - Output to Wiegand Controller
device
• Position the employee so the face is in the middle of the two
3 = Not Used 8 = GND - Ground connection cameras with 9 to 25 inches between the face and the
4 = NO - Normally open internal dry terminal.
9 = GND - Ground connection
contract relay output
• The image collecting screen will display, start the face
5 = COM - Common output for internal recognition enrollment.
10 = Not Used
dry contract relay
32 • Appendix B – Access Control Enrolling Employee Faces • 17• Perform 2 small head circles to the right.
• Perform 2 small head circles to the left. Enrollment Guide (cont.)
• Move the face closer to the terminal until the white dashed
square appears.
• Move the face back until there is 9 to 25 inches between
their face and the terminal.
• Turn the head fully to the right.
• Turn the head fully to the left.
• Raise the head up slightly. Slowly move your face Slowly turn your head fully
• Lower the head down slightly. closer until the white- to the right, and then fully
dashed frame appears and to the left, all the while
• Move the face back from the terminal until there is 9 to 25 then move away until the keeping you eyes centered
inches between the face and the terminal (if adjust white-dashed frame on the screen.
positioning message is still displaying). appears.
• Resume small head circles to the right (if adjust positioning
message is still displaying).
• The progress bar at the bottom of screen will display the
process of the imaging.
• When the face is enrolled the terminal will display, “Permit
Open Door?” press ESC.
• When “Permit Attendance?” displays press OK. Note: You
must press OK; otherwise punches will not be recorded for
polling. Tilt the head down slightly If you wear glasses all of the
• The screen will display “Finished” and will return to the “Input (chin lowered) while keeping time, or on occasion, you
User No” screen. Continue with the next employee or press your eyes on the screen, must initially enroll with your
ESC, ESC and ESC again to return to the normal time/date then tilt the head back glasses on (sunglasses or
screen. slightly (chin upward). dark tinted glasses are not
allowed). Once the progress
• bar indicates enroll is 50%
Card Verification Method Selected complete, REMOVE YOUR
GLASSES and complete the
(FR700 only) enrollment without your
The card verification method is typically used for temporary glasses on.
employees. This verification method only requires that the employee
present their badge and then have a snapshot taken.
The terminal only verifies the badge, it doesn’t verify the employee, it
simply takes a snapshot of the person presenting the badge. This
allows the user to verify that the correct employee presented the
18 • Enrolling Employee Faces Appendix A – Enrollment Guide • 31badge and no buddy punching (when late or absent employees have
co-workers punch the time clock for them) has taken place.
Appendix A - • When “Please Swipe Card” displays present the card at the
terminal.
• When the card is registered the terminal will display, “Permit
Enrollment Guide •
Open Door?” press ESC.
When “Permit Attendance?” displays, press OK. Note: You
must press OK; otherwise punches will not be recorded for
polling.
• The screen will display “Finished” and will return to the “Input
Follow these guidelines for trouble-free enrollments.
User No” screen. Continue with the next employee or press
During the enrollment process the employee should keep their eyes ESC, ESC and ESC again to return to the normal time/date
centered on the screen at all times. Try to keep a solid green box screen.
around your face by following the steps below.
Card and Face Verification Method Selected
(FR700 only)
When enrolling employee faces take the following into consideration:
Eye Glasses - It is recommended for the employee to enroll with the
eye glasses on for half the process, then remove the eye glasses
and complete the registration.
Position yourself and bend at The line of squares at the Hair Style - If the employee has a hair style that has their hair
the waist to bring your face 1 bottom of the screen indicate covering or blocking their eyes, move the hair away from the eyes
- 2.5 ft. from the screen on how much data is needed to during the registration process.
the terminal. complete the enrollment.
• When “Please Swipe Card” displays, present the card at the
terminal.
• Position the employee so the face is in the middle of the two
cameras with 9 to 25 inches between the face and the
terminal.
• The image collecting screen will display. Start the face
recognition enrollment.
• Perform 2 small head circles to the right.
The white dashed box is Slowly make an imaginary circle • Perform 2 small head circles to the left.
preparing to locate points. with your nose. Two small circles
Identification images will only to the right and two to the left • Move the face closer to the terminal until the white dashed
be taken when the green box while keeping your eyes square appears.
appears around your face. centered on the screen.
• Move the face back until there is 9 to 25 inches between
their face and the terminal.
30 • Appendix A – Enrollment Guide Enrolling Employee Faces • 19• Turn the head fully to the right. Note: If changes are needed, from the Functions Menu press 4 -
System Setting and then 2 - Set Network. Make the needed
• Turn the head fully to the left. adjustments and press OK to save the changes.
• Raise the head up slightly. #2 Make sure that the network communications settings are
• Lower the head down slightly. correct in the PayClock software. To check the settings:
• Move the face back from the terminal until there is 9 to 25 • Open PayClock and click on the Terminal Manager tab. The
inches between the face and the terminal (if adjust Terminal Manager window will open.
positioning message is still displaying). • Select the FaceIN terminal from the list; verify that the IP
• Resume small head circles to the right (if adjust positioning Address on the Connection tab matches what was
message is still displaying). configured on the terminal.
• The progress bar at the bottom of screen will display the If after going through each item above you are still not
process of the imaging. communicating with the terminal, have the network administrator
or IT person make sure there aren’t any issues with the network.
• When the face is enrolled the terminal will display, “Permit
Open Door?” press ESC. When an employee presents their face it is not recognized.
• When “Permit Attendance?” displays, press OK. Note: You • If the employee’s facial appearance has changed, re-enroll
must press OK; otherwise punches will not be recorded for the employee.
polling. • Make sure the employee is presenting their face within range
• The screen will display “Finished” and will return to the “Input of the terminal, within 9 to 25 inches of the front of the
User No” screen. Continue with the next employee or press terminal.
ESC, ESC and ESC again to return to the normal time/date How do I restart the FaceIN terminal if it stops or appears to
screen. hang up?
• Disconnect the AC power. Wait a few seconds and
reconnect.
• Press the RESET button on the bottom of the terminal.
Is the FaceIN terminal waterproof?
NO, the terminal is not waterproof! Make sure you keep the
terminal away from water or a wet/damp environment.
How do I clean the FaceIN terminal?
Use only a soft cloth or similar material to clean the screen and
front of the terminal. Avoid using water or cleaners.
Can I place the FaceIN terminal outside?
It is not recommended to place the terminal in a low temperature
environment. The working temperature for the screen and other
parts in the terminal are normal indoor temperatures.
20 • Enrolling Employee Faces Troubleshooting the FaceIN • 29Troubleshooting the Using the FaceIN
FaceIN Terminal
The FaceIN will be ready for use when the facial registration process
is complete.
If the PayClock software doesn’t communicate with the FaceIN try
these suggestions:
General Troubleshooting
• Make sure that all connections are secure and the cable is in
tact.
• Make sure that the network cable is securely connected to
the Ethernet port on the terminal.
• Make sure that the terminal’s power supply is securely
connected to an electrical outlet.
• Make sure that the power supply is securely connected to
the terminal and the unit is powered up. To punch, the employee will simply approach and look at the
terminal. Within seconds they are identified and punched In or Out.
Upon successful verification the terminal will play a confirmation
FaceIN Troubleshooting sound and the screen will display the employee’s first name and time
The FaceIN terminal will not communicate with the PayClock of punch.
software.
#1 Make sure that the network communications settings are
correct at the terminal, to check the settings:
• At the FaceIN terminal press the MENU key. Administrator
verification is required. The Functions Menu will open.
• Press 5. The System Info. menu will open.
• From the System Info. menu, press 2 - Product Info.
• Verify the addresses for the IP, Mask and Gate.
• To exit press ESC.
28 • Troubleshooting the FaceIN Using the FaceIN Terminal • 21You can also read