GNSS QUICK START GUIDE - MICROSURVEY FIELDGENIUS FOR ANDROID - MICROSURVEY ...
←
→
Page content transcription
If your browser does not render page correctly, please read the page content below
0

   GNSS QUICK                                             MicroSurvey
                                                          FieldGenius for
  START GUIDE                                             Android

Reference Guide for FieldGenius for Android GNSS Set Up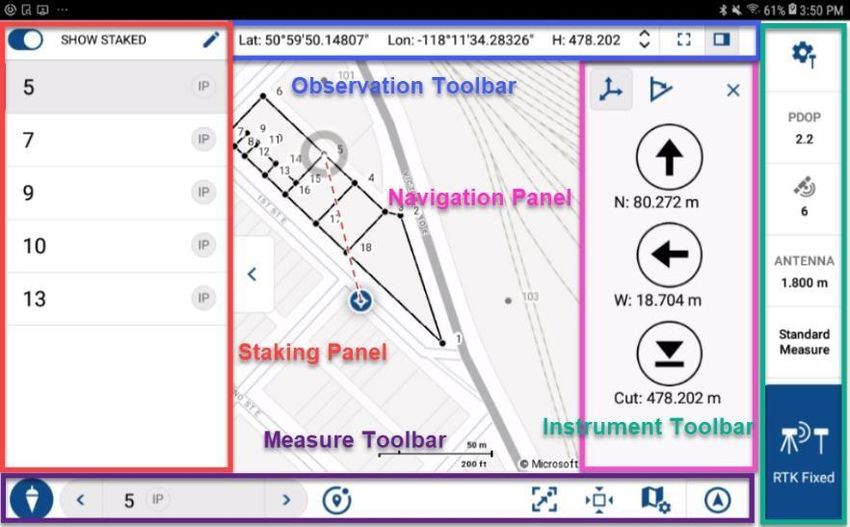
1     FieldGenius for Android Quick Start Guide

    Contents
    Part 1 – Create a New Project ..............................................................................................................................................3
       Project Settings ....................................................................................................................................................................4
           Units and Scale ................................................................................................................................................................4
           Coordinate System .........................................................................................................................................................4
           Project Files ......................................................................................................................................................................5
    Part 2 – First Time Rover Setup...........................................................................................................................................6
       Create Instrument Connection Profile ............................................................................................................................6
           Create a New Profile ......................................................................................................................................................6
           Enter Name and Save ....................................................................................................................................................6
           Set Up Communication ..................................................................................................................................................6
       Setting up Corrections ........................................................................................................................................................7
           Configure Correction Link..............................................................................................................................................8
           Radio ..................................................................................................................................................................................8
           RTK Internet .....................................................................................................................................................................9
       Setup the Data Source .....................................................................................................................................................10
       Antenna Height ..................................................................................................................................................................10
           Model................................................................................................................................................................................10
           Measure Point ................................................................................................................................................................10
       Tolerance Settings Concepts..........................................................................................................................................11
           Active Tolerance ............................................................................................................................................................11
    Part 3 – Program Options and Interface ..........................................................................................................................12
       Settings ................................................................................................................................................................................12
           Units .................................................................................................................................................................................12
           Language ........................................................................................................................................................................12
           Interface ...........................................................................................................................................................................12
       Toolbars ...............................................................................................................................................................................12
           Survey Map View ..........................................................................................................................................................12
           Staking Map View..........................................................................................................................................................18
    Part 4 – Measure Modes and Workflows .........................................................................................................................21
       Survey Map View...............................................................................................................................................................21

MICROSURVEY AND FIELDGENIUS ARE REGISTERED WITH THE U.S. PATENT AND TRADEMARK OFFICE BY MICROSURVEY
        SOFTWARE INC.© 2021 MICROSURVEY SOFTWARE INC. ANDROID IS A TRADEMARK OF GOOGLE LLC.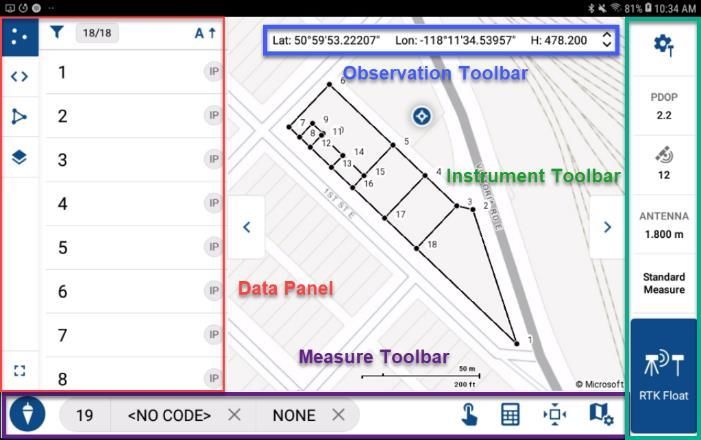
2     FieldGenius for Android Quick Start Guide

           Standard Measurement ...............................................................................................................................................21
       Staking Map View ..............................................................................................................................................................22
           Point Staking ..................................................................................................................................................................22
       Configuring Program Options .........................................................................................................................................23
           Map View Options .........................................................................................................................................................23
    Appendix ..................................................................................................................................................................................25

MICROSURVEY AND FIELDGENIUS ARE REGISTERED WITH THE U.S. PATENT AND TRADEMARK OFFICE BY MICROSURVEY
        SOFTWARE INC.© 2021 MICROSURVEY SOFTWARE INC. ANDROID IS A TRADEMARK OF GOOGLE LLC.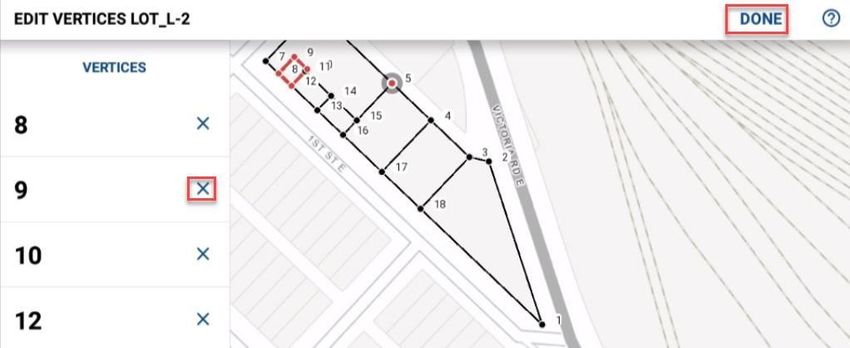
3    FieldGenius for Android Quick Start Guide

    Part 1 – Create a New Project
    The Project Manager in FieldGenius for Android is used to open, create, and delete projects.

     Create a new project.
        1. From the “Projects” screen, select the “New
            Project” button.

     Configure and Save a New Project.
        1. Enter a name for your project.
            Note: No spaces are currently allowed in
            the project name.
        2. Select the Units, Coordinate System and
            Vertical System.
        3. Tap the list button and select the country
            that the work is being conducted in.
            - 1. Select Country
            - 2. Select arrow to expand list
            - 3. Select Horizontal System
        4. Tap the Horizontal System to select
        5. Tap the Vertical System to select
        6. Tap the “i” button to review.
        7. Tap “Create Project” to save your new
            project to the Project List.
            Note: To cancel without setting up a new
            project, tap the back arrow button.

MICROSURVEY AND FIELDGENIUS ARE REGISTERED WITH THE U.S. PATENT AND TRADEMARK OFFICE BY MICROSURVEY
        SOFTWARE INC.© 2021 MICROSURVEY SOFTWARE INC. ANDROID IS A TRADEMARK OF GOOGLE LLC.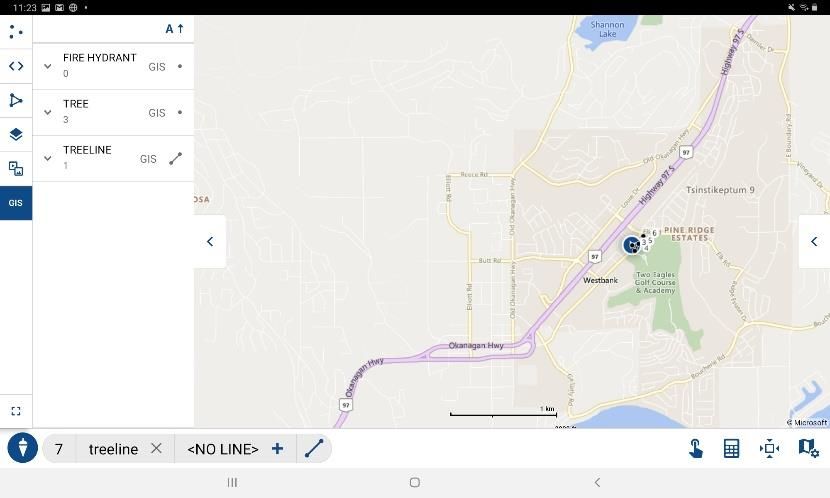
4    FieldGenius for Android Quick Start Guide

    Project Settings
    A FieldGenius for Android project needs to have the Units and Coordinate System defined during the “New
    Project” configuration. Use the drop-down menus to select the appropriate Units and Coordinate System for
    your project.

    Units and Scale
    The Distance Unit and Angle Unit must be set when a
    project is created and cannot be modified once created.

    Distance Unit
    Choose from Meters, International Feet, or US Survey
    Feet

    Angle Unit
    Angular Units are set to Degrees. (Only degrees are
    supported at this time.)

    Coordinate System
    The project Coordinate System is selected during the
    new project configure and cannot be modified after a
    project is created. The Horizontal Projected Coordinate
    System for your project will be listed in the drop-down
    list of Coordinate Systems. To view a list of previously
    selected Coordinate Systems, tap on the drop-down list.
    To select a Coordinate System not shown in the drop-
    down list, select the Country List to view all available
    Coordinate Systems. You can tap the (i) button to see
    more details on the selected Coordinate System.

    Country List
    If your Coordinate System is not shown in the Coordinate System drop-down list, select the list icon to the
    right of the Coordinate System drop-down list. You can select the country you are working in from the list
    and then select the appropriate Coordinate System from the list. If you do not see your Coordinate System,
    you can create a User Defined Coordinate system by entering projection parameters and a datum shift
    equation (if required). This feature does not support grid file-based datum shifts.

    Gridshift Catalog
    Some coordinate systems will require the download of a grid shift file. View the grid shift catalog for a list of
    gridshifts available for download. If you are not able to locate the gridshift file you require use the Feedback
    option in the settings menu to contact support so we can develop this gridshift and add it to the catalog.

MICROSURVEY AND FIELDGENIUS ARE REGISTERED WITH THE U.S. PATENT AND TRADEMARK OFFICE BY MICROSURVEY
        SOFTWARE INC.© 2021 MICROSURVEY SOFTWARE INC. ANDROID IS A TRADEMARK OF GOOGLE LLC.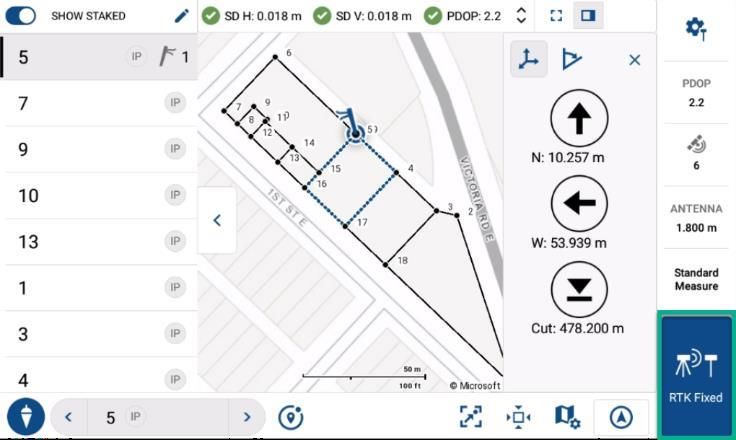
5    FieldGenius for Android Quick Start Guide

    Vertical System
    Select the Vertical Datum for your project from the
    catalog of available options. The catalog will always
    contain Ellipsoidal (WGS84) and all available Geoid
    Models.

    See the Appendix for more information about Geoid
    Models.

    Code List
    Use the drop-down selector to select the code list library
    required for the project you are configuring.

    The code lists are stored using a .ctf file format and are stored in the following file path: Internal
    Storage>FieldGenius>Configurations.

    Feature List
    The feature list is an optional file that can be configured for your project if you are required to collect GIS
    attribute information along with your observations.

    Utilize the feature manager to create or edit existing feature files.

    Project Files
    Each FieldGenius for Android project is made up of multiple files and database records saved in a
    FieldGenius project folder on the device. The project folder is located at: Internal
    Storage>FieldGenius>Projects>Project Name.

    Project File Descriptions
    FieldGenius for Android projects are folders containing at least seven files as described below.

     ProjectName.sqlite                                        Project database records
     Survey.xml                                                Point and line description
     Project Settings                                          Project settings and information
     InstrumentProfiles.json                                   GNSS instrument connection profile information
     Tracexxx-xx-xx_xx-xx-xx.txt                               Troubleshooting trace file
     Map3_datum                                                Coordinate system datums
     Map3_ellipsoids                                           Coordinate system ellipsoids
     Map3_Systems                                              Coordinate systems

MICROSURVEY AND FIELDGENIUS ARE REGISTERED WITH THE U.S. PATENT AND TRADEMARK OFFICE BY MICROSURVEY
        SOFTWARE INC.© 2021 MICROSURVEY SOFTWARE INC. ANDROID IS A TRADEMARK OF GOOGLE LLC.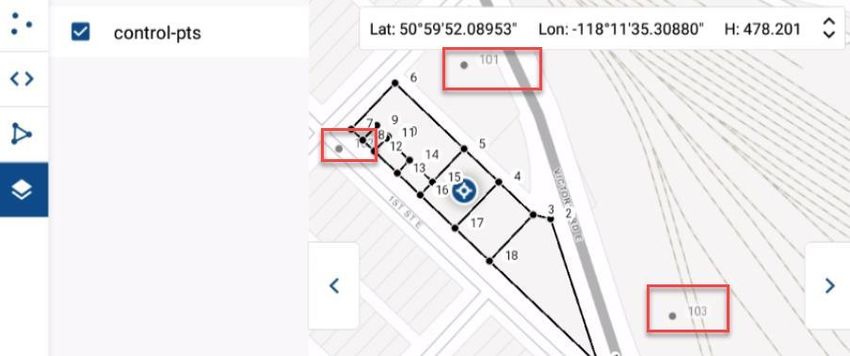
6    FieldGenius for Android Quick Start Guide

    Part 2 – First Time Rover Setup
    FieldGenius for Android instrument profiles contain settings specific to each instrument. When selecting an
    instrument profile and connecting to the instrument, all these settings are automatically populated.

    Create Instrument Connection Profile
    Once you have created and configured your new project, it is time to create your GNSS Rover Profile.

    Create a New Profile
       1. From the Main Menu, tap “Select Instrument”
          button.
       2. On Instrument Profile page, tap “Add Profile.”

    Enter Name and Save
       1. Select either GNSS rover or GNSS reference.
       2. Select the “Make” of your instrument from the
          drop-down.
       3. Select the “Model” of your instrument from the
          drop-down.
       4. Accept or edit the auto-populated “Profile Name.”
          Note: No spaces are allowed in the profile name.
       5. Tap “Create”

    Set Up Communication
       1. Tap “SET UP COMMUNICATION.”
       2. Connection Type = Bluetooth
       3. Tap “Search” to see a list of available Bluetooth
          devices.
       4. A spinning icon will appear while searching for
          available Bluetooth devices.
       5. Select the GNSS receiver as you Bluetooth
          search for the device.
       6. Tap “Refresh List” if the receiver does not appear
          on the list of devices.
       7. Tap the “Connect” button to enable the Bluetooth connection.
              • While connecting, status messages will be shown in the pulsating plumb-bob status pop-up.
              • Once connected you should see the current solution along with satellites and PDOP values.

MICROSURVEY AND FIELDGENIUS ARE REGISTERED WITH THE U.S. PATENT AND TRADEMARK OFFICE BY MICROSURVEY
        SOFTWARE INC.© 2021 MICROSURVEY SOFTWARE INC. ANDROID IS A TRADEMARK OF GOOGLE LLC.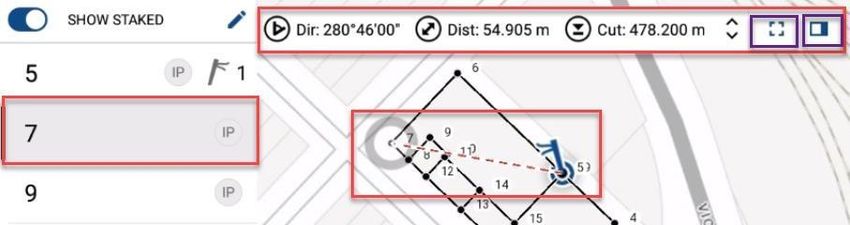
7    FieldGenius for Android Quick Start Guide

              •   For current position information, tap on
                  the “i” button.
              •   Select on the 3-dot menu to access
                  receive information and additional
                  instrument settings.

    Setting up Corrections
    You should now be connected to the instrument; the
    next step is to set up your receiver to receive RTK
    Corrections. Tap the “SET UP CORRECTIONS” button.

    Then choose the method for how you intend on
    receiving RTK corrections.

MICROSURVEY AND FIELDGENIUS ARE REGISTERED WITH THE U.S. PATENT AND TRADEMARK OFFICE BY MICROSURVEY
        SOFTWARE INC.© 2021 MICROSURVEY SOFTWARE INC. ANDROID IS A TRADEMARK OF GOOGLE LLC.
8    FieldGenius for Android Quick Start Guide

    Configure Correction Link
    When connecting to a GNSS Rover Device, the
    “Corrections” page will be displayed. Select the
    method type for how you intend to obtain RTK
    corrections:

       •    RTK via Radio: select to obtain corrections
            from a UHF reference base station.
       •    RTK via Internet: select to obtain corrections
            from caster over an internet connection.
       •    No RTK: select to receive autonomous
            position locations with no corrections.

    Radio
    Tap the “SETUP COMMUNICATIONS” button.

    Device Settings
    Select the appropriate type of radio from the drop-down
    list.

    Radio Settings
    For radio corrections, choose the appropriate Device
    and Port from the drop-down menu options. Select
    “Radio Settings” to review or change the current radio
    configuration settings. Refer to the Radio Manufacturer
    for the appropriate settings. Choose the Make and
    Model from the drop-down menus and set the channel
    or frequency. On some models, the radio will be
    automatically programmed by FieldGenius for Android
    to the correct channel or frequency selected. Configure
    the radio settings as necessary following manufacturer’s
    recommendations.

       •    Configure the radio settings.
       •    Channel.

MICROSURVEY AND FIELDGENIUS ARE REGISTERED WITH THE U.S. PATENT AND TRADEMARK OFFICE BY MICROSURVEY
        SOFTWARE INC.© 2021 MICROSURVEY SOFTWARE INC. ANDROID IS A TRADEMARK OF GOOGLE LLC.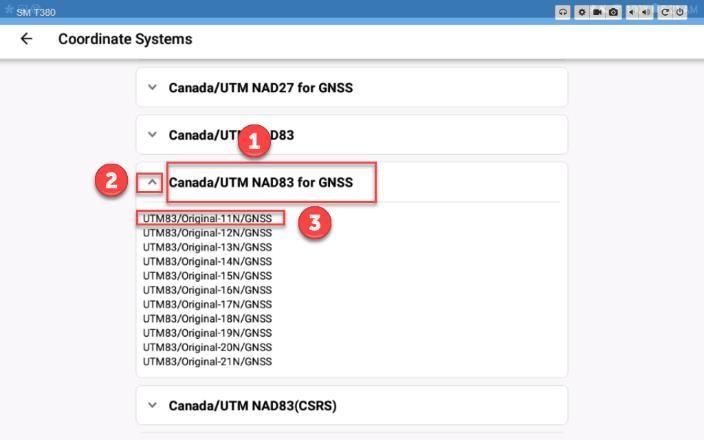
9    FieldGenius for Android Quick Start Guide

       •   Channel Spacing,
       •   Protocol.
       •   FEC.
       •   Transmission Power.
       •   Device Port: select the appropriate port when
           there are multiple options.

    RTK Internet
    Select the appropriate correction link device type
    option: Data Collector or GSM Modem.

    Data Collector = connects the data collector to the
    internet using the device manufacturer instructions.
    The status of the connection, (connected/not
    connected) will be displayed below the “Type”
    selection field.

    GSM Modem = allows you to set up corrections from a
    cellular network. You will require the following
    information before you can configure receiving
    corrections via GSM.

       •   Model
       •   APN
       •   Username
       •   Password

MICROSURVEY AND FIELDGENIUS ARE REGISTERED WITH THE U.S. PATENT AND TRADEMARK OFFICE BY MICROSURVEY
        SOFTWARE INC.© 2021 MICROSURVEY SOFTWARE INC. ANDROID IS A TRADEMARK OF GOOGLE LLC.
10 FieldGenius for Android Quick Start Guide
Setup the Data Source
Fill in the correction source fields shown to set the
receiver up to receive RTK corrections.
The required NTRIP information:
• Internet address.
• Port.
• Username.
• Password.
Start/Stop Receiving Corrections
Once the corrections are configured, select the
“Start Receiving” button to implement
processing and the application of corrections to
the GNSS position. To terminate applying the corrections, select the “Stop Receiving” button.
Antenna Height
The Antenna Height dialogue allows the user to change
the measured height of the antenna an also define a user
defined antenna with changed offsets if required.
Model
The preconfigured offsets information of the receiver is
stored under the Offsets section.
Select “User Defined” from the model pulldown to manually
enter an offset value to change the antenna setting.
Measure Point
Available options vary between receivers.
MICROSURVEY AND FIELDGENIUS ARE REGISTERED WITH THE U.S. PATENT AND TRADEMARK OFFICE BY MICROSURVEY
SOFTWARE INC.© 2021 MICROSURVEY SOFTWARE INC. ANDROID IS A TRADEMARK OF GOOGLE LLC.11 FieldGenius for Android Quick Start Guide
Tolerance Settings Concepts
FieldGenius for Android can be configured using three
tolerance settings that can determine the minimum
requirements that must be met for storing a position
when the tolerance setting is active. The user can
change the active tolerance setting to suit the project
requirements.
Default Tolerance settings:
• Autonomous
• RTK Float
• FTK Fixed
The three tolerance settings each have a default
description and various options configured for specific
conditions. The available options may vary between
GNSS receivers. Tap the desired tolerance panel to select
it as the active tolerance to be used by the software. The
active tolerance will have a checkmark next to the name.
Active Tolerance
The Active Tolerance is used when measuring points to
determine if minimum specifications are met based off
the actions taking place. It is a method of ensuring
quality of data. If a measured point is out of tolerance, a
warning icon will be displayed on the point review
screen. The user has the option to re-measure the point
or to save the point even though it does not meet
tolerance.
Tap the “three-dot” icon to edit the tolerance setting to
set custom tolerance values. There is no option to create
a new tolerance, only to edit the existing ones to meet your required specifications. You can use the
“Description” field to name the tolerance setting. Tap “OK” to save the tolerance values.
Once you are in the Map View, the Observation Toolbar
will have a view that displays the current GNSS solution
horizontal standard deviation (SD H), vertical standard
deviation (SD V) and PDOP values. The icon beside
each value indicates if the current solution is within or
out of tolerance. By using this view on the Observation
Toolbar, the user can preview if tolerances are met
before taking a measurement.
MICROSURVEY AND FIELDGENIUS ARE REGISTERED WITH THE U.S. PATENT AND TRADEMARK OFFICE BY MICROSURVEY
SOFTWARE INC.© 2021 MICROSURVEY SOFTWARE INC. ANDROID IS A TRADEMARK OF GOOGLE LLC.12 FieldGenius for Android Quick Start Guide
Part 3 – Program Options and Interface
Settings
FieldGenius for Android application settings are accessed from the Main Menu by tapping the “Settings”
button. Some commonly used settings that you may need to customise are outlined below.
Units
Angular Format
Set the Angular Format for display in DEGREES MINUTES SECONDS or DECIMAL DEGREES
Angular Precision
Set the number of integers to display after the decimal point for angular values.
Linear Precision
Set the number of integers to display after the decimal point for linear values.
Language
When you change the language, you will need to restart the application before the new language is
displayed.
Interface
Switch map display modes between High Contrast and Dark Mode
Toolbars
On the Survey and Staking map view screens, the
FieldGenius for Android interface consists of multiple
toolbars and data panels that display all the information
the surveyor needs to conduct fieldwork on one screen.
The goal of the toolbar and data panels is to provide
necessary information with the minimal number of taps to
navigate within the map screen. Within FieldGenius for
Android, the workflows are split between surveying points
and staking points. The different map views allow for the
display of more tools aligned to the specific work activity.
On the Main Menu, select either “Survey” or “Staking” to
navigate to the appropriate map view.
Survey Map View
Survey Toolbars and Data Panels
The Instrument Toolbar and the Data Panel can be opened or collapsed to show more of the map
view when needed by tapping the Open and Close tabs beside each.
MICROSURVEY AND FIELDGENIUS ARE REGISTERED WITH THE U.S. PATENT AND TRADEMARK OFFICE BY MICROSURVEY
SOFTWARE INC.© 2021 MICROSURVEY SOFTWARE INC. ANDROID IS A TRADEMARK OF GOOGLE LLC.13 FieldGenius for Android Quick Start Guide
GNSS Instrument Toolbar
Instrument Settings Opens the GNSS Rover Profile screen which provides access to
Button change instrument-specific settings.
PDOP Button Displays the position DOP values. Tap to cycle through PDOP,
HDOP VDOP, and position Standard Deviation values.
Satellite Plot Button Displays the number of satellites used for the current position
solution. Tap to open the sky plot or to access the satellite list.
Antenna Height Displays the current antenna height set and provides access to
Button the Antenna Height dialogue.
Measure Mode Button Displays the current measurement mode and provides access to
the Measure Modes screen to select a measure mode.
Measure Button Displays the current solution type and is used to begin a position
measurement.
MICROSURVEY AND FIELDGENIUS ARE REGISTERED WITH THE U.S. PATENT AND TRADEMARK OFFICE BY MICROSURVEY
SOFTWARE INC.© 2021 MICROSURVEY SOFTWARE INC. ANDROID IS A TRADEMARK OF GOOGLE LLC.14 FieldGenius for Android Quick Start Guide
Observation Toolbar
The Observation Toolbar shows information about the current position. The Observation Toolbar is linked to
the Instrument Toolbar and will only display when the Instrument Toolbar is open and you are connected to
an instrument. Tap the Observation Toolbar to cycle through the different display modes:
• Latitude, Longitude, Height.
• Northing, Easting, Height.
• Horizontal SD, Vertical SD, PDOP.
• SOG. COG, Time, (GPS).
Measure Toolbar
The Measure Toolbar provides information on the point and line settings plus a quick access to highly used
features and map view options.
The Plumb-bob icon provides navigation to the Main Menu Screen.
The numbers and code provided next to the plumb-bob is information about the next point to be measured.
• The number of the next point measured.
• The Point Code of the next point measured. Tap the area to open the code list and
select a code for the next point to be measured. It the code has a line symbol both the point
code and line segment will be set for the next point measured. If the line segment icon is missing on
the code list name, then only the Code will be set to the selected name.
Manual Measure Brings up the Manual Measure Page that allows users to
Button navigate a target to a location and save a point as a manual
measurement in the points database.
COGO Button Displays the list of available COGO options and allows the user
to tap on an option and open the COGO data panel
Zoom Extents Button Resizes the Map View to include all project points, lines and
current GNSS position.
Map Options Button Opens the Map Options panel that allows users to customize the
display of points, lines background maps and map center
features.
MICROSURVEY AND FIELDGENIUS ARE REGISTERED WITH THE U.S. PATENT AND TRADEMARK OFFICE BY MICROSURVEY
SOFTWARE INC.© 2021 MICROSURVEY SOFTWARE INC. ANDROID IS A TRADEMARK OF GOOGLE LLC.15 FieldGenius for Android Quick Start Guide
Survey Data Panel
Use the arrow tabs to open and collapse the data panel on the Survey Map View.
The left data panel type selection bar allows the user to switch between different
data panels. Tap the icons to switch between the following data panels:
• Points List.
• Code List
• Line Segment List
• Xref – External References List
• Media – List of existing photos taken that are associated with the project
• GIS – List of existing GIS Point/Line attributes that been collected
The data panel provides key lists of items that users may want to select or change
quickly when taking measurements in the field.
Full Screen View – Tap the Full-Page Icon at the bottom to open the full-page details for a selected
data panel.
Points List – Lists the project points. To filter the list by point code, tap the
“funnel” icon. A filtered list will display the number of points listed of the
total points in the project. To sort the points, tap the “sort” icon and select
the sort option.
The full screen mode will display all the information
about a specific point. To edit or delete a point, you
need to open the Full-Screen Mode and select the
“three-dot” icon. The icon on the left indicates
whether the point is a Control Point or a Staked out
point. If the point is staked out, the staking icon will
be shown with the number of times the point has
been staked. Use the expand arrow to show a
summary of the staked points.
Code List – Lists the codes that can be assigned to a point when it is
measured. Tap a code to select it. The code will then be shown in the
Next Code field on the Measure Toolbar.
The full screen mode will allow users to add new codes. Users can tap
the Full-Screen Icon and then the “Add” button. A code can be assigned
as a point code or both a point code and a line type code.
MICROSURVEY AND FIELDGENIUS ARE REGISTERED WITH THE U.S. PATENT AND TRADEMARK OFFICE BY MICROSURVEY
SOFTWARE INC.© 2021 MICROSURVEY SOFTWARE INC. ANDROID IS A TRADEMARK OF GOOGLE LLC.16 FieldGenius for Android Quick Start Guide
Line Codes – Shows a list of line segment codes that can be selected and then
edited or set to active. If set to active, the code is listed in the “Next Line” field and
the next measurement taken will be appended to the line segment. If the user
selects “edit,” the data panel will display the list of point vertices that are included in
the line segment. The user has the option to add or delete vertices to the line
segment. To delete a vertex, tap the ‘X” next to the point number in the data panel.
To add a point to the end of the line segment, tap the Map and select a point. Tap the “Done” button to exit
the edit mode.
The full screen view allows user to add a new line type. On the full screen, tap the Line Type and then on
the right side, tap the “+” button to create a new line segment. Each line segment shows the number of point
vertices that are included in the line segment. Tap a line segment to select it and have the option to make it
active or edit it.
Xref Layers – The list of external references allows a user to select a different project on their Android tablet
and import the project points as a background layer on the current project. The Xref points have an opacity
of 60% of the project points so the user can differentiate between the current and background points.
In the full screen view, users can see a list of all the available Xref files available on their data collector.
Select the check box to have the Xref file displayed as a layer on the current project.
MICROSURVEY AND FIELDGENIUS ARE REGISTERED WITH THE U.S. PATENT AND TRADEMARK OFFICE BY MICROSURVEY
SOFTWARE INC.© 2021 MICROSURVEY SOFTWARE INC. ANDROID IS A TRADEMARK OF GOOGLE LLC.17 FieldGenius for Android Quick Start Guide
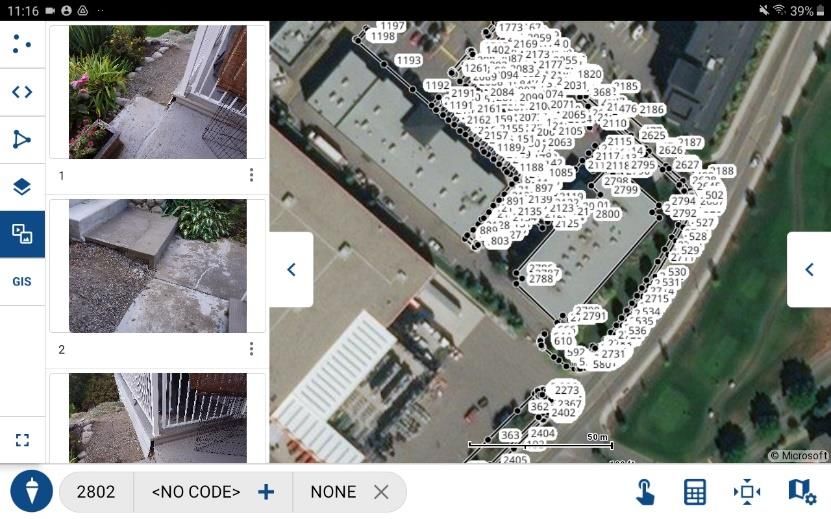
Media – The media data panel allows you to view images that are tied to specific points in the project. You
can use the 3-dot menu to icon to access options to work with project media to reassign links or delete if
required.
GIS – The GIS data panel allows you to view codes available to use for GIS points and lines collection and
displays the number of points and lines collected for each attribute code.
MICROSURVEY AND FIELDGENIUS ARE REGISTERED WITH THE U.S. PATENT AND TRADEMARK OFFICE BY MICROSURVEY
SOFTWARE INC.© 2021 MICROSURVEY SOFTWARE INC. ANDROID IS A TRADEMARK OF GOOGLE LLC.18 FieldGenius for Android Quick Start Guide
Staking Map View
Staking Toolbars and Data Panels
The Instrument Toolbar and Data Panel can be opened or collapsed by tapping the Open and Close
tabs beside each to show more of the Map View When needed.
GNSS Instrument Toolbar
The Instrument Toolbar displays position information and provides access to settings and measure modes.
The Instrument Toolbar has the same features and functionality as the Survey Instrument Toolbar. (See
Instrument Toolbar description in the Survey Map View section.
Staking Toolbar
The Staking Toolbar provides information on the next point to be staked with quick navigation buttons.
The Plumb-bob icon provides navigation to the Main Menu screen.
Next stake point features:
• Tap the < icon to go to the previous point on the Stake List.
• The Stake Number Filed displays the next point the be staked and the point code.
• Tap the > icon to go to the next point on the stake list.
• Tap the icon to find the closest point on the stake list to your current position.
• Tap the icon to zoom the screen to include your current position and the next stake point.
• Tap the center icon to center the map on your current position.
• Tap the icon to display the map control panel.
MICROSURVEY AND FIELDGENIUS ARE REGISTERED WITH THE U.S. PATENT AND TRADEMARK OFFICE BY MICROSURVEY
SOFTWARE INC.© 2021 MICROSURVEY SOFTWARE INC. ANDROID IS A TRADEMARK OF GOOGLE LLC.19 FieldGenius for Android Quick Start Guide
Staking Data Panel
The Staking data panel provides a list of the points on the Staking List.
Turn ON the toggle if you want to see the points on the Staking List that have already
been staked. If the toggle is OFF, then only the points remaining to be staked will be
shown.
Tap the “pencil” icon to open the full screen view which allows users to add and remove
points from the staking list.
On the full screen view of the Staking List, the user can select points or remove them
from the Staking List by tapping the checkbox next to the point number.
To assist in selecting points to be added to the Staking List, the user can filter or sort the
list. If the points list has been filtered, the number of total points is displayed. To open the
filter option, tap the funnel icon and select the codes you want to add to the filtered list.
Select “APPLY” when done.
To sort the points list, tap the “sort” icon.
The points selected on the Staking List are indicated by
the checkmark and the status of the staked points on the
list are shown by the icons “to be staked” and
“already staked” If a point has already been staked,
the number of times is indicated next to the icon.
Once you have added or removed all the points you
wanted from the Staking List, tap “DONE” to update the
list and return to the Staking Map View. If you want to
return to the map view without updating the list, select the back icon.
Navigation to Stake Point
The staking screen provides several different features and views to help the user navigate to the next point
to be staked. If the Staking data panel is open, the next point to be staked is highlighted on the list.
The Observation Toolbar has two view options to show the Cartesian Northing, Easting and Cut/Fill
distances from the current position or Direction, Distance, and Cut/Fill to the selected stake point.
.
On the Map View, the current location of the GNSS receiver is shown and the next point to be staked is also
shown with a red dashed rubber band line connecting the two. As the user moves the GNSS receiver, the
rubber band line and Observation Toolbar values are updated in real time on the screen.
MICROSURVEY AND FIELDGENIUS ARE REGISTERED WITH THE U.S. PATENT AND TRADEMARK OFFICE BY MICROSURVEY
SOFTWARE INC.© 2021 MICROSURVEY SOFTWARE INC. ANDROID IS A TRADEMARK OF GOOGLE LLC.20 FieldGenius for Android Quick Start Guide
If the user wants, they can open a partial or full screen data panel to display the navigation
information by tapping the data panel icon or full-page icon in the Observation Toolbar.
On the data panel while in Full-Page View, the user cab toggle between Cartesian and Direction
views by tapping the appropriate icon. To close the data panel or full screen view and return to
the map view, tap the “X” button.
MICROSURVEY AND FIELDGENIUS ARE REGISTERED WITH THE U.S. PATENT AND TRADEMARK OFFICE BY MICROSURVEY
SOFTWARE INC.© 2021 MICROSURVEY SOFTWARE INC. ANDROID IS A TRADEMARK OF GOOGLE LLC.21 FieldGenius for Android Quick Start Guide
Part 4 – Measure Modes and Workflows
FieldGenius for Android has separate Survey and Staking workflows and Map View Screens that are
accessed from the Main Menu.
Survey Map View
On the Survey Map View, select the Measure Button to store a position. The Measure Button will display the
receiver’s current GNSS Solution.
Standard Measurement
General Procedure is as shown in the table below.
Start Measurement
1. With “Standard Measure” Mode set, select
the Measure Button to start measuring the
current position.
2. The Measure Button will display the
receiver’s current GNSS solution.
3. The Observation Toolbar can show if the
current solution is within the applied
horizontal and vertical tolerances.
Confirm Measurement
4. The number of observations is determined
by what Tolerance Mode is set as active.
5. RMS values are shown.
6. “Store Position” button is available once
tolerance criteria are met.
7. Use the “Tolerance Override” option if you
want to store out of tolerance
observations.
Note: Out of tolerance observations are shown
with a warning icon in the Observations Table.
Store Position
8. Accept or change the point name.
9. Accept or change the point code.
10. Check the Control Point box if the point is
a control point.
11. Review the Cartesian Coordinates.
12. Tap “SAVE” to store the point and add it to
the points database.
13. Tap the “Back Arrow” to return to the
previous screen without storing the point.
MICROSURVEY AND FIELDGENIUS ARE REGISTERED WITH THE U.S. PATENT AND TRADEMARK OFFICE BY MICROSURVEY
SOFTWARE INC.© 2021 MICROSURVEY SOFTWARE INC. ANDROID IS A TRADEMARK OF GOOGLE LLC.22 FieldGenius for Android Quick Start Guide
Staking Map View
Select Staking from the Main Menu.
Users can choose between Point, Line or Surface Staking modes.
Point Staking
General Procedure is shown in the table below.
Add Points to the Staking List
1. Select “edit” from the Staking List Panel
2. On the “Edit Stake List” screen, Add Point
to the Staking List.
3. Select “Done.”
Select Next Point to be Staked.
4. Select the Point on the Staking List or tap
the point on the Map Screen.
Note: the point needs to be on the Staking List
to be selected from the map screen.
5. Use the Measure Toolbar to select
Previous, Next, or Closest point to be
staked.
Stake Point When Ready
6. Select the Point on the Staking List or tap
the point on the Map Screen.
7. Navigate to the Stake Point.
8. The Staking Map View provides several
different views and tools to assist you in
locating the stake point:
a. Map View with rubber band dotted
line between the current position
and stake point.
b. Observation Toolbar with Cartesian
or Direction Navigation distances.
c. Navigation Panel with Cartesian
and Directional distances.
d. Full-Screen view of Cartesian and
Directional distances.
9. When at the stake point, tap the Measure
button to start a measurement.
MICROSURVEY AND FIELDGENIUS ARE REGISTERED WITH THE U.S. PATENT AND TRADEMARK OFFICE BY MICROSURVEY
SOFTWARE INC.© 2021 MICROSURVEY SOFTWARE INC. ANDROID IS A TRADEMARK OF GOOGLE LLC.23 FieldGenius for Android Quick Start Guide
Store Staked Point
10. Review the staked point information.
11. Select “Save” to add the point to the Points
Database.
12. Select the Back Arrow to return to the
previous page without saving the point.
Note: To stake a point more than once, turn
on “Show Staked Points” toggle on the
Staking Data Panel. Then, tap on the
staked point and take another
measurement. The new staked point will
contain the number of times it has been
staked in its name. (e.g., 5_1 to 5_2 etc.)
Note: You can open the Stake List Full-
Page view from the Staking Data Panel at
any time during staking.
Configuring Program Options
Program Options are designed to help the user get the most out of FieldGenius for Android. Options relevant
to GNSS workflows and map view display options are summarized below.
Map View Options
The Map View Options are accessed from the bottom toolbar map setting icon on the map view screen.
• The user can pan the map by using one finger to move the image on the main screen.
• The user can zoom in on the map by using two fingers to pinch or expand the map zoom level.
Map Interface Options
Point Names
To display Point Names on the map view, switch the toggle ON.
Lines
To display the Lines on the map view, switch the toggle to ON.
Scale Bar
To display the Map Scale Bar on the map view, switch the toggle to ON.
Background Map Type
When the Android device is connected to the internet, the user can select a
background map to display on the Map View screen. There are four map type
view settings available:
• Street View
• Satellite Image
• Terrain
• No Background Map
MICROSURVEY AND FIELDGENIUS ARE REGISTERED WITH THE U.S. PATENT AND TRADEMARK OFFICE BY MICROSURVEY
SOFTWARE INC.© 2021 MICROSURVEY SOFTWARE INC. ANDROID IS A TRADEMARK OF GOOGLE LLC.24 FieldGenius for Android Quick Start Guide
Map Opacity
The background map opacity can be adjusted using the + and – buttons on the opacity control so the user
can make the map image lighter to better see the project points and lines dependant on different lighting
conditions.
Center to Current Location
Tap the center icon to move the map view so that when you are connected to a GNSS receiver, the
current location is always centered on the map. Turn the center toggle ON to update the map view so that
your current location is always centered on the map when you move.
MICROSURVEY AND FIELDGENIUS ARE REGISTERED WITH THE U.S. PATENT AND TRADEMARK OFFICE BY MICROSURVEY
SOFTWARE INC.© 2021 MICROSURVEY SOFTWARE INC. ANDROID IS A TRADEMARK OF GOOGLE LLC.25 FieldGenius for Android Quick Start Guide
Appendix
Additional Resources for FieldGenius for Android.
Online Manual
A version of the complete FieldGenius for Android Manual is available online at:
Online Help Manual
Movies
A selection of instructional videos for FieldGenius for Android are available online at:
FieldGenius for Android How-to Videos
Helpdesk
Contact MicroSurvey Support through the MicroSurvey Helpdesk at:
MicroSurvey Helpdesk
Grid Shift Files
MicroSurvey provides a collection of Grid Shift files for FieldGenius for Android, files and instructions are
available at:
Grid Shift Files
MICROSURVEY AND FIELDGENIUS ARE REGISTERED WITH THE U.S. PATENT AND TRADEMARK OFFICE BY MICROSURVEY
SOFTWARE INC.© 2021 MICROSURVEY SOFTWARE INC. ANDROID IS A TRADEMARK OF GOOGLE LLC.You can also read