HorschConnect OPERATING INSTRUCTIONS - TRANSLATION OF THE ORIGINAL OPERATING INSTRUCTIONS READ CAREFULLY PRIOR TO STARTING UP! KEEP OPERATING ...
←
→
Page content transcription
If your browser does not render page correctly, please read the page content below

OPERATING INSTRUCTIONS
                                                       HorschConnect

                               TRANSLATION OF THE ORIGINAL OPERATING INSTRUCTIONS
                                              READ CAREFULLY PRIOR TO STARTING UP!
60047363 • 01 • 04/2021 • en          KEEP OPERATING INSTRUCTIONS IN A SAFE PLACE!
Table of contents

Table of contents
1 Introduction ..........................................................................................................................................               4

2 Hardware ..............................................................................................................................................               5
    2.1      SmartCan LED ..........................................................................................................................................    5
    2.2      Terminal UT client ....................................................................................................................................     5
             2.2.1 Prerequisites ................................................................................................................................        5
             2.2.2 Charge page ................................................................................................................................          5
             2.2.3 Start page....................................................................................................................................        6
             2.2.4 Info..............................................................................................................................................    7
             2.2.5 Licenses .......................................................................................................................................      9
             2.2.6 Diagnostics ..................................................................................................................................       10
             2.2.7 GPS source...................................................................................................................................        12
             2.2.8 Mobile communication settings ...................................................................................................                    13
             2.2.9 Hotspot .......................................................................................................................................      13
             2.2.10 WiFi Client ...................................................................................................................................     14
             2.2.11 MobileControl..............................................................................................................................         15
             2.2.12 Installation and Update of SmartCan............................................................................................                     17
             2.2.13 Weather station ...........................................................................................................................         17
    2.3      MobileControl App...................................................................................................................................       18
             2.3.1 Supported mobile operating systems ...........................................................................................                       18
             2.3.2 Pairing mobile device – SmartCan ................................................................................................                    18
             2.3.3 Functions .....................................................................................................................................      20
             2.3.4 Start screen..................................................................................................................................       20
             2.3.5 Calibration menu .........................................................................................................................           21
             2.3.6 Metering units detail view............................................................................................................               26
             2.3.7 Machine information ...................................................................................................................              27
             2.3.8 SmartCan status...........................................................................................................................           28
             2.3.9 Settings .......................................................................................................................................     28

60047363 • 01 • 04/2021 • en                                                                                                                                             3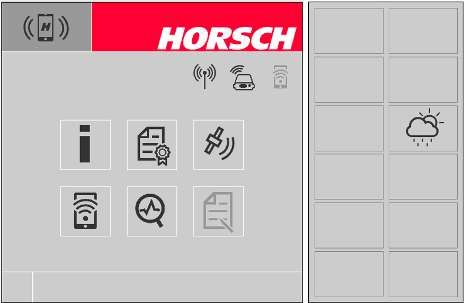
1 Introduction
      HorschConnect facilitates linking customers, their machines and HORSCH. Con-
      nectivity is ensured by the SmartCan module on the machine.
      The recorded data is made available in the Cloud or transmitted to a mobile device
      via WLAN. A GPS receiver complements the system and allows recording telemetric
      data.
      The HORSCH MobileControl is an app available for Android and iOS and enables
      performing machine functions via smartphone, for example, calibration of HORSCH
      drills, nozzle tests of Leeb crop protection sprayers and single row tests for HORSCH
      Maestro.
      Additional functions, such as wireless software updates or remote diagnostics of
      data to Farm Management Systems can be performed in the future with HorschCon-
      nect.

4                                                             60047363 • 01 • 04/2021 • en
2 Hardware
                         2.1 SmartCan LED
                                The LED on the SmartCan indicates its status.

                                 LED                                      Meaning
                                 off                                      SmartCan receives no power
                                 flashing green                           SmartCan is in the start phase
                                 lit green (permanently)                  SmartCan is operational; Internet recep-
                                                                          tion via mobile communication is estab-
                                                                          lished
                                 lit red (permanently)                    SmartCan is operational; there is no In-
                                                                          ternet reception via mobile communica-
                                                                          tion

                         2.2 Terminal UT client

                       2.2.1 Prerequisites
                                ISOBUS-capable terminal

                       2.2.2 Charge page
                                The UT client is charged on the terminal after power-up.

60047363 • 01 • 04/2021 • en                                                                                         5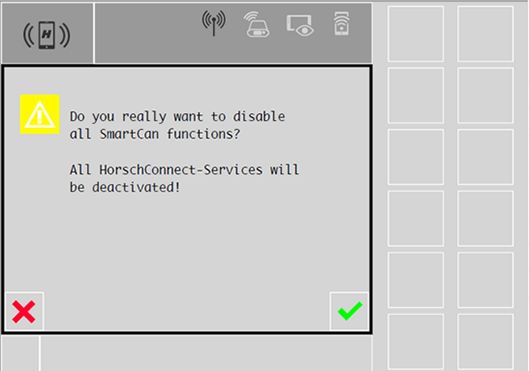
2 | Hardware

               2.2.3 Start page
                     Open HorschConnect. The Start page is displayed.

                     The icons in the upper area indicate the status of various functions:

                                      Mobile connection active

                                      Mobile connection inactive

                                      SmartCan hotspot active

                                      SmartCan hotspot inactive

                                      MobileControl active

                                      MobileControl inactive

                     The buttons framed white are used to access the corresponding subpages.

                                    Machine-specific information
                                    (Machine and software information)

                                    Licenses

6                                                                             60047363 • 01 • 04/2021 • en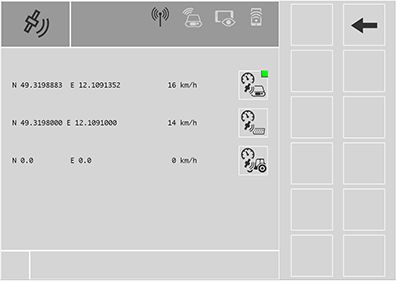
Hardware | 2

                                              MobileControl

                                              Diagnostics

                                              GPS

                                              Machine registration

                       2.2.4 Info
                                              Information

                               The most important information on the machine is available here.

                                1
                                2
                                3
                                4

                               1    Machine type
                               2    Serial number of the machine
                               3    Name of the SmartCan
                               4    Version of the SmartCan

                                               Check for new updates and perform updates

60047363 • 01 • 04/2021 • en                                                                                7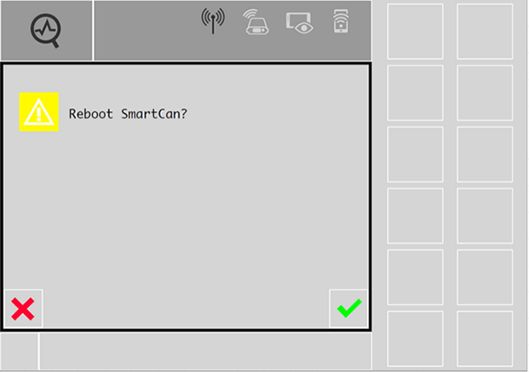
2 | Hardware

                                     Perform a reboot

                                     Reset to factory settings

               2.2.4.1 Reboot
                      The SmartCan can be rebooted here.

                                     Perform no reboot.
                                     Back to the Info screen.

                                     Perform reboot

8                                                                60047363 • 01 • 04/2021 • en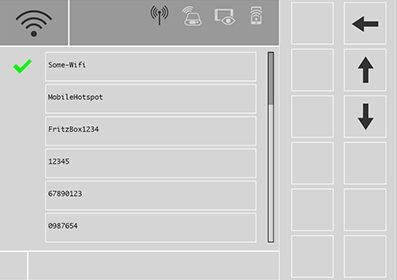
Hardware | 2

                      2.2.4.2 Factory settings
                               The system can be reset here to factory settings.

                                             Do not reset.
                                             Back to the Info screen.

                                             Reset to factory settings.

                       2.2.5 Licenses
                               The license information of the SmartCan is available here.

                                                Deactivate HorschConnect functions.

60047363 • 01 • 04/2021 • en                                                                          9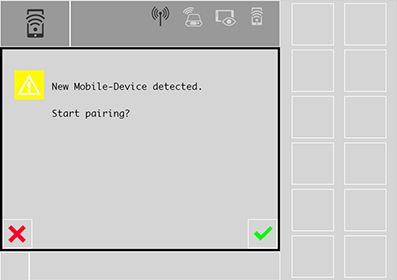
2 | Hardware

                                               The module is active.

                                               The license for the module is activated.

                                               No license is available for the module.

Deactivating HorschConnect func-   The softkey is used to activate and deactivate all HorschConnect functions and data
tions                              connections. The following message is displayed when HorschConnect is deactivated
                                   with the power softkey.

                         2.2.6 Diagnostics
                                                                       1

                                                                       2

                                                                       3

                                                                       4

                                                                       5

                                                                       6

                                                                       7

                                                                       8

                                                                       9

                                                   Establish remote support connection
                                                   A connection to HORSCH is established to allow HORSCH Service
                                                   to access the SmartCan.

10                                                                                        60047363 • 01 • 04/2021 • en
Hardware | 2
Access the mobile page
Access the WiFi client page
Access the Secure Config page
Test the Internet connection
1 Name of the SmartCan / production number
2 Version of the SmartCan
3 Serial number of the SIM card
4 CPU utilisation
5 Memory utilisation
6 Assignment of individual partitions
7 WiFi mode, hotspot or client and IP address
8 Name of WiFi network
9 Connection quality / provider / IP address
Test the Internet connection
Internet connection test in progress
60047363 • 01 • 04/2021 • en 112 | Hardware
Internet connection test completed
2.2.7 GPS source
On this page, the current coordinates and speed for each GPS source are displayed.
Depending on the software version, the respective sources can be selected with the
buttons. The active source is indicated by the green square.
Internal GPS
GPS via serial interface
GPS via CAN bus
12 60047363 • 01 • 04/2021 • enHardware | 2
2.2.8 Mobile communication settings
The access data for the SIM card can be entered here to use one's own SIM card.
1
2
3
4
1 APN (Access Point Name)
Enter the APN.
2 Enter the user name
3 Enter the password
4 Enter the PIN of the SIM card.
2.2.9 Hotspot
1
2
3
Change the WPA key
1 Name of the hotspot
2 Password for the hotspot
3 QR code for automatic connection with the hotspot.
60047363 • 01 • 04/2021 • en 132 | Hardware
2.2.9.1 WPA key
Change the WPA key
The screen for changing the WPA key is opened with the softkey.
A new WPA key can be entered in the white filed.
2.2.10 WiFi Client
Ø Select a hotspot in the white field.
Ø The connection to the selected hotspot is established by pressing the Play but-
ton.
Clicking on the white field opens the list of available hotspots (SSID):
14 60047363 • 01 • 04/2021 • enHardware | 2
After selecting the hotspot (SSID) an input field for entering the hotspot password is
displayed:
Cancel
Connect to the hotspot.
2.2.11 MobileControl
On the start page of MobileControl the connection information of the WiFi hotspot
is displayed, together with its name and the password. The QR code replaces the
password entry.
Hotspot screen
List of paired devices
60047363 • 01 • 04/2021 • en 152 | Hardware
2.2.11.1 Paired devices
The list of the paired devices is displayed here.
The device is paired and confirmed.
Remove the device from the list.
The device is paired but not confirmed.
Confirm the device with the button to be able to use it.
The following screen is displayed when a device is connected while the MobileCon-
trol page is open:
Cancel
Start the pairing process
16 60047363 • 01 • 04/2021 • enHardware | 2
2.2.12 Installation and Update of SmartCan
SmartCan features an automatic update function via the Internet. Regular scanning
for updates is performed, and they are installed in the background. An update be-
comes active at the next system start.
2.2.13 Weather station
An optional Weather station is available for HorschConnect.
Ø Press the softkey to open the Weather station screen.
Weather station
The weather station can capture and display the following data:
• Speed and direction of the actual wind relative to North.
• The speed of gusts.
• Temperature
• Humidity
The values are recorded every second and displayed as average. The average value is
formed using a configurable time interval.
A value is displayed for gusts if the wind speed is 10 knots above average. The
highest value in the current time interval is then displayed.
1
2
3
4 5
Weather station
60047363 • 01 • 04/2021 • en 172 | Hardware
1 True wind speed
2 Wind speed
3 Gusts
4 Ambient temperature
5 Humidity
Settings
Ø Press the softkey to open the settings.
Ø The Average interval can be entered on the Settings screen. This is the interval
(in seconds) for calculating the average values.
2.3 MobileControl App
2.3.1 Supported mobile operating systems
• Google Android: 9 and higher
• Apple iOS: 14.2 and higher
2.3.2 Pairing mobile device – SmartCan
To be able to utilise all HorschConnect functions, a tablet or smartphone must be
connected with the system.
Ø Connect the HORSCH machine with a suitable tractor via ISOBUS.
Ø Switch on the ignition or start the engine of the tractor.
Ø Open the WiFi settings on the smartphone or table to connect with the
HorschConnect WiFi. After a few seconds the "HORSCH SmartCan-" WiFi is displayed on the mobile device.
Ø The three-digit production number is shown on the terminal or the housing of
the SmartCan; remove the grey plastic cover from the HorschConnect to locate
it.
Ø Select the network and connect the mobile device with this network.
18 60047363 • 01 • 04/2021 • enHardware | 2
Ø Enter the password supplied when prompted and confirm the input. The mo-
bile device is connected with the HorschConnect.
Ø Confirm the device on the terminal, refer to the Paired Devices section.
The following message is displayed if the device was not yet confirmed in the UT cli-
ent:
1. On the terminal, press the softkey for accessing the list of paired devices.
List of paired devices
2. Select and confirm the desired device from the list:
ð The device will be marked with a green checkmark and is now permanently
paired:
60047363 • 01 • 04/2021 • en 192 | Hardware
2.3.3 Functions
To be able to use MobileControl, the app must first be downloaded and installed.
The app is available at the AppStore (iOS) and the Google Playstore (Android).
The HORSCH MobileControl app allows executing various machine functions for
HORSCH implements:
• Calibration of HORSCH drill metering units
• Row tests for HORSCH single grain drills
The smartphone or table is connected with the SmartCan of the machine via local
WiFi which avoids having to leave the tractor frequently. This increases user friendli-
ness.
2.3.4 Start screen
1
2
3
4
5
1 Calibration menu
2 Detail view of row metering unit
3 Machine information
4 SmartCan – Information/Status
5 Settings
20 60047363 • 01 • 04/2021 • enHardware | 2
2.3.5 Calibration menu
All metering units already calibrated are identified by a green checkmark. All con-
figured metering units are displayed. The corresponding calibration menu is opened
by selecting the respective metering unit.
2.3.5.1 Metering unit calibration menu
1. For calibration, refer also to the operating instructions for the drill controls.
The quantity to be placed can be set here. If it is not yet known, it can be calculated
by pressing the button.
Calculate calibration quantity
60047363 • 01 • 04/2021 • en 212 | Hardware
Pre-metering/Fill rotor
Start calibration process
2. Set the calibration figure with the slide control.
A speed of 60 rpm is stored as default. This speed is sufficient under normal
conditions. The calibration speed should approximately correspond to the
speed during field work to ensure the filling in the metering cells is roughly the
same.
3. For calibration, the hopper must be filled with a sufficient quantity of the
product to be placed. For correct calculation of the calibration quantity all cells
in the rotor must be filled when starting the calibration process. Press the Fill
cells softkey.
During Calibration the calculation basis for exact metering control is determined.
The computer needs the product weight that was removed during calibration as in-
put value.
The product quantity taken should be as large as possible to keep measuring errors
low. However, the quantity taken must not exceed 10 kg if the pulling scale sup-
plied is used.
Start the calibration Ø Weigh the calibration container and write down the weight.
Ø Place the container under the metering unit and open the covering. Residual
quantities must be removed from the fall sluice.
Ø Press the softkey to start the calibration process.
The following pop window-up appears:
1. Operating the calibration switch on the machine. The rotor turns and fills the
calibration container.
22 60047363 • 01 • 04/2021 • enHardware | 2
Cancel
2. Press the softkey to cancel and to restart the calibration process.
After finishing calibration, the menu for entering the calibration quantity appears.
3. Remove the calibration container. Should product residues remain in the fall
sluice they must be removed.
4. Weigh the calibrated product.
Deduct the weight of the calibration bag, as otherwise the placing quantity
will be considerably falsified.
5. Enter the weight at the Calibration quantity item. A prompt asks whether the
calibration value entered shall be saved.
6. Confirm the value with the green checkmark. The process can be repeated
with the Play softkey.
The calibration process is closed with the green checkmark. A prompt asks whether
the calibration value entered shall be saved.
After confirming the calibration weight, the possible speed range will be calculated
and displayed:
60047363 • 01 • 04/2021 • en 232 | Hardware
Discard results – Calibration must be performed again.
Accept results
If the results are accepted, calibration for additional metering units or drilling can be
started. A message appears that must be confirmed with OK:
If the displayed speed range does not correspond to the desired working speed the
rotor must be selected larger or smaller accordingly.
The calibration process must be repeated in this case.
24 60047363 • 01 • 04/2021 • enHardware | 2
Repeat the calibration process
Confirm
The following message is displayed after confirming:
The adjustment range of the metering motor lies between 15 rpm and 120 rpm.
At speeds higher than 120 rpm a warning is displayed stating that the rotational
speed is too high. At higher speeds uniform filling of the metering cells can no
longer be guaranteed. For most applications, the speed should lie between 50 rpm
and 90 rpm.
60047363 • 01 • 04/2021 • en 252 | Hardware
2.3.6 Metering units detail view
Ø Select the desired row with the arrows.
Start the metering unit
1
2
3
4
5
1 Display of missed seeds in %
2 Display of double seeds in %
3 Variation coefficient in %
4 current current consumption
Current consumption must not exceed 3 Ampere permanently during opera-
tion.
5 current speed
Cancel
The previous menu can be accessed with the softkey.
26 60047363 • 01 • 04/2021 • enHardware | 2
2.3.7 Machine information
Machine information is displayed here. The error memory can be accessed with the
softkey.
Error memory
The error messages are sent to the connected device by e-mail.
Error memory e-mailing
60047363 • 01 • 04/2021 • en 272 | Hardware
2.3.8 SmartCan status
Information and the status of the SmartCan is displayed here. Switching to the previ-
ous page is done with the softkey.
2.3.9 Settings
Different settings can be made here.
Log files can be uploaded with the softkey.
The changes are accepted with the Checkmark softkey; in some cases, the app is re-
started.
1
2
3
4
28 60047363 • 01 • 04/2021 • enHardware | 2
1 Test mode On/Off
The app can be tested in test mode; a SmartCan or a machine is not required
here.
2 Units of measurement
A selection can be made between metric and imperial.
3 Language
The language can be set here.
4 Design
The design can be set here.
60047363 • 01 • 04/2021 • en 29Notes 30 60047363 • 01 • 04/2021 • en
All details on technical specifications and illustrations are
approximate and non-binding.
Subject to technical product revisions.
You can also read