Heart Rate Monitor - Kinetik Wellbeing
←
→
Page content transcription
If your browser does not render page correctly, please read the page content below
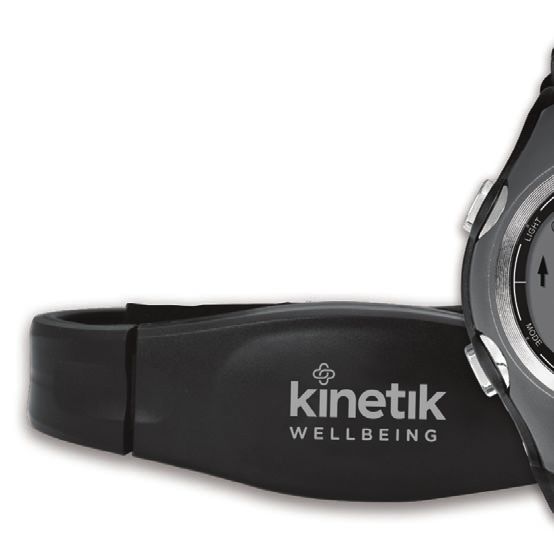
Heart Rate Monitor
                     HRM4 Series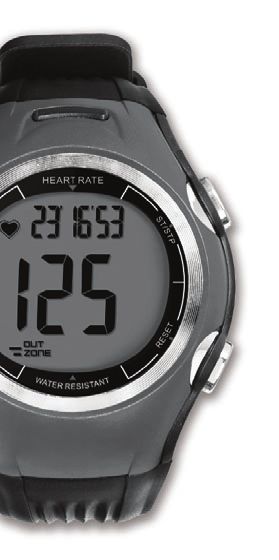
Content
Introduction                                  2
Features                                      3
Parts                                         4
Keys and Functions                            5
Quick Start Wearing the Chest Belt            6
Quick Start Zone Selection                    7
Time Set Time                                 8
Heart Rate Monitor Getting Started            9
Heart Rate Monitor Data Display/Zone Range   10
Heart Rate Monitor User Settings             11
Heart Rate Intensity Chart                   12
Data Overall Information of Performance      13
Alarm                                        14
Stopwatch                                    15
Troubleshooting                              16
Care & Maintenance                           17
Audible Alert How to turn on/off             18
Watch Reset                                  19
Battery Requirement                          20
Specifications                               21
Explanation of Symbols on Unit               22
Introduction
Thank you for buying the Kinetik Wellbeing Heart Rate Monitor.

At Kinetik Wellbeing our mission is for every home to own affordable healthcare products that
help people to manage their wellbeing. Taking regular exercise and increasing your heart rate
above its resting level can help to lower blood pressure, improve your circulation and strengthen
your heart and lower your risk of heart disease.

The Kinetik Wellbeing Heart Rate Monitor is designed to keep a check on your heart rate during
physical activities.

If you are concerned or in any doubt about your fitness levels or heart rate, always consult your
doctor. If you are embarking on a change of lifestyle, diet or exercise regime you should always
consult with a healthcare professional before doing so.

Before using the Kinetik Watch and Heart Rate Monitor, please read the instructions included
in this user manual.

                                                 2
Features
• Large LCD Display
• Alarm
• Clock (12/24 hour)
• Stopwatch
• Workout Memory
• Exercise Timer
• In-Zone Timer
• % of Max. Heart Rate
• Maximum Heart Rate
• 3 Selectable Heart Rate Zones
• Average Heart Rate
• Audio and Visual Alarm in Target Zone
• Upper & Lower Heart Rate Zone Alarm
• Calories Burnt Counter
• EL Backlight
3Heart Rate Monitor
Adjustable Chest Strap
4Keys and Functions
MODE
• Scrolls through various modes of the watch
• Advances to next variable in setting sequence
ADJUST/LIGHT
• Activates Light
A DJUS T / • Enters the setting sequence for each setting mode
LIGHT S TA R T / STOP • Clears session data
START/STOP
• Increases variable in setting sequence
• Pauses time in HRM mode
RESET
MODE R ESET
• Decreases variable in setting sequence
• Toggles through sub modes
• Toggles between pounds/kilograms
• Ends session
5Quick Start Wearing the Chest Belt
Follow steps 1. through 4. to wear the chest belt and go for a run.
1. Open the chest belt. 2. Insert the tab into the hole, make sure tab
and hole are on the same level.
3. Position on rib cage under the chest. Make 4. Lift the belt slightly from the skin and wet both
sure the chest belt is positioned in the right grooved areas on the back to ensure strong
direction and worn directly against the skin. connection between your pulse and the
chest belt.
6Quick Start Zone Selection
LEVEL 1
55 – 70%
Sustain a healthy heart and lose weight.
LEVEL 2
70 – 80%
7. Develop endurance and increase stamina.
Start Run
LEVEL 3
80 – 100%
Sustain excellent fitness condition and increase
5. 6. muscle strength.
Enter Toggle
Graphical representation of Maximum Heart Rate
HRM mode sub-modes
Current HR reach less than 60%
of your max. heart rate.
Current HR reach 60-85%
No Signal of your max. heart rate.
Three dash lines will apear if the
watch is not receiving transmission
from the chest belt.
Current HR reach 85% or above of
your max.heart rate.
7Time Set Time
In TIME mode you can set the Time, Date, and Hour Format.
Follow steps 1. through 5. to set the time and date.
2. 3.
Hold 2 sec. +Digit
5.
Exit
1.
Scroll to 3.
TIME mode -Digit
4.
Select Next
Variable
Set Set Set Set Set Set Choose
Hour Minute Seconds Year Month Day 12/24 Hour
Clock
8Heart Rate Monitor Getting Started
PRINCIPLE OF THE HEART RATE ZONE
It is important that you know your maximum heart rate, training zone, upper heart rate limit and
lower heart rate limit before you begin. They help you achieve the maximum health benefits out of
your workout. We recommend consulting a medical practitioner or registered physician before
setting your personal training-schedule and target. Or you can set your own upper and lower limit
using the following as a reference guide:
Calculation of Maximum Heart Rate: Male = 220 – Age, Female = 226 – Age
Getting Started
Follow steps 1. through 3. to get ready and start your run.
The three dash lines will
blink while receiving
transmission from the
chest belt.
3.
Start when READY
is displayed
1. 2.
Enter Scroll through and
HRM mode choose according
9Heart Rate Monitor Data Display/Zone Range
The exercise time is displayed under the heart rate by default. Press the START/STOP key to view
other information.
Pause Session
Press pause
curren session
start/stop
Hold 2 sec
to save data
Exercise Max Calorie
Time HR%
Scroll Data
In Zone Highest Current
Period Heart Rate Time
In-Zone Out-Zone
Your heart rate If your heart rate
is within your is out of zone,
zone range the High or Low
arrows will display
10Heart Rate Monitor User Settings
Your heart rate is measured in beats per minute (bpm) and setting a heart rate zone allows you to work
with an upper and lower heart rate limit. Follow steps 1. through 6. to adjust the User Settings.
3.
Hold 2 sec.
6. 4.
Exit +Digit/Toggle
1.
Scroll to
HRM mode 2.
Scroll to Heart
Rate Zone (H1) 5. 4.
sub-mode Select Next -Digit/Toggle
Variable
Set Set Set Set Set Set Set Set HR
Age Sex HR Zone Upper Lower Unit Weight Zone Alarm
Level HR Zone HR Zone ON/OFF
Limit Limit
11Heart Rate Intensity Chart
This is an alternative to check your heart rate zones based on gender, age and weight. Starting
with your Max Heart Rate (MHR), use the chart to calculate your zones depending on the intensity
of your workout. Please note that this chart may not be suitable for everyone.
Max Heart Rate Level 1(55-70%) Level 2(70-80%) Level 3(80-100%)
Male=220-Age Sustain a healthy Develop endurance Sustain excellent fitness
Female=226-Age heart and lose weight and increase stamina condition and increase
muscle strength
Age Male Female Male Female Male Female Male Female
20 200 206 110 140 113 144 140 160 144 164 160 200 164 206
25 195 201 107 136 110 140 136 156 140 160 156 195 160 201
30 190 196 104 133 107 137 133 152 137 156 152 190 156 196
35 185 191 101 129 105 133 139 148 133 152 148 185 152 191
40 180 186 99 126 102 130 126 144 130 148 144 180 148 186
45 175 181 96 122 99 126 122 140 126 144 140 175 144 181
50 170 176 93 119 96 123 119 136 123 140 136 170 140 176
55 165 171 90 115 94 119 115 132 119 136 132 165 136 171
60 160 166 88 112 91 116 112 128 116 132 128 160 132 166
65 155 161 85 108 88 112 108 124 112 128 124 155 128 161
70 150 156 82 105 85 109 105 120 109 124 120 150 124 156
75 145 151 79 101 83 105 101 116 105 120 116 145 120 151
12Data Overall Information of Performance
In DATA mode you can view your stored data from the last session.
Follow steps 1. through 2. to manage your data. *Please note only one session worth of data can be stored.
Exercise In Zone Calorie
1. 2. Time Period
Scroll to
Data mode
Highest Average
Heart Rate Heart Rate
13Alarm
In ALARM mode you can toggle ON/OFF for the alarm and adjust the time.
Follow steps 1. through 5. to adjust alarm settings.
5. 3.
Exit +Digital/Toggle
2. Turn Alarm ON/OFF
Hold 2 sec.
The alarm icon will
show in any mode of
1. the display when the
4. 3. alarm is turned ON.
Select -Digital/Toggle
Next
Variable
* The settings
will be automatically
updated once the
Scroll to alarm time is adjusted.
Alarm mode
Set Set
Hour Minute
14Stopwatch
In stopwatch mode, you can measure the amount of time elapsed from a particular time that the watch is
activated to the time that the watch is deactivated. Follow steps 1. through 3. to use the stopwatch.
2.
Start/stop
1. 3.
It Will Show"STW" Reset
For 1 Second Then
Go Into Stop Watch
MODE
Split Time Counting
If you want a split time, start the timer and then press the reset button. The watch will continue to measure the
amount of time that has passed. To see the time elapsed, press the start button until the timer is live again.
15Troubleshooting
Heart rate doesn't display on watch
- The chest belt may not be positioned correctly.
- The grooved sensors may not be wet enough, wet and try again.
- It is recommended that the grooved sensors are directly on your skin.
Heart rate reading on watch is inconsistent or stops
- The battery may need to be replaced in the chest belt.
- Sources of electromagnetic fields can cause interference. (Appliances, computers, and power lines)
Watch beeps continuously
- If the zone alarm is on and your heart rate is not in any of the zone ranges, the watch will beep to indicate you
are out of the zones.
Watch display may be frozen due to static electricity
- The display may be frozen due to static electricity or recent battery replacements, If this occurs, press on
all 4 side buttons at the same time to reset to factory settings.
16Care & Maintenance
Avoid extreme force, shock, dust temperature, or humidity. Such conditions may cause malfunctioning,
a shorter electronic lift span, damaged batteries, or distorted parts.
Rinse the watch with fresh water to avoid materials building up that can interfere with the reception of
the pulse.
Do not use abrasive or corrosive materials to clean the watch or chest belt. Abrasive cleaning agents may
scratch the plastic parts and corrode the electronic circuit.
Avoid tampering the internal components of the watch. Doing so will terminate the sensors warranty
and may cause damage.
17Audible Alert How to turn on/off
When will the Heart Rate Monitor make an audible alert?
1- As a button sound
2- Alarm
3- HR mode – It will beep when your max and minimum heart rate is over the target set.
How to turn off the beep.
To turn off the beep on the Heart Rate Monitor follow steps 1. through 3.
2.
Toggle the
beep on/off
1.
Scroll to
TIME mode
3.
Exit
18Watch Reset
To reset the watch, press all 4 buttons at the same time. The watch will show the below screen.
Note: When resetting the watch, you will lose all data and personal settings (time, date, heart rate modes,
alarm) will revert to factory mode
19Battery Requirement
Warning: Keep watch batteries away from children, If swallowed, contact a doctor immediately.
Warning: Batteries contain chemical substances. They should be disposed of properly according to local regulations.
WATCH Battery Type: CR2032 Lithium
Battery Life: The battery is estimated to last 1 year depending on frequency and use of certain features.
step 1 step 2 step 3 step 4
HR Chest Belt Battery Type: CR2032 Lithium
Battery Life: The battery is estimated to last 1 year if the chest belt is used one hour per day.
1. 2. CR2032
3.
Use a coin to unscrew the battery Remove old battery and insert a Replace the battery hatch
hatch on the watch by turning CR2032 lithium battery with the
counter clockwise writing facing you
* Please make sure the O-ring (rubber ring surrounding battery) has not been removed from its place.
WE STRONGLY RECOMMEND TAKING YOUR WATCH TO A LOCAL RETAILER OR JEWELLER TO HAVE THE BATTERY
REPLACED TO AVOID THE POSSIBILITY OF PERMANENTLY DAMAGING THE WATCH.
20Specifications
WATCH
Water Resistance: 1 ATM Suitable for everyday use.
Splash/rain resistant. NOT suitable for showering, bathing, swimming, snorkelling, water related work
and fishing. Water damage will occur if watch buttons are pressed under water. Please dry after use.
Operating Temperatures: -5 to 50 degree Celsius.
Material Specifications:
Crystal: Acrylic Case: Acrylonitrile butadiene styrene (ABS)
Keys: Acrylonitrile butadiene styrene (ABS) Polyurethane
Buckle: Stainless Steel Bezel: Stainless Steel Caseback: Stainless Steel Strap: Polyurethane
Mode Limits: Heart Rate 30-240bpm
HEART RATE CHEST BELT
Water Resistance: 1 ATM Suitable for everyday use.
NOT suitable for showering, bathing, swimming, snorkelling, water related work and fishing. Please dry after use.
Operating Temperatures: -5 to 50 degree Celsius.
Material Specifications:
Case: Acrylonitrile butadiene styrene (ABS) Strap: Polyurethane Band: Elastic
21Explanation of Symbols on Unit
Read the instructions (actual symbol colours are white on a blue background).
Symbol for “Manufacture Date”.
Symbol for "Environment Protection" – Waste electrical products should not be disposed
of with household waste. Please recycle where facilities exist. Check with your local
Authority or retailer for recycling advice.
Symbol for “Manufacturer”.
Symbol for “Complies with EU requirements”.
Symbol for “European Representative”.
Model Reference.
22Harvard Medical Devices Ltd.
Unit 1002, 10th Floor, Railway Plaza,
39 Chatham Road South, Tsimshatsui,
Kowloon, Hong Kong.
Kinetik Medical Devices Ltd.
Medicity Nottingham, D6 Building West,
Thane Road, Nottingham. NG90 6BH
Made in PRC Kinetik HRM4 UK IB 20181004You can also read


