HOT TUB INSTRUCTIONS - Paradise Hot Tubs
←
→
Page content transcription
If your browser does not render page correctly, please read the page content below
HOT TUB
INSTRUCTIONS

     1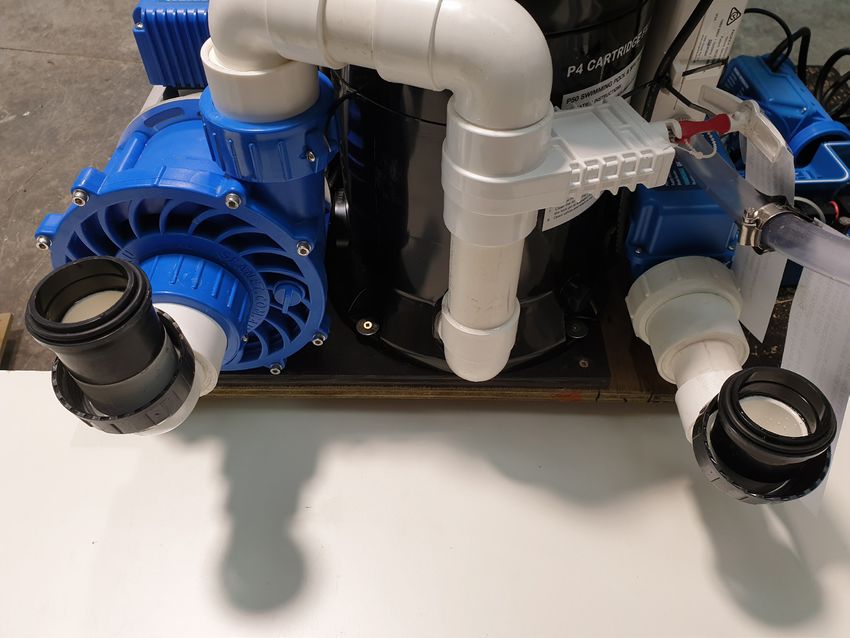
Thank You!
Firstly, thank you for selecting a PARADISE HOT TUBS hot tub. We really
appreciate your order.
Please take time to read these instructions BEFORE using your tub.
For any technical help regarding the pump, heater or tub operation involving
the touch-pad, please email service@spanet.com.au with your phone number
and someone will contact you to help.
For any technical help regarding anything other than the the pump, heater
or tub operation involving the touch-pad, please either email sales@
paradisehottubs.co.nz or call us to discuss.

Damage During Shipping
Hot tubs shipped from our workshop are all adequately packed to reduce the
chance of damage.
In the unlikely event of damage occurring, you must notify PARADISE HOT
TUBS LTD of any damage within 7 days of receiving your tub. Please send us
photos.

Shipping Pallet
Hammer off the 4 pallet wooden blocks to remove tub off shipping pallet.
Top pallet wooden pieces (100 x 25) is untreated wood so suitable for firewood.
Bottom pallet feet (100 x 25) is treated wood so NOT suitable for firewood.

 Tub safety
 Please note the following general safety points:
 1. Tub safety is your responsibility.
 2. Never allow unsupervised children to use your tub. Be sure that a
    responsible adult is in control at all times.
 3. IT IS YOUR RESPONSIBILITY TO PREVENT ACCIDENTAL
    DROWNING.
 4. Always lock the cover when not in use
 5. Consult your physician for advice on hot tubbing for children, pregnant
    women, people with heart conditions or if you have any other specific
    questions concerning health and safety.
 6. Do not use excessive amounts of alcohol while hot tubbing!
 7. It is important to keep the water in your tub as clean as possible by
    regular filter maintenance and changing the water every 3-4 month.

                                      2
Contents
Installation............................................................................................................ 4

Pump Installation Procedure................................................................................ 5

Wifi Module.......................................................................................................... 8

Cabin Hooks......................................................................................................... 8

Filter...................................................................................................................... 9

2hp 2 Speed Pump............................................................................................ 10

Heater, Controller and Touch-Pad...................................................................... 10

Maintenance and General Running.................................................................... 11

Cleaning Filter Cartridges................................................................................... 12

Insulated, Lockable Hard Cover......................................................................... 13

Outside Tub Maintenance.................................................................................. 13

Wood Oil Instructions......................................................................................... 13

Ozone Water Treatment...................................................................................... 14

Silver Cove Quick Instructions........................................................................... 14

Removing Cedar Hatch For Servicing................................................................ 15

SPANET Master Reset........................................................................................ 16

Warranty............................................................................................................. 17

Sticky Labels Quick Reference.......................................................................... 18

                                                              3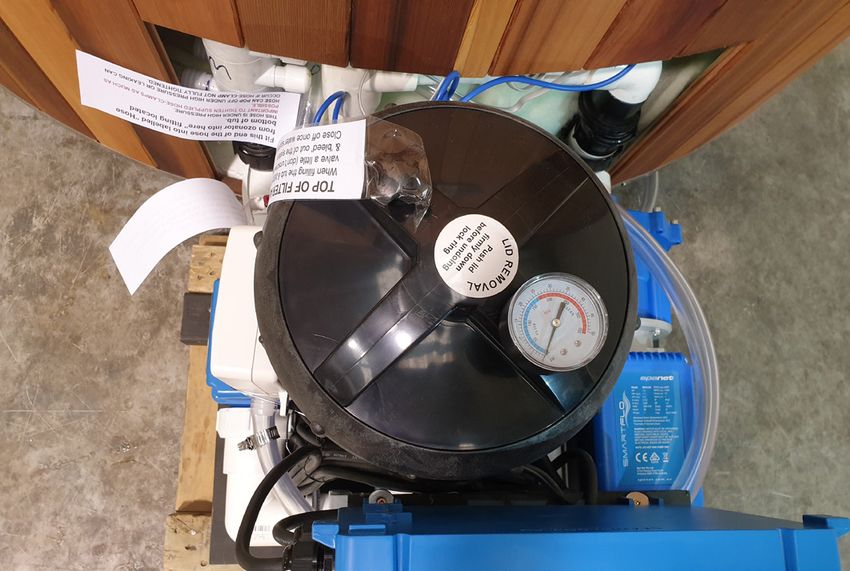
Installation
An electrician:
You will need an electrician to wire up a 15amp or 10amp outdoor power supply.
Only one power point is required. The pump, touch-pad, LED light, ozonator,
Wi-Fi and heater are all connected into the blue SPANET controller unit which
comes with a 5m power cable and plug attached.
Plumbing:
Our tubs are designed for easy self-installation with simple to follow
instructions. No plumbing or gluing is required as everything comes glued
together and water tested.
A basic DIY skill is only required. No technical pool installer is required unless
you feel you can’t install yourself in which case you can contact your local pool
shop for assistance.
Site your tub on a level, compact surface. Refer to website for a site
preparation guide.
Your tub has been supplied with:
• SV Mini 1
• No circ (circulation) pump
• No blower pump
No circulation pump is required as you have been supplied with a 2 speed
pump.
Low speed (speed 1) is for circulation (filtrating and heating the water).
High speed (speed 2) is for the massaging therapeutic high water flow through
the jets.
No blower pump is required as you have been supplied with an air venturi
bubble system.

                                        4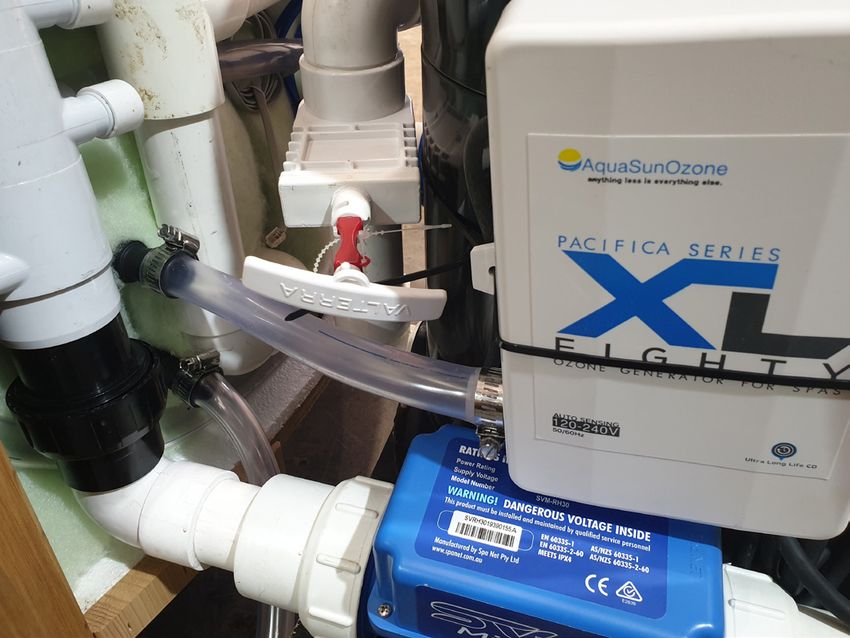
Pump Installation Procedure
1. If you have been supplied pump steps or a pump box, remove the 3
   sided cedar wall piece (you may need to remove some ‘shipping screws’
   first) and place the plywood pump steps or pump base piece hard up
   against the tub wall correctly into position.
   If you have not been supplied pump steps or a pump box, skip to the next
   step.
2. Place pump unit (with black painted plywood piece intact) onto the pump
   steps or pump box base. Line up against the tub wall making sure that the
   2 black pump/heater fittings line up with the 2 corresponding tub fittings.

3. Make sure there is an even gap either side of the pump unit for the
   pump steps/pump box wall piece to slide on and fit correctly.

                                       5
4. Make sure ozonator hose is on the ‘inside’ of the pump to tub black
   fitting (circled as shown), then loop hose from tub around and onto white
   ozonator box.
   This is under high pressure and hose can pop off meaning total tub water
   loss so tighten fully as much as possible!

5. Fit the clear hose from the ozonator outlet (left side of the ozonator)
   onto the labelled ozonator fitting on the tub wall.
   Fit hose-clamp (taped onto hose). This is under high pressure and hose can
   pop off meaning total tub water loss so tighten fully as much as possible!

                                      6
6. BEFORE tightening the pump ‘nut’ (part 1 in photo) and heater ‘nut’ (part
   2 in photo), angle the 2 black mac-union fittings with black ‘nuts’ (part 3 in
   photo) to lineup with the 2 black fittings from tub.
   Then...
   Hand-tighten (‘wiggle’ to help) as much as possible the 2 black plastic
   ‘nuts’ (part 3 in photo) first then tighten the pump ‘nut’ (part 1 in photo) and
   heater ‘nut’ (part 2 in photo).
   Tighten carefully, just a little with polygrips if need be (if water leaks out).
   No need to overtighten (with polygrips) as damage may occur. Just a small
   ‘tweak’ is needed if necessary.

                                        7
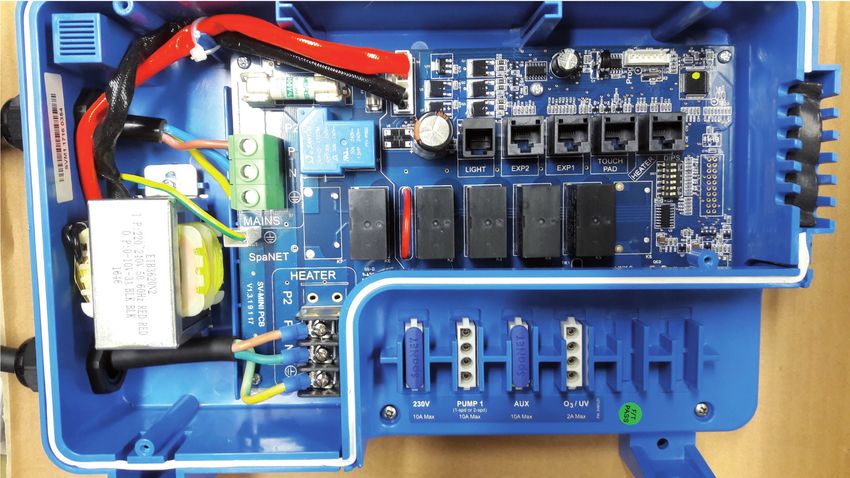
7. Plug in the LED light and touch-pad connectors into the control box.
   Making sure that the power is disconnected, unscrew the 4 screws
   (labelled 1, 2, 3, 4) on the blue controller panel and connect:
   • The touch-pad plug into the socket circled below
   • The Wi-Fi plug into the socket circled below
   • The LED light plug into the socket circled below

8. Open the filter air bleed valve a little to allow air to escape out. Do not
   unscrew all the way off.
9. Fill tub with water and close off air bleed valve once water squirts out.
10. Plug in the pump unit and turn on!

Wi-Fi Module
Wi-Fi module is fully weather protected and can be placed outside
for better reception. Plug into ‘EXP1” on the blue control box (see
photo above). Refer to separate Wi-Fi manual for instructions.

Cabin Hooks
If your tub is located in a high wind area and comes supplied with
a cedar pump box or pump steps, we advise to fit the supplied cabin hooks to
secure it.
1. Fit the looped ‘eye’ piece onto the tub wall in the appropriate position
   (outside of the pump box or pump step wall piece).
2. Fit the hook pieces so that it connects up securely.

                                        8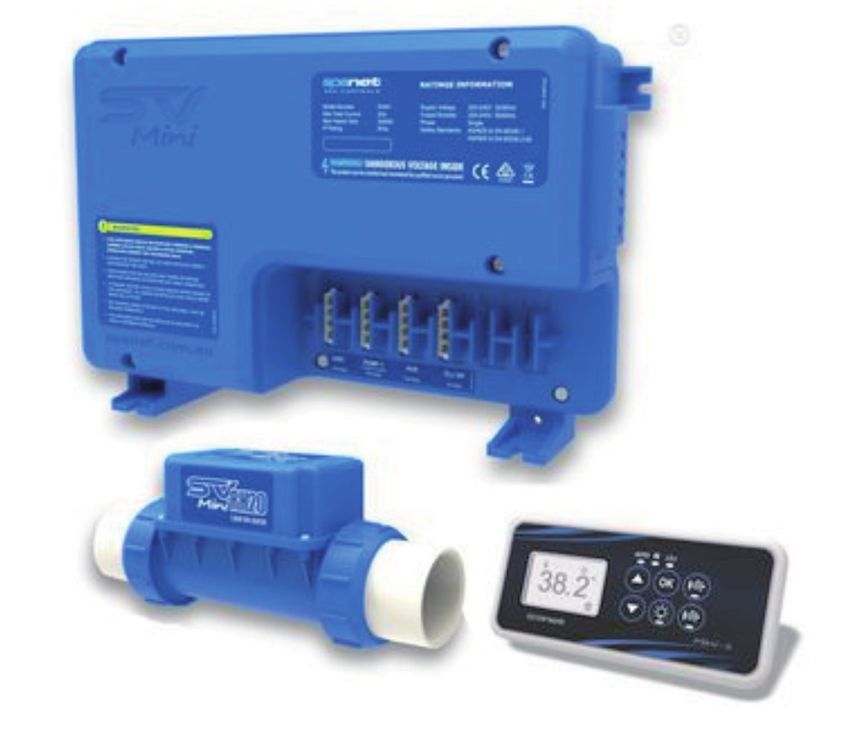
Filter
Unscrew the black filter air bleed valve (on top of filter lid) a little every
time when filling the tub.
This allows any air in the system to ‘bleed’ out.
As soon as water squirts out, screw close.
If this is not done an error code may result and pump will not function correctly.
Do not over-tighten air valve. If water comes out, loosen off a bit.
It is important to regularly clean the filter cartridge (every two weeks).
Check the pressure gauge on top of the filter and when the needle hits the red
zone (or gets close to it), then it’s time to clean the cartridge.
Before unscrewing the filter lid, push in the 2 valve handles to shut off water flow.
To unscrew the filter lid, open the air bleed valve a little to release any air
pressure, push down the side latch that is located underneath the lid of the
filter. Then unscrew the large, black, lid ring/nut piece and completely remove.
Then lift off the filter lid.
The suction pressure may make removing the
filter lid a little difficult. If this is the case, the
best way is to carefully ‘wiggle’ the filter lid
from side to side a little and this should do the
trick!
Best way is to soak the dirty filter cartridge in a
cartridge cleaning solution (napisan works well)
then rotate the two cartridges.
Replace the cartridges each year.
Buy new filter cartridges from:
www.spastore.co.nz
Search on this website for: 370 x 185mm
Davey Spa Quip C500 Spa Pool Filter

                                              9
2hp 2-speed pump
• The 2hp pump has a 2 speed motor for more efficiency and quietness. The
  1st or low speed is run most of the time for heating and filtration. If wanting
  extra pressure from the jets when inside the tub, push on the touch-pad for
  the 2nd or high speed
• The pump unit needs to be covered and protected from the weather.
• Access is needed to the pump unit for any servicing and also to clean the
  cartridge in the filter.
• NEVER run the pump without water!
• ALWAYS make sure there is water
  above the hole on the top white
  suction skimmer fitting on the tub
  wall when pump is operation.
• Ideally, it’s best to run the pump on
  auto mode. Set the timer so that
  it shuts off overnight if noise is a
  problem at night.

Heater, controller and touch-pad
Your hot tub comes with the latest in
SPANET pump technology and with
a user-friendly touch-pad with many
advanced features.
Refer to the separate SPANET touch-
pad controller manual regarding the
operating instructions.
Choose which orientation of the touch-
pad you prefer (facing inwards or
outwards) then peel the backing off to
allow the touch-pad to be fixed into your
desired position.

                                          10
Maintenance and General Running
THE TUB
1. Keep tub cover on when not in use. Most heat loss occurs when cover is
off
2. Close air venturi black valve (for bubbles) when tub not in use. Air bubbles
reduce the water temperature therefore requiring more heating and cost.
3. Empty tub every 3-4 months.
If using Silver Cove, it’s safe to drain onto your garden.
Before emptying, it’s recommeded to scrub tub inside with a soft brush (if
required) and hose down.
4. Occasionally there may be slight slimy feel to the tub, this is a coating of
biofilm. Gently clean the cedar with a soft brush and replace the water.
You may need to rethink your water treatment system if this continues to
happen.
3. The stainless steel bands are maintenance free and do not need any
adjusting.
THE WATER
There are many water treatment solutions available today, so consider this as a
general guide and always follow the directions of the product you have chosen.
1. Showering, or washing, before using the tub will greatly reduce the need for
chemicals.
2. If you are keeping the tub running all the time then the water should be
replaced 2-4 times a year depending on how much use the tub has.
3. Ensure the pump is running and dissolve any chemicals before adding
them to the tub.
4. Most treatment solutions have multiple products but it is important to only
add then one at a time.
5. Allow time after adding a chemical before testing the water.
6. Remove and clean the filter cartridge ideally every 2 weeks depending on
usage or when the pressure gauge on top of the filter enters the red zone.
Soaking the filter cartridge in a filter cleaning chemical (or napisan) and
rotating the 2 cartridges is the ideal method to help keep the water clean
and filtered correctly.
7. Run a spa pipe cleaning solution through the system every 6 months
to remove any biofilm buildup in the pipes, this is best done just before
changing the water.
11Cleaning filter cartridges
Routine cleaning
How clean your water and your filter is can be directly related to how often your
hot tub is used and the climate you live in. The more often it’s used or the warmer
your climate is, the more often you’re going to need to clean your filter cartridge.
A good rule of thumb for cleaning your filter cartridge is once every 1-2 weeks. To
do this, simply remove your filter from the tub and give it a thorough rinsing with
your garden hose.
Thorough cleaning (3 months)
Ideally, you should change the water in your hot tub every 3-4 months and you
should perform a more thorough cleaning of your filter at this time as well. To
do this, you will rinse the filter as before with the routine cleaning.
Replacement (1 year)
Hot tub filters no matter how often you clean them should be changed every
year for optimum performance.
Your hot tub filter is essential to your hot tub’s heater operating
properly.
You will want to replace your filter when it shows signs of wear or
damage or lack of water pressure going through it because it may
compromise other parts of the system, which cost a lot more to
repair or replace then a hot tub filter.
IMPORTANT!!!
Very important to keep the filter cartridge as clean as possible.
This obviously makes for cleaner, more healthy spa water and also limits the
chance of problems occurring with your pump system.
Clean every 1-2 weeks if the tub is in constant use.
Ideally soak one cartridge in a filter cartridge cleaning solution (or napisan) and
rotate with the other cartridge.
Discard and replace cartridges after 1 year.
THE COVER
1. Clean your cover every month with a sponge and gentle household cleaner.
2. Condition the vinyl as necessary to prolong the life and look of the cover.
12Insulated, lockable hard cover
• Your tub comes with a insulated hard cover
with keyed locks
• Use the provided screws (located with the
instruction pack inside the tub) to fit the
cover strap buckles to the tub wall
• Use the provided cover keys to lock the
cover
• Please refer to the separate cover instructions
Outside tub maintenance
• 2 coats of Supreme Haarlem Danish Oil applied to the outside of the tub. Advisable
to re-coat every 6-12 months depending on the tub location
• Use a cloth to apply then wipe off excess
• Only use on the tub outside wall/top curved cedar rim pieces so not inside the tub
• Buy from Bunnings or Mitre 10
Wood Oil Instructions
FREQUENCY
Day 1: After initial set up and installation of your tub, oil all cedar parts of the
tub. Baby oil can be used on the 3 stainless steel bands around the tub to
clean off any wood oil.
6 MONTHLY
Oil tub and steps/pump box ideally every 6 months or as required when the tub
fades. NEVER OIL ANY INTERNAL CEDAR PARTS, ONLY THE EXTERNAL
(OUT OF WATER) PARTS.
METHOD
1. Apply oil to a clean and dry surface
2. Use a clean and dry, lint free cloth
3. Apply oil onto surface and thoroughly ‘buff’ off any excess
4. Keep freshly oiled surfaces dry (especially top horizontal
step tread pieces) for at least 24 hrs after oiling to avoid
water spotting
5. Be aware that oily cloths can self combust so rince cloth
in water and hang out to dry
For more detailed instructions, refer to instructions on oil tin.
13Ozone Water Treatment
Enjoy the benefits of our natural spa treatment on your Paradise Hot Tub.
Our OZONE SPA SANITISER uses natural processes to provide crystal
clear, clean and healthy spa water that looks, feels and smells just like nature
intended.
• NO eye irritation
• NO skin irritation
• NO chemical smell
• NO corrosive effect on spa or
associated equipment
OZONE disinfection is much more effective
than chlorine in killing Giardia, Noro Virus,
Crypto and is proven to control and
remove unwanted chloramines. Some
chlorine free sanitiser may still be needed
to be used to maintain a residual and for
shock treatments.
SILVER COVE
• Replace harsh, toxic chemicals with the health and skin-enhancing virtues
of Colloidal Silver
• Is environmentally safe and natural, eliminating the need for Chlorine and
Bromine
• No harmful chemicals - easy to use safe and gentle on skin, hair, eyes and nose
• Is odourless and tasteless
• Is the easy, low maintenance usage
Silver Cove Quick Instructions
LARGE TUB (2250L)
Day 1: After cleaning and refilling the tub with fresh water, add 2250ml of Silver
Cove
Day 2: Add 1000ml of Silver Cove
Day 3: Add 1000ml of Silver Cove
Once A Week Thereafter: Add 1000ml of Silver Cove
14MEDIUM TUB (1750L)
Day 1: After cleaning and refilling the tub with fresh water, add 1750ml of Silver
Cove
Day 2: Add 850ml of Silver Cove
Day 3: Add 850ml of Silver Cove
Once A Week Thereafter: Add 850ml of Silver Cove
SMALL TUB (1000L)
Day 1: After cleaning and refilling the tub with fresh water, add 1000ml of Silver
Cove
Day 2: Add 500ml of Silver Cove
Day 3: Add 500ml of Silver Cove
Once A Week Thereafter: Add 500ml of
Silver Cove
Recommended not to sit in tub days 1-3 if
possible. No harm will occur if you do sit in
tub but the Silver Cove works best if you stay
out. If you find the seats are a little slimy, add
some Oxy Shock (a non-chlorine product)
that you can buy online or from your local
pool and spa shop. Refer to the Silver Cove
bottle and included instructions for more
details about Silver Cove and how to use it.
Removing Cedar Hatch For Servicing
1. Unscrew the 4 screws
2. Push a big nail into the bottom screw holes and gently tap with a hammer to
remove the bottom row of glued together cedar pieces
3. Gently tap the stainless steel band down a little
4. Push a big nail into the top screw holes and gently tap with a hammer to
remove the top row of glued together cedar pieces
5. Reverse procedure above to refit
15Innovative Spa Solutions
SV Mini Software (EEPROM) Reset
In some situations the SV Mini controller may not operate as expected or display unusual characters or numbers on
the touch pad LCD display. This may be a result of the software memory (EEPROM chip) within the SV Mini controller
being corrupted.
If you ever discover a SV Mini controller not operating as expected, be it pumps not working, blowers only working
for a few seconds, strange or blank displays etc... you should always try the below procedure to reset the software
(EEPROM chip) first before reporting a RMA fault. In most situations the EEPROM reset will solve the problem.
How to reset the SV controller software (EPRM)
SV Mini controllers feature a hidden OEM configuration menu which allows
customisation of certain important spa control settings.
- To access the OEM config menu on a SV Mini 1 press and hold the
hidden buttons (shown by the red dotted circles aside)
simultaneously until display shows L.SHD. For SV Mini 2 press and
hold the PUMP C + BLOWER buttons simultaneously (refer aside)
- Use the DOWN arrow button to navigate through the configuration
menu items until EPRM is displayed
- When EPRM is displayed on screen press the OK button to execute
- the software reset
- The display will very briefly flash ESET as the reset process takes
place
- It is best practise to then reset the mains power (i.e. turn off/on)
to reboot the control if an EPRM factory reset has been performed.
Note:
All software values are reset to factory default EXCEPT the L.SHD (load shed) setting as the L.SHD setting
will have been customised to suit the particular spa pool and its available power supply by the spa
manufacturer or installing electrician.
16Warranty
1. The tub itself comes with a guarantee for 5 years from the date of delivery
against failure in structure due to faulty workmanship or materials,
provided that the installation, use and maintenance have been carried out
in accordance with normal practice according to our recommendations.
2. All equipment i.e. heater/controller, pump, filter, light, control valves,
touch-pad have a 2 year warranty from the date of delivery against faulty
components, provided they are used under the terms of the manufacturer’s
warranty. Heating elements are not covered under this warranty against
corrosion due to water imbalance.
3. This warranty does not extend to wear and tear or damage resulting from
accident, negligence, misuse or inappropriate chemical maintenance of
the tub.
4. The warranty is not transferable.
5. That the tub has been maintained and the water therein chemically treated
according to sound and well established methods and abrasive cleaners
are not used on the tub’s surfaces.
6. The guarantee shall be invalid if the tub is damaged by earth or ground-fill
movement, act of God, acts of aggression, by accident, or by intentional,
reckless negligent acts of any person. In no event shall Paradise Hot Tubs
Ltd, it’s agents or employees, be liable for injury to any person for any
claim of damage, however arising.
7. The tub cannot be altered or modified from its original state. All servicing
and repairs to be carried out only by a service agent authorized by
Paradise Hot Tubs Ltd.
8. If any such defects appear or occur the purchaser shall inform Paradise
Hot Tubs Ltd or it’s representative by notice in writing within seven days of
such defect. Any such notice is required to set out the exact nature of the
defect and the circumstances in which it was noticed.
9. No refund if you change your mind, or if skin rashes occur.
17Sticky Labels Quick Reference
1 - VALVE
Valve now in OPEN position.
MUST remain locked in open position (using the red spacer clips) during pump
operation.
If not locked, valve may slowly close & reduce water-flow which can cause
heating element burnout.
Push valve handle inwards to close when cleaning filter cartridge.
2 - TUB TO OZONATOR HOSE
Fit clear hose from tub into ozonator inlet (right side of white ozonator box).
Make sure ozonator hose is on the ‘inside’ of the pump to tub black & onto
white ozonator box.
This hose is under high pressure.
IMPORTANT TO TIGHTEN SUPPLIED HOSE-CLAMP AS MUCH AS POSSIBLE.
Hose can pop off under high pressure or leaking can occur if hose-clamp is not
fully tightened.
3 - OZONATOR TO TUB HOSE
Fit this end of hose from the ozonator to tub wall fitting (labelled “3 – ozonator
tub fitting”)
This hose is under high pressure.
IMPORTANT TO TIGHTEN SUPPLIED HOSE-CLAMP AS MUCH AS POSSIBLE.
Hose can pop off under high pressure or leaking can occur if hose-clamp is not
fully tightened.
4 - FILTER AIR BLEED VALVE
When filling the tub & before turning pump on, open filter top valve a little (don’t
unscrew fully) to allow any air to escape & ‘bleed’ out of the system.
Close off once water squirts out.
Do not overtighten.
5 - BLACK MAC-UNIONS
Angle these 2 black mac-union fittings to line up with the 2 corresponding black
mac-union fittings from tub before tightening the blue pump ‘nut’ & white heater
‘nut’.
Hand-tighten (‘wiggle’ to help) as much as possible the 2 black plastic ‘nuts’
first then tighten the blue pump ‘nut’ (part 1 in photo) & heater ‘nut’ (part 2 in
photo).
186 - WI-FI MODULE
Wi-Fi module fully weather protected.
Can be placed outside for better reception.
Refer to the separate wi-fi instruction manual for more detailed instructions.
7 - PUMP BASE SCREWS
Do not remove the pump/filter from this black plywood base.
Screw down these 4 screws to secure the plywood pump base to the pump box
or pump steps which will stop vibration & noise.
8 - CONTROL BOX
1. Unscrew the 4 screws (labelled 1,2,3,4) to remove blue panel
2. Connect touch-pad plug
3. Connect LED light plug
4. Screw pack blue panel
9 - OZONATOR TUB FITTING
Use the provided hose-clamp (taped to other end of hose).
This hose is under high pressure.
Important to tighten the supplied hose-clamp as much as possible.
Hose can pop off under high pressure or leaking can occur if hose-clamp is not
fully tightened.
10 - DRAIN HOSE
The valve is now in the CLOSED position.
Attach your garden hose to drain.
Empty tub every 3-4 months (or when needed).
If using Silver Cove water treatment, it’s safe to drain tub water onto your
garden.
11 - LED LIGHT CABLE
Refer to instruction manual (page 8) for connection.
12 - TOUCH-PAD CABLE
Refer to instruction manual (page 8) for connection.
13 - MISSING CEDAR PIECES
These pieces are intentionally missing to enable our pump box or curved pump
steps to fit better up against the tub wall (for customers who have received
either of these items).
1914 - BUBBLE VALVE
Twist to open (anti-clockwise) for air bubbles.
Turn off bubbles (clockwise) when not in use or during heating to save on
running costs.
15 - TOUCH-PAD
Choose which way you prefer this to face, then peel of the sticky back & fix
down.
16 - WATER LEVEL
Water level must be to at least the bottom ‘groove’ (of the 6 grooves) on this top
white suction fitting.
If not, air will be sucked into the system & problems could occur.
Disregard the marked “water line” on this fitting. Water level can be anywhere
above the bottom “grove” depending on body mass index of bathers & the
desired water level for your enjoyment.
During pump operation, bubbles will rise up underneath the seat. This is normal
and these bubbles are from the ozonator.
17 – WOOD OIL (SEE PAGE 13)
18 – FILTER CARTRIDGE (SEE PAGE 12)
19 – SILVER COVE WATER TREATMENT (SEE PAGES 14-15)
20You can also read