HOW TO CREATE AN E-SHOP - Step by step guide on how to create an e-shop using Shopify
←
→
Page content transcription
If your browser does not render page correctly, please read the page content below

HOW       TO      CREATE              AN       E-SHOP
 Step by step guide on how to create an e-shop using Shopify

Contents:

01   Setting up a Shopify account
     Configuration and using
02   your own website address

03   Selecting a design template

04   Adding a Payment Service Provider

05   Uploading Your Products and Managing Inventory

06   Fulfilment. Viewing Sales and Shipping orders
01. SETTING UP A SHOPIFY ACCOUNT
Setting up a
Shopify Account

01   Open the shopify website

     https://www.shopify.com

02   Click on 'Start Free Trial'

03   Enter your details

     (email, password, site name).

     a) Be sure to create a secure
     password with upper/lower case
     alpha numeric mix

     b) Select a sitename that matches
     your salon/brand name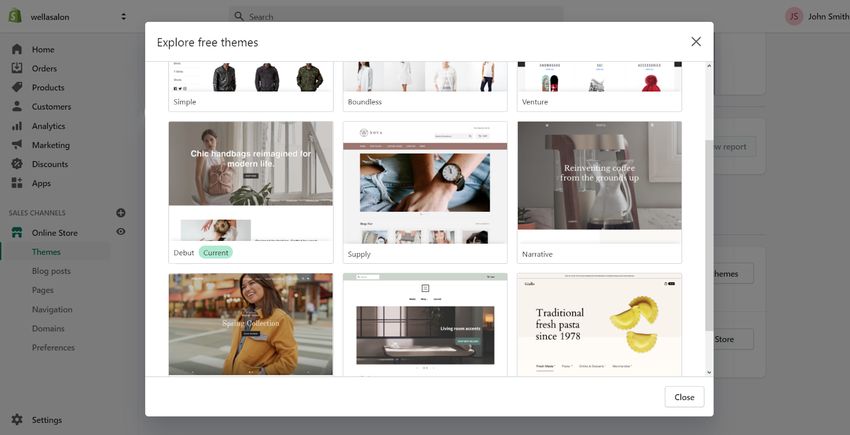
Choose options that best

04   describe your business in

     “Tell us about yourself” section

05   Enter your address
     and other details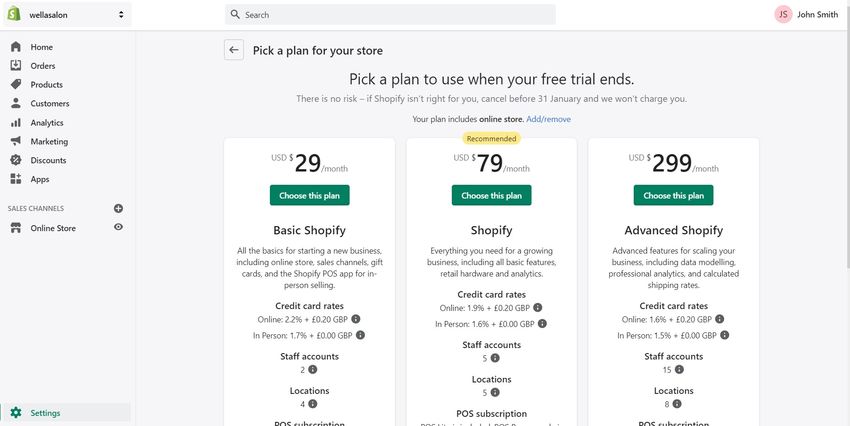
02. BASIC CONFIGURATION & USING
        YOUR OWN WEBSITE ADDRESS
Here we show how to make your domain name point to the store. Be careful if you are using your
             primary website as this will re direct your website to your e-shop.
                        You can always buy a new one in Shopify.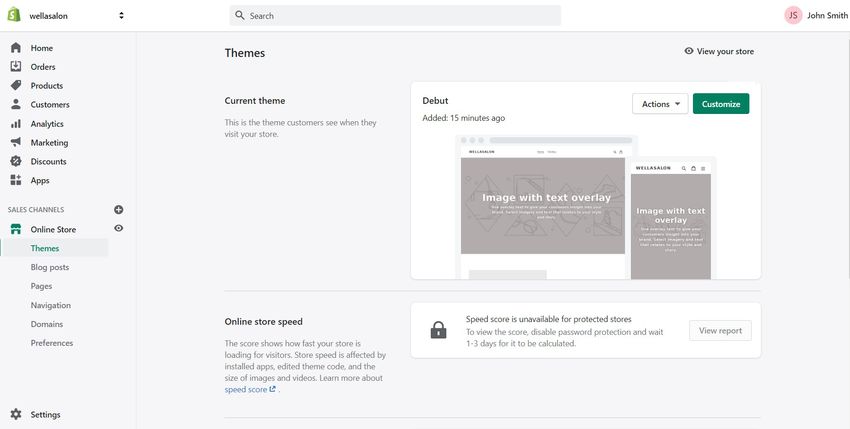
Basic Configuration and Using

your Own Website address

     Open this link, replacing [your_site_name]

01   with “site name” created in Section 1

     https://[your_site_name].myshopify.com/
     admin/settings/domains

02   If you don’t have a domain:
         a) Click on ‘Buy new domain’

         b) Choose domain name that you want

         c) Follow the steps to connect the

            domain to your account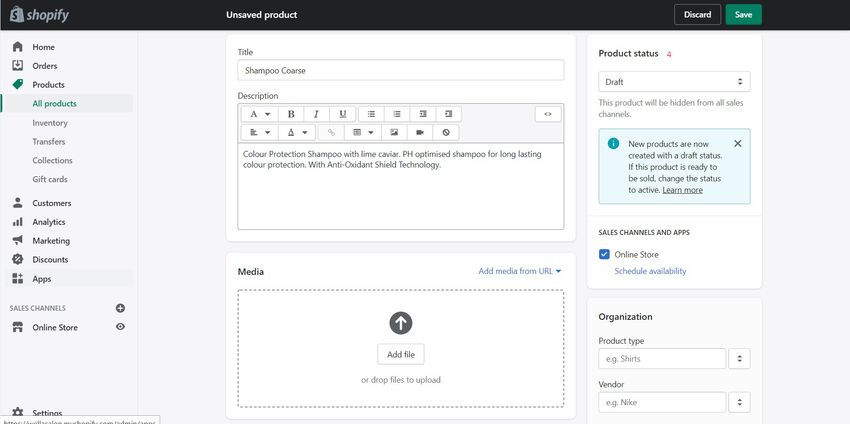
03      If you have domain name that
        you would like to use:

       a) Click on ‘Connect existing domain’

       b) Enter your domain name

       c) Click on ‘Connect automatically’

          You will be redirected to your domain name
          host and prompted you to change the “A
          Record” setting. This ensures that your
          domain name points to the Shopify store.
Alternatively if you experience difficulties doing this:
       d) Select “Connect Manually”
           Copy the “A Record” settings. You will
           need to input this into your domain
           hosting administration.

           Steps to manually update your A Record
           will vary depending on the domain host
           that your domain name is registered with.
           We recommend contacting your domain
           host support or searching for a guide
           “How to update A Record on ”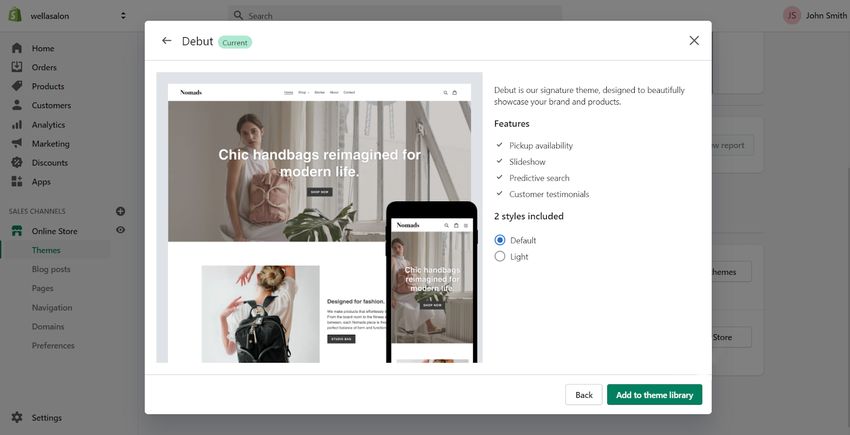
03. SETTING A DESIGN TEMPLATE
Selecting a Design
Template
Let's start with adding free design template or
theme to your Shopify site. This will give your site
an Ecommerce design and functionality.

01    Open this link replacing [your_shop_name]
      https://[your_shop_name].myshopify.com/
      admin/themes

02    Click on ‘Explore free themes’

03    Choose a design that you like
      such as ‘Debut’ or any other
04 Click ‘Add to the library’
05
To edit and customize the
template click on ‘Customize’
Below are some examples of
basic design changes that you
can make in the theme editor.a) Click ‘theme settings’ Click "Add Section" on the left menu to add a
Change favicon
new section to your website. You can also drag
Change colours and fonts
and drop sections to change the order of them
Change theme style
on your website.The left hand side menu shows
06 all of the sections that can be
edited within the
theme/design.
a) Click on the section you want
to edit to open it in the editing
panel. For example selecting
"Header" will open to header/top
part of the website.b) Clicking on the eye icon will hide this section but not remove it. c) Left Click and drag the section with the mouse to change the section order
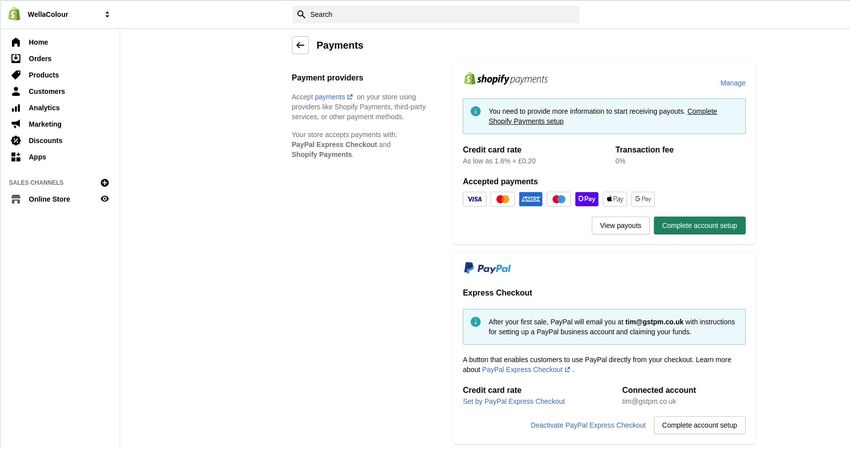
04. ADDING A PAYMENT SERVICE
                                    PROVIDER
                     In this section we explain how to set up Shopify payments.
This is Shopify’s own payment service provider. In later guides we will explain how to add your own
                  merchant. To get started quickly Shopify Payments is the easiest.
                               You can find out more about rates here.
Adding a Payment
Service Provider
Credit Card Processing
To edit settings open page replacing
[your_site_name] with the site name
01 your selected in step 1
https://[your_site_name].myshopify.com/
admin/settings/payments
02 Click “Complete account setup”
03 Enter business information:
Business type
Companies House Registration
Number (CRN) (optional)
Do you have a VAT number?
VAT number
Business address
City
ZIP/postal code04 Enter Personal details
First name
Last name
Date of birth
05 Fill all fields detailing the types of products
you will sell in the “Product details” section
Business category
Description of products or services
06 Enter Customer billing statement
Statement descriptor is the company's name
that appears on a credit card statement. It is
very important to use a name that customers
will recognise or you may get chargebacks
from customers
Phone number should be your customer
services support number
07 Enter Banking information
to get paid from Shopify
Sort code
Account number
08 Click “Complete account setup”IMPORTANT NOTE: It is critical to test payments thoroughly. At least test using Shopify test transaction cards which can be found here. Follow the steps in this video tutorial. It is advisable to test with real cards and other payment methods such as Paypal or Apple Pay, if you have them configured, to ensure everything works before releasing this to the public.
Paypal Payments
You will need a Paypal account associated with the email
you used to setup the Shopify store in order to proceed
adding Paypal payments to your Shopify store.

If you don't have a PayPal business account with the email
address you used to set up your store, then you can add
your email address to an existing PayPal account or sign
up for a new PayPal business account with the same email
address you used to set up your store.

01    To enable Paypal payments navigate to “Settings”
      then “Payments” in the Shopify admin

02    In the Paypal Section select “Activate” (or if already
      active select “Deactivate” then activate again),

         Enter the email address for your PayPal
         account, then click “Next”
         Enter the password for your PayPal account,

         then click “Log In”, On the PayPal permissions
         page, click “I Give Permission”

03    Return to Shopify admin and make a test
      transaction to verify it works
05. UPLOADING PRODUCTS, CREATING A
CATEGORY & MANAGING INVENTORY
In this section we show in detail how to add a product Category (Shopify call them “Collections”)
and then how to add a single product to that Category.Uploading Your Products,
Creating a Category and
Managing Inventory
To create a Category open the page
01
https://[your_site_name].myshopify.com/
admin/collections
Click ‘Create collection’ and Enter
collection details as follows:
Collection title (required)
Description (optional)
Collection type - Switch to ‘manual’
Add image if you wish (optional)Now to Add Your
First Product
Open
https://[your_site_name].myshopify.com/admin/
02 products or select “All Products” in the navigation
To add your first product click ‘Add product’ and
add the following information
a) Product title
b) Product description
c) Upload product images
d) Choose product status
‘Draft’ if the product not ready to sale
‘Active’ if the product ready to be sold
03 Product price - Add the price that
you wish to sell the product for04 Inventory
add “SKU (Stock Keeping Unit)”, this should
be provided in your supplier product
catalogue or Salon stock management
system but you can create your own (E.G.
“SHAM001). Each product and variant
should have a unique SKU. This is to help
manage stock.
GTIN (Optional). GTIN is the barcode number.
Add Product Quantity
Add the total available stock available for sale.
You can deselect “Track Quantity” to sell
without tracking your stock or “Continue selling
when out of stock” if you want to sell when out
of stock. Be careful with these options as
customers will express dissatisfaction if you
cannot fulfil an order.
In the right column under “Organisation” Choose
05 the “Collections” field and select the appropriate
collection. You created this in step 1
06 In Shipping Details section - enter the appropriate
weight for the productIf a product has multiple variants then you should
07 add those Variants. For example different colours
and sizes.
a) View the “Variants” section
b) You can add new product variants adding
different product size, product and other
options. Be sure to add the correct size and
image if appropriate to ensure good user
experience.
Once you have added your first
08 Collection/Category, Product and Variants (if
needed) then finally click the "Save" button.
Congratulations you have saved your first
product. It is possible to upload products in bulk.Bulk Product Upload
You may want to ask for some technical support to
do this step or follow the this guide, referring to
Shopify help pages, as these steps can change:
01 First you will need to download the sample
product excel spreadsheet here.
02 Add your products to the excel file maintaining the
exact format and field names that they provide:
a) Refer to “Description of the product import
CSV file” in the Shopify help guide referencing
mandatory and non-mandatory fields
b) Linking products to “Collections” (Shopify
product categories) can be achieved by
adding an additional column to the excel
called “Collection”.
You must create these collections first in
the Shopify admin following Step 1 -
Section 5
c) Adding Variants and Multiple Product
Images. See Shopify guide hereWhen your file is ready Select “Products” then
“All Products” in the left menu
03 NOTE: Before you start the next step you must
have “Collections” created that match those in
your product catalogue.
04 Select “Add File”, navigate to the product
catalogue excel and import the file.
05 Select “Upload and Continue” then preview
your products to ensure they are correct.
Select “Import Products” and Shopify will start
06
adding your products. Note this can take a
few minutes to complete depending on the
size of your catalogue.
07 When complete you will see your products
listed on the products page.
It is highly recommended to review your product
08 listings in detail in the customer facing store.
Make sure they are in the correct categories.06. VIEING SALES & SHIPPING ORDERS Please make sure you have selected a Shopify plan before you proceed to this step.
6.1 Select Your “Shopify Plan”

     Open

01   https://[your_site_name].myshopify.com/
     admin/orders?selectedView=all

02   Click on ‘Select plan’

03   Choose plan
       “Shopify Basic” is suitable for most
       businesses. Shopify charge 2.2% + 20p for
       every transaction with a monthly
       subscription of $29. You can compare all
       of the plans here.
       You can also upgrade later to benefit
       from lower credit card processing rates.

04   Choose ‘Billing cycle’ and ‘Payment
     method’ (Monthly, Yearly)

05   Select “Start Plan”
6.2 Fulfilling Customer
Orders Manually
Before you start fulfilling orders make sure that you
have not selected “Automatically fulfill all of the
order’s line items” in the “Order Processing”
section of your store Admin. It is also worth
considering using a specialist label printer
Open
01 https://[your_site_name].myshopify.com/ad
min/orders?selectedView=all or select
“Orders” in the left admin menu
02 Select the order you want to fulfil
In the Order Details Page use “SHIPPING
ADDRESS” which can be used to create a
03 label. You can also select “Print” drop down
menu and “Print Packaging Slip” which
should be included with the order.After you have packaged & posted the
04 order, mark it as fulfilled so the customer
receives a notification
Notes On Shipping:
You can take bulk actions, such as
Printing Packaging Slips and marking
orders as fulfilled, in the Orders page by
filtering and selecting orders, then
selecting actions from the actions menu
above the orders list.
Shopify provides a wide range of shipping
options. For more details review the
Shopify Shipping Guide. Here you will find
more detailed information around
streamlining this process, integrating with
hardware and courier services.You can also read