HOW TO REMOVE WALLPAPER WITH AN ELECTRIC STEAMER - D.I.Y CLINICS
←
→
Page content transcription
If your browser does not render page correctly, please read the page content below
HOW TO REMOVE
WALLPAPER WITH AN
ELECTRIC STEAMER

      D.I.Y
     CLINICS
D.I.Y. CLINIC REQUIREMENTS
SAFETY CONSIDERATIONS AND RECOMMENDATIONS:
1. Before using the equipment, read and observe the safety instructions detailed in the Users
Manual.
2. Make sure the electrical lead is in good working condition.
3. A Wagner steamer unit must be earthed. If the electrical lead or plug is damaged do not
use. Only an authorised repair agent can replace a damaged electrical lead or plug, as
special tools are required.
4. Before connecting to the mains supply, ensure that the supply voltage is identical with the
value given on the rating plate.
5. The Wagner Steamer should only be used with clean water. Do not add wallpaper stripping
additives or chemicals.
6. Never point the steam plate/bar at people, animals or objects that can be damaged by high
temperatures. Do not place you hand in front of the steam plate.
7. Keep children and animals away from the machine at all times.
8. When working in close proximity to wood, gypsum substrate, plasterboard or
.laminated/coated surfaces remember that these may be damaged by heat or steam.
9. Before filling and emptying the water tank, remove the mains plug from the mains socket.
Never overfill the water tank above the maximum level. If the machine has been overfilled or
there is any other operating problem remove the mains plug from the mains socket.
10. Never leave a machine that has been switched on unsupervised. Never let the water tank
boil dry as boiling dry may cause overheating or fire.
11. Before undoing any of the hose connectors allow the machine to cool down for at least two
minutes.
12. Never use the machine without the steam plate/bar. When the machine is heating up to
.operating temperature hot water may overflow from the steam plate/bar. When overhead
.work is being performed, hot water may drip from the steam plate/bar. Care must be taken
to avoid scalding.
13. Make sure all electrical sockets, switches and outlets are switched off. Ensure all electrical
sockets, switches and outlets are covered. Do not allow steam or water to come in contact
with them.
114. The maximum extension cord length to be used is 10 metres. The cord diameter must be at
least 3 x 1mm2. The extension cord must be fully unwound.
15. Ensure that the machine is on a stable flat surface and is in an upright position when in use.
16. Do not stand or sit on the machine or put any objects on top of the machine.
17. Do not stretch the steam hose or bend it sharply. If a steam hose is cracked, worn or Never
block the safety valve. Never pull on the steam hose or power lead.
18. Never put the machine into water or other liquids.
19. Always carry the machine by the handle.
20. Empty the machine after use and when dry inside store standing upright.
21. Always wear suitable clothing. Cover areas of exposed skin on your arms and legs. Wear
protective goggles and rubber gloves to protect your eyes and hands.
TOOLS (AS REQUIRED):
1. Wagner W15 Electric Wallpaper Steamer Remover
2. Scoring Tool
3. Wall Scraper
4. Protective Goggles
5. Rubber Gloves
6. Canvas Drop Cloth or Plastic Sheet
7. Step Ladder
21. Removing old wallpaper completely and correctly is an essential part of surface
preparation before painting or adding new wallpaper.
A clean surface free of old paper and adhesive is necessary to get the best finish.
2. Before you start to work, you will need to prepare the room.
• Remove all decorative objects and other hanging items from the walls.
• Remove as much furniture as possible and cover whatever cannot be
removed.
• Make sure all electrical sockets, switches and outlets are switched off and are
covered.
• Spread drop sheets along the baseboards and tape them to the baseboards.
This will stop messy wallpaper scraps from getting on the floors.
3. Identify the type of Wallpaper to be removed;
Wallpaper can be either porous or non-porous and knowing what you have on the wall will
determine how easy it is to remove and the type of technique required. If the wallpaper is
non-porous (waterproof) such as those coated in vinyl or foils you will need to score the
wallpaper being using the steamer so that the steam can soak into the adhesive and soften
it. You can test for porosity by spraying a small area with hot water. If the wallpaper is
porous the paper should absorb the water almost immediately.
4. Scoring the Old Wallpaper;
In order to achieve the quickest results it is best to gently score the wallpaper to be removed
before applying steam. If you are dealing with non-porous wallpaper you must score the
wallpaper for it to be effective. Scoring should be performed with an approved scoring tool,
as the rounded edges will help ensure that you don’t cause damage to the plasterboard
underneath.
To score the wallpaper, make gentle cuts in a crisscross pattern approximately 15cm apart.
Score all over the paper to be removed, paying close attention to the corners and edges of
the wall.
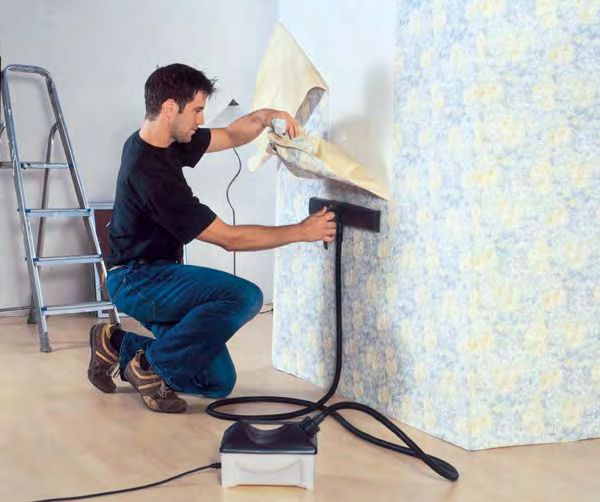
5. Why use an Electric Steamer to Remove Old Wallpaper;
There are a number different ways to remove old wallpaper. If the surface area involved is
large, involves more than one layer of wallpaper, the wallpaper has been painted over or the
wallpaper was not properly sealed then using a steamer is the most effective and less time
consuming method. A wallpaper steamer is a hotplate attached to a hose extending from a
hot water reservoir that heats the water and directs steam to the hotplate. Applying steam to
the wallpaper softens the paper and breaks down the adhesive. A wallpaper steamer is
environmentally friendly as it uses only clean water so there are no chemicals involved in
the process.
6. Prepare the Electric Wallpaper Steamer;
a. Fill the Water Container – To fill the unit, remove the filler cap and hose. Fill the water
container with clean tap water. To reduce the time taken for the unit to produce steam
you can use hot water. Only fill the water to the maximum water level indicated. The
water container will hold 4 litres of water, which will take about 20 minutes to produce
steam and will operate for about 80 minutes.
3b. Attach the Steam Hose to the Container – Connect the end of the steam hose with
the large connector to the water container. This is a quarter turn fitting.
c. Attach the Hose to the Steam Plate – Connect the end of the hose with the small
black connector to the fitting on the steamplate. Hand tighten.
d. Attach the power cord to the unit – Connect the matching ends to unit.
e. Plug in the Power Cord – Once the power cord is plugged in and the switch activated,
it will take about 20 minutes to produce steam depending on the amount of water in
the container. It is important to note that there is not an ON-OFF switch on the unit.
The unit is ON when it is plugged in.
7. Remove the Old Wallpaper;
a. Once steam is flowing out of the steam plate the steamer is ready to use.
b. Start at the top of the wall and work your way down.
c. Begin by holding the steamplate flat against the scored wallpaper for about 10
seconds.
d. Move the steamplate to a new section and use the scraper blade to remove the
section, which has just been steamed. Let the wet wallpaper fall to the floor and onto
the drop sheet.
e. The surface of the wall will be soft when it is steamed. Take care not to gouge into
the plasterboard with the scraper when you are removing the old paper.
f. Do not move the steam plate around the walls too quickly. Also don’t wet a larger
area than you can scrape off in about 15 minutes.
g. If the wallpaper does not remove easily, hold the steamplate against the wallpaper for
a longer period of time.
h. If you are working above chest height it is suggested that use a stepladder to avoid
hot water dripping down your arm.
8. Refilling the Electric Wallpaper Steamer;
a. Do not operate the steamer once the water container is empty.
b. To refill the unit, unplug the power cord from the power source and allow the unit to
cool for a minimum of 2 minutes.
c. Slowly remove the fill cap and refill the container. Replace the fill cap.
d. Plug the power cord back in and allow the unit to reheat.
e. Once steam is flowing out of the steam plate it is ready to use again.
9. Corrective Action Recommendations if Steamer is not Working;
Problem Cause Correction
Unit leaks steam from Hose kink. Check for kink in hose.
pressure relief valve.
Obstruction. Check for obstruction in steamplate.
Steamer allowed to No water in There is a safety cut-off fuse to prevent the unit from over-
boil dry. container. heating.
This is an automatic recycling device and will reset itself.
a. Disconnect power cord from the power source and allow
10 minutes for the unit to cool down.
b. After 10 minutes refill with water.
c. Plug power cord in and allow water to heat.
410. Removing Old Adhesive;
Once the wallpaper has been removed you should check to see if there is any residual
adhesive. Depending on the type of adhesive used this may not have been removed in the
steaming process. If the adhesive is particularly strong you may need to use a heavy-duty
detergent to remove this. You should consult with your hardware store specialist to help find
the right one and to understand the application requirements.
11. Storing an Electric Steamer;
a. Unplug the unit from the power source.
b. Wait a minimum of 2 minutes and slowly open the filler cap.
c. Drain the remaining water from the container. Never store the unit with water in the
container.
d. When dry inside pack back into the box and store standing upright.
5CHECKLIST & TIPS
CHECKLIST:
• Prepare the room and surrounding area.
• Identify the type of wallpaper to be removed.
• Score the old wallpaper.
• Prepare the Electric Wallpaper Steamer.
• Remove the old wallpaper.
• Refill the Electric Wallpaper Steamer as required.
• Remove any residual adhesive.
• Dispose of old wallpaper scraps.
• Dry Steamer unit fully and store away safely.
• Ensure walls are clean and dry before adding paint or new wallpaper.
HANDY HINTS:
• Convert your Wagner W15 Wallpaper Steamer into a universal cleaning unit by
adding a Steamer Accessories Kit. The Steamer Accessories Kit includes a
variety of tips and extensions as well as a floor wipe and window wiper.
• Fill the Electric Steamer water tank with hot water to greatly reduce the time
required to produce steam.
• For larger jobs, use the attachable extension arms for the steam plate to give
you greater surface coverage.
6You can also read