IMI National Guidelines - A Guide to Good Practice
←
→
Page content transcription
If your browser does not render page correctly, please read the page content below
IMI NATIONAL GUIDELINES:

               IMI National Guidelines
                 A Guide to Good Practice

                     Cleft Lip and Palate
                               Audit Review

            These guidelines have been developed by the Institute of Medical Illustrators,
                               in consultation with specialist advisors.
  They should be considered a guide to good practice, providing a baseline for auditable standards.
         If necessary, adaptations may be made to take into account your local conditions.

    © Institute of Medical Illustrators 2018. All rights reserved. Unauthorised copying, distribution or
         commercial exploitation is prohibited and will constitute an infringement of copyright.

Reproduction permission granted for personal and educational use, and for the development of Medical
       Illustration departmental guidance, subject to acknowledgement of the source material.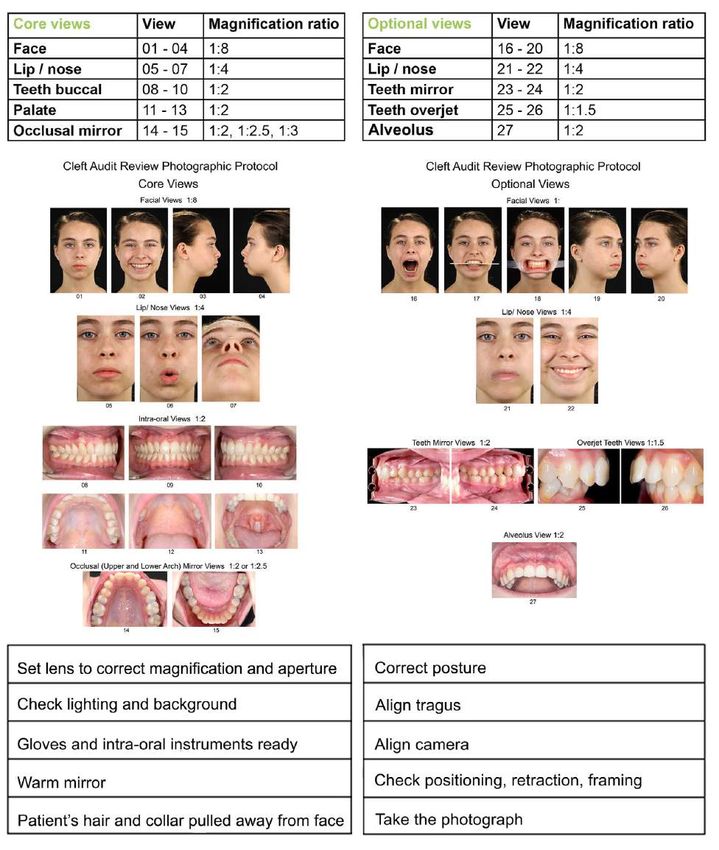
IMI National Guideline – Cleft Lip and Palate
                                                   Lead Author – Marie Jones and Johnny Volcano
                                                                 Date Created – September 2018
                                                                 Revision Date – September 2021
                                                                                      Version – V2

        Contents                                                                 Page
        Introduction                                                             04

1       Background: cleft lip and/ or palate                                     04 - 10
1.1     Main categories of cleft lip and palate                                  06 - 07
1.2     Classification of cleft lip and palate                                   08
1.3     Photographic involvement in cleft patient treatment plan                 08 - 09
1.4     Considerations for photography of patients with a cleft                  10

2       Photographic techniques                                                  11 – 65

2.1.1 Cleft Audit Review photographic sets of views                              12 - 15
      Core views for babies                                                      12
      Core views for babies and young children (alternative)                     13
      Core views for children and adults                                         14
      Optional views for children and adults                                     15
2.1.2 Photographic background                                                    16 -17
2.1.3 Equipment                                                                  17
2.1.4 Magnification ratio                                                        18

2.2     Photographic techniques: babies and young children                       19 - 29
2.2.1   Facial views babies and young children lying down                        21
2.2.2   Facial views 01, 03, 04: lying down                                      22 - 23
2.2.3   Facial views 01, 03, 04: sitting (aided)                                 24 - 26
2.2.4   Lip/ nose views 05 and 07                                                27
2.2.5   Palate Views 11,11a and 12                                               28 - 29

2.3     Photographic techniques: children and adults                             30 – 40
        Background, lighting and patient/ photographer positioning
2.3.1   Patient and photographer positioning: facial views                       32 - 34
2.3.2   Core facial views 01 to 04                                               35
2.3.3   Core lip/ nose views 05 to 07                                            36 - 37
2.3.4   Optional facial views 16 to 18                                           38
2.3.5   Optional facial views 19 and 20                                          39
2.3.6   Optional lip/ nose views 21 and 22                                       40

                                                                                                 2
IMI National Guideline – Cleft Lip and Palate
                                                  Lead Author – Marie Jones and Johnny Volcano
                                                                Date Created – September 2018
                                                                Revision Date – September 2021
                                                                                     Version – V2

        Contents cont.

2.4    Photographic techniques: Intra-oral photography                          41 - 66
2.4    Intra-oral photography                                                   42
2.4.1  Anatomical terms and dental notation                                     42
2.4.2  Palmer’s Dental Notation                                                 43 - 46
2.4.3  Intra-oral photography and equipment/ dental mirrors and retractors      47 - 48
2.4.4  Intra-oral photography: young children                                   49
       Core Intra-oral views                                                    50 - 63
2.4.5 Core buccal teeth views: 08 to 10                                         50 - 55
2.4.6 Core palate views: 11 to 13                                               56 - 57
2.4.7 Core occlusal mirror arch views: 14 and 15                                58 - 63
       Optional Intra-oral views                                                64 - 66
2.4.8 Optional ‘True Lateral’ buccal mirror views: 23 and 24                    64
2.4.9 Optional teeth overjet views: 25 and 26                                   65
2.4.10 Optional alveolus view: 27                                               66

        Quick Reference Guide                                                   67

        Authors                                                                 68
        Acknowledgements                                                        69 - 70
        Figures                                                                 71 - 73
        References/ Bibliography                                                74
        Further reading                                                         75 - 76
        Appendix 1: CRANE database: birth by cleft type                         77
        Appendix 2: Anatomy of the face and mouth                               78

                                                                                                3
IMI National Guideline – Cleft Lip and Palate
                                                    Lead Author – Marie Jones and Johnny Volcano
                                                                  Date Created – September 2018
                                                                  Revision Date – September 2021
                                                                                       Version – V2

                                        Introduction
The Clinical Standards Advisory Group Cleft Lip and Palate U.K. Study (CSAG, 1998) carried out
by a multidisciplinary cleft team examined care and outcomes in children born with a unilateral
cleft lip and palate (UCLP). They recommended reliable audit review including taking high quality,
standardised medical photographs of children born with a cleft lip and/ or palate at recommended
ages of 0 (pre-first operation), 5, 10, 15 and 20 years of age.

The standardised medical photographs within this Guideline have been established in
collaboration with multidisciplinary cleft teams comprised of: Consultant Orthodontist; Speech and
Language Therapist; Cleft Surgeons and Medical Photographers (see Acknowledgements).

1.     Background: Cleft Lip and/ or Palate
Approximately 1 in 700 babies (1,200 babies) in the U.K. are born with Cleft Lip and/ or Palate
(CLP) malformations; it is the most common craniofacial congenital abnormality in the U.K. (NHS,
2018).

A cleft lip is a split or gap, which affects one or both sides of the upper lip and may extend into the
base of the nose and the alveolar ridge (gum). A cleft palate occurs when the palate fails to fuse
and may affect the soft palate and the hard palate. The result is a gap in the roof of the mouth
(palate) that connects the mouth directly with the nasal cavity.

Often, the cause of the cleft is not known but there may be a family history of clefts, environmental
factors or a genetic diagnosis; up to 50% of babies with isolated cleft palate have been found to
have a genetic cause for the cleft. The Cleft Registry and Audit NEtwork (CRANE) was set up by
the Department of Health in 2000 to collect information about all children born with a cleft lip and/
or palate in England, Wales and Northern Ireland. CRANE (2018) states:

“CRANE collects information on these children at birth or at diagnosis, and into childhood. This
includes information about the surgical treatments children have had, and how they are getting on
in terms of their speech, hearing, growth, dental health and overall health.”

                                                                                                     4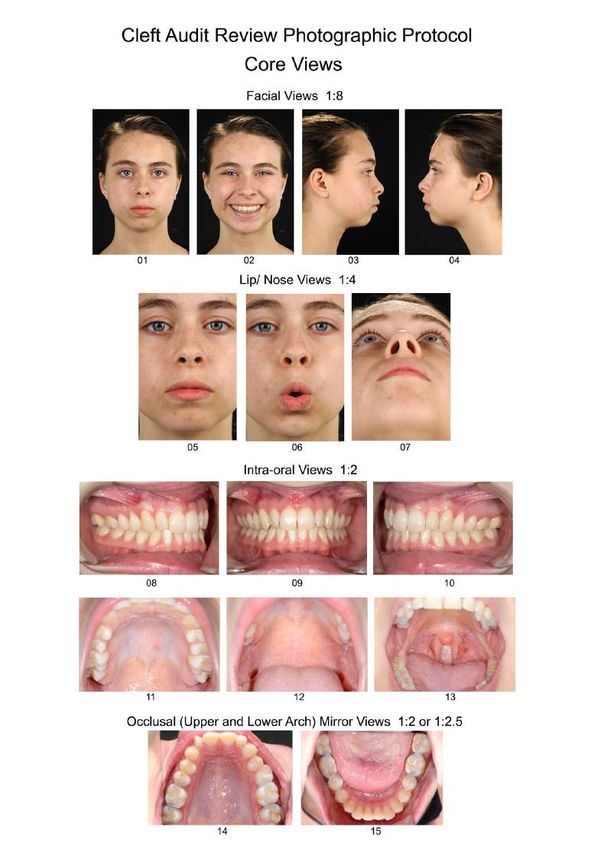
IMI National Guideline – Cleft Lip and Palate
                                                          Lead Author – Marie Jones and Johnny Volcano
                                                                        Date Created – September 2018
                                                                        Revision Date – September 2021
                                                                                             Version – V2

The figures acquired by CRANE for births have remained consistent over many years (see
Appendix 1); the average distribution of cleft types between 2008 and 2017 are demonstrated in
Figure 1 and are approximately: CL 24% CP 45% UCLP 21% BCLP 10%

             Figure 1. Cleft type of children born with a cleft lip and/ or palate in England, Wales and
                       Northern Ireland average between 2008 and 2017 (CRANE, 2018)

Many clefts occur in isolation, i.e. without any other anomaly or syndrome; however, there are
more than 300 syndromes associated with cleft lip and/ or palate, common examples are:
Stickler’s syndrome, 22q11 deletion syndrome (DiGeorge syndrome) and Van der Woude
syndrome. A standard set of medical photographs of all cleft types at an early (pre-operative)
stage could also enable identification of altered craniofacial morphology or associated syndromes.

                                                                                                           5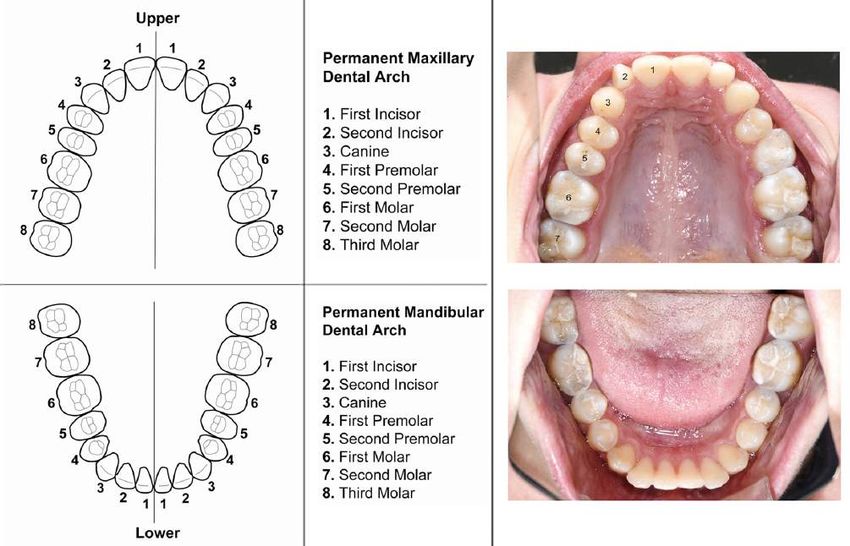
IMI National Guideline – Cleft Lip and Palate
                                                       Lead Author – Marie Jones and Johnny Volcano
                                                                     Date Created – September 2018
                                                                     Revision Date – September 2021
                                                                                          Version – V2

1.1 Main categories of cleft lip and palate
Figure 2 demonstrates the main categories of cleft lip and palate.

                            Figure 2. Main categories of cleft lip and/ or palate

                                                                                                     6
IMI National Guideline – Cleft Lip and Palate
                                                       Lead Author – Marie Jones and Johnny Volcano
                                                                     Date Created – September 2018
                                                                     Revision Date – September 2021
                                                                                          Version – V2

The manifestation of each patient’s condition is very individual as demonstrated in Figure 3a.

                              Figure 3a. Variations of cleft lip and/ or palate

Other abnormalities of the palate that may also be imaged include submucous cleft palate, palatal
fistula and oral damage following illness or injury. It may not be immediately obvious that the
palate is affected from the facial appearance, see Figure 3a.

                                Figure 3b. Unusual palatal presentations

                                                                                                     7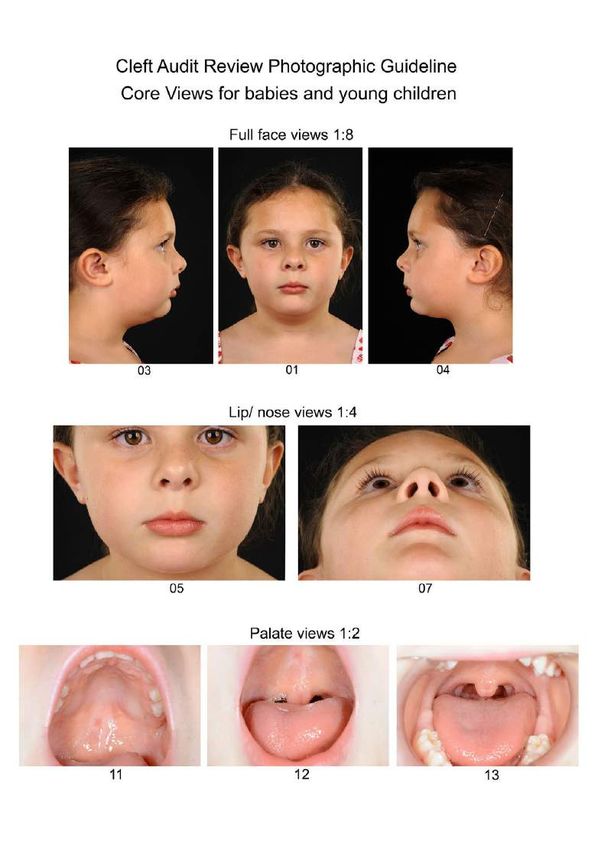
IMI National Guideline – Cleft Lip and Palate
                                                      Lead Author – Marie Jones and Johnny Volcano
                                                                    Date Created – September 2018
                                                                    Revision Date – September 2021
                                                                                         Version – V2

1.2 Classification of cleft lip and palate
There are different methods of describing cleft types e.g. the LAHSAL code (Figure 4a.). This
‘code’ indicates the area of the mouth affected by the cleft. An uppercase letter indicates a
complete cleft, a lowercase letter indicates an incomplete cleft, and a dot or dash indicates a non-
affected area. Therefore, expressed as (Figure 4a.):

   •   LAHSAL        complete bilateral cleft lip and palate;
   •   .…..l         left incomplete unilateral lip only, no palate involvement;
   •   …S..          soft palate only, no lip involvement.

                            Figure 4a. LAHSAL Code system with patient examples

1.3 Photographic involvement in cleft patient treatment
plan
A treatment and surgical plan will have been devised for each patient in consultation with the
multidisciplinary team and the patient/ parent or legal guardian.

Babies with a cleft are usually photographed for the first time at their initial clinic/ multidisciplinary
clinic visit, pre-operative assessment clinic or on admission to hospital for their first operation. This
could range from when the baby is around 6 weeks old to 12 months old.

                                                                                                        8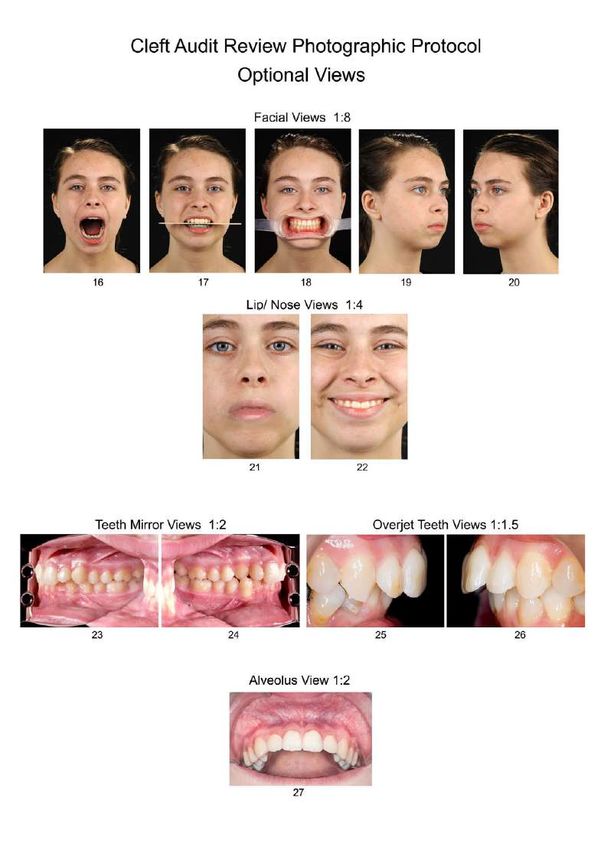
IMI National Guideline – Cleft Lip and Palate
                                                          Lead Author – Marie Jones and Johnny Volcano
                                                                        Date Created – September 2018
                                                                        Revision Date – September 2021
                                                                                             Version – V2

Sets of medical photographs will be required at each stage of treatment dependent upon clinical
need (see Figure 5) e.g. orthodontic treatment (see IMI National Guidelines Orthodontic
Photography, 2008), and rhinoplasty (see IMI National Guidelines Rhinoplasty Photography,
2018).

All cleft patients regardless of cleft type will have a set of medical photographs (as in this
Guideline, Figures 11a and 11b) taken at audit review ages* of 0 (pre-first operation), 5, 10, 15
and 20 years of age (CSAG, 1998). However, this is dependent on individual cleft unit preference.

      Figure 4b. Cleft patient treatment plan that may include photographic involvement – audit review ages*

                                                                                                               9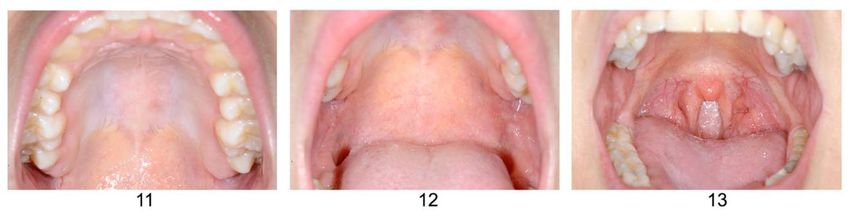
IMI National Guideline – Cleft Lip and Palate
                                                    Lead Author – Marie Jones and Johnny Volcano
                                                                  Date Created – September 2018
                                                                  Revision Date – September 2021
                                                                                       Version – V2

1.4 Considerations for photography of patients with a cleft

As with all accurate medical photography, consider the following: background; lighting; equipment;
patient and photographer positioning; communication; informed consent and confidentiality; safe
and appropriate storage of images; data protection (GDPR, 2018; DPA, 2018); health and safety
and infection control, i.e. the decontamination or disposal of intra-oral equipment – see relevant
IMI Guidelines for more detailed advice. Many of these considerations are as for orthodontic
photography (see IMI Guidelines Orthodontic Photography, 2008).

Good communication with the parent and child is essential to gain trust and co-operation. It is
important that they are confident that the photographer is comfortable with handling their child.
This helps them to relax and feel less anxious about the session (this is especially true of new
parents). It will also help when they return three to five months later for the post-op assessment
clinic when further photography will be necessary.

If possible, request that the baby is not fed directly before photography as this increases the risk of
reflux when the baby is laid on the mat. This may result in milk being visible in the oral cavity
possibly obstructing anatomical structures. The baby may also be too relaxed and possibly be
incapable of opening their mouth, making the palatal shots impossible.

Ask the parent to remove any of the baby's clothes that may obscure the face, especially loose
vests (the chin must be fully visible), unless this distresses the baby or child. Babies may start to
cry and portray a distorted facial aspect that can render the image clinically invalid. Although it is
best to have an unobstructed view of the face and head, young babies may need their heads to be
gently held to obtain correct positioning for photography. A cleft consultant’s opinion is: “Having a
settled baby is more important to the clinicians than minor distractions such as fingers or clothes at
the periphery of photos.”

Consideration should be given for patients with additional problems such as a tracheostomy or
nasogastric (NG) tube/ nasopharyngeal airway (NPA). Ensure any equipment/ tubes are placed
away from the lip/ nose where possible. Some syndromes or conditions associated with clefts may
require additional considerations for positioning of the head so as not to compromise the baby’s
airway. A clinical nurse specialist/ parent/ assistant may need to help.

                                                                                                    10
IMI National Guideline – Cleft Lip and Palate
Lead Author – Marie Jones and Johnny Volcano
Date Created – September 2018
Revision Date – September 2021
Version – V2
2
Photographic techniques
2.1.1 Cleft Audit Review
Photographic sets of views
11IMI National Guideline – Cleft Lip and Palate
Lead Author – Marie Jones and Johnny Volcano
Date Created – September 2018
Revision Date – September 2021
Version – V2
Template 1a. Cleft Audit Review core views for babies
12IMI National Guideline – Cleft Lip and Palate
Lead Author – Marie Jones and Johnny Volcano
Date Created – September 2018
Revision Date – September 2021
Version – V2
Template 1b. Cleft Audit Review core views for babies and young children (alternative)
13IMI National Guideline – Cleft Lip and Palate
Lead Author – Marie Jones and Johnny Volcano
Date Created – September 2018
Revision Date – September 2021
Version – V2
Template 2a. Cleft Audit Review core views for children and adults
14IMI National Guideline – Cleft Lip and Palate
Lead Author – Marie Jones and Johnny Volcano
Date Created – September 2018
Revision Date – September 2021
Version – V2
Template 2b. Cleft Audit Review optional views for children and adults
15IMI National Guideline – Cleft Lip and Palate
Lead Author – Marie Jones and Johnny Volcano
Date Created – September 2018
Revision Date – September 2021
Version – V2
2.1.2 Photographic background
Plain black or white backgrounds are recommended. Most departments now use paper or
disposable backgrounds. If photography is not taking place in a studio, a temporary background
may be made from a white sheet or a plain wall. Cluttered backgrounds are distracting.
Studio electronic flash is recommended for photographing a patient’s facial views. Output with
reflectors, soft boxes or umbrellas should be capable of producing sufficient light for an aperture of
at least f/16 and positioned to give uniformity and contrast. Ideally, lights should either be
suspended on a ceiling-mounted system or on mobile stands to provide a safe and convenient
working environment for photographer and patient.
Position the two key lights at approximately 45° to the patient and level to the patient's head. To
obtain 'softer' repeatable lighting without prominent specular highlights, large reflector umbrellas or
soft-boxes may be used, Figures 6a and 6b. (Also see IMI Clinical photography studio, design and
planning guideline, 2012).
With a black background two rear lights must be used to provide ‘rim-lighting’ and separate the
subject from the background, a hair light should also be used if available, see Figure 6a.
Figure 6a. Lighting set-up for black background (AP views)
16IMI National Guideline – Cleft Lip and Palate
Lead Author – Marie Jones and Johnny Volcano
Date Created – September 2018
Revision Date – September 2021
Version – V2
With a white background the two rear lights should be directed at the background to produce a
shadowless white background, see Figure 6b. Care should be taken not to over light the
background as this will result in flare. However, if the background is underlit it will appear grey.
Figure 6b. Lighting set-up for white background (AP views)
2.1.3 Equipment
All camera equipment in this guide is based around a full-frame sensor CCD, i.e. Nikon DSLR and
Canon DSLR with 105mm Micro-Nikkor 1:2.8 lens/ Canon 100mm 1:2.8 Macro lens respectively
and Macro ring-flash units. It is essential that the lens be capable of producing magnifications of
up to 1:1 and must have a minimum working aperture of at least f/22 for optimum depth of field. By
using a lens with an effective focal length of between 100mm and 135mm sufficient subject to
camera distance is maintained, which avoids distortion and ensures the correct perspective, as
well as providing a convenient working distance for both the facial and intra-oral views.
For cameras with non-full-frame sensors, typically 1.5x crop factor (Nikon DX), a set focal length
and fixed focusing distance should be chosen to give the same view as shown in these guidelines
e.g. the Nikon DX DSLR with 60mm Micro-Nikkor 1:2.8. will have a similar working distance as the
full frame (FX) DSLR with 105 Micro-Nikkor 1:2.8.
If the working distance does not allow for the use of a 100mm/105mm lens on a full-frame sensor,
i.e. in small clinic rooms, then a shorter focal length of 50mm/ 60mm (macro lens) or equivalent
can be used, however, this will result in subject distortion.
17IMI National Guideline – Cleft Lip and Palate
Lead Author – Marie Jones and Johnny Volcano
Date Created – September 2018
Revision Date – September 2021
Version – V2
2.1.4 Magnification ratio
Table 1 demonstrates the magnification ratios for all views.
Table 1. Magnification ratios
If the camera has a full frame sensor, a scale of 1:8 should be used for the full-face views of
babies, children and adults (core views 1 to 4 and optional views 16 to 20). Do not try to fill the
frame with the image in camera. Using the same magnification from the first pre-operative views
ensures consistency through to adulthood (see Figure 7a). The image may be cropped when
presented to eliminate distracting space around the features.
Figure 7a. Comparison of AP view at 1:8
Similarly, a scale of 1:4 should be used for the lips/ nose core views 5, 6, 7 and optional views 21,
22. For intra-oral core views 8-15 and optional views 23-28 use 1:1.5, 1:2, 1:2.5 and 1:3.
18IMI National Guideline – Cleft Lip and Palate
Lead Author – Marie Jones and Johnny Volcano
Date Created – September 2018
Revision Date – September 2021
Version – V2
2.2
Photographic Techniques:
Babies and young children
19IMI National Guideline – Cleft Lip and Palate
Lead Author – Marie Jones and Johnny Volcano
Date Created – September 2018
Revision Date – September 2021
Version – V2
2.2 Photographic techniques: babies and young children
All facial views should be taken in portrait format for the children and adults (see Figure 8a),
although, some units/ individual cleft surgeons may prefer the close-up views (5 and 7) of the nose
and lips to be taken in landscape format (see Figure 8b.).
Figure 8a. Core set of views for babies Figure 8b. Core set of views for babies and young
children (alternative)
20IMI National Guideline – Cleft Lip and Palate
Lead Author – Marie Jones and Johnny Volcano
Date Created – September 2018
Revision Date – September 2021
Version – V2
2.2.1 Photographic techniques:
Babies and young children lying down
• Babies and young children may be photographed sitting up or it may be easier to photograph
them lying down at least until the age of 6 months when they begin to sit up unsupported as
described.
• Use a lighting technique that is flexible such as a hand-held flash with studio lights bounced
off the ceiling/ walls as fill-in to reduce the harshness of the shadows, rather than direct
studio lighting. Ensure the flash is positioned so that the shadows are in the correct
orientation, i.e. from top to bottom and front to back, see Figure 8c.
• Provide a baby changing mat or a gym mat covered with either a paper towel or a sheet (as
in Figure 8c); only plain black or white should be used. Check that the background material
covers the area that you are photographing. The parent will need to kneel to one side of the
baby so as not to be in view or obstruct the lighting.
• The parent should place the flat of their hand alongside the baby's arms; this keeps them out
of shot and prevents the baby from wriggling too much. Generally, young babies are quite
happy to be in this position as they feel secure with their parents' hands supporting them.
Figure 8c. Hand-held flash in the studio
21IMI National Guideline – Cleft Lip and Palate
Lead Author – Marie Jones and Johnny Volcano
Date Created – September 2018
Revision Date – September 2021
Version – V2
2.2.2 Facial views 01, 03, 04 at 1:8 lying down
View 01 Face AP 1:8
• You may need to place a small pillow or padding under the baby’s shoulders to allow the
head to rest back in the correct anatomical position or photograph the head at an angle to
ensure that you are parallel to the Frankfort plane as in Figure 8d.
Figure 8d. Rolled sheet for support/ camera position
• When changing the magnification for a different view, the photographer should step away
from the child so that the alterations to lens and aperture can be made safely.
22IMI National Guideline – Cleft Lip and Palate
Lead Author – Marie Jones and Johnny Volcano
Date Created – September 2018
Revision Date – September 2021
Version – V2
Views 03 and 04 Face right and left lateral at 1:8 lying down
• Ask the parent to turn the baby onto their side at an angle of 45° to 60°; the photographer is
able to adjust their position to achieve a lateral view (Figure 8e). The parent should gently
hold the baby’s arms close to their body. The other hand should be placed along the baby's
back to support them. Do not get the parent to prop the baby at 90° to the mat, as the baby
will invariably turn their face to the mat. A parent or colleague may be able to help by
attracting the baby’s/ child’s attention.
Figure 8e. Rolled sheet/ parent’s hand for support
• Studio lighting or hand-held lighting (with or without studio lighting fill-in) may be used.
• The photographer should stand behind the child when photographing a baby lying on the mat
and position the flash so that shadows fall in the correct anatomical orientation. With a hand-
held flash, this will mean crossing arms to achieve the correct position for one of the lateral
views (Figure 8f). This technique may also be adapted and applied when using hand-held
flash for (sitting) children and adults on location, i.e. in a clinic room.
Figure 8f. Photographer, camera and hand-held flash positioning
23IMI National Guideline – Cleft Lip and Palate
Lead Author – Marie Jones and Johnny Volcano
Date Created – September 2018
Revision Date – September 2021
Version – V2
2.2.3 Facial views 01, 03, 04 at 1:8 sitting (aided)
• Babies and very young children may be photographed sitting on their parent’s lap (Figure 9a)
or sitting up next to a parent rather than lying down.
Figure 9a. Patient sitting on parent’s lap
• Suitable seating would be a bench without a backrest to avoid obscuring the back of the
head. Alternatively, turn a chair so that the backrest is on the lateral side of the patient with
the parent supporting the baby or young child.
• The photographer may need to kneel or find alternative seating to be at the same level as a
small child.
24IMI National Guideline – Cleft Lip and Palate
Lead Author – Marie Jones and Johnny Volcano
Date Created – September 2018
Revision Date – September 2021
Version – V2
• Use Figure 9b as a guide for the black background set-up.
Figure 9b. Lighting diagram for black background AP view – patient sitting on parent’s lap
• Use Figure 9c as a guide for photographing the AP face on a white background.
Figure 9c. Lighting diagram for white background AP view – patient sitting on parent’s lap
25IMI National Guideline – Cleft Lip and Palate
Lead Author – Marie Jones and Johnny Volcano
Date Created – September 2018
Revision Date – September 2021
Version – V2
Views 03 and 04 Face right and left lateral sitting (aided)
• Move the two key lights around the patient to light the lateral face (Figure 9d) to ensure the
there is adequate lighting.
Figure 9d. Lighting diagram for black background lateral view – patient sitting on parent’s lap
• Move the two key lights around the patient to light the lateral face (Figure 9e).
Figure 9e. Lighting diagram for white background lateral view – patient sitting on parent’s lap
26IMI National Guideline – Cleft Lip and Palate
Lead Author – Marie Jones and Johnny Volcano
Date Created – September 2018
Revision Date – September 2021
Version – V2
2.2.4 Lip/ nose views: 05 and 07 at 1:4
Lying down
• Babies are best photographed lying down for these views. A parent may need to hold the
child's head but avoid obscuring any part of the face.
• Position the baby on the mat as before. A towel or other kind of padding may be placed
beneath the background material to fit in the nape of the baby's neck as for the AP view. This
will allow their head to be tilted back slightly for ease of photography to ensure the chin is not
tilting down towards the chest as would be a more natural position in a young baby.
• This method may be used for babies or very young toddlers. However, if a toddler or young
child is not comfortable with this method or with tilting their head back, they may be happier
sitting rather than lying down; this is particularly apparent in babies once they are able to sit
up by themselves.
Sitting (aided)
• A parent may need to stand behind the child so that they can rest their head on the parent
when looking up for the worm’s eye view (WEV), some children feel 'safer' doing this. A
suitable material background may be held in front of the parent to ensure an even
background (must comply with Trust’s health and safety and infection control policies).
27IMI National Guideline – Cleft Lip and Palate
Lead Author – Marie Jones and Johnny Volcano
Date Created – September 2018
Revision Date – September 2021
Version – V2
2.2.5 Babies and young children intra-oral photography:
Palate views: 11, 11a and 12 1:2
• The photographer must familiarise themselves with the anatomy of the face and mouth.
Observe the main reference points of the palate, (Figure 10a), see Appendix 2.
Figure 10a. Anatomy of the palate
• Align the camera perpendicular to the relevant point of focus (x) of the palate, i.e. hard, hard
and soft, soft, see Figure 10b.
Figure 10b. Focus points (x) of the palate
28IMI National Guideline – Cleft Lip and Palate
Lead Author – Marie Jones and Johnny Volcano
Date Created – September 2018
Revision Date – September 2021
Version – V2
• These views are generally easier to obtain whilst the baby is lying down as with the WEV and
when the baby cries or yawns, see Figure 10c.
Figure 10c.Yawning to view palate
• Alternatively, the young baby may be held lying down on the parent’s lap so that the baby’s
head rests on the parent’s knees.
• Use a ring-flash and set the lens aperture to at least f/29/ f/32.
• If it has not been possible to obtain a good view of the palate pre-operatively then take the
photograph in theatre (see Figure 10d) once the baby is anaesthetised.
Figure 10d. Photography of a cleft palate taken in the operating theatre
29IMI National Guideline – Cleft Lip and Palate
Lead Author – Marie Jones and Johnny Volcano
Date Created – September 2018
Revision Date – September 2021
Version – V2
2.3
Photographic Techniques:
Children and adults
Background, lighting and patient/
photographer positioning
30IMI National Guideline – Cleft Lip and Palate
Lead Author – Marie Jones and Johnny Volcano
Date Created – September 2018
Revision Date – September 2021
Version – V2
2.3 Photographic techniques: children and adults
Audit Review photographs to be taken at ages 5, 10 and 15 years, see Figures 11a and 11b.
Figure 11a. Core views for children and adults Figure 11b. Optional views for children and adults
Medical photographers should familiarise themselves with the main anatomical features of the
face, see Figure 11c, see Appendix 2 for terms.
Figure 11c. Anatomy of the face, lips and nose
31IMI National Guideline – Cleft Lip and Palate
Lead Author – Marie Jones and Johnny Volcano
Date Created – September 2018
Revision Date – September 2021
Version – V2
2.3.1 Patient and photographer positioning: facial views
• The AP view of the face is a key view for the surgeons as a benchmark of the patient’s
appearance. This view and the worm’s eye view (view 07) are essential when the cleft team
is auditing aesthetic outcomes.
• Remove coats and head scarves (where acceptable to the patient), turn down collars to
ensure that the patient’s ears and jaw line are clearly visible. Glasses, all visible jewellery
and body piercings should be removed.
• Removable appliances should be taken out, unless there is a specific request for
photographs to be taken with appliances in place, to demonstrate their effect.
• Ensure correct posture and positioning for patient and photographer. The patient should be
sitting up straight with both feet on the floor (not crossing legs). A small child may prefer to sit
cross-legged on a stable chair, they are used to sitting cross-legged at school and this can
improve their posture. Allow young children to keep their favourite toy with them, see Figure
11d.
Figure 11d. Correct seating and posture, young child with toy
32IMI National Guideline – Cleft Lip and Palate
Lead Author – Marie Jones and Johnny Volcano
Date Created – September 2018
Revision Date – September 2021
Version – V2
• Hair should be pulled back off of the face and neck. The ears should be visible so that the
tragus may be aligned correctly. This is especially important in the lateral views (see Figure
11e.). Use plain hair accessories and comply with infection control policies – some Trusts
only allow single-use accessories. The most common error by the photographer is not
holding the camera at the same level as the patient’s head.
Figure 11e. Incorrect patient positioning and inadequate retraction of hair
• Also apply these principles to male patients, see Figure 11f. They do not usually mind using
hair accessories when you explain that you need to see all of the face and neck. The
photographs will be of no clinical value if they do not show the full features of the patient.
Figure 11f. Correct compared with inadequate retraction of hair in male patient
33IMI National Guideline – Cleft Lip and Palate
Lead Author – Marie Jones and Johnny Volcano
Date Created – September 2018
Revision Date – September 2021
Version – V2
• The patient’s face and lips should be in a relaxed natural position and not posturing,
especially if they have incompetent lips, which do not close together when at rest. The
patient should be sitting upright and looking directly ahead, in their natural head position.
• The patient’s teeth should be at rest, i.e. the patient should have their mouth closed in a
relaxed position and not clenching their teeth or pressing their lips together.
• Adjust the patient's chin position until the head is correctly aligned. The patient’s head should
not be tilted, i.e. the median plane should be vertical and should be level and aligned to the
Frankfort Horizontal Plane or Reid Plane (Figure 11g).
• The mid-vertical grid line should pass through the mid-sagittal plane or median
plane of the face. The mid-horizontal passes through the Frankfort horizontal plane, see
Figure 11g.
Figure 11g. Correct patient positioning and effective retraction of hair
• Ensure both camera lens and photographer are aligned and parallel to the subject; this
reduces the possibility of image perspective distortion due to poor positioning and viewpoint.
34IMI National Guideline – Cleft Lip and Palate
Lead Author – Marie Jones and Johnny Volcano
Date Created – September 2018
Revision Date – September 2021
Version – V2
2.3.2 Core facial views: 01 to 04 1:8
Views 01 and 02 Face AP and AP smiling 1:8
• Views 01, 03 and 04 should be at rest, also with teeth in a relaxed position, i.e. teeth not
biting down (not in occlusion).
• View 02 should be a full smile to show the teeth.
• Use the lighting, positioning and background as previously described, see pages 32 – 34.
Views 03 and 04 Face right and left lateral 1:8
• Ask the patient to rotate 90°. Ensure the head is aligned using the Frankfort Plane, the distal
eyebrow should not be visible in this view, see Figure 11g.
• Use the lighting, positioning and background as previously described.
35IMI National Guideline – Cleft Lip and Palate
Lead Author – Marie Jones and Johnny Volcano
Date Created – September 2018
Revision Date – September 2021
Version – V2
2.3.3 Core lip/ nose views: 05 to 07 1:4
View 05 Lips/ nose AP 1:4
• Apply the lighting and alignment techniques as for the full-face AP views. Ensure that the
chin is included in this view. In adult patients the eyebrows may only just be in the frame at
this magnification to enable the chin to be included. In a small child more of the forehead will
be visible in addition to the chin (see Figure 12a).
Figure 12a. Comparison of view 05 to accommodate the chin
36IMI National Guideline – Cleft Lip and Palate
Lead Author – Marie Jones and Johnny Volcano
Date Created – September 2018
Revision Date – September 2021
Version – V2
View 06 Lips blowing 1:4
• Ask the patient to blow or whistle. A younger child will usually understand 'blowing out a
candle'.
View 07 Lips/ nose Worm’s Eye (basal) view (WEV) 1:4
• Move the key lights to be level with the orbit and turn off the hairlight if possible. The patient
should tip their head back. The horizontal grid passes along the base of the nose and the
vertical grid through the mid line of the face.
• The base of the columella should be aligned at 90° to the camera lens axis (see Figures 12a
and 12b), the correct position may need to be estimated if the patient has a ‘slumped’
septum as in Figure 12a. Figure 9b demonstrates the lip obstructing the base of the
columella because the head has been tipped back too far (see Figure 12c).
Figure 12b. Correct Worm’s Eye View (WEV) in patient Figure 12c. Incorrect WEV:
with and without a cleft lip obstructing base of columella
37IMI National Guideline – Cleft Lip and Palate
Lead Author – Marie Jones and Johnny Volcano
Date Created – September 2018
Revision Date – September 2021
Version – V2
2.3.4 Optional facial views: 16 to 18 1:8
Apply lighting and align face as for AP views. Views to assess 3D facial asymmetry and
specifically occlusal cants linked to asymmetry.
View 16 Face AP with mouth open
• To demonstrate jaw asymmetry. When the patient opens their mouth wide there may be a
tendency to tip their head back; ensure that their head is in the neutral position.
View 17 Face AP with spatula
• To demonstrate jaw asymmetry and an occlusal cant, therefore, place the spatula in the
mouth evenly.
View 18 Face AP with retractors
• To demonstrate the relationship between the teeth and facial symmetry (or asymmetry).
Place the retractors in the mouth evenly (see intra-oral section).
• Observe infection control and consent procedures when placing intra-oral equipment in a
patient’s mouth.
38IMI National Guideline – Cleft Lip and Palate
Lead Author – Marie Jones and Johnny Volcano
Date Created – September 2018
Revision Date – September 2021
Version – V2
2.3.5 Optional facial views: 19 and 20 1:8
Optional Views 19 and 20 Face right and left oblique (45°) 1:8
• Apply lighting techniques as for lateral views (Figures 9e and 9f). Align face with the tip of the
nose to the cheek, or a 45°angle may be measured on the floor of the studio and marked,
again use the Frankfort Plane to gain accurate alignment (Figure 12d). Typically, patients
with a cleft have a misaligned nose or a deficient columellar length pulling the nasal tip down.
The angle of the alar wings may be too acute to align with the cheek; therefore, this method
should be used as a guide, but the judgement needs to be made as to the position of the
nose with the cheek (Figure 12e).
Figure 12d. Incorrect and correct oblique view Figure 12e. Correct oblique view
(patient with a cleft)
39IMI National Guideline – Cleft Lip and Palate
Lead Author – Marie Jones and Johnny Volcano
Date Created – September 2018
Revision Date – September 2021
Version – V2
2.3.6 Optional lip/ nose views: 21 and 22 1:4
• Apply lighting and alignment: as for views 05 and 06.
View 21 Lips AP in repose 1:4
• To demonstrate relaxed view of mouth and teeth. Patients tend to pull their lips together if
feeling tense, encourage the patient to fully relax their lips/ mandible.
View 22 Lips AP smiling 1:4
• To demonstrate movement or lack of movement of the lips. Ensure that the patient shows
their teeth when smiling.
40IMI National Guideline – Cleft Lip and Palate
Lead Author – Marie Jones and Johnny Volcano
Date Created – September 2018
Revision Date – September 2021
Version – V2
2.4
Photographic Techniques:
Intra-oral photography
41IMI National Guideline – Cleft Lip and Palate
Lead Author – Marie Jones and Johnny Volcano
Date Created – September 2018
Revision Date – September 2021
Version – V2
2.4 Intra-oral photography
Much of this information is also contained within the IMI Orthodontic Guidelines (2008). Patients
with a cleft will need varying intra-oral surgery and treatment depending on cleft type. The
treatment plan (see Figure 4b.) demonstrates the photographic involvement.
The ‘Core’ set of 15 views will be taken at each audit review age of 5, 10, 15 and 20 years with
Optional views as requested.
2.4.1 Anatomical terms and Dental Notation
Figure 13a demonstrates the anatomy of the mouth and teeth. Figure 13b demonstrates the
anatomical notation for the teeth.
Figure 13a. Anatomy of the mouth and teeth
Figure 13b. Anatomical notation for the (permanent) teeth
42IMI National Guideline – Cleft Lip and Palate
Lead Author – Marie Jones and Johnny Volcano
Date Created – September 2018
Revision Date – September 2021
Version – V2
2.4.2 Palmer’s Dental Notation
Palmer’s Dental Notation is the most common tooth designation system in use in the U.K., see
Figures 14a to 14d).
Alternative systems that may be encountered are the Universal system, adopted by the American
Dental Association and the FDI/ International system adopted by the Fédération Dentaire
Internationale.
Palmer’s Dental Notation for Children: deciduous teeth
Figure 14a. Palmer’s Dental Notation for Children: deciduous teeth buccal surface
(Adapted from IMI, 2008)
• Children’s teeth are referred to as Primary or Deciduous.
• Annotated from 1 to 5 in each quarter.
• May also be annotated A to E.
• The Universal system of notation may be encountered. This annotates deciduous teeth from
A to T. This starts from the upper right 2 molar and goes around in a clockwise direction.
43IMI National Guideline – Cleft Lip and Palate
Lead Author – Marie Jones and Johnny Volcano
Date Created – September 2018
Revision Date – September 2021
Version – V2
Palmer’s Dental Notation for Children:
deciduous teeth maxillary and mandibular dental arches
Figure 14b. Palmer’s Dental Notation for Children: deciduous teeth maxillary and mandibular dental arches
occlusal surfaces (Adapted from IMI, 2008)
44IMI National Guideline – Cleft Lip and Palate
Lead Author – Marie Jones and Johnny Volcano
Date Created – September 2018
Revision Date – September 2021
Version – V2
Palmer’s Dental Notation for Adults: permanent teeth
Figure 14c. Palmer’s Dental Notation for Adults: permanent teeth buccal surface
(Adapted from IMI, 2008)
• Tooth notation is an identification and reference system to specify areas and/ or teeth within
the mouth.
• The mouth is divided into quarters, and the teeth within those areas are assigned a number
from 1 to 8.
• Wisdom teeth (Number 8) do not always erupt and often have to be removed; these may not
be visible.
• The Universal system of notation may be encountered. This labels adult teeth from 1 to 32.
This starts from the upper right third molar and goes around in a clockwise direction.
45IMI National Guideline – Cleft Lip and Palate
Lead Author – Marie Jones and Johnny Volcano
Date Created – September 2018
Revision Date – September 2021
Version – V2
Palmer’s Dental Notation for Adults:
permanent teeth maxillary and mandibular dental arches
Figure 14d. Palmer’s Dental Notation for Adults: permanent teeth maxillary and mandibular dental arches occlusal
surfaces (Adapted from IMI, 2008)
46IMI National Guideline – Cleft Lip and Palate
Lead Author – Marie Jones and Johnny Volcano
Date Created – September 2018
Revision Date – September 2021
Version – V2
2.4.3 Intra-oral photography and equipment
For intra-oral photography, a ring-flash provides even lighting without shadows and with some
units, a degree of modelling can be achieved by positioning the flash unit. The ring-flash must be
capable of producing sufficient light for an aperture of at least f/22 to maximise depth of field. A
working aperture of f/32 or more is desirable for a good depth of field to ensure the full dentition is
in sharp focus. The ring-flash is not suitable for facial views as the lighting ‘flattens’ the features
and produces a ‘hot spot’ of light in the centre of the image.
The patient should be seated comfortably but should sit up straight (Figure 15a) as with the facial
views to avoid any distortion due to incorrect seating position or camera angle. Some departments
may have use of a dental chair. Align the head observing the Frankfort Plane; Figure 15b
demonstrates the position of the teeth in relation to the Frankfort Plane.
Figure 15a. Patient and photographer correct positioning Figure 15b. Frankfort Plane in relation to teeth position
47IMI National Guideline – Cleft Lip and Palate
Lead Author – Marie Jones and Johnny Volcano
Date Created – September 2018
Revision Date – September 2021
Version – V2
Dental mirrors and retractors
All intra-oral instruments must be sterilised in accordance with Infection Control Trust policy.
A range of mirrors and retractors (see Figures 16a. and 16b.) are required to cope with the variety
of dentitions, patient’s age, size of mouth and shape of the lips.
Patients with repaired cleft lip may have difficulty in retraction of their lips due to surgical scarring.
Those patients with additional disorders, for example Pierre Robin sequence, have retrognathia
(recessed chin) and patients with 22q11 deletion syndrome have extremely small mouths and may
have difficulty fitting even the smallest retractors into their mouth.
Figure 16a. Dental mirrors (IMI, 2008) Figure 16b. Dental retractors
• Mirrors (see Figures 16a) are available in either stainless steel or surface coated glass. A
standard set of mirrors should include palatal mirrors for both adults and children. Palatal
mirrors are necessary for photographing the palate, maxillary and mandibular dental arches.
Buccal mirrors are used for the ‘True lateral’ mirror views. The buccal mirrors may also be
used to image the dental arches in smaller children if the palatal mirrors are too big.
• Retractors are most commonly plastic and come in pairs but do not have to be used in set
pairs; ‘mix and match’ combinations should be used to achieve maximum retraction of the
buccal mucosa in order to image the dentition and intra-oral anatomy (see Figures 16b).
48IMI National Guideline – Cleft Lip and Palate
Lead Author – Marie Jones and Johnny Volcano
Date Created – September 2018
Revision Date – September 2021
Version – V2
2.4.4 Intra-oral photography: young children
• Most young children are happy to let the photographer place intra-oral retractors and dental
mirrors in their mouth and will tolerate these well for the entire photography session. They
may be able to hold the intra-oral retractors themselves (see Figure 17) and may need a rest
between views.
• Some children may need a parent to hold the retractors. The photographer may help put the
retractors into the child’s mouth whilst the parent stands behind the child holding the
retractors in place (see Figure 17). The parent will be reliant on the photographer to guide
them as to the position of the retractors (offer gloves to the parent). Allow the child to hold
their special toy in their lap to make them feel comfortable (see Figure 17).
• If the child will not tolerate any retractors, they or the parent may use their fingers to retract
the lips to give a limited view of the dentition (see Figure 17); offer the chance for the child to
wash their hands before placing in their mouth. Offer gloves if the child is willing; however,
many do not like the smell or taste and prefer to use their fingers without gloves.
Figure 17. Retraction techniques for intra-oral photography with young children
49IMI National Guideline – Cleft Lip and Palate
Lead Author – Marie Jones and Johnny Volcano
Date Created – September 2018
Revision Date – September 2021
Version – V2
Core Intra-oral views
2.4.5 Core intra-oral views buccal teeth: 08 to 10 1:2
The buccal views illustrate the patient's full dentition in centric occlusion and coordination of the
‘bite’.
View 09 Teeth AP in occlusion 1:2
• Prepare all camera equipment and intra-oral instruments (including tissues) before patient
enters studio.
• Set camera to correct magnification and aperture with ringflash attached.
• Ensure hands have been washed and are clean. Wear gloves (non-latex if either the
photographer or patient are sensitive to latex).
• Remove intra-oral appliances or prostheses if possible: the clinician may request
photographs with and without appliances. Ask the patient to pull their tongue away from their
teeth to demonstrate the gaps in the dentition (Figure 18a).
Figure 18a. AP buccal teeth view with and without prosthesis
50IMI National Guideline – Cleft Lip and Palate
Lead Author – Marie Jones and Johnny Volcano
Date Created – September 2018
Revision Date – September 2021
Version – V2
• Teeth in occlusion - patient needs to bite gently on their back teeth. Keep the lens axis in line
with the occlusal plane so that the camera is not looking up or down at the teeth. The
horizontal grid line should pass through the bite line (occlusal line) and equally divide the
image horizontally and vertically; however, patients with a cleft of the lip and alveolus are
often rather asymmetrical (Figure 18b). Do not try to overcorrect an asymmetrical bite line.
Figure 18b. Asymmetrical dentition in patient with a bilateral cleft of the lip, alveolus and palate
• Keep the lens axis in line with the occlusal plane so that the camera is not looking up or
down at the teeth. Keep both retractors in a straight line, which is at 90° to the patient’s
midline. Focus one third in, at the canines, to achieve maximum depth of field, see Figure
18c. Hold camera very steady with both hands to avoid ‘camera shake’.
Figure 18c. Point of focus for core buccal teeth views
• Use the largest retractors that are comfortable for the patient; however, if the retractors are
too large, they may prevent adequate retraction of the lips and buccal mucosa at the molars
and may prevent complete occlusion of the teeth. If the retractors are too small, the result will
be lip-lag where the lips cover the teeth and alveolus. See Figure 18d.
51IMI National Guideline – Cleft Lip and Palate
Lead Author – Marie Jones and Johnny Volcano
Date Created – September 2018
Revision Date – September 2021
Version – V2
Figure 18d. Inadequate retraction of buccal mucosa due to incorrect retractor size
• Place retractors gently around the patient’s lips. Pull the retractors forward, towards the
camera and laterally (out to the side) to prevent shadows (due to lack of retraction), see
Figure 18e.
Figure 18e. Correct retraction for AP buccal teeth view
• Figure 18f demonstrates incorrect retraction and tongue position. Retraction may be
particularly difficult when the patient has a restrictive lip scar; the retractors should be pulled
upwards to provide a clear view of the upper alveolus and teeth (rather than the lower gum)
and the tongue should be pulled back inside the mouth away from the dentition to
demonstrate the gaps in the dentition.
52IMI National Guideline – Cleft Lip and Palate
Lead Author – Marie Jones and Johnny Volcano
Date Created – September 2018
Revision Date – September 2021
Version – V2
Figure 18f. Incorrect retractor and tongue position
• Figure 18g demonstrates comparative correct retraction of upper lip and correct tongue
position.
Figure 18g. Correct retractor and tongue position
53IMI National Guideline – Cleft Lip and Palate
Lead Author – Marie Jones and Johnny Volcano
Date Created – September 2018
Revision Date – September 2021
Version – V2
Views 08 and 10 Right and left buccal views teeth in occlusion 1:2
• Aim to show from the central incisor to the second molar (7) and if possible, to the third molar
(8).
• It is not always possible to retract the buccal mucosa enough to show the occlusion of the
rear molars effectively and obtain the correct oblique teeth position: usually due to lip
scarring or a patient’s small mouth in those with associated craniofacial syndromes. 'True
lateral' mirror views (views 22 and 23), may be used as an alternative or in addition to views
08 and 10 buccal teeth views in order to show the occlusion of the rear dentition. If retraction
is difficult or appropriate mirrors unavailable, then the rear occlusion of the teeth may need to
be imaged separately.
• As with the AP view, larger retractors may prevent adequate retraction. In addition, if the
distal (furthest from the camera) retractor is pulled too far laterally then there may not be
enough ‘give’ left in the lip to retract the proximal (nearest) retractor fully, see Figure 18h.
Figure 18h. Incorrect size and position of retractors for buccal views
54IMI National Guideline – Cleft Lip and Palate
Lead Author – Marie Jones and Johnny Volcano
Date Created – September 2018
Revision Date – September 2021
Version – V2
• To obtain maximum retraction, use a combination of appropriately sized retractors. You do
not have to use a matching pair. For the oblique views a smaller retractor may be used in
the proximal position and a larger retractor used in the distal position (Figure 18i).
• Relax the distal retractor medially and pull the proximal retractor laterally towards the
patient’s ear and slightly away from their cheek pulling the buccal mucosa away from the
teeth. Lift the proximal retractor in line with the dentition to obtain a clear view of the rear
molars, see Figure 18i.
Figure 18i. Correct size and position of retractors with focus point (x) for buccal views
• Focus on the canine (3)/ first premolar tooth (4) depending on the angle of the maxillary arch.
• The camera should be positioned at 45° to the patient’s midline.
• Keep the occlusal plane horizontal and in the middle of the frame.
55IMI National Guideline – Cleft Lip and Palate
Lead Author – Marie Jones and Johnny Volcano
Date Created – September 2018
Revision Date – September 2021
Version – V2
2.4.6 Core palate views: 11 to 13 1:2
• Use a ring flash with the lens set to at an aperture of f/32 for all these views with a
magnification ratio of 1:2.
• These views demonstrate the anatomy and function of the palate.
View 11 Hard palate
• Ask the patient to tilt their head back and open their mouth as wide as possible. A parent
may need to stand behind the young child so that the child may rest their head on the parent
(as with the AP teeth view), see Figure 17a.
• Focus on the upper part of the hard palate (x) not the teeth, see Figure 19a. The mid vertical
line in the camera should align with the mid line of the palate.
Figure 19a. Focus point (x) hard palate
56IMI National Guideline – Cleft Lip and Palate
Lead Author – Marie Jones and Johnny Volcano
Date Created – September 2018
Revision Date – September 2021
Version – V2
View 12 Soft palate at rest
• Ask the patient to open their mouth as wide as possible. Focus on the soft palate (x), see
Figure 19b. If the tongue obscures the palate, a tongue depressor may be used but patients
tend to gag if this is pushed too far back into their mouth.
Figure 19b. Focus point (x) soft palate at rest
View 13 Soft palate lifting
• Focus on the soft palate and uvula (x) or position where the uvula should be if not present,
see Figure 19c.
• Ask the patient to say a long 'aah'. Alternatively, a 'deep gasp in' causes the palate to be
lifted. As for view 12, it is often difficult to keep the tongue out of the way and several
attempts may be needed. Allow the patient to rest between attempts.
Figure 19c. Focus point (x) soft palate lifting
57IMI National Guideline – Cleft Lip and Palate
Lead Author – Marie Jones and Johnny Volcano
Date Created – September 2018
Revision Date – September 2021
Version – V2
2.4.7 Core occlusal mirror arch views: 14 and 15 1:2 (1:2.5, 1:3)
Views 14 Upper occlusal mirror arch view 1:2 or 1:2.5, 1:3
• Remove dental plates or other appliances. The clinician may require intra-oral views with and
without intra-oral appliances (see Figure 20a).
Figure 20a. Mirror view of palate with and without appliance
• Explain to the patient that the mirror needs to be warmed to prevent it from misting up,
ensure it is not too hot before placing in the patient’s mouth.
• Ideally the magnification ratios should remain constant; however, if the full dentition will not fit
within the frame at 1:2 then use 1:2.5 or 1:3 (see Figure 20b), also applicable to lower
occlusal view. Make a note of the revised magnification to ensure that the images are
comparable at the next photography session.
58IMI National Guideline – Cleft Lip and Palate
Lead Author – Marie Jones and Johnny Volcano
Date Created – September 2018
Revision Date – September 2021
Version – V2
Figure 20b. Magnification ratios: upper occlusal view
• If the entire dentition cannot be accommodated in one view then several images may be
needed, see figure 20c.
Figure 20c. Mirror views of maxillary (upper) dental arch
• Open the lens aperture one stop or one and a half stops (at least f/22) to allow for the loss of
flash coverage and intensity as it is a reflected mirror image. If the flash output is inadequate,
then consider increasing ISO.
• If necessary, help the patient place the mirror into their mouth on the dorsum of the tongue;
be careful not to push the mirror too far back as this could gag the patient. Generally, it is
better for the child to do this themselves so that they can feel how far back they are pushing
the mirror or ask a parent to help if necessary. Ensure the full dentition is included in the
image (Figure 20c).
• The mirror should be angled downwards, at 45° to the occlusal plane, with the lens axis of
the camera at an angle of 45° to the mirror in order to obtain a view that appears to be taken
from 90° to the occlusal plane, focus on the canines (x), see Figure 20d.
59You can also read