BLM's Lotic Assessment, Inventory, and Monitoring (AIM) 2021 Field Season: Evaluation & Design Management Protocol
←
→
Page content transcription
If your browser does not render page correctly, please read the page content below
BLM’s Lotic Assessment, Inventory,
          and Monitoring (AIM)
     2021 Field Season: Evaluation &
      Design Management Protocol
VERSION 4.0
Produced by BLM National Operations Center (NOC) and the BLM/USU National Aquatic
Monitoring Center (NAMC) – 12/2020

      Points on map represent sampled locations from 2013-2019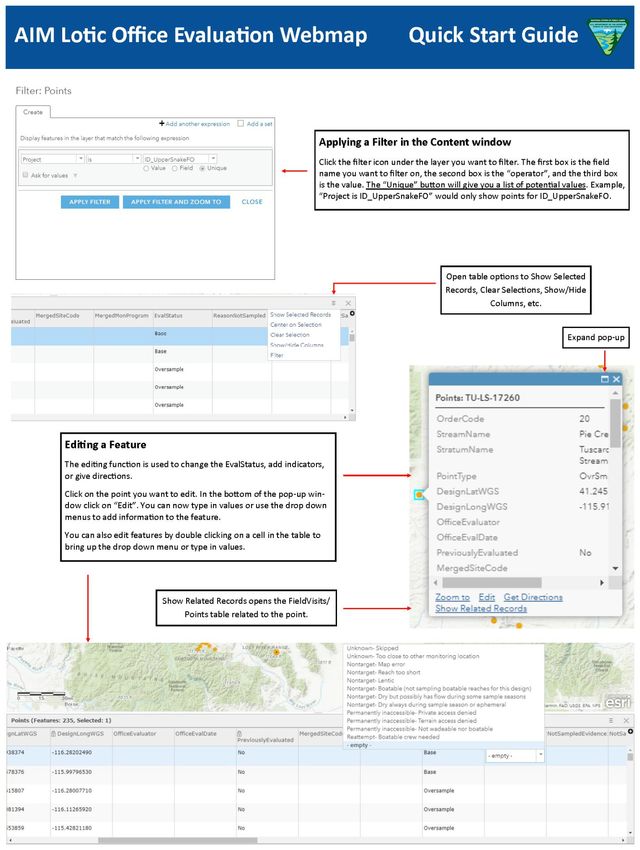
2

Contents
INTRODUCTION AND DESIGN CONCEPTS .................................................................................................... 3
       1.1 How to use this protocol ................................................................................................................ 3
       1.2 What is reach evaluation and design management? .................................................................... 3
       1.3 Design concepts for reach evaluation and design management .................................................. 4
STEP BY STEP DIRECTIONS ........................................................................................................................... 9
       Step 1 – Understanding Your Design and Design Management Tools ............................................... 9
       Step 2 – Select Targeted Points, Points for Potential Merging, and Contingent or Supplemental
       Indicators ............................................................................................................................................ 12
       Step 3 – Office Evaluation .................................................................................................................. 15
       Step 4 – Trip Planning......................................................................................................................... 19
       Step 5 – Field Evaluation .................................................................................................................... 21
       Step 6 – Finalize Evaluation Status .................................................................................................... 22
Glossary ...................................................................................................................................................... 26
Target population: ..................................................................................................................................... 27
Appendix 1. QuickStart Guide: AIM Lotic Office Webmap ....................................................................... 28
Appendix 2. Office Webmap Metadata ..................................................................................................... 30
References .................................................................................................................................................. 35

                                                    Reach Evaluation and Design Management Version 4.0 December 2020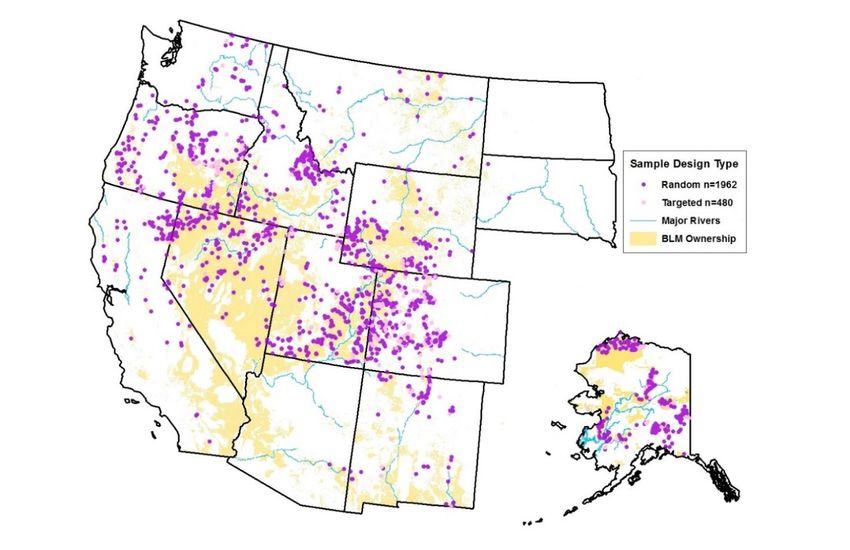
INTRODUCTION AND DESIGN CONCEPTS
1.1 How to use this protocol
Design management consists of six iterative steps (Fig. 1), which are outlined in the step-by-step
instructions below. For each of the six steps, the protocol outlines the responsible parties, required files
and tools, and detailed instructions. Supporting information including design concepts and definitions of
key terms are provided in the design concepts and glossary sections. Specifically, terms formatted with
bold and italics are defined in the glossary, terms in single quotes are the column names for items in the
design tools, and double quotes indicate data in a specific cell of a table.

1.2 What is reach evaluation and design management?
Reach evaluation is the process of determining and documenting which reaches need to be sampled,
how a crew will access point coordinates, whether field crews successfully sampled each reach, and why
some reaches were not sampled. Reach evaluations can involve both office and field efforts. Design
management is the process of documenting reach evaluation outcomes, both office and field-based.
Proper design management is important to maintain the statistical validity of your sample design and
the subsequent inferences drawn from collected data. Reach evaluation and design management begin
prior to the start of the field season and continue until the desired sample size is met for the entire
sample design.

Figure 1. Flow chart showing the six design management steps color coded by responsible parties. The
branches of the model indicate the iterative process of office and field evaluation, replacing reaches that
were not sampled, and rescheduling reaches that should be reattempted until desired sample sizes have
been achieved. The tools used for each step are called out in black text in the key and discussed in the
Step By Step Directions section.
4

1.3 Design concepts for reach evaluation and design management
Base, oversample, and targeted Point Types
Each point in a design is classified as either:
    • base: points in a random design that correspond to the desired sample size for a given stratum.
        Ideally, all base points would be successfully sampled and no oversample points would be
        needed. However, for a variety of reasons, base points are frequently rejected and
        subsequently not sampled.
    • oversample: points in a random design that are used as replacements for points that are
        rejected or cannot be sampled.
    • targeted: points identified by field office staff for sampling that are not part of a random
        design.

Evaluation Status
Reaches can be assigned one of four evaluation statuses based on information gained by office and/or
field evaluations. The evaluation status can also change throughout the field season as new information
is gained (e.g., evaluation status changes from “Not Sampled” to “Reattempt” to “Sampled”), but the
evaluation status of all attempted reaches needs to be finalized at the end of the field season.

    •   Sampled: When a reach is sampled, it is considered a member of the target population, data
        are collected, and the data are used for analysis and reporting.
    •   Not Sampled: A reach that was either rejected during the office evaluation process because it
        met the “Not Sampled” criteria listed below or a reach that the crew attempted to sample but
        could not because it met the criteria below. This category must be approved by the BLM project
        lead by the end of the field season.
    •   Reattempt: this is a reach that either:
            o A crew attempted to sample, but for one of several reasons did not sample and the
                 project lead or crew manager decided they should return to the reach during the
                 current field season and reattempt a sample effort.
            o A specialized crew, such as the boating crew, is needed. Be sure to see the ‘Reason Not
                 sampled’ section below to record this situation. In most cases, these points should be
                 reattempted the next year.
    •   Ready to field visit: Reaches that were office evaluated, but the crew has not yet attempted to
        sample.
Reason Not Sampled
Reaches classified as “Not Sampled” must have an accompanying reason as to why the reach could not
be sampled. There are many different reasons that a reach may not be sampled, but they can be broken
into 4 main groups:
    •   Nontarget: Reaches not sampled because the selected reach location was ephemeral, lentic, a
        map error, etc., and therefore not considered a part of the target population (Table 1).
        Nontarget reaches are removed from estimates of stream kilometers in different condition
        categories but used to estimate errors in the NHD and resulting BLM stream kilometer
        estimates. Therefore, it is very important to accurately record why a reach was classified as
        nontarget (Table 1).
    •   Permanently Inaccessible: Reaches that cannot be sampled now or in the foreseeable future
        (e.g., 10 years) because of terrain barriers, landowner access, or wadeability issues (Table 1).
        The decision to classify a reach as permanently inaccessible should not be taken lightly, as
        omitting reaches can create ‘holes’ or gaps in the design (see ‘Holes in the design’ in the design

                                  Reach Evaluation and Design Management Version 4.0 December 2020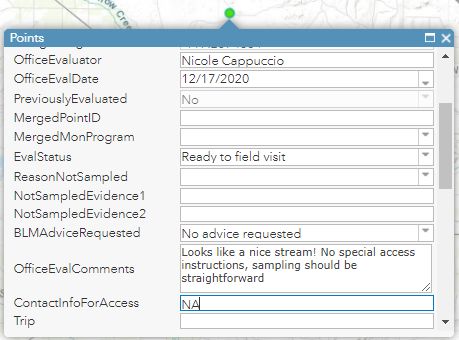
5

    concepts section below), thus reducing the design’s statistical rigor.
•   Unknown: Reaches that fall prior to the last evaluated reach within a stratum for a given year
    (i.e., have a lower ‘Order Code’) that were skipped, categorized as “too close” to another sample
    reach in the same design, or not evaluated in the sample design are classified as “unknown” and
    are counted as ‘holes’ in the design. Unknown reaches can have a negative effect on the
    statistical rigor and inference of the sample design and efforts should be taken to avoid having
    reaches with such a status. Ideally at the end of the study, no sample reaches would be
    classified as “unknown”.
•   Reattempt- Boatable crew needed: Sample reaches that are intended to be sampled but a crew
    is unable to collect the minimum amount of data with the wadeable protocol. Project leads
    should determine if they will report on all rivers and streams, or only wadeable rivers and
    streams for their AIM project. If reporting on all streams and rivers, boatable reaches should be
    sampled by a boat crew. If reporting on only wadeable streams and rivers, non-wadeable
    systems would be considered “Nontarget Boatable”. A boatable crew can also be used if access
    to the point requires boats but the reach itself is wadeable.

                             Reach Evaluation and Design Management Version 4.0 December 2020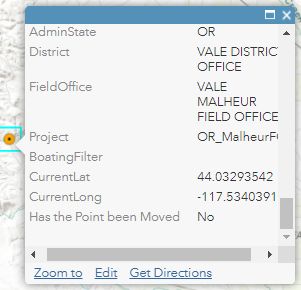
6

Table 1. Reasons for which lotic AIM reaches are rejected or not sampled and respective evaluation status
categories for unsampled reaches (i.e. revisit, permanently inaccessible, nontarget).
Not sampled        Reason not
                                                                       Description
   status            sampled
                Above bankfull      The water is above bankfull or temporarily too deep or swift to wade but
                or flow too high    could be sampled when flows recede.
                                    The project lead wants boatable reaches to be sampled and the reach
                Boatable crew
                                    must be sampled by boat because the water will always be too high for
                needed
                                    wading. See below for other boatable options.
       Reattempt

                                    Field data collectors attempted to gain access or sample the reach but
                                    were unable to complete sampling and the reach should be reattempted
                Other               later. Temporarily inaccessible examples include: taking a different route;
                temporarily         gaining landowner permission or rescheduling if they were unavailable
                inaccessible        during possible sample times; running out of time; inclement weather or
                                    fire danger; an overnight backpacking trip, more capable truck, or ATV are
                                    required.
                Private access      This reach can only be accessed by crossing posted private land, and
                denied              landowner permission was explicitly denied.
    Permanently
    Inaccessible

                                    All possible routes were attempted, but natural barriers such as cliffs,
                Terrain access
                                    slopes > 50%, waterfalls, extremely dense vegetation, or beaver
                denied
                                    complexes prevented access.
                Not wadeable        The reach will always be unsafe to wade or boat (e.g., reaches with long
                nor boatable        segments of class V whitewater, steep creeks in constrained gorges).
                                    The reach was determined to be dry (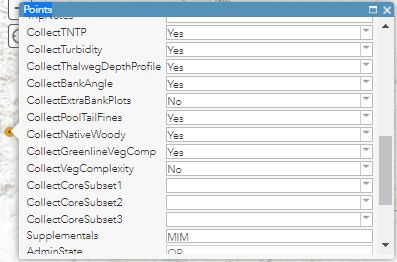
7

Evaluation and sampling order
All points in a design are intended to be sampled in the order in which they appear within each stratum.
As a rule of thumb, start by evaluating and sampling base points (i.e., the lowest ‘Order Code’) for each
stratum. If a point (base or oversample) is rejected and classified as “Not Sampled”, replace it with the
first oversample point within a given stratum (lowest ‘Order Code’) to achieve the desired sample size.
‘Order Code’ is a sequential number assigned to each point within each stratum and used to ensure
points are in the correct order.

It is not always logistically practical to visit points in their exact order. Below are some best practices for
evaluating and sampling base and oversample points:
      • Base points may be evaluated (office and/or field) in any order if you are confident all base
          points within a stratum will be evaluated or sampled by the end of the field season. Whenever
          possible, base points should be prioritized before oversample points.
      • Evaluate all base points in each stratum first. Then assess the base point failure rate for each
          stratum by counting the number of inaccessible or nontarget reaches. Use this failure rate to
          estimate how many oversample points may be needed per stratum. For example, if there are
          ten base points and five fail, ten more oversample points are likely needed to ensure five more
          sampleable points on average. If during the field season it seems as though an insufficient
          number of oversample points were drawn in the design to achieve desired sample sizes, contact
          the person responsible for office evaluation or the National AIM Team, respectively.
      • Use the above failure rates and anticipated oversample points to plan field trips so that both
          base and oversample points are visited. This can be advantageous if potentially needed
          oversample points are located near base points that you plan to sample during current or future
          trips, and it would be difficult or resource intensive to visit these oversample points at a later
          date. However, determining how many oversample points are needed can be a guessing game.
          Therefore, the first trips should just consist of base points until you have a better idea of how
          many points are actually rejected.
      • If points are sampled out of order it is important that no holes are left in the design by the end
          of the field season (see ‘Holes in the design’ in the design concepts section).

Holes in the design
Sampling reaches out of order or having lots of inaccessible reaches can cause ‘holes’ in the design.
Holes result from “inaccessible” or “unknown” reach designations that fall between evaluated reaches,
which includes sampled reaches. As a rule of thumb, ensure that holes do not make up >30% of
evaluated reaches (excluding nontarget).

Some holes are inevitable due to denied access through private property or unsafe access or sampling
conditions. Depending on the desired sample size, one or two holes in a sample design are generally
acceptable. However, if too many reaches are classified as “inaccessible” or “unknown” (>30% of
reaches), a systematic bias may be created that can impact condition estimates. For example, if all
inaccessible reaches are located in remote wilderness areas with minimal anthropogenic impacts,
excluding these reaches from your analysis could result in worse overall condition estimates than if
those reaches were sampled.

When managing a design, it can be difficult to determine how much effort should be expended sampling
difficult reaches because the number of holes in the design is unknown. As design implementation
progresses, the importance of putting extra effort into accessing very remote points, or those with
otherwise difficult access issues, will become more obvious.

                                   Reach Evaluation and Design Management Version 4.0 December 2020
8
Design Management Example
In the example design stratum below (Table 2), the desired sample size is seven (i.e., 7 base points). The
first three reaches were sampled, but reach XX-SS-1046 was rejected as nontarget and needed to be
replaced. The first possible replacement within the oversample was reach XX-SS-1057, which also turned
out to be nontarget and thus the next oversample in the list, XX-SS-1063, was evaluated and sampled.
The next evaluated reaches were XX-SS-1048, 1052, and 1055, two of which were sampled and one of
which was rejected as inaccessible and needed to be replaced. The next available oversample reach was
XX-SS-1066, which was also inaccessible. The next reach that should have been evaluated was XX-SS-
1071, which was skipped for some unknown reason, thereby creating another hole. While the sample
size (n=7) was finally met when XX-SS-1079 was sampled, the person managing the sample design
inadvertently created another hole in their design by skipping reach XX-SS-1071. This mistake could
affect the statistical rigor of the design, especially since 30% of the points (not considering nontarget
reaches) are classified as holes (i.e., “unknown” or “inaccessible”). It would be advantageous to try to
access and sample the unknown reach if there is time during the current year’s sampling season. If you
cannot do this, sample one or more extra oversample reaches to increase the number of sampled
reaches compared to the number of holes.
Table 2. Example columns from a completed design at the end of a field season illustrating the outcome of
replacing failed reaches with oversamples and the concept of ‘holes’. In this example, the desired sample size for
stratum XX-SS is seven. There are two nontarget reaches (not holes), two inaccessible reaches, and one unknown
reach which combined creates a total of three holes.
Order
PointID PointType EvalStatus ReasonNotSampled Design consequence
Code
1 XX-SS-1000 Base Sampled Used in analysis
2 XX-SS-1020 Base Sampled Used in analysis
3 XX-SS-1035 Base Sampled Used in analysis
4 XX-SS-1046 Base Not Sampled Nontarget - Lentic Not a hole, replace with oversample XX-SS-1057
5 XX-SS-1048 Base Sampled Used in analysis
Permanently Inaccessible -
6 XX-SS-1052 Base Not Sampled HOLE, replace with oversample XX-SS-1063
Private Denied Access
7 XX-SS-1055 Base Sampled Used in analysis
Not a hole; use next oversample to find
8 XX-SS-1057 OvrSmp Not Sampled Nontarget - Reach Too Short
replacement for XX-SS-1046
9 XX-SS-1063 OvrSmp Sampled Used to replace XX-SS-1052; used in analysis
Permanently Inaccessible - HOLE; use next oversample to find replacement
10 XX-SS-1066 OvrSmp Not Sampled
Terrain Denied Access for XX-SS-1046
11 XX-SS-1071 OvrSmp Not Sampled Unknown - Skipped HOLE
12 XX-SS-1079 OvrSmp Sampled Used to replace XX-SS-1046
13 XX-SS-1084 OvrSmp Oversample Sample size met; point not needed
Reach Evaluation and Design Management Version 4.0 December 20209
STEP BY STEP DIRECTIONS
Step 1 – Understanding Your Design and Design Management Tools
Overview: The National AIM Team and project leads work together to decide what kind of design is most
appropriate: randomly selected points, targeted (e.g., designated monitoring areas), or a mixture of
both. All design-based decisions are documented in Monitoring Design Worksheets and all members of
the lotic AIM implementation team should understand the difference between random and targeted
points, what strata were used, how to utilize base versus oversample points, why the sample order
matters, and the desired design sample sizes. Such concepts are defined in the design concepts or
glossary sections and should be reviewed before proceeding. Once design concepts are understood,
then review your design management tools to understand how the Office Webmap, Field Webmap, and
the Sample Size Dashboard are used; all can be accessed by both BLM and our partners.
Responsible Parties: All parties involved in implementing a sample design
Tools:
• Monitoring Design Worksheet – BLM document outlining monitoring objectives and the
Monitoring Design.
• Office Webmap – Webmap used for tracking all design points and associated information. This
should only be used on a computer, not on a tablet. Information entered into this map will be
automatically synced to the Field Webmap (explained below) when the crew is online.
• Sample Size Dashboard – Displays the desired sample size per strata, the number of sampled
and nontarget reaches, and the number of holes that are recorded in the Office Webmap.
• Field Webmap – A Webmap for the field crews to use in the Field Maps application on their
iPad. All information entered into this map will be automatically synced to the Field Visits layer
of the Office Webmap when the crew takes their iPad back online.
Detailed instructions about how to use your design management tools:
1. Understand all design concepts described above.
2. Project leads should review their Monitoring Design Worksheet.
3. Access the Office Webmap: Follow these instructions to ensure you have access to the
appropriate tools. Once you have access, copy and paste the below links into the Google
Chrome web browser:
a. BLM users: Access the BLM Natl Lotic AIM Group. The first time you use this link, locate
the bell icon in the upper right-hand corner of the screen and click “view your
invitations” to accept access to the Webmap Group. After accepting, re-click the link or
navigate to the “BLM Natl Lotic AIM” Group page. From here you will see links for
several tools including the Office Webmap
b. GeoPlatform users (automatically added to group): Access the BLM Natl Lotic AIM
Group
4. On the BLM Natl Lotic AIM AGOL Group page, locate the Office Webmap hyperlinks in the group
description and select the one associated with the account type you are using (i.e., BLM-EGIS
Users, GeoPlatform Users).
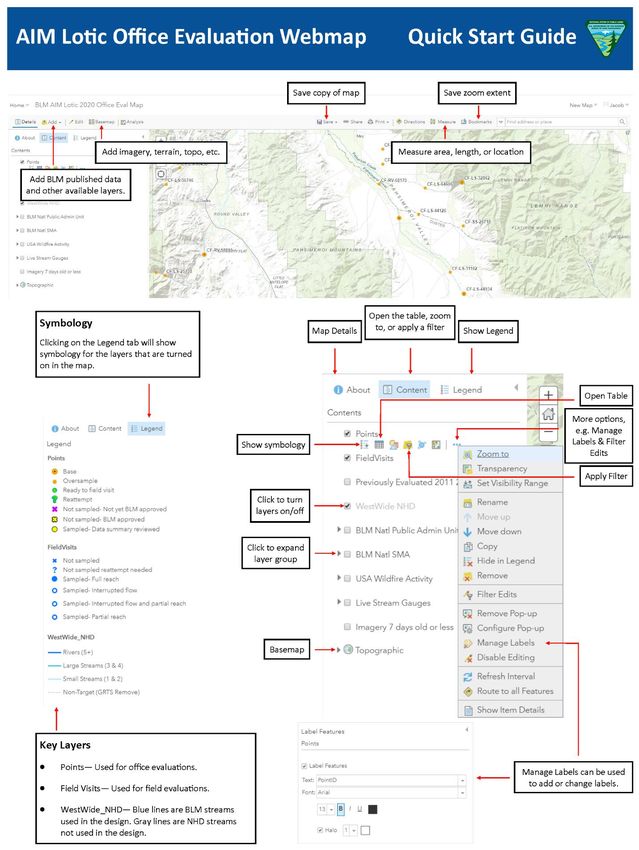
5. Understand the Office Webmap:
a. Review the QuickStart guide (Appendix 1)- This guide will orient you to Webmaps in
general, but also provide more detailed information about layers, symbology, and
functions you will commonly use, including some of those listed below.
Reach Evaluation and Design Management Version 4.0 December 202010
b. Review all layers
i. See the ‘Layers in the Office Webmap’ section below for a description of each
layer.
ii. Review Appendix 2- This will explain all the columns in the two key layers
(Points and Field Visits) and can serve as a quick reference to better understand
which columns must be filled out and the responsible party.
c. Filter the Webmap for your use. Common filters for each task are listed below:
i. Office Evaluation: ‘Project’; also might initially want to filter by ‘StrataName’ to
display one stratum at a time and ‘PointType’ so that only base points are
visible. However, oversample points will need to be included once all base
points are office evaluated.
ii. Trip Planning: ‘Project’ and ‘EvalStatus’- Only points that are “Ready to Field
Visit” and “Reattempt” (Consider labeling with Order Code or Trip)
iii. Finalizing Eval Status: ‘Project’ and ‘EvalStatus’; only points that are
“NotSampled- not yet BLM approved” or “Ready to Field Visit”
d. Edit Points layer to change the evaluation status, add indicators, or give directions.
i. Edits can be made by clicking on a point and then clicking “Edit” (remember to
re-click “Edit” when you’re finished editing) or in the table by double clicking on
a cell (do not need to click edit).
ii. Column names with padlock icons are locked and cannot be edited. If the
attribute name does not have a padlock icon, you can double click the cell for
editing.
6. Understand how the Office Webmap interacts with the Field Webmap and Field Visits layer.
i. The Points layer should only be edited on a computer by those responsible for
Office Evaluation and Design Management tasks.
ii. The Field Visits layer should only be edited by the crews on their iPad through
the Field Maps application (an ESRI application replacing Collector).
iii. When points are set to “Ready to Field Visit” in the Points layer the crew will
field visit those points and add them to the Field Visits layer in the Field
Webmap.
iv. The Field Visits layer of the Field Webmap syncs directly with the Field Visits
layer in the Office Webmap once the crew gets back online and syncs the Field
Maps application.
1. The field visited point will now appear on the Office Webmap.
2. Within the Points layer, there will also now be a related record for the
visited points. You can view these visits two ways:
a. In the popup for a point, you can select “Show Related Records”
and a table of all the Field Visits for that specific point will
appear.
b. In the table, click the “Show” link in the ‘FieldVisits’ column to
show related records. The number listed in this column is the
number of times the crew field evaluated the reach.
7. Understand how the Sample Size Dashboard works:
a. All instructions are listed on the left side panel in the dashboard.
b. Generally, you will apply filters to select your points to calculate sample sizes, holes, etc.
Reach Evaluation and Design Management Version 4.0 December 202011
i. The formulas in this tool are based on information in the ‘EvalStatus’ and
‘ReasonNotSampled’ columns in the Points layer of the Office Webmap.
c. The Sample Size Dashboard updates immediately when the ‘EvalStatus’ or
‘ReasonNotSampled’ fields are edited in the Points layer.
d. If the numbers in the Sample Size Dashboard appear off, ensure that your Points layer is
up to date and refresh the Sample Size Dashboard webpage. If issues persist, contact
the National AIM team.
Layers in the Office Webmap:
• Points layer: Used to view all points in a design for a given year and to track progress toward
meeting desired sample sizes. This layer tracks:
o Office evaluation comments and general information (Office evaluator, date evaluated,
merging of points, contact information, and directions)
o Reach evaluation statuses (‘EvalStatus’ column)
o Reasons a reach is not sampled (‘ReasonNotSampled’ column)
o Indicators to collect at each reach (e.g., ‘TNTP’, ‘Turbidity’ columns)
o When initial data QC is completed by the project lead or crew manager (‘EvalStatus’ of
“Sampled- Data Summary Reviewed”)
o Trip information (‘Trip’ and ‘TripNotes’ columns)
o Reaches on the boating crew’s sample list (‘BoatingFilter’ column)
o Point labels will appear when you zoom in
• Field Visits layer: Used to track individual field visits and is related to all of the raw field data
collected with Survey123.
o Every time a crew attempts to visit a point, the crew should create a new record. Each
point can have multiple recorded field visits before successful sampling occurs.
o Each visit should have an appropriate ‘FieldEvalStatus’ and possibly ‘ReasonNotSampled’
along with all other associated columns completed (see Step 5- Field Evaluation for
more details).
o Once the crew syncs the Webmap and Survey123 data forms this layer will relate
directly to all of the raw data collected at the reach and also to a Data Summary PDF.
• National Hydrography Dataset (NHD): The NHD layer the National AIM team uses to draw
points for most designs.
o The national NHD is visible at a large scale, but if you need to click this layer for
additional attributes and information, zoom into a local area. The resolution of the layer
adjusts based on your zoom.
o Oregon will have two layers because we used two different NHDs: one for the local
designs and one for the Western Rivers and Streams Assessment design.
o The NHD will appear and be a “clickable” feature as you zoom in.
• Lotic Previously Evaluated Points: This layer contains a record of every reach that has been
previously evaluated as part of the BLM’s Lotic AIM program. This layer should be used as a
reference layer while office evaluating points to prevent duplicated office evaluation efforts
across years and to learn from previous evaluations. Any points that have a record in the Lotic
Previously Evaluated Points layer should have ‘Yes’ autopopulated in the Points layer
‘PreviouslyEvaluated’ column. Access information from the previously evaluated points layer
Reach Evaluation and Design Management Version 4.0 December 202012
may be particularly useful, but previously evaluated reaches classified as “Not Sampled” should
not automatically be written off as “Not Sampled”. Consider if reach conditions may have
changed across years and also consider how valid previous evaluations were. This layer will
appear as you zoom into a local area.
• Other useful layers:
o BLM administrative unit boundaries (i.e., BLM NATL Public Admin Unit)
o BLM ownership (e.g., Surface Management Agency)
o USGS stream gauges (i.e., Live Stream Gauges)
o Imagery (Add basemap imagery for zoomed detail)
• Add basemaps, your own layers, or already published layers to this map as well
o Basemaps are added from the basemap menu above your map content.
o Click the Add option above the map content and add layers from various sources. If you
are adding a shapefile it must be in a zipped folder.
• Survey123 Data Layers and Tables
o Raw field collected data will upload to layers and related tables on the Webmap.
o More information can be found in the Lotic Data Management Protocol and the Lotic
AIM Technology Manual once updated for the current field season.
Step 2 – Select Targeted Points, Points for Potential Merging, and Contingent or Supplemental
Indicators
Overview: Project leads identify targeted points for sampling, if applicable, and specify which points
need contingent or supplemental indicators collected. In addition, project leads determine if any
random points can be merged with existing monitoring locations to maximize opportunities for trend
assessments and data applicability to management decisions. Lastly, points from the same design that
are in very close in proximity to one another are evaluated for potential skipping.
Responsible Parties: Project leads
Files and Tools:
• Office Webmap
• Shapefiles or CSV of other existing monitoring locations (MIM, PFC, AREMP, PIBO, other).
Shapefiles must be in a zipped folder to add to the map.
• Targeted Point Request Form – Survey123 Web Form used when requesting that a new or an
existing targeted ‘PointID’ be generated. You must have acquired access to the AIM Lotic
Webmap Group prior to using this form.
• Current year’s task order
Detailed Instructions – Targeted Points:
1. Ensure you have access to the AIM Lotic Webmap Group (See Step 1 - Understanding your
Design and Design Management Tools)
2. Determine if your point has been previously evaluated as a part of lotic AIM. If you are not sure,
consult the Lotic Previously Evaluated layer to determine if there is a point in this layer in your
desired location.
3. Determine if you can use a random point from your design as a targeted sample location. To do
Reach Evaluation and Design Management Version 4.0 December 202013
this turn on the Points layer and if the point falls in a desired targeted location mark the point as
“Ready to field visit” and make notes in the ‘OfficeEvalComments’ that it should be sampled as a
targeted location and provide the information listed in number 3 below. If the point does not
fall in the exact desired location, we recommend requesting a targeted point exactly where you
want it to be located.
4. Gather the following information about your targeted point.
a. Previous ‘PointID’ if the point has been previously evaluated
b. The latitude and longitude (in decimal degrees; WGS84; six decimal places): (49.452684,
-119.562379)
c. Stream or drainage name (not required)
d. Field office the point falls in
e. Reason for choosing this targeted point location
f. If and how far the point can be moved. This usually depends on the reason for choosing
a reach. A restoration reach usually can’t be moved. If you just want a sampled reach
somewhere on a specific stream, it can usually be moved to make sure the crew can
sample the whole reach.
g. Is there a temporal constraint on when the point needs to be sampled?
5. Submit a Targeted Point Request Form to the National AIM Team. (You must have acquired
access to the AIM Lotic Webmap Group prior to using this form)
6. Once the National AIM Team receives the request, they will work on appending a new point to
your project in the Points layer. Note that it may take up to 24 hours for the point to be added.
Once a targeted point has been appended to the Points layer, the crew will have to take their
device back online to sync the newly added ‘PointID’.
Detailed Instructions – merging or skipping reaches:
1. Examine the location of point coordinates in the AIM design in relationship to pre-existing
sample reaches or new AIM reaches to be sampled on the same stream. Point coordinates that
fall in very close proximity to an existing sample reach can be considered for merging or
skipping. If points are not from the same design, consider merging. In contrast, points within the
same design cannot be merged, but they can be considered for skipping. To merge or skip a
reach, the random sample point coordinates must meet ALL of the following criteria:
a. Be within the following distance of the other point:
i. Small streams (1st and 2nd order): 500 m
ii. Large streams (3rd and 4th order): 1000 m
iii. Rivers (5th+ order): 2000 m
b. No geomorphic differences exist between the two sample reaches. Specifically,
determine if valley confinement and the subsequent extent of the floodplain area and
vegetation type appear similar between the two sample reaches.
c. No perennial or intermittent tributaries enter between the two sample reaches.
d. No management changes exist between the two sample reaches. Specifically, determine
if fence lines, changes in land ownership, or other land-use activities differ between
reaches.
2. Document merged points if all of the above criteria are met as follows:
a. Record the point identifier of the point you want to merge with in the ‘MergedPointID’
column. This is called ‘PointID’ for all AIM points, but for non-AIM points record
whatever that program uses for an identifier or name for that location. Worse case, if
there is no specific ID, just use something generic such as stream name so that we can
link the two sample efforts together in the future.
Reach Evaluation and Design Management Version 4.0 December 202014
b. Record the monitoring program you are merging the point to in the
‘MergedMonProgram’ column (PIBO, MIM, AREMP, PFC, AIM, other).
c. The location of the new sample point needs to be moved to the location of the existing
monitoring location to ensure spatial compatibility of monitoring data and so the crew
knows the correct location to sampled. To do this:
i. Type coordinates into the “Find Address” search bar at the top right of the
Webmap, hit enter/return, and click “Add to Map Notes” in the popup. This will
drop a pin on the Webmap.
ii. Coordinates should be typed in decimal degrees format
EX: 45.17938374, -116.28202490
iii. Click the AIM point you are moving
and select “edit” on the lower
section of the popup window. Then
click and drag the point to the
desired sample location.
iv. Review the ‘CurrentLat’ and
‘CurrentLong’ attribute fields and
ensure that they were updated to
the new coordinates you moved
the point to. Also ensure that the
field ‘Has the Point been Moved’
says “Yes”. This step is essential
because the crew will field visit the
‘CurrentLat’ / ‘CurrentLong’
coordinates.
d. For all points being merged with other AIM points, please email Jacob Shipman
(jshipman@blm.gov) to let him know you’ve merged a point in your design. He will swap
the current ‘PointID’ and the ‘MergedPointID’ so the crew collects data using the
previously evaluated ‘PointID’.
e. For all points being merged with Non-AIM points (e.g., “PIBO”, “MIM”, “Other”), the
original AIM ‘PointID’ from the design will be used for data collection and not the
‘MergedPointID’.
f. Points within the same design cannot be merged! Consider skipping one of the points,
but remember skipping points will create holes.
3. Document any skipped points if all of the above criteria are met as follows:
a. Record the ‘EvalStatus’ as either “Not sampled- BLM approved” if you are a BLMer, or
“Not-sampled- Not yet BLM approved” if you are not a BLMer and set the
‘ReasonNotSampled’ to “Unknown - Too Close to other monitoring location”.
b. You must make a comment in the ‘OfficeEvalComments’ about which point it was too
close to, why it was skipped, and explain how it met all criteria.
c. You do not have to skip points that meet the too close criteria and skipping points may
negatively impact the statistical rigor of your design by creating holes.
Detailed Instructions – selecting contingent or supplemental indicators to be collected at each reach:
1. Core indicators should be collected at all random points.
2. Project leads should identify additional contingent or supplemental indicators to be collected at
each reach. Not all reaches require the same contingent and supplemental indicators to be
collected. A list for each point ensures the crew knowns the correct indicators to collect.
Reach Evaluation and Design Management Version 4.0 December 202015
a. Reference the Monitoring Design Worksheets and contract/agreement (if applicable) for
more information about which indicators are to be collected at each reach.
b. In each of the Contingent Indicator columns within the Points layer, select yes or no to
indicate if it will be collected.
c. In the Supplemental
Indicators column
within the Points
layer, type which
supplementals you
want collected.
d. If you have a default
set of indicators to
be collected, please
work with the
National AIM Team
and they can
prepopulate the
corresponding
columns so there is
not as much manual
selection.
3. In some cases, a subset of core indicators may be collected and specified in the ‘CoreSubset’
columns. Please contact the National AIM Team for guidance on when this may be appropriate.
4. Contingent indicators selected in the Points layer are ultimately passed into Survey123 when
Forms are launched. The indicators you select in the Points layer will select what is defaulted
when the crew opens the form and those indicators will or will not be available for collection. If
something is accidentally not set properly in the Points Layer, the user will be able to override
the defaults in Survey123 so that the correct data is collected.
Step 3 – Office Evaluation
Overview: The purpose of office evaluation is threefold: 1) to determine whether a reach meets the
definition of the target population (e.g., perennial wadeable streams on land managed by the BLM
within the Bruneau Field Office) and should be sampled or is not part of the target population and
should not be sampled (Table 1); 2) to assess the accessibility of a reach; and 3) to plan travel routes to
the point coordinates. Field crew efficiency and productivity is often directly related to how well reaches
are evaluated and thus the value of this process cannot be underestimated. Office evaluation involves
using available geospatial information and local knowledge to determine if a field visit is needed and to
record access information. Rejected points need to be replaced by oversample points until the desired
sample size is met – see ‘evaluation and sampling order’ design concept. This process requires iteratively
updating the ‘EvalStatus’ throughout the season and finalizing this field at the end. All points are
assigned “Base” and “Oversample” as their ‘EvalStatus’ at the beginning of the field season to properly
symbolize the points on the Webmap. ‘PointType’ is a noneditable column that permanently stores
“Base” or “Oversample” designations.
Responsible Parties: Project leads, crew managers, and/or field crews
Files and Tools:
• Office Webmap
Reach Evaluation and Design Management Version 4.0 December 202016
Detailed instructions – completing office evaluations in Office Webmap: Document all information
obtained and decisions made during the office evaluation process in the ‘Points’ layer as follows:
1. For each point, consider the area you are assessing for perennial flow, wadeability, access, and
land ownership.
a. A minimum of 75 m up and downstream of the point coordinates needs to be evaluated,
but this length should increase for larger systems (reach length = 20x bankfull width).
b. Note that crews have the ability to move point coordinates during the field visit to meet
the sampling criteria (See TR 1735-2 Section 3.2 for more information).
2. Determine whether a reach meets the definition of the target population and is accessible (see
below for a list of example stream flow, access and ownership questions):
a. If the sample reach is believed to be a member of the target population (e.g., perennial
stream on BLM land within your reporting unit),
i. Determine if the reach is accessible and provide access information:
1. If it is inaccessible, complete the ‘EvalStatus’ and ‘ReasonNotSampled’
columns.
a. The ‘EvalStatus’ of “Not Sampled – BLM approved” should be
used by BLM project leads.
b. The ‘EvalStatus’ of “Not Sampled – Not yet BLM approved”
should be used by anyone other than the BLM project lead
conducting the evaluation.
i. All points with an ‘EvalStatus’ of “Not Sampled – Not yet
BLM approved” will need to be verified by a BLM
project lead and changed to “Not Sampled – BLM
Approved” by the end of the field season if in
agreement. See Step 6 – Final Evaluation Status below.
ii. Clearly state the reasons why a reach was determined
to be permanently inaccessible in the
‘OfficeEvalComments’ column.
2. If you think the reach could be accessible
a. Use the ‘EvalStatus’ column in the Points layer to select the
“Ready to Field Visit” option.
Reach Evaluation and Design Management Version 4.0 December 202017
b. Provide all relevant notes for the field crew regarding point
access, the timing of sampling, etc. in the ‘OfficeEvalComments’
column.
c. Provide any landowner contact information and names in the
‘ContactInfoForAccess’ column. Names, phone numbers, and
emails must be kept out of the ‘OfficeEvalComments’.
b. If the sample reach DOES NOT meet the definition of the target population, set the
‘EvalStatus’ field to “Not Sampled” and fill out the appropriate ‘ReasonNotSampled’
(Table 1). For more details about “Not Sampled- BLM approved” vs “Not Sampled- Not
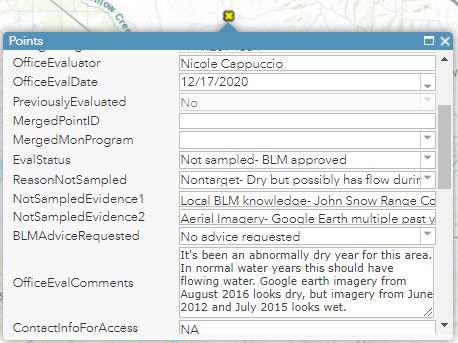
yet BLM Approved” see above steps.
i. All points with a ‘ReasonNotSampled’ of “Nontarget” must have
‘NotSampledEvidence1’ and ‘NotSampledEvidence2’ filled out. What were the
tools you used to determine this designation (e.g., local knowledge [give name if
not yourself], imagery, gauges, SMA, etc.)?
ii. Also clearly state the reasons why a reach was determined to not be part of the
target population in the ‘OfficeEvalComments’ column (e.g., the point falls in
the Salmon Field Office, but this is the Upper Snake Field Office design and
should only include points in Upper Snake FO).
c. If questions persist about if a reach is part of the target population or accessible use the
‘BLMAdviceRequested’ column to specify who you need advice from, and clearly record
in the ‘OfficeEvalComments’ column what you need advice or assistance with as
follows:.
i. Select “…advice needed” if additional information is needed before you can
determine if a point should be marked as “Ready to field visit” or “Not
Sampled”.
ii. Do NOT select “…advice needed” if you have all the needed information and a
point just needs to be “Not Sampled-BLM approved”.
Reach Evaluation and Design Management Version 4.0 December 202018
Stream flow, access, and ownership considerations:
1. Stream Flow Considerations: Examine the location of the reach in the Office Webmap to determine:
a. Does the reach fall on or near an actual stream? If not, record the ‘ReasonNotSampled’ as
“Nontarget- Lentic” or “Nontarget- Map Error” (Table 1).
b. Is the system likely to be perennial? Streams should be sampled if they contain water at five
or more of the eleven main transects during the time of sampling, even if that water is no
longer flowing. If the office evaluator is not sure, the point coordinates should be visited by
a field crew.
i. For non-perennial reaches that the office evaluator is sure will never contain water
during the sample period (usually June 1-Sept 31), use the “Nontarget- always dry
during the sample season or ephemeral” designation (Table 1).
ii. If you are office evaluating in a drought year or at the end of the season you may
find a reach that is dry at the moment, but will likely have water in future years, or
earlier in the sample season. To avoid permanently writing off these points as dry
use the “Nontarget- possibly has flow during some sample seasons” designation.
iii. If you are unsure if a reach will always be dry, use the “Nontarget- possibly has flow
during some sample seasons” designation so the point is re-evaluated at another
time.
iv. Furthermore, two sources of ‘NotSampledEvidence’ are mandatory for Nontarget
rejections.
c. Is there a specific time of year the reach should be sampled based on when the stream
might be influenced by runoff, weather, dam operations or irrigation withdrawals and
returns?
d. Can the reach be boated but not waded? Consult with the project lead and determine if
boatable reaches should be sampled as part of the design, or if the project lead is only
intending to report on wadeable streams and rivers.
i. Boatable reaches that should be sampled need to be sampled by a specialized crew
with a different protocol. If you cannot return to the point later in the season and
wade at least 50% of the reach, then use the ‘Not Sampled Reason’ of “Reattempt-
Boatable crew needed”.
ii. If the project lead wants to report on only wadeable streams and rivers and not
sample any boatable systems, then use “Nontarget- Boatable (not sampling
boatable reaches for this design)”.
iii. If the project lead is unsure, please contact the NOC to determine the appropriate
next steps.
e. Is the reach both unsafe to wade and unsafe to boat? If so, record the ‘ReasonNotSampled’
as “Not wadeable nor boatable” (Table 1).
2. Access Considerations: Examine the location of the reach in the Office Webmap to gain an
understanding of potential access routes and terrain. In doing so, document answers to the
following questions in the ‘OfficeEvalComments’ column in the Points layer:
a. Is the point safe to access? If not, record the ‘ReasonNotSampled’ as “Permanently
Inaccessible-Access denied terrain” (Table 1). Permanently Inaccessible should only be used
if the point is truly inaccessible and multiple attempts have been made to visit the point
coordinates and access will be impossible/impractical by all crews for at least 10 years into
the future. It should be noted that using this status creates holes in the design.
b. What are the driving directions to access the point coordinates and what will road
Reach Evaluation and Design Management Version 4.0 December 202019
conditions be like? Provide multiple suggestions when possible.
c. How long (in miles) is the hike from the parking area to the sample point? Lotic AIM does
not have a maximum hike distance used to reject points like terrestrial AIM. Crew and
project leads should assess the situation and determine if the crew is capable of making the
hike and it is safe to attempt. Three- to five-mile hikes are not rare.
d. How difficult is the hike (easy/moderate/hard/very difficult)?
e. Are there unique challenges that might affect access (e.g., cliffs or private land)?
f. Are there any specific access directions (e.g., access directly from the north and pick your
way between the cliff bands) that need provided to crews?
3. Landownership Considerations: In the Office Webmap, examine the location of the point in relation
to public and private land and determine if you need permission to cross private land to access the
point. If so, research and document answers to the following questions in the ‘OfficeEvalComments’
or ‘ContactInfoForAccess’ columns:
a. Is there less than 100 m of stream on BLM land on a small isolated parcel?
i. If yes, can you move the point to accommodate 100 m of BLM land and ≥5 transects?
1. If yes, continue to office evaluate the reach.
2. If no, consider rejecting the reach as “Not Sampled” and ‘ReasonNotSampled’
as “Nontarget – Reach too short” (Table 1).
ii. If no, consider rejecting the reach as “Not Sampled” and ‘ReasonNotSampled’ as
“Nontarget – Reach too short” (Table 1).
a. If there is >100 m of BLM land but the point falls on the edge of BLM land, the field crews
can move the point in the field to sample the reach.
b. Where is private land in relation to the point (e.g., upstream, East, etc.)?
c. Have you arranged to access the point? If not, what are the next steps toward arranging
access?
d. Who is the point of contact to gain access and how should the person be contacted? Only
record contact information in the ‘ContactInfoForAccess’ column.
e. What are the access stipulations/directions from the landowner?
f. Have all private landowners denied access and no other routes are possible? If so, record
the ‘ReasonNotSampled’ as “Permanently Inaccessible-Private access denied” (Table 1).
4. Trend Considerations: Consider if you are interested in reach specific trend at this location and
determine if you would like to sample around the same time of the season it was previously
sampled. If this is the case, we consider sampling within two weeks of the previously sampled date
to reduce the typical within season variability (e.g., Point XY-SS-55555 was sampled June 7, 2015,
revisit between June 1 and June 14, 2020). Assessing the trend of conditions across the landscape
does not require sampling within the two-week window. Contact the National AIM Team for more
information.
Step 4 – Trip Planning
Overview: Once reaches are office evaluated, trip planning begins by logically grouping and planning to
sample reaches labeled “Ready to Field Visit”. Crews can typically sample one reach per day if drive
times are not too long. Trip planning is an iterative process that should be re-assessed after each trip
considering rejected, nontarget, and temporarily or permanently inaccessible reaches and the need for
oversample points. To retain statistical validity of the design while also being efficient with your
sampling efforts, it is important to balance the sampling order, sample size, and spatial extent of each
sample trip. Use the Sample Size Dashboard to review the number of sampled reaches, progress
Reach Evaluation and Design Management Version 4.0 December 202020
towards achieving desired sample sizes, and number of holes. As a reminder the Points layer ‘EvalStatus’
must be up to date for correct values to appear in the Sample Size Dashboard.
Responsible Parties: Project leads, field crew leads, or crew managers may complete this step.
Files and Tools:
• Office Webmap
• Sample Size Dashboard
Detailed Instructions – Trip Planning:
Step 1. Select groups of reaches that are spatially close together, while considering the following:
1. The number of selected reaches for each sampling trip will depend on the length of trip, the
distance between point coordinates, stream size, the difficulty of point access, and the
likelihood of point failure. If the points are within 1-2 hour drive of each other, and the hike to
each point is relatively short (less than ~2 miles each way), crews can typically sample one point
per day. If drive time and hike distances are longer, more time will need budgeted per point.
2. When selecting points geographically close together, you should always consider the sample
order and potential for creating holes in the design (see ‘Holes in the design’ in the design
concepts section).
3. Make sure to filter out any Boating reaches by using the “BoatingFilter” unless your crew is
specifically sampling boatable reaches.
4. The National AIM Team strongly recommends adding several extra points to every trip, so that
the crew has backup options in the event that points are rejected or temporarily inaccessible.
Base the number of backups on the likelihood of rejection for each point scheduled on the trip.
Step 2. Review evaluation information in the Points layer to determine if additional information or
contacts are needed and allow enough time to follow up for more information if needed.
1. Review if the point has been merged or moved and if this was intentional.
o Specifically, review the ‘MergedPointID’, ‘CurrentLat’, ‘CurrentLong’, ‘Has the Point been
Moved’, and the ‘OfficeEvalComments’ columns.
o Follow up with the office evaluator and project lead if the point was moved, but there is
no indication in the notes or merged info that would support this.
2. Review information about private landowners or field personnel that should be contacted and
determine if there is enough time do to so before the trip begins.
3. Review the driving and access routes in your Office Webmap or other available resources to
determine if supplemental maps or information are needed. When reviewing maps, pay
particular attention to areas that could prohibit access (e.g., cliffs). If terrain impediments are
identified, consider other routes, even if alternative routes will require longer hiking.
Step 3. Create a list of points to visit on the field trip
1. Based on the above, create a list of points the crew should attempt to visit on their field trip.
The list should include the order that the crew should sample points and a list of backup points.
Backup points should include notes such as ‘sample this point if point XYZ fails’ or ‘sample if
extra time’. Make sure the crew clearly understands any special point access instructions before
departing.
2. In the Points layer, use the ‘Trip’ column to record which points should be sampled during each
trip and the ‘TripNotes’ field was included to record notes about sample order. These are simply
included as a tool to assist trip planning and do not need to be used.
Reach Evaluation and Design Management Version 4.0 December 202021
a. For the ‘Trip’ column we suggest using a trip number or the date that the crew will leave
for their trip to group points. If a point is not visited during the trip, simply update the
trip column when the crew returns to the office and before they leave for their next trip.
b. For the ‘TripNotes’ column we suggest using this to explain sample order or priority for
the trip and any notes about a reach, including which points should be picked up if
others fail. Neither of these columns are stored in our database so only use them for
temporary trip planning information. Make sure all other information is put into the
‘OfficeEvalComment’ field or other appropriate fields.
Tips for trip planning:
● Filtering the Points layer by your ‘Project’, which points have a ‘EvalStatus’ of “Ready to field
visits” and “Reattempt” will help remove clutter on the map during trip planning.
● Schedule difficult points for the start of the field trip when the crew has more time and energy.
● Plan easy points at the end of the trip in case the crew is running short on time and energy.
● Plan easy points for the entire first trip of the season, hardest points in the middle of the field
season, and easy points at the end of the season when the crews are running out of time and
energy.
● Consider snowpack, flow regimes, and irrigation withdrawals, but generally plan Small Steam
strata at the beginning of the season before some of them dry up, Large Streams in the middle
of the season so that flows are safe to wade, and Rivers at the end to be wadable at all.
Step 5 – Field Evaluation
Overview: Field crews can sample, not sample, or reschedule points for another visit. Field crews are
responsible for recording the outcome of all attempted field visits in the Field Visit layer (See Table 1 for
possible point statuses). Any rejected points need to be replaced by oversample points until the desired
sample size is met – see ‘evaluation and sampling order’ design concept.
Responsible Parties: Field crews
Files and Tools:
• Field Webmap – Field Visit records are added to this map through the Field Maps application.
Detailed Instructions: Content can be viewed and updated with or without internet access. All crews
should be able to take a Webmap offline in the Field Maps application by specifying an area on the
Webmap to cache. After editing or creating field visits on the offline Webmap, open the Field Maps
application while online to sync all changes.
Step 1. Ensure you have all the needed information
1. Crew reviews their trip schedule. Look at each point on the list and review the directions and
access information. If there are questions the crew should follow up with the office evaluator
before departing on the trip.
2. Review merged or moved points. Ensure any moved or merged points were intentional by
looking at the ‘MergedPointID’, ‘CurrentLat’, ‘CurrentLong’, ‘Has the Point been Moved’, and the
‘OfficeEvalComments’ columns. Follow up with the office evaluator and project lead if there is
no indication in the notes or merged info to support the merge or move.
3. Review indicators to be collected. Review which indicators are to be collected at which reaches.
Not all reaches will have the same indicators to collect so be careful not to miss anything. Check
that you have the gear to sample those indicators, and that you understand the field protocol to
Reach Evaluation and Design Management Version 4.0 December 2020You can also read