Installation, operation - Broche Flamberge " Centenaire " - La Cornue
←
→
Page content transcription
If your browser does not render page correctly, please read the page content below
La      Cornue
              1908         2008

        L a    C o r n u e      1 9 0 8

Installation, operation
and maintenance
m a n ua l
   C   H Â T E A U          S   E R I E S

       Broche Flamberge
       Rotisserie
       « Centenaire »
         BY LA CORNUE

               ANSI/CGA Standard
                  Designation
                     85KJ
Read all instructions before using this appliance. Save these instructions for future reference.
I M P O R TA N T S A F E T Y I N S T R U C T I O N S
WARNING: IF THE INFORMATION ON THIS
MANUAL IS NOT FOLLOWED EXACTLY, A FIRE OR
E X P L O S I O N M AY R E S U LT C A U S I N G P R O P E RT Y
DAMAGE, PERSONAL INJURY OR DEATH.
— Do not spray aerosols in the vicinity of the range while it is in
use.
— Do not store or use combustible materials, gasoline or other
flammable vapors or liquids in the vicinity of this or any
other appliance.
— WHAT TO DO IF YOU SMELL GAS
• Do not try to light any appliance.
• Do not touch any electrical switch.
• Do not use any phone in your building.
• Immediately call your gas supplier from a neighbor's
phone. Follow the gas supplier's instructions.
• If you cannot reach your gas supplier, call the fire depart-
ment.
— Installation and service must be performed by a qualified
installer, service agency or the gas supplier.
WARNING: NEVER use this appliance as a space heater
to heat or warm the room. Doing so may result in carbon
monoxide poisoning and overheating of the appliance
WARNING: NEVER cover any slots, holes or passages in
the appliance bottom or cover an entire rack with mate-
rials such as aluminum foil. Doing so blocks airflow
through the appliance and may cause carbon monoxide
poisoning. Do not use aluminum foil to line surface unit
drip bowls, except as suggested in the manual. Improper
installation of these liners may result in a risk of electric
shock, or fire.
LA CORNUE Installation guide Broche Flamberge Page 1Read all instructions before using this appliance. Save these instructions for future reference.
I M P O R TA N T S A F E T Y I N S T R U C T I O N S
This book contains many important safety messages.
Always read and obey all safety messages.
Installer: Leave these instructions with the appliance
In Case of Fire
Do not use water on grease fires. Never pick up a fla-
ming pan. Turn the controls off. Smother a flaming pan on a
cooktop burner by covering the pan completely with a well fit-
ting lid or baking tray. If available use a multipurpose dry chemi-
cal or foam-type fire extinguisher.
Open doors and windows or if a hood is fitted turn it on to remo-
ve smoke and odor.
To Prevent Fire or Smoke Damage
Before using the appliance make sure all the packing materials
have been removed. Always keep the area around the appliance
free from combustible materials, gasoline, and other flammable
vapors and liquids.
If the appliance is installed near a window, proper precautions
should be taken to prevent curtains from blowing over the bur-
ners.
NEVER leave any items on the appliance. The hot air may igni-
te flammable items and may increase pressure in closed contai-
ners, which may cause them to burst. Many aerosol-type spray
cans are EXPLOSIVE when exposed to heat and may be highly
flammable. Avoid their use or storage near an appliance.
Many plastics will burn and most are damaged by heat. Keep
plastic items away from parts of the appliance that may become
warm or hot. Do not leave plastic items on the appliance as they
may burn, melt or soften if left too close to a vent or a lighted
burner.
Page 2 Installation guide Broche Flamberge LA CORNUERead all instructions before using this appliance. Save these instructions for future reference.
I M P O R TA N T S A F E T Y I N S T R U C T I O N S
uProper Installation - Be sure your appliance is properly installed
and grounded by a qualified technician.
The installation of your La Cornue appliance must conform with
local codes or, in the absence of local codes, in the USA with the
"National Fuel Gas Code", ANSI Z223.1NFPA 54, latest edition, and,
in Canada, with CAN/CGA - B149.1, and CAN CGA - B149.2,
“Installation Code for Gas Burning Appliances”.
The appliance must be electrically installed and grounded in
accordance with local codes or in the absence of such codes with
the latest edition of the “National Electrical Code”, ANSI/NFPA 70
in the USA, and CSA C22.2 “Canadian Electrical Code” - in Canada.
Important - Save the installation instructions for the local
electrical inspector’s use.
uThis appliance is designed for domestic cooking only. Use for any
other purpose could invalidate any warranty or liability claim.
uThe appliance and its individual shutoff valve must be disconnected from
the gas supply piping system during any pressure testing of that system at
test pressures in excess of 1/2 psig (3.5 kPa).
uThe appliance must be isolated from the gas supply piping system by closing
its individual manual shutoff valve during any pressure testing of the gas
supply piping system at test pressures equal to or less than 1/2 psig
(3.5 kPa).
uThe inlet gas supply pressure to the appliance must be within the following
limits
LA CORNUE Installation guide Broche Flamberge Page 3Read all instructions before using this appliance. Save these instructions for future reference.
I M P O R TA N T S A F E T Y I N S T R U C T I O N S
uPurchaser of this appliance must post in a prominent location instructions
to be followed in the event the user smells gas. This information shall be
obtained by consulting your local gas supply company.
uThe use of a gas cooking appliance results in the production of heat and
moisture in the room in which it is installed. It is essential that the kitchen
where your appliance will be installed has excellent ventilation to the
outside for steam and combustion gases removal. Keep natural ventilation
holes open or install a mechanical ventilation device, (mechanical extractor
hood).
uProlonged intensive use of the appliance may call for additional ventilation,
for example opening a window, or more effective ventilation.
uDo not obstruct the flow of combustible and ventilation air
uLeak testing of the appliance shall be conducted according to the
manufacturer’s instructions.
uA manual valve must be installed in an accessible location in the gas line
external to the appliance for the purpose of turning on or shutting off gas
to the appliance.
uElectrical Grounding Instructions
To avoid risk of electrical shock, personal injury, or death, make sure your
appliance has been properly grounded and always disconnect it from main
power supply before servicing.
uPower failure - In the case of prolonged power failure no attempt should
be made to operate the appliance during power failure.
uWear Suitable Clothing - Never wear loose-fitting or hanging clothes
while using the appliance. Be careful when reaching for items stored in
cabinets over the appliance. Flammable material could be ignited if brought
in contact with a burner flame or hot surface and may cause severe burns.
Page 4 Installation guide Broche Flamberge LA CORNUERead all instructions before using this appliance. Save these instructions for future reference.
I M P O R TA N T S A F E T Y I N S T R U C T I O N S
uUse Only Dry Potholders or Oven Gloves - Moist or damp potholders
on hot surfaces may result in burns from steam. Never let a potholder
touch hot heating elements.
Do not use a towel or other bulky cloth in place of a glove. They might
catch fire if they touch a hot surface.
Use dry oven gloves when applicable - using damp gloves might result in
steam burns when you touch a hot surface. Never operate the appliance
with wet hands.
uDo Not Leave Children Alone - Children should not be left alone or
unattended in area where appliance is in use. They should never be allo-
wed to sit or stand on any part of the appliance.
Do not allow children to climb or play around the appliance.
Teach them not to play with controls or any other part of the appliance.
Destroy the carton and plastic bags after unpacking the appliance. Never
allow children to play with packaging material.
Do not store items of interest to children in cabinets above an appliance or
in appliance - children climbing on the appliance to reach items could be
seriously injured.
uDo not use the appliance for storage - This instruction manual is based
on safety considerations. Flammable materials should not be stored in an
appliance or near the burner. This includes paper, plastic and cloth items,
such as cookbooks, plastic ware and towels, as well as flammable liquids.
Do not store explosives, such as aerosol cans, on or near the appliance.
Flammable materials may explode and result in fire or property damage.
uStorage should not be installed directly above an appliance.
uDo not touch burner, areas near burner or interior surfaces of
appliance - Gas burner may be hot even if they have been off for some
time. Areas near the gas burner and interior surfaces may become hot
enough to cause burns. During and after use, do not touch, or let clothing
touch or other flammable materials contact the burner, areas near the bur-
ner or interior surfaces until they have had enough time to cool.
LA CORNUE Installation guide Broche Flamberge Page 5Read all instructions before using this appliance. Save these instructions for future reference.
I M P O R TA N T S A F E T Y I N S T R U C T I O N S
uUser Servicing - Do not repair or replace any part of the appliance unless
specifically recommended in the manual. All other servicing should be
referred to a qualified technician. Never modify or alter the construction of
the appliance by removing levelling legs, panels, wire covers, screws, or
any other part of the product.
uImportant Safety Notice and Warning - The California Safe Drinking
Water and Toxic Enforcement Act of 1986 (Proposition 65) requires the
Governor of California to publish a list of substances known to the State of
California to cause cancer or reproductive harm, and requires businesses to
warn customers of potential exposures to such substances.
This appliance contains or produces a chemical or chemicals which can
cause death or serious illness and which are known to the state of
California to cause cancer, birth defects or other reproductive harm.
Users of this appliance are hereby warned that the burning of gas can
result in low-level exposure to some of the listed substances, including
benzene, formaldehyde and soot, due primarily to the incomplete combus-
tion of natural gas or liquid petroleum (LP) fuels. Properly adjusted bur-
ners will minimize incomplete combustion.
Exposure to these substances can also be minimized by properly venting
with an open window or using a ventilation fan or hood.
To reduce the risk from substances in the fuel or from fuel combustion
make sure this appliance is installed, operated, and maintained according
to the instructions in this booklet.
u Quality of Flames - On Natural Gas the burners’ flames should be a
blueish color with, at most, a slight yellowish fringe. On Propane gas the
flames may be “softer”. The burner flames may have a slight yellowish tip.
If the flame burns with a long white tip you should call for service.
MAKE SURE THE FLOW OF COMBUSTION AND VENTILATION AIR TO
THE APPLIANCE IS UNOBSTRUCTED.
Page 6 Installation guide Broche Flamberge LA CORNUERead all instructions before using this appliance. Save these instructions for future reference.
I M P O R TA N T S A F E T Y I N S T R U C T I O N S
uIMPORTANT: Never keep pet birds in the kitchen or in rooms
where the fumes from the kitchen could reach. Birds have a very
sensitive respiratory system. Fumes released due to overheated
cooking oil, fat, margarine and overheated non-stick cookware
may be harmful.
uAll parts of the appliance become hot with use and will retain heat
even after you have stopped cooking.
Take care when touching appliance, to minimize the possibility of burns,
always be certain that the controls are in the OFF position and that it is cool
before attempting to clean the range.
uClean with caution. If a wet sponge or cloth is used to wipe spills on a
hot surface, be careful to avoid steam burns. Some cleansers can produce
noxious fumes if applied to a hot surface.
In the interests of hygiene and safety the appliance should be kept clean at
all times as a build up in fats and other food stuff could result in a fire.
uAlways keep combustible wall coverings or curtains etc. a safe distance
away from your appliance.
uWhen using an electrical appliance near the rotisserie, be sure that the cord
of the appliance does not come into contact with the rotisserie.
uTake care that no water seeps into the appliance.
uThis appliance is designed for cooking foods only and must not be used for
any other purpose.
uThis appliance is heavy, take care when moving it.
uWhen the appliance is not in use ensure that the control knobs are in the
off position.
LA CORNUE Installation guide Broche Flamberge Page 7Read all instructions before using this appliance. Save these instructions for future reference.
FRANCE
Ateliers La Cornue
14, rue du Bois du Pont - Z.I. les Béthunes
95310 Saint-Ouen l'Aumône - FRANCE
Phone: + 33 (0)1 34 48 36 36 - Fax: + 33 (0)1 34 64 32 65
Postal address:
La Cornue SAS - B.P. 99006
95070 Cergy Pontoise Cedex - FRANCE
www.lacornue.com
e-mail: a.table@la-cornue.com
USA
Middleby Residential :
4960 Golden Parkway, Building 3A
Buford, GA 30518
After-sales Service:
of 7:00 a.m. and 4:00 p.m. Pacific Time,
Monday through Friday, excluding national Holidays
by calling 877-LACORNUE
CANADA
You can find these instructions on following web sites:
USA
www.lacornueusa.com
Canada
www.lacornue.com/ca
www.agamarvel.com
Page 8 Installation Guide Broche Flamberge Centenaire USA
April 2019
08NOTINSTBFG100/UL-4La Broche Flamberge “Centenaire” Dear Customer, Thank you for choosing a La Cornue product. We hope that you will derive tremendous enjoy- ment from cooking delicious meals with it. The aim of this document is to make you familiar with the potential provided by a professional quality product designed for individuals, and to facilitate its maintenance. Above all, a La Cornue product is manufactured using noble and pure materials. The choices made for some components, are the result of criteria of technicality and professional perfor- mance, which are not attainable with other materials or protective treatments. We are very much attached to the authenticity of our products and we are convinced that you will appre- ciate them even more as you use them. In order to make sure that you will be satisf ied with your product for a long time, we recom- mend that you follow the advice given in the "User's Instructions" section of this document. Thank you for choosing us, Kind regards, President and Managing Director LA CORNUE Installation guide Broche Flamberge Page 9
CONTENTS                                                                                                            Contents

                                               CONTENTS
                                                                                                          Page

    IMPORTANT SAFETY INSTRUCTIONS .............................................................. 1

    DESCRIPTION .............................................................................................. 11
        1. General ......................................................................................... 11
        2. Dimensions ................................................................................... 12

    INSTALLATION ........................................................................................... 13
         1. Safety precautions ........................................................................ 13
         2. Electrical supply ............................................................................ 14
         3. Gas supply .................................................................................... 14

    CONNECTIONS ............................................................................................. 15
        1. Electrical connections ................................................................... 15
        2. Gas connection ............................................................................. 16

    FUNCTIONNING ........................................................................................... 18
        1. Ignition - Broche Flamberge Gas .................................................. 18
        2. Operation on the rods ................................................................... 18
        3. Positioning of the rods .................................................................. 18
        4. How to use the various rods ......................................................... 19
        5. Cooking ........................................................................................ 19
        6. Cleaning ........................................................................................ 20
        7. Important ...................................................................................... 21

    MAINTENANCE ........................................................................................... 22
        1. Important information .................................................................. 22
        2. Electrical diagram ......................................................................... 23

    WARRANTY ................................................................................................ 24

Page 10                             Installation guide Broche Flamberge                                      LA CORNUE
General DESCRIPTION
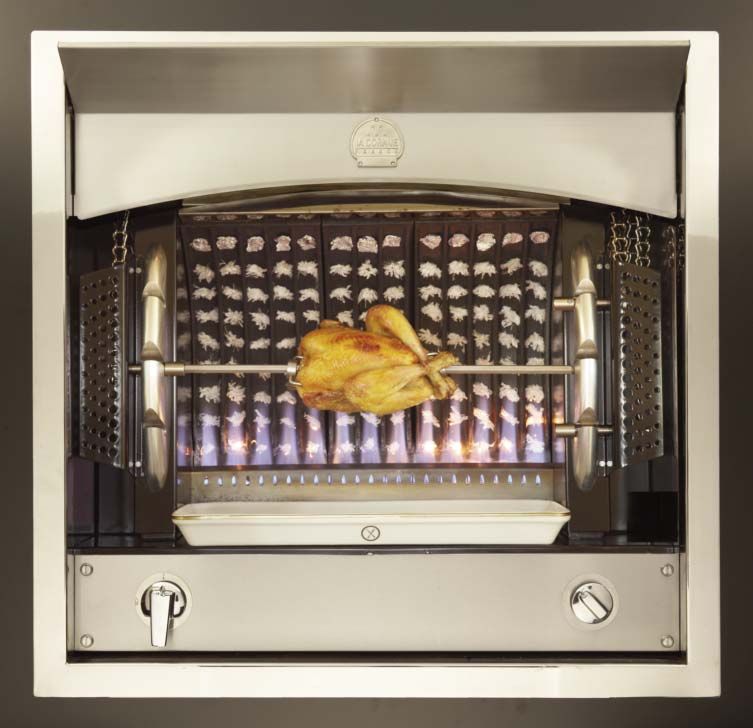
"LA BROCHE FLAMBERGE"
"ON DEVIENT CUISINIER, MAIS ON NAÎT RÔTISSEUR"
"COOKING CAN BE LEARNED, BUT ROTISSERIE COOKING IS AN INNATE SKILL"
This dictum, scrupulously believed by the Chaîne de Rôtisseurs (renowned guild of
rotisserie cooks), demonstrates all the difficulties and subtleties of cooking on a spit.
Certain absolute principles of this type of ancestral cooking mode must be respected in
order to achieve outstanding results.
DESCRIPTION
1. G ENERAL
The "Broche Flamberge" is a rotisserie from the "La Cornue" line, designed for com-
bustible or non-combustible built-in installation. It consists mainly of a heating source
(gas burner) and an electrical motor for the rotisserie.
It is delivered with the following accessories:
— 2 Flat Rods (Spit),
— 1 English - style Rod,
— 1 Drip Tray.
Flat Rod (Spit) English - style Rod
The "Broche Flamberge" comes out in 1 model:
— Gas model, ref. BFG- -00UCT, for use with either natural or propane gas.
The following table outlines the nominal electrical power and gas input ratings of the
model BFG Broche Flamberge.
Model BFG- -00UCT
Electrical Power 15.5 Watts (120 V a.c.)
Natural Gas Pressure 5" W.C.
Input Rating 27,000 BTU/hr
Propane Gas Pressure 11" W.C.
Input Rating 25,000 BTU/hr
LA CORNUE Installation guide Broche Flamberge Page 11DESCRIPTION Dimensions
2. D IMENSIONS
Broche Flamberge
— Height: 28.5" (725 mm)
— Width: 29.7" (755 mm)
— Depth: 15" (380 mm)
— Weight: 132 lbs (60 kg)
Frame
— Height: 31.2" (792 mm)
— Width: 32" (815 mm)
Gas Inlet Male
1/2 NPT connection
Rear View Electrical
connection
Terminal
Block
Gas Inlet Male
1/2 NPT connection
Page 12 Installation guide Broche Flamberge LA CORNUEDimensions DESCRIPTION
Built-in Opening
— Height: 28.7" (730 mm) minimum - 30” (760 mm) maximum
— Width: 30" (760 mm) minimum - 31.5” (800 mm) maximum
— Depth: 19" (480 mm) minimum
Minimum distance from the floor to the bottom of cut-out opening = 36 in.
For installation in either combustible or non combustible locations.
Minimum clearances from combustible or non combustible construction 0 inches.
I N S TA L L AT I O N
In order to be able to install your Broche Flamberge as soon as it is delivered, you must
ensure an appropriate preparation of your kitchen, as well as adequate gas and electri-
cal power (15.5 W, 120 V a.c.).
1. S AFETY PRECAUTIONS
1.1. Venting
The use of a gas cooking appliance results in the production of heat and moisture in
the room in which it is installed. It is essential that the kitchen where the "La Cornue"
rotisserie will be installed has excellent ventilation to the outside, for vapour and
combustion gases, and a fresh air inlet.
Do not use air recycling systems.
Ventilation exhaust devices can be vapour aspirators or hoods.
LA CORNUE Installation guide Broche Flamberge Page 13INSTALLATION Electrical, Gas Supply
1.2. Built-in enclosure
The Broche Flamberge is designed for installation in either combustible or non-com-
bustible enclosure. No combustible material should be installed in front of the applian-
ce, at a distance shorter than 5 ft (1.50 m)
The dimensions of the enclosure are as follows:
— Height: 28.7" (730 mm) minimum - 30” (760 mm) maximum
— Width: 30" (760 mm) minimum - 31.5” (800 mm) maximum
— Depth: 19" (480 mm) minimum (to allow free space behind unit)
A frame will cover the outline of the enclosure with a 1.6" (40 mm) overlap at top and
both sides and at the bottom. The Broche Flamberge can be fixed from the front by
means of 4 screws on the frame, in a position to be determined by the installer, depen-
ding on the appearance or configuration of the wall covering.
2. E LECTRICAL SUPPLY
Voltage: 120 V a.c., Single Phase, 60 Hz
Safety: this appliance when installed must be electrically grounded in
accordance with local codes, or in the absence of local codes, with the latest
edition of the National Electrical Code, ANSI / NFPA 70 in the USA or the
Canadian Electrical Code, CSA C22.2 - in Canada.
3. G AS SUPPLY
Gas is supplied to this unit by means of a 1/2" diameter pipe.
Use sealing compound on all pipe joints. Compound used must be resistant to the
action of LP Gases.
The gas supply line to the appliance must be at least the same size as the gas inlet. An
easily accessible manual shutoff valve must be installed, keeping in mind the fact
that on the appliance, the gas inlet is located at the back:
NOTE:
Make sure that the supply line is clear of burrs and metal particles in order to
avoid damage to the gas controls once the gas is turned on. The pipe
connections can then be made
When your "La Cornue" appliance is installed between kitchen cabinets, the manual
shutoff valve should be accessible. We recommend it be located at the rear of an adja-
cent cabinet.
According to gas regulations, any opening in the wall or on the floor for gas supply of
the appliance must be properly sealed as well as any circulation of air between the gas
supply room and the kitchen.
When all the work has been carried out on your gas supply network, ensure that no
Page 14 Installation guide Broche Flamberge LA CORNUEElectrical CONNECTIONS
metallic burr can enter the supply tube of the stove and block the burners. Then make
sure that all gas connections are properly sealed.
Refer to "Important Safety Information" section, on pages 1 - 8.
After all work has been completed on your gas supply network, an operating test must
be performed before connecting the Broche Flamberge, in order to ensure that no
metallic particles may enter the supply tube and obstruct the burner. The gas supply
piping system must be tested as shown in page 3 of this guide.
CONNECTIONS
1. E LECTRICAL CONNECTIONS
The appliance must be electrically installed and grounded in accordance with
local codes or in the absence of such codes with the latest edition of the
"National Electrical Code", ANSI/NFPA 70 in the USA, and CSA C22.2
"Canadian Electrical Code” - in Canada.
Disconnect all power supply circuits before accessing the junction boxes.
G N Ph
The Broche Flamberge is supplied with a connection terminal
block accessible by unscrewing the stainless steel protection plate
on the backside.
This appliance must be supplied with 120 Volt and 60 Hz frequency, 120 V a.c. / single phase
and connected to an individual, properly grounded branch circuit,
protected by a circuit breaker or time-delay fuse. Circuit Breaker G-Ground = Green
N-Neutral = White
size chosen to meet local codes according to max electrical power of
Ph-Phase (Hot) = Black
15.5 Watts (0.13 Amps).
Wiring must conform to National Electric Codes.
If the electric service provided does not meet the above specifications, have a licensed
electrician install an approved outlet.
Because rotisserie terminals are not accessible after appliance is in position, flexible
service conduit or cord must be used. The appliance can then be easily disconnected for
servicing.
REMINDER: connection to the general power supply must be via terminal blocks
(preferably of the self-shearing type), not by means of plugs.
Fix the cable way below the hot air outlets, at the back of the Broche Flamberge, never in
front of them.
LA CORNUE Installation guide Broche Flamberge Page 15CONNECTIONS Gas 2. G AS CONNECTION The installation of your La Cornue appliance must conform with local codes or, in the absence of local codes, in the USA with the "National Fuel Gas Code", ANSI Z223.1, latest edition, and, in Canada, with CAN/CGA - B149.1, and CAN CGA - B149.2, "Installation Code for Gas Burning Appliances". All La Cornue appliances are fully assembled and equipped for use with the type of gas shown on the rating plate of the appliance. If no special instructions were mentioned upon ordering, the rotisserie is fitted with orifice for natural gas. Prior to installation, ensure that the local distribution conditions (type of gas and gas pressure) are compatible with rating plate supplied on appliance. The rotisserie is designed to operate at a manifold pressure of 5’’ of Water Column on natural gas, or a manifold pressure of 11’’ of Water Column on LP gas (Propane). If the rotisserie is to be used on LP gas, a qualified LP installer must convert it. We recommend that the rotisserie be converted before installation. For proper operation, the pressure of natural gas supplied to the regulator must be between 6’’ and 10’’ of water column. For LP gas, the pressure supplied must be between 12’’ and 13’’ of water column. When checking for proper operation of the regulator, the inlet pressure must be at least 1’’ greater than the operating (manifold) pressure as given above. The pressure regulator located at the inlet of the rotisserie manifold must remain in the supply line regardless of whether natural or LP gas is being used. A flexible metal appliance connector used to connect the rotisserie to the gas supply line should have an I.D. of ½’’ and be 5 feet in length for ease of installation. The outlet pressure of the gas regulator is factory set and must not be altered. For the rotisserie the regulator and the pressure tap can be found at the bottom of the rotisserie, behind the front cover. Connect the Rotisserie to the Gas Supply Shut off the main gas supply valve before disconnecting the old appliance and leave it off until the new hook-up has been completed. Don’t forget to relight the pilot on other gas appliances when you turn the gas back on (i.e. gas water heater). Because hard piping restricts movement of the appliance, the use of a CSA International certified flexible metal appliance connector is recommended unless local codes require a hard piped connection. Page 16 Installation guide Broche Flamberge LA CORNUE
Gas                                                                           CONNECTIONS

Never use an old connector when installing a new appliance. If the hard piping method
is used, you must carefully align the pipe; the rotisserie cannot be moved after the
connection is made. To prevent gas leaks, put pipe joint compound on, or wrap pipe
thread tape with yellow Teflon* around, all male (external) pipe threads.
*Teflon: Registered trademark of DuPont
NOTE: if joint compound is used compound must be neutral to the action of LP gas.

Install a manual gas line shut-off valve in the gas line in an easily accessed location
outside of the appliance. Make sure everyone operating the appliance knows where and
how to shut off the gas supply to the appliance.

Connect flexible metal appliance connector to the gas inlet of the rotisserie. Position
rotisserie to permit connection at the shut-off valve.
When all connections have been made, make sure all rotisserie controls are in the off
position and then turn on the main gas supply valve.

Use a liquid leak detector at all joints and connections to check for leaks in the system.
Use a product specifically manufactured for leak detection. Leak testing of the appliance
shall be conducted in accordance to the manufacturer’s instructions.
NOTE: do not use open flame to check for gas leaks.

Do not route the hose, at the back, in front of or near a hot air outlet from the
rotisserie or any other heat source.
The hose must not be pinched or kinked.

The appliance must be connected to the type of gas shown on the rating plate of the
                                   appliance.

                    The gas supply line must be at least a 1/2 inch pipe.

         On all pipe joints use sealing compound that does not react to LP gas.

                    Check gas leaks by using a liquid leak detector.

                               Do not use an open flame

                  NOTE : Propane gas cylinders must never be
                        located inside your home.

                                          INSTALLER

            Leave this manual with the appliance and advise
                the customer to keep it for future reference.
               Inform the consumer of the location of the
                           gas shut-off valve.

LA CORNUE                      Installation guide Broche Flamberge                Page 17
FUNCTIONING Ignition, Operation
FUNCTIONING
1. I GNITION - B ROCHE F LAMBERGE G AS
The gas model of the Broche Flamberge includes a safety valve with a thermocouple: if
the burner goes off accidentally, gas supply will be cut off automatically after a few
seconds.
To ignite the gas burner: press the control knob (left side) and rotate it counter
clockwise, to the "big flame" position. The gas at the burner ignites automatically. Keep
the knob pressed in for 10 to 15 seconds, or longer if necessary (up to 30 seconds on
new equipment); then release the knob burner should stay on.
The sparking noise means that the ignition system is operating normally.
- Low setting: this is achieved by rotating the knob fully counter clockwise (small
flame).
- Shutoff: bring the knob back to its vertical position by rotating it to the right.
If the burner flame goes out, wait 1 - 2 minutes and repeat the above procedure but
keep the knob pressed down for a few more seconds (when the system is new, it takes
a little longer for safety devices to function normally).
Release the knob.
Rotate knob to the "HIGH" position. You will need to preheat 5 to 10 minutes before
you place the food to be cooked.
2. O PERATION OF THE RODS
Lift the switch on the right-hand side (position 1
“ON”) of the rotisserie to start driving the motor.
Position 0 - “OFF”.
3. P OSITIONING OF THE RODS
The Flamberge is equipped with three rod holders.
Insert tip of the rod into one of rod holders depen-
ding on type of food to be broiled.
It is recommended to center the roasts on the rod.
You can use the 3 cooking levels independently and Rod holder
vary the cooking temperature by more or less dis-
tancing the roast from the heat source. Rod
Page 18 Installation guide Broche Flamberge LA CORNUECooking FUNCTIONING
The rods position can be adjusted in order to increase/reduce the distance between the
burner/radiant cast-iron back and the rods:
In order to increase the distance between the burner/radiant cast-iron back and the
rods: pull the rod support - this position is generally adequate for large joints of meat
or poultry on one main rod.
In order to reduce the distance between the burner/radiant cast-iron back and the
rods: push the rod support toward the burner/radiant cast-iron back.
a a ^
Support position 1 Support position 2 Support position 3
Warning: the rod supports are very hot - always use oven gloves or oven mitts.
4. H OW TO USE THE VARIOUS RODS
Rod should not be loaded with more than 22 lbs (10 kg)
All types of meat that can be put on a spit, such as chicken, turkey, duck, hare, etc…
should be supported by flat rod. Secure the meat with the forks supplied to that end.
For red meat, or sides that are difficult to balance on the rod, use the English rod.
Flat Rod (Spit) English - style Rod
5. C OOKING
White meat, such as poultry, veal, pork, can be placed in the rotisserie without prehea-
ting it.
For red meat, such as joints of beef or lamb, it is recommended to preheat the
rotisserie for about 5 - 10 minutes, before placing the roast. This will ensure that the
outside of the meat will be properly sealed.
LA CORNUE Installation guide Broche Flamberge Page 19FUNCTIONING Cleaning To cook a chicken, duck or pigeon, for example, run a spit through it, then place it on the middle disc. Check the distance of your supports: a free-range chicken, which takes longer to cook, should be placed farther from the heat source. The cooking time for a chicken varies, on average, between 45 and 60 minutes. Use the same method for duck or pigeon. If you wish to roast two large ducks or cockerels, use both spits and place them on the upper and lower discs. Check that the wings are secured and that the two spits do not come into contact with each other when rotating. When cooking larger pieces of meat, such as rack of lamb, whole fish and other roasts, fix them between the central tongs; you can sprinkle them with herbs, lemon slices or spices, to taste. It only requires twenty minutes to cook a loin of lamb or a beautiful bream. To sear your dish and keep it rare and juicy, turn up the heat. Whatever your menu, the rotisserie is always a festive and mouth-watering spectacle, that will have your guests coming back for more. Don’t forget to place a dish under- neath the spits. 6. C LEANING Clean appliance regularly, including special rotisserie surfaces, with recommended cleaning agents. The cooking grease should be removed from all cooking surface and tray every time the appliance is used, to avoid any risk of fire. Front Panels The external parts, which are not exposed to fat splatters, only require a minimum effort to keep them clean and beautiful. The level of cleaning really depends on the frequency of use and the environmental climate. If kept in a holiday home, especially in a marine climate, it should be thoroughly cleaned before your departure. And isn’t it nice to return to a spark-ling clean cooker. Due to the damp environment, the salt in the air and the acidity in the fat attack all metals, even solid brass and stainless steel. The cleaning products should be chosen according to the surfaces to be cleaned. - Bright colored enamel fronts Because the enamel is vitrified, you can use a window-cleaning product on a paper towel. As fat may splash and splatter when a rotisserie overheats, use an “Ajax Cream” type product and a sponge for cleaning. Enhanced results can be obtained by using window cleaning products. Page 20 Installation guide Broche Flamberge LA CORNUE
Cleaning                                                                     FUNCTIONING

- Stainless steel front panel

For routine cleaning, use terebenthine or domestic alcohol on a piece of paper towel.
Every three to six months, give your brushed steel front panel a thorough cleaning to
remove grease.
For this type of in-depth cleaning, use a mild detergent or soft soap, thoroughly diluted
in hot water. Then rinse with clean water.

A finishing touch with terebenthine will eliminate all traces of water and detergent.

- Matt enamelled colored fronts (matt black, pebble grey)

Remember that matt colors are fragile by nature.

Matt colors are not vitrified and are therefore not protected: the use of products that
are too powerful can leave irrecoverable marks.
However, we have been applying this finish for many years now, as it is extremely easy
to clean and maintain. Simply follow our instructions.

Clean in lukewarm water using household soap applied to a non-abrasive sponge or
even better why not use domestic soap in gel form. Then rinse in pure water and dry
carefully with a paper towel.

Finishes

- Nickel or chrome finishes

These do not require any particular cleaning. Simply use a window-cleaning product
applied to absorbent paper or a cloth to remove any finger marks.

- Copper or Brass finishes

Use a special copper cleaning product, in paste or liquid form, and a soft cloth.
Then remove all traces with a damp sponge. By removing product deposits with water,
your rotisserie stay shinier, longer.

We recommend “Copper Cleaner” from “Spring” or “Bistrot Cuivre” from “Matfer”.

Avoid the use of anti-oxidation products, which cause black deposits to form on the
appliance and take twice as long to clean off.

 7. I MPORTANT

It is recommended not to touch the bunches of ceramic, as this may damage them.

LA CORNUE                    Installation guide Broche Flamberge                  Page 21
M AINTENANCE                                                                       Important

                              M AINTENANCE
1. I MPORTANT      INFORMATION

u Keep appliance area clear and free from combustible materials, gasoline and other
 flammable vapours and liquids.

u Do not obstruct the flow of combustion and ventilation air

u Contact the factory representative to perform maintenance and repairs.

u Clean appliance regularly, including special rotisserie surfaces, with recommended
 cleaning agents.

u Disconnect power supply to the appliance before servicing.

u All adjustments have been made in the factory to ensure optimum results.

                                        IMPORTANT
 This equipment is design-certified by a Nationally Recognized Testing Laboratory to
 the appropriate National Standards as indicated on the Equipment Rating Plate.
 Any modification without written permission of the La Cornue Company voids the
 certification and warranty of this equipment.

 Your selection of LA CORNUE equipment is your assurance of quality and dependability that
 reflects over 100 years of experience in manufacturing the finest gas cooking equipment.
 You can always rely on your dealer and the Company to stand behind every product
 anywhere in the U.S.A. For additional equipment, service and information contact your
 dealer.

Page 22                    Installation guide Broche Flamberge                   LA CORNUE
Electrical diagram M AINTENANCE
2. ELECTRICAL DIAGRAM
“CAUTION - Label all wires prior to disconnection when servicing controls.
Wiring errors can cause improper and dangerous operation.”
“Verify proper operation after servicing.”
7
LA CORNUE Installation guide Broche Flamberge Page 23WARRANTY 5 years
WARRANTY (5 YEARS)
LA CORNUE COMPANY WARRANTS to the original Company except that such obligation to bear labor
user for a period of five years from date of delivery charges shall not apply to products or parts installed
not to exceed 66 months from date of shipment by outside the United States and Canada. Replacement
Company that the product(s) manufactured by part(s) must be supplied by La Cornue direct or
Company are free from defects in material and through its dealer or qualified service agency and the
workmanship. defective part(s) returned to same intact.
COMPANY SHALL HAVE NO OBLIGATION FOR THIS STATES THE EXCLUSIVE REMEDY against
ANY PRODUCT which has been misapplied, Company relating to the product(s), whether in
mishandled, abused, misused or subjected to harsh contract or in tort or under any other legal theory,
chemical action, or improperly installed nor to any and whether arising out of warranties,
product modified by unqualified service personnel or representations, instructions, installation or defects
damaged by flood, fire or other acts of God or which from any cause.
has the serial number removed or altered.
Adjustments such as calibrations, leveling, tightening COMPANY SHALL NOT BE LIABLE, whether in
of fasteners or utility connections normaly associated contract or in tort or under any other legal theory,
with original installation are the responsibility of the for loss of use, revenue or profit, or for substitute use
dealer or installer and not that of Company. or performance, or incidental, indirect, or special or
Warranty does not cover freight charges for new or consequential damages, or for any other loss or cost
defective parts. of similar type.
THE LIABILITY OF COMPANY FOR BREACH OF THIS WARRANTY AND THE LIABILITY SET FORTH
SUCH WARRANTY is exclusively limited to, at HEREIN ARE EXCLUSIVE and in lieu of all other
Company option, the replacement or repair of any liabilities and warranties, express or implied,
part found by Company to be not as Warranted including but not limited to implied warranties of
herein and, in such event replacement or repair shall merchantability and fitness for particular purpose
be made within 60 months from the date of and constitutes the only warranty of Company with
installation. The Company shall bear the normal the respect to product(s).
labor charges in effecting such replacement or repair,
to the extent that performance is effected, within 50
miles from an office of a qualified service agency of
IMPORTANT INFORMATION:
When requesting information, manuals, replacement parts or service, always refer to the model and
serial number of your unit. The serial plate is located on the left hand side of the appliance.
For your convenience space is provided below to record this information for future reference.
SERIAL No
MODEL No
DEALER
INSTALLATION DATE
Page 24 Installation guide Broche Flamberge LA CORNUEL a C o r n u e 1 9 0 8
Ateliers La Cornue
14, rue du Bois du Pont - Z.I. les Béthunes
95310 Saint-Ouen l'Aumône - FRANCE
Postal address : La Cornue SAS - B.P. 99006
95070 Cergy Pontoise Cedex - FRANCE
Phone : + 33 (0)1 34 48 36 36 - Fax : + 33 (0)1 34 64 32 65
E-mail : a.table@la-cornue.com
w w w . l a c o r n u e . c o mYou can also read