Installing, Configuring and Implementing an SMF in Joomla
←
→
Page content transcription
If your browser does not render page correctly, please read the page content below
The Annals of “Dunarea de Jos” University of Galati
              Fascicle I – 2009. Economics and Applied Informatics. Years XV – no 2 - ISSN 1584-0409

        Installing, Configuring and Implementing
                     an SMF in Joomla
                                    Maria Cristina ENACHE
                                         mpodoleanu@ugal.ro
                                 University “Dunarea de Jos” of Galati

         Abstract
         This paper’s goal is to show how an asynchronous communication component
         which can also be used in teaching activities was installed, configured and
         implemented on the website of the Department of Accounting and Economic
         Informatics of the Economics Faculty within the Dunarea de Jos University in
         Galati. This component is known under the name of forum or discussion
         board.
         Keywords: Web 2.0, forum, CMS
         JEL Code:

1. Introduction

Web 2.0 names new ways of considering and employing the organizational capabilities of
WEB. According to these, the content and information are not offered to the visitors only by
the media, governments and private companies anymore, but also by private persons, linked
between each other by informal networks based on Internet and which actively contribute and
take part in the offering and spreading of information in the entire world by the means of web.
Typical examples for this new tendency are the so-called wiki, weblogs (or, the simplified
form, blogs), portals and the image, music, movie/video and software exchange markets in the
Internet, like Flickr, YouTube and the File sharing sites.

The media in the whole world has reacted intensely to these new points of view and it was
suspected that they would have direct social and economic effects. The most widely used web
2.0 technologies in supporting the teaching process and building teaching materials, evaluating
and analysing the evolution of the students, building informing and forming presentations, time
planning, building the timetable and the activities calendar, developing collaboration projects
of which many are student-oriented are: blogs, wikies, RSS, bookmark collaboration bookmark
systems, podcasting.

2. The discussion board

The discussion board is one of the asynchronous communication means, in which any member
of the group can open certain discussion topics, address questions and has the possibility of
receiving several answers from different group users. The questions and answers are visible to
any user and the threads are easy to follow. In the learning process this service is widely used,
because the teacher can explain a problem to a great number of students on a topic chosen by
one of them. Besides, here is the place to exchange opinions on the entire educational process,
there can be made considerations concerning other similar institutions in the country or abroad,
all this for the common goal of improving the educational process. So, discussion boards are

                                                      337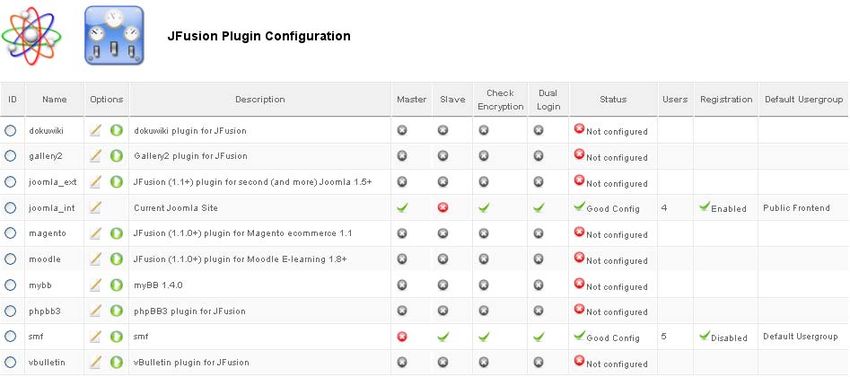
The Annals of “Dunarea de Jos” University of Galati
              Fascicle I – 2009. Economics and Applied Informatics. Years XV – no 2 - ISSN 1584-0409

common space where people can communicate asynchronously. Someone posts a message,
which is added to a list of messages on a certain topic, called “thread”. The message can start
with a dialogue or can be added to a dialogue. Threads on forums are usually archived and
archives usually become useful information resources. The discussion board appears as a
virtual space for a great number of users interested in a certain topic, considering their
diversity. It works asynchronously, like a public collective mailbox in which every user is free
to see the incoming messages and post an answer. In certain situations, a person, called
“moderator”, can take responsibility for leading the debates and eliminating messages that do
not comply with the subject of the forum. The “news” section is read by the users with a text
editor program, which has the possibility to search and select the ones they are interested in.

Although discussion boards exist since the Internet was born, their utility must not be ignored.
They represent a source for building online communities. Discussion boards offer a way to
archive knowledge shared by an entire community. Discussion boards are used for different
types of conversations. They can be used to ask questions and get answers, to express opinions
and feelings or to show a talent or a project.

Discussion boards can also have funny features. Avatars, for an instance, are graphical icons
representing a real person in a virtual world. As discussion boards provide a sequential
discussion, archive the information and can be accessed anytime and anywhere a computer and
an internet connection are available, they can be easy to use instruments. Also known as
“newsgroups”, discussion boards allow users to exchange any kind of information on different
topics.

Contrary to the e-mail principle, messages on discussion boards do not go directly into the
users’ mailboxes, but are stored on servers accessible from the Internet. In these conditions,
any interested user can connect to the server and consult the messages and can also take part in
these electronic conferences by transmitting and publishing messages. Thus, there can be
brought into attention the public character of this communication form. In a discussion board
communication is asynchronous, so there is a certain amount of time between posting a
message and getting the feedback. Not all persons implied are connected simultaneously and
the messages are addressed to all the potential members of the discussion board. Certain
groups are moderated, that is to say all the transmitted messages first reach a moderator, who
has to approve their appearance on the discussion board. It is more and more difficult for an
Internet communication beginner to see the difference between classic e-mail and a forum,
because these informational resources are based on the same principles: identifying the sender,
identifying the subject of the message and the field of interest; the precise identification of the
information exchange (individuals for e-mail and site, message, individuals for discussion
boards); definition of the message content.

As far as the communication exchange types within a discussion board, there can be
distinguished the following three main types of activities and communication relationships:
- the display unit;
- question /answer;
- debates.

Simple Machines Forum - SMF is a free software package which allows one to create his/hers
own community. SMF is PHP coded and uses a MySQL database. SMF is a next generation
discussion board – type software and it is completely free and will remain free. It is very easy
to install, even for beginners. Available on the web since 2004 and not fortuitously called SMF
(Simple Machines Forum), this open source software is built to offer users an excellent

                                                      338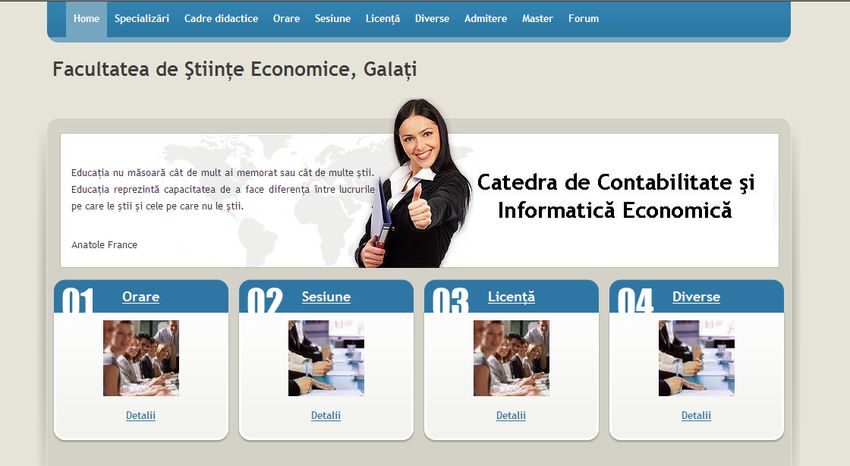
The Annals of “Dunarea de Jos” University of Galati
              Fascicle I – 2009. Economics and Applied Informatics. Years XV – no 2 - ISSN 1584-0409

community starting and managing platform. SMF can be configured in about 40 languages and
has an intuitive, WYSIWYG-equipped interface.

In order to install an SFM discussion board, the following resources must be provided:
9     Operating system;
9     Web server compliant with PHP and MySQL (3.23.28 and later versions), PostgreSQL
      (7.4.10 and later versions) or SQLite (1.x and later versions);
9     Browser: Microsoft Internet Explorer (5.0 at least), Opera (7.0 at least), Netscape (6.0 at
      least), Mozilla Firefox (2.0 at least).
SMF can be downloaded form the following source: http://download.simplemachines.org.

The downloaded archive contains all the installation files. It must be extracted in a folder
named using the pattern forum_name and placed in the htdocs root folder on the web server.
Then the database must be created. If the “local machine installation” choice is made, with a
Xampp or Nushpere server, the database must be placed in http://localhost/phpmyadmin.

In this article we shall present the implementation of such a discussion board on a server called
host28.net and its synchronization with a content-management system which deals with the
documents belonging to the Department of Accounting and Economic Informatics.
In the control panel provided when creating an account there are a file manager and a database
administration tool, the local version of phpmyadmin. There are 4 steps to consider when
installing a discussion board.

Step 1 – file upload or transfer
PHP files must be uploaded in the [htdocs] folder of the user account. This can be done with an
FTP client, using the user, password and server. After completing this, the [htdocs] folder must
be checked to see if the files are in it.

Step 2 – database building
99% of the scripts require MySql databases. The database admin tool will be used to create a
MySQL database. The name must be remembered, as it will be necessary for the next step.

Step 3 – finding the installation page
Already having the uploaded files and the database, the next step is to use a web browser in
order to find the install page for the script. Usually it appears when the site address is typed. It
is possible that one would have to search for it. For example:
    • http://yourwebsite.com/install.php,
    • http://yourwebsite.com/install,
    • http://yourwebsite.com/installation.
If the install page cannot be found you must check if the files in the [htdocs] folder were
correctly uploaded. This can be done with the File Manager in the Control Panel.

Step 4 – Finishing the installation
Most of the questions the script asks during the installation process are accessible even to lay
users.
In order to gain access to the database, the following things must be known:
• MySQL database name: (can be found using the [Database Administrator] in Control
    Panel)
• MySQL password: the same with the Control Panel password
• MySQL user name: id provided by host28.net
• MySQL host name: sql104.host28.net.

                                                      339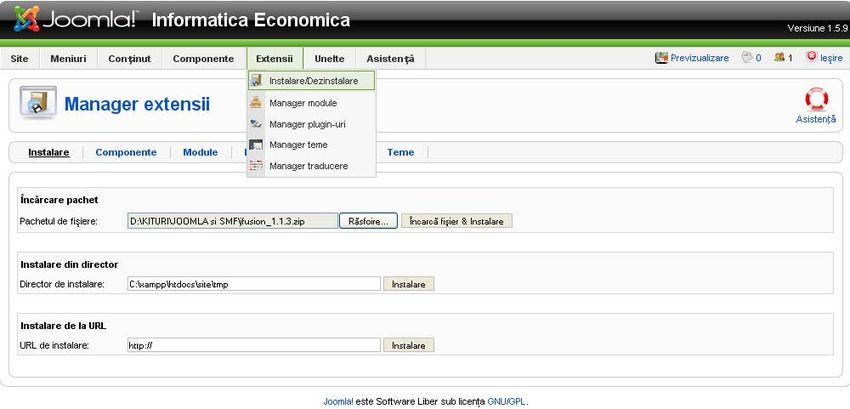
The Annals of “Dunarea de Jos” University of Galati
                 Fascicle I – 2009. Economics and Applied Informatics. Years XV – no 2 - ISSN 1584-0409

After finishing the installation, the access for visualising the SMF discussion board will be
provided via the browser, typing http://host/discussion-board_name. For the proposed case
study, the address is http://cie.host28.net/forum
Then the administrator can create the desired discussions and threads using the Control Panel.

                    Fig. 1 - Department of Accounting and Economic Informatics website

            Fig. 2 - Department of Accounting and Economic Informatics Discussion boards

Basic settings

Now we shall remind some information required during the installation and configuration
process.
    9 The Discussion Board name: this is the name which will appear upon installation
    completion. The default is “My Community”, but it can be modified;
    9 The Discussion Board URL: in most cases, this is completed by default by the
    installation wizard, which automatically detects the discussion board adress;

                                                         340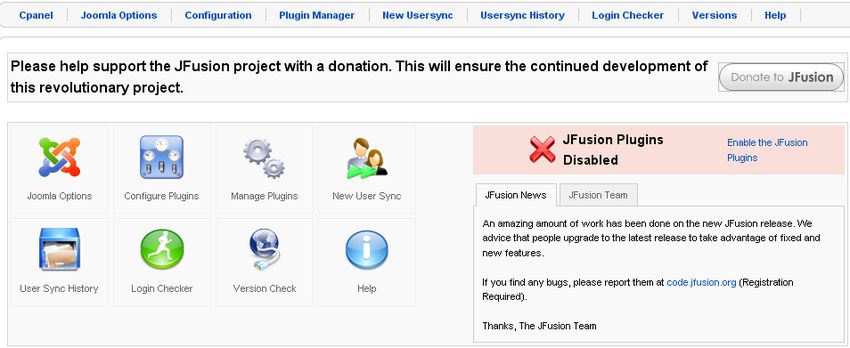
The Annals of “Dunarea de Jos” University of Galati
              Fascicle I – 2009. Economics and Applied Informatics. Years XV – no 2 - ISSN 1584-0409

    9 Gzip compressed output: this function does not correctly run on all servers, but helps
    saving bandwidth by compressing output pages; this option is active by default;
    9 Database sessions recording: this option is active by default in order to use the
    database for sessions instead of files; thus, the sessions will be dependent;
    9 UTF-8 character set: feature which allows the database and data to use the UTF-8
    international character set, which is very useful when working with several languages
    using different character sets;
    9 Allow statistics: when active, this option will allow SMF to visit the site once a month
    in order to collect basic statistics.

MySQL Server Settings:

    9 MySQL user: username for connecting to the MySQL database;
    9 MySQL user password: password required when connecting to the MySQL database;
    9 MySQL database name: name of the database which is to be used by SMF in order to
    store data;
    9 MySQL table prefix: the default smf_ value must be kept.

Once completed these fields, click the Execute button and complete the next step. The interface
will create a new administrator account during the stage called: Create your account:
    9 Username: administrator username required for authentication;
    9 Password: necessary in order to authenticate on the server; must be typed twice for
    checking;
    9 E-mail: must be valid;
    9 MySQL database password: required for security reasons.

Before visualising the discussion board it is very important to erase the install.php file. The
installation program provides a checkbox in order to automate this task if checked. If this file is
not erased, there will appear a warning that must be manually erased.

3. Implementing and configuring in a Joomla CMS

Next, we will show how to implement the asynchronous communication component, that is to
say the discussion board, within a content management system – CMS, respectively the
Joomla, in order to synchronize the users created in CMS with those on the SMF discussion
board.

The Implementation of the SMF discussion board in the Joomla CMS will be made with the
help of a brige, which will log in and out and synchronize the 2 applications.

For the department’s site and the implemented discussion board we used the 1.1.3 version of
the Jfusion bridge. This software package can be downloaded from www.jfusion.org.

JFusion uses a master/slave system for managing the users on different software platforms.
That is to say that one of the software programs has a master – type control over the users and
the Fusion slave-type plug-in tracks user information, which can be found in the master plug-
in. Thus, we will set Joomla as master and SMF as slave. Joomla uses plug-ins for the
authentication procedures, which makes the connection routine easier to modify. All user
records and password changes must be performed by the means of the master software.
JFusion will update the slave software with user details from the users table from the master
software. The JFusion authentication plug-in gets the username/password from the master
software database and checks if the completed password matches with the stored one. If the

                                                      341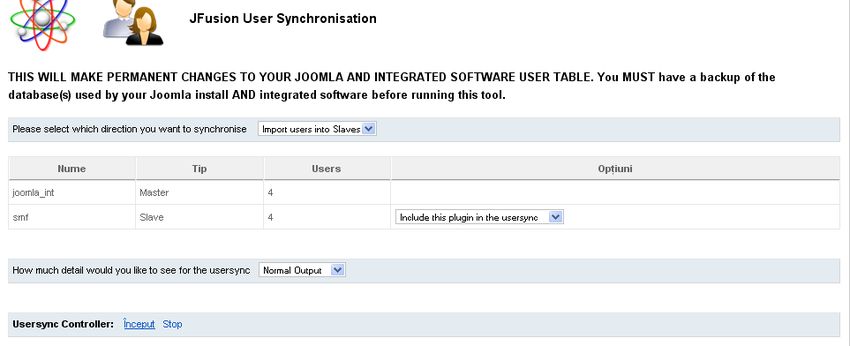
The Annals of “Dunarea de Jos” University of Galati
              Fascicle I – 2009. Economics and Applied Informatics. Years XV – no 2 - ISSN 1584-0409

passwords match, JFusion checks if the user exists in all databases, thus completing user
synchronization. JFusion makes no modifications on the integrated software. This means that
the integrated software, as well as Joomla can be updated without reinstalling or reconfiguring
JFusion. That is why it is no longer necessary to waste time reconfiguring the bridge. Since no
modifications are made on the integrated software, the login way and behaviour are not
changed either.

Among the advantages of using the JFusion bridge there are: the discussion board software can
be installed on the same server as Joomla, the provided wizard making it very easy to install
and configure, only one table is used for authentication, support for several languages, easy
uninstalling (in the Plugin Manager menu from the back end there is an option to uninstall the
JFusion plug-in). The resources necessary to install the JFusion component are: Joomla, PHP
(version 5.0 and above) and a MySQL database (version 4.1.x and above).

Installing and configuring the JFusion component.
In the administration section of Joomla, access the Extensions menu, like in the figure above,
and pick up the Install/Uninstall option. In the Install menu, load the jfusion_1.1.3.zip file.

                     Fig. 3 - Stage The loading stage of JFusion component in CMS

After loading the file, all the components of the JFusion package appear installed. The JFusion
control panel looks like the one in the next image and contains the following menus:
9 Joomla Options;
9 Configuration;
9 Plugin Manager;
9 New Usersync;
9 Usersync History;
9 Login Checker;
9 Versions; Help.

                                                      342
The Annals of “Dunarea de Jos” University of Galati
Fascicle I – 2009. Economics and Applied Informatics. Years XV – no 2 - ISSN 1584-0409
Fig. 4 - Control Panel
a. Joomla Options – there are several options here. For an instance:
Plugin General Details:
9 Description: “Current Joomla Site” is displayed by default, but it can be modified;
9 Full URL to Software: URL address of the site created in Joomla.
Login Options:
9 Login Identifier: select what you want users to type when connecting to Joomla; the
options are: username, e-mail or username/e-mail;
9 Username Filter: for a standard username filtering it must be kept the joomla_int
setting.
Users Options:
9 Usergroup Management: this setting helps managing user groups; JFusion can handle
the user groups in 2 ways: simple (groups are established only for newly created users and
then they run completely independent from other software) and advanced. In the
Usergroup Mode section, the option simple will be kept. The Default Usergroup option
will be: Public Frontend.
9 Auto Register Users: this setting will be used when JFusion runs with other
authentication plug-ins, like Gmail. If users are to login in Joomla using these plug-ins, the
option will be “Yes”; otherwise set it to “No”.
9 Auto Update Activation: similar to the above setting. If set to “Yes”, any
modifications brought to the activation of the user account in the master software will be
copied in Joomla. If set to “No”, activation of the user account in the master software will
not be copied in Joomla.
9 Auto Update Bans: "Yes" would allow a banned user in the master software, thus
banning him in Joomla. “No” means that the username is not banned in Joomla.
9 Auto Update Email: any modifications in the e-mail settings will be updated in Joomla
(“Yes”) or not (“No”).
343The Annals of “Dunarea de Jos” University of Galati
Fascicle I – 2009. Economics and Applied Informatics. Years XV – no 2 - ISSN 1584-0409
Fig. 5 - Joomla Options - User Options
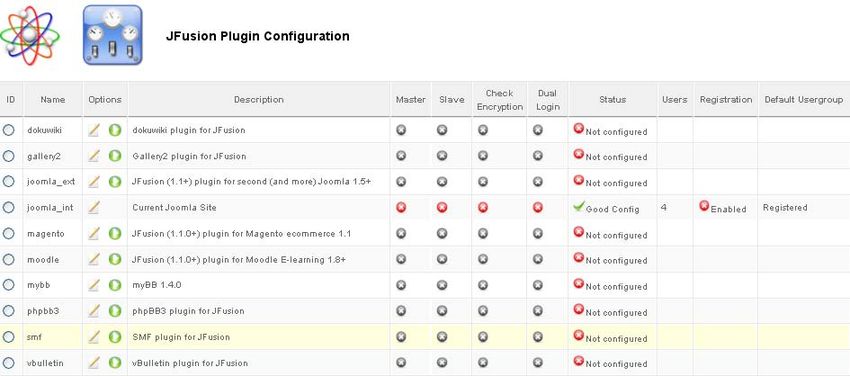
b. Configuration
During the configuration stage, it must be established which of the software programs, Joomla
or SMF, is the master and which is the slave. This is probably the most important setting,
which will provide a smooth operation of the two components. This means that the software
importing the users will be slave, respectively the SMF, and the Joomla will be master.
Before configuring the JFusion plug-in, the window looks like that:
Fig. 6 - JFusion Plugin Configuration
In the joomla_int, which is the plug-in for the current site, the Edit plugin option must be
clicked. Thus, the joomla_int JFusion Plugin Editor configuration stage appears, which has all
the options completed by default. This stage is identical to the settings made during the first
stage, in the Joomla Options menu. Next, Joomla will be set as the Master, and finally the
configuration will look like that:
344The Annals of “Dunarea de Jos” University of Galati
Fascicle I – 2009. Economics and Applied Informatics. Years XV – no 2 - ISSN 1584-0409
Fig. 7 - Set Joomla as master software
The Configure Plugin option will bring up the smf JFusion Setup Wizard. As the extraction of
the necessary data for this setting must be made from the config.php file, in order not to make
any mistakes, the wizard performs this automatically, the user completing only the path to the
software that JFusion is to integrate, in this case: http://cie.host28.net/forum. Or it could also
be C:\xampp\htdocs\forum. Then, if the file is found, the wizard displays it. After saving the
options completed by default by the wizard, the SMF is set as the slave software.
c. New Usersync
Before any synchronization, Joomla must be set as the master and the SMF as the slave,
because the slave software must be implemented in the master software.
In the first window, the synchronization direction must be selected, that is to say Import users
into Master, which implies copying the users in the slave software into the master software, or
Import users into Slaves, which implies copying the users in the master software into the slave
software. Because we wanted to synchronize the users on the department’s site with those on
the forum, the synchronization direction will be: Import users into Slaves.
.
Fig. 8 - JFusion User Synchronisation
345The Annals of “Dunarea de Jos” University of Galati
Fascicle I – 2009. Economics and Applied Informatics. Years XV – no 2 - ISSN 1584-0409
For the SMF software program, which in this case is employed as a slave software, there are
two options: Exclude this plugin from the usersync and Include this plugin in the usersync. The
option to choose is Include this plugin in the usersync
Depending on how many details we want displayed after the synchronization, Normal Output
or Extended Output can be chosen. Then click on Start, and the user synchronization will be
finished in a few seconds.
d. Usersync History – keeps a record of the synchronization status, that is to say details
regarding the number of synchronized users, time taken by this operation, etc.
e. Login Checker
In order to verify if the user login operation is correct the Login Checker routine is used. This
instrument can be used to troubleshoot login problems when JFusion login does not run
correctly. The last step to do after configuring JFusion is to activate the plug-in. Sometimes
plug-ins are not activated using the above method. In the event this happens, they must be
manually activated: in the back end section, in the Plugin Manager menu the "Authentication-
Joomla" and "User-Joomla" options are set to inactive, then, the "Authentication-JFusion" and
"User-JFusion" options are set to active.
Conclusions:
Like we stated in the beginning of this article, the purpose of implementing an asynchronous
communication component (the SMF discussion board) in a stand-alone site was achieved. In
this article we are presented the result of this implementation process, the stages and a series of
basic configuration steps. The created forum can serve as support for a future development.
References
1. http://www.cmswatch.com
2. http://www.webcms.ro
3. http://www.joomla.ro
4. http://www.simplemachines.org
5. http://www.jfusion.org
346You can also read