Inverter Operating Instructions - Komet Inverter - Komet Irrigation
←
→
Page content transcription
If your browser does not render page correctly, please read the page content below
Operating Instructions

                            Inverter

    Komet Inverter

A

    > Operating Instructions

                English, Deutsch, Italiano, Français

                                                       1
Table of content - Inhaltsverzeichnis - Sommario - Sommaire

                 4    Operating instructions - English
                 16   Gebrauchsanweisung - Deutsch
                28    Istruzioni d'uso - Italiano
                40    Instructions d'utilisations - Français

                52    EC Declaration - EC Erklärung - Dichiarazione CE - Déclaration CE
Table of content                                                                                 English

                   5    Safety Instructions
                   6    Preparation of Sprinkler
                   7    Description of Components
                   8    Application

                   9    Function & Positions of the Inverter

                   10   Set-up of the Inverter for Application "A" (Initial Inversion)

                   12   Set-up of the Inverter for Application "B" (Regular Retraction)

                   13   Set-up of the Inverter for Application "C" (Transition to Full-Circle Mode)

                   13   Security Feature of the Inverter Fork

                   14   Set, Activate and Start the Timer

                   15   Battery Replacement

4
4
Safety Instructions                                                                                              English

IMPORTANT!
These instructions must be given to the operator. Before operating the Komet Inverter, the operator must
read these instructions carefully. Keep these instructions for future reference.

  DANGER!
  GENERAL SAFETY INSTRUCTIONS FOR THE USE OF BIG VOLUME SPRINKLERS

  1. Do not perform any adjustments or controls while the sprinkler is in operation.

  2. Stand clear of the action area of the sprinkler.

  3. Stand clear of the high pressure water jet.

  4. Insure water jet is not directed toward people, powerlines, roads, buildings or any other objects.

  5. Before operating the sprinkler, insure no people are standing in its action area.

  DANGER!
  SAFETY INSTRUCTIONS FOR THE USE OF THE KOMET INVERTER

  1. Before operation insure that both sector angles are correctly set and the inverter is in the correct position to
     operate the first sector.
  2. The arrows on the sector rings must point towards each other and the inverter fork, in its respective position,
     needs to be located in between them.
  3. Insure that the sector rings are firmly locked.

  4. Insure that the timer is activated but has not yet started.

  5. Security feature of the inverter fork – insure, that the inverter fork is locked in its defined position.

  6. Check battery status.

                                                                                                                        5
Preparation of Sprinkler                                                                                           English

The timer for the Komet Inverter is not preinstalled and must be installed prior to usage:

Turn gun to the side.                                            Unlock the lid of the timer with a flat screwdriver by
                                                                 TURNING the screwdriver, then remove the lid.

Install the timer with the 4 supplied Allen screws (M4 x 12).    Reinstall the lid and lock it securely.
Make sure that the plug is facing downwards.

                                                                                   A

                                                                                       B

Connect the plug and screw it in tight.                          Move the inverter circuit from left to right (A), make sure
                                                                 that cable (B) does not get under tension.

 6
 6
Description of Components                                                                                               English

                                                                 Sector Angle 1

                                                                                  Upper Sector Ring 1

    Timer

                                                                                                                 Lock Nut

            Inverter Circuit

                      Magnetic Button

                                                                                                            Full-Circle Adapter
                                        Inverter Fork                                      Sector Angle 2

                                                        Lower Sector Ring 2

                                                                                                                                  7
Application                                                                                                       English

The patented Komet Inverter allows to operate the gun           hence the timer triggered through motion, the preset time
in two completely independent sector angles. Starting in        starts the countdown.
sector 1, the gun turns automatically into sector 2 after
                                                                After the 36 hours have elapsed, the timer must be re-
a preset time has elapsed. The required time will be set
                                                                activated.
through a timer.
                                                                If required, a supplied full-circle adapter can be installed.
The timer is fitted with an accelerometer. After the time is    This allows the gun to change from sector 1 into full-circle
set, and the timer has been activated, the timer remains in     operation mode "C", after the preset time has elapsed. The
stand-by mode for 36 hours. Within this time frame the gun      full-circle mode remains active, until the adapter is manually
can be started. As soon as water is running through the gun,    removed.

The Komet Inverter is suitable for the following applications:

             Application "A"                          Application "B"                          Application "C"

      Irrigation with initial inversion            Irrigation with regular              Irrigation with initial inversion
                of the gun.                        retraction of the gun.                 and transition to full-circle
                                                                                        operation until the end of the
                                                                                                irrigation action.

 8
 8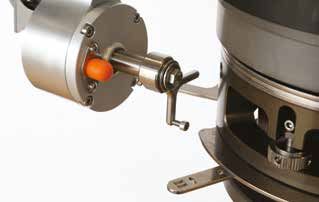
Function & Positions of the Inverter                                                         English

                                          The Inverter fork is pointing up, in between
                                                   arrows of sector rings 1.

The gun is operating in sector 1,
if the inverter fork is in its basic
position, located between the
upper sector rings 1.

                                        Inverter fork in search position: the screw of the
                                        inverter fork is lying on the lower sector rings 2.

After the preset time has
elapsed, a magnet is released,
unlocking the inverter fork and
bringing it into search position.

The inverter fork in search
position is now moving along
the lower sector rings, until the
screw is falling through the gap
and the inverter fork is locked
in its lower position. The gun is
now operating in sector 2.

                                          The Inverter fork is falling through the gap
                                                     of the sector rings 2.

                                                                                                    9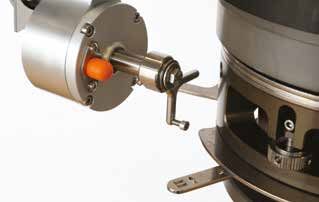
Set-up of the Inverter for Application "A" (Initial Inversion)                                                           English

1. Set Sector 1
     • To set sector 1 (first angle) loosen the upper lock                • After the desired angle has been set, tighten the lock
       nut. The sector rings 1 are now released and can be                  nut by hand (without tools).
       brought into the desired position.
                                                                          • If the inverter fork in its basic position (see positions
       ATTENTION! The set sector angle is always lying
                                                                            page 9) is located outside of sector 1, turn the inverter
       in between the arrows pointing to each other.
                                                                            fork forcefully clockwise until it can be moved below
     • Make sure, that the inverter fork is positioned IN                   the arrow of sector ring 1. As soon as the inverter fork
       BETWEEN the arrows of the sector rings 1, pointing                   is positioned in between the arrows of sector rings 1
       to each other.                                                       pointing to each other, bring the inverter fork into its
                                                                            initial basic position by turning it anti-clockwise.
                                 The Inverter fork is positioned            ATTENTION! The inverter fork must be turned
                           in between the arrows of the sector rings 1,     back to its defined position until it clicks into
                                     pointing to each other                 place. Control whether the inverter fork is effectively
                                                                            locked by trying with minimal force to move it. If
                                                                            effectively locked it must stay in place.

2. Set Sector 2
     • To set sector 2 (second angle) loosen the lower lock nut.
       The sector rings 2 are now released and can be
       brought into the desired position for sector 2.
     • Tighten the lock nut by hand.
     • Control that sector rings 1 and 2 are effectively locked
       by trying to move them.                                                          Lock Nut

                                                                                                                      Sector Angle 2

10
10
Set-up of the Inverter for Application "A" (Initial Inversion) English
3. Bring the Inverter Fork into its Basic Position
• To operate in sector 1, the inverter fork must be • Now push the magnetic button and simultaneously
brought into its basic position. At that, the upper fork turn the inverter fork anti-clockwise until the
is pointing upwards and is locked by the engaging magnetic button clicks into place. Control whether
magnet which has to be pushed in completely. the inverter fork is effectively locked by trying to turn
the inverter fork again with minimal force. In case it is
properly locked, it must not move.
• Is the inverter fork in its lower position (see page 9)
continue as following: Make sure that the inverter
• The inverter is now set in the correct position for
fork is positioned in between the arrows of the
application "A".
sector rings 1, pointing to each other (it is eventually
necessary to rotate the sector rings 1 so long, as to
Inverter fork
guarantee that the inverter fork is located in between in basic position
them). Bring the inverter circuit into Position R
(across from timer). Upper
sector rings 1
Position "R"
Timer
Lower
sector rings 2
• Control that the first sector angle 1 is correctly set,
by rotating the gun to the left and to the right within
sector 1. If the inverter fork is correctly locked in
place, the inverter fork will not move when hitting the
upper sector rings.
4. Set Timer
• Set the time including an eventual pre-irrigation time, • After activation the timer has a delay of 60 seconds.
for the required time frame to irrigate sector 1 (page 14). During this time the countdown will NOT start, enabling
the user to leave the irrigation cart without triggering
• As soon as the timer is activated, it remains active, in
the timer.
stand-by mode, for 36 hours.
• The countdown starts, as soon as water is running
through the gun or the gun is moved otherwise.
11Set-up of the Inverter for Application "B" (Regular Retraction) English
1. Set Sector 2
• If the gun is operated only in one sector
angle, the lower sector rings 2 should be
used.
• Loosen the lower lock nut and move the
sector rings 2 into the required position.
ATTENTION! The set sector angle is
always lying in between the arrows
pointing to each other.
• If the inverter fork is already in its lower
position, make sure the inverter fork is
positioned in between the arrows of sector Inverter fork in its lower position, in between
rings 2 pointing to each other. arrows of sector rings 2 pointing to each other.
2. Bring the Inverter Fork in its Lower Position
Is the inverter fork in its basic position (see page 9), • After approx. 1 minute, the magnet releases and the
hence not yet in its lower position, continue as inverter fork will be unlocked (a clicking sound is
following: audible).
• The inverter fork in its basic position must be • Now turn the gun anti-clockwise until the bolt of the
positioned in between the arrows of sector rings 1. lower inverter fork is falling through the gap of the
Sector 1 can be chosen freely. sector rings 2.
• Bring sector circuit into Position L – sector circuit • The inverter fork is now locked in lower position and
must be located beneath timer. the gun can operate in sector angle 2.
Position "L"
Timer
• Control that the inverter is correctly preset, by turning
the gun to the left and to the right within sector 2. If
• Set the timer for 1 minute (setting of timer see page 14). the inverter is correctly set, the inverter fork will not
move when hitting the lower sector rings 2.
• Start timer by pushing the drive arm down and letting
it swing up again. Consider that the countdown can
only be activated after 60 seconds. After activation
wait until time has elapsed.
12
12Set-up of the Inverter for Application "C" (Transition to Full-Circle Mode) English
1. Set Sector 1
• Set sector 1 as described in application "A", paragraph 1. • Make sure that the inverter fork in its basic position
Set Sector 1 (page 10). is located in between the arrows of the sector rings 1
pointing to each other.
2. Install Full-Circle Adapter
• To ensure that after operating in sector 1 the gun will
change into full-circle operation, the full-circle adapter
must be manually installed onto the lower sector rings 2.
• Loosen the lower lock nut and move the lower sector
rings 2 towards each other, so far as to make sure
that the adapter is covering the entire gap.
• The full-circle adapter is now forming a continuous
surface preventing the screw of the lower inverter
fork to fall through the gap.
• Set the timer for sector 1 and activate it (page 14).
IMPORTANT! When the gun has changed from sector 1
to full-circle mode, the gun will continue to operate
in full-circle mode until the full-circle adapter is
manually removed.
Security Feature of the Inverter Fork
The implemented security feature of the inverter fork
should prevent damage to the sector assembly, in case of
forceful movements (for example swinging of the gun during
repositioning of the irrigation machine).
ATTENTION! Has the inverter fork forcefully been moved
from its defined basic position, make sure to bring it
back to its defined position before operating the gun.
There is only one defined position for the inverter fork. In
this position the notch on the inverter fork engages with the
pin in the shaft.
13Set, Activate and Start the Timer English
Calculate required time until inversion
Usually the preset time at least needs to cover the time frame needed to retract the throw radius R of the gun, including an
eventual pre-irrigation time (delay of retraction). The known values, speed of retraction “v” of the irrigation machine in m/h
(meter/hour) and throw radius “R” of the gun in m (meter) result in the following formula:
Throw Radius of Gun R (m)
Time t (min) = m * 60 + Delay of Retraction
Speed of Retraction v( h )
Example
Speed of the hose retraction = 20 m/h - Throw radius of the gun = 60 m - Delay of retraction = 15 min.
60
t= * 60 + 15 = 195 min
20
Setting of the time
• Press any button until only the number on the right side
starts blinking. Then set the required time (in minutes)
with the arrow buttons. After setting the time, wait
4 seconds until the display goes black. The defined time
remains stored, until it is manually changed.
Activation of timer
• The last set time remains stored in the timer’s memory.
Push any button to bring the timer into stand-by mode.
The symbol “S.” is blinking on the left side.
• On the right side, the predefined time is blinking. The
timer is now activated. It remains active, in stand-by
mode, for 36 hours.
Start of Countdown
• The countdown of the timer starts automatically through
the implemented accelerometer. The accelerometer will
be triggered through an abrupt movement of the gun (for
example if water is running through the gun).
• During the countdown the dot symbol “.” is blinking and
the remaining time is shown on the right side of the
display. After the time has elapsed the gun automatically
performs the inversion.
ATTENTION! The timer is very sensitive. Before leaving
the irrigation cart, make sure that the timer is activated
but has not yet started the countdown.
Functionality control
In case the functionality of the timer is controlled while it is not installed on the gun, make sure to keep the timer in a
vertical position during the test. A horizontal alignment may already trigger the accelerometer of the timer and start the
countdown.
14
14Battery Replacement English
In case of weak batteries, the symbol “b” appears on the display of the timer. The batteries should be changed.
The included lithium-ion batteries are expected to have a life time of 6 years.
Alternatively, regular 1.5V AA batteries can be used. The expected life time of this kind of batteries is approximately 1 year.
To replace the batteries, open the lid, exchange the batteries and close the lid again (see page 6).
When changing the batteries, make sure that no liquids are entering the housing to avoid oxidation of electronical parts.
15Inhaltsverzeichnis Deutsch
17 Sicherheitshinweise
18 Vorbereitung des Regners
19 Komponentenbeschreibung
20 Anwendung
21 Funktionsweise & Positionen
22 Einstellung des Inverters für Anwendung "A" (Anfangsinversion)
24 Einstellung des Inverters für Anwendung "B" (normaler Einzug)
25 Einstellung des Inverters für Anwendung "C" (Übergang in die Kreisfunktion)
25 Sicherheitsfunktion der Invertergabel
26 Timer einstellen, aktivieren und starten
27 Batteriewechsel
16
16Sicherheitshinweise Deutsch
WICHTIG!
Diese Bedienungsanleitung muss dem Betreiber des Gerätes ausgehändigt werden. Vor Inbetriebnahme
ist der Betreiber verpflichtet die Betriebsanleitung durchzulesen. Die Sicherheitshinweise müssen befolgt
werden. Diese Betriebsanleitung ist aufzubewahren.
GEFAHR!
ALLGEMEINE WARNHINWEISE FÜR DIE BENUTZUNG VON GROSSFLÄCHENREGNER
1. Keine Einstellungen oder Kontrollen am laufendem Regner vornehmen.
2. Halten Sie sich nicht im Arbeitsfeld des Regners auf.
3. Halten Sie sich nicht im Bereich des Hochdruck-Wasserstrahls auf.
4. Stellen Sie sicher, dass der Wasserstrahl nicht auf Personen, Hochspannungsleitungen, Straßen, Häuser oder
andere Objekte gerichtet ist.
5. Vor dem Einschalten des Regners überprüfen, dass sich keine Personen im Arbeitsbereich des Regners aufhalten.
GEFAHR!
WARNHINWEISE FÜR DIE INBETRIEBNAHME DES KOMET INVERTERS
1. Vergewissern Sie sich, dass vor Inbetriebnahme des Regners die Sektorwinkel richtig eingestellt sind und dass der
Regner für die Beregnung des ersten Sektorwinkels richtig positioniert ist.
2. Die Pfeile auf den Sektorscheiben müssen zueinander zeigen und der jeweilige Finger der Invertergabel muss sich
zwischen den Pfeilen befinden.
3. Kontrollieren Sie, dass die Sektorscheiben gut blockiert sind.
4. Kontrollieren Sie, dass der Timer aktiviert aber nicht schon gestartet ist.
5. Sicherheitsfunktion der Invertergabel – stellen Sie sicher, dass die Invertergabel in ihrer definierten Position eingerastet
ist.
6. Überprüfen Sie den Batteriestatus.
17Vorbereitung des Regners Deutsch
Der Timer für den Komet Inverter ist nicht vormontiert und muss daher vor Inbetriebnahme am Regner angebaut werden:
Regner auf die Seite drehen. Deckel des Timers mit einem Schraubenzieher durch
DREHEN des Schraubenziehers entriegeln und abnehmen.
Den Timer mit den 4 mitgelieferten Inbus-Schrauben Deckel wieder aufsetzen und verriegeln.
(M4 x 12) so montieren, dass der Stecker nach unten zeigt.
A
B
Stecker anstecken und festschrauben. Inverterschaltung von links nach rechts bewegen (A), dabei
kontrollieren, dass das Kabel (B) nicht unter Zug kommt.
18
18Komponentenbeschreibung Deutsch
Sektorwinkel 1
Obere Sektorscheiben 1
Timer
Rändelmutter
Inverterschaltung
Magnetknopf
Gleitschuh
Invertergabel Sektorwinkel 2
Untere Sektorscheiben 2
19Anwendung Deutsch
Der patentierte Komet Inverter erlaubt es, den Regner Bewegung aktiviert wird, beginnt die vorprogrammierte Zeit
in zwei voneinander unabhängigen Sektoren arbeiten zu abzulaufen.
lassen. Der Regner startet im Sektorwinkel 1 und wechselt
nach Ablauf einer mittels Timer voreingestellten Zeit Nach Ablauf der 36 Stunden muss der Timer neu
automatisch in den Sektorwinkel 2. aktiviert werden.
Der Timer ist mit einem Beschleunigungssensor Bei Bedarf erlaubt ein aufsteckbarer Gleitschuh, den Regner
ausgestattet. Nach Einstellung des Timers befindet sich nach Ablauf der voreingestellten Zeit, von Sektor 1
dieser in Wartestellung und bleibt für 36 Stunden aktiv. in Kreisberegnungsfunktion "C" übergehen zu lassen.
Innerhalb dieser Zeit kann der Regner gestartet werden. Die Kreisberegnungsfunktion bleibt bis zum manuellen
Sobald Wasser durch den Regner fließt, dieser also mittels Entfernen des Gleitschuhs aufrecht.
Für folgende Anwendungen ist der Komet Inverter geeignet:
Anwendung "A" Anwendung "B" Anwendung "C"
Beregnung mit Beregnung mit normalem Beregnung mit
Anfangsinversion des Regners Einzug des Regners Anfangsinversion und
automatischen Übergang in
Kreisberegnung bis zum Ende
des Beregnungszyklus
20
20Funktionsweise & Positionen Deutsch
Invertergabel oben, zwischen Pfeilen von
Sektorscheiben 1
Der Regner arbeitet im Sektor 1,
wenn sich die Invertergabel in
Grundstellung zwischen den
oberen Sektorscheiben 1 befindet.
Invertergabel in Suchstellung liegt
mit Sektorschraube auf Sektorscheibe 2 auf.
Nach Ablauf des Timers, wird
ein Magnet gelöst, welcher
die Invertergabel löst und in
Suchstellung bringt.
Die Invertergabel fährt nun in
Suchstellung auf den unteren
Sektorscheiben entlang, bis sie
durch die Aussparung fällt, in
Position Unten einrastet, und im
Sektor 2 weiterarbeitet.
Invertergabel fällt durch Aussparung
der Sektorscheibe 2.
21Einstellung des Inverters für Anwendung "A" (Anfangsinversion) Deutsch
1. Sektor 1 einstellen
• Zum Einstellen des Sektors 1 (erster Sektor) lösen Sie • Wurde der gewünschte Sektor 1 eingestellt,
die obere Rändelmutter. Die Sektorscheiben 1 sind fixieren Sie die Rändelmutter oben von Hand (ohne
nun frei und können in die jeweilige Position gebracht Werkzeug).
werden.
• Sollte sich die Invertergabel in Grundstellung (siehe
ACHTUNG! Der eingestellte Sektorwinkel liegt Positionen Seite 21) außerhalb des Sektors 1 befinden,
immer zwischen den zueinander zeigenden Pfeilen. können Sie diese mit Kraft im Uhrzeigersinn drehen,
bis sie unterhalb des Pfeiles der Sektorscheibe 1
• Achten Sie dabei darauf, dass die Invertergabel
hindurchgeht. Danach Invertergabel gegen den
ZWISCHEN den zueinander zeigenden Pfeilen der
Uhrzeigersinn zurück in Grundposition bringen.
Sektorscheiben 1 liegt.
ACHTUNG! Die Invertergabel muss durch ein
Invertergabel liegt zwischen Pfeilen
fühlbares Einrasten wieder in ihre definierte
von Sektorscheiben 1
Position gebracht werden. Kontrollieren Sie ob die
Invertergabel tatsächlich eingerastet ist, indem Sie
erneut versuchen mit wenig Kraft die Invertergabel zu
verschieben.
2. Sektor 2 einstellen
• Zum Einstellen des Sektors 2 (zweiter Sektor) lösen Sie
die untere Rändelmutter. Die Sektorscheiben 2 sind nun
frei und können in die Position für den zweiten Sektor
gebracht werden.
• Rändelmutter per Hand fixieren.
• Kontrollieren Sie ob die Sektorscheiben 1 und 2 fixiert Rändelmutter
sind, indem Sie erneut versuchen beide zu verschieben.
Sektorwinkel 2
22
22Einstellung des Inverters für Anwendung "A" (Anfangsinversion) Deutsch
3. Invertergabel in Grundstellung bringen
• Um im Sektor 1 arbeiten zu können, muss die • Drücken Sie nun den Magnetknopf und drehen
Invertergabel in Grundstellung gebracht werden. gleichzeitig die Invertergabel gegen den
Dabei zeigt der obere Sektorfinger nach oben und ist Uhrzeigersinn bis der Magnetknopf einrastet.
blockiert. Kontrollieren Sie ob der Magnetknopf eingerastet
ist. Die Invertergabel darf sich bei leichter Kraft-
einwirkung nicht verdrehen lassen.
• Sollte sich die Invertergabel in Position Unten (siehe
Seite 21) befinden, gehen Sie wie folgt vor: Achten
Sie darauf, dass sich die Invertergabel zwischen den • Der Inverter befindet sich nun in der
zueinander zeigenden Pfeilen der Sektorscheiben 1 Ausgangsposition für die Anwendung "A".
befindet (fallweise müssen die Sektorscheiben 1 so
lange gedreht werden, bis die Invertergabel wieder Invertergabel
in Grundstellung
dazwischen positioniert ist). Bringen Sie die Inverter-
schaltung auf Position R (gegenüber des Timers).
Obere
Sektorscheiben 1
Position "R"
Timer
Untere
Sektorscheiben 2
• Kontrollieren Sie ob die Ausgangsposition korrekt
eingestellt wurde, indem Sie den Regner im Sektor 1
nach links und nach rechts drehen. Bei korrekter
Voreinstellung wird die Invertergabel beim Anschlag
an der Sektorscheibe nicht aus Ihrer Position
gebracht.
4. Timer einstellen
• Stellen Sie den Timer auf die gewünschte • Nach der Aktivierung hat der Timer eine Verzögerung
Beregnungszeit des Sektors 1 ein (Seite 26). von 60 Sekunden. In dieser Zeit startet der Countdown
NICHT, so dass der Benutzer den Regnerwagen
• Sobald der Timer aktiviert ist, bleibt er für 36 Stunden
verlassen kann, ohne den Timer auszulösen.
aktiv.
• Der Timer beginnt abzulaufen, sobald Wasser durch den
Regner fließt oder der Regner anderweitig bewegt wird.
23Einstellung des Inverters für Anwendung "B" (normaler Einzug) Deutsch
1. Sektor 2 einstellen
• Wird der Regner mit nur einem Sektorwinkel
betrieben, werden die untenliegenden
Sektorscheiben 2 verwendet.
• Rändelmutter unten lösen und
Sektorscheiben 2 in die gewünschte Position
bringen.
ACHTUNG! Der eingestellte Sektorwinkel
liegt zwischen den zueinander zeigenden
Pfeilen.
• Befindet sich die Invertergabel bereits in
der Position Unten, Invertergabel zwischen Invertergabel in Position Unten zwischen den zueinander
den zueinander zeigenden Pfeilen der zeigenden Pfeilen der Sektorscheiben 2.
Sektorscheiben 2 arretieren.
2. Invertergabel in Position Unten bringen
Sollte sich die Invertergabel in Grundposition (siehe Seite 21), • Nach ca. 1 Minute löst die Haltekraft des Magneten und
also nicht bereits in Position Unten befinden, wie folgt die Invertergabel wird frei (ein Klicken ist zu hören).
vorgehen.
• Den Regner nun gegen den Uhrzeigersinn drehen,
• Invertergabel in Grundposition muss zwischen den bis die Schraube am unteren Sektorfinger durch die
zueinander zeigenden Pfeilen der Sektorscheiben 1 Aussparung der Sektorscheiben 2 fällt.
liegen. Sektor 1 kann beliebig gewählt werden.
• Die Invertergabel ist nun in Position Unten fixiert und
• Sektorschaltung in Position L bringen – Sektorschaltung der Regner kann im Sektorwinkel 2 arbeiten.
muss neben Timer liegen.
Position "L"
Timer
• Kontrollieren Sie ob die Ausgangsposition korrekt
eingestellt wurde, indem Sie den Regner im Sektor 2
nach links und nach rechts drehen. Bei korrekter
• Timer auf 1 Minute stellen (Timereinstellung siehe Seite 26). Voreinstellung wird die Invertergabel beim Anschlag an
der Sektorscheibe nicht aus Ihrer Position gebracht.
• Timer durch Hinabdrücken und Loslassen des
Schwinghebels aktivieren und warten bis die Zeit
abgelaufen ist. Darauf achten, dass sich der Countdown erst
nach 60 Sekunden aktivieren lässt.
24
24Einstellung des Inverters für Anwendung "C" (Übergang in die Kreisfunktion) Deutsch
1. Sektor 1 einstellen
• Stellen Sie den Sektor 1 ein wie für Anwendung "A" • Achten Sie darauf, dass sich die Invertergabel in
(Seite 22), Abschnitt 1. Sektor 1 einstellen beschrieben. Grundstellung zwischen den zueinander zeigenden
Pfeilen des Sektors 1 befindet.
2. Gleitschuh aufschieben
• Um den Regner nach Sektor 1 in die
Kreisberegnungsfunktion übergehen zu lassen, muss
manuell der Gleitschuh auf die untere Sektorscheibe
aufgeschoben werden.
• Lösen Sie dazu die untere Rändelmutter und schieben
die beiden Sektorscheiben 2 soweit zueinander,
bis der aufgeschobene Gleitschuh die gesamte
Aussparung ausfüllt. Danach Rändelmutter unten
wieder fixieren.
• Der Gleitschuh bildet nun eine durchgängige Fläche
und verhindert, dass die Schraube am unteren
Sektorfinger durch die Aussparung fällt.
• Timer für Sektor 1 einstellen und aktivieren (Seite 26).
WICHTIG! Hat der Regner von Sektor 1 in die
Kreisfunktion gewechselt, bleibt diese so lange
aufrecht, bis der Gleitschuh manuell wieder entfernt
wird, ggf. bis zum Maschinen Stopp.
Sicherheitsfunktion der Invertergabel
Die eingebaute Sicherheitsfunktion der Invertergabel
soll vermeiden, dass bei großer Krafteinwirkung Schäden
am Sektorgestänge entstehen (z.B. durch Hin- und
Herschlagen des Regners während der Überstellung der
Beregnungsmaschine).
ACHTUNG! Wurde die Invertergabel mit Kraft aus ihrer
definierten Position gebracht, muss sichergestellt
werden, dass sie vor Inbetriebnahme des Inverters
wieder in ihre definierte Position zurückgebracht wurde.
Die Invertergabel hat nur eine definierte Position. In dieser
Position rastet die Nut der Invertergabel auf einem Stift ein.
25Timer einstellen, aktivieren und starten Deutsch
Ermittlung der Zeit bis zur Inversion
Im Normalfall wird solange gewartet, bis sichergestellt ist, dass der Regner nicht mehr über das Feld hinaus beregnet,
d.h. es muss mindestens die Zeit vergehen, welche benötigt wird um die Wurfweite R des Regners einzuziehen. Die
Einzugsgeschwindigkeit „v“ der Maschine in m/h (Meter/Stunde) und die Wurfweite „R“ (in Meter) des Regners sind bekannt.
Daraus ergibt sich folgende Formel:
Wurfweite Regner R (m)
Zeit t (min) = m * 60 + Verzögerungszeit Einzugsbeginn
Einzugsgeschwindigkeit v( h
)
Beispiel
Einzugsgeschwindigkeit der Maschine = 20 m/h - Wurfweite Regner = 60 m - Verzögerungszeit Einzugsbeginn = 15 min.
60
t= * 60 + 15 = 195 min
20
Einstellen des Timers
• Beliebige Taste so oft drücken, bis nur die Zahl auf der rechten Seite
blinkt. Dann die gewünschte Zeit (in Minuten) mit den Pfeiltasten
einstellen. Nachdem die Zeit eingestellt wurde, 4 Sekunden warten
bis das Display erlischt. Die eingestellte Zeit bleibt so lange ge-
speichert, bis sie geändert wird.
Aktivieren des Timers
• Die zuletzt programmierte Zeit bleibt gespeichert. Durch Drücken
einer beliebigen Taste wird der Timer auf Stand-By gesetzt. Auf der
linken Seite des Displays erscheint nun „S.“.
• Auf der rechten Seite blinkt die voreingestellte Zeit in Minuten. Der
Timer ist nun aktiviert und befindet sich für 36 Stunden im Stand-By
Modus.
Start des Countdowns
• Der Count-Down des Timers startet automatisch durch einen
eingebauten Beschleunigungssensor. Dieser wird durch eine
ruckartige Bewegung ausgelöst (zum Beispiel wenn Wasser durch den
Regner fließt).
• Der Punkt “.“ blinkt und die verbleibende Zeit erscheint auf der
rechten Seite des Displays. Nach Ablaufen des Count-Downs führt der
Regner die Inversion automatisch durch.
ACHTUNG! Der Timer ist sehr bewegungssensitiv. Ein
Herabspringen vom Regnerwagen beispielsweise kann den
Timer bereits auslösen. Vergewissern Sie sich vor Verlassen des
Regnerwagens, dass der Timer aktiviert aber noch nicht gestartet ist.
Funktionskontrolle
Sollten Sie die Funktion des Timers in nicht montiertem Zustand kontrollieren wollen, achten Sie bitte darauf, während des
Funktionstests den Timer vertikal zu halten. Eine horizontale Ausrichtung kann bereits den Beschleunigungssensor und
damit den Count-Down des Regners aktivieren.
26
26Batteriewechsel Deutsch
Im Falle von schwachen Batterien erscheint am Display des Timers das Symbol "b". Die Batterien sollten gewechselt werden.
Die verbauten Lithium-Ionen-Batterien sollten eine Lebensdauer von 6 Jahren haben.
Alternativ können auch handelsübliche 1,5V AA Batterien verwendet werden. Die Lebensdauer von handelsüblichen
Batterien beträgt im Schnitt 1 Jahr.
Um die Batterien zu wechseln, entfernen Sie den Deckel, tauschen die Batterien und bringen den Deckel wieder an (siehe
Seite 18).
Achten Sie beim Wechseln der Batterien darauf, dass keine Feuchtigkeit ins Gehäuse eindringt, ansonsten könnte die
Elektronik oxidieren.
27Sommario Italiano
29 Avvisi di sicurezza
30 Preparazione dell'irrigatore
31 Descrizione dei componenti
32 Applicazioni del Komet Inverter
33 Funzionamento & posizioni del Komet Inverter
34 Impostazione del Komet Inverter per applicazione "A" (inversione iniziale)
36 Impostazione del Komet Inverter per applicazione "B" (rientro normale)
37 Impostazione del Komet Inverter per applicazione "C" (funzione circolare)
37 Funzione di sicurezza della forcella Inverter
38 Timer: impostazione, attivazione e inizio conto alla rovescia
39 Cambio batterie
28
28Avvisi di sicurezza Italiano
IMPORTANTE!
Queste istruzioni d’uso devono essere consegnate all'operatore del dispositivo. Prima della messa in
servizio, l'operatore è obbligato a leggere queste istruzioni d'uso.
Tutte le istruzioni di sicurezza devono essere osservate e rispettate.
Queste istruzioni d’uso devono essere conservate per future consultazioni.
PERICOLO!
AVVERTENZE GENERALI PER L'USO DEGLI IRRIGATORI A LUNGA GITTATA
1. Non apportare regolazioni o eseguire controlli sull'irrigatore in funzione.
2. Non sostare nell'area di lavoro dell'irrigatore.
3. Non sostare nell'area del getto d'acqua ad alta pressione.
4. Assicurarsi che il getto d'acqua non sia rivolto a persone, linee elettriche, strade, case o altri oggetti.
5. Prima di mettere in funzione l'irrigatore, assicurarsi che non vi si trovino persone nell'area di lavoro dell'irrigatore.
PERICOLO!
AVVERTENZE PER LA MESSA IN FUNZIONE DEL KOMET INVERTER
1. Assicurarsi che gli angoli settore siano impostati correttamente prima di mettere in funzione l'irrigatore e che
l'irrigatore sia orientato correttamente per irrigare il primo angolo settore impostato.
2. Le frecce sui dischi settore devono essere rivolte l'una verso l'altra e la rispettiva leva della forcella Inverter deve
trovarsi tra le frecce.
3. Controllare che i dischi settore siano ben bloccati.
4. Controllare che il timer sia stato attivato però non abbia incominciato il conto alla rovescia.
5. Funzione di sicurezza della forcella Inverter, verificare che la forcella Inverter si trovi nella sua posizione di lavoro
definita.
6. Verificare stato batteria.
29Preparazione dell‘irrigatore Italiano
L'irrigatore viene consegnato con il timer non montato. L'utente dovrà montarlo prima della messa in funzione:
Appoggiare l’irrigatore sul fianco in modo che la staffa di Sbloccare il coperchio del timer inserendo un cacciavite
montaggio del timer sia rivolta verso l’alto. nelle apposite fessure. RUOTARE il cacciavite per sbloccare
il coperchio.
Fissare il timer con le 4 viti testa cava esagonale (M4x12). Riposizionare il coperchio e bloccarlo accuratamente con i
Assicurarsi che il connettore sia rivolto verso il basso. ganci per evitare infiltrazioni d’acqua nel timer.
A
B
Collegare il connettore con il timer ed avvitare bene. Muovere l’asta settore da sinistra a destra (A) e verificare
che il cavo (B) non sia sotto tensione.
30
30Descrizione dei componenti Italiano
Angolo settore 1
Dischi settore 1 (superiori)
Timer
Dado zigrinato
Cambio inversione
Innesto magnete
Pattino
Forcella Inverter Angolo settore 2
Dischi settore 2 (inferiori)
31Applicazioni del Komet Inverter Italiano
Il Komet Inverter (brevetto Komet) consente all'irrigatore di brusco viene rilevato dal sensore di accelerazione, come p.e.
operare in due angoli settore indipendenti. L'irrigatore inizia generato dall’irrigatore in funzione.
ad irrigare nell'angolo settore 1 e passa automaticamente
all'angolo settore 2 dopo il trascorrere di un tempo Dopo le 36 ore, il timer deve essere riattivato.
preimpostato.
Se necessario, un pattino applicabile consente all’irrigatore
Il timer è dotato di un sensore di accelerazione. Dopo di passare dal settore 1 alla funzione d'irrigazione circolare
avere impostato ed attivato il timer, esso rimane in attesa "C" dopo il trascorrere del tempo preimpostato. La funzione
dell'avvio dell’irrigatore per 36 ore. Il conto alla rovescia del d'irrigazione circolare rimane attiva fino alla rimozione
tempo impostato parte solamente quando un movimento manuale del pattino.
L'inverter Komet è adatto per le seguenti applicazioni:
Applicazione “A“ Applicazione “B“ Applicazione “C“
Irrigazione con inversione Irrigazione con rientro Irrigazione con inversione
iniziale dell’irrigatore. normale dell’irrigatore. iniziale e passaggio
automatico all'irrigazione
Gli angoli settore possono circolare fino alla fine del ciclo
essere liberamente scelti d'irrigazione.
senza vincoli.
32
32Funzionamento & posizioni del Komet Inverter Italiano
La forcella Inverter in posizione "alta"
in mezzo alle frecce dei dischi settore 1
L'irrigatore funziona nel settore 1
quando la forcella Inverter si
trova nella posizione di base tra
i dischi settore superiori 1.
La forcella Inverter in posizione di ricerca appoggia
con la vite sui dischi settore 2
Dopo lo scadere del timer, viene
attivato un magnete che libera
la forcella Inverter in modo
da potere essere portata in
posizione di ricerca.
La forcella Inverter scivola
sui dischi settore inferiori 2
fino a quando trova l’apertura
attraverso la quale cadrà in
posizione bassa. La forcella
Inverter viene bloccata nella
posizione bassa. L’irrigatore ora
continua a funzionare nell'angolo
settore 2.
La forcella Inverter cade attraverso l’apertura
dei dischi settore 2 in posizione "bassa"
33Impostazione del Komet Inverter per applicazione "A" (inversione iniziale) Italiano
1. Impostazione dell'angolo settore 1
• Per impostare l’angolo settore 1 (primo settore) • Una volta impostato l‘angolo settore 1 desiderato,
allentare il dado zigrinato superiore. I dischi settore 1 bloccare i dischi settore con il dado zigrinato
ora sono sbloccati e possono essere portati nella stringendo bene, a mano (senza ausilio di attrezzi).
desiderata posizione.
• Se la forcella Inverter si trovasse nella posizione di
ATTENZIONE! L'angolo settore impostato si trova
base (pagina 33) ma al di fuori dell’angolo settore 1, è
sempre tra le frecce che si puntano.
possibile forzare il dispositivo di sicurezza della forcella
• Assicurarsi che la forcella Inverter sia posizionata TRA Inverter ruotandola in senso orario fino a quando
le frecce, incise sui dischi settori 1, che si puntano. passa sotto le frecce dei dischi settore 1. Una volta in
posizione corretta riportare la forcella Inverter nella
posizione verticale, girandola in senso anti orario.
La forcella Inverter deve trovarsi
tra le frecce dei dischi settori 1 che si puntano ATTENZIONE! La forcella Inverter deve essere
riportata nella sua posizione base. Raggiunta questa
posizione si avverte uno scatto. Controllare che la
forcella Inverter sia effettivamente bloccata tentando
di spostarla con poca forza.
2. Impostazione dell’angolo settore 2
• Per impostare l’angolo settore 2 (secondo angolo
settore), allentare il dado zigrinato inferiore. I dischi
settore 2 possono ora essere portati in posizione per
definire l’angolo settore 2. L’angolo settore 2 si trova tra
le frecce che si puntano.
• Bloccare i dischi serrando il dado zigrinato.
Dado zigrinato
• Verificare nuovamente che ambo i dischi, settore 1 e
settore 2, siano ben bloccati.
Angolo settore 2
34
34Impostazione del Komet Inverter per applicazione "A" (inversione iniziale) Italiano
3. Portare la forcella Inverter in posizione base
• Per poter lavorare nel settore 1, la forcella Inverter • Premere ora l’innesto magnete e allo stesso tempo
deve essere portata nella posizione base. La leva ruotare la forcella Inverter in senso antiorario fino a
superiore della forcella Inverter punta verso l'alto e la quando il pulsante del magnete si innesta. Controllare
forcella Inverter rimane bloccata in questa posizione. che l’innesto magnete sia ben inserito. La forcella
Inverter deve rimanere bloccata nella posizione alta.
• Se la forcella Inverter è in posizione abbassata
(pagina 33), procedere come segue: Assicurarsi che • L'inverter è ora posizionato per operare con
la forcella Inverter si trovi tra le frecce dei dischi l’applicazione "A".
settore 1 superiori. Spostare l’asta settore a destra in
posizione R (opposto al timer). Forcella Inverter
nella posizione di base
Posizione "R"
Dischi settore 1
(superiori)
Timer
Dischi settore 2
(inferiori)
• Controllare che l’angolo settore iniziale sia stato
impostato correttamente ruotando l'irrigatore a
sinistra e a destra. Verificare che la forcella Inverter
sia posizionata correttamente nella posizione di base
(pagina 33). Verificare che la forcella Inverter sia
bloccata e l’innesto magnete è tutto inserito.
4. Impostazione Timer
• Impostare il tempo fino all’inversione dell’irrigatore • Dopo l'attivazione il timer ha un ritardo di 60 secondi.
compreso un eventuale tempo di ritardo prima d'iniziare Durante questo tempo il conto alla rovescia NON si avvia,
l'avvolgimento del tubo (pagina 38). permettendo all'utente di scendere dal carrello senza
attivare il timer.
• Dal momento dell’attivazione del timer esso rimane
attivo per 36 ore. • Il timer incomincia il conto alla rovescia dal momento
che passa acqua attraverso l’irrigatore oppure con un
movimento brusco dell’irrigatore.
35Impostazione del Komet Inverter per applicazione "B" (rientro normale) Italiano
1. Impostazione dell'angolo settore 2
• Se l'irrigatore viene utilizzato con un solo
angolo settore, è consigliabile utilizzare i
dischi settore 2 (inferiori).
• Allentare il dado zigrinato di bloccaggio
dei dischi settore 2 (inferiori) ed impostare
l’angolo settore 2 desiderato.
ATTENZIONE! L'angolo settore impostato
si trova sempre tra le frecce che si
puntano l’una con l’altra.
• Se la forcella Inverter si trova già in
posizione bassa, assicurarsi che la forcella La forcella Inverter in posizione bassa tra le frecce
Inverter sia posizionata e bloccata tra le dei dischi settore 2 che si puntano.
frecce dei dischi di settore 2.
2. Portare in posizione bassa la forcella Inverter
Se la forcella Inverter si trova nella posizione di base • Dopo circa 1 minuto, il magnete rilascia la forcella
alta (pagina 33) e non ancora nella posizione bassa, Inverter in modo che essa non sia più bloccata (si sente
procedere come segue: un clic).
• La forcella Inverter in posizione di base si troverà tra le • Girare l’irrigatore in senso anti orario fino a quando
frecce dei dischi settore 1. la vite cade attraverso l’apertura dei dischi settore 2
(inferiori).
• Spostare l’asta settore a sinistra in posizione L (vicino
al timer). • La forcella Inverter è ora bloccata in posizione bassa e
l'irrigatore è pronto per lavorare nell'angolo settore 2.
Posizione "L"
Timer
• Verificare che l’angolo settore 2 sia impostato
• Impostare il timer a 1 minuto (pagina 38). correttamente ruotando l'irrigatore a destra e a
sinistra.
• Attivare il timer con un brusco movimento dell'irrigatore
ed attendere fino allo scadere del tempo. Considerare
che il conto alla rovescia può essere attivato solo dopo
60 secondi.
36
36Impostazione del Komet Inverter per applicazione "C" (funzione circolare) Italiano
1. Impostazione dell‘angolo settore 1
• Impostare l’angolo settore 1 come descritto per • Assicurarsi che la forcella Inverter si trovi nella
l'applicazione "A" (pagina 34), Punto 1. Impostazione posizione di partenza tra le frecce del settore 1 che si
dell'angolo settore 1 puntano l’una col'altra.
2. Applicare il pattino
• Per passare al modo d'irrigazione circolare dopo
l’inversione dall’angolo settore 1, bisogna apportare il
pattino sul disco settore inferiore 2.
• Per fare ciò, allentare il dado zigrinato di bloccaggio dei
dischi settore 2 (inferiori). Spostare i dischi in modo da
permettere al pattino di riempire l’apertura nel disco.
Quindi fissare nuovamente i dischi settore 2 con il dado
zigrinato.
• Il pattino forma ora una superficie continua ed
impedisce che la forcella Inverter possa cadere
attraverso l’apertura nel disco settore.
• Impostare il timer per settore 1 ed attivarlo (pagina 38).
IMPORTANTE! Se l'irrigatore è passato dall’angolo
settore 1 alla funzione d’irrigazione circolare, questo
modo di funzionamento circolare rimane attivo fino a
quando non si rimuove manualmente il pattino dagli
anelli settore 2.
Funzione di sicurezza della forcella Inverter
La funzione di sicurezza integrata nella forcella Inverter è
progettata per evitare danni al leveraggio settore in caso di
urti sulla forcella Inverter che possono avvenire p.e. durante
lo spostamento della macchina semovente.
ATTENZIONE! Se la forcella Inverter è stata forzata
dalla sua posizione predefinita, è necessario assicurarsi
che essa sia stata riportata nella posizione predefinita
prima di mettere in funzione l’irrigatore.
La forcella Inverter ha una sola posizione predefinita. In
questa posizione, la scanalatura della forcella Inverter si
impegna su un perno.
37Timer: impostazione, attivazione e inizio conto alla rovescia Italiano
Determinazione del tempo fino all‘inversione
Normalmente il tempo impostato minimo è il tempo necessario per avvolgere la distanza/gittata dell’irrigatore più
eventualmente un tempo di ritardo iniziale di avvolgimento. La velocità “v” di rientro della macchina in m/h (metri/ora) e la
gittata “R” (metri) dell’irrigatore sono noti. Da qui si deduce la formula:
Gittata irrigatore R (m)
Tempo t (min) = m * 60 + evtl. tempo ritardo avvolgimento
Velocità di rientro v( h )
Esempio
Velocità di rientro tubo = 20 m/h - Gittata irrigatore = 60 m - Tempo ritardo avvolgimento = 15 min
60
t= * 60 + 15 = 195 min
20
Impostazione del tempo
• Premere un tasto più volte fino a quando lampeggia solamente il
numero sul lato destro. Ora impostare il tempo desiderato con i tasti.
Dopo avere impostato il tempo, attendere 4 secondi, dopo di che il
display si spegnerà. Il tempo impostato resta memorizzato fino a
quando non verrà modificato.
Attivazione del timer
• Il tempo per ultimo impostato rimane sempre memorizzato. Premere un
tasto per attivare il timer. Sul lato sinistro del display apparirà la lettera
"S" ed un punto "."
• Sul lato destro del display lampeggerà il tempo impostato. Il timer ora è
attivato e rimane in modo stand-by per 36 ore.
Avvio del conto alla rovescia (Countdown)
• Il conto alla rovescia viene avviato automaticamente per via di un
accelerometro integrato nel timer. Inizia nel momento che passa acqua
attraverso l’irrigatore oppure sente un brusco movimento.
• Una volta avviato il timer, il punto “.” lampeggia ed il tempo rimanente
appare sulla destra del display. Dopo lo scadere del tempo l’irrigatore
esegue automaticamente l’inversione.
ATTENZIONE! L’accelerometro è molto sensibile. Anche oscillazioni
del carrello portairrigatore, per esempio saltando dal carrello
portairrigatore dopo avere attivato il timer, possono innescare il conto
alla rovescia. Prima di allontanarsi dall’irrigatore, assicurarsi che il timer
sia attivato, però non abbia ancora iniziato il conto alla rovescia.
Controllo funzione del timer
Se si desidera controllare la funzione del timer singolo non montato sull’irrigatore, assicurarsi di tenerlo in verticale e
di appoggiarlo su una superficie solida per evitare di fare già partire il conto alla rovescia quando si preme un tasto per
attivare il timer.
38
38Cambio batterie Italiano
Quando le batterie stanno per scaricarsi sul display appare il messaggio “b”, che indica batterie quasi esaurite. A questo
punto le batterie sono da sostituire.
Le batterie montate sono ai ioni di litio e dovrebbero avere una durata di 6 anni.
Al posto di batterie ai ioni di litio si possono usare anche normali batterie AA da 1,5V. Si consiglia di sostituire questo tipo di
batteria ogni anno.
Per la sostituzione delle batterie, rimuovere il coperchio, sostituire le batterie e riagganciare il coperchio (pagina 30).
Prestare attenzione a non introdurre acqua all’interno del contenitore in quanto causerebbe ossidazione dei componenti
elettronici.
39Sommaire Français
41 Consignes de sécurité
42 Préparation de l'arroseur
43 Description des composants
44 Application
45 Fonctionnement & positions de l'Inverter
46 Réglage de l'Inverter pour application "A" (inversion initiale)
48 Réglage de l'Inverter pour application "B" (retrait normal)
49 Réglage de l'Inverter pour application "C" (passage en mode circulaire)
49 Dispositif de sécurité de la fourche Inverter
50 Paramétrer, activer et démarrer le compteur
51 Changement de pile
40
40Consignes de sécurité Français
IMPORTANT !
Ce mode d'emploi doit être transmis à l'opérateur de ce produit. Avant la mise en service, l'opérateur doit
lire attentivement ce mode d'emploi. Les consignes de sécurité doivent être rigoureusement suivies.
Ce mode d'emploi est à conserver.
DANGER !
CONSIGNES DE SECURITE GENERALES POUR LES ARROSEURS A GRANDE PORTEE
1. Ne faire aucun réglage ou contrôle lorsque l'arroseur fonctionne.
2. Rester en-dehors de l'aire couverte par l'arroseur.
3. Se tenir à l'écart du jet d'eau à haute pression.
4. S'assurer que le jet d'eau n'est pas orienté en direction de personnes, de lignes à haute tension, de rues, de
maisons ou de tout autre objet.
5. Avant de mettre en marche l'arroseur, vérifier que personne ne se trouve dans la surface d'arrosage.
DANGER !
CONSIGNES DE SECURITE POUR L'UTILISATION DE L'INVERTER KOMET
1. Avant la mise en marche de l'arroseur, assurez-vous que les angles secteurs sont réglés correctement et que
l'arroseur est orienté correctement pour l'arrosage du premier angle secteur.
2. Les flèches sur les disques secteurs doivent pointer l'une vers l'autre et la fourche Inverter doit se trouver entre
elles.
3. Vérifiez que les disques secteurs sont bien bloqués.
4. Vérifiez que le compteur est activé, mais qu'il n'a pas encore démarré.
5. Dispositif de sécurité de la fourche Inverter – vérifiez que la fourche Inverter est enclenchée dans la position
définie.
6. Vérifiez l'état de la pile.
41Préparation de l'arroseur Français
Le compteur de l'Inverter Komet n'est pas prémonté et doit donc être installé sur l'arroseur avant la mise en service de celui-ci :
Mettre l'arroseur sur le côté. Déverrouiller le couvercle du compteur à l'aide d'un
tournevis plat et le retirer EN TOURNANT le tournevis.
Monter le compteur à l'aide des quatre vis Allen fournis Réinstaller le couvercle et le verrouiller.
(M4x12). La prise doit être tournée vers le bas.
A
B
Brancher la prise et serrer la vis. Déplacer l'Inverter de la gauche vers la droite (A), en
vérifiant que le câble (B) n'est pas tendu.
42
42Description des composants Français
Angle secteur 1
Disque secteur supérieur 1
Compteur
Écrou moleté
Corps Inverter
Bouton aimant
Patin de guidage
Fourche Inverter Angle secteur 2
Disque secteur 1nférieur 2
43Application Français
L'Inverter Komet breveté permet à l'arroseur de fonctionner l'arroseur, le mouvement active le compteur, et la durée
dans deux secteurs indépendants l'un de l'autre. L'arroseur paramétrée commencer à s'écouler.
commence son travail dans l'angle secteur 1 et après que la
Une fois que les 36 heures se sont écoulées, le compteur
durée impartie à l'aide du compteur est écoulée, se tourne
doit être à nouveau activé.
automatiquement vers l'angle secteur 2.
Si nécessaire, un patin de guidage amovible peut être installé
Le compteur est équipé d'un accéléromètre. Une fois que afin que l'arroseur, après que la durée impartie est écoulée,
le compteur a été paramétré, il se met en mode veille et puisse passer du secteur 1 à l'arrosage circulaire "C".
reste actif pendant 36 heures. L'arroseur peut commencer Ce mode circulaire reste actif tant que le patin de guidage
son travail dans ce laps de temps. Dès que l'eau arrive dans amovible n'a pas été retiré manuellement.
L'Inverter Komet est conçu pour les applications suivantes :
Application "A" Application "B" Application "C"
Arrosage avec inversion Arrosage avec retrait normal Arrosage avec inversion
initiale de l'arroseur de l'arroseur initiale et passage à l'arrosage
circulaire jusqu'à la fin du
cycle d'arrosage
44
44Fonctionnement & positions de l'Inverter Français
Fourche Inverter en position haute,
entre les flèches des disques secteur 1
L'arroseur fonctionne dans le
secteur 1 si la fourche Inverter
est dans sa position initiale,
entre les disques secteurs
supérieurs 1.
La fourche Inverter est en position de recherche,
avec la vis secteur placée sur le disque secteur 2
Après le décompte du compteur,
un aimant se détache, va
déverrouiller la fourche Inverter
et la mettre en mode recherche.
La fourche Inverter se déplace
alors en mode recherche le long
des disques secteurs inférieurs,
jusqu'à ce qu'elle tombe dans
l'encoche et se mette en position
basse, afin de continuer de
fonctionner en secteur 2.
La fourche Inverter tombe dans l'encoche
du disque secteur 2
45Réglage de l'Inverter pour application "A" (inversion initiale) Français
1. Régler le secteur 1
• Afin de régler le secteur 1 (premier secteur), desserrez • Une fois le secteur 1 choisi, resserrez l'écrou moleté à
l'écrou moleté du haut. Les disques secteurs 1 sont la main (sans outil)
alors débloqués et peuvent être mis dans la position
• Si la fourche Inverter se trouve en-dehors du secteur 1
désirée.
dans sa position initiale (voir les positions page 45),
ATTENTION ! L'angle secteur choisi se trouve vous pouvez la forcer à revenir sous la flèche du
toujours entre les flèches pointant l'une vers l'autre. disque secteur 1 en la tournant précautionneusement
dans le sens des aiguilles d'une montre. Ramener
• Vérifiez que la fourche Inverter se trouve ENTRE les
ensuite la fourche secteur en position initiale en la
flèches des disques secteurs 1 qui pointent l'une vers
tournant dans le sens contraire des aiguilles d'une
l'autre.
montre.
La fourche secteur se trouve entre les flèches
des disques secteurs 1. ATTENTION ! Un clic signifie que la fourche
Inverter a été ramenée dans sa position intiale.
Vérifiez que la fourche Inverter est effectivement
enclenchée en essayant à nouveau de la déplacer
doucement.
2. Régler le secteur 2
• Afin de régler le secteur 2 (second secteur), desserrez
l'écrou moleté du bas. Les disques secteurs 2 sont
alors débloqués et peuvent être mis dans la position
désirée.
• Serrer l'écrou à la main (sans outil).
• Vérifiez que les disques secteurs 1 et 2 sont bloqués Écrou moleté
en essayant de les déplacer.
Angle secteur 2
46
46You can also read