IOS USER'S MANUAL FOR THE CAMRANGER 2 - CAMRANGER, 2019 US PATENT 9712688
←
→
Page content transcription
If your browser does not render page correctly, please read the page content below
iOS User’s Manual for the CamRanger 2

© CamRanger, 2019
US Patent 9712688          11/09/19                1
Hardware ........................................................................................................4
   Device ........................................................................................................... 4
   Battery ..........................................................................................................5
   WiFi ...............................................................................................................6
   SD Card ........................................................................................................6
   Antennas.......................................................................................................6
Configuration..................................................................................................6
   Web GUI .......................................................................................................6
   Network ........................................................................................................7
   WiFi ...............................................................................................................7
   System ..........................................................................................................8
   Sharing (Direct) .............................................................................................9
Setup .............................................................................................................10
CamRanger 2 App ........................................................................................11
   Connection Screen .....................................................................................12
   Main Screen................................................................................................13
   Status Bar ...................................................................................................13
   Recent Thumbnails .....................................................................................14
   Main Image View ........................................................................................14
       Captured Image .............................................................................................. 14
       Live View Stream .............................................................................................15
       Camera Properties ..........................................................................................16
       Camera Actions...............................................................................................17
   HDR/Advanced Bracketing Tab.................................................................. 18
   Timer Tab ....................................................................................................19
   Focus Tab ...................................................................................................21
       Focus Adjustments .........................................................................................21
       Focus Stacking ...............................................................................................21
       Advanced Focus Stacking ..............................................................................22
   Card Contents ............................................................................................ 23
   Settings.......................................................................................................24
       Image and Live View Overlays ........................................................................24

© CamRanger, 2019
US Patent 9712688                                            11/09/19                                                      2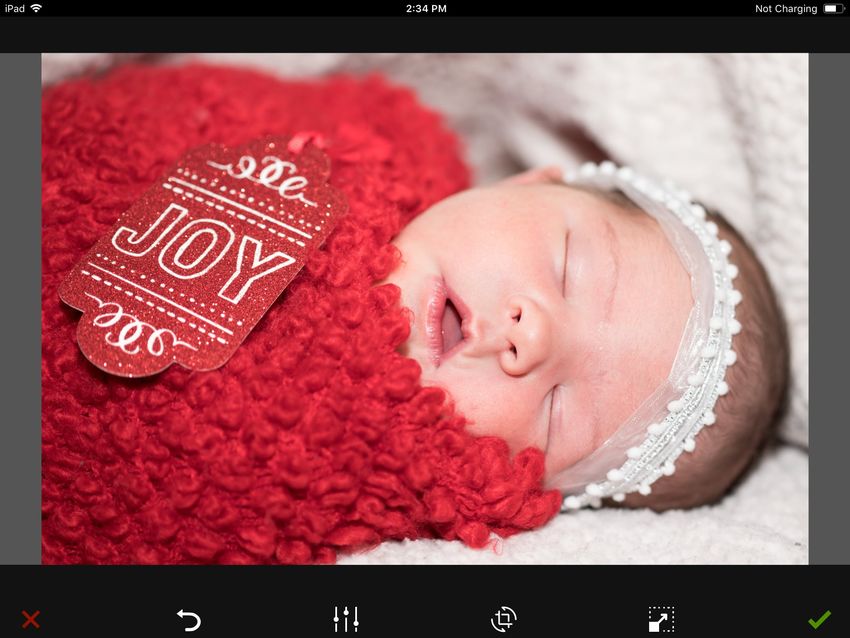
Image Editing..............................................................................................30
  Image Sharing and Transfer........................................................................31
SD Card Access ...........................................................................................32
  Web Viewer .................................................................................................32
  SMBFS / Samba Share ..............................................................................33
PT Hub & MP-360 Tripod Head ...................................................................33
  PT Hub Hardware .......................................................................................33
  MP-360 Motorized Tripod Head Hardware ................................................ 34
       Specifications ..................................................................................................34
  Setup ..........................................................................................................35
  App Additions with the PT Hub and Tripod Head ......................................36
Camera Setup ...............................................................................................36
  Canon ......................................................................................................... 36
  Nikon ..........................................................................................................37
  Sony............................................................................................................37
  Fujifilm ........................................................................................................38
Tips & Troubleshooting ................................................................................38
  Connection .................................................................................................39
  Performance ...............................................................................................39
  Images ........................................................................................................39
Important Information .................................................................................41

© CamRanger, 2019
US Patent 9712688                                            11/09/19                                                        3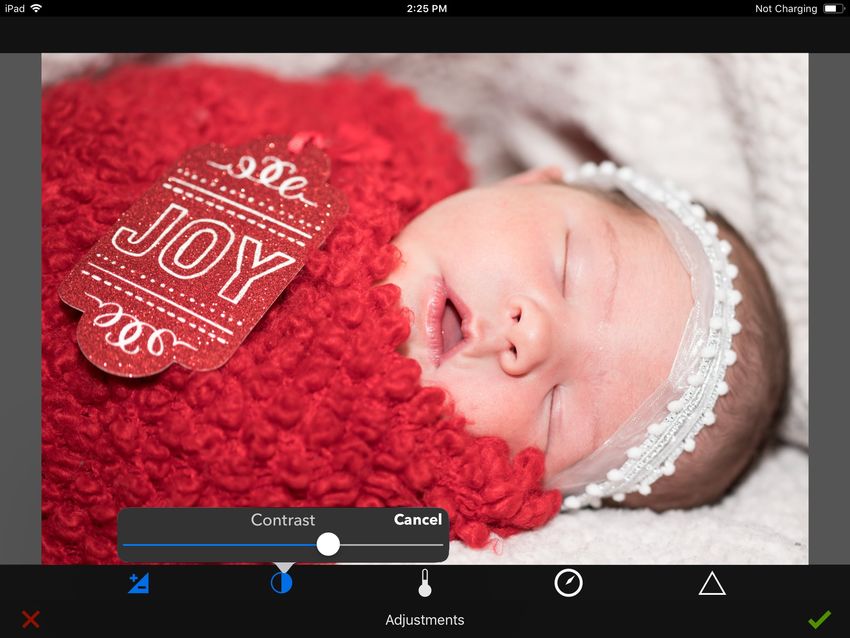
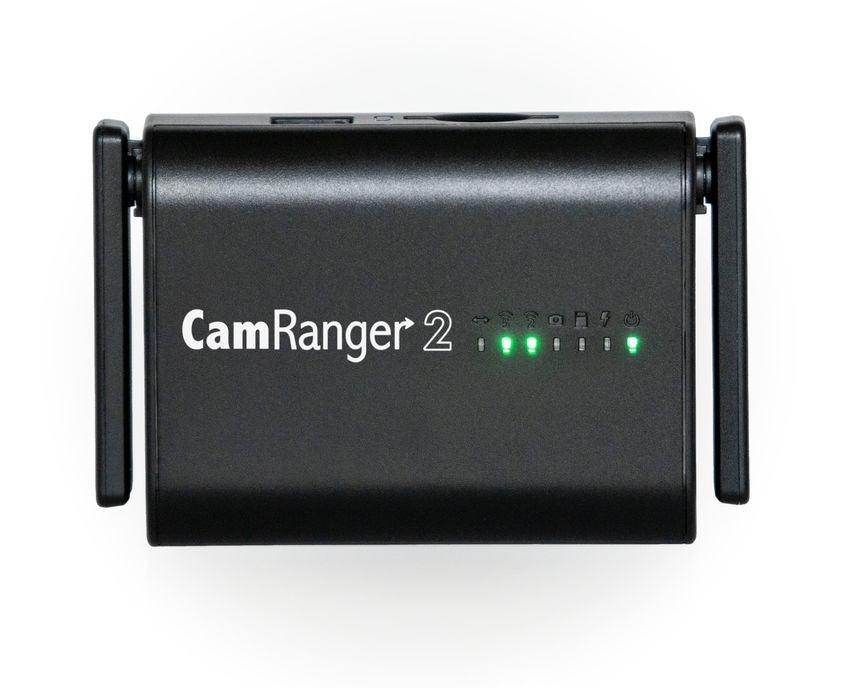
Hardware

Device

1. Ethernet Port
2. Reset Button - Press and hold to reset device to factory settings.
3. Battery Compartment - Refer to the battery section for more information.
4. LEDs

5. Charging Port - Charge with a USB micro cable.
6. Power Switch - Press to turn on, press and hold 1-2 seconds to turn off. Press and hold
   15 seconds to force power off.
7. SD Card Port - SD/SDHC/SDHX compatible - required for Sony and Fuji
8. USB Port - Connect camera with appropriate USB cable
9. 1/4” 20 Socket (not pictured) - located on bottom on device for attachment to hot shoe
   adapter, L-bracket, quick release plate, etc.

The CamRanger 2 is not water resistant and should not get wet.

© CamRanger, 2019
US Patent 9712688                          11/09/19                                         4
Battery
The CamRanger 2 battery is a rechargeable, replaceable 3400 mAh lithium ion battery. The
battery is accessed by removing the battery compartment on the bottom of the CamRanger.
The battery is marked with a positive (+) and negative (-) end and the battery must be inserted
in the proper orientation, matching the diagram in the battery compartment.

One method to ease in removal of the battery is to push the battery down against the spring
with a spring or finger and then use the corner of the battery compartment cover at the top of
the battery to pop out the battery.

The battery lasts about 5-6 hours in normal usage. The number and range of wireless
connections as well as how much data is being transmitted are the largest factors in battery
life.

The battery can be charged in the CamRanger 2 using a micro USB cable. 5V 2A input is
ideal. Lower current input can be used, but charging may take longer. While charging the
charging light will turn orange. If there
is a failure during charging, the
orange LED will blink. The battery can
also be charged outside of the
CamRanger 2 using the charger
available from CamRanger.com.

The CamRanger 2 battery is designed
with a number of safety features.
However, care must still be used
when using or storing batteries. It is
important to follow these precautions:

© CamRanger, 2019
US Patent 9712688                           11/09/19                                           5
WiFi
The CamRanger 2 creates two WiFi networks: 2.4 GHz (802.11n) and 5 GHz (802.11ac).
Typically the 5GHz network will be much faster and is usually the best choice. However,
depending on various external factors, the 2.4 GHz network can have better range.

The CamRanger 2 has two external, adjustable antennas. At close distances, the antenna
positioning typically has very little impact on performance. However, at longer distances, the
orientation can make a difference. In general, performance may be better if the antennas are
perpendicular to the user’s wireless device.

SD Card
The CamRanger 2 has a slot for SD/SDHC/SDXC cards. An SD card is required when using a
Sony or Fuji camera, when performing direct image sharing, or workflows that save images to
the CamRanger 2’s SD card.

Antennas
Generally the position of the antennas it not very important. However, when trying to
maximize range, antenna placement could make a difference. Please use care not to bend or
break the antennas and to always store the CamRanger 2 with the antennas folded down.

Configuration

Web GUI
The CamRanger 2 can be configured using the web GUI. To access, first connect to the
CamRanger 2 network, and then use a web browser to navigate to http://192.168.82.1. Enter
the default password of admin and click “Login”.

For normal operations it is not necessary to change any settings. However, advanced users
are able to make significant changes and customization. Please also note that many of these
changes require the network or WiFi connection to be reset. So the connection to the Web
GUI may be temporarily lost when making updates.

© CamRanger, 2019
US Patent 9712688                          11/09/19                                              6
Network
The network tab displays general network
and Ethernet settings. The user can change
the IP address, enable or disable the DHCP
server, and change the Ethernet port mode
to LAN or WAN. The MAC address is also
displayed.

For nearly all circumstances, LAN is the
correct Ethernet port mode. WAN can be
used when the CamRanger 2 is connected
to an existing router with an Ethernet cable.
The CamRanger 2 will then be able to be assigned an IP address from the existing router.

WiFi
The WiFi tab allows the user to configure the wireless networks.

© CamRanger, 2019
US Patent 9712688                           11/09/19                                       7

The country dropdown should be set to the user’s location. This will ensure that the proper
WiFi channels are available.

The available settings are the same for the 2.4 GHz and 5 GHz and are listed side by side.
Generally “auto” should be selected for the channel. However, this may be overridden to use
a specific channel. Additionally, this value will be locked to a particular channel if the network
is bridged into an existing network.

The CamRanger 2 can join into an existing WiFi network by configuring a client network. This
can be useful for scenarios where the user wants to use the CamRanger 2 and also access an
existing network, particularly when the existing network has Internet access. The CamRanger
2 can then be used from the normal CamRanger 2 network as well as the existing network.
The CamRanger 2 will continue to attempt to rejoin this network upon start up.

To join an existing WiFi network, press the “Configure” button for the appropriate network
frequency and follow the prompts. If the CamRanger 2 has properly joined the WiFi network,
the network name, status, and assigned IP address will be listed. To disconnect from the
existing network, press the “Disable” button.

System
The system tab displays various battery and
system level information and settings.

The firmware version is listed as well as
options to upgrade the firmware or reset
back to factory defaults. It is important to
only upgrade the firmware with CamRanger
provided firmware files.

The current device configuration can be
saved and then later re-applied, by using the

© CamRanger, 2019
US Patent 9712688                              11/09/19                                          8
“Upload” and “Archive” buttons. The Archive button will download a zipped file of the device
settings. The Upload file can then be used to select one of these zipped files and apply the
saved settings.

Basic battery statistics are also listed. These values are approximate, though the more charge
and discharge cycles the battery does without being removed, the more accurate it will be.
Diagnostic battery statistics can also be displayed.

Sharing (Direct)

The CamRanger 2 is typically used with the CamRanger 2 application. However, there are a
couple options for transferring images without using the CamRanger software: printing with a
DNP wireless print server, or uploading to an FTP server.

Both methods and transferring images require an SD card and for the CamRanger to able to
communicate with DNP or FTP server. Typically this requires bridging into an existing network
as detailed in the WiFi configuration section.

© CamRanger, 2019
US Patent 9712688                           11/09/19                                           9
Setup

• Set up the camera
Depending on the camera and workflow, it may be necessary to adjust camera settings.
Please refer to the appendix at the end of this document for more details.

• Charge CamRanger 2
Charge the CamRanger 2 battery as described in the battery section.

• Download the CamRanger 2 app
The CamRanger 2 is downloaded from the Apple App Store on your iPad/
iPhone. The easiest way to find it is to search “CamRanger 2” within the App
Store app.

The CamRanger 2 app requires iOS 9+.

• Connect the camera to the CamRanger 2
Connect the camera to the CamRanger 2 using the appropriate type of USB cable. An angled
USB mini cable is provided, which works for many cameras. However, some cameras use
different cable types. The camera came with the correct cable, or another cable can be
purchased.

The CamRanger 2 should not be allowed to hang from the camera by the USB cable. The
USB cable connections should not be stressed. The CamRanger 2 can be attached using the
provided hot shoe adapter and 1/4” 20 mount. The mount can also be used to connect to a
quick release clamp allowing attachment to a plate or L-bracket. Quick release clamps are
available at CamRanger.com.

The camera may need to be configured to allow the CamRanger 2 to communicate with it via
USB. Often in-camera WiFi must be disabled. Additionally, some cameras have a USB mode/
connection that must be set to PTP/PC Remote.

© CamRanger, 2019
US Patent 9712688                          11/09/19                                         10
If possible, any USB battery charging feature on the camera should be disabled. If it cannot or
is not disabled, the CamRanger battery life will be much less.

• Connect to the CamRanger 2 WiFi network
Turn on the CamRanger Mini and wait about 30-45 seconds for the device to initialize. When it
is ready both 2.4 GHz and 5 GHz WiFi lights will turn on.

Go to the Settings on the iPad/iPhone and go to the WiFi settings. Select and join the WiFi
network “CamRanger-___” where the last three characters in the CamRanger serial code are
listed followed by “2.4” or “5” designating the 2.4 or 5 GHz network. In general, the 5 GHz
network should be used, though the 2.4 GHz network may
have better range. The WiFi password is the CamRanger 2
serial code in all CAPS. To the right is an example of what
your password will look like.

• Launch app
Ensure the camera is turned on and awake and launch the CamRanger 2 app.

CamRanger 2 App
Note: the CamRanger 2 app supports the iPad, iPhone, and iPod Touch running iOS version
9+. The layout of the app will vary slightly based on the device and orientation. However, only
a single device and orientation will be displayed here.

© CamRanger, 2019
US Patent 9712688                          11/09/19                                           11
Connection Screen
The connection screen appears after launching the application. The current WiFi network is
displayed below the Connect button. The iOS device must be connected to the CamRanger 2
WiFi network, so the network must be listed as the CamRanger-*. The only exception is for
advanced users who have bridged the CamRanger 2 into an another WiFi network.
At the bottom of the screen are three buttons: Cached Images, View Ratings, and Settings.

The Cached Images button will show the user thumbnails for all images that are currently
saved in the temporary cache. The thumbnails can be double tapped to view the full
resolution image. Viewing cached images should not be relied upon for viewing old images.
However, it can be useful for quickly viewing recent images without being connected to the
CamRanger and camera. It should be noted that if an image was not viewed previously then it
will not be available in the cache.

The View Ratings button will show a listing of images that have been rated on this particular
device. A listing of the ratings can also be exported via email. Please see the Ratings section
for more information on the ratings system.

The Settings button will bring up the Settings
screen (see the Settings section for more details).
Note that a connection has not been made with the
CamRanger at this point so some settings may not
be available.

After ensuring the camera is on, awake, and
connected to the CamRanger 2 with a USB cable,
press "Connect" to connect to the CamRanger 2
and begin a session. Please see the
troubleshooting appendix if there are difficulties
connecting.

© CamRanger, 2019
US Patent 9712688                           11/09/19                                            12
Main Screen
After successfully connecting in the app, the main camera control screen will be displayed.

Status Bar
The topmost line of the status bar shows the camera’s battery life, camera name, and number
of shots available on the camera’s removable media using the current settings. Note that not
all cameras will provide the number of shots remaining.

The bottom line shows the CamRanger 2 battery life, the CamRanger 2 SD card status, and if
present, the available space on the SD card.

The gear button the right will open the app settings. The settings are covered in depth in
Settings section.

The exposure icon to the left of the settings button
accesses the camera presets list. The user can save the
camera’s current settings and then change back to those
settings at a later time. Note that particular presets may
no longer be valid in all situations. For example, if a
Canon camera was in Manual auto exposure mode when
the presets were saved, the saved shutter speed will not
be able to be set if the camera has been changed to
Aperture Priority mode.

© CamRanger, 2019
US Patent 9712688                            11/09/19                                         13
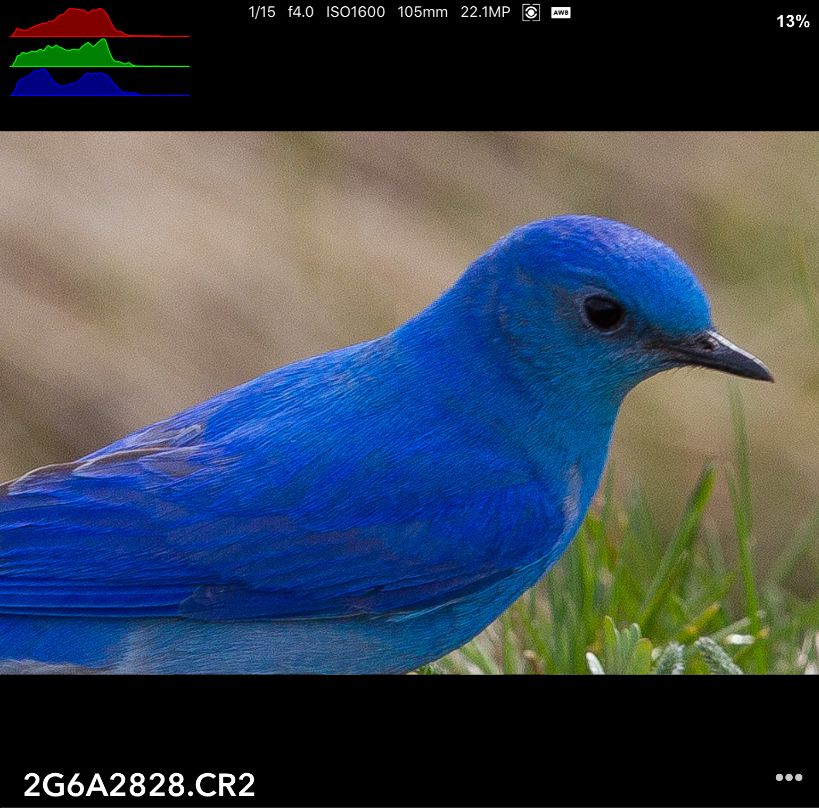
Recent Thumbnails
As images are captured, the thumbnails are automatically displayed along the top of the
screen. RAW images will have a small red R icon at the top right. Video files will have a small
blue video icon. JPG images will have no icon. If an image is captured in both RAW and JPG
format, only the JPG thumbnail will be displayed.

Selecting a thumbnail will download the image to be displayed at full resolution. Selecting a
RAW file will the download and display the JPG version embedded in the RAW. The resolution
is the same, but it is compressed compared to the RAW.

Video files can either be streamed or directly downloaded to the device’s photo library. This is
configured within the app settings. Depending on compression and resolution settings and
the WiFi speed, downloads can be very time consuming. However, it can be a convenient
feature to check a short clip or a view a small portion.

Main Image View
The main image view displays both
captured images and the live view stream.

Captured Image
The picture to the right shows a captured
image with a number of overlays. These
and other overlays can be toggled on or off
from within the the settings. Images first
display at a "fit to window" size. The
image's scale percentage is shown at the
top right. Images may be zoomed in and
out with a two finger pinch or double
tapping. The maximum zoom is 200%.

Images are oriented as the camera orients them. Typically the camera will have the option to
configure the orientation of portrait images.

© CamRanger, 2019
US Patent 9712688                            11/09/19                                           14
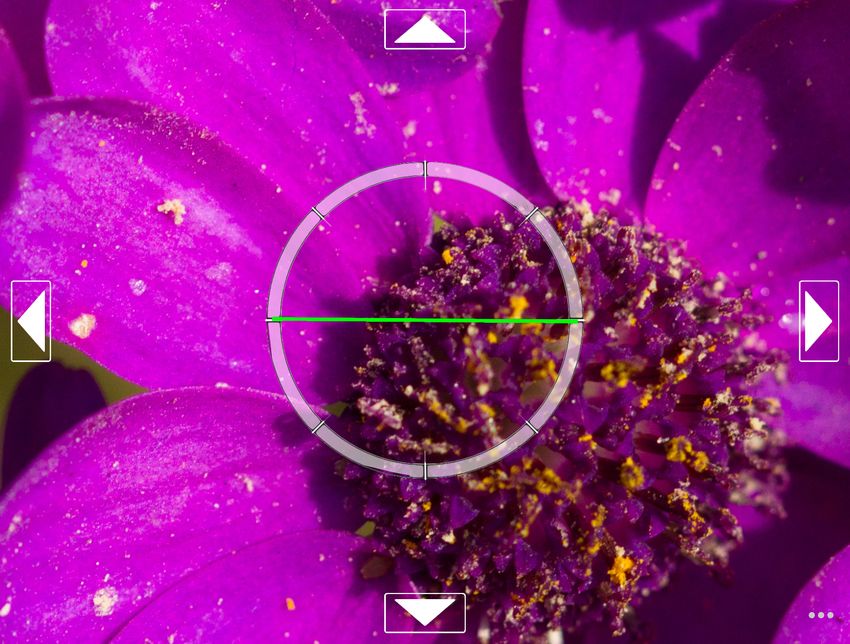
The “…” button at the bottom right displays options based on the context. When viewing a
captured image, the options will be: Toggle Full Screen, Share, Edit, Rate, and Delete.
Toggling full screen will expand and shrink the image view to take up the full screen or resume
its normal position. Selecting Delete will prompt the user to confirm the deletion of the image
from the camera’s memory card. Selecting Share will bring up the file sharing dialog allowing
a number of options, including saving the image to the device’s photo library. Please see the
image sharing section for more details. The Edit button will open the image editing window to
crop, rotate, and adjust the image. Please see the image editing section for more information.

Live View Stream
When live view is on, the image in the main image view is automatically updated as new live
view frames are received. The frame rate can vary greatly based on a number of parameters
such as the signal strength and camera model. However, assuming a good connection, about
15 fps would be typical.

During live view the image
may be single tapped to
focus on that point, also
known as “touch focus”.
For cameras that support
it, the focus box that is
displayed will temporarily
turn green if focus is
acquired and turn red if
focusing failed. Note that
the CamRanger does not
actually do any focusing,
but simply tells the
camera to try to focus at the selected area.

© CamRanger, 2019
US Patent 9712688                          11/09/19                                          15
Double tapping on the image during live view will zoom in at that point, and then alternatively
zoom back out. When zoomed in, arrow buttons will appear at the edges enabling small
adjustments to the zoom positioning.

Please note that the focus and zoom capabilities will vary by camera, and not all models will
support all of these controls.

A variety of overlays are available in live view and are turned on or off from within the settings.
Note that overlays such as histogram or focus peaking can reduce the live view frame rate.

Camera Properties
The camera properties will look slightly different depending on the device, orientation, and
camera model.

Auto exposure mode, shutter speed, ISO, white balance, focus mode, image format, drive/
capture mode, and metering are displayed as shown. The exposure meter can have different
meanings. It shows exposure bracketing and then either exposure compensation or exposure
metering depending on the context. If the property can be changed, then it will be white.
Disabled properties are grey. The values displayed are the values that are currently set on the
camera.
Pressing a property button will bring up a list of
possible values that can be selected.

Some Sony cameras change exposure parameters
differently than other cameras. The camera cannot
simply be set to a particular exposure value.
Rather, the exposure value can only be
incremented or decremented. For shutter speed

© CamRanger, 2019
US Patent 9712688                            11/09/19                                          16
and ISO, this process is automated for the user when a particular value is selected, though it
will take longer for the value to be set on the camera as it must be adjusted one step at a
time. For aperture, the user is presented with an up/down control to manually increment or
decrement the value.

Camera Actions
The red capture button initiates the camera trigger. The exact camera behavior is dependent
on the camera and camera properties, most importantly the capture mode. The continuous
capture mode operates differently for camera manufacturers. For most, it operates like
camera’s trigger, shots are taken as long as the capture
button is pressed. However, Nikon is different in that if a
continuous shooting mode is selected, a burst number must
also be set. With each single capture press the specified
number of shots will then be taken.

For Canon and some Fuji and Sony cameras, a yellow button will appear at the top left of the
Capture button. This button is the equivalent of performing a “half-press” of the camera’s
shutter button. This is useful for getting auto focus and determining the camera’s exposure
metering. If the camera’s exposure mode is set to manual, the exposure meter will briefly
show the exposure level. If set to an automated exposure mode, the exposure parameters
calculated by the camera will be shown for a few seconds. For example, if in aperture priority,
the shutter speed calculated by the camera will be shown briefly.

For some cameras, a green dot may also appear to the upper right of the Capture button. This
is a focus indicator and a signal from the camera that the camera lens has acquired focus.

The auto / manual focus toggle button shows if the camera will attempt to focus as part of
capture. Depending on the camera and configuration the user may or may not be able to
change this.

The live view button toggles live view on and off. Live view must be controlled from the
CamRanger and not from the camera.

© CamRanger, 2019
US Patent 9712688                           11/09/19                                          17
The movie button toggles movie mode on and off. When movie mode is on, the Capture
button changes to “Record” and pressing this button will start and stop movie recording.

HDR/Advanced Bracketing Tab
The HDR tab is accessed by pressing the HDR
button shown highlighted in blue. The HDR
bracketing works by actually adjusting the
camera’s exposure parameters between shots. The
only limitations to the bracketing is the camera’s
possible exposure parameters.
The property field specifies the camera property to
be changed. The three options are Shutter Speed,
Aperture, and ISO. The Mid-Point indicates the
middle exposure of the sequence. The step size
sets the number of steps to adjust the exposure
between each shot. The number of shots specifies the number of shots in the sequence. The
maximum number of shots is dynamically calculated based on the mid-point and the possible
camera values.

The minimum and maximum exposure values for the sequence will be displayed above the
Start button. Press the Start button to begin the sequence.

Because the CamRanger is actually changing the camera’s exposure parameters, the camera
must be set to Manual exposure mode to perform HDR bracketing.

HDR sequences can also be performed when the camera is set to bulb mode. The settings
are similar, except that the property is shutter speed/bulb duration and the mid-point is set in
seconds. The minimum bulb duration is 100 ms. The Advanced Bracketing tab will
automatically change to bulb settings when the camera is set to bulb mode.

© CamRanger, 2019
US Patent 9712688                            11/09/19                                         18
HDR bracketing is not available for Sony cameras. However, Sony provides a large number of
built-in capture modes to perform bracketed captures.

HDR sequences can also be saved and then restored later. Press the database icon
in the bottom left of the HDR dialog. A dialog will appear allowing the current
sequence to be saved or previous sequences to be applied.

Timer Tab
                                           The Timer tab is accessed by pressing the
                                           stopwatch button and is used to configure the
                                           CamRanger as an intervalometer as well as specify
                                           exposure times when the camera is bulb mode.

                                           The initial delay is the amount of time to delay
                                           before the sequence is started. This can be useful
                                           for making a custom timer mode with a set delay.
The number of shots to take must be entered as well as the time between shots. Note that
depending on the camera, the time between shots may be longer than entered if the time is
less than a few seconds.

© CamRanger, 2019
US Patent 9712688                          11/09/19                                           19
The estimated duration for the time lapse to complete is automatically calculated and displayed, as well as the length of a 24 fps video if one was created from the resulting captures. If the camera is in manual mode, the HDR switch may be toggled on. Each capture will then be an HDR sequence of captures. The HDR parameters are those that are set in the HDR tab. Press “Start” to begin the sequence. After started, the iOS device does not need to remain connected to the CamRanger. So there is no need to remain close by during a long time lapse sequence. When the camera is in bulb mode, the timer tab can also be used to perform bulb shots with a specified duration. The Start button in the Bulb section will only take a single shot. However, time-lapse can be combined with bulb mode to perform a time-lapse with each bulb duration set by the shot duration. Bulb ramping can also be configured by pressing the ramp button and can be used to slowly adjust exposure over time by varying the duration of shutter. The exposure change over the entire sequence is set by the EV Change field. This value can be positive to increase the exposure or negative to decrease the exposure. The Initial Duration field sets the initial bulb time. The CamRanger 2 will automatically adjust the ISO as necessary to avoid exceeding the Max Duration (or Min Duration) if the EV Change is negative. For example, if the initial duration 0.5 seconds and the EV Change is +10, then without any other changes, the bulb duration would have to be about 8.5 minutes. Likely, a bulb shot of 8.5 minutes is not desirable. Assume, a © CamRanger, 2019 US Patent 9712688 11/09/19 20
photographer wants to keep the bulb duration under 30 seconds. The Max Duration can be
set to 30 seconds and the CamRanger will automatically increase the ISO to keep the bulb
duration under 30 seconds.

The minimum bulb duration is 0.1 seconds. Though please note that the accuracy of the bulb
duration is not as good near this minimum value.

Focus Tab
The Focus tab is accessed by pressing the
magnifying glass button. Live view must be turned
on to use the focus tab.

Focus Adjustments

The Focus Adjust section of the tab is for
performing incremental adjustments to the focus.
The arrow buttons will perform a large, medium, or
small focus adjustment depending on the button
selected. The arrows pointing down move the
focus in closer while the arrows pointing up move
the focus further away.

Focus Stacking
A new focus stacking method is available which automates more of the process. Changing to
the previous focus stacking method is still possible by turning on “Classic Focus Stacking” in
the settings. The new focus stacking method requires the user to specify the nearest and
furthest focus points and then the CamRanger automates the step size and number of shots
based on the camera, lens, and aperture. Because the aperture affects the depth of field, this
focus stacking method can only be used when the camera is in manual or aperture priority
exposure modes.

Point 1 is the nearest focus point and point 2 is the furthest away. The points are set by
pressing the respective “Set” button when the focus is at the desired point. To set the first
© CamRanger, 2019
US Patent 9712688                         11/09/19                                            21
focus point any focus adjustment method can be
used. However, after a point has been set only
incremental focus adjustments can be used. Touch
focus or manual lens cannot be used as there is then
no way to track the focus changes that have been
made. If one of these methods is used to change focus then any focus points that were set
may be automatically cleared.

Once the two focus points are set, pressing the bullseye button will move the focus to that
position. It will not be able to achieve a cinematic quality follow focus, but can be useful to
return the lens to a particular focus point. Pressing clear will clear that focus point so it can be
reset.

After the focus points are set, the Start button will be enabled and pressing it will start the
focus stacking process.

For Canon cameras, the CamRanger can only know the lens focal length by downloading an
image. If an image has not been downloaded in that session yet, the focus stacking section
will be disabled and instead a button will be shown to take a configuration shot. Pressing the
button will result in the camera capturing an image, downloading the image to determine the
lens focal length and then immediately deleting the image.

Advanced Focus Stacking
                                             Pressing the plus button will reveal the advanced
                                             focus stacking options and provide additional
                                             feedback.
                                             The focal length is automatically determined,
                                             however, it can be changed if it needs to be
                                            manually overridden. The CamRanger 2 does a
pretty good job determining a reasonable number of shots and step sizes for a given
scenario. However, the user may want to adjust this. The simplest way is to change the

© CamRanger, 2019
US Patent 9712688                            11/09/19                                             22
adjustment factor to increase or decrease the distance between shots. The user can also
have complete control over the number of shots and step size by turning off the Auto switch.
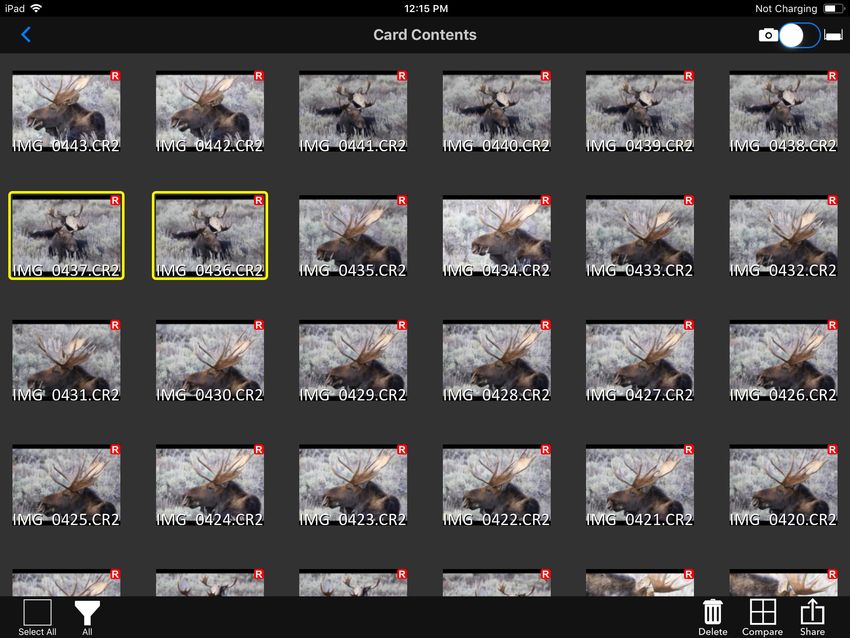
Card Contents
Pressing the SD Card at the top left will open a new window that displays all the
thumbnails for the images on the camera’s memory card.
The thumbnails can be filtered by type by selecting the filter option at the bottom left. The
filter options are All, JPG, RAW, and Video.
To view an individual image, double tap on the thumbnail. Multiple images can be selected by
tapping on the thumbnails. The images can then be deleted or shared with the Delete and
Share buttons on the bottom right. Multiple images can also be compared by pressing the
Compare button after selecting between 2 and 4 images. The selected images will then be
show at the same time.
© CamRanger, 2019
US Patent 9712688 11/09/19 23The slider at the upper left controls the source of the images: the camera’s the memory card
or the CamRanger 2’s memory card.
Settings
The settings menu is accessed from the gear button on the top right of the main screen or the
lower right of the connection screen.
The Camera connection mode is only shown for Nikon and Fuji cameras. These modes
behave a little different depending on the camera manufacturer.
Nikon - When set to PC, the camera is physically locked but the CamRanger 2 can control
more camera settings. In Camera mode shooting from the camera is possible, but changing
certain settings with the CamRanger 2 is not.
Fuji - When set to PC the camera can be controlled with the CamRanger 2, but is physically
locked out from being operated manually. When set to camera, the camera can be controlled
like normal, but the CamRanger 2 cannot control the camera, only receive images.
Image and Live View Overlays
• GridLines
• Show Gridlines - overlays gridlines over both live
view and captured images
• Grid Layout - the number of gridlines horizontally
and vertically
• Gridlines Color - the color of the gridlines
• Watermark
© CamRanger, 2019
US Patent 9712688 11/09/19 24•Show Watermark - Overlays a watermark over both
live view and captured images
•Watermark Text - The text used in the watermark
•Watermark Location - Center, Bottom-Left, Bottom-
Right, or Tile
•Watermark Size - Small, Medium, or Large
• Save with Watermark - Sets if saved or exported
images will have the watermark
• Image Overlay
• Use Image Overlay - overlays an image over
both live view and captured images
• Image - Select an image from the iOS device’s
photo library
• Opacity - Use the slider to set the image overlay opacity/alpha value
• Other Overlays
• File Name - shows the captured image file name at
the bottom left of the image
• Exif Data - displays basic meta data for captured
images at the top of the image
• Histogram - shows an RGB histogram at the top left
for both live view and captured images
• Highlights - Over-exposed areas of captured images
are overlaid in red
• Shadows - Under-exposed areas of captured images
are overlaid in blue
• Rotate Live View - for select cameras the live view will
automatically rotate when the camera is in portrait
© CamRanger, 2019
US Patent 9712688 11/09/19 25orientation
• Electronic Level - an electronic level is shown over live view for select cameras
• Focus Peaking - a red outline is drawn on in-focus edges (this is only an approximation
of relative focus)
• Night Mode - A red tint is overlaid over the app to assist in maintaining night vision
Note that the histogram and focus peaking overlay will reduce the live view frame rate or time
for a captured image to display.
• Controls & Workflows
• Image Workflow
• Quick RAW Mode - When enabled, the
CamRanger will transfer and display the JPG
image embedded in the RAW image which will
be much quicker. When disabled, the full RAW
image will be transferred.
• Auto View Images - Three possible settings for
automatically viewing images
• OFF - Captured images are not automatically displayed and must be individually
selected to be viewed.
• ON - Captured images are automatically displayed as they are taken
• Camera - Images are not automatically displayed, but can be displayed as controlled
by the photographer at the camera. To display an image it must be modified on the
camera. this can be done a few ways, but theses methods may work well:
• Canon - Give the image a rating
• Nikon - “lock” the image
• Sony/Fujifilm - not applicable
Note that for these methods, the change can immediately be reversed.
• Auto Save Images - when an image is viewed for the first time it can automatically be
saved/uploaded to one of the following places
© CamRanger, 2019
US Patent 9712688 11/09/19 26• OFF - Do not automatically transfer
• Photo Library - iOS device’s photo library
• FTP - Configured in transfer settings section
• Dropbox - Configured in transfer settings section
• DNP Printer - Requires DNP’s wireless print server
• Other Controls
• HDR/Focus Stack Delay - add an additional
delay between captures during focus stacking
and HDR. This can be useful for things such as
allowing flashes to recharge.
• 200% Live View Zoom - adds a 200% live view
zoom level in addition to fit to window and
100%, if the camera supports 200% zoom
• Mirror up - Controls the camera mirror up mode
(Canon cameras only)
• Classic Focus Stacking - configure focus
stacking with the original CamRanger method where the user selects the step size and
number of shots
• Movie Restart Interval - Configure the CamRanger 2 to automatically stop and restart
recording to help handle video recording time limits. Note that there will be a second or
two gap in between the two recordings.
• Save Fuji RAWs - For quickest previews the suggested setting is to configure the
camera to save RAW images to the camera’s SD card. The process of saving the RAW
image to the CamRanger 2’s SD card is time consuming. In cases where this is
unnecessary, turn off “Save Fuji RAW” and Fuji RAW images will not be saved to the
CamRanger 2’s SD card.
• Image Sharing and Transfer
• Image Workflow - Repeated from Controls & Workflows. See above.
© CamRanger, 2019
US Patent 9712688 11/09/19 27• CamRanger SD Card
• SD Image Prefix - Images saved to the
CamRanger 2’s SD card will have this prefix
• Barcode Button - When enabled, a barcode
button will be shown next to the Settings button.
The barcode button will bring up a dialog to
enter an SD Image Prefix. A barcode scanner can then be used to easily change the
image prefix.
• Automatically transfer images - When enabled, all images captured will be transferred
to the CamRanger 2 SD card. This requires the CamRanger app to remain connected
and is only valid for Canon and Nikon as Sony and Fuji already have all images saved
to the CamRanger 2 SD card.
• CamRanger Share - Refer to the image sharing section for more details on how to use
CamRanger Share to share images with multiple
devices.
• CamRanger Share - Enables and disables
CamRanger Share
• Auto Share Images - If enabled, all images viewed for
the first time will be shared
• Auto Share Thumbnail - Automatically share all
thumbnails
• Share Live
View - Share the
live view feed with clients
• Clients can save images - Allows clients to save
the image to their wireless devices.
• Show Clients - Provides a list of the currently
connected clients.
• FTP - Configure a connection to an FTP server. This
may require bridging the CamRanger into an existing
WiFi network.
• Host/Server Name: formatted like ftp.server.com
© CamRanger, 2019
US Patent 9712688 11/09/19 28• Username
• Password
• Port - default is 21
• Use Passive
• Remote Directory - optional directory on server that must already exist
• Check FTP Connection - attempts to connect to the FTP server using the provide values
• Dropbox - Configure a connection to Dropbox
• Log In/Log Out - Enables logging in or out of a
Dropbox account and provides status
• Remote Directory - optional directory in the
Dropbox account that must already exist
• System
•Battery Info - Displays battery diagnostic information
•Cache - The CamRanger 2 app uses a temporary
cache on the device to store thumbnails and images.
•Cache Size - The size in GB of the cache. This will
affect how many
images are able
to be stored
before being
deleted.
• Clear Cache - If strange issues are occurring,
such as the wrong image being displayed,
clearing the cache may fix it.
• Image Ratings List
• Show Ratings - Display a list and thumbnails of
images that have been rated within the
CamRanger 2 app
• User Manual - view this document
© CamRanger, 2019
US Patent 9712688 11/09/19 29• Email Support - Opens a newly created email addressed to email CamRanger support.
Requires the iOS mail app to be configured.
• Terms - Display terms, conditions, warning information, licenses, etc.
• CamRanger Version - the first digits are the software/app version and the digits after the
final period is the CamRanger firmware version
• Exit - closes the current session and returns to the connection screen
Image Editing
Basic image edits and
cropping can be done to
images viewed within the
CamRanger 2 app. To access
the image edits screen, select
the context button (…) when
viewing an image and select
“Edit”. All edits are non-
destructive and can be
removed. However, the edited
image will be displayed as well
as used for exporting/saving.
The picture above shows the
image editing screen. From left
to the right, the controls at the
bottom are Cancel, Undo,
Image Adjustments, Crop and
Rotate, Resize, and Save.
The Cancel button will revert
any changes and close the
editing screen. The Undo
button will revert all changes.
© CamRanger, 2019
US Patent 9712688 11/09/19 30Selecting the Image Adjustments button will display the image adjustments screen. The
buttons at the bottom control the exposure, contrast, white balance, vibrance, and
sharpening. If a value has been changed, the button will appear as blue.
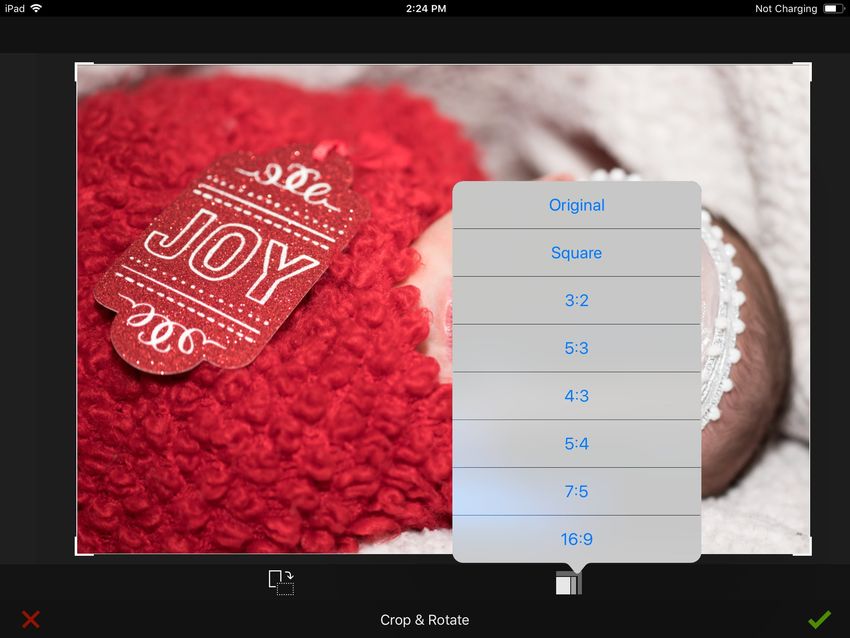
Selecting the Crop and Rotate
button will display the rotation
and crop controls. The button
on the bottom left will rotate
the image, while the the one on
the right will enable cropping,
including preset aspect ratios.
The Resize button will preset a
few common sizes to reduce
the resolution of the image.
This can be useful for transferring images
where full resolution is not necessary.
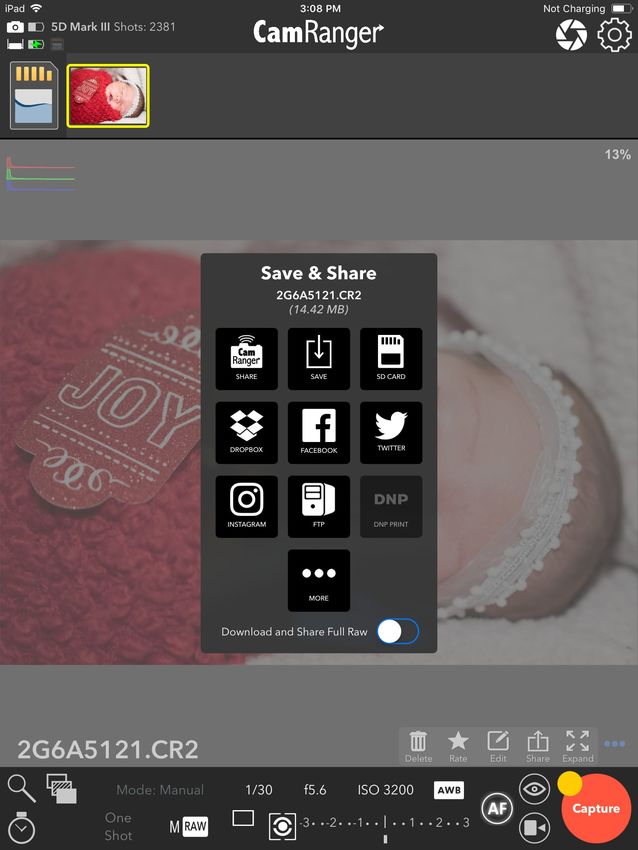
Image Sharing and Transfer
The CamRanger 2 provides a number of
options for saving, uploading, and transferring
images.
To access the sharing options, select the
context button (…) when viewing an image and
select “Share”. The Save & Share dialog will
then appear. The options are as follows:
• CamRanger Share - Share with other clients
using the CamRanger Share app. Please
refer to the CamRanger Share documentation
© CamRanger, 2019
US Patent 9712688 11/09/19 31for more information. • Save - Save the image to the iOS device’s photo library. • SD Card - Save the image to the CamRanger 2’s SD card. • Dropbox - Upload the image to Dropbox. Requires logging into a Dropbox account within the CamRanger 2 app settings. • Facebook - Upload the image to Facebook using the account configured within the iOS device settings. • Twitter - Upload the image to Twitter using the account configured within the iOS device settings. • Instagram - Upload the image to Instagram. Requires downloading and configuring the Instagram app. • FTP - Upload an image to the FTP server configured within the CamRanger 2 app settings. • DNP Printer - Print the image using the DNP wireless print server. • More - Use the iOS system sharing dialog to transfer/save the image. Note that many of these options require Internet connectivity, requiring bridging the CamRanger into an existing WiFi network. SD Card Access The SD card on the CamRanger 2 enables a two different ways of viewing/accessing images saved on the SD card in addition to using the CamRanger app or physically moving the SD card. Web Viewer Thumbnails and images saved on the CamRanger 2 SD card can be accessed using a web browser. Just like accessing the web GUI, use a web browser to navigate to http:// 192.168.82.1. But then click the “SD Card Gallery” button. Thumbnails for all the images will load and the images can be viewed and/or downloaded. © CamRanger, 2019 US Patent 9712688 11/09/19 32
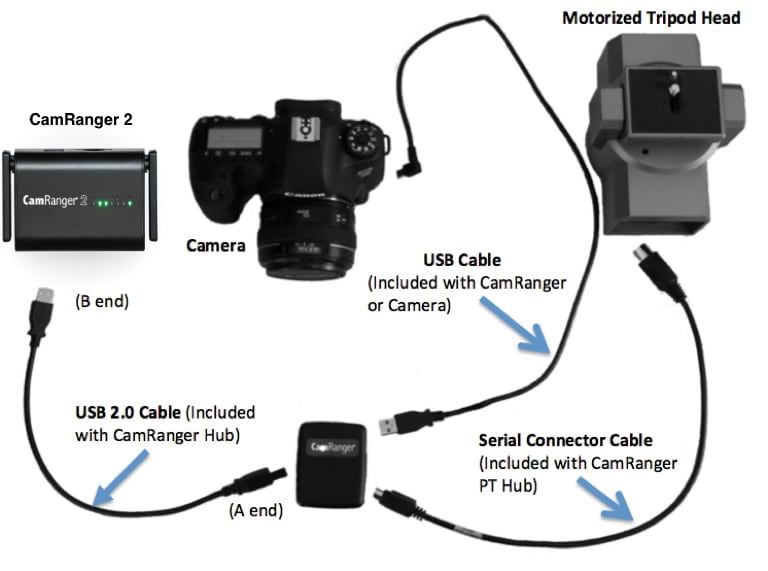
SMBFS / Samba Share
The SD card in the CamRanger 2 can also be mounted as a read-only samba share. More
simply, the SD card can be accessed like a normal drive from nearly any platform. This opens
up a large number of workflows, for example, selects could be saved to the SD card where an
assistant on a remote computer can quickly transfer these selects and begin processing.

PT Hub & MP-360 Tripod Head

To use the PT Hub and motorized tripod head a CamRanger and supported camera are
required.

PT Hub Hardware

1. USB A Connector - Connects to CamRanger
2. Serial Connector - Connects to PT Hub
3. USB B Connector - Connections to camera

© CamRanger, 2019
US Patent 9712688                         11/09/19                                        33
MP-360 Motorized Tripod Head Hardware
• Threaded Mounting Point - 1/4 20 threaded female opening for mounting to an existing
 tripod head (does NOT mount directly onto tripod legs)
• Battery Compartment - Open the battery compartment by sliding the cover downward and
 then lifting it outward. Insert 4 AA batteries oriented according to the markings in the battery
 compartment. The MP-360 may also be powered by an AC adapter.
• Power LED - Green when power is on (cannot be used to determine battery level)
• Power Switch - To turn on, set to “M”
• Camera Mounting Screw - 1/4 20 mounting screw

Specifications
• Power Source: 4 AA batteries or A/C adapter (neither included)
• Vertical Tilt: +/- 15 degrees
• Horizontal Pan: 360 degrees with unlimited rotation
© CamRanger, 2019
US Patent 9712688                          11/09/19                                           34
• Maximum Camera Weight: 6 lb (2.7 kg)
• Size (LxHxW): 5.75 x 4.5 x 4 inches (145 x 115 x 103 mm)
• Weight: 1.75 lb (800 g)

Setup
Required Parts:
•   CamRanger 2
•   PT Hub
•   Motorized Tripod Head (MP-360, Bescor, or Hague)
•   USB cable for camera connection
•   Serial Cable (included with PT Hub)
•   USB A to B cable (included with PT Hub)
•   Camera
•   Mobile Device (iOS/Android)

• Connect the CamRanger 2, PT Hub, tripod head, and camera as shown in the above
    diagram.
• Set the tripod head power switch to “M” to turn on the tripod head
• Setup and start the rest of the equipment as normally done

© CamRanger, 2019
US Patent 9712688                         11/09/19                                 35
App Additions with the PT Hub and Tripod Head
When the CamRanger app is started with the PT Hub and MP-360 connected, a tripod button
will appear next to the other tab buttons.
A directional pad is displayed on the tripod tab. Press and hold to move the tripod head in the
desired direction. Double tapping will continue to move the tripod head in that direction until
the directional pad is tapped again. The slider below the directional pad controls the pan/tilt
speed of the tripod head. The approximate MP-360 battery capacity is shown at the top left.
The panorama button at the bottom left expands the tripod tab to display the controls for
configuring an automated panorama.
To perform a panorama, a calibration must first be performed. To calibrate, press the
“Calibrate” button and follow the steps. The calibration is valid for four hours or until the
session is restarted or the tripod head speed is adjusted.
After calibrating, the number of shots, total number of degrees, and panorama direction can
be specified before pressing “Start” to begin the process.
Camera Setup
Canon
• Exposure Simulation: Camera setting that controls if the live view exposure should
match the camera’s exposure settings, or always show a reasonably exposed image.
Typically a photographer would want exposure simulation off when the ambient light
doesn’t match the amount of light during capture, such as when using strobes or
flashes.
• Image Playback Time: Camera setting that specifies how long an image should be
shown on the camera’s rear LCD. A long playback time can impact certain functions,
most notably it can slow down focus stacking.
• In-Camera WiFi: In-camera WiFi and all similar settings must be turned OFF.
• Image Transfer/FTP: Any image transfer and FTP transfer settings must be turned OFF.
© CamRanger, 2019
US Patent 9712688 11/09/19 36Nikon
• Connection Mode: CamRanger setting with two options PC and Camera
• PC: The camera is physically locked out, but more control is possible remotely.
Specifically, camera controls set with physical knobs or dials can be changed
with the CamRanger, such as drive mode, focus switch, etc.
• Camera: The camera can be physically controlled, but the CamRanger cannot
change as many camera settings.
• Exposure Preview: Camera setting that controls if the live view exposure should match
the camera’s exposure settings, or always show a reasonably exposed image. Only
higher end Nikons have this setting. Typically a photographer would want exposure
simulation off when the ambient light doesn’t match the amount of light during capture,
such as when using strobes or flashes.
Sony
An SD card is required in the CamRanger 2 when using a Sony camera.
• Remote Ctrl: Camera setting that enables the CamRanger to control the Camera. This
must be turned on.
• USB Connection: Camera setting that must be set to PC Remote.
• USB LUN Setting: Camera setting that should be set to Multi.
• USB Power Supply: Camera setting that controls if the camera should charge from the
USB port. Generally, this should be turned off as it will drastically reduce the
CamRanger’s battery life.
• Control with Smartphone: This camera setting must be turned OFF.
• PC Remote Settings: Camera setting that controls where images should be saved. It is
recommended to the set the Still Image Save Destination to PC+Camera. Images will be
saved to the camera’s memory and sent to the CamRanger. The recommend RAW+JPG
PC Save Image setting depends on the photographers workflow. For quick previews,
this should be set to JPEG only and the image format should be set to RAW+JPG.
• Exposure Step: Camera setting that controls the step size between exposure values.
Only 0.3EV is supported for changing shutter speed and ISO.
© CamRanger, 2019
US Patent 9712688 11/09/19 37• Live View Display: Camera setting that controls if the live view exposure should match
the camera’s exposure settings, or always show a reasonably exposed image. Typically
a photographer would want this set to “Setting Effect OFF” when the ambient light
doesn’t match the amount of light during capture, such as when using strobes or
flashes.
• WiFi Settings: Any in-camera functionality should be turned off.
• Auto Review: Camera setting that controls how long an image is previewed on the
camera’s rear LCD. Turning this off can improve the speed of some CamRanger
functions.
• Long Exposure Noise Reduction: Camera setting that enables automatically taking a
“dark frame subtraction” shot after captures of longer than 1″. Not supported for
intervalometer sequences.
• Focus Mode: Touch focus is only compatible with select focus modes.
Fujifilm
An SD card is required in the CamRanger 2 when using a Fuji camera. Some Fuji camera’s will
also draw power over USB whenever possible. This results in much lower battery life (about
2.5 hrs instead of 5 hrs).
• Wireless: All WiFi settings and connections should be disabled/off.
• Power Management->Auto Power Off: Camera setting that controls the camera
powering off. This should be set off.
• Connection Setting->PC Connection Mode: Camera setting that controls the saving of
images. This should be set to USB Tether Shooting Auto. Then images will be saved to
the camera’s SD card and sent to the CamRanger.
• Save Fuji RAWs: A CamRanger setting to help speed image previews. If the
photographer wants quick previews, and the image format is set to RAW+JPG. The
RAW image will not be saved to the CamRanger and just the JPG image will be used.
Tips & Troubleshooting
Below are some more common troubleshooting tips.
© CamRanger, 2019
US Patent 9712688 11/09/19 38For more detailed information see the knowledge base at CamRanger.com/knowledge-
base
Connection
• Ensure the iPhone/iPad is connected to the CamRanger WiFi network
• If either the CamRanger 2 battery or camera battery is very low, it may refuse to connect
• Any camera WiFi connectivity and built-in camera sharing must be disabled
• The CamRanger 2 has the same limitations as any WiFi network and can be negatively
impacted by environmental interference. Strong interference can result in a failure to join
the CamRanger 2 WiFi network.
• If the one or both of the CamRanger 2 WiFi networks are not appearing in the list of
available networks, typically they will appear after waiting 15-30 seconds. Sometimes
turning the iOS device WiFi off and back on may be necessary.
• A VPN configured on the iOS device will likely prevent a connection and so must be
completely disabled/removed.
Performance
• The closer the iPad/iPhone is to the CamRanger 2, the faster image transfer and live view
will be.
• Environmental interference can reduce performance.
• Displaying high resolution images requires a lot of device RAM. If the amount of available
RAM is low, then poor performance or crashes may occur. Restarting the iPad/iPhone will
make more RAM available.
• Exact features are camera dependent. Unfortunately some cameras do not support all the
features as other cameras.
• At close distances, the 5 GHz WiFi network will typically be much faster. Depending on the
environment and device used, the 2.4 GHz WiFi network may have better range.
Images
• For Canon and Nikon, thumbnails are not displayed until after the image has finished saving
to the camera’s memory card. This is usually relatively quick, but can take a little while
depending on the memory card speed, image resolution, number of shots taken in
succession, etc.
• For Sony and Fuji, thumbnails are not displayed until after the image has finished saving to
the CamRanger 2’s memory card. This typically is slower than writing to the camera’s card.
© CamRanger, 2019
US Patent 9712688 11/09/19 39• The smaller the image the quicker it can be saved, transferred, and rendered.
• There are a wide number of options for image format and saving settings depending on the
exact workflow. In general, for the common use case of quickly viewing images it is
recommended to use the following settings:
• Canon - RAW only - app setting Quick Raw enabled
• Nikon - RAW only - app setting Quick Raw enabled
• Fuji - RAW + JPG - camera setting USB Tether Shooting Auto, app setting Fuji Save
RAWs disabled
• Sony - If camera supports, camera setting Still Image Save Dest. = PC+Camera, shoot
RAW + JPG
• For more detailed descriptions and examples, please refer to the CamRanger Knowledge
Base on the CamRanger website
• If the camera has multiple memory cards, the image playback card should be set
accordingly on the camera.
© CamRanger, 2019
US Patent 9712688 11/09/19 40You can also read