Job Aid CMS Navigation and Account Profile Setup - Metrolinx
←
→
Page content transcription
If your browser does not render page correctly, please read the page content below

Job Aid
CMS Navigation and Account Profile Setup
Date: March 2021
Version 2.0

Table of Contents

Introduction.................................................................................................................................................................... 3
Welcome Page............................................................................................................................................................... 3
Update your Account Profile ........................................................................................................................................ 5
          Account Profile Photo ........................................................................................................................................ 5
          Account Profile Location.................................................................................................................................... 6
          Account Profile Preferences .............................................................................................................................. 7
          Add Device ......................................................................................................................................................... 8
          Disconnect a Registered Device ....................................................................................................................... 9
Learner Home .............................................................................................................................................................. 10

                                                                                                     Job Aid – CMS Navigation and Account Profile Setup                              2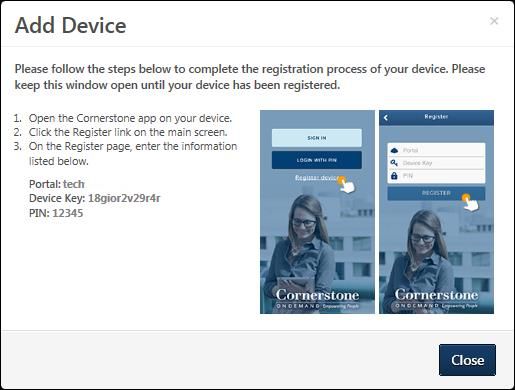
Introduction
This Job Aid will walk you through the actions to effectively navigate through your
personalized Competence Management System (CMS) account and setup your account
profile preferences.

Your account is self-managed and allows you to maintain full control over your own
training registrations, course selections, testing, and course completion. It also
provides you’re the ability to real-time access your training transcript details,
certifications, and view your completed audit details.

Welcome Page
When you log into your account, you are automatically taken to your personalized
welcome page. This page provides a view of learning objects and actions associated
with your transcript, competencies, and pending evaluations.

To access the welcome page at any time, hover over the Home tab in the top
navigation bar and select the Welcome option from the dropdown list.

  1.                                 Top Navigation Bar

                                     Use the top navigation bar to access tabs and pages
                                     such as: Home, Learning, Learner Home, View Your
                                     Transcript, Events Calendar, and Add External
                                     Training.

                                     To access the pages under each tab, hover over the
                                     tab.

                                     Please note that based on your access level, you will
                                     have different options in the navigation bar.

       •   Learner Home: This is your detailed learning page where you take charge of
           your personal development. You can also view your personal training
           information, course catalogs that are assigned to you, transcript view for status
           of training progress, learning and audit completions, etc.
       •   View Your Transcript: Displays all your learning curriculum (either selected or
           assigned to you) in a structure list.
       •   Events Calendar: Allows you to view and select available courses in a calendar
           view format. You access the course by clicking on the course title and to view
           course details, hover over the course title.
       •   Add External Learnings: This section allows you to register for external
           learnings. All external learnings go through an approval process, and the

                                                  Job Aid – CMS Navigation and Account Profile Setup   3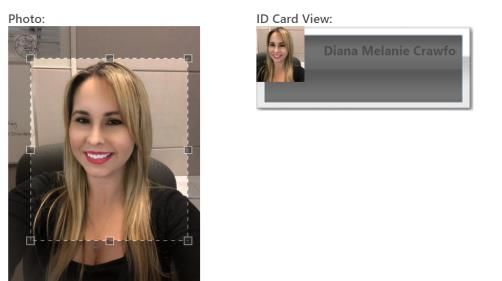
information will be added to your transcript where you can follow the approval
      process by monitoring the status of the external training.

2.                             Register for PTS Session

                               To register for a PTS training session and to select
                               your session, click on the here link.

3.                             Ready for the Exam?

                               Once you have attended the PTS training session,
                               you can attend and complete the PTS exam by
                               clicking on the here link.
4.                             Visit your Learner Home banner

                               Clicking on this banner redirects you to the Learner
                               Home screen that displays your learning objects in a
                               detailed view.

                               Refer to the “Learner Home” section for further
                               details.

5.                             Your Transcript

                               Clicking on the “Your Transcript” heading launches
                               your trainings that are assigned. You can also view
                               and launch your trainings within this section.

6.                             Competence

                               This section displays all your competencies with
                               associated due dates and expiration dates.

7.                             Pending Evaluations

                               This section displays all your pending evaluations, if
                               applicable.

8. Update your profile

                               Clicking on the “Update your profile” button takes
                               you to your account preferences where you update
                               your photo and location information.

                                           Job Aid – CMS Navigation and Account Profile Setup   4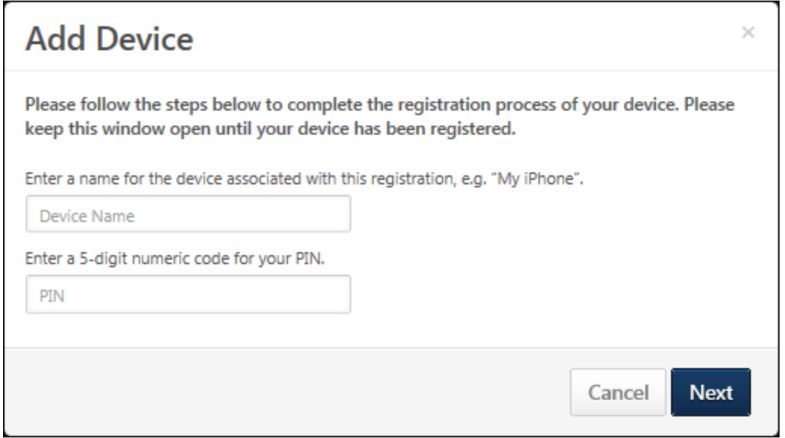
Update your Account Profile
The first time you log into your CMS account, it is required that you set up your account
profile preferences, which includes your photo and location details. The My Account
area allows you to modify your preferences, manage social accounts, manage mobile
devices, manage course reviews, and view order history.

It’s important that this information be completed and updated regularly to ensure it is
relevant. This is the photo that will be used for your temporary PTS certificate and PTS
ID Card, and it will be sent to the address listed in your account profile.

Warning: It is required that you complete your account profile details and upload a
photo that meets specifications immediately before registering for a PTS session.
Without a photo or details, you will not be able to successfully complete the PTS
certification.

Account Profile Photo

1.   Click on the Update your profile button.
2.   You are now in the account preferences page. To update your photo, click on the
     dropdown arrow on the photo image and select the change option.

3.   Click on the Choose File button to browse and upload a profile photo. Once
     selected, click on the Upload button. The recommended size is 150 x 174 pixels.
     Use the cropping and focus tool to adjust the view of the photo once the upload is
     complete.

Photo specifications:

The head shot photo you attach must be current and include the following:
   • Clear head shot without being burred or pixelated.

                                                Job Aid – CMS Navigation and Account Profile Setup   5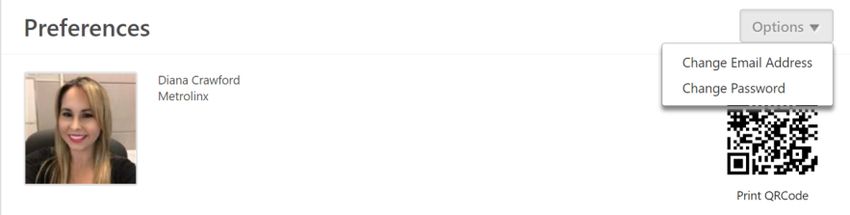
•    Forward facing.
     •    Portrait orientation, not landscape.
     •    In colour (no black and white photos).
     •    Include top of shoulders.
     •    No hats or sunglasses.
     •    Shirt must be worn.
     •    Cannot be a secondary photo (e.g. taking a picture of a government issued ID or
          of a printed picture).

4.       Click on the Save button.

Account Profile Location
From within the account preferences page, under the Settings tab you specify your
location details.

1.       Out of office: Select this checkbox to change your status to Out of Office if you’ll
         be away on an extended leave.

2.       Time Zone: Select your time zone using the dropdown list.

3.       Select Signature: Select a font style for how you would like your signature to look
         on certificates and documentation using the dropdown list.

4.       Address Line 1: Enter the address to where you would like your PTS ID Card sent.
         This can be a personal or work address.

5.       Address Line 2: Enter additional address information. E.g. P.O. box

6.       City: Enter the city the address resides.

7.       State/Province: Enter the state or province the address resides.

8.       Zip/Postal Code: Enter the zip or postal code the address resides.

9.       Country: Select the country your address resides using the dropdown list. Note:
         It does not default to Canada.

                                                     Job Aid – CMS Navigation and Account Profile Setup   6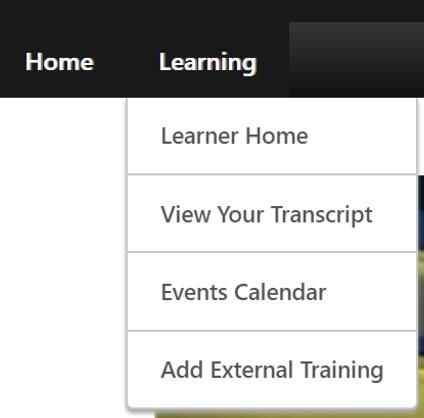
10. Validate that the information is correct and click on the Save button to save your
    profile preferences.

11. A Save Notification popup appears where you can click the Close button to return
    to your account profile or click on the Go to home page button which takes you
    back to the Welcome page.

Account Profile Preferences
Within your account profile, you can manage your preferences relating to your email
and password.
1.   From within your My Account Preference page, click on the Options button. The
     dropdown list appears with the options to Change Email Address or Change
     Password.

     •    Change Email Address: Select this option to change your system email
          address. This email address is used to send notifications and reminders from

                                               Job Aid – CMS Navigation and Account Profile Setup   7
the system. You must enter the new email address twice to ensure it is
entered correctly.
• Change Password: Select this option to change your system password. A
pop-up appears with the system password requirements. You must first enter
your current password, and then enter your new password. You must enter
the new password twice to ensure it is entered correctly.
Note: If these options are not available, it is because they are not enabled by
the system administrator in Password Preferences.
Add Device
The Devices tab enables you to register your mobile phones, tablets or computer.
Users must register their mobile phone, tablet, or computer on this page in order to log
in to the Cornerstone Learn application using a unique device key.
You can also disconnect
devices and mobile
applications.
1. Click on the Devices
tab in your account
profile.
2. To register a device,
click on the Add
Device button.
3. The Add Device pop-up appears. In the first field, enter a name for the device. For
example, if it is a mobile phone, you may enter "Mobile Phone" or the brand of
mobile phone.
Note: The Device Name entered here does not persist on the Devices page after a
user’s initial login to the Learn App.
4. In the second field, enter a temporary five-digit numeric PIN. This PIN must be five
numbers, and it will be used during the Device Registration workflow, before
configuring a permanent six-digit PIN which will be used to log into the Learn App
from then on.
Job Aid – CMS Navigation and Account Profile Setup 85. Select the Next button to proceed to the next step.
6. The next step displays instructions that must be completed within the Learn app.
Do not close the pop-up until the registration process is complete within the
Learn app because the Device Key and Temporary PIN information is required
to register the mobile device within the app. The portal name will be pre-
populated.
7. After completing the registration process, click on the Close button. The
registered mobile device appears in the Devices page.
Disconnect a Registered Device
To disconnect a registered device, in the Devices table, select the Disconnect button
next to the appropriate device. This opens a confirm pop-up.
Click on the OK button to disconnect or click on the Cancel button to stay connected.
After removing your device, you will not be able to log in using that device again, and a
new pairing must be created.
Job Aid – CMS Navigation and Account Profile Setup 9Learner Home
The Learner Home page is your detailed learning page where you take charge of your
personal development.
It’s a central location that you can view your personal training information, course
catalogs that are assigned to you, transcript view that displays all your learning
curriculum, status of training progress, learning and audit completions, time allotted to
training curriculum, etc.
Navigate through this page by hovering over the information to identify interactive
links.
Job Aid – CMS Navigation and Account Profile Setup 10You can also read