Dejero LIVE+ 20/20 Transmitter - NCC News Links
←
→
Page content transcription
If your browser does not render page correctly, please read the page content below
Dejero LIVE+
20/20 Transmitter
This Dejero kit will allow you to broadcast live from the field, using a Canon XF305 camera kit. Please
follow the following steps in order!!
1. Preliminary Check:
To set up the Dejero 20/20 unit, you’ll need:
20/20 suitcase, including:
o 20/20 “lunchbox” unit
o HDMI cable
o 5-pin-to-3pin blue XLR cable for the IFB
o 2 charged Anton Bauer Batteries (approx. 2 hours total power) (plus 2 backup batteries)
o AC Car cigarette-lighter power adapter
o Canon XF 305, camera batteries, tripod, mic(s)/cables, portable light. NOTE: make sure
the DISPLAY button on the camera is turned OFF, to avoid sending excess viewfinder
material back in the picture.
2. Installing Batteries
1. Slide each battery onto the battery
mounting plates, located on the back of
the transmitter.
2. When properly inserted, the battery
should click into place and feel securely
seated on the plate.
3. Always use both batteries; never run it on
just one battery!
3. Powering the LIVE+ 20/20 Transmitter
1. Power up the transmitter by pressing
the power button on the right-side of
the device. Just ONE firm PRESS! It will
take several seconds for it to actually
start booting.
2. The main window loads and start-up
messages appear in the Display
window. Keep waiting, it should
soon boot.
4. Connect the Canon XF305 Camera to Dejero
First, set up your Canon camera audio in this way:
  •     Make sure to turn off the internal (front) mic on the camera, and use channel one in the camera
        for the mic from the talent; sometimes you have to switch between channels - make sure to check
        audio before you go live, primary mic on Channel one, internal mic turned OFF!
  •     Make sure to change toggle switches below the mic jacks on the camera from internal to external mic,
        to make sure the internal mic CANNOT send audio to the camera!
  •     In front of camera, toggle selection so it matches the choice of talent mic being used:
             o Wireless mics= mic +48
             o Wired mics= mic
             o Multbox input=line

Connection ports are located on the top and side of the transmitter case.

Connect your camera to the device by plugging it directly into the HDMI port on the LIVE+ 20/20 Transmitter
case.

Take the HDMI cable from the backpack, and plug it into the HDMI port on the back of the Canon; it’s behind a
plastic door that says HDMI, the lower-left “pocket” on the lower right side of the back of the camera.

Plug the other end of the HDMI cable into the HDMI slot on the top of the Dejero case (see below image.)
Make sure all cables are firmly connected. HDMI sends both video and audio from the camera.

      5. Connect IFB (earpiece unit)
IFB enables communication and cueing from the studio to the talent.
A program feed is sent to an earpiece worn by the talent.
      1. Plug the 5-pin XLR connector end of the IFB external adapter
         into the corresponding connector on the transmitter and make
         sure there are is an earphone/IFB attached.
      2. IFB begins working as soon as a live stream is started.
      3. When IFB is functioning properly the transmitter will display IFB
         Active.
      4. The talent should be able to hear both the newscast audio,
         PLUS the producer as well.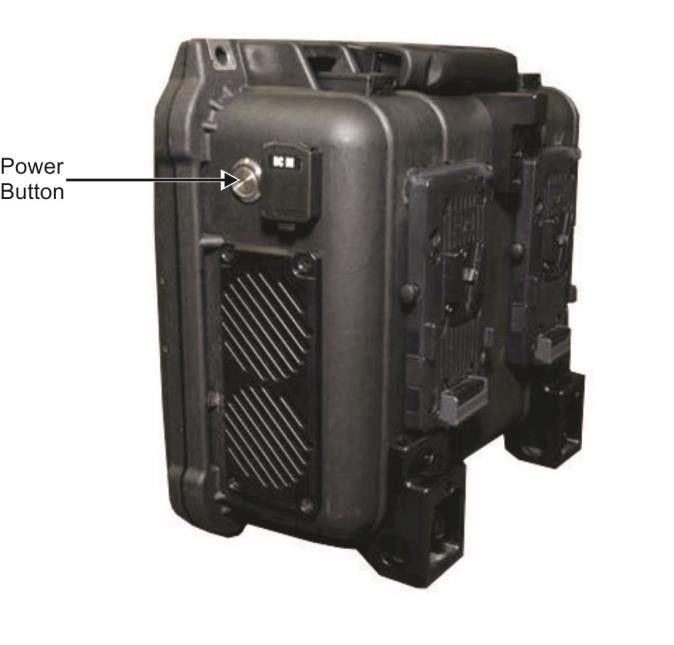
The Display Window
When the transmitter is powered on, the main window loads into the Display window. If the camera is
powered on, you should see it in the windows with PREVIEW and NCC NEWS DEJERO layered over it.
Note: if you see the audio meter, F-stop, and other camera viewfinder junk in this window, that’s what you’ll be
sending to the studio! Make sure to turn the camera DISPLAY OFF, after setting audio levels, before going live.
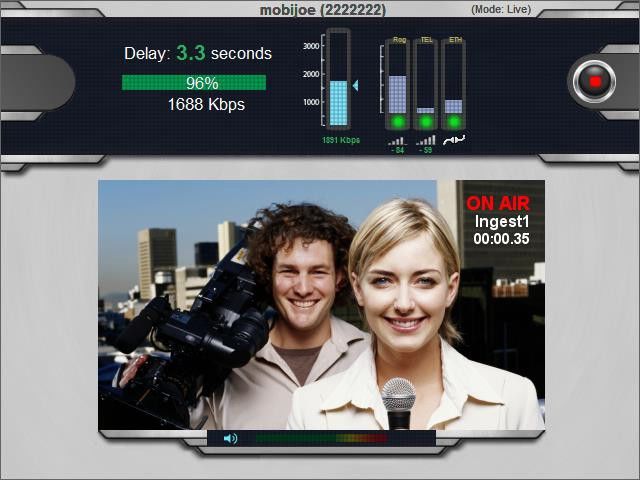
Start and Stop Live Shots
Once your camera is connected to the transmitter, you can begin or end transmission by pressing the
touchpad buttons corresponding to the Play and Stop icons.
To Broadcast Live:
Check the upper-left area above the window on the transmitter for the Device Ready message.
Press the touchpad button beside the Play icon FIRMLY to begin broadcasting live video from
the transmitter. The video window allows you to monitor the video feed as it is transmitted. The
“ON AIR” message is displayed in the preview window when you are operating in LIVE mode.
When the transmitter is on, it automatically detects all available cellular connections.
Each of the individual card transmission meters will be displayed in the user interface with the
network name and the signal strength. The grey dot will change to green once Play has been
pressed for a live broadcast.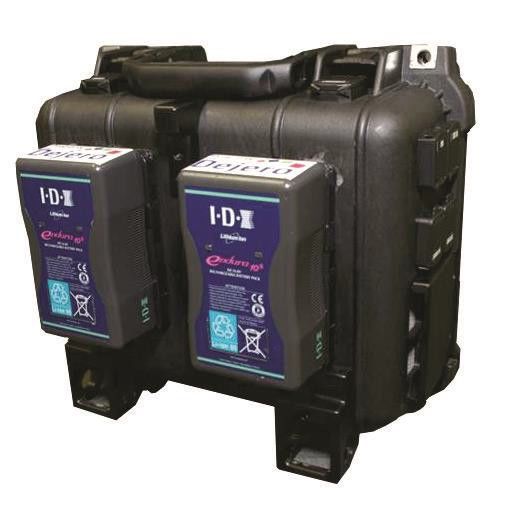
Sound meters are located along the bottom of the video window. Sound being sent out
can be raised or lowered by pressing the VOL UP or VOL DOWN buttons on the right.

            When the live shot is over, press the touchpad button beside the Stop icon
            FIRMLY (upper-right) to stop broadcasting video from the transmitter.
            Power the unit down with one FIRM press of the POWER button (be patient.)

 Removing Batteries

     •   Make sure the transmitter has completely shut down before removing the batteries.
     •   Remove each battery by pressing the release mechanism on the side of the battery mounting plates.
     •   Slide the battery off the plate.

 Oh, no, the batteries are dead, Jim!
 If you are completely out of battery power, and are near an electrical outlet, you can use the AC adaptor to
 power the transmitter, batteries should not be attached. The batteries will drain while the transmitter is
 using AC power.
 If you are not near AC power, but near a car, you can power the unit with the car cigarette
 lighter cable in the backpack unit.
 So, the transmitter can be powered by:
     •   Two batteries mounted onto the battery plates (two fully charged batteries provide a run time
         of approximately t w o hours)

     •   Universal AC/DC power adapter (DC IN 4 Pin XLR connector on the side of the unit)
     •   Car charger adapter
Can I hot-swap batteries while the LIVE+ 20/20 Transmitter is running?
    •   If batteries still have some power, it may be possible to “hot swap” – replace
        one battery at a time with a freshly charged battery – without interrupting
        operation. Do not attempt to operate device on a single battery for longer
        than it takes to perform the swap.

The LIVE+ 20/20 Transmitter is not powering on
    •   Make sure you are using freshly charged batteries and that they are securely seated
        in the battery mounting plates.
    •   If you are using AC power, confirm all cable connections are secure. Make sure the
        blue light on the converter box is illuminated, indicating power is supplied by the AC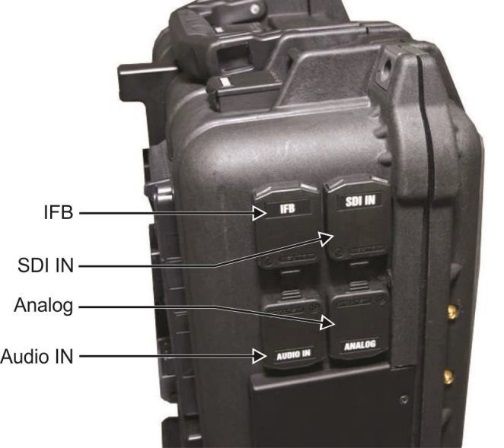
Extra Stuff

Are you near a live Internet Ethernet Cable? Connect Ethernet!
The Ethernet port on the transmitter provides the option to broadcast using an Ethernet connection.
You can choose to transmit via Ethernet only, or Ethernet and cellular networks simultaneously. Go to
the Configuration window, press the “Connection” touchpad button and then select either “All” or
“Ethernet Only”.

Broadcast using Ethernet
    1. Plug the Ethernet cable into the Ethernet input port on the transmitter.
    2. Once the transmitter is powered on, access the Configuration window and specify whether you
       want to transmit over cellular networks and Ethernet simultaneously, or only over Ethernet.

Record Video Directly to Dejero to Send Back to Newsroom

You can record video directly into the Dejero unit, and then send it back to the newsroom.
In the center of the screen on the right hand side there is a button labeled ‘Mode’, which allows quick
switching between ‘Live’ mode, and a RECORD/SEND mode.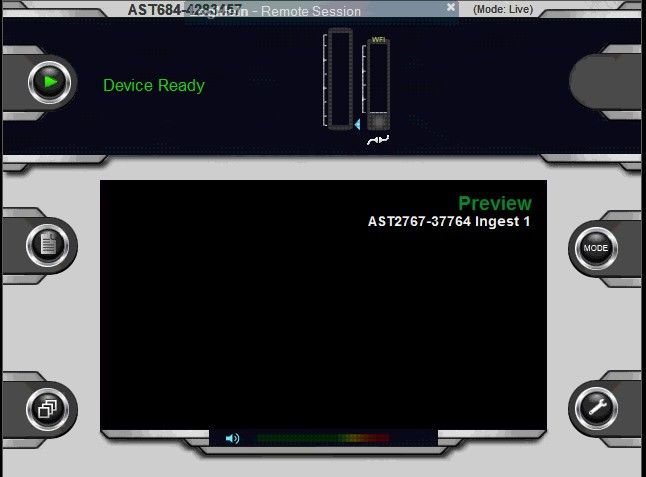
To record video into the Dejero:

    •   press the MODE button until the words NCC NEWS DEJERO disappear from the preview screen
    •   press the DEVICE READY button (in the upper left) to start recording, and the STOP button in
        the upper-right to stop recording
    •   to send a clip back to the newsroom, press the middle left button to SELECT clip – MULTIPLE
        CLIPS can be selected!
    •   When the clip(s) is selected (highlighted in green), press the ACTIONS button in the lower left
    •   Finally, press the TRANSMIT CLIP button
    •   Contact the newsroom when finished to let them know the files are available
    •   Press the EXIT button to return to the main screen
    •   Press the MODE button until you see NCC NEWS DEJERO in the preview window, to return to
        “LIVE” mode
You can also read