Leverage TesTing Device - Owner's Manual & User Guide - Copyright 2009 - All Rights Reserved
←
→
Page content transcription
If your browser does not render page correctly, please read the page content below
TM

Leverage Testing Device
 Owner’s Manual & User Guide

     Copyright © 2009 - All Rights Reserved   Version: 1.1
KrosschecK™ Leverage Testing Device
Owner’s Manual & User Guide

                                             Contents
     Recommended Use of the KrosschecK™ Device.......................................1
     Component List & Assembly............................................................................2
     Application Instructions..................................................................
                 General Notes & Recommendations..............................................3
                 Preliminary Guidelines........................................................................5
                 Attaching the Leverage Testing Device........................................6
                 Leverage Testing Evaluation Protocol...........................................7
     Leverage Testing Results.................................................................................10
     Treatment Recommendations.......................................................................11
     Warranty & Contact Information..................................................................12

 Recommended Use of the KrosschecK™ Leverage Testing Device
       The KrosschecK™ Leverage Testing Device (KLTD) is designed as a complimentary work-
 up tool for veterinarians and farriers. This tool can be included in the standard lameness
 evaluation workflow to both add information for forming a diagnosis, as well as contribute
 to the structuring of a treatment plan. When the KLTD is used in conjunction with gait evalu-
 ations, nerve blocks, flexion tests, radiographs and other diagnostic imaging techniques, the
 ability to pinpoint a diagnosis can improve. Moreover, the use of the Leverage Testing Device
 encourages a close working relationship and participation between the veterinarian, farrier,
 horse owner and the horse. All members of the “Team” are able to offer input and hopefully
 make contributions that will ultimately help correct or at least improve the comfort and well-
 being of the horse.
      Here is what Dr. Gayle Trotter had to say about the inclusion of Leverage Testing in a
 veterinarian’s lameness workup protocol.
 “With an accurate presumptive diagnosis for lameness in horses, appropriate correc-
 tive measures often lead to a successful conclusion. However, chronic lameness can
 often present a disappointing challenge for many veterinarians. Leverage testing, and
 the interventions indicated by the testing results, offers options to help improve func-
 tion in some of these cases. By paying careful attention during testing, and conscien-
 tiously monitoring case progress (and changing treatment as necessary) some of these
 cases can have significant improvement in their clinical signs and a return to useful
 function.” ~ Dr. Gayle Trotter, DVM, MS, Diplomate ACVS

                                                                                                                   1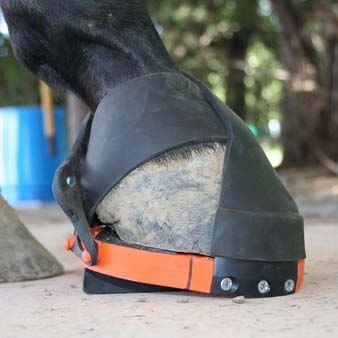
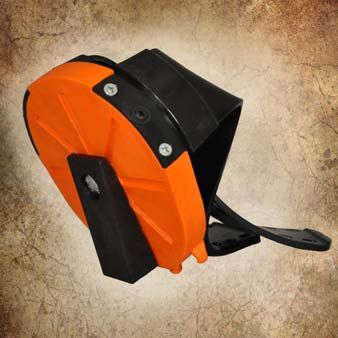
Component List & Assembly
        Base Plate (Sm, Md, Lg, XL)                              Wedged Dial
                                                               (Sm, Md, Lg, XL)

       Strap (x2)
    (Sm/Md or Lg/XL)

                                                          D

                                                          G

                                         B

                                     C
                                             B            F
                                                           E

                                                                   A
                               Carriage Bolt      Screw (x4)           Pan Head Screw (x2)
                                 5/16 x 1”         #8 x 3/4”                 #8 x 1”

                                                               B                    C
                                         A

                                                                   F               G
     *Non-Skid Adhesive                            E       Flat Washer        Flat Washer
      Pad Not Shown in             D              Wave     3/8 x 3/16”        3/8 x 1/16”
       Illustration. It is   5/16 Nylock Nut     Washer
     applied to the FOOT
     Surface of the Base
              Plate
2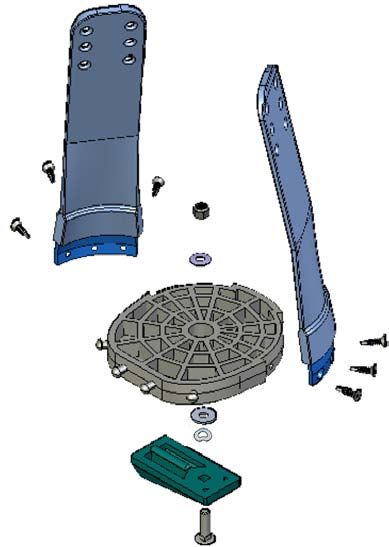
KrosschecK™ Leverage Testing Device
Application Protocol

                    Application Instructions
 General Notes & Recommendations:
      Prior to strapping the KrosschecK™ Leverage Testing Device (KLTD) to the horse’s foot,
 there are several tips and guidelines to cover.
 1. WARNING - The KrosschecK™ Device is primarily constructed of plastic, and although it
 works well on many surfaces, it can be slippery on some concrete finishes. For safety reasons,
 we highly recommend using the device only on rubber mats or firm dirt surfaces. We cannot
 be responsible for accidents that may occur if the device is used on slick concrete finishes.
 2. The veterinarian or the farrier working on the case who will be in charge of making the
 grading evaluations needs to be the person picking up the foot that does not have the KLTD
 attached to it. A different individual that will not be responsible for evaluating the leverage
 grades can attach the boot and rotate the dial on the bottom of the device.
 3. The person picking up the non-booted foot needs to remain consistent in how they ap-
 proach the horse and how they pick up the foot. This will yield the most consistent informa-
 tion from the horse.
 4. If at all possible, shoes should be removed prior to applying the KrosschecK™ Device.
 Reason for removing shoes are:
      - Fitting the device is more difficult with the thickness of a shoe.
      - Shoes/nails tear up the non-skid material on the foot side of the device.
      - Removal of some flares or dorsal wall distortion may be necessary to get a proper fit
      and foot alignment on the device.
 5. It is important to make sure that nerve blocks and/or sedation affects are worn off prior
 to doing the Leverage Testing procedure. The horse needs to be able to give a true pain re-
 sponse to the leverage test in order to offer
 reliable information. In addition, it is impor-   Fig. 1
 tant for the horse to feel “TRUE” discomfort
 so that they do not incur further injury from
 having the foot leveraged.
 6. When selecting the proper size boot, it is
 important to align the center of the KLTD as
 closely as possible to the center of articula-
 tion of the distal interphalangeal (DIP) joint.
 The center of the KLTD is basically the center
 of the attaching bolt for the wedged dial.
 (Fig. 1) To accurately locate the center of
 the DIP joint, we recommend using the NB
 Hoof Mapping Protocol as established by the
 Equine Lameness Prevention Organization.
                                                                                                3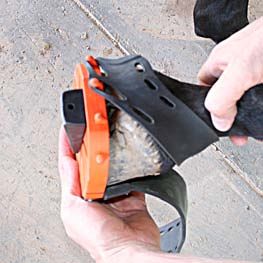
For the most current version please visit the ELPO website: www.e-hoofcare.com.
In general, the center of the DIP joint is found through the combination of 3 methods, or the
best 2 out of 3 in cases where all 3 do not fall in line with each other.
     A - Measure back 1” (on medium size foot) from the TRUE (exfoliated) frog apex and
     make a mark.
     B - Mark the termination point of the bars into the frog commissures on both sides of
     the frog. Generally there will be a ‘swell’ or reverse arc in the commissure that indicates
     the true termination of the bars.
     C - Scribe a line along the sole/wall junction on both sides of the quarter region on
     each foot. It may be necessary to remove some chalky sole material to see this
     junction clearly. Visually or with a straight edge, mark the ‘peak’ or most outside point
     of that arc. This is generally the widest part of the ‘sole’.

    A                               B                                C

If all 3 locations line up, connect the lines with a marker. If only 2 of the 3 line up, use those
locations and scribe a line across the foot. This will get you relatively close to the center of
articulation of the DIP Joint. Continue the line at the widest part up on to the outside of the
hoof wall. This will make it easier to align it with the center of the KLTD.

             Too Small                                                  Too Large

                                           Correct Fit

4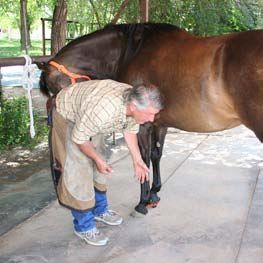
KrosschecK™ Leverage Testing Device
Application Protocol

 Preliminary Guidelines
 1. As mentioned in the recommendations earlier, horseshoes should be removed
 prior to establishing a baseline and applying the KrosschecK™ Leverage Testing De-
 vice. However, we DO NOT recommend trimming the foot before leverage testing
 so that you can get a true reading on how hoof distortions may be affecting the
 lameness. An exception to this rule would be if there exists a gross amount of hoof
 distortion and you cannot effectively get the KLTD lined up and attached to the
 foot. In that situation, you may need to have SOME OF the distortions/flares re-
 moved. Do be conservative though, as you will want to leave enough foot to work
 with for establishing a properly balanced foot later on.
 2. Documenting the results of the Leverage Test is a key factor in having success
 with the KLTD. [Data Collection Forms (in tripli-
 cate) have been provided in your KLTD Kit and you
 can order more from EDSS, Inc. (719) 372-7463. You
 can also download forms from our website and print
 them out at your convenience.] Therefore, prior to
 establishing a baseline and attaching the KLTD, we
 recommend you fill in all the required information
 on the form, or have an assistant do it for you.
 3. The primary veterinarian or attending farrier who
 will be determining the leverage grades must first
 establish a BASELINE reading prior to the KLTD be-
 ing attached to the horse’s foot. When you decide
 which foot you would like to test first, you estab-
 lish a baseline by picking up the opposite foot. For          Figure 2
 example, if you are going the TEST the Right Front
 foot, you will pick up the Left Front foot to deter-
 mine the comfort level of the horse while stand-
 ing primarily on the Right Front foot. (Figure 2)
 Along with determining the comfort of the weight
 bearing on the Right Front, you will also be judg-
 ing how easily or compliant the horse is to having
 their feet picked up in general. You should pick up
 the foot at least 2 to 3 times in order to determine
 an average response from the horse. It is also im-
 portant to establish a consistency in the way you
 ASK for the horse’s foot. (Figure 3) If your approach
 to the horse and to the limb is not consistent, your
 leverage testing results will be less accurate.
                                                               Figure 3
                                                                                   5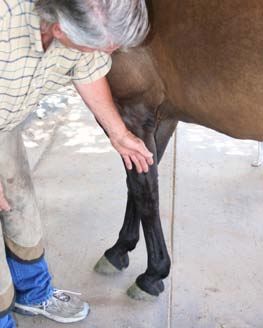
Attaching the KrosschecK™ Leverage
Testing Device to the Foot
4. Select the proper size KrosschecK™ Device using
the guidelines mentioned earlier (e.g. The center
of the foot [widest part of the foot] should line
up with the center of the KLTD.) (Figure 4) Always
make sure that you start with the Wedged Dial in
the center heel position. (Figure 4)
5. Slide the foot into the KLTD making sure that the
toe quarters of the foot are pressed firmly against
the base of the attaching straps. The rubber sur-
face of the straps will help hold the foot in place
during the leverage testing process.
6. Reach around to the front of the foot and grab
one of the attaching straps. (Figure 5) Pull the strap       Figure 4
across the toe to
the opposite side
of the hoof, then
wrap it around the
diagonal heel bulb
and attach the end
of the strap to the
pegs on the back
of the base plate.
(Figure 6)      The
PEGS that you will
hook the end of                  Figure 5                    Figure 6
the strap to will be
on the same side
of the KLTD as the
attached end of
the strap.
7. Next, reach un-
der and grab the
other strap and
again pull it across
the toe to the op-
posite side of the
foot. (Figure 7)
                               Figure 7                         Figure 8
The strap should
then wrap over the heel bulbs and attach to the pegs on the same side of the boot.
Once both straps are hooked over the pegs, they should have crossed over each
other both on the front of the foot and at the heel bulbs. (Figure 8)

6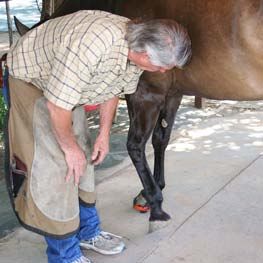
8. Once the KLTD is securely attached to the foot and placed on the ground, adjust
the straps so that they cross the ankle comfortably. (Figure 9) If the straps are too
low on the hoof capsule, they will not hold the foot as securely. (Figure 10)

                      Correct                            Incorrect
                  Figure 9                              Figure 10
Note: To help keep the KLTD in good, working condition, set the foot on the ground,
rather than letting it drop. Repeated slamming and jabbing of the toe of the boot into
the ground may wear on the attachment support piece.

Leverage Testing Evaluation Protocol
9. After attaching the KLTD and placing the foot on
the ground, the horse may move their foot around
and seem uncomfortable, especially if they are not
use to having anything attached to their feet. Do
not misinterpret this response as “pain” discom-
fort. The horse may need a moment to become
use to the device being attached to the foot. They
will usually become comfortable with it and then
you can start your evaluation. Please note how-
ever that if the horse has had the KLTD on for sev-
eral minutes without any fidgeting or apprehen-
                                                               Figure 11
sion, and then becomes uneasy or unable to find
a comfortable spot, then this is mostly likely due
to actual pain or discomfort. We will cover more on
reading the responses later.
10. Once the horse has become use to the device
being attached to their foot, you can begin your
evaluation. Start by picking up the foot that does
not have the device attached to it. Again, the way
you approach the limb and pick up the foot should
be the same as when you established your baseline.
(Figure 11 & 12) Once you have picked up the foot,
you will normally only hold it up for 2 to 3 seconds.
At this time, you should be forming a judgement on             Figure 12
                                                                                     7
(A) how easily the horse picked the foot up, and (B)
how willingly the horse holds the foot up or how
urgent they are about putting the foot back down.
11. After 2 to 3 seconds, you will then place the foot
back on the ground. At this stage you will evalu-
ate (C) how quickly and how much they load the
foot you just put back on the ground, and (D) how
quickly and how much they unload the foot with
the KLTD attached to it. (Figure 13)
12. You will repeat steps 10 and 11 at least 2 or 3
more times. Your final “grade” will be determined                Figure 13
from your evaluation of the horse’s response
throughout the whole process. Simply doing steps 10 and 11 one time will generally
not give you enough “real” information because the horse may be a little apprehen-
sive about what will happen when they pick up the non-booted foot. The second
and third time you pick up the foot will usually yield the best information.
13. Additional responses from the horse can sometimes offer meaningful informa-
tion as well. These are often times things that are noticed by your assistant, the far-
rier, or the horse’s owner. For example, the position of the other feet in order to
re-distribute weight loading, attention or focus of the horse, licking & chewing to
denote a feeling of relaxation, etc. can all be meaningful bits of information. In time,
your personal experiences with the KLTD and the participation of the owner will likely
enhance the usefulness of the Leverage Testing process in your diagnostic protocol.
14. Once you have completed all the required steps, you will need to make a deter-
mination of the Leverage Testing Grade for that foot with the Wedged Dial in the
current position. The grading scale is located on the Data Collection Form and is
listed below as well.

                 -1                                -2                                 -3
            Mild Dislike                   Moderate Dislike                     Strong Dislike
     Will Pick Up Other Foot But         Will Pick Up Other Foot with    Unwilling to Pick Up Other Foot
     Will Not Hold it Up For Long.      Hesitation, But Anxious to Put    or Cannot Even Get Foot with
     Unloads Other Foot Faster        it Back on the Ground. Unloads     Leverage Device Placed on the
         Than The Base Line.            Leveraged Foot Immediately.        Ground Due to Discomfort.

                                        Displays No Definite Comfort or Discomfort with the Position of
     0 (Neutral)        Indifferent             the Leverage Device. Similar to the Base Line.

                +1                                 +2                                +3
             Mild Like                       Moderate Like                       Strong Like
     Willing to Pick Up Foot. Not In More Willing to Pick Up Foot. Picks Up Foot Without Asking.
     a Hurry to Place it Back on the Slow to Put Foot Down. Not    Holds Foot Up After Letting Go.
    Ground. Unloads the Other Foot Eager to Unload the Other Foot.  Does Not Unload Leveraged
    Similar or Slower than the Base  Relaxes and May Elicit Some Foot. Lots of Licking & Chewing.
                   Line.                 Licking & Chewing.
8
15. After you have decided on a leverage evaluation grade for the foot with the
wedged dial in the current position, you can turn the dial to the next recommended
location. To turn the wedged dial, simply lift the thicker outside portion slightly and
push the dial to the desired position. There is a locking mechanism molded into the
base plate surface of the wedged dial that will fall into each groove as you rotate the
wedge. If you find moving the wedged dial difficult, we have included a “Dial Handle”
that can be inserted into the hole at the end of the wedge to make lifting and rotating
easier. Below is a diagram that shows the recommended leverage testing sequence.
You can modify it slightly to suit your own needs if necessary, but do keep in mind
that you should always work in diagonals around the foot.
16. Repeat Steps 10 - 15 for each Wedged Dial position.

     #1 - Center Heel             #2 - Center Toe             #3 - Lateral Quarter

  #4 - Medial Quarter             #5 - Lateral Toe              #6 - Medial Heel
    Lateral Side

                                                                              Medial Side

                    #7 - Medial Toe              #8 - Lateral Heel
                                                                                            9
Leverage Testing Results
When you have tested the horse in each position and recorded the grades, you
will need to evaluate your results for both diagnostic and treatment development
purposes. As mentioned at the start of this guide, the Leverage Testing Device is
intended to be used in conjunction with your other diagnostic and imaging pro-
tocols. The results of the leverage test may offer some supporting information for
a diagnosis that has already been established, or it can offer a direction for focus-
ing specific imaging methods such as Radiographs or MRI. The following table is
simply a general reference guide for primary structures that are most likely being
influenced through the leverage testing. This is not to be considered a guide for
determining a specific diagnosis, nor is this a list of ALL structures being affected.
Table of Affected Structures
Position of Primary Structures Affected or Influenced
Wedge Dial
- Decreased Tension of Deep Digital Flexor Tendon
#1 (Heel) - Third Interosseus Muscle (Susp. Lig.) & Extensor Branches of Susp. Lig.,
- Increased Tension of Dorsal Digital Extensor Tendon
- Increased Tension of Deep Digital Flexor Tendon
- Third Interosseus Muscle (Susp. Lig.) & Extensor Branches of Susp. Lig.,
#2 (Toe) - Decreased Tension of Dorsal Digital Extensor Tendon
- Increased Tension on Impar Ligament
- Increased Tension on Collateral Sesamoidean Ligament
- Increased Tension of Medial Collateral Ligament of DIP & PIP Joint
- Decreased Tension of Lateral Collateral Ligament of DIP & PIP Joint
#3 (Lat. Qtr.)
- Coffin Joint Surface (contact on lateral side)
- Increased Tension of Medial Collateral Sesamoidean Ligament
- Increased Tension of Lateral Collateral Ligament of DIP & PIP Joint
- Decreased Tension of Medial Collateral Ligament of DIP & PIP Joint
#4 (Med. Qtr.)
- Coffin Joint Surface (contact on medial side)
- Increased Tension of Lateral Collateral Sesamoidean Ligament
- Increased Tension of Palmar Medial Collateral Ligament of DIP Joint
#5 (Lat. Toe) - Decreased Tension of Dorsal Lateral Collateral Ligament of DIP Joint
- Increased Tension of Medial Collateral Sesamoidean Ligament
- Increased Tension of Dorsal Lateral Collateral Ligament of DIP Joint
#6 (Med. Heel) - Decreased Tension of Palmar Medial Collateral Ligament of DIP Joint
- Decreased Tension of Medial Collateral Sesamoidean Ligament
- Increased Tension of Palmar Lateral Collateral Ligament of DIP Joint
#7 (Med. Toe) - Decreased Tension of Dorsal Medial Collateral Ligament of DIP Joint
- Increased Tension of Lateral Collateral Sesamoidean Ligament
- Increased Tension of Dorsal Medial Collateral Ligament of DIP Joint
#8 (Lat. Heel) - Decreased Tension of Palmar Lateral Collateral Ligament of DIP Joint
- Decreased Tension of Lateral Collateral Sesamoidean Ligament
*The above table is only offered as a general guide. The participation of a qualified equine veterinarian and the use of further
imaging diagnostic equipment may be required to verify any findings on a per horse basis.
10Treatment Recommendations
It is our opinion that unrecognized and untreated hoof capsule distortions are
a major contributing factor in many common lameness issues today. The Instruc-
tional DVD includes specific guidelines for preparing feet to minimize or eliminate
hoof distortion. For best results, these guidelines should be closely followed. The
type or style of shoe that is applied to the foot is less important than the hoof trim-
ming. In many cases where the Leverage Grade varies by only 1 or 2 points from
one position to its diagonal position, the lameness can usually be greatly improved
through the recommended hoof preparation guidelines. In circumstances where
the point spread from one position to its diagonal position is 3 or more, then a
temporary mechanical apparatus (like a wedge rail) may be required in addition to
the recommended hoof preparation protocol. Extra prosthesis or apparatuses built
into the shoe or added to the shoe should be used with caution and monitored
closely by the attending veterinarian and farrier. Examples of available mechani-
cal devices and possible applications will be available on our website as they are
submitted.
For full details on the recommended hoof preparation protocol, please visit our
website. Below is a list of “general” guidelines we recommend for optimal treat-
ment results.
1. The live, “functional” sole should be used as your primary guide for trimming the
hoof wall to achieve medial/lateral and dorsal/palmar balance.
2. Heels should be prepared so they:
a) have a similar curvature
b) end close to the back of the frog (usually within 1/4”)
c) are close to the level of the live sole
d) offer a solid base of support for the back of the foot
3. The sole in the toe region should not be over-trimmed. Only chalky, exfoliating
material should be removed.
4. The hoof wall in the toe-quarters (pillars) should be prepared close to the level
of the live sole and at an equal height on each side relative to the live sole.
5. The hoof wall should be dressed to eliminate flares and to achieve a uniform
wall thickness all the way around when viewed from the bottom.
6. The hoof wall should be dressed prior to fitting shoes so that the shoe is not
shaped to match flares or distortions.
7. The foot surface of the shoe should be equally distributed around the widest
part of the foot from a dorsal/palmar perspective.
8. In most instances, a slight roll in the toe of the shoe is helpful for minimizing
leverage on the internal structures, especially in cases where lameness exists.
9. Shoes with a half round or beveled outer perimeter are helpful for cases where
lameness exists, especially for horses that turn circles.
111 Year Limited Warranty
The KrosschecK™ Leverage Testing Device comes with a 1 Year Limited
Warranty on Product Defects & Failures. Certain components are susceptible
to damage from normal wear and tear while using the device. Under the
Warranty, we will replace the following components should they become unus-
able.
- Wedged Dial (Up to 2 Wedge Dials Per Size can be replaced under the
terms of the warranty.)
- LTD Strap (Up to 4 Pairs of Straps Per Size can be replaced under the terms
of the warranty.)
- Non-Skid Adhesive Pad (Up to 3 Pads Per Size can be replaced under the
terms of the warranty.)
- Base Plate (1 Base Plate Per Size can be replaced under the terms of the
warranty. Proof of Defect or Damage must be submitted to qualify for replace-
ment.)
- Bolts, Screws & Fasteners (Can be requested with replacement parts.)
To qualify for replacement of defective or damaged components, you must
Register your Warranty prior to making a claim. Without a valid Warranty
Registration, we cannot process replacement requests.
You can Register your Warranty by Mail or Online at: www.LeverageTesting.com
Contact Information
Technical Support, Purchasing & Product Replacement (Outside Europe)
Equine Digit Support System, Inc.
506 State Hwy 115 ~ Penrose, CO 81240 ~ USA
Phone: (719) 372-7463 ~ E-mail: edssinc@nbhoofcare.com
www.nbhoofcare.com
Technical Support, Purchasing & Product Replacement (Europe)
Total Foot Protection, Ltd.
Bridge House Equestrian Centre ~ 5 Oaks Road
Horsham ~ West Sussex ~ United Kingdom ~ RH13 0QW
Tel: +44 (0)1403 791000 ~ Website: www.totalfootprotection.com
Documentation & Additional Product Information
www.LeverageTesting.com
12You can also read