Madrid e-Filing (International Registration for Trade Marks) User Guide - May 2019 - IP Australia
←
→
Page content transcription
If your browser does not render page correctly, please read the page content below
Madrid e-Filing (International
Registration for Trade Marks) User Guide

May 2019

ISBN 978-1-925245-35-6 (Online)
Copyright
All content in this publication is provided under a Creative Commons Attribution
4.0 International (CC BY 4.0) licence.
http://creativecommons.org/licenses/by/4.0/ with the exception of:
• the Commonwealth Coat of Arms,
• IP Australia’s corporate logo
• photographs of our staff and premises
• content provided by third parties – including photographs, logos, drawings
     and written descriptions of patents and designs

Third party copyright
IP Australia has made all reasonable efforts to:
• clearly label material where the copyright is owned by a third party
• ensure that the third party has consented to this material being presented
     in this publication.
Permission may need to be obtained from third parties to re-use their material.
© Commonwealth of Australia 2015 [Reprinted with corrections: January 2018]

Attribution
The CC BY licence is a standard form licence agreement that allows you to
copy and redistribute the material in any medium or format, as well as remix,
transform, and build upon the material, on the condition that you provide a link
to the licence, you indicate if changes were made, and you attribute the
material as follows:

Licensed from the Commonwealth of Australia under
a Creative Commons Attribution 4.0 International Licence.

Contact us (www.ipaustralia.gov.au) if you have any enquiries about
IP Australia’s copyright licence or the use of material in this publication.
Contents
1       Introduction ......................................................................................................................................... 1
2       Access to Madrid e-filing ...................................................................................................................... 1
3.      Changing the access user name ............................................................................................................ 3
4.      Madrid International Trademark System .............................................................................................. 4
     4.1       Applicant request list .................................................................................................................... 4
     4.2       New request (application) ............................................................................................................ 6
     4.3       Designated contracting parties ..................................................................................................... 9
     4.4       Applicant .....................................................................................................................................11
     4.5       Representative ............................................................................................................................13
     4.6       Languages and correspondence ...................................................................................................14
     4.7       Mark ...........................................................................................................................................15
     4.8       Goods and services ......................................................................................................................19
     4.9       Limitations ..................................................................................................................................22
     4.10      Claimed priorities ........................................................................................................................25
     4.11      MM17 .........................................................................................................................................27
     4.12      MM18 .........................................................................................................................................29
     4.13      Attachments ................................................................................................................................30
     4.14      Fee calculations ...........................................................................................................................31
     4.15      Validation ....................................................................................................................................32
     4.16      Payment ......................................................................................................................................33
     4.17      Summary .....................................................................................................................................35
5.      Responding to a formalities issue ........................................................................................................36
     My requests ............................................................................................................................................38
6.      Certification ........................................................................................................................................44

Revision history

Date                             Amendments

28/02/2017                       Document Controlled

01/08/2017                       System enhancements including electronic MM18 form and payment procedures

18/01/2018                       System enhancements to payment procedures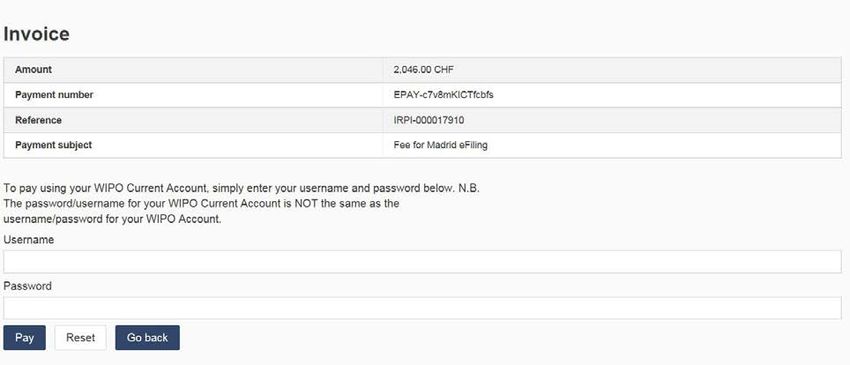
1/2/2019   System enhancements including electronic MM17 form

1/5/2019   System enhancements including the Limitation procedures
1 Introduction
Madrid e-filing is a web solution designed to facilitate easy filing of an international trade mark application
within the Madrid System. It allows an applicant or agent to electronically file the application to the Office
of Origin (IP Australia). IP Australia will then do the minimum filing check before sending the certified
application to WIPO.
This guide is a quick introduction for the IP Australia customer that describes how the new Madrid
e-filing System can be used for electronic transmission of the International Registration
Application/s.
2 Access to Madrid e-filing
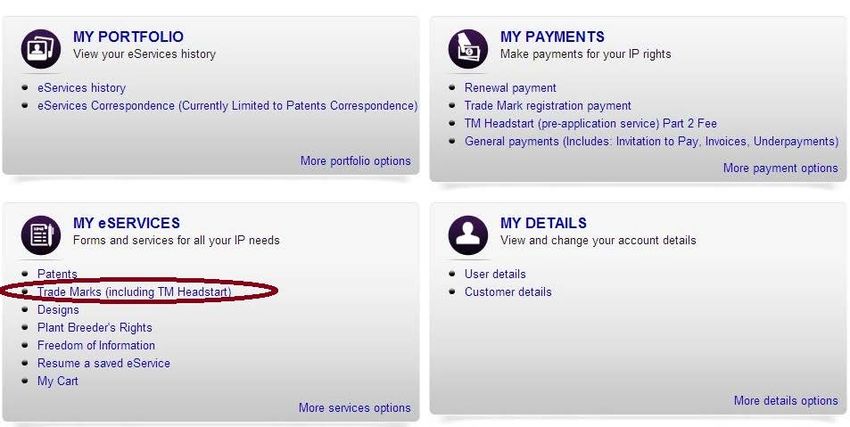
1. Logon to the IP Australia eServices portal and find the eServices home page.
2. Select the ‘Trade Marks (including TM Headstart)’ link.
3. You will then be taken to the Trade Marks eServices menu. From this menu, select the
‘Application for International Registration (Madrid Protocol)’ link.
1
This document is controlled. Its accuracy can only be guaranteed when viewed electronically.
Effective Date: 1 May 2019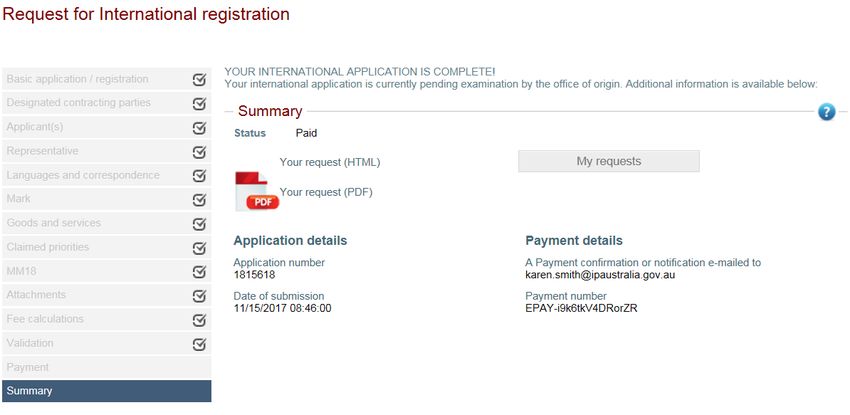
4. You will be prompted prior to being navigated directly to the WIPO Madrid e-filing System.

5. Select the ‘Apply for International Registration using WIPO Madrid e-filing System’ link.
6. You will then be taken to the ‘My requests’ page of the Madrid International Trademark System

                                                                                                   2
This document is controlled. Its accuracy can only be guaranteed when viewed electronically.
Effective Date: 1 May 2019
3. Changing the access user name
1. It is not possible to change the user name. However, a user may give access to or share requests with
another registered user.
          •     e.g. person 1 files an international application then decides that person 2 or a general user
                name needs access to the records or to be able to file another application. To do this you may
                share requests with other users

2. Log on under person 1’s user name, then proceed to the “My tasks” screen. Click on “Settings” in the
right hand corner

3. The screen below will appear. Under the heading “Share requests with other people”, enter person 2’s
user id and their email address in the relevant fields. Click on “Add member” and the details will be listed
below. You must now click on “Save”
          •     NOTE: Careful consideration should be given before sharing a user id with anybody, all users
                will be able to file new applications and view all records

                                                                                                                 3
This document is controlled. Its accuracy can only be guaranteed when viewed electronically.
Effective Date: 1 May 2019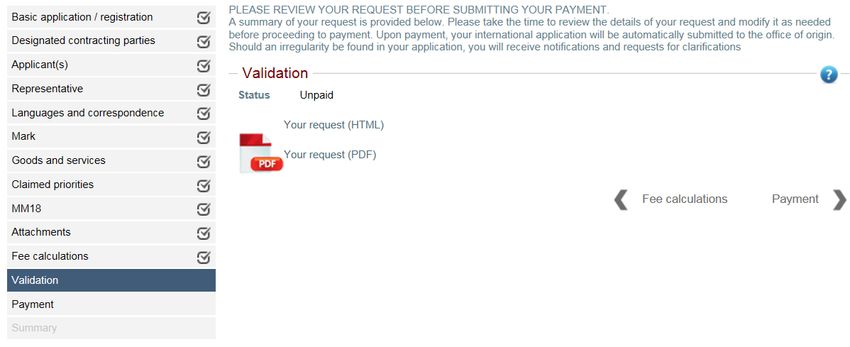
4. Madrid International Trademark System

4.1 Applicant request list
1. Upon logging in, you will see the request list as your home page.
2. The request list displays the list of all the applications for the user in their various states.

3. The following columns are displayed:
       • Number – The Australian Basic Application (BA) or Registration number (BR)
       • My reference – Your reference details are entered for the application
       • Mark text – Displays the name of the mark or the text
       • Updated – Date when the application was last updated
       • Paid – Displays if the application has been paid for or not.
       • Status – The status at which the application is at. List of statuses can be:
               • Incomplete request – An application that has been started by you but not
                  completed. You have full access to the application.
               • Submitted to office – A completed application that has been submitted to IPA
                  office for verification. You have view only access to the application.
               • Office examination – An application that the IPA office has started verifying. You
                  have view only access to the application.
               • Correction pending - An application that IP Australia has started verifying and
                  identified issues that are required to be fixed by you before proceeding forward.
                  You have limited access to update the application.
               • Submitted to WIPO – A certified application that has been submitted to WIPO
                  for processing. You have view only access to the application.
            •    Clicking on this       will display additional details for the application (Filing language;
                 Applicants Reference; Mark text; WIPO service request number). Different action and
                 details will be displayed depending on the application status.

                                                                                                                4
This document is controlled. Its accuracy can only be guaranteed when viewed electronically.
Effective Date: 1 May 2019
o     Incomplete request – Only an incomplete request can be deleted (not submitted
                            to WIPO/Australia).

                      o     Submitted to Office & Office Examination – Allows you to view the submitted
                            request.

                      o     Correction Pending – Allows you to view the irregularities created by the
                            National Office for the application.

                                                                                                          5
This document is controlled. Its accuracy can only be guaranteed when viewed electronically.
Effective Date: 1 May 2019
4.2 New request (application)
1. To create a new application click on the New Request Button.

2. You will be taken to the Basic Application/Registration screen.

3. To access Help, click on the question mark      icon
        • a pop-up box may appear at the bottom of the screen, click on “show all content”
        • click on the question mark icon again and the text will appear
        • this will have to be done in every screen.

4. Enter the reference details for your application.

5. Click on the Import trademark button.
6. You will then be taken to the Import trademark screen.
7. Choose to search by the Australian Basic Application or Registration number and click ‘search’.
       a. The Basic Application or Basic Registration details are required for you to proceed
           further with your application.

                                                                                                 6
This document is controlled. Its accuracy can only be guaranteed when viewed electronically.
Effective Date: 1 May 2019
8. The system displays the Australian Basic Application or Registration details
9. Confirm that the correct trade mark is displayed and click OK.
10. You will be presented with the Basic Application/Registration screen.
a. You can choose to have multiple basic applications or registrations but they MUST ALL
be the same representation e.g. TM 874843 – NORWOOD, 884459 – NORWOOD,
995652 – NORWOOD. The first trade mark entered will display and is considered as
the main one to be used by the IP Australia for verification.
b. The first Basic Application or Registration details cannot be deleted once you move to
the next tab (Designated contacting parties tab).
c. If the record has been saved and you wish to delete the first number, you must go back
to the My Requests screen, click on the icon, and click on delete. To start again,
you click on New Request.
7
This document is controlled. Its accuracy can only be guaranteed when viewed electronically.
Effective Date: 1 May 20198 This document is controlled. Its accuracy can only be guaranteed when viewed electronically. Effective Date: 1 May 2019
4.3 Designated contracting parties

1. Once the Australian Basic Registration or Application record has been selected, click on the
   ‘designated contracting parties’ button to proceed with the application.
2. You will be taken to the ‘Designated contracting parties’ screen.

3. The system displays the list of all the countries in alphabetical order that you can designate.
4. Select the countries you want to designate.

                                                                                                     9
This document is controlled. Its accuracy can only be guaranteed when viewed electronically.
Effective Date: 1 May 2019
5. Click on the ‘Applicant’ button to navigate to the next screen.
10
This document is controlled. Its accuracy can only be guaranteed when viewed electronically.
Effective Date: 1 May 20194.4 Applicant
1. The system will display the Applicant Name retrieved from the Australian Basic Application or
Registration.
2. Click on the applicant name and you will be taken to the Add/Edit Applicant screen to modify
the details.
a. Existing applicant details stored against the Australian Basic application or registration
will be auto populated. Verify and correct details if required.
b. A valid email address and telephone number is mandatory if you don’t designate a
representative.
OR
c. You have the capability to add additional applicants by clicking on the Add another
Applicant Button. The button will take you to a blank Add/Edit applicant screen to enter
details.
d. You can delete the additional applicant if required, but at least one applicant for the
application is mandatory. Note: all applicants must be same as what’s on the basic
application or registration
3. Select the Applicant Type; the applicant can be either a Physical Person or a Legal Entity.
11
This document is controlled. Its accuracy can only be guaranteed when viewed electronically.
Effective Date: 1 May 20194. The Entitlement to File section will open and the system will display different data fields
depending on the applicant type selected
.
a. Physical Person – If the applicant is a physical person, you must nominate as a national
or domiciled. Note: if domiciled, you need to supply a street address. A PO Box or c/o
is not acceptable.
b. Legal Entity - If the applicant is a legal entity, they must be a national of Australia or
there must be a real and effective industrial or commercial establishment in the territory
covered by the office of origin. Note: a street address is required. A PO Box or c/o is
not acceptable. If a PO Box or c/o has been provided as the applicant’s address, the
‘Provide another address’ tick box should be selected and further fields will display
where the street address can be entered.
c. Legal nature of the legal entity: e.g. Company Limited by Shares, Proprietary Limited,
Corporation etc.
• may be required by certain designated Contracting Parties; for example, if the
United States of America is designated, it is necessary to include these indications.
Note: we suggest you quote details in order to avoid any delays in processing your
application
• Country of legal entity – mandatory
• State of Incorporation – state legal entity is registered in – optional
5. Click on the ‘Representative’ button to navigate to the next screen.
12
This document is controlled. Its accuracy can only be guaranteed when viewed electronically.
Effective Date: 1 May 20194.5 Representative
1. The ‘Representative’ screen will auto populate with the details that appear on the basic
application.
a. Designating a representative is optional. If a representative has not been assigned,
then the email and phone number for the applicant are mandatory.
2. Verify the displayed details or edit if required.
3. Click on the ‘Languages and correspondence’ button to navigate to the next screen.
13
This document is controlled. Its accuracy can only be guaranteed when viewed electronically.
Effective Date: 1 May 20194.6 Languages and correspondence
Note: All fields are mandatory and the “Second language for European Union” field will only
populate if the European Union has been designated.
1. You may select from English, French and Spanish as your preferred language of
communication with WIPO.
2. You can only select English as your preferred language of communication with the Office of
Origin (IP Australia).
3. If you have designated the European Union, you must select a second language. Options for a
second language are French, Spanish, Italian or German.
4. If you have designated a representative, then all the correspondence will be sent to the
representative address.
a. If you have not appointed a representative, the system will default to the applicant’s
address.
b. You can choose to send the correspondence to another address. The system will allow
you to add additional address details.
5. Click on the ‘Mark’ button to navigate to the next screen.
14
This document is controlled. Its accuracy can only be guaranteed when viewed electronically.
Effective Date: 1 May 20194.7 Mark
1. Existing mark details stored against the Australian Basic application or registration will be auto
populated.
Note: If the ‘Kind’ and/or ‘Type’ is not correct, see the help text by clicking the question mark
icon and select accordingly
15
This document is controlled. Its accuracy can only be guaranteed when viewed electronically.
Effective Date: 1 May 20192. You must indicate the kind and type of mark.
a. If the mark is a word only DO NOT add any additional text/symbols. The trade
mark in the International registration must be identical to the basic trade mark.
The image representation section will not appear if the Mark Kind is a ‘word.’
Note: The system should automatically indicate that the mark be considered as a mark
in standard characters.
b. If the Australian Trademark is in colour, the system should automatically check the box
beside ‘the mark is in colour’. If the indication at this check box is not correct, please
amend as applicable. WIPO charge an administration fee to process colour marks. If
you do not wish to be charged this fee, you must request an amendment to the basic
mark to be converted to black and white or grey scale.
Note: This is separate to claiming colour as a distinctive feature.
c. The system allows you to claim colour as a distinctive feature of the mark. The ‘Colour
claimed’ section will only display if you have checked both the ‘Mark is in colour’ option
and then checked ‘The applicant claims colours as a distinctive feature of the mark’.
You must enter at least one colour.
Series Marks
a. There is no provision for Series marks to be filed under the Madrid Protocol. If the
trademark is a series mark, you must choose one mark from the series on which to
base your international application. If you wish to claim for all marks, you will need to
apply for a separate international application for each individual mark.
b. If it is a word mark, then delete the words in the series mark not being claimed and
leave the one that is
If it is an image, the system will auto populate the first image that appears on ATMOSS. If it
is not the image being claimed on the international application, then you must supply a
copy of the image, which is. If all the images of the series mark appear in the box, then you
must supply a copy only of the image which is being sought. This can be done by
uploading a file consisting of:
• a covering letter advising that the national application is a series mark and you are
applying for the attached mark
• a copy of the image as a separate attachment on its own.
Then in the Attachment Tab, click on “Add files” select the appropriate file, click on “Start
upload”. Note: you can’t jump to the attachment tab until the previous ones are
completed.
16
This document is controlled. Its accuracy can only be guaranteed when viewed electronically.
Effective Date: 1 May 2019Transliteration and Other mark information
a. You will be required to provide a transliteration for a Mark containing non-Latin
characters or non-Arabic numbers (such as Chinese characters).
b. You may tick the box ‘If the words contained in the mark have no meaning (and
therefore cannot be translated)’ or include a translation into English, French or Spanish.
This is optional.
c. Description of the Mark (optional) - where the basic application or basic registration
contains a description of the mark, the same description may, if the applicant so wishes
or if the Office of origin so requires, be included in this section. If a description is
provided, it must be a description of the mark and not, for example, a statement
concerning the use of the mark or its reputation.
17
This document is controlled. Its accuracy can only be guaranteed when viewed electronically.
Effective Date: 1 May 2019d. Voluntary description of the mark (optional) – any description of the mark, including the
description contained in the basic application or registration, if you were not required to
provide this description in the Description of the Mark field.
d. Verbal element details should be provided if the mark feature is a Combined (picture
and text logo). If these are not auto populated, then the customer should add them.
3. Click on the ‘Goods and services’ button to navigate to the next screen.
18
This document is controlled. Its accuracy can only be guaranteed when viewed electronically.
Effective Date: 1 May 20194.8 Goods and services
1. A pop-up box will appear advising edited goods and services cannot be broader than what is
on the basic application/registration. Click OK.
2. The system displays a list of all the existing goods and services details stored against the
Australian Basic application or registration.
Note: The only tool currently available is ‘MGS Manager’ (Madrid Goods & Services Manager).
When selected this will populate a ‘Check terms’ button which has been provided only as a tool to
assist with the acceptability of the claims.
3. Click on each Class for the system to display the full list of items claimed within that class.
19
This document is controlled. Its accuracy can only be guaranteed when viewed electronically.
Effective Date: 1 May 2019a. You can choose to either change the goods/services claimed by limiting them or you
can leave them exactly as they are on their Basic Application. Note: if you edit the list of
goods or services, the edited items cannot be broader in scope than those of the basic
application/registration.
b. Bilingual Display – Not applicable when applying for an international application via this
Office of Origin.
c. Edit – This button will allow you to change all the terms specified within that class. Or
you can click on the individual term to edit or remove it individually.
d. Remove selected terms – This button will allow you to remove all the terms that you
have checked. To re-enter the claim(s), click on edit.
e. Clear – This button will allow you to remove all the terms within that class (selected or
un-selected). To re-enter the claim(s), click on edit.
f. – This button will delete the whole class and all the terms listed within that class.
If you wish to undo the deletion, click on the down arrow in the New Class field and
select the relevant class number then click on the plus icon . Repeat if reversal of
deletion is applicable for other classes.
20
This document is controlled. Its accuracy can only be guaranteed when viewed electronically.
Effective Date: 1 May 2019g. The system will display a confirmation message for any amendments made to a class.
If you wish to proceed click the OK button.
4. Click on the ‘Limitations’ button to navigate to the next screen.
21
This document is controlled. Its accuracy can only be guaranteed when viewed electronically.
Effective Date: 1 May 20194.9 Limitations
1. To create a limitation list of goods and services for one or more designated contracting parties
(countries) click on the ‘Add a limitation’ button.
2. Click on the down arrow and select the country you wish to apply the limitation to and then
click on the plus sign . The country will then populate in the heading bar as well as in the left
of the window.
3. If the same limitation is required for another country, click on the down arrow, select the country
and click on the plus sign . Repeat if the limitation applies to further countries.
• To remove a country from the list, click on the cross to the left of the country name.
• To remove an entire limitation list, click on the cross on the right of the heading bar.
22
This document is controlled. Its accuracy can only be guaranteed when viewed electronically.
Effective Date: 1 May 20194. To display and add a class to the list:
• Click on the down arrow in the bottom right hand side of the window and select the
class required. Note: Only the classes listed on the international application will
populate for selection
• Click the plus sign
• Repeat for further classes.
• To remove a class, click the cross .
5. Click on the class to view the claims where you can:
• Click ‘Edit’, makes changes to the claims and then click ‘Ok’ to save the changes.
• Remove claims by ticking the box next to the relevant claim(s) and click ‘Remove
selected terms’.
23
This document is controlled. Its accuracy can only be guaranteed when viewed electronically.
Effective Date: 1 May 2019Note: The ‘Check terms’ button has been provided only as a tool to assist with the acceptability of
the claims.
6. Click on the ‘Claimed priorities’ button to navigate to the next screen.
24
This document is controlled. Its accuracy can only be guaranteed when viewed electronically.
Effective Date: 1 May 20194.10 Claimed priorities
Priority can only be claimed where the filing date of the earlier Application or Registration is within 6
months of the filing of the International application.
1. If priority is being claimed, click on the ‘Add claimed priority’ button
2. The filing office will default to Australia. If priority relates to another country, click on the down
arrow and select the country.
3. Enter the number of earlier filing – please enter the application or registration number.
4. Enter the date of filing.
25
This document is controlled. Its accuracy can only be guaranteed when viewed electronically.
Effective Date: 1 May 2019Note: The filing date of the Application or Registration in the claimed priority cannot be older
than six months.
5. The drop down list will contain all the classes that are present in the main goods and service
list.
6. If priority is being claimed for all the goods and services indicated in the International
application, then you do not need to do anything.
7. If the priority is only being sought for one or some classes, select the class by clicking on the
down arrow and
then:
a. To transfer all the terms within the class, click the curved arrow next to the class
number. This will move all terms to the right-hand column. If required, repeat for further
classes.
b. To transfer selected terms within the class, click on the relevant term(s) within the class
(hold down the Ctrl key to highlight multiple terms) and click the curved arrow next
to the terms. This will move the selected terms to the right-hand column. If required,
repeat for terms within further classes.
c. ‘Remove class’ button – This will remove all the terms within the selected class.
d. ‘Remove selected terms’ button – This will remove all the highlighted terms within the
selected class.
e. ‘Add another claimed priority’ button – This allows you to add another claim priority.
f. X button – This button will delete the whole claimed priority.
8. If the European Union has been designated, click on the ‘MM17’ button to navigate to the next
screen and follow the instructions at step 4.10.
9. If the United States of America has been designated, click on the ‘MM18’ button to navigate to
the next screen and follow the instructions at step 4.11.
10. If the European Union and the United States of America have not been designated, click on the
‘Attachments’ button to navigate to the next screen and follow the instructions at step 4.12.
26
This document is controlled. Its accuracy can only be guaranteed when viewed electronically.
Effective Date: 1 May 20194.11 MM17
If the European Union has been designated the option of adding a seniority claim is available at the
MM17 tab. The MM17 Claim of Seniority should only be completed where the applicants have this
mark registered in a Member State of the European Union for goods and services included in this
international application.
1. If seniority is being claimed, click on the ‘Add seniority’ button
2. Select the European country code by clicking on the down arrow and clicking on the relevant
country.
27
This document is controlled. Its accuracy can only be guaranteed when viewed electronically.
Effective Date: 1 May 20193. Enter the registration number of the earlier filing.
4. Select the scope of the registration as either National of International by clicking on the down
arrow.
5. Enter the filing date of the earlier registration.
6. If seniority is being claimed for all the goods and services indicated in the International
application, then you do not need to do anything.
7. If the seniority is only being sought for one or some classes, select the class by clicking on the
down arrow and
then:
a. To transfer all the terms within the class, click the curved arrow next to the
class number. This will move all terms to the right-hand column. If required, repeat
for further classes.
b. To transfer selected terms within the class, click on the relevant term(s) within the
class (hold down the Ctrl key to highlight multiple terms) and click the curved arrow
next to the terms. This will move the selected terms to the right-hand column. If
required, repeat for terms within further classes.
c. ‘Remove class’ button – This will remove all the terms within the selected class.
d. ‘Remove selected terms’ button – This will remove all the highlighted terms within
the selected class.
e. ‘Add another seniority’ button – This allows you to add another seniority claim.
f. X button – This button will delete the whole claimed priority.
8. If the United States of America has been designated, click on the ‘MM18’ button to navigate to
the next screen and follow the instructions at step 4.12.
9. If the United States of America has not been designated, click on the ‘Attachments’ button to
navigate to the next screen and follow the instructions at step 4.13.
28
This document is controlled. Its accuracy can only be guaranteed when viewed electronically.
Effective Date: 1 May 20194.12 MM18
If the United States of America has been designated it is mandatory to complete the MM 18 -
Declaration of Intention to Use the Mark.
All fields and the penalty warning tick box must be completed and the signature. The system will
now automatically populate the forward slash ( / ) at the start and end of the name in the signature
field once you have progressed through to the attachment screen e.g. /Robert Jones/
Please note: If the MM18 is not correctly completed and there are no other formality issues, our
office will not raise a formality. The application will be certified and forwarded to WIPO who will
issue an Irregularity Notice.
Click on the ‘Attachments’ button to navigate to the next screen
29
This document is controlled. Its accuracy can only be guaranteed when viewed electronically.
Effective Date: 1 May 20194.13 Attachments
1. If one of the Designated Countries is the United States of America, the MM18 form that was
completed on the previous screen will be attached here and can be viewed by clicking on the
pdf link.
2. If one of the Designated Countries is the European Union and an MM17 Seniority Claim was
completed it will only be viewable in the application summary available at the Validation screen.
3. Upload any other files relevant to the application, e.g. a covering letter and/or a copy of the
single image of the series mark being sought if required (see the Mark tab, Item 3.7(3)).
a. Click on ‘Add files’
b. Select the appropriate file
c. Click on ‘Start upload’.
Note: You can only upload one attachment at a time
4. Click on the ‘Fee calculations’ button to navigate to the next screen.
30
This document is controlled. Its accuracy can only be guaranteed when viewed electronically.
Effective Date: 1 May 20194.14 Fee calculations
1. Click on ‘Show fees details’ to display the fee breakdown of all the charges for the international
application in Swiss Francs.
a. Each time the user makes a change to the ‘Goods and services’ or adds additional
‘Designated countries’ this screen will be refreshed with a new breakdown of fees.
b. The respective individual fees for Japan, and Cuba are payable in two parts (more
details in the help text within the application, under the Designating Countries tab)
Note: the individual fees payable in second parts quoted in the summary are ONLY an
indication of the possible fee due. Please ensure that you re-calculate the fees at the
time of paying, to ensure any fee changes in those countries have been calculated
correctly.
2. Click on the ‘Validation’ button to navigate to the next screen.
31
This document is controlled. Its accuracy can only be guaranteed when viewed electronically.
Effective Date: 1 May 20194.15 Validation
1. The Validation screen will open displaying a PDF and a HTML link to the summary of your
application. Open a link and check that the application details are correct. If not, return to the
relevant tab and make the necessary changes.
2. Once the information in the summary is correct, save a copy to your computer for your records.
3. Click on the ‘Payment’ button to navigate to the next screen.
32
This document is controlled. Its accuracy can only be guaranteed when viewed electronically.
Effective Date: 1 May 20194.16 Payment
1. This screen displays the payment methods by which you can make payment for the
international application to WIPO. Payment can be made by credit card or WIPO current
account. Please refer to the WIPO website for further information regarding a WIPO current
account http://www.wipo.int/about-wipo/en/finance/current_account/
2. Select your preferred method of payment from the dropdown list.
3. Click on the ‘Pay’ button to navigate to the next screen.
a. If paying by Credit Card:
• Enter the credit card type, cardholder name, number, CVV and expiry date
• Click the ‘Pay’ button
33
This document is controlled. Its accuracy can only be guaranteed when viewed electronically.
Effective Date: 1 May 2019• In the verification screen that populates check the details and, if correct, click
the ‘Submit’ button for the payment to be processed and proceed to step 4
below
Note: Should the credit card not be accepted, it may be that additional authorisation is required. It
may be that authorisation is not yet in place for the credit card or is being blocked by the issuing
financial institution. Please contact your financial institution.
b. If paying by WIPO Current Account:
• Enter the Username and Password
• Click the ‘Pay’ button
4. Once the payment is successful the system will automatically open at the Summary screen.
34
This document is controlled. Its accuracy can only be guaranteed when viewed electronically.
Effective Date: 1 May 20194.17 Summary
1. The Summary screen will open confirming the application has been submitted and will display:
a. a PDF and a HTML link to the summary of your application
b. the date of submission of your application
c. the email address to which the payment confirmation has been sent
d. the payment number
.
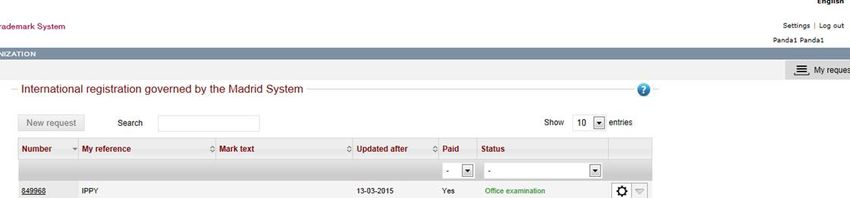
2. Click on the My requests button to return to the ’My Requests’ screen where the status of the
Application should be changed from Incomplete to Submitted to Office. Please check to
make sure this status has changed. If the status has not changed, please check the ‘Paid’
status which should read ‘Yes’.
Note: You will no longer be able to update your submitted international application but you can
click on the and, in the window that opens, click on the ‘Display request’ link to view the
submitted application.
35
This document is controlled. Its accuracy can only be guaranteed when viewed electronically.
Effective Date: 1 May 20195. Responding to a formalities issue
If formality issues are detected in your application you will receive an email advising you to log
back into the Madrid e-filing system through the IP Australia eService portal.
IMPORTANT NOTES:
• You must overcome the issue(s) and return the application back to IP Australia within
six weeks of the filing date or else you may lose your filing date.
• The formality issues are not listed in the email notification. You must log back into your
application in the Madrid e-filing system to view the formality issues.
• You can only fix the issues that have been identified, do not make any further changes
to the details, as filed, which are on that page. Changing any other part of the
application e.g. designating another country, is not possible.
To access the Madrid e-filing system:
• Logon to the IP Australia eServices portal and find the eServices home page.
• Select the ‘Trade Marks (including TM Headstart)’ link.
• You will then be taken to the Trade Marks eServices menu. From this menu, select the
‘Respond to an Unable to Certify Notice’ link.
36
This document is controlled. Its accuracy can only be guaranteed when viewed electronically.
Effective Date: 1 May 2019• You will be prompted prior to being navigated directly to the WIPO Madrid e-filing
System.
• Select the ‘Respond to an Unable to Certify Notice using the WIPO Madrid eFiling
System’ link.
• You will then be taken to the ‘My requests’ page of the Madrid International Trademark
System
37
This document is controlled. Its accuracy can only be guaranteed when viewed electronically.
Effective Date: 1 May 2019My requests
1. The ‘My requests’ page will be your homepage.
2. The page displays all the applications you have filed in various states.
3. The applications with formalities issues will be in the status ‘Correction Pending’.
4. There are two ways in which you can respond to formalities issues
a. By clicking on the trade mark number
b. By clicking on the icon
5. Option a. Clicking on the trade mark number
• The application opens up and these speech bubble icons will appear in the tab(s)
where an issue has been identified
• Once you click on the speech bubble icon you will receive a message relating to
this issue. For example, in the case of goods and services, the message below
appears, click on OK.
38
This document is controlled. Its accuracy can only be guaranteed when viewed electronically.
Effective Date: 1 May 2019• Enter a comment in the Answer box
• Click on the class in question, click on ‘Edit’, make the change and click on ‘OK’.
39
This document is controlled. Its accuracy can only be guaranteed when viewed electronically.
Effective Date: 1 May 2019• Continue through each tab that has a speech bubble icon until all the formalities issues
have been addressed.
• Click on the ‘Payment, summary and validation’ tab. You will see an overview of your
response, then click on ‘Send’.
• The status will revert back to ‘Office examination’.
6. Option b. By clicking on the icon.
• This below pop up box appears, then click on ‘Display Formality Issues’.
• The Summary and validation screen appears and the speech bubble icon will
appear in the tab(s) where an issue has been identified.
40
This document is controlled. Its accuracy can only be guaranteed when viewed electronically.
Effective Date: 1 May 2019• Click on the speech icon and you will get a message that relates to the issue. In
the case of goods and services, the message below appears, click on OK
• Enter a comment in the Answer box.
41
This document is controlled. Its accuracy can only be guaranteed when viewed electronically.
Effective Date: 1 May 2019• Click on the class in question, click on ‘Edit’, make the change and click on ‘OK’.
42
This document is controlled. Its accuracy can only be guaranteed when viewed electronically.
Effective Date: 1 May 2019• Continue through each tab that has a speech bubble icon until all the formalities issues
have been addressed.
• Click on the ‘Payment, summary and validation’ tab. You will see an overview of your
response, then click on ‘Send’.
• The status will revert back to ‘Office examination’.
43
This document is controlled. Its accuracy can only be guaranteed when viewed electronically.
Effective Date: 1 May 20196. Certification
Once any formalities issues are overcome and the application is in order, our office will certify that
the information in the application corresponds with the information held by the Registrar in respect
of the basic application and/or registration.
A Notification of Certification email will be forwarded to the email address(es) noted on the
international application and the status of the application will change to WIPO Processing.
To follow the progress of the application you can log onto WIPO's search facility Madrid
Monitor at https://www.wipo.int/madrid/monitor/en/ and conduct a “realtime search”.
- End of document -
44
This document is controlled. Its accuracy can only be guaranteed when viewed electronically.
Effective Date: 1 May 2019© Commonwealth of Australia 2016
You can also read