Making Light-Sabers using Blender's composite nodes 3 Strip Technicolor Conversion Baking Light Projection And Shadows Using the Sequence Editor ...
←
→
Page content transcription
If your browser does not render page correctly, please read the page content below
Issue 17 | July 2008

                                                                          Blender learning made easy

                   Making Light-Sabers using Blender's composite nodes

                                         3 Strip Technicolor Conversion

                                   Baking Light Projection And Shadows

                                             Using the Sequence Editor

COVERART - ‘Elephants Dream’
EDITOR
Gaurav Nawani     gaurav@blenderart.org   CONTENTS                                                                        2
MANAGING EDITOR
Sandra Gilbert  sandra@blenderart.org

WEBSITE
Nam Pham            nam@blenderart.org
                                            Making lightsabers using Blender's composite nodes             9
DESIGNER
Gaurav, Sandra, Alex
                                                               3 Strip Technicolor Conversion             15
PROOFER
Kevin Braun
Phillip Ryals
Bruce Westfall                                                                                            17
Joshua Leung                                            Baking Light Projection And Shadows
Lynda Schemansky
Eric Pranausk
Noah Summers                                                                                              20
Joshua Scotton                                                     Using the Sequence Editor
Mark Warren
Wade Bick
Patrick O'Donnell                                                                                         23
Brian C. Treacy                                                           Lighting: Plan it out
Scott Hill
Henriel Veldtmann

                                                                     Interview ‘Tony Mullen’              26
WRITERS
Mackraken Mackraken
Tyson Benard
Arland B. Woodham III                                                  Interview ‘Allan Brito’            28
Sandra Gilbert

COVER ART                                      Book Review - Blender 3D Architecture, Build-              30
Elephants Dream
                                                                         ings, and Scenery

        www.blenderart.org                                                 Issue 17 | July 2008 - Lights Camera Action!
EDITORIAL                                                                                                                             3

                                                                                   Welcome to issue # 17 of BAM. This issue we
                                                                                   take a look at using Blenders post processing
                                                                                   tools as well as explore some tips and tricks to
                                                                                   make your lighting more impressive.
                                                                                   And as a special treat we hear from not one, but
                                                                                   two Blender authors as they talk about their
                                                                                   new books.
                                                                                   Well what are waiting for? Get reading already.
               Sandra Gilbert
              Managing Editor                                                     Happy Blending!

                                N       ormally "Lights, Camera, Action!" is a
                                        phrase we associate with traditional film sandra@blenderart.org
                                        making, but it applies equally well to 3D
                                animation. Often the order is open to interpre-
                                tation, depending on project work flows and
                                individual tastes, but the same steps are needed
                                for a successful animation.
                                Animation projects require far more than just
                                modeling an object or character and animating
                                its movements. Lighting for visual appeal and
                                to set the mood or tone can be a time consum-
                                ing phase of its own. Then of course there are
                                effects and sound to be added. AII in all, the
                                final stages of a production can take just as
                                long as the initial stages.
                                And as luck would have it, Blender has the tools
                                to make it all that much easier. With the use of
                                render layers and nodes for compositing and a
                                fully functional sequence editor, Blender offers
                                you full control when finalizing your animation
                                project.

www.blenderart.org                                                                         Issue 17 | July 2008 - Lights Camera Action!
IZZY SPEAKS : Output Formats!                                                                                                                  4

                                                                                         codec confusion, and for the greater part of it, is just
                                  Output Formats:                                        what we need. So, here it is.
                                  You finished your animation project. It was hard
                                  work but you overcame all the frustrating obstacles    From the BlenderWiki:
                                  and now you are ready to render your masterpiece,
                                  only to be confronted with a confusing number of       Free Advice
                                  choices. Which codec is the right one? How do you
                                  get sound? Should you render individual images or      Choosing which format to use depends on what you
                                  straight to a video format?                            are going to do with the image.
     At some point or another     I don't know about you, but honestly this is the part        If you are going to email it to your friends, use
   I have tried (or attempted)    of animating that I dread. New codecs come out all           JPG
                                  the time and somehow I seem to have every single
        Just about all of them.   one of them on my computer. I have no idea which             Combine it with other images in post processing
                                  one is best. Some are better for dvds, some are bet-         and simple color/alpha composition, use PNG
                                                                                               use nodes to simulate depth of field and blur-
                                  ter for viewing online, some I have no idea what             ring, use EXR
                                  they are best for and they all have different compres-
                                  sions, rules, problems and benefits. At some point or        Composite using Render Passes, such as the Vec-
                                  another I have tried (or attempted to try) just about        tor pass, use Multilayer.
                                  all of them with varying results.                       If you are animating a movie and are not going to do
                                  Then the ability to actually output sound with my       any post-processing or special effects on it, use ei-
                                  animations added a whole new wrinkle to an already ther AVI-JPEG or AVI Codec and choose the XviD open
                                  sticky issue. Recently, while attempting to finish up codec. If you want to output your movie with sound
                                  a very simple project, I ran across a great page in the that you have loaded into the VSE, use FFMPEG.
                                  Blender wiki (amazing how much info is hidden in       If you are going to do post-processing on your mov-
                                  plain sight in that wiki), that answered most if not   ie, it is best to use a frame set rendered as PNG im-
                                  all of my output questions. And it is ironically       ages; if you only want one file, then choose AVI Raw.
                                  enough titled Output Formats. Go figure!               While AVI Raw is huge, it preserves the exact quality
                                  Now I'm not going to reinvent the wheel or copy the of output for the post-processing.
                                  whole page here, but I am going to tell you that it
                                  explains the Format Panel, the available presets and
                                  available options. It even defines all those file for-
                                  mats as well as compression, codecs and the FFM-
                                  PEG Video and Audio. But the best part of all, (and I
                                  am going to just copy this part, because I think it is
                                  definitely worth copying) is the Free advice section
                                  of the page. It gives you a clear path through the

www.blenderart.org                                                                                  Issue 17 | July 2008 - Lights Camera Action!
IZZY SPEAKS : Output Formats!                                                                                           5

                     After post-processing (compositing and/or sequenc-
                     ing), you can compress it down. You don't want to
                     post-process a compressed file, because the com-
                     pression artifacts might throw off what you are try-
                     ing to accomplish with the post-processing.
                     Note that rendering a long animation to calculate in
                     a unique file (AVI or QuickTime) is more risky than in
                     a set of static images: if a problem occurs while ren-
                     dering, you have to re-render all from the beginning,
                     while with static images, you can restart the render-
                     ing from the place (the frame) where the problem
                     occurred!
                     One other note, while not a format problem per say,
                     caused me no end of headaches until I saw the FFM-
                     PEG Audio section. Adding audio is now possible, but
                     remember to Click the Multiplex Audio button or you
                     will not get sound, not matter what codec combina-
                     tion you try.

www.blenderart.org                                                            Issue 17 | July 2008 - Lights Camera Action!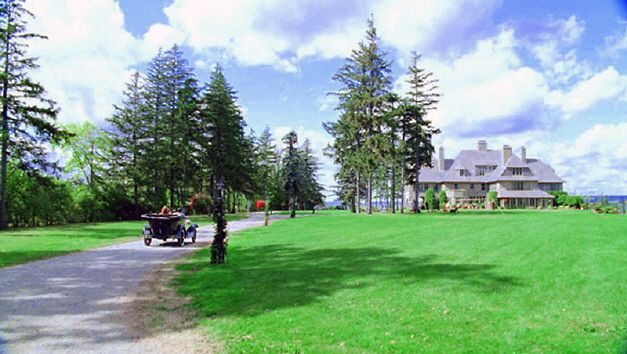
BLENDER NEWS                                                                                                                                                            6

                                                                                                                   In May 2008, the Blender Foundation released their
                                                         Blender News!                                             second open-movie project: "Big Buck Bunny," a
                                                                                                                   funny and furry 3D short about a giant rabbit who
                                                         Blender Conference 2008                                   gets even with bullying rodents. This session brings
                                                                                                                   together the key people who created the movie and
                                                         The Seventh Blender Conference will again be held in      presents all the aspects of an open-source and open-
                                                         Amsterdam, and we will return to the original cosy        content-based animation studio, and how this af-
                                                         and classy venue "De Waag"!                               fects the creative process.
                                                         Dates: Fri-Sat-Sun, 24-25-26 October, Amsterdam, the      The panelists showcase project files from the studio,
                                                         Netherlands                                               and even recreate parts of the film on demand! This
                                                                                                                   90 minute session starts with a screening of the 10-
                                                         Expect this to be an exciting and memorable confer-       minute film and ends with a 15-minute Q&A with the
                                                         ence once again... with so many Blender projects          audience.
                                                         that have been realized, or are still being realized...
                                                         one can only imagine what is going to be an-
                     Blender Conference, Siggraph 2008

                                                         nounced!
                                                                                                                   Moderator
                                                             Registration for the conference will open at the
                                                             end of July.                                          Ton Roosendaal
                                                             We also will offer full week courses, the week        Blender Foundation
                                                             before and after the conference, in the studio of
                                                             the Amsterdam Blender Institute.
                                                         Call for participation details.
                                                                                                                   Panelists
                                                                                                                   Sacha Goedegebure, Director/Writer

                                                         SIGGRAPH 2008 The Making of                               Andy Goralczyk, Art Director
                                                         "Big Buck Bunny": An Open-                                Nathan Vegdahl, Character Animator
                                                         Source Evolution                                          "Big Buck Bunny"

                                                         SIGGRAPH 2008                                             Bassam Kurdali, Director "Elephants Dream"

                                                         Wednesday, 13 Au-
                                                         gust, 8:30 - 10:15 am.
                                                         Petree Hall C

www.blenderart.org                                                                                                           Issue 17 | July 2008 - Lights Camera Action!
BLENDER NEWS                                                                                                                                                             7

                                                                                                                    "When you look at the international game jams,
                                                         Apricot Open Game                                          there’s no real teaching and no targeted thinking
                                                                                                                    about what the participants should get out of the
                                                         Development at the Blender Institute has been noth-
                                                                                                                    event. It’s completely different when we hold Game
                                                         ing short of amazing lately with all the improve-
                                                                                                                    Development Camp because young people come
                                                         ments being made for Project Apricot.
                                                                                                                    here also to receive instruction in computer game
                                                             Blender GLSL: Shading Nodes Goodies                    work as well as critique from business professionals"
                                                                                                                    explains Emil Kjaehr of UNF’s organizing group.
                                                             First Playable Demo
                                                                                                                    Game Development Camp has long been booked to
                                                             Shadow Baking!                                         capacity, where about 50 high school students from
                                                                                                                    all over the country share their common interest for
                                                             Progress update, GLSL, shape keys, speedups in         computer games in a creative and educational way
                                                             the BGE!!                                              for an entire week.
                                                         While many of the improvements have been to the
                                                                                                                    Many of the participants have already some experi-
                     Blender Conference, Siggraph 2008

                                                         game engine, many will translate over to the rest of
                                                                                                                    ence in developing computer games on their own,
                                                         blender as well.
                                                                                                                    but at Game Development Camp, Aalborg
                                                                                                                    University’s students and teachers provide a focused
                                                                                                                    introduction to 2D graphics, 3D animation and vari-
                                                                                                                    ous forms of computer game programming.
                                                         Computer game camp in Den-
                                                                                                                    One of the teachers is Pablo Vasquez from the
                                                         mark is the world’s largest                                Blender Institute’s Apricot project. Vasquez is flying
                                                                                                                    in from the Netherlands specifically to instruct the
                                                         When high school students from all over Denmark
                                                                                                                    camp participants.
                                                         gather at Aalborg University to develop computer
                                                         games it is likely to be the world’s largest arrangement   "We don’t tell the participants what to do or how to
                                                         of its kind. About 50 young men and women are using a      do it. We make sure that they get a solid framework.
                                                         part of their summer vacation to learn more about idea     This is achieved by providing themes for assignments
                                                         development, animation, programming, and not least,        and a range of exciting, professional inputs, all
                                                         cooperation – from Pablo Vasquez and others.               geared toward getting them to unfold on their own
                                                                                                                    and to work together in the groups they are placed
                                                          Lots of ”game jams” are held all over the world,
                                                                                                                    in. We also know from our camps in recent
                                                         where people interested in computer games meet
                                                                                                                    years that it makes for a great experience of solidar-
                                                         and work together in teams, but each summer when
                                                                                                                    ity and provides other positive experiences for the
                                                         The Danish Youth Association of Science (UNF)
                                                                                                                    participants" explains Emil Kjaehr.
                                                         comes to Aalborg University, it’s an event of an en-
                                                         tirely different calibre.

www.blenderart.org                                                                                                            Issue 17 | July 2008 - Lights Camera Action!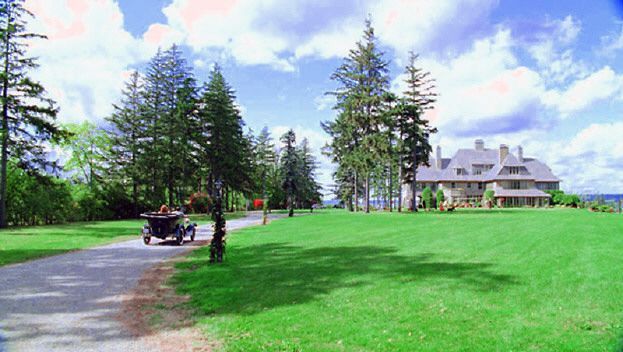
BLENDER NEWS                                                                                                                                               8

                                                         Game Development Camp 2008 is by all appearances
                                                         the largest camp for computer game development in
                                                         the world and the arrangement can also serve as a
                                                         nesting box for future game developers. The games
                                                         that are developed in the last week of July will be
                                                         judged and commented on by teachers from Aalborg
                                                         University and by professionals in the field from,
                                                         among others, the Danish Hitman game giant IO In-
                                                         teractive.
                                                         But in order to strengthen knowledge sharing and
                                                         solidarity across the groups, there is no element of
                                                         competition where a winner needs to be selected.
                                                         During the camp, which runs from July 27th to Au-
                                                         gust 2nd, the young participants also have the op-
                     Blender Conference, Siggraph 2008

                                                         portunity to meet game developers, who talk about
                                                         their career choice and offer recommendations. Af-
                                                         ter the actual camp, the games will be made availa-
                                                         ble to all curious game freaks at www.game.unf.dk.
                                                         The event is sponsored by, among others, the Facul-
                                                         ties of Engineering, Science and Medicine at Aalborg
                                                         University.

                                                         Further information:
                                                         Emil Kjaehr, Public Relations Manager, Game Devel-
                                                         opment Camp 2008, tel. +45 28 72 52 31

www.blenderart.org                                                                                              Issue 17 | July 2008 - Lights Camera Action!
3D WORKSHOP:                                    Making lightsabers using Blender's composite nodes                                                     9

                                                  Introduction
                                                  Let’s face it, everyone loves lightsabers.
                                                  Glowing beams that can cut through
                                                  nearly anything. Many people have
                                                  wanted to make these in Blender, hence
                                                  the usual methods of using halos and the
                                                  lightsaber script.
                                                   Many Blender users want the look that
                                                   others are achieving with the common
                                                   program Adobe After Effects, but
                                                   couldn’t come to grips with Blender's
                                       composite nodes and don’t have the cash to fork out
                                       on After Effects. Hopefully this tutorial will solve
                                       that problem by giving you a method for making
                                       lightsabers of professional quality inside Blender.

                                       Getting Started:
                                       The first thing we need to do is delete the default
                                       cube and lamp. Select them (RMB Click) and delete
                                       them (‘X’). I usually move the camera into position
                                       by snapping it to the grid (shift + S) and clearing the
                                       rotation (alt + R) and manually rotating it to face the
                                       center of the 3d plane.
                                       I then setup my interface for compositing, but you
                     By Tyson Benard

                                       can set it up however you want. Next, go into the
                                       cameras POV (numpad 0) and click
                                       View>>Background Image on the 3D window header.
                                       Load the image or movie that you want to work on          Once that is done, we can add the core. Press
                                       into this window. Once it’s loaded, make sure the         Spacebar>>Add>>Curve>>Bezier Circle. Once you have
                                       frame size of the image/movie and your render im-         added the Circle, select 2 vertices and hit
                                       age size is the same.                                     W>>Subdivide. Do this to opposing ends of the circle,
                                                                                                 then select the 4 original vertices and press ‘V’ to
                                                                                                 make them vector curves. You should have some-
                                                                                                 thing like this.

www.blenderart.org                                                                                          Issue 17 | July 2008 - Lights Camera Action!
3D WORKSHOP:                                      Making lightsabers using Blender's composite nodes                                                     10

                                  Once that is done, select one of the main vector points,     Once you have this shape, double
                                  shift-click to deselect the 2 points breaking off of it,     right click on the main vertex of
                                  and snap (shift + S) the cursor to that point so your cur-   one of the vector curves and press
                                  sor is in this position.                                     ctrl + H to bring up the Hooks
                                                                                               menu and click ‘Add, New Empty’.
                                                                                               Do this on all 4 vector curves, then single right click on
                                                                                               the Bezier curves and add a hook to them as well.
                by Tyson Benard

                                  Then set the median point to ‘3d cursor’.

                                  Select the point closest to the Bezier curve and scale it    Note: I changed my empties to Plain Axes in the edit
                                  to 0 using the numpad. Do this to all 4 of the vector        buttons (F9) while they were selected in object mode. I
                                  curves. You should end up with this.                         also named them for reference while editing them for
                                                                                               movies and scaled them so they didn’t overlap each
                                                                                               other.

www.blenderart.org                                                                                            Issue 17 | July 2008 - Lights Camera Action!
3D WORKSHOP: Making lightsabers using Blender's composite nodes 11
You can now move
them to match the
lightsaber in your
image/movie. If you’re
doing a movie, make
sure to enable
‘Automatic keyfram-
ing’ in the User Prefer-
ences window or on
the timeline. This will
automatically set an
object level keyframe every time you move an empty in Here's the picture I used.
object mode. I also recommend adding the empties to a
group for easier selection.
Note: Once object hooks have been added, don’t edit
the curve in edit mode unless you delete the relevant
hook first. You must then add the hook again to the
modified curve. You will not be able to modify the
curve in object mode as it is completely controlled by
the object hooks.
Here's the lightsaber core rendered out (F12).
by Tyson Benard
Here is the shape in the 3d window
www.blenderart.org Issue 17 | July 2008 - Lights Camera Action!3D WORKSHOP: Making lightsabers using Blender's composite nodes 12
Here's the material. Note: For the part will greatly speed up your workflow as Blender won’t
that goes behind run the compositing calculations until this button is
him, I simply selected.)
changed the curve,
rotating and scal-
ing the empty that
controls it. You
could use a more
accurate mask,
creating a curve
just like the light-
saber, but giving it
a black material
instead of white.
Also, make sure
the black one is
closer to the cam- Delete the connection by left-click and dragging a box
era than the saber around it. This box will delete this connection. Then
core object. move the two nodes apart to create some workspace.
At this point, I can show you another way to create a
mask. Create a mask shape, like the lightsaber, but use
as many vertices as you need to mask the foreground
object that the lightsaber is passing behind. Also, I rec-
ommend using many masks to do various parts of an
object instead of one mask for everything. This will se-
Now we can start to set up the glow riously crowd the interface and the outliner, but with
in the composite nodes. proper naming of objects it should help a lot. Put the
In the main window, change the win- mask(s) on a different layer and go into the render set-
by Tyson Benard
dow type to 'Node Editor'. tings and change the render settings like this:
On the header, press the 'Composite
Node' button and the 'Use Nodes'
button. You should then see some-
thing like this. (Note: when you are
editing the nodes and don’t need to
see the results instantly, whether in
the backdrop or a viewer window,
deselect the ‘use nodes’ button. This
www.blenderart.org Issue 17 | July 2008 - Lights Camera Action!3D WORKSHOP: Making lightsabers using Blender's composite nodes 13
To do this, go into the render but- mask layer can also have motion blur and other effects
tons (F10), and find the ‘Render to further enhance the quality of the mask, while leav-
layers’ tab. On this, make sure all ing the saber core nice and sharp. You can also adjust
layers that have objects to render the ‘fac’ value lower for slightly transparent masks,
are selected in the top layer selec- such as smoke.
tor. On the bottom one, select in-
dividual layers that you want to Next, hit Spacebar>>Add>>
render separately (e.g. the saber Filter>>Blur. Change the blur
core on one layer and the mask on type to 'Gauss' and change
another). This will allow you to the values to X=3 and Y=3.
composite them in different ways You can change these if you
in the compositor. like but this is the value I
use to soften the edge of
Once that is done, go into the the core. If you want your
‘Node Editor’ window and core to be perfectly sharp
Spacebar>>Add>>Input>>Render then don't blur this first
Layers. Set the new one to the node.
‘Mask’ layer and make sure the first one is the saber
core. Now press
Spacebar>>Add>>Color>>Mix.
Once this is done,
Spacebar>>Add>>Color>>Mix,
and set it to ‘Multiply’. Then Note: In these screenshots, the
feed the image output of the mask render layer node is not
mask into the bottom input included, but if you do use it,
on the mix node and the saber then you can simply feed the
core into the top, and set the output of the mix node right
‘fac’ to 1.00. Multiply does ex- into where you see the ‘saber
actly as it says, it multiplies core’ render layer.
by Tyson Benard
the value of each pixel, and
what you see is the result. In
this case, since the mask will
have a black object (value=0),
this will multiply out to equal
0 and all the transparent areas
will be unaffected, thus block-
ing out the area of the saber
that goes behind an object
that has been masked. The
www.blenderart.org Issue 17 | July 2008 - Lights Camera Action!3D WORKSHOP: Making lightsabers using Blender's composite nodes 14
Change the dropdown menu to 'Screen'. You will then have it render the composite node tree. This is how it
want to duplicate (Shift+D) these nodes and link them should look:
together as well as Spacebar>>Add>>Color>>RGB Curves
to create this node tree:
Also, you can add a color ramp instead of RGB curves if
you feel more comfortable working with ramps.
The first two blur nodes (above and below each other
at the beginning of the node tree) should have the
same values. The blur nodes on the top should have
progressively increasing values from left to right, creat-
ing a smooth, large blur. The last 'Screen' node at the
end of this node tree should have a factor of 1 to pre-
serve the white core. If the 'fac' value is less than 1,
then the core will not be white.
Note: I did a quick bluescreen key so you can see the
by Tyson Benard
Finally, duplicate the last 'Screen' node (the 'fac' 1 node)
and use it to combine your saber render and your im- lightsaber better and grouped the nodes to conserve
age. To input the image, press Spacebar>>Input>>Image, space.
and select your image from the dropdown menu. Then I hope you have learned what you hoped to learn here
link the output of that screen node to the 'Composite' and that this gave you some better insight into Blend-
node. Use a viewer node (Spacebar>>Output>>Viewer) to er's composite nodes.
see if it worked without having to render the whole
thing. Thanks for reading!
Also, in the render menu in the buttons window, be
sure to enable 'Do Composite' in the Animation tab to
www.blenderart.org Issue 17 | July 2008 - Lights Camera Action!3D WORKSHOP: 3 Strip Technicolor Conversion 15
complicated as it looks. First, add three Channel Key
Introduction nodes from the Matte section and a Separate RGBA
node from the Convertor section of the Add menu.
The goal of the effect is to take video im- Take each of these and connect them to the output
agery and make it look like it was filmed of the Image node. I will get back to the Separate
using Technicolor. This can be fairly easy RGBA node later.
to accomplish using Blender’s node sys-
tem and is just a matter of knowing First, set each of the Channel Key nodes to R, G, and
which settings to use. I am using the B. Also set the Low on each node to 0.5 and the High
same image that was used in the aviator- to 1.0. These nodes let us make masks based on the
vfx example. colors in the image and to use them for the effect
we need to combine them. So now we need three
Mix nodes from the Color section of the Add menu.
Using the drop down, change each node from Mix to
Multiply and then connect the two Image inputs to
the Matte outputs of the two Channel Keys that are
not part of that color.
For the first Mix node it is the Red channel, so we
take the Matte outputs of the Green and Blue Chan-
nel Keys and connect them to the inputs of our Red
Mix node (the order does not matter). After that, we
create three more Mix nodes set to Multiply.
By Arland B. Woodham III
Start by bringing up the
nodes editing window, se-
lecting Composite Nodes
and then Use Nodes. This
will add a basic node setup
to the screen. Select the
Render Layer node and de-
lete it. Now add an Image
node found under the Input
section of the Add menu.
Then select the image you
wish to apply the effect to.
Here is the node setup.
Don’t worry, it’s not really as
www.blenderart.org Issue 17 | July 2008 - Lights Camera Action!3D WORKSHOP: 3 Strip Technicolor Conversion 16
Now we are going to use the Separate RGBA node, con-
nect each output to the appropriate node and for the
second node input, use the output of the previous Mix
node (again the order does not matter). Finally, add a
Combine RGBA node from the Convertor section of the
Add menu and connect each Mix node into it. All that is
left is to connect the image output to the Composite
node and Render. (Make sure Do Composite is selected
in the Render Options).
The resulting render is almost done, but there is a
slight problem with the bright white parts of the
clouds. This is noticeable in the upper left corner so to
And there you have it - Blender can perform the same
compositing effect that was used in a major motion
picture.
by Arland B. Woodham III
Arland B.
Woodham III
correct this you need to adjust
the Channel key amounts. My name is Arland B. Woodham III
Here I have dropped the High but, most call me Barry. I am a
value one of the Red channel Graphic Specialist for a company
to 0.95 and the result looks that creates military training
good. This can be hit or miss, courseware.
just tweak the high value on
each channel by small Webpage
amounts until you get the de-
sired result.
www.blenderart.org Issue 17 | July 2008 - Lights Camera Action!3D WORKSHOP: Baking Light Projection And Shadows 17
We will change the sphere and cone's color by creat-
Introduction ing two materials.
In this tutorial we will bake light projec- Select the sphere and hit F5 (Shader section) Select
tion and shadows on a room. This is a Add new and add pure red using the RGB Sliders
way to emulate an object’s shadows. RGB(1,0,0). Do the same for the cone but change to a
This method doesn't work if the object different color, try Blue RGB(0 , 0.5 , 1)
or light is moving.
One last thing: the cube`s normals are looking out-
side, so if we preview our scene we will not be able
Setting up the scene. to see the walls. Lets fix this by selecting the cube,
changing to edit mode (TAB Key), selecting all (A
1. Open Blender into a new scene. Lets key) and pressing CTRL+F for face specials menu.
get that default box to be our room
Select Flip Normals and exit Edit mode (Tab Key
walls. Select the box, bring up the trans-
again). Now the cube room is ready.
form properties windows (N Key). Insert these val-
ues for each object. Ok, our scene is done.
2. Setting up the walls for baking.
Now we will create a UV Calculation for every face
inside the cube. In order to do this we will split the
3D viewport to see the UV/image window.
Now we have our room,
light and camera in
place. Lets add some ob-
jects, a UVsphere and a
Cone and set up these
By Mackraken
transformations:
At 3D view: Select the cube. Enter edit mode (Tab)
Select all inside (A) Press U (UV Calculation Menu)
and choose “Lightmap UVPack” .
www.blenderart.org Issue 17 | July 2008 - Lights Camera Action!3D WORKSHOP: Baking Light Projection And Shadows 18
If you need to change your light properties (location,
color, ….) you will have to bake again as we just did.
Press New Image and 1024 for image size. 512 would
also be fine. It's important to select “New Image” ONLY
the first time we are doing this calculation. If we need
to calculate the UV’s again deselect this option.
Ok. We have a new Black coloured texture for our cube BGE Capture before baking BGE Capture after baking
and the UV coordinates. Exit edit mode. Press F10 to go
to render options and go to “Bake” menu.
Some last tips:
You can animate your camera inside the room by
changing the UV/Image window to the Ipo Curve edi-
tor. Go to frame 1, select the camera, press (I key), and
select LocRot to make the first key.
Advance about 100 frames. With the camera selected,
press (Shift + F) “fly mode”, use the W,A,S, and D keys
to move your camera, and click the LMB when you are
Select our cube if not selected, press the “Bake” button satisfied with the view. Press (I key) and select LocRot
again.
by Mackraken
and voilà! We got a nice, shadowed room!.
The baked texture must be saved. If you save your Insert as many keys as you like... once you are finished,
scene and quit, you will lose the bake, so in the UV edi- hit F4 to go to the Logic Panel. Add a sensor, controller
tor, select image-> save, or pack to include the image in and actuator and set up like this (Camera selected)
the .blend file. You can improve your shadow quality by Ok that's all… oh, and press P to preview. :P
selecting the light, hit F5(Shading) And increasing Soft
size, samples and threshold.
www.blenderart.org Issue 17 | July 2008 - Lights Camera Action!3D WORKSHOP: Baking Light Projection And Shadows 19
Going further: our Red Sphere. If not, just rotate the spot to do that.
With the spot selected hit ALT+D to create an instance.
I wasn't satisfied with the dark shadows and their qual- Without moving the mouse LMB again. We do this be-
ity, and thought that will help to understand how cause we want the same shadow intensity on both ob-
blender’s light works. For a deeper information about jects.
this matter please refer to a tutorial by Olivier Saraja.
Rotate Lamp.002 to head toward the cone. Now Select
Moving on. First we are going to subdivide the cube a “Only Shadow” for this Lamp.002. Because Lamp.001
little. This is for adjusting the margins when we have and Lamp.002 are instances the options changed in one
more complex meshes to be baked. light will change the other too. Hit F12 to preview the
scene. We should have something like this.
Select the cube. Enter Edit Mode (TAB Key) Select All (A
Key). Press W for Specials Menu. Select Subdivide. Sub- Ok, we will handle our shadow's Hardness by control-
divide once more Exit Edit Mode ling the Spot's Energy. Lets try 0.5
Now lets light 'em up!
Nowadays, the Lamp light can cast shadows but you
can't work with them. We will use spot lights which
are more configurable to cast shadows for our objects
and emulate the shadows cast by our Lamp light.
In order to do this:
Hit F12 to preview the shadows. It seems much better
First select the lamp and disable “Ray Shadow”. Now now.
we don't have any shadows. With the lamp selected,
press Shift+D to duplicate and without moving the Lets bake the cube again to draw our new shadows on
mouse press LMB, so we have the duplicated light at the wall. Press P to preview in real time. This is much
the same exact position as the original one. better now, but if we are too close to the objects we
can see that they don't have enough resolution.
Because it will be hard to select one or the other light,
change the UV/Image window to the Outliner. Within Samples = 1 Samples=16. Max the light’s samples to 16
by Mackraken
the outliner, select the Lamp.001 and go to Lamp Op- and bake again. You can try different values at “Shadow
tions. and spot section” to get the desired effect. Don't forget
to save or repack the baked image before quitting
Change the selected Lamp Blender. Ok, that's truly all.
button for Spot. We can
see we have more options Any questions mail to me at
now. If all goes well the mackraken2023@hotmail.com
spot will be heading for Cheers!.
www.blenderart.org Issue 17 | July 2008 - Lights Camera Action!3D WORKSHOP: Using the Sequence Editor to Get out of Hot Water 20
1 First gather up about 2-3 dozen photos (or imag-
Introduction es) of your choice and an appropriate song. Okay,
here we go...
“Do you know what today is?” has got to
be the one sentence everyone dreads. It 2 Change your screen layout to the Sequence con-
figuration (fig1). Now to add your images.
generally heralds you getting into very
hot water with someone you care about, 3 In the VSE window, Add->Images and right-click
over a special occasion you had no ex- each of the pictures that you want to include. If
cuse to forget. And while the occasion you want to include more than one at a time,
forgotten can be anything from a birth- just hold down the right button and drag the
day, anniversary, Mother's day, Father's mouse over their filenames.
day to International All About Me Day, 4 When they are all selected, click the Select Im-
the end result is the same, you are in ages button and drag and drop the strip to start
very BIG trouble. It no longer matters at frame 1. (If you chose more than 1 image to
that you had planned to do something special, add, Blender combined all your images into one
whether you were going to create the most stun- strip)
ning image then frame and matte it, or produce the 5 Set your end frame to the end frame of your strip
perfect animation to commemorate the occasion. (the number of images selected).
Because you obviously got smacked up along side
the head with a really big “Whoops, I forgot all 6 In the Scene-Render buttons, set your
about it” stick. Well not to worry, all you need is a Frames/Second to 1 (format panel) and choose an
.avi or .mov format. This will generate a video
couple dozen photos/images, an appropriate song, that shows each image for 1 second.
Blender's Sequence Editor and a couple of hours.
An often overlooked feature, Blender's
Sequence Editor is a flexible place for
editing your video/animation footage.
You can review your video/animation
and stitch together different scenes or
By Sandra Gilbert
sections. There are built-in as well as
plug-in effects you can use to
smoothly transition from one se-
quence of your video to another.
Even less well known is that the Se-
quence Editor can also be used to
make a quick and easy slide show.
Which is what we are about to do.
And quite honestly, it really couldn't
be any easier.
www.blenderart.org Issue 17 | July 2008 - Lights Camera Action!3D WORKSHOP: Using the Sequence Editor to Get out of Hot Water 21
6 In the Scene-Render buttons, set your Alpha Over, Under, and Over Drop Built-in Effects
Frames/Second to 1 (format panel) and choose an
.avi or .mov format. This will generate a video that Wipe Built-in Effect
shows each image for 1 second. If you want the Glow Built-in Effect
slides to play longer than 1 second, you can press Y
to separate the image strip into individual image Transform Built-in Effect
sequences; a pop up dialog will ask you how many
frames to make each image (at 25 fps, enter 125 for Color Generator Built-in Effect
a five second showing of each image, for example).
You can then arrange and re-arrange the individual Speed Control Built-in Effect
slides however you want. Using Speed for a Slow-Motion Effect
7 Enter your output filename (output panel), enable Using speed control for frame matching
Do Sequence, and click Anim.
Changing video frame rates
Pretty darn easy. But maybe just a little boring. Let's
add that song you picked out.
1 Go back to the Add menu and this time select Au- Let's go with the Wipe effect. There are four different
dio (HD), browse to your song and select it. WAV Wipe effects available. Clock: like the hands of an ana-
format is best.
2 Drag it to an empty channel and line it up with our
images.
3 In the Render Format panel, choose FFMPEG. (fig2)
4 An additional Audio panel will appear, (fig3) make
sure you select the Multiplex Audio button, or your
sound won't be included into your slide show.
Okay now we have audio. If you still have a little time
to spare, you can add transitions between each image.
by Sandra Gilbert
There are a number of built-in transitions we can use.
Add Effect
Subtract Effect
log clock, it sweeps clockwise or (if Wipe In is enabled)
Multiply Built-in Effect counterclockwise from the 9:00 position. As it sweeps,
Cross and Gamma Cross it reveals the next strip.
Fade to Black
www.blenderart.org Issue 17 | July 2008 - Lights Camera Action!3D WORKSHOP: Using the Sequence Editor to Get out of Hot Water 22
Iris: like the iris of a camera or eye, it reveals the next 1. Select the Do Sequence button
strip through an expanding (or contracting) circle. You
can blur the transition, so it looks like ink bleeding 2. Select the Multiplex Audio button
through paper.
Depending on how many images, length of song,
Double Wipe: Starts in the middle and wipes outward, number of effects and render options you used, you
revealing the next strip. It can also Wipe In, which should have your slide show within just a couple of
means it starts at the outside and works its way to- hours.
ward the middle. You can angle and blur the wipe di-
rection as well. Single Wipe: Reveals the next strip by This fairly simple project, while only a slide show,
uncovering it. Controls include an angle control so you shows just how easy it can be to use the Sequence Edi-
can start at a corner or side, and blur the transition. tor. Now, granted, there are far more options available
than we used and when used in conjunction with com-
To use an effect that makes a transition between two positing nodes, the Sequence Editor is capable of pro-
strips such as the Wipe effect, you must Box select or ducing professional movies and animations with all the
shift-right-click two of them. When you add the effect polish and pizazz of Hollywood. For more information
strip, it will be placed in a channel above the two im- on how to use the Sequence Editor, visit the blender-
ages in Grab mode (click to drop it on a channel). Its wiki.
duration will be the overlap between the two strips as
a maximum.
You can choose which Wipe effect you want, as well as
set the options for it in the Sequencer buttons panel.
(fig 3)
by Sandra Gilbert
Now, once you have added as many transitions as you
want, go ahead and render it out. Two important op-
tions to remember before rendering:
www.blenderart.org Issue 17 | July 2008 - Lights Camera Action!3D WORKSHOP: Lighting: Plan it out 23
dated and overused method, try adding some varia-
Introduction tion to your setup either with colored lights or alter-
ing the positions to add an extra punch to your
We all know by now that lighting image. While you can achieve decent lighting with
seems to be my nemesis. And hon- Ambient Occlusion to create general overall lighting,
estly, you would think with all the you might instead try a single spot focused on your
study and research I have done on object and an additional hemi light to add overall
the subject that I would be a light- brightness. Changing the position of lights can also
ing master by now. Yeah, not even! change the mood or tone of your image, so don't be
afraid to move the lights around.
But there's a funny thing about ob-
sessive research and study, eventu- Once you move past single images and portraits is
ally the volume of information when the real planning begins. To a certain degree,
starts to reach a point of critical landscapes, interiors and/or any other image that
mass and things start clicking, or in contains logical lighting sources are somewhat eas-
my case, finally registering. For ex- ier to plan lighting for. Refining it on the other hand
ample, I was recently reading the takes practice and experience...or someone to write
lighting chapter from Allan Brito's new book up a nice little guide explaining how to go about it.
(Blender 3D: Architecture, Buildings and Scenery) :P
where he was advising the reader to sit down and
think about the lighting. And how it was important ... which is just what I found recently while brows-
to look at your image and define where the light is ing through the BSoD section of the Blenderwiki. I
coming from before you start adding lamps - in don't know how I missed it before, maybe I just
other words, “to plan it out”. wasn't yet ready for such relevant information. But
there it was, a lighting guide filled with just the in-
Now you would have thought that was so obvious formation needed to push my understanding past
that it didn't need stating, but just as obviously, it the critical mass point.
needed to be stated to me. As I thought about how I
generally go about lighting an image, I realized that Guillermo S. Romero(gsrb3d), author of the BSoD:
more often than not, lights just keep getting thrown Introduction to Lighting, in addition to explaining
into the scene, adjusted, deleted , added etc. with no lighting in general and lighting options in Blender,
real planning involved. included a series of exercises to explore different
By Sandra Gilbert
lighting conditions. Breaking away from the three
Depending on your image, planning it out can still point studio setup, using the same scene for each
be time consuming. Even if you know exactly where exercise he explains the following lighting condi-
you want your lights (lamps), you will still spend tions:
time adjusting the intensity (energy) and color. Then
there is the whole issue of shadows. But don't de-
spair, eventually you will get the hang of how it all
goes together. Of course, it helps if someone points
you in the right direction.
For single objects and or portraits that normally use
the traditional three point (studio) setup, a rather
www.blenderart.org Issue 17 | July 2008 - Lights Camera Action!3D WORKSHOP: Lighting: Plan it out 24
Sunny
Cloudy
Overcast
Night
Variation 1: Movie Full Moon
Variation 2: House Light
Flashlight
Room
Variation: No Window
One thing I really liked about the exercises, in addition
to the fact that he broke down and described what
each lighting condition required, is that he actually ex-
plained the use of each lamp and what it added to the
image. There is even a blend file to study for each exer-
cise.
One last tip, actually a quote from Guillermo:
“Finally, no matter if it should be right based in the val-
ues we use, we have to get it too look right, even if
that means forcing things, doing nasty cheats to cover
issues and taking advantage of our errors if they look
fine anyway; or maybe rethinking the original plan a
bit. It is not what should be correct, but what looks
correct.”
by Sandra Gilbert
www.blenderart.org Issue 17 | July 2008 - Lights Camera Action!Over $1600 in prices
The Blender World Cup is an an-
nual competition set up for The 2008 BWC Trophy 1st The 2008 BWC 2nd Place glass
Blender artists. 2008 is the 5th $250 CASH from BA.org
year it has run, and is proving to
A SpaceNavigator from 3Dconnexion A SpaceNavigator from 3Dconnexion
be the biggest yet.
A copy of Bounce Tumble and A Free Pick from the Blender E-shop
Each year the top entrants leave Splash, signed by Tony Mullen
A Free Pick from the
the competition with a nice A Free Pick from the Blender E-shop BlenderArtists.org shop
stack of prizes and a piece of art
they can be proud of. A Free Pick from the
BlenderArtists.org shop
Check it out at:
2nd
BWC.blenderartists.org The winner also gets to choose
which school gets the following The 2008 BWC 3rd Place glass
prizes:
10 Blender text books from Natcoll A SpaceNavigator from 3Dconnexion
10 SpaceNavigators from A Free Pick from the Blender E-shop
3Dconnexion
A Free Pick from the
Big Buck Bunny, Mancandy FAQ , BlenderArtists.org shop
and Creature Factory from the
Blender E-shop
3rdINTERVIEW: Tony Mullen 26
Tony Mullen, author of “Introducing to Character Animation butions will help to make this book especially valu-
with Blender”, has written a new book," Bounce, Tumble and able for people who want to push the envelope of
Splash!". their Blender skills.
Tony covers the newest physics and dynamics features of How hard was it to get a publisher such as Sybex to Pub-
Blender in a full color guide to the more complex features of lish the Book(s)?
Blender.The book is filled with step by step instructions and
in-depth explanations of how each step was taken, and why And was the first book already (in one form or an-
each choice was made. other) written before they accepted it for Publica-
tion?
In a fun community interview Tony answers some of our most
burning questions concerning “Bounce, Tumble and Splash!” I initially approached several publishers with a pro-
as well as a surprise or two. posal for the character animation book that in-
cluded a full table of contents outline and
description of the book (this would all change
somewhat when I wrote the actual book). The
Are you currently making a book on the Blender game thing that publishers want to know is what is new
engine? Any plans to write a new book about Blender? and original about the book, and why you think
What would that be ? anybody would buy it. At the time I wrote the pro-
posal, all the other English Blender books were out
Thanks for these questions! I guess this is as good a of print, and when I pointed the Sybex folks to the
time and place as any to announce my next book, Blender.org website and gallery I think the book
which will be "Mastering Blender" and will be part proposal sold itself. Some other publishers turned
of Sybex's "Mastering" series (just as "Introducing the proposal down, but Sybex was very interested,
Character Animation with Blender" was part of and they weren't the only ones. It was simply a
their "Introducing" series). crime that there were no books on the market at
This book will be the most advanced Blender book all for Blender, and so the timing was right. My en-
yet. A large portion of it will be about ordinary thusiasm might have been infectious.
Blender functionality, but focusing on features and Any suggestions for other people that would like to write
functionality that are new or have not yet been de- a book such as yours?
scribed in depth in other books. Another signifi-
cant portion of the book (probably about 4 My suggestion would be to identify a need and fill
chapters worth) will be devoted to Python script- that. For me, I was motivated to write the book
ing for Blender and all its variations (PyDrivers, originally because of my own frustration at not
PyNodes, PyConstraints, scriptlinks, etc), with the being able to *buy* the kinds of Blender books I
aim of getting newbies and non-programmers up- wanted. If they had already existed it would have
to-speed with scripting in Python. There will also never occurred to me to throw my hat into the
be a significant section on the game engine, in- ring. At this point, there are still a lot of areas and
cluding using Python in the game engine. applications of Blender that haven't been dealt
with thoroughly in book form. The greatest benefit
It's a little early to say with complete certainty, but to the community (and the greatest chance of sell-
I also hope to have some material contributed by ing books!) comes if you can contribute something
some other authors, who are well-known experts that people can't find elsewhere.
in the Blender community. I hope that their contri-
www.blenderart.org Issue 17 | July 2008 - Lights Camera Action!INTERVIEW: Tony Mullen 27
Of course, the field of Blender books is filling up. This is an interesting question and I think I could
There are now four Blender books in print in Eng- rattle on for hours about it.
lish that I know of, with at least 3 more that I
know of on the way, so if you really want to write In fact the files that accompany the books, such as
a book, the big challenge now is to find an original the Captain Blender .blends, etc, are already open
angle. content. You can use them and distribute them
freely according to the text files included with the
In other words, don't write a book such as mine, blends.
because there already is one!
The short answer regarding the books themselves
How many Fluid Sim tutorials will there be in your book? is that as long as I'm contracted to work through
Sybex or any other mainstream publisher, I don't
I think the chapter on fluids is 60 or 70 pages long have the right to decide how the books are re-
(I'd have to go check). There are several step by leased, so no, there's no chance of those books
step demonstrations and some extended in-depth ever being released by me as open content.
examples. Basically, everything you ever wanted to
know about fluid simulation in Blender is covered. The longer answer is that I believe there's still a
way to go before the ideal business models have
Will it be possible to buy the book in .pdf? been developed for working with open content,
but I would love to see that happen. I could not
That's up to the publisher. I think that they usually afford to put in the time and effort it takes to write
do release books in pdf form at some point. I'm not these books if I wasn't getting paid to do so, so it's
really sure why, though, because nobody seems to really necessary to have a functioning business
actually buy those, based on the last royalty report model. At the same time I believe that open con-
I saw. tent is the way of the future for a variety of rea-
"Bounce, Tumble, and Splash!: Simulating the Physi- sons. I admire the Blender Foundation for their
cal World with Blender 3D" is going to be my bible efforts and successes at forging a business model
until you release your next book. I would like Blender based on open content. I also am encouraged
to be taught in major 3D institutes, and I believe when I see bands like Radiohead embrace alternate
that given the strict "traditional" nature of these methods of distributing and getting paid for their
places, what are the chances of you releasing a book work. It's all still fairly experimental, but I think
that will appeal to the humorless Head of Depart- the experiments are yielding some interesting re-
ments - like simply "Simulating the Physical World sults that will help to create tomorrow's open busi-
with Blender 3D". ness models.
My experience with heads of departments hasn't For now, though, the royalties system is still the
always been so humorless, but in any case, if peo- only really reliable means by which a creator's con-
ple want to teach the contents of my book, I'm tribution can be remunerated fairly. So I'm happy
afraid they're going to have to suck it up and buy a to be working within the traditional model while it
book with a catchy title! lasts. purchase/delivery from Amazon.
Will you ever consider releasing your books as open con- Tony has also created a little teaser video featuring some of
tent? (Not like I wouldn't buy it anyway, I have a copy of the examples and tutorials found in the book, which can be
Introduction to Character Animation on my desk) found on YouTube.
www.blenderart.org Issue 17 | July 2008 - Lights Camera Action!INTERVIEW: Allan Brito 28
Allan Brito, author of “Blender 3D – Guia do Usuario”, has For my projects involving 3D, we completely left
written a new book, “Blender 3D: Architecture, Buildings and behind 3ds Max, and focused our production on
Scenery”, a guide to using Blender to create architectural vis- Blender in 2004. I'm not at the studio anymore, but
ualizations. I still use Blender for all my projects involving 3D
visualization.
“Blender 3D: Architecture, Buildings and Scenery” is available
for purchase from Packt Publishing , in both printed and eb- Your 1st Blender book was more of a general introduc-
ook format. There are also full color images from the book tion to Blender, what made you choose such a specific
available for download.. topic such as architectural visualizations of buildings, in-
teriors, and environmental scenery for your 2nd book?
Today, Blender has a lot of great books and training
Can you tell us a little about yourself and your experi- DVDs, but most of these materials are related to
ence with Blender? character animation or general 3D
animation/modelling. Since I'm an architect and
Sure, I'm a 29 year old architect, who lives and use Blender mostly for project and design visualiza-
works in Recife, Brazil. Since my graduation in ar- tion, I miss a book or guide about it. When you
chitecture, back in December of 2000, I've started start to search about this subject, all the books and
to work with architectural visualization, mostly tutorials about it, are related to 3ds Max or Au-
with 3ds Max for a small studio here in Brazil. A todesk. And with this book I wanted to give the
few months later I started to teach 3D modeling Blender community and other artists the chance to
and animation as well, and I fell in love with the start using Blender to work with architectural visu-
experience. I have enjoyed so much the experience, alization, and not be bound only with Autodesk
that I never stopped teaching 3D. softwares.
Back in 2003 I had been invited to test a promising Having used Blender in your work as an Architect, how
3D software called Blender. After a few minutes of does Blender stand up compared to other programs used
testing I was already impressed with it! Right after in the architectural industry?
my first contact with Blender I was studying it to
make some tests with some of my projects. And as As a visualization tool, Blender has all the tools to
a tryout for my students, I started to teach 3D create and render geometry. There are a few tools
modeling with both 3ds Max and Blender. and features missing in Blender, which could im-
prove and speed up architectural visualization
With the use of Blender as both an academic and projects. The integration with CAD tools is one of
professional tool, my students asked me for guides them, if you start to use Blender for archviz, you
and manuals in Brazilian Portuguese. Then I will see that this is a feature that still needs im-
started to write guides and documentation for my provement.
students. And then I came up with the idea to
write a book about Blender in Brazilian Portuguese Other programs used in the archviz industry al-
(Blender 3D – Guia do Usuario), because by that ready have a better integration with CAD files,
time there wasn't any updated documentation for mostly because the company that develops the
Blender, not even in English, and I saw that as an CAD software is the same behind the 3d visualiza-
opportunity to help the community and start a tion suite.
book project.
www.blenderart.org Issue 17 | July 2008 - Lights Camera Action!INTERVIEW: Allan Brito 29
Is it impossible to do that in Blender? No! Of How long did it take to complete this book?
course it's not impossible, but it still requires a few
tricks and work with Python scripts. This was a long project, I started to work on it in
June of 2007 and finished the first draft of the book
For me that’s the only drawback for Blender com- in December of that year. The revision took a few
pared to other 3d applications, Blender still re- extra months and the Book was released back in
quires a bit of intermediate knowledge of users, to May 2008. It was an eleven-month project!
bypass a few tasks. That's why a book on the sub-
ject fit quite well for those artists! Do you have plans to produce future books on Blender?
What improvements would you like to see in Blender Sure! I love to write about computer graphics, and
that would make your job as an architect easier? Blender is my favorite subject.
Architects love precision, and I really would love to If so, what topics/titles can we look out for?
see improvements in Blender about the way we
can change and model geometry. The render API I have plans to write a title about the use of the
would be a great improvement too, it would make Game Engine, since I teach it here in Brazil as part
possible to render scenes with more external of my Blender class. I would love to write a title
renders like Yaf(a)Ray, without the need of special only about advanced rendering techniques, with
Blender builds. external renderers and the composite nodes.
Having already written a book about Blender (Blender 3D Is there anything else you would like to mention?
– Guia do Usuario), what, if anything, did you learn while I hope the community finds the book useful and
writing the 1st book that you then applied to the writing that it can be a way to make more artists to use
of this book? Blender. There are already a few projects to im-
In my first book, I was making my first move as an prove the features of Blender, especially for archi-
author and it's quite hard to keep on track with a tectural visualization and I believe this field will see
book project of almost 500 pages. For this second some great improvements in the next Blender re-
book, I have started with a lot of notes and ideas leases.
for each chapter. Before the first draft of each If you want to discuss architectural visualization
chapter, I already knew the points to make the with Blender, stop by my web site related to
connection or reference between the chapters. Blender and archiviz, to check out some tutorials
Another thing I learned from the first book is to or articles related to architectural visualization
keep a close eye on the Blender updates. The up- with Blender.
date cycle of Blender is a nightmare for anyone in-
terest in keeping an updated documentation. Well,
as an artist I think it's great! But with a release cy-
cle of 5-7 months it's hard to start and finish a
book project at the same Blender version.
For this second book I was always tracking the
SVN and testing builds of Blender, to look for new
tools or features that could be in the book.
www.blenderart.org Issue 17 | July 2008 - Lights Camera Action!BOOK REVIEW: Blender 3D Architecture, Buildings, and Scenery 30
In addition to the printed version there is also a e-book the previous chapter, yet it is written in such a way that
version available for purchase and download. each chapter can be referenced and read on its own.
Blender is known for it's modeling and animation ca- Following the recent trend of most software books being
pabilities, what is less well known is it's ability to pro- printed in black and white, Blender 3d: Architecture, Build-
duce architectural visualizations and interactive ings and Scenery is filled with black and white screenshots
walk-throughs of architectural projects. Seeking to that for the most part were clear, crisp and easy to read,
introduce and promote Blender as a valuable addition still, some screenshots as well as the final renders would
to the architectural tool set, Allan Brito, a Brazilian have been more effective in color.
architect shares his experience in using Blender to
produce architectural visualizations and interactive I enjoyed Allan's writing style and found it easy to under-
walk-throughs. stand and follow along. Although there were some typos
and places where the casual conversational writing style
Allan used to share his experience and expertise seemed
What's It About? awkward and forced, overall his writing style was not only
instructional, but effective in conveying his topic.
Blender 3d: Architecture, Buildings and Scenery is bro-
ken into fourteen chapters that begin by explaining Although I realize that this book was aimed at introducing
what is required in architectural visualization and architects to Blender, and as such probably didn't need as
how blender can be effectively used to create and en- much detailed explanation for them to follow along, I
hance such projects. As the reader goes through the chap- would have preferred more in depth explanations of some
ters, the author breaks down the different tools in blender of the sections and more examples in a book of this size
and shows how they can best be used for each step in the and subject matter. It seemed that some areas were only
process. Along the way he offers tips, specific techniques touched on briefly and could have been expanded on more
and tutorials/exercises to illustrate the concepts needed to fully.
create the various architectural components. In addition New users might find this book doesn't explain some con-
he explains how to save time and frustration by setting up cepts thoroughly enough and would be well served to
an efficient file naming/saving system as well as how to have some basic Blender knowledge first. On the other
set up and use libraries of previously created models and hand, intermediate to advanced users
materials for use in future projects. should have no problem applying the
concepts covered.
While not intended as a general introduction to Blender, 4/5
as the focus is on using Blender for architectural projects,
the author covers basic Blender functionality as well as
advanced techniques that could be applied to other areas Book Review by Sandra Gilbert
of Blender usage.
Author(s): Allan Brito
Presentation: Publisher: Packt Publishing
Language: English
At 316 pages, Blender 3d: Architecture, Buildings and Scen- Paperback: 316 pages [191mm x 235mm]
ery, is a good sized book. It is organized in a logical man- Release date: May 2008
ner that allows for each succeeding chapter to build upon ISBN 1847193676
www.blenderart.org Issue 17 | July 2008 - Lights Camera Action!You can also read