Manual for Rearing Crickets, Flies and Mealworms - Michael J. Smith and Allison M. Welch University of Missouri - Columbia - University ...
←
→
Page content transcription
If your browser does not render page correctly, please read the page content below
Manual for Rearing
 Crickets, Flies and
     Mealworms

Michael J. Smith and Allison M. Welch
  University of Missouri – Columbia

    Copyright © Michael J. Smith and Allison M. Welch, 2005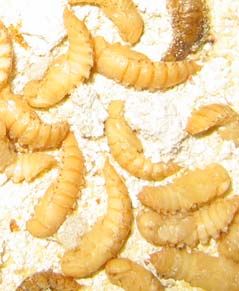
Rearing crickets, flies and mealworms                                                         1

1.1. Culturing crickets
Step 1: Cricket tubs should be set up as shown in Figure 1. Every tub has two square
egg cartons and two
plastic food trays. Our
food trays are lids of
containers that we already
had in the lab. One food
tray holds cricket and cat
food and the other, one
piece of washed organic
lettuce (≈ 3 inches2) and
two small organic carrots.
Tubs with small juveniles
should have some cricket
food placed upon the
ground under the egg
carton. For adults and
subadults, replace food
trays at every feeding; for Figure 1: Layout for each cricket tub.
juveniles, replace food trays only as necessary.

   All tubs have two water feeders (Figure 2) placed at the opposite end to the
                                       feeding trays (Figure 1). Water feeders
                                       should be checked at every feeding and
                                       replaced when they are less than half full
                                       of water. Water feeders are made by
                                       filling a small plastic vial with water and
                                       stopping the end with wet cotton wool. It
                                       is a good idea on quiet days to spend ½ an
                                       hour making up fresh water feeders. They
Figure 2: Water feeder
                                       can be stored in the fridge.

Step 2: Adult tubs have two egg pads which are positioned as shown in Figure 1.
Adults have fully developed wings and juveniles do not. Egg pads are replaced three
times per week and are set up by placing wet
cotton into a large Petri-dish. Egg-pads should
be damp, but should not have free sitting water.
When the cotton wool is first placed in the
Petri-dish, turn it upside down and squeeze out
the excess water by squeezing the cotton wool
between your fingers and the bottom of the
Petri-dish. The cotton wool should also cover
the entire inside of the Petri-dish. Each used
pad should be removed from its Petri-dish and
housed in a plastic container with holes (Figure
3) for hatching. Write the date on the plastic
tub so that we can monitor hatching time.
                                                         Figure 3: Housing of used egg-pads

                         © Michael J. Smith and Allison M. Welch, 2005
Rearing crickets, flies and mealworms 2
Step 3: Every weekday 1/5th of the cricket tubs should be replaced by a fresh one.
This way, every tub is washed once every week (juvenile tubs are replaced only as
necessary). To change the tubs, gently lift the egg cartons and hold in the dirty tub
until the crickets have settled down. With the two tubs placed next to each other, lift
the egg cartons and place them into the clean tub. Replace or swap over the food trays
as necessary and gently tip the remaining crickets into the clean tub. Care should be
taken to not get dead crickets into
the clean tub. Replace or swap
over the water feeders and egg-
pads as necessary. A binder clip
should be attached to each
changed tub so that you know
which tubs have been changed
and which still need to be done
(Figure 4). At the end of the
week you can remove all of the
clips and start again in the
proceeding week. Store tubs with
the food trays facing outwards so
that you can easily see whether
Figure 4: Tubs set up with binder clips to confirm that
they have been cleaned for the week.
the food is low etc. If tubs are
unacceptably dirty, if they are
becoming damp inside, or if food is eaten too quickly, the cricket density in the tub
may be too high. In such a case, divide the crickets into two tubs.
Step 4: Egg pads should be checked for hatchlings three times per week. Tape over
the holes on containers housing the egg pads a couple of days before hatching is
expected. Hatchlings should be transferred to a tub set up as described above (section
1.1), mixing offspring from several different egg pads to minimize inbreeding. After
hatchling production has been minimal for at least three days, egg pads may be
discarded, and the plastic containers cleaned. Any containers/egg pads that become
infested with flies should be frozen for at least one day to kill the flies, then
discarded/cleaned. Many of the smaller crickets will be used for food for the frogs, so
it is important to maintain numbers such that there are enough adults and intermediate
stages for the colony to be maintained.
To keep fruit flies under control, use fly traps made by combining a large pinch of
yeast and a pinch of sugar with water in a small plastic cup. Cover the cup with
plastic wrap and secure with a rubber band; poke a pencil-sized hole in the plastic
wrap. Flies will be attracted to the yeast, get trapped in the cup, and eventually
drown. (You can help ensure that the flies stay trapped by swirling the liquid to
immerse them.) Rinse out weekly. Keep fly traps wherever flies are a problem. You
can also use sticky fly traps where flies are a problem.
Step 5: Report the starting and finishing date of consumables on the appropriate form
(see Section 1.7) and make sure that you wash up at the end of the day so that tubs
and feeding trays are ready for the next day. It is important to monitor the use of
consumables so that we can make sure that they are always available. Please notify
the appropriate person when any consumable or supply is running low. Delays in
consumable availability could cause serious problems. There is limited space for
washing to dry, so remove all washed equipment at the start of each day and store it in
© Michael J. Smith and Allison M. Welch, 2005Rearing crickets, flies and mealworms 3
the correct place. Finally, always use the filtered water for the egg-pads, washing of
the food and for the water feeders. When washing up the tubs and food trays wash in
hot tap water and then rinse in the filtered water.
1.2. Culturing fruit flies
Step 1: Flies are kept in one quart wide-mouth glass
jars. Jars need to be sterilized in the autoclave before
use. Place the jars into the autoclave and ensure that
they have aluminum foil over the mouth. Make sure that
you’ve been trained to use the autoclave before
beginning! Adjust the “Minutes Steam Sterilize” to 25
minutes and the “Minutes Steam Dry” to 7-10 minutes.
If there is a problem, press the reset button and start
again. When ready press the “Gravity: cycle select”
button. Record your name and date on the autoclave log
sheet. Everything is very hot, so wear autoclave gloves
and take care not to touch the sides of the machine while
loading and unloading the jars. The metal measuring
cups and washed cotton should also be sterilized in the
autoclave.
Figure 5: Example of fly jar
Step 2: Each jar contains a medium of dehydrated mashed potato, sugar (sugar:potato
ratio 1 tablespoon:1 cup), water and yeast. First place 2/3 cup dehydrated mashed
potato and 2 teaspoons sugar in the bottom of the jar and swirl to mix (Figure 5). The
mixture should be about 1-inch deep. Then slowly pour in about ½ cup filtered water,
allow the water to soak into the potato mix, and sprinkle a small pinch of yeast over
the top of the mixture. Be careful not to add too much water, as it will result in runny
medium that slides out of the jar when trying to remove the flies.
Step 3: Once the jars have the medium in them, transfer adults from at least two
different jars (to minimize inbreeding) into each new
jar. Each new jar should only have about 100 flies, so
you may need to divide the flies from a jar into two or
more new jars. After flies have been added, cover the
top of the jar with a square of cotton fabric and seal
with the ring part of the lid (Figure 6). Label each new
jar with the date it was started and the strain of fly.
Label old jars with “H” (for harvested), the date flies
were most recently removed, and the strain of fly.
Store jars in the appropriate place.
New jars will start producing flies in 10 days to 2 Figure 6: Lid of fly jar
weeks. Old jars can be rechecked for flies up to once
per week. As with the crickets, flies will be needed for feeding the frogs, so it is
important to maintain enough individuals from each generation to sustain numbers.
© Michael J. Smith and Allison M. Welch, 2005Rearing crickets, flies and mealworms 4
Step 4: Any jars in which flies have regained flight should be placed in the freezer
for at least one day in order to kill all flies and prevent the flight back-mutation from
invading the colony. Any jars that have medium that is too runny to use, or that are
producing few enough flies that the jars could be better used to start new cultures can
also be placed in the freezer for a day. Jars that are no longer producing flies can be
cleaned without being placed in the freezer. Jars must be cleaned and autoclaved
before using for new cultures. Cotton fabric squares should also be washed with hot
water and then autoclaved and reused.
1.3. Culturing mealworms
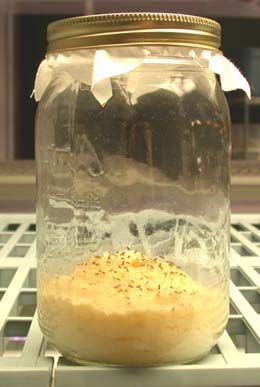
Step 1: Mealworm larvae are set up in medium-sized plastic containers. Fill each
container to about one third with mealworm mixture (see
below). Place four small organic carrots and a piece of
egg-carton on top of the mixture. Pupae (Figure 7) and
adult beetles should be collected every two days from the
larval containers (be sure to check them under the egg
carton) and set up in a new container (set up as described
above for the larvae) to lay eggs. Place about 50
pupae/adults in each adult container. Once the adults die
and the eggs hatch, continue the cycle by collecting newly
emerged adults and placing them in a new adult container
and so on. Remember to mix individuals from different
containers to minimize inbreeding. Figure 7: Mealworm pupae
Step 2: Mealworm feed consists of 1 bag of cornmeal, ½ cup of cricket food and 1
tablespoon of bone meal. Sift the individual ingredients before adding them to the
container to remove large objects. Sifting can be done in a fume hood or outdoors (to
avoid breathing the dust).
© Michael J. Smith and Allison M. Welch, 2005Rearing crickets, flies and mealworms 5
1.4. Appendix 1: Sources for supplies
Organism Item Procedure
General use Latex gloves http://www.mugeneralstores.com or scientific supplier
Paper towels http://www.mugeneralstores.com or scientific supplier
Crickets Organic carrots & local grocery
organic green leaf
lettuce
Cotton roll http://www.jorvet.com/pricelist.cgorder_form.phpi
product number = J197; discount if order 90 rolls
Cat food local grocery or Wal-Mart
Cricket food http://www.flukerfarms.com; high calcium cricket food,
product 71106
Egg cartons http://eggcarton.com/; product #ETP-30
Petri-dishes scientific supplier
Crickets http://www.reptilefood.com; ¾ inch crickets are subadults
appropriate for starting or supplementing laboratory colony
Large plastic tubs Wal Mart
Small plastic tubs Wal Mart
Solo 16oz deli The Bean Farm, 425-861-7964 or
cups (with holes) http://www.beanfarm.com/
Flies Sugar local grocery
Yeast local grocery. (not rapid-rise or bread machine yeast)
Plain dehydrated local grocery.
mashed potato
Cotton fabric Wal-Mart – thin, white and 100% cotton (e.g., muslin)
Aluminum foil local grocery.
Jars (quart-sized, WalMart (in season)
wide mouth, with
ring)
Mealworms Bone meal local feed store (Bourne Feed – 573-474-4113;
4011 I-70 Dr. SE)
Corn meal local grocery.
Cricket food http://www.flukerfarms.com; high calcium cricket food;
product 71106
Small plastic tubs Wal Mart
© Michael J. Smith and Allison M. Welch, 2005Rearing crickets, flies and mealworms 6
1.5. Appendix 2: Cricket consumables check list
Cotton Wool Lettuce Carrots Cat food Cricket food Egg Cartons
Start Finish Start Finish Start Finish Start Finish Start Finish Start Finish
© Michael J. Smith and Allison M. Welch, 2005Rearing crickets, flies and mealworms 7
1.6. Appendix 3: Mealworm consumables check
list
Bone meal Carrots Corn meal Cricket food
Start Finish Start Finish Start Finish Start Finish
© Michael J. Smith and Allison M. Welch, 2005Rearing crickets, flies and mealworms 8
1.7. Appendix 4: Fly consumables check list
Mashed potatoes Yeast Sugar Cotton fabric Aluminum foil
Start Finish Start Finish Start Finish Start Finish Start Finish
© Michael J. Smith and Allison M. Welch, 2005You can also read