Manual for Service Employees - Version 4.5 - based on IT
←
→
Page content transcription
If your browser does not render page correctly, please read the page content below
Manual
for Service Employees
Version   4.5

                    1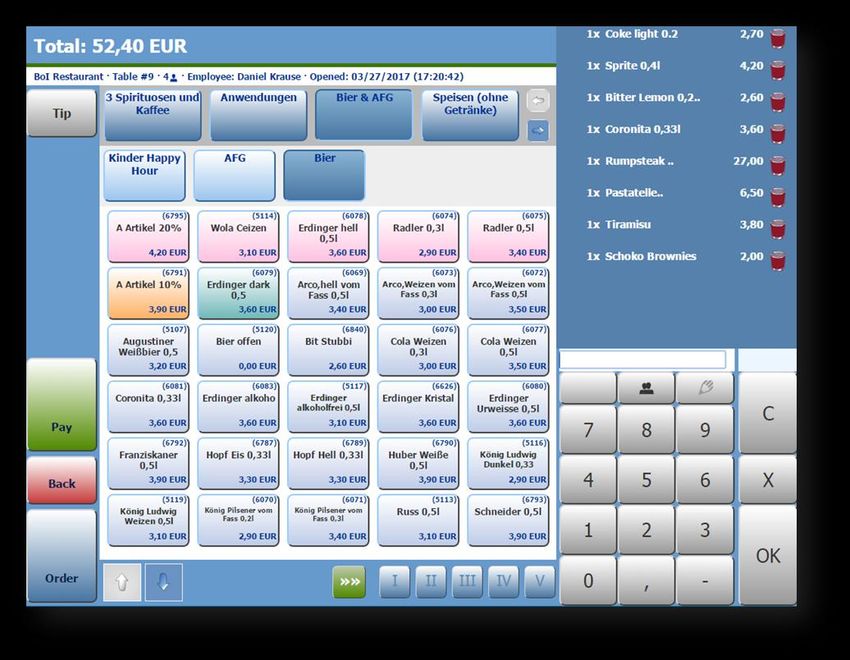
Login and Choose Your Outlet ................................................................................................................................................3
1    MY POS Express Cashpoint .............................................................................................................................................5
  1.1     Posting Items ..............................................................................................................................................................5
     1.1.1 Minus Postings ......................................................................................................................................................6
  1.2     Checking out ...............................................................................................................................................................7
  1.3     No Wallet? ...................................................................................................................................................................9
  1.4     Service Features ...................................................................................................................................................... 10
     1.4.1 Print Daily Reports: ........................................................................................................................................... 10
     1.4.2 Reload Cashpoint: ............................................................................................................................................. 10
     1.4.3 Reposting your Tip: .......................................................................................................................................... 10
2    MY POS Transaction Cashpoint .................................................................................................................................. 11
  2.1     Opening an New Table/ Transaction ............................................................................................................. 12
  2.2     Number of Guests.................................................................................................................................................. 12
  2.3     Taking Orders .......................................................................................................................................................... 14
     2.3.1 Additional Order Information ...................................................................................................................... 15
  2.4     Food Sequence ....................................................................................................................................................... 17
  2.5     Posting ....................................................................................................................................................................... 18
     2.5.1 Tip ........................................................................................................................................................................... 19
  2.6     Cancellations and Negative Bookings ........................................................................................................... 20
3    Managing Tables .............................................................................................................................................................. 21
  3.1     Creating a Sub-Table ............................................................................................................................................ 22
  3.2     Moving Items from Table to Table .................................................................................................................. 23
  3.3     Adopting a Co-worker’s Table .......................................................................................................................... 24
  3.4     Merging Two Tables ............................................................................................................................................. 24
  3.5     Splitting an Invoice ................................................................................................................................................ 25
  3.6     Deleting a Table ...................................................................................................................................................... 25
  3.7     My Tables – Other Tables – All Tables ........................................................................................................... 26
  3.8     Print Positions for Dividing a Bill ..................................................................................................................... 26
4    Close a Table and Print an Invoice ............................................................................................................................ 27
  4.1     Pay Method Split .................................................................................................................................................... 29
  4.2     Print Receipts ........................................................................................................................................................... 31
  4.3     Re-open Transactions ........................................................................................................................................... 31
5     Service Features ............................................................................................................................................................... 32
  5.1     Day-end closing and Cash Balance ................................................................................................................. 32
  5.2     Reload Cashpoint ................................................................................................................................................... 32
  5.3     Repost your Tip ....................................................................................................................................................... 32
6    Spa-Cashpoint ................................................................................................................................................................... 33
  6.1     Billing of Spa Sales with Connected Hotel System ................................................................................... 33
  6.2     Day Spa Guests and Direct Payment: Settle MY SPA Services ............................................................. 33
  6.3     Management of Day Spa Guest Revenues................................................................................................... 36
  6.4     Authorization for Billing ...................................................................................................................................... 36
7    Support................................................................................................................................................................................. 37

                                                                                              2
Login and Choose Your Outlet

Start the ‘MY POS’ application.

Please choose property, outlet and cash point if no default is set. Enter your Service Code or use your
Service Card for authorization and click ‘OK’.

Tip:

Looking for your Service Code? It is created when your administrator sets up a user in the MY POS
administration backend. If you log in there, you will see your Service Code in the info toolbar or in your
user profile.

                                                    3
There are two versions to work with MY POS Cashpoints:

   •   Express Cashpoint
       Quick booking and checkout of items in shops, bars, coffee shops or quick-service.

   •   Restaurant Cashpoint
       For handling international restaurants including table management.

If you have chosen the setting: ‘Both Cashpoint Types’ in the MY POS Backend Administration you may
not only choose your outlet, but also the type of cash point suitable for the situation.

                                                 4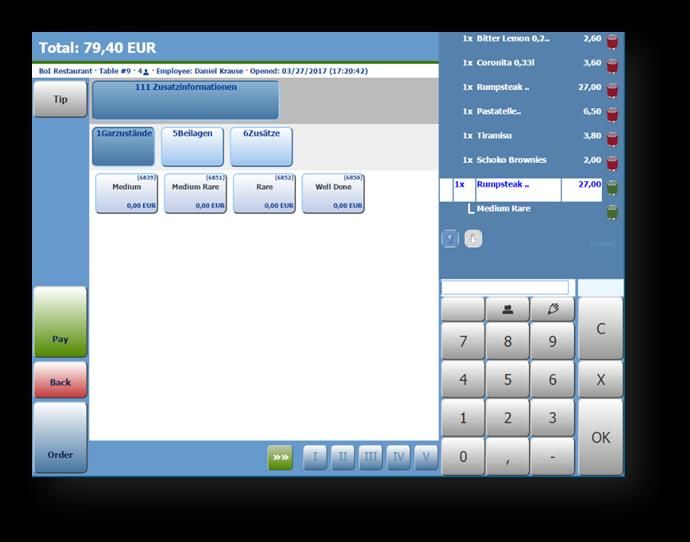
1 MY POS Express Cashpoint

1.1 Posting Items

After login, you see the cash point’s product range.

To post items, simply click on the items your customer wishes to purchase. All orders will be listed in
the blue field on the right. In this list, items may be deleted or supplemented with items (e.g. toppings
for ice cream). Would you like to enter a quantity more than one of the same item? Please enter the
amount in the number pad first, then click on the desired item.

You may also enter items with their unique Item-ID. To do so, please use the number pad (in this
example: 3 x 6105 for three Cappuccino).

A click on ‘Back’ deletes all entries and brings you back to the Welcome Page to choose another outlet
or log out.

                                                    5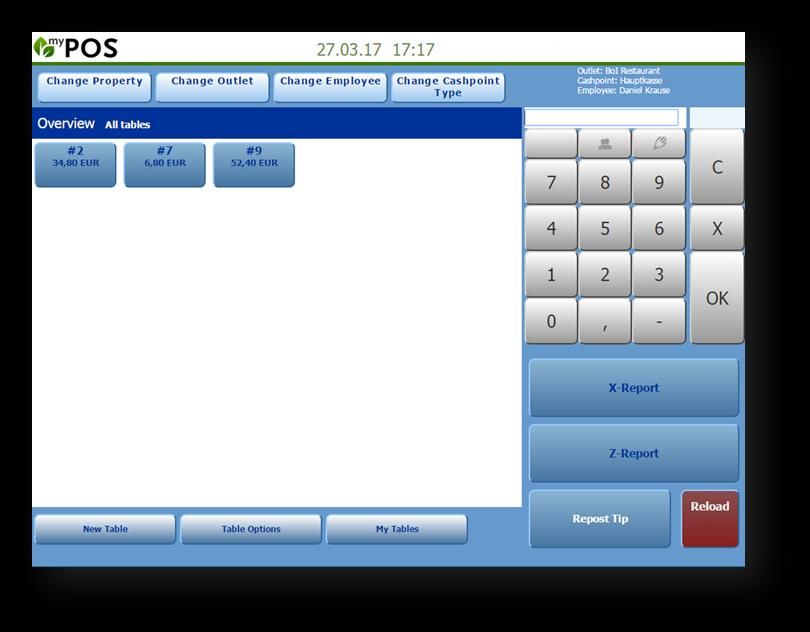
1.1.1 Minus Postings

If you have the user rights to post negative amounts of items,
you will see a minus in the number pad: ‘-‘.

Activate it with a click, and all items posted will now be
shown in the list with a minus and handled as cancellations.
Deactivate it by clicking again.

                                                   6
1.2 Checking out

‘That’s all?’ Please click on ‘Pay’.

Now you will see the list of possible payment methods.

You may also grant a discount by
checking the discount box. If you
did so, in the next step you will
be asked for the discount
amount (in percent).

Then, you can also choose if you
want the discount to apply to all
possible items in the transaction
or if only selected items should
be discounted.

                                                 7
If you are working with
guest cards, you may
use the card with your
reader or enter the
guest’s ID or room
number directly in the
number pad.

After confirming your
posting, clicking on ‘OK’
will start printing a
receipt (including
discount if checked).

                            8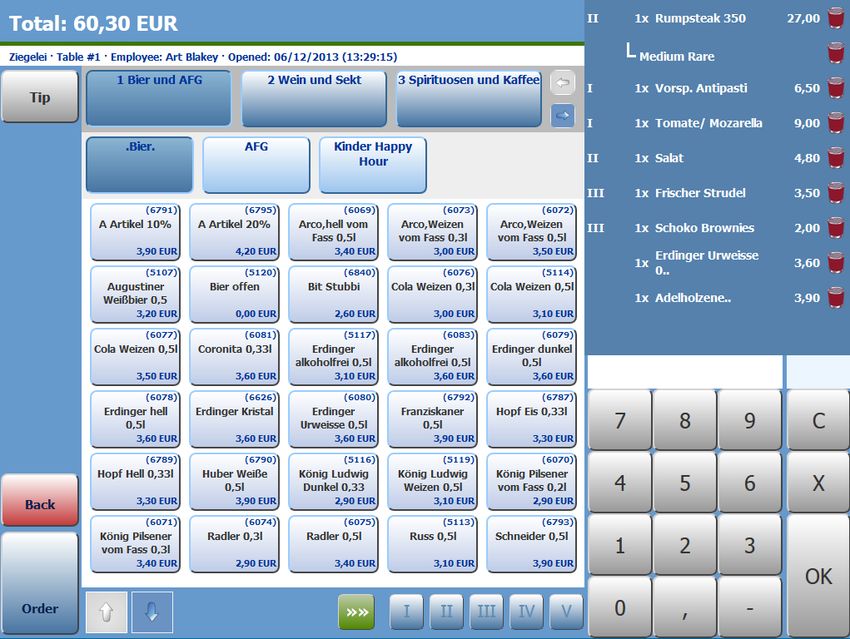
For printing the receipt again, click on ‘Reprint Receipt’ or choose to go back to the Express Cashpoint
Overview. If you choose certain Payment Methods like ‘Cash’ or ‘Guest Card’, an additional button will
let you print a business receipt for entertainment expenses.

Tip: If you use the cash register for a spa or other shop that does not require hospitality receipts, you
can deactivate this function. Select the relevant sales outlet via "Sales outlets" and check the box "Spa
sales outlet".

1.3 No Wallet?

The function 'Parking' saves the postings in the transaction cashier and releases the express cashpoint
for further postings. A prerequisite for this is that both types of POS terminal are released at this point
of sale.

You will find the parked transactions marked with the prefix 'P' when
changing the cash register type.

                                                     9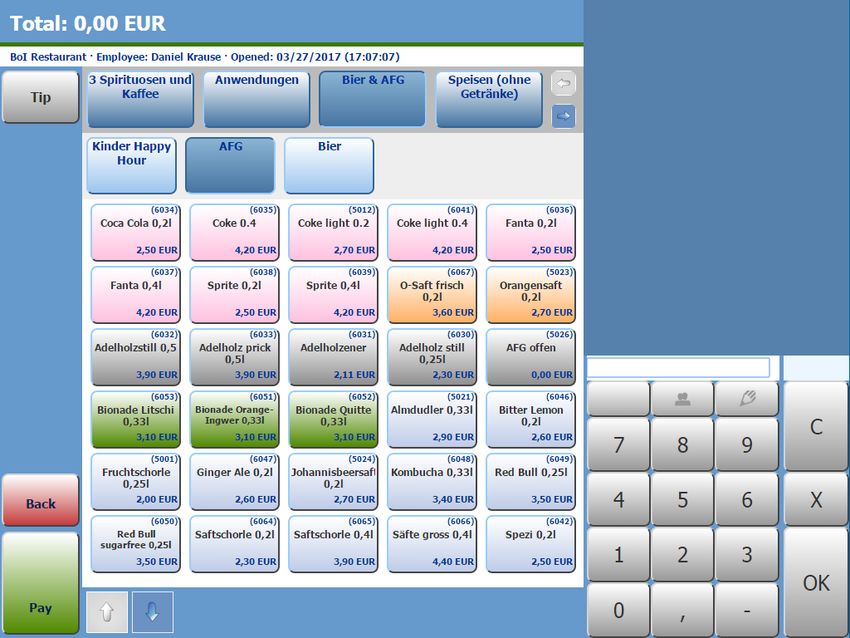
1.4 Service Features

1.4.1 Print Daily Reports:

X-Report: See or print your outlet’s sales for the day. A click on this
button shows all revenues.

Z-Report: Print your outlet’s sales for the day for all your employees
from this outlet. Click on the Z-Report Button.
Please note that the Z-report can only be printed if there is no open
table/transaction for this sales point.

1.4.2 Reload Cashpoint:

Click on ‘Reload’ to restart the cash point.

1.4.3 Reposting your Tip:

If you choose the Payment „Guest Card“ or enter a roomnumber, you
may easily repost your tips without re-entering the guest card
number. When you click this button, you will be asked for the
transaction number (found on the receipt).
Make sure that the transaction took place today and you were logged in as the person that took and
settled the orders. In the transaction details you may enter the tip you received.

                                                     10
2 MY POS Transaction Cashpoint
After your log in you see the table/ transaction overview where you manage open tables.
1
2
3
5
4
Sections:
(1) Here you will find the sales outlet and cash register you are currently working in. Your login
name is displayed
(2) In the white section you will find all tables/ transactions, which are assigned to you
(3) Number pad for entering your ID, item IDs and amounts or Guest Card ID’s.
C: Delete
X: Amount
OK: Enter
(4) Manage and edit tables
(5) Personal Cash Balance (X-Report) and Daily Closing (Z-Report)
112.1 Opening an New Table/ Transaction
When new guests arrive, and take a seat, you
create a new table in MY POS to post their
orders. Click on ‘New Table‘ and enter the
table’s number. Confirm it with a click on
‘Save‘ or delete the new table with a click on
‘Cancel‘.
As a shortcut, you may also enter a number directly and
the new table will be set immediately.
You can open existing tables by clicking the table icon or
by entering the number.
2.2 Number of Guests
If in the MY POS backend the setting to count the number of guests at the tables is cho-sen, you are
now asked to enter it.
You may see this information in the table’s information bar and may change the number anytime as
long as the t ransaction is not closed.
12The number of guests can be
changed by opening the table,
for example by entering the table
number or clicking on the table.
Click on the desired table, enter
the new number in the number
field and click on the guest
button.
A pop-up opens and informs
you again about the change,
which is now already visible in the
info bar.
However, if you
now press
"Cancel", the
change will be
discarded. You
must click on
"Book" to activate
the change, or click
on "Pay" to settle
the table directly.
132.3 Taking Orders
After you have successfully created a new table, you may enter the items ordered.
First choose the category in the first row and the sub-category in the second row (use the left/ right
arrows to see more). Now you see the items with their ID and prices.
To place the order you can either click on the item, enter the item’s ID in the number pad, or, in case of
similar orders, enter the amount, click on the ‚X‘ and then choose the item to be ordered.
If you would like to book an article on the table, click on this article. You can enter the quantity of the
article by first clicking on the desired number and then on the article.
You may change a price by clicking on the item in the blue field, but only if manual price changes are
allowed for this item. This is defined in the item’s details in the MY POS
Administration Backend.
You can also book the item by entering its item ID without clicking on it.
142.3.1 Additional Order Information
You may also add information like meat doneness or toppings. Click on the item in the order list on the
right and possible additions or substitutions are shown in the middle. Each item may be supplemented
with options such as:
• Degree of doneness: medium, rare, well done
• Plus – Minus: with/ without onions
• Toppings or side dishes
Please note that additional item options have to be set up in the MY POS Administration
Backend and apply only if assigned to this outlet.
To add ordering information, click on the item in this table’s order list. The list of order informations
opens in the middle. Select your additional option and it will be attached to the item in the order list.
Click on the green ‘Order’ button to save the order and print the order where it is needed – in the
kitchen, the bar or elsewhere. ‘Cancel‘ takes you back to the table overview.
15This table’s order list is shown in the blue field on the right, if the order is long, the arrows take you up
and down to see more.
Every time you choose this table, you will see the orders entered – until the guests wish to pay and
you close the table. You may do this by clicking on ‘Pay‘.
You can also enter a free text at the article, which will be visible on the kitchen and gangway receipts.
Select an article and click on the pen button above the number field.
A keyboard opens. Enter the text and confirm the
input with the "OK" button or cancel the input by
clicking "C".
After that, the pencil icon appears next to the article, where you can make changes to the free text by
clicking again.
162.4 Food Sequence
By clicking on the roman numbers below, you may select the courses - whether a dish is ordered as a
starter or a main dish… You may enter the items in any order, the items will be sent to and printed out
in the kitchen course by course. This way you can choose any menu item, like a salad, as a main course
and the kitchen will know, when to serve it.
You may enter the course by clicking on the appropriate roman number directly after choosing the item,
or later by clicking on the item in the list and so reactivating it.
Clicking on the chosen roman number again deletes the course.
If you want to inform the kitchen that the next course may be
served, click on the green arrow button and then on the number
button of the course you want to be printed. Now, you see an
overview of all items that belong to that course and after confirming by clicking on ‘Print’, the kitchen
receipt will be printed.
172.5 Posting
When booking articles, they appear in the blue area at the top right. There is always only a certain
number of articles to be seen, please scroll with the arrow keys up and down to see the other booked
articles.
When you have finished entering, save all articles with their respective quantities and prices by clicking
on "Book". This will take you back to the table overview. At the same time the kitchen receipt will be
printed out.
182.5.1 Tip
To post the tip you received, please enter the amount and click on the grey tip button in the upper left
corner.
192.6 Cancellations and Negative Bookings
Already booked articles now show a red waste basket instead of the green waste basket (simply
deleting is possible). Articles with the red basket had been ordered for preparation and therefore must
be cancelled if you want to alter the order.
If your user rights are set accordingly, you may cancel already
booked items by entering your Service Code and CIN. By
clicking on "Cancel" the articles just selected for the table will
be deleted and you will be returned to the table overview. From
the table view you can open the payment dialog directly at any
time by clicking on the button "Pay".
If, in addition to the right to
cancel, you are authorized
for negative postings, you
can enter articles with a
negative quantity. In the
keyboard field you will see a minus icon after logging in: "-". You
can activate this by pressing it - pressing it again deactivates the
key again. Items that you book with the key activated now appear
in the display with a negative number and are charged as
cancellations.
203 Managing Tables
Clicking on 'Table Options‘, a variety of features to manage and edit open tables occur.
213.1 Creating a Sub-Table
When new guests arrive and no table is available, you might want to ask them to join an open table. The
feature Sub-Table makes this possible: click on ‘Create Sub-Table‘ and choose the table the new guests
have joined. Add all orders as usual.
New Sub-Table of Table No 1
223.2 Moving Items from Table to Table
A click on ‘Move Positions‘ asks you to choose the table, from which you wish to choose existing orders.
After that, please choose the table you want the positions to be moved to:
After having defined both tables, you may select single positions by clicking on them. If you wish to
move all, please click on the arrow. Click on ‘Save’ to apply the changes or ‘Cancel’ the process.
233.3 Adopting a Co-worker’s
Table
Click on ‘Adopt Table‘ and a list of all your
colleague’s tables is shown. Simply click on the
one you wish to adopt and it appears in your
personal table overview.
3.4 Merging Two Tables
This feature is designed to combine two tables’ orders and post them on one table. Please click on
‘Merge Tables‘ and choose the first table, then the second one, each with a click:
Now decide, which table is now active.
The other table will be deleted, but all
postings can be found on the
destination/ main table.
243.5 Splitting an Invoice
If you have activated the feature ‘Allow
Invoice Split’ in the backend settings for
the outlet, a new button will appear, called
‘Split Invoice’. Click on it and you will have
to select the table which you want to
divide evenly by the number of guests at
the table (or you can enter a new amount).
After selecting the table, you can enter the
amount of required partial bills and the
item positions will be divided by this
number. Now, you can bill the sub-tables
separately, but you cannot book any more
additional items to any of the individual
tables.
Slight deviations in the cent range
may appear with the total amount of
the partial bills, because the
individual item positions are divided,
not the total amount of the bill.
3.6 Deleting a Table
Please click on ‘Delete Table‘. In the following
overview you can see all tables that may be
deleted (only empty tables without items
entered). Choose it with a click.
253.7 My Tables – Other Tables – All Tables
Clicking on this button shows tables
of this outlet.
3.8 Print Positions for Dividing a
Bill
If guests sitting at one table wish to pay
separately, you may print all the positions to
manually split the invoice before paying. Please
click on ‘Print Open Items‘ and choose the table.
264 Close a Table and Print an Invoice
Please choose a table and click on the ‘Pay‘ button.
Now you see the Payment View and may select a Payment Method and grant a discount for the table.
You also see the transaction details on the right. The Payment Methods you see here depend on the
ones created in the MY POS Management backend.
If you like to grant a transaction/table discount, check the box.
Choose the appropriate Payment Method by clicking the button, using the guest card if a reader is
attached or entering the guest’s ID in the number field.
If the discount box was checked, you will be asked to enter the discount in percent of the table’s bill
after you have chosen the Payment Method. As of now, you can give the discount to selected items
instead of the whole transaction, as long as they are reducible.
An item is reducible when you activated one of the possible discounts for it in the MYPOS Backend
(except for All Inclusive).
27On the right, you can see that all
reducible items are
automatically chosen for the
transaction discount, but you
can undo that by clicking in the
box next to the item.
You will be asked to confirm
closing the table and check all
details again. Confirm with a
click on ‘Continue‘ or delete all
entries with a click on ‚Cancel‘.
All items will be reposted on the
table.
In the last step, you see all items with their (reduced) prize, as well as the given discounts. If everything
is in order, confirm the checkout by clicking ‘OK’. Or reject all your changes by clicking ‘Cancel’ and
you will get back to the booking overview of your transaction.
284.1 Pay Method Split
If your guests want to pay the bill with different payment methods, for example by paying part of the
bill with a coupon, there is a new feature that allows you to bill partial amounts of the table with
various payment methods. First, you have to enable this feature in the Outlet settings in the MYPOS
Backend by checking the box next to the payment method ‘Allow Pay Method Split’. Now, after
choosing the first payment method when billing, you enter the desired amount that shall be posted to
this payment.
Confirm the payment with ‘OK’. You will be redirected to the billing screen where you select the
payment methods. Here, you can now see the outstanding invoice amount of this transaction, as well
as the amount and the method that was used for the first payment.
Now, you may choose the
payment method for the next
payment and either enter a new
partial amount in the number
field or leave it empty, then the
complete outstanding amount
will be posted to this payment
method. Confirm with a click on
‘OK’.
29The function Paymethod Split may also be used, if the transaction consists of one or more negative
postings. Please note: transactions, in which positive and negative postings of items are mixed, may not
be splitted!
Attention: For properties in countries where fiscal printers are mandatory you cannot mix internal and
external payment methods!
The different payment methods will be shown in the MYPOS Backend in the transaction data, in the
Statistics, as well as on the daily closing reports (X- and Z-report) and will be adopted for the
cancellations.
304.2 Print Receipts
After having confirmed closing
the table you are asked to choose
your next step: Either re-print the
receipt (if applicable) print a
business receipt for
entertainment expenses
(depends on Payment Method
and outlet settings), or choose to
return to your tables or change to
the Express Cashpoint.
4.3 Re-open Transactions
Every closed transaction receives its unique ID. You can see it on the receipt. Enter it and confirm.
Then enter a new table number and all
items will be reposted on the new table.
315 Service Features
5.1 Day-end closing and Cash Balance
Daily Closing (Z-Report)
A receipt is printed showing the sales, tips and cancellations of all service
personnel, broken down by payment method, which have been made in
this sales outlet since the last Z-report was printed. The 'Z-report' is only
printed once and always as a paper document at the receipt printer and is
only possible if all open transactions for all service personnel have been
completed. If you have authorization for day-end closing, click on Z-
report and confirm your selection.
Cash balance (X-Report)
Your sales can be viewed on screen
at any time, even if transactions are
still open. The printout on the
receipt printer can also be selected.
5.2 Reload Cashpoint
Click on ‘Reload’ and you will restart the cash point.
5.3 Repost your Tip
If you choose the Payment ‘Guest Card’, room or reservation , you may easily repost your tip without re-
entering the guest card number. When you click this button, you will be asked for the transaction
number (found on the receipt). Make sure that the transaction took place today and you were logged
in as the person that took and settled the orders. In the transactions details you may enter the tip you
received.
326 Spa-Cashpoint
6.1 Billing of Spa Sales with Connected Hotel System
If you do not want to check in day spa guests in your hotel system, or you wish to offer direct payment
of Spa sales additionally to posting sales on the hotel bill, we offer the integration of MY POS.
Payment methods created in the cash register are offered directly in the MY SPA user interface and
billings are sent to connected POS printers, also with cash drawer opening.
The advantage: the easy-to-use billing mask for booking sales to the hotel bill is maintained and
supplemented by the selection of direct payment methods from the cash register. The cash desk
interface is available in the browser window for billing advanced booking transactions such as split
invoices, merge transactions or finance splitting with multiple payment methods. The MY POS
administration backend offers article management, statistics and financial reporting.
For Austria, the mandatory connection to the tax authorities exists, for Germany it is implemented, it
has been announced by the authorities for 2020. Italian fiscal printers can be used. The connection of
the MY POS cash register to your hotel system can be solved via an additional POS interface, but you
might as well use the cash-point system stand-alone.
6.2 Day Spa Guests and Direct Payment: Settle MY SPA Services
In the Main Settings of your spa you may choose if you want to use MY POS as an express cash
register with direct production of the guest’s invoice, or if you would like to continue processing the
billing as an open transaction in the cash point surface.
When selecting the setting ‘Express Cashpoint, the payment methods set in the MY POS
administration are offered in the selection of the payment methods that are possible for this guest. If
he is checked in at the hotel, the payment method ‘hotel bill’ is pre-selected. If the guest is checked
out, blocked our unknown in the hotel system, only the payment methods of the cash register are
offered.
33When choosing the setting ‘Transaction Cashpoint', the payment methods in the MY SPA settlement
screen are not selected directly. All sales are sent as one transaction to the MY POS cash-point surface
for further processing, e.g. billing with multiple payment methods.
34The MY POS screen can be easily opened in another browser tab, the sent transactions are marked by
the names of the guests:
During the billing process, you can choose transaction management activities such as merging
transactions, splitting transaction items, split bills, proportional payment or mixing different payment
methods.
It is also possible to use the cash point surface for billing without first opening a transaction in MY
SPA. Please note, that those sales are not shown individually the MY SPA reports and guest accounts.
These ‘other sales’ are saved under collective terms in the statistics. Please create your own collective
‘customer’ and ‘article’ - name them as you wish - and select and save them in the spa shop data
under PMS Settings.
356.3 Management of Day Spa Guest Revenues
Used as a transaction cash-point, MY POS can open a transaction of your Day Spa guests when
entering, and name it according to a locker number, guest ID or RFID transponder ID. On this open
transaction not only entrance fees are booked, but e.g. also consumptions which are ordered at bar
and kitchen printers. Bookings from MY SPA can be sent to open transactions with reductions,
additional product sales and gratuities – all assigned to the executing specialist. Are you interested in
further information about the MY POS system for your hotel? Contact your MY SPA distributor or us
directly.
6.4 Authorization for Billing
You may determine whether an employee is entitled to settle accounts in MY SPA and, in addition,
whether he may change prices (already at the time of reserving an appointment, as well as in the
payment dialog for changing individual prices and grant percentage discounts).
367 Support
This software is constantly being improved. Learning from each other, we consider your experience
and closely keep an eye on new features and trends. So we are excited to hear from you and
incorporate your ideas into our products. Some ideas will be implemented immediately, some later.
But with every fine-tuning, with every new feature, MY POS is evolving to better map your processes
and meet your expectations.
based on IT GmbH
Bernhard-May-Str. 58N
65203 Wiesbaden
E-Mail info@based-on-it.de
Telefon +49-(0)611-950005-0
37You can also read