MANUEL DE L'UTILISATEUR MANUALE D'USO - User Manual - XZENT
←
→
Page content transcription
If your browser does not render page correctly, please read the page content below
User Manual
BENUTZERHANDBUCH
MANUEL DE L’UTILISATEUR

UAS
M NE R
    UA LE M A
          D'U SN
               O UAL

                             X-127

 1-DIN DAB+ Infotainer with adjustable 9-inch display
 1-DIN DAB+ Infotainer mit einstellbarem 9 Zoll Display
 Infotainer 1-DIN DAB+ con display da 9 pollici regolabile
 Infotainer 1-DIN DAB+ avec écran réglable de 9 pouces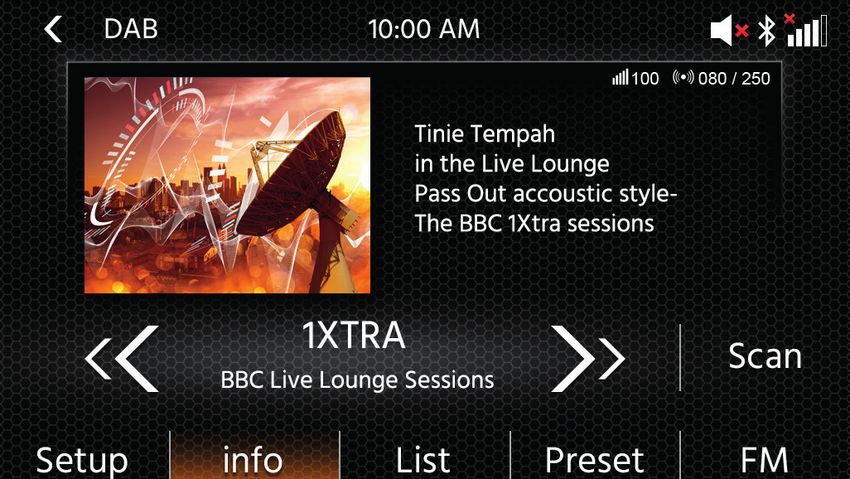
CONTENT INHALT SOMMAIRE SOMMARIO SAFTY INFORMATION
Seite 28 Page 54 Pagina 80
General
1. The descriptions and other content shown in this manual may deviate from the real device.
2. Pictures shown in this manual and some HMI screenshots may deviate from the real unit.
ABOUT THIS MANUAL 3. Specifications and technical design of this device model are necessarily subject to change
This manual contains important information and warnings about the operation of this XZENT unit. without notice.
Please store it in a place where you have access later on.
■ Read the instructions entirely. Heed all warnings. Follow the instructions.
■ Retain this manual. Whoever will use the unit should have access to this manual.
■ This unit is designed to be functional in vehicles with 12 V DC battery and negative ground.
■ Do not operate the unit in any other way than described in this manual. Failure to follow the
SAFETY INFORMATION 3 instructions as provided may void your warranty.
■ Do not disassemble or alter the unit in any way because this will void your warranty. Do not
DEVICE SUPPORT, SOFTWARE UPDATES AND MAINTENANCE 4 attempt to repair or to service the unit yourself, but contact an authorized XZENT dealer instead.
■ Use only original accessories which are designed and manufactured for the unit, otherwise you
FRONT PANEL 5 will risk damage. Install the unit according to the mounting instructions by using the supplied
mounting accessories. Acceleration forces during accidents can be huge. Incorrectly mounted
ADJUSTMENT OF THE DISPLAY POSITION 6-7 devices pose a serious risk for the driver and passengers during an accident.
■ Protect the unit from water and other liquids that could enter the housing. A short circuit or even
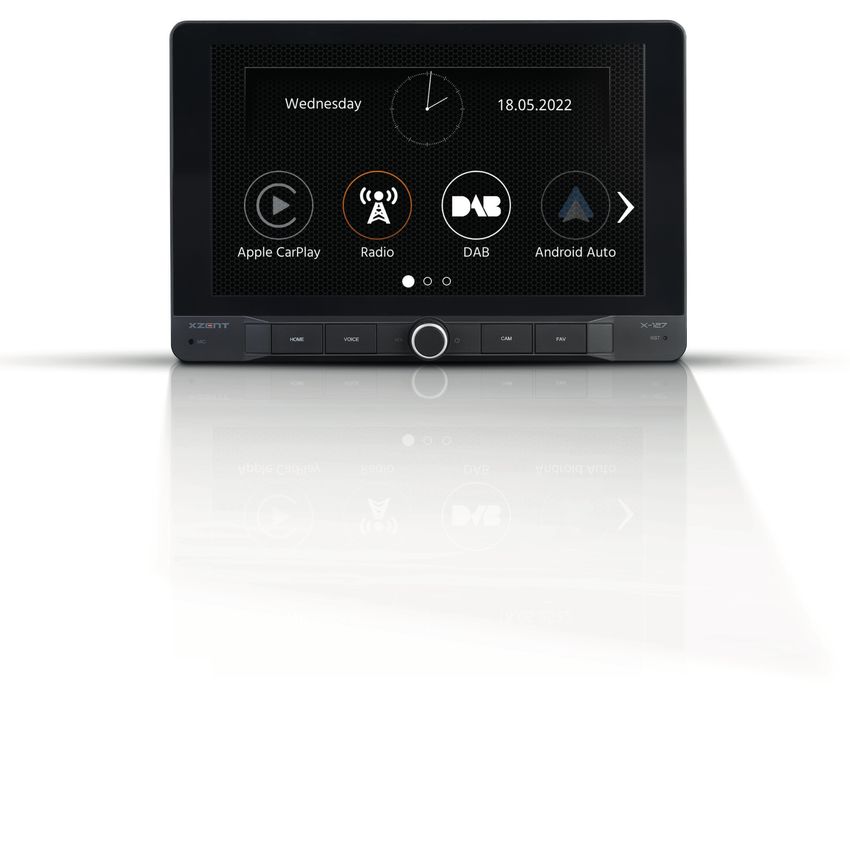
MAIN MENU 8 a fire could result.
■ To prevent a short circuit, never insert any metallic object (such as coins or metal tools) into the unit.
STEERING WHEEL CONTROL (OE mode, IR-Stalk-interface) 9-11 ■ Before you replace a defective fuse try to find the cause for the short circuit. Pay attention to
the cables of the power supply! If the short circuit does not result from a failure of the power
DEVICE SETTINGS 12-13 supply or wiring, you can replace the defective fuse with a new one (of identical value). If the
shortcircuit persists, contact an authorized XZENT dealer.
DAB RADIO SOURCE 14 ■ When connecting to any other device, read the user‘s guide for compatibility and notes on
electrical connections. Do not try to connect incompatible products.
FM RADIO SOURCE 15 ■ Be careful not to drain the car battery while using the unit when the car engine is turned off.
Because the unit consumes a considerable amount of energy and the battery will be charged
USB/IPod/BT MUSIC (A/V) SOURCE 16-17 only while the engine is running, it might happen that the battery will discharge to a point where
it is not possible to start the engine anymore.
BLUETOOTH PAIRING, CONNECTING, CALLING, MUSIC 18-19 ■ According to the law in different European countries, driving with monitors showing movies in
the viewing range of the driver is not allowed, because the driver might get distracted from
APPLE CARPLAY SOURCE 20 traffic. Please respect the traffic regulations of your country or you may face legal penalties
in case of accidents or even lose your insurance coverage. Pay attention to the playback volume
GOOGLE ANDROID AUTO SOURCE 21 inside your vehicle since you are required to notice exterior warning sounds like police sirens etc..
■ Don‘t expose the unit to hard impacts. A mechanical or electrical malfunction of the unit could be
CAMERA SOURCE 22 the result.
■ Should any problems or questions occur during the installation, please consult your XZENT
A/V-IN, HDMI SOURCE 23 dealer/importer.
TERMS OF WARRANTY 24-25
ADDITIONAL INFORMATION, TECHNICAL SPECIFICATION 26
2 3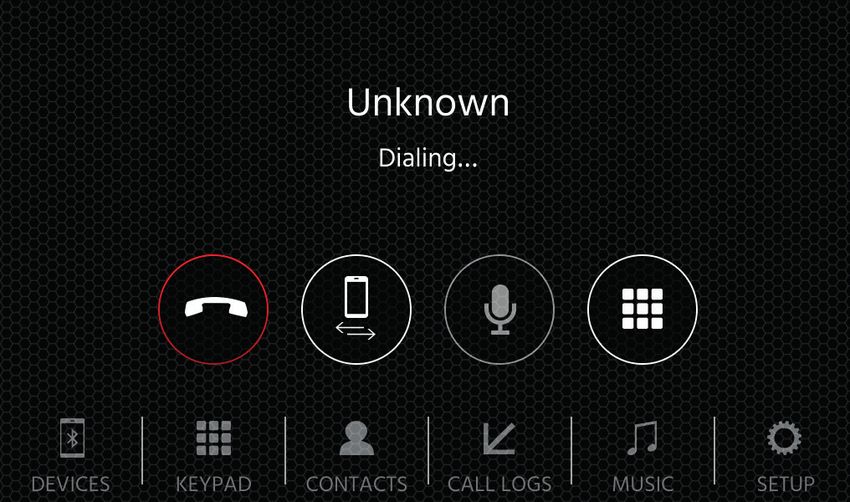
DEVICE SUPPORT, SOFTWARE UPDATES AND                                                                                                                        FRONT PANEL
             MAINTENANCE

    Software updates and improvements are provided via USB updates which can be downloaded from
    our website www.xzent.com Also customer care, FAQs and other helpful information can be found
    there.

    ATTENTION: this device has specific USB ports with special functions (USB-1, gray) and (USB-2,
    black). The extension cables are distinguishable thru text-label to ensure proper identification.

    Software updates provided via XZENT MUST be installed on “USB-1” (USE FOR SW UPDATE). If the
    installation has been done by 3rd party without proper marking/identification of the extension wire – do
    try the other port in case of update-failure.

    USB1 (gray): For Smartphone Connectivity:
                 • Apple Car Play,
                 • Google Android Auto,
                 • Software Updates
    USB2 (black): For charging phones or UBS media playback.

                                                                                                                    A                2     3              1              4         5                  B

                                                                                                               Operation buttons:

                                                                                                               1.       VOL/POWER:       Press and hold for standby mode (Screen OFF, Audio OFF).
                                                                                                                                         If powered on, press to mute.
                                                                                                                                         If powered off, press to power on.
                                                                                                                                         Rotate clockwise to increase audio volume.
                                                                                                                                         Rotate anti-clockwise to decrease volume.
                                                                                                               2.       Home             Press to return to home screen.
                                                                                                                                         Press in home screen to go to last source (if available).
                                                                                                               3.       VOICE:           Press to start voice recognition (in use with CarPlay or Google
                                                                                                                                         Android Auto)
                                                                                                               4.       CAM:             Press to show default camera, press again to close the camera view.
                                                                                                               5.       FAV:             Press to execute assigned FAV shortpress function from device
                                                                                                                                         settings (see chapter device settings).
                                                                                                                                         Press and hold to execute assigned FAV longpress function from
                                                                                                                                         device settings (see chapter device settings).

                                                                                                               A.       MIC              internal microphone for handsfree functions.
                                                                                                               B.       RESET            Press to perform a power reset.

4                                                                                                                                                                                                              5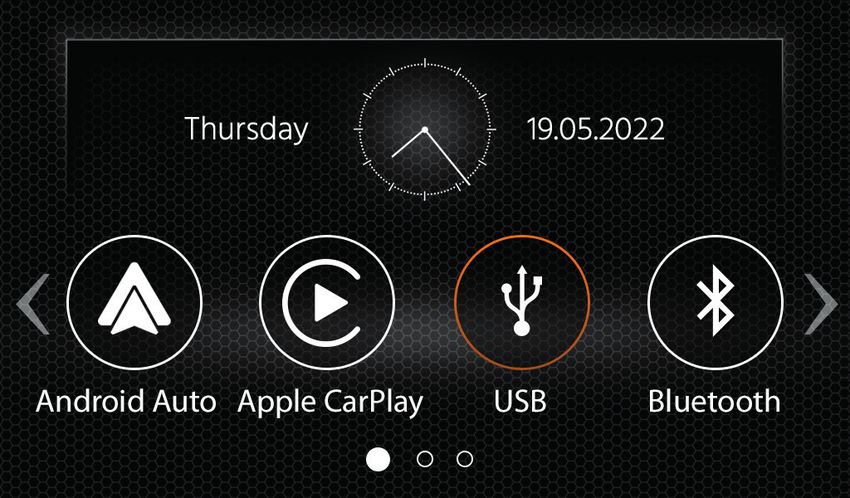
ADJUSTMENT OF THE DISPLAY POSITION                                                                  CUSTOMIZING AND DISPLAY DEPTH ADJUSTMENT

                                                                                                                                                                         Step 1:
                                                                                                                                                                         Remove the cover No.14 of the adjustment
                                                                                                                                                                         mechanism

                                                                                                                                                           1
                                                                                                                                          No.3

    Adjustment of the display position (vertical height, horizontal viewing angle and tilt).

    The display of the X-127 can be adjusted vertically in height as well as in viewing angle and tilt.
                                                                                                                                                                         Step 2:
    Note:                                                                                                                                                                Remove the 4 outer top screws and leave the center
    • Adjustments to the display should not be made while driving.                                                                                                       screw fastened. Gently pull the display-mounting-
    • Observe the safety instructions of the vehicle. Also pay attention to the accessibility of buttons such                                                            bracket by pulling on the display panel from the
      as warning lights or air outlets.                                                                                                                                  chassis to the desired 1/2" or 1“ position. To lock it in
    • The display should always be held with both hands „parallel“ (left and right centered) to adjust it.                                                               place, fasten the 4 outer top screws (see figure).
    • The X-127 should be firmly mounted.

    Viewing angle adjustment and tilt:
    Grasp the display at the center of the left and right edges and push with one hand and pull with the
    other to adjust the viewing angle. For the tilt angle, perform a tilting motion away from or toward your-
    self with both hands.                                                                                                                                  2
    Height adjustment:
    Grasp the center of the display at the left and right edges and slide the display up or down.
                                                                                                                Note:
                                                                                                                Do not remove
    Depth adjustment requires partial disassembly and adjustment of the standard mounting. Pay attenti-         the center                                               On demo pictures the Display panel group is not
    on to the separate section explaining this.                                                                 screw                                                    visible to allow better visibility of the top screws.

    CUSTOMIZING DISPLAY DEPTH ADJUSTMENT

    The depth adjustment of the display can be changed from default 0” setup (0mm) to 1/2“ (12.5mm)
    or 1” (25mm).
                                  A                                                                             1" (25 mm)       1/2" (12.5 mm)   Flush (default 0 mm)
                                          A
                                          Prerequisite: X-127 is disengaged from 1DIN dashboard and
                                          no mounting cage is fitted.                                                                                                    Step 3:
                                          To unlock the device from 1DIN dashboard, rotate the display
                                                                                                                                                          3              Reinstall or install the X-127 to 1DIN dash board
                                          group to a 90° position by holding the panel group with both                                                                   (see separate chapter). Installation process is same
                                          hands and rotating it clockwise or anti-clockwise for 90°.                                                                     as default but other covers No.14 for the adjustment
                                          Loosen the trim bracket from main body and insert the device                                                                   mechanism is required at the end.
                                          release keys No.3 at corresponding gap on left and right side
                                          (centre, between the main body and the 1-DIN mounting
                                          bracket – see picture). The release keys need to be inserted
                                          deep enough to disengage the clamp of the mounting bracket.
                                          Pull the X-127 out once the mounting bracket clamps are fully
                                          disengaged.                                                                                         Flush (default 0 mm)

                                                                                                                         1" (25 mm)
                                                                                                                                         1/2" (12.5 mm)

6                                                                                                                                                                                                                                    7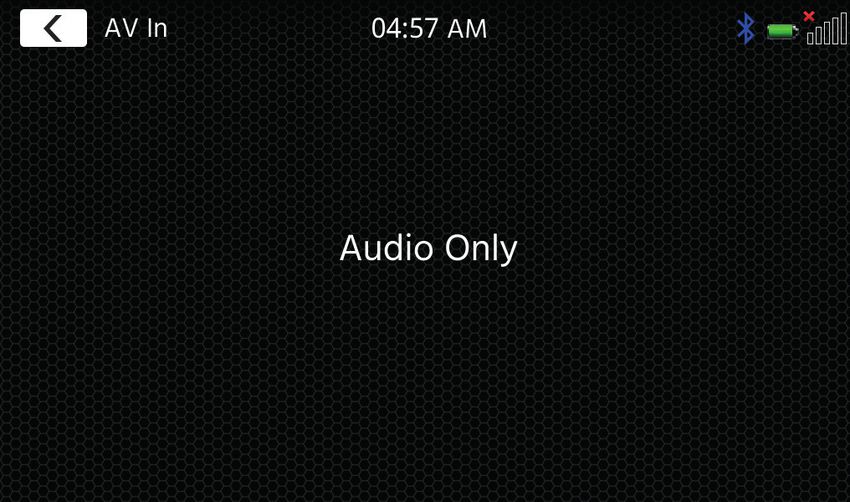
MAIN MENU                                                                                     STEERING WHEEL CONTROL (OE MODE, IR-STALK-INTERFACE)

                                                                                                            The XZENT device is pre-confi gured to work with an IR-Stalk-Interface which is NOT included in the set.
                                                                                                            Alternatively an existing analogue steering wheel control can be connected to XZENT Analogue Key
                                                                                                            interface (Key1 / Key2 / GND).
                                                                   A                                        X-127 has 2 different modes, MODE-2 (default for high ohms values) or MODE-1 (for low ohms values)
                                                                                                            to support different ohms ranges. The ohms ranges of each mode cannot be mixed to support SWC that
                                                                                                            have both mixed low and high ohms values.

                                                                                                            MODE 2 (HIGH OHM BASED):

          1

                                                                                                                                                                     4
                                                                                                                       1
                                                                                                                                      2                                  5

                                                     B                                                                                                               6

                                                                                                                                     A1                              A2

                                                                                                                       3
                                                                                                                                      A                                  B
    MAIN MENU operation buttons and display

    A                    Time and date.
    B                    Page indicator.
                                                                                                            Operation buttons:
    1.   Source Icon     Press to open selected source.                                                     1. Skip next:                 this button follows the Graphical User Interface (GUI) function of
                                                                                                                                          the active audio source.
    To browse the different source icons, swipe left or right. Alternatively you can press the arrow keys   2. CAM/voice:                 press to activate CAM source. Press again to close CAM source.
    to browse the different pages.                                                                                                        Press & hold to activate CarPlay or Google Andorid Auto voice control.
    To return to this screen you can press the HOME front sensor key or the return arrow button in top      3. Skip last:                 this button follows the Graphical User Interface (GUI) function of
    left corner of every source.                                                                                                          the active audio source.
                                                                                                            4 . Vol+:                     press to increase active audio volume level.
                                                                                                            5. Mute/Pickup/hangup:        While no active call, press to MUTE or unmute all audio. During incoming
                                                                                                                                          call (ringing), press to pick up call. While active call, press to end call.
                                                                                                            6. Vol-:                      press to decrease active audio volume level.

                                                                                                            A: You can customize the buttons of your SWC to your preference by placing standard or alternative
                                                                                                            buttons to your SWC. The process is explained at the end of this chapter.

                                                                                                            Alternative buttons:
                                                                                                            Each mode has different alternative buttons for assignment.
                                                                                                            A1. Alternative function SRC or SRC/Voice: Press to select a different Source via Main Menu highlighting.
                                                                                                                 or press and hold to activate CarPlay or Google Andorid Auto voice control.
                                                                                                            A2. Alternative function FAV or NAV/voice: Press to invoke the assigned FAV function from Setup or
                                                                                                                 press to start native navigation (not for X-127), press and hold to activate CarPlay or Google Andorid
                                                                                                                 Auto voice control.

                                                                                                            B: This button will reset any custom configuration on the SWC back to factory settings.

8                                                                                                                                                                                                                         9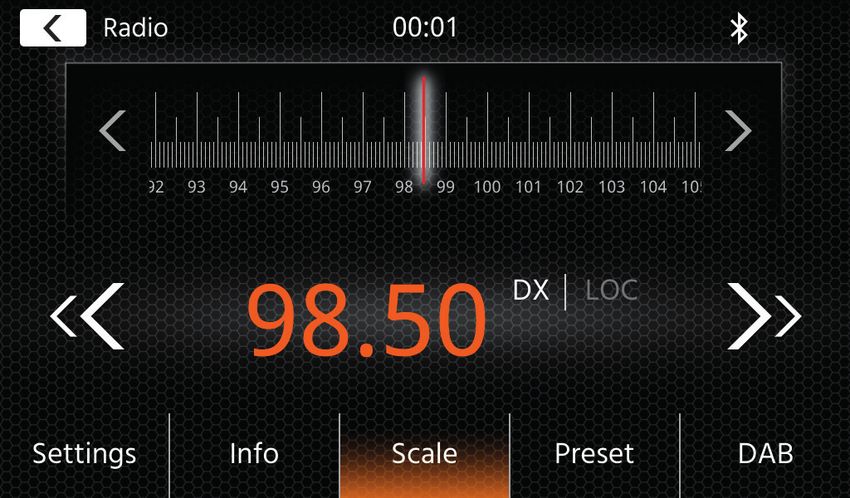
MODE 1 (LOW OHMS BASED):                                                                            SWC (re)Assignment process:
                                                                                                         The process is similar to both SWC modes and only differs by other standard and alternative buttons.
                                                                                                         The standard and alternative buttons function are explained at the beginning of this chapter for each
                                                                                                         mode. You can re-assign the buttons of your SWC. Please note that this mode is NOT for the IR-stalk in-
                                                                                                         terface mode. Press the “Change” button to start re-assiging the functions to your liking. The system will
                                                                                                         clear all buttons from the steering wheel and marks the top left SWC button which shall be assigned first.
               1              2                3                4                  5                     You need to assign all cleared buttons one by one from top left to bottom and then the right side from top
                                                                                                         to bottom. The current button which is to be assigned with a function will be hi-lighted for you. Example:
                                                                                                         To assign a function, select a function icon via touch from the middle (for example SRC / voice). After the
                                                                                                         desired function (in this example SRC / voice) is marked, press the corresponding SWC-Button (in this
                                                                                                         example top left). The system will now gray-out the SRC / voice button in the middle and put the SRC /
               6              7                8                9                 10                     voice function to the top left SWC button. Later you can trigger SRC / voice by pressing the top left SWC
                                                                                                         icon (instead of default MUTE). After the first button is assigned, the system will hi-light the next button to
                                                                                                         be assigned by a still available (non-grayed-out) function from the middle. After all buttons on the SWC
                                                                                                         are defined – you can close the SWC assignment and use the new configuration from now on. To resto-
                                                                                                         re back to default values press the “Default” button. The functions will then restore to standard values.

                                                                                                         Board/Trip-Computer:
                                        11               12                                              The SWC buttons for trip-, board computer and cruise control operation are directly assigned to the rela-
                                                                                                         ted vehicle functions, e.g. the function of these buttons on the steering wheel is completely independent
                                                                                                         of the device mounted in the vehicle.

                                                                                                         Note:
                                                                                                         The SWC related functions are only available if the device is connected with a compatible stalk-interface
                                                                                                         via IR in wire to a compatible vehicle model or via (Analog Key) if existing in the vehicle.
     Mögliche Tastenfunktionen und Bedientasten
                                                                                                         CAN IR stalk interface modules are being developed by various providers and, as soon as these are
     1. MUTE:       short press to mute the XZENT audio output. Press again to undo the mute function.   available, details on support can follow.
     2. Vol-        short press to reduce the volume of the current active audio channel (media vol,     The change from mode 1 to mode 2 must be completed by restarting the device.
                    voice, etc.).
     3. Vol+        short press to increase the volume of the current active audio channel (media vol,
                    voice, etc.).
     4. Skip back   short press to while media source DAB, USB, FM, etc. is active to do the same
                    touchscreen button operation.
     5. Skip next   short press to while media source DAB, USB, FM, etc. is active to do the same
                    touchscreen button operation.
     6. Pickup      short press to accept incoming call.
     7. HangUp      short press to end ongoing call.
     8. SRC:        Press to select a different Source via Main Menu highlighting.
     9. FAV         short press to execute assigned FAV function from device settings (see chapter
                    device settings).
     10. CAM        short press to open camera source. Press again to close.

     11. Change     short press to remove current steering wheel button assigments and reassign them
                    (see next Chapter).
     12. Default    wshort press to load default values of mode 1.

10                                                                                                                                                                                                                         11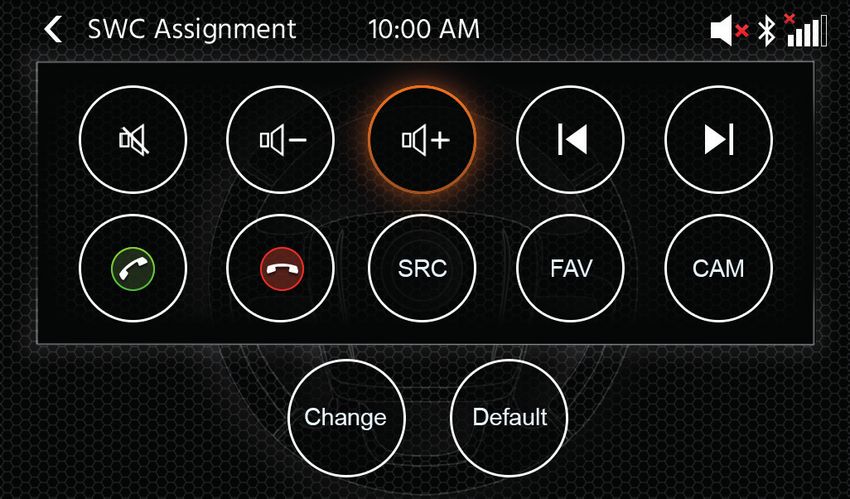
DEVICE SETTINGS
                                                                                                                                            change the frequency bands to your liking.
                                                                                                                                            Balance and Fader can also be optically adjusted or LPF, Subwoofer
                            1                                                                                                               level and Loudness can be adjusted.
                                                                                                                                      4(d) Loudness: Press to ON/OFF loudness.
                      2                                                                                                               4(e) Subwoofer Power: Press to ON/OFF subwoofer power.
                                                                                                                                      4(f) Subwoofer Gain: Press arrow key to change subwoofer gain if Subwoofer
                                                                                                                                            Power is set to ON.
                                                                                                                                      4(g) Startup volume: Press more key. Here you can change individually all
                                                                                                                                            available sources in regard of startup volume.
                                                                                                                                            You can choose to apply the last used volume, or set a fix volume on startup.
                                                                                                                   5.   TFT           Here you can adjust settings in regard of the screen for example brightness
                                                                                                                                      mode or brightness values.
                                                                                                                                      5(a) TFT brightness day: Press arrow keys to set value for day mode.
                                                                                                                                      5(b) TFT brightness night: Press arrow keys to set value for night mode.
                                                                                                                                      5(c) Dim mode: Press arrow keys to set value.
                                                                                                                                            Auto: the brightness is adjusted automatically with switching on the front
                      3                   4                     5                     6                     7                               headlights of the vehicle (Night).
                                                                                                                                            Day: the brightness is permanently at day value.
                                                                                                                                            Night: the brightness is permanently at night value.
                                                                                                                                      5(d) Touchscreen Auto Standby: On set idle time, the screen will be powered
     Operation Buttons:                                                                                                                     off when not operated (audio will continue in background).
                                                                                                                   6.   Camera        Enables you to adjust settings on the connected rear view camera.
     1.   Return          Press to return to the home screen.                                                                         6(a) Reverse Camera: Press arrow keys to adjust value.
     2.   List area       The shown list area is depending on the currently selected category.                                              Cam1: Will use the Video Cam1 input
                          To see other settings you can scroll/swipe the list up and down or select                                         Cam2: Will use the Video Cam2 input
                           different category from the lower area.                                                                          Cam1+Cam2: Will use the Video Cam1 on reverse gear, and will switch
     3.   General         Contains general settings like language, date&time, FAV key assignment.                                           automatically after a delay to Cam2 when reverse gear is released.
                          3(a) System Language: Press arrow keys to select language.                                                  6(b) Reverse Camera Mute: Press to change value (Mute, Reduce, Off)
                          3(b) Time sync mode (DAB+): Press switch to ON/OFF setting.                                                 6(c) R-Cam switch off delay: Press arrow keys to change the delay time until
                          3(c) FAV short press: Press arrow keys to assign a different function.                                            the cam view auto closes after leaving reverse gear.
                          3(d) FAV long press: Press arrow keys to assign a different function.                                       6(d) Camera picture: Press arrow keys to adjust value (normal or hor. mirrored).
                          3(e) Beep: Press switch to ON/OFF setting (Enable/Disable key press beeps).                                 6(e) Camera 1 Grid Lines: Press to turn camera 1 grid lines off and on. At the
                          3(f) Microphone: Press arrow key to change selected microphone.                                                   camera source, you can adjust the position of the lines if the function is set ON.
                          3(g) Wallpaper: Press to select different background.                                                       6(f) Camera 2 Grid Lines: Press to turn camera 2 grid lines off and on. At the
                          3(h) Key Illumination: press to change key color illumination                                                     camera source, you can adjust the position of the lines if the function is set ON
                          3(i) Date: Press manually set a date (only possible if the sync modus is set to OFF).    7.   Miscellaneous Here you can find information on the software device version and load factory.
                          3(j) Time: Press to manually set time (only possible if the sync modus is set to OFF).                      7(a) Software version: Press more key to show the device system software version.
                          3(k)Time Zone: Press to manually set time zone.                                                             7(b) Install Software: Press more key to start software installation from USB-1 port.
                          3(L)Time Format: Press arrow keys to change 12/24h format.                                                        If the files are not found, the buttons to proceed will not enable.
                          3(M) Apple connectivity: press to change mode                                                               7(c) Factory default: Press more key and confirm to perform a factory reset.
     4.   Audio           Contains setting for audio and sound adjustments.                                                           7(d) SWC assignment: Press to open the SWC assignment screen for Analogue-
                          4(a) Balance: Press arrow keys to shift the center to left or right position.                                     Key mode (not for IR-Stalkinterface mode)
                          4(b) Fader: Press arrow keys to shift the center to front or rear position.                                 7(e) Open Source License: press to see the license text.
                          4(c) Equalizer: Press to open EQ. You can select different EQ-Presets or manually                           7 (f) Legal: press to see legal entries.

12                                                                                                                                                                                                                               13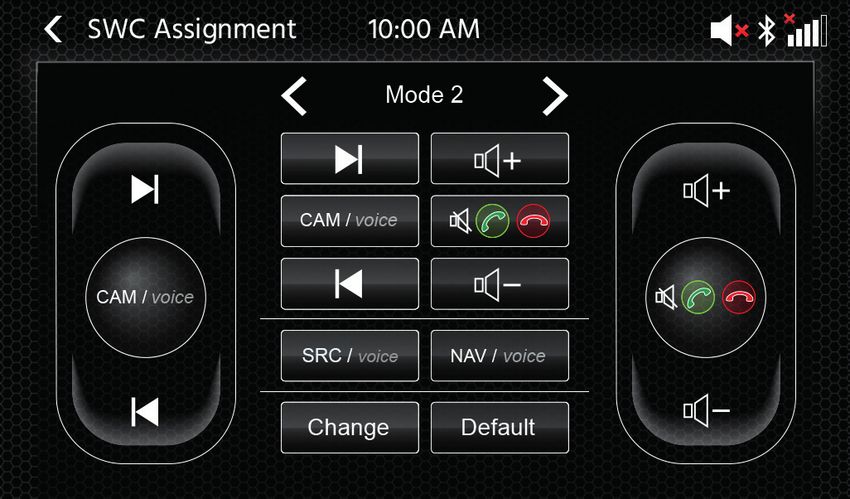
DAB RADIO SOURCE                                                                                                                                                       FM RADIO SOURCE
     You can enter the DAB source among other ways via the front panel DAB sensor key or via the           You can enter the FM source among other ways via the front panel via the Home Screen Source Icon. You can
     Home Screen Source Icon. You can also directly switch from the FM source to DAB source via the        also directly switch from the DAB source to FM source via the FM key in lower right corner of the DAB source.
     DAB key in lower right corner of the FM source.                                                       In the lower section you can change the category which will also update the main area of the source accordingly.
     With the DAB source you can enjoy the enriched digital radio services which are possible via the
     new DAB+ standard. In the lower section you can change the category which will update the main
     area of the source accordingly.
                                                                                                                    1
                                                                                                                                                  A
           1
                                                                  E      F
                                                                                                                    4.¹                                                                         4.¹

                                               B                                                                   4.²                                B                       C                 4.²
                                 A

           3.¹                                                     3.¹           7
                                       C
                                                                                                              2                   3                       4               5                 6
                                                      D
          2             3                  4              5
                                                                             6
                                                                                                           Operation buttons
     Operation buttons                                                                                     1. Return: Press to return to the home screen.
     1. Return     Press to return to the home screen.                                                     2. Settings: Opens additional settings for the FM source.
     2. Settings   2(a) Reset: press to flush list and start new scan.                                        2(a) Auto Save: Press Start to initiate auto search&store for the presets.
                   2(b) Comfort Scan: press to switch Comfort scan ON/OFF                                     2(b) Mode: Press the key arrows to change DX/LOC mode shown next to the frequency.
                   2(c) DAB-DAB Service Following: Press to switch function ON/OFF.                           2(c) AF: Press switch to ON/OFF AF-function (Alternative Frequencies).
                   2(d) Antenna supply: Press switch to activate/deactivate 12V power supply for your         2(d) TA: Press switch to ON/OFF TA function (FM Traffic Announcements)
                   DAB Antenna                                                                             3. Info This view will show you the station name and the received radio text.
                   2(e) DAB Firmware: Shows current DAB fi rmware version.                                    Between the up and down seek buttons (arrow keys) the frequency is additionally displayed.
     3. Info       This view allows you to see current played station logos, slideshow pictures and           Press the arrow keys to initiate up/down seek to the next receivable station.
                   text which is aired from the station.                                                   4. Scale
                   3.1 Press the arrow keys to change the station of current selected ensemble.               (A) FM Frequency scale band with a marker of the current tuned frequency.
                   Press and hold the arrow keys to change to next possible ensemble – the first station      (B) Current set frequency.
                   of new ensemble will be auto played.                                                       (C) Current FM Mode. Can be changed in FM Settings.
                   3 (A) Slideshow placeholder or received MOT Slideshow pictures aired by the selected       4.1 Press the arrow keys to single step 0.1 MHz up/down.
                   station.                                                                                   4.2 Press the arrow keys to initiate up/down seek to the next receivable station.
                   3 (B) DLS text; 3 (C) Service Label / Station name; 3 (D) Ensemble Label                5. Preset This view show the preset buttons that work like a quick select or favorite button. To save the
                   3 (E) Signal quality of the selected station.                                              current station to a preset button, press and hold it until the button is updated with the station information.
                   3 (F) Station list count / max stations                                                 6. DAB Press button to directly switch to DAB radio source.
     4. List       The list view allows you to see all received ensembles and will be periodically
                   refreshed.                                                                              Note:
                   You can select an ensemble by tapping on it and it will show the contained stations     This unit features an RDS tuner. RDS is a system that transmits data on top of the FM radio signal. Availability
                   which you also can directly tap to play.                                                and content of the RDS data depend on the respective broadcast station and its signal strength. RDS does, for
     5. Preset     This view shows the preset buttons that work like a quick select or favorite button.    example, transmit alternative frequencies, which allow for frequency changes without user interaction.
                   To save the current station to a preset button, press and hold it until the button is   You need to have the AF function activated in order to use the RDS functionality and features.
                   updated with the station information.
     6. FM         Press the button to change directly to FM radio source.
     7. SCAN       Press to search for new stations and update the station list.

     Notes:
     Please remark that some features depend on the aired station or the reception quality.

14                                                                                                                                                                                                                              15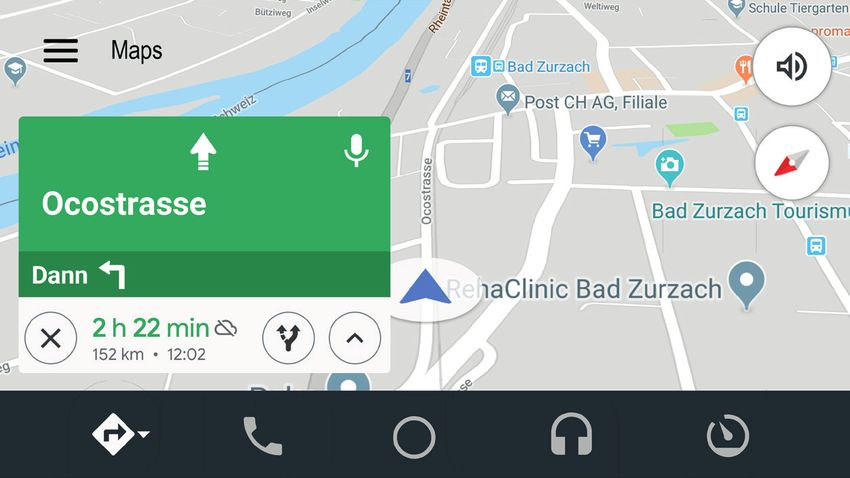
USB/IPOD/BT MUSIC (A/V) SOURCE
     The sources USB and iPod can be accessed among other ways thru their home screen icon and BT
     music with a connected phone via the Bluetooth source to play audio (BT, USB, iPod) or video (USB only).
     Playing files is similar for all sources and can be controlled via the mediaplayer UI. To play videos in                                                                                          B
     USB mode you need change the standard filter in list view (4) to the video file type (B).                                        A

                1                                                                2         3         4

                                                                                                                    At the list view mode (not available in Bluetooth music) you can browse your media files similar like
                                                                                                                    a folder-file list. To open folders just simply tap on them to show their content which you also can
                                                                                                                    directly tap to start playback. It will be shown with a play icon and also at the bottom line. To go back
                                                                                                                    one level use the back (A) button or you can change to the video media type (only USB mode) by
                                                                                                                    pressing (B) the filter icon.
     In this main view the mediaplayer controls are displayed. As usual you can use the pause/resume/play
     or skip buttons to play the next track. You can also activate the special functions like repeat and shuffle.   Additional notes on Video playback:
                                                                                                                    The video playback is only possible if the handbrake is engaged.
     Operation buttons:                                                                                             The playback will be in full screen mode – to leave the full screen mode press simply the touch
                                                                                                                    screen area of your device.
     1.   Return      Press to return to the home screen.
     2.   EQ          Press to open equalizer settings (see chapter device settings).
     3.   Search      Press to open search (not available in Bluetooth music).
     4.   List        Press to open the list view (not available in Bluetooth music).

16                                                                                                                                                                                                                              17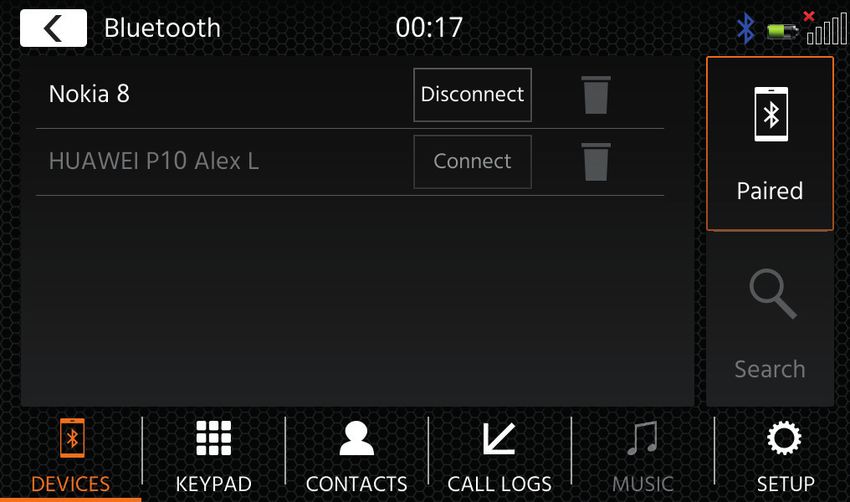
BLUETOOTH PAIR, CONNECT, CALL, MUSIC
     On initial use the category (2) is active and you can pair your compatible phone via scan/search. Plea-      On incoming/outgoing or active call, the device will automatically switch to a full screen mode and
     se ensure your phone is visible until it appears in the search result list. To pair tap the line with your   shows you the contact name or number (if available) or unknown in case of a suppressed callerID.
     phone from the list and confirm the pass key. Please also ensure that permission such as to contacts         Depending on the call status (initiate, ringing, dialling, active) you can hang-up, reject, accept/
     are granted/accepted. Active or auto connected phones are shown in status area (A) with an active            pick-up a call (1), on active call you can switch to private mode (2) or to car loudspeakers, mute the
     Bluetooth icon, battery and signal strength icon (if supported).                                             XZENT microphone (3) or open the keypad for call options (4).
     In the lower section you can choose a different category which will update the main view area.

                                                                                 A
             1

                                                                                                                                         1                 2                3                 4

                 2             3              4               5              6              7

     Operation buttons
     1. Return      Press to return to the home screen.
     2. Devices     Here you can manage your paired phones (manual connect/disconnect, delete) or
                    add new phones via search.
                    Tap the connect/disconnect button to disconnect manually and connect a different
                    other phone.
                    Tap the waste bin icon button to delete a paired phone
                    Note: it is only possible to connect a single phone at the same time.
     3. Keypad      Press to open the dial keypad with the active phone.
     4. contacts    Press to open the contact list of the active phone.
                    You can manually re-sync in case if not all contacts are shown or new contacts have
                    been added to the phone.
                    You can slide the list or use the search function to look up a contact.
                    A contact can be operated like a folder and be tapped to open its containing numbers.
                    Tap on the line number to initiate a call attempt.
                    Use the orange back button on top left position of the list view to browse one level up.
     5. Call log    Here you have a separate list view for outgoing, received/incoming or missed calls.
                    You can tap a line to initiate a call attempt.
     6. Music       Press to initiate the Bluetooth music playback via A2DP.
                    Note: Some smartphones need to start the music app on the smartphone first.
                    The usage of Bluetooth music player is described in chapter „USB/IPod/BT Music
                    (A/V) Source“
     7. Setup       Press to open the Bluetooth settings for extended options like auto connect, auto
                    answer contact list settings and microphone adjustments.
                    6(a) Auto Connect: Press switch to ON/OFF Auto Connect.
                    6(b) Auto Answer: Press switch to ON/OFF Auto Answer.
                    6(c) Microphone Gain: Press arrow keys to change values.
                    6(d) Contact Order: Press arrow keys to change value.

18                                                                                                                                                                                                                         19
APPLE CARPLAY GOOGLE ANDROID AUTO
With Apple CarPlay, you are be able to access compatible apps and online services of your With Google Android Auto, you are be able to access compatible apps and online services of your
iPhone in your car and operate them intuitively with the display of your XZENT device or the voice Android smartphone in your car and operate them intuitively with the display of your XZENT device
assistant from Apple. or the voice assistant from Google.
PREPARATION: PREPARATION:
■ Connect the compatible iPhone with the USB-1 port of the XZENT device. ■ Download the Android Auto app from the Google Play Store.
■ In case Bluetooth is not paired automatically, connect manually. ■ Connect the Android smartphone with the FRONT USB connector of the XZENT device.
■ Unlock your iPhone. ■ Bluetooth will be automatically establish on FRONT USB first time connection.
INITIAL OPERATION:
INITIAL OPERATION:
1. For the initial operation, the vehicle must not be in motion and the hand brake must be put on.
1. For the initial operation, the vehicle must not be in motion and the hand brake must be engaged. 2. Tap to the Android Auto icon in the main menu of the XZENT device to choose the Android Auto source.
2. Tap to the CarPlay icon in the main menu of the XZENT device to choose the CarPlay source. 3. Follow the dialogue on the display of your smartphone to install Android Auto and to configure the
After the initial operation has been completed successfully, the CarPlay user interface appears on start behaviour. It is possible to change the selected start behaviour in the setup operations
the screen of the XZENT device. anytime later.
1. Tap to display the home screen of CarPlay. 4. After the initial operation has been completed successfully, the Android Auto user interface
2. Tap to open XZENT main menu. appears on the screen of the XZENT device.
3. Tap any of the APP icon to start the application.
7
Note: You can only have one active route guidance. If a route guidance is started with CarPlay, the
natvie navigation source is terminated in order to avoid the spoken messages of 2 systems for route
guidance. The navigation source is no longer started automatically and must be started manually the
next time it is used. 1
3
2 3 4 5 6
1. Android Auto User Interface.
2 2. Navigation.
3. Telephony.
4. Open Android Auto user interface.
5. Media playback.
6. Open XZENT main menu.
7. Activate Android Auto voice control.
1
Note:
■ Android Auto may not be available on all devices and is not available in all countries and regions.
■ To use Android Auto with your Android Smartphone, at least Android 5.0 (Lollipop) or a higher
version of the Android operation system must be installed on your smartphone.
■ For more detailed information about Android Auto, please visit https://www.android.com/auto/
and https://support.google.com/androidauto#topic=6348027
20 21CAMERA SOURCE A/V-IN, HDMI SOURCE
X-127 features 2 individual camera inputs. CAM1 and CAM2 AV IN are found on the 24-PIN AV The A/V-IN and HDMI source can be entered among other ways via the home screen icon.
cable (connector B). The source will provide you the A/V-IN or HDMI signal input to your XZENT device. There is no
The device will activate the camera power via 12 VDC (PWR Cam1 12VDC or PWR Cam2 specific touch operation here besides the back to home screen button.
12VDC at the 24-PIN AV wire) to allow picture input of one camera picture at a time. Do not
connect the camera power to a permanent power to avoid overlaying of CAM1 and CAM2 pic- Operation Buttons
ture and continious duty. 1. Return Press to return to the home screen.
If the XZENT Setting is set to CAMERA>CAM1+CAM2, the camera source is in dual mode and
you can press the CAM Switch button to change the picture from CAM 1 to CAM2. By default
the XZENT is set to CAMERA>CAM1.
Each camera source has a different color of camera lines, the can be turned off and on in
XZENT main settings.
To adjust the camera lines to your requirements, activate the corresponding CAM source by 1
pressing the CAM Icon in main menu or enter reverse gear (CAM 1). When the camera picture
is visible, press the gearwheel to enter the camera settings. Each camera source can save an
individual camera line adjustment.
22 23TERMS OF WARRANTY
What products are covered by XZENT’s limited Warranty?
No warranty service will be provided, moreover, if the model number
The limited Warranty (the “Warranty”) applies to XZENT products purchased from an authorized dealer by
/serial number/UUID/product number on the product is changed, erased, made illegible or removed. The
end customers in the European Economic Area or Switzerland (“Territorial Scope”).
same applies if the receipt or invoice is incomplete and/or illegible when presented.
What is the validity period of XZENT’s Warranty?
Is XZENT liable for other defects or damage?
Under this Warranty, XZENT warrants, for a period of 2 years, that the product is free from defects in material
XZENT will repair or replace products, only if they are covered by the terms of this Warranty. XZENT is not
and/or workmanship at the time of the original purchase. This 2-year period commences on the date of the
liable for any material or intangible loss or damage such as the price paid for the product, loss of profits,
original purchase as per the original invoice or until receipt. If you have purchased the product as a consumer,
revenue, data, or relating to the enjoyment of the product or components associated with it, arising directly
and the defect is identified within the first six months after the original purchase (see above), we will assume
or indirectly under this Warranty or otherwise in relation to products or services. This likewise applies to
that the defect already existed at the time of purchase.
loss or damage relating to the impairment or operational failure of the product, or devices associated with
it, caused by defects or the non-availability of the product during the time it is with XZENT or XZENT’s
Who can claim under the Warranty?
service partner, as well as to periods of downtime and business interruptions. In addition, XZENT does not
XZENT grants the limited Warranty to natural persons only, who purchased the relevant product primarily for accept any liability for shipment-related risks - such as the loss or destruction of the product - in connection
personal use. with the fulfilment of the Warranty.
This disclaimer applies to losses of damage irrespective of the legal basis, especially on the grounds of
What is covered by the Warranty? negligence, other wrongful conduct (torts), breach of contract, express or implied guarantees, and strict
XZENT warrants that the product is free from defects in material and/or workmanship at the time of the original liability (even if XZENT or its service partner has been advised of the possibility of such damage occurring).
purchase. XZENT does not, however, provide a warranty covering every defect and damage that may occur. If these disclaimers are prohibited or limited under the applicable law, XZENT will limit its Warranty and
It only covers the hardware components of the device, and in no event the software used with the device, liability to the extent permissible under the applicable regulations. For example, some national laws prohibit
regardless if this was provided by XZENT or the third-party vendor. The Warranty therefore does not cover the exclusion or limiting of damages payable in connection with negligence, gross negligence, willful
the following cases, in particular: wrongdoing, deceitful conduct, and other such acts. For the duration of this Warranty, all liability that
cannot be excluded completely will be limited to the extent permissible under the applicable law. Liability
■ normal wear and tear (such as to surfaces and protective coverings); under this Warranty is limited to the price paid for the product. If the applicable law only permits higher
■ superficial damage, such as scratches, dents, and damaged plastic, worn or mechanically defective limits on any liability, this higher limitation will apply.
connections;
■ misuse, including any treatment resulting in physical or superficial damage, such as a cosmetic defect, How do I exercise my Warranty rights?
to the product;
■ damage caused by connecting or using the product for a purpose other than those specified, or a If you want to exercise your entitlements under this Warranty, please contact the authorized dealer where
failure to observe the operating and/or installation instructions for the particular model; the product was purchased, and present it with the original copy of the till receipt or invoice. Do not return
■ installation or use of the product contrary to the applicable technical standards, or the safety regulations any products to XZENT directly, otherwise our Warranty obligations cannot be fulfilled. You will find the
in the country in which the product is installed or used; name of the relevant dealer or reseller on your proof of purchase.
■ damage caused through an unauthorized attempted repair, or an attempted repair by someone other Defective devices sent by the authorized dealer to the service center, must also be accompanied by
than a XZENT authorized service partner; any accessories with a logical connection to the observed fault. This means, for example, the navigation
■ damage caused by modifications to the product not expressly authorized by the manufacturer; package on an SD or microSD card supplied or purchased with the device, if problems or functional errors
■ damage caused by malicious code (“Software Viruses”) or by using software not supplied with the were observed in connection with the navigation function.
product or which was incorrectly installed;
■ use of third party vendor software programs for editing, modifying, adapting, or extending XZENT’s How will XZENT fulfil its Warranty?
authorized software components as are run on the product; XZENT or its service partner will choose to either repair or replace the product or its defective parts covered
■ use of third-party vendor firmware/operating system software by the Warranty, and assume the costs of material and labor in doing so.
■ damage caused by liquids or chemicals of whatever type, and/or excessive temperatures, moisture, Repairs under the Warranty must be carried out by XZENT or its authorized service partner. Products that
or damp; are repaired or replaced may contain new and/or refurbished components and devices. Components that
■ accidents, drops or other such effects of extreme accelerating forces; are swapped out will become the property of XZENT.
■ damage caused by lightning strikes, electrostatic charge, incorrect operating voltage, water, fire, force
majeure, inadequate ventilation for other reasons for which XZENT is not responsible; Will I incur any costs in connection with the Warranty service?
■ damage caused by using the device outside of the defined specifications;
XZENT assumes the costs of material and labor in connection with its Warranty service. The Warranty
■ damage caused by using the product with other systems or devices, which are not designed to be used
holder is responsible for the costs of shipment and bears the risks connected with the shipment (see
with this product;
above). If the product is found to be operating faultlessly, or there is no warranty entitlement because the
■ adjustments or modifications without XZENT‘s prior written approval, including product upgrades
warrant period has expired or for any other reason, XZENT or its authorized service partner will be entitled
extending beyond the specifications or characteristics described in the operating manual;
to charge a flat-rate investigation fee of €30.00.
■ modifications of the product for the purpose of adapting it to national or local technical norms or safety
standards of countries for which the product was not expressly designed or manufactured;
Do this Warranty affect my statutory or contractual rights?
■ using service or spare parts not produced or distributed by XZENT;
■ using the product in connection with accessories not approved for use with this product; This Warranty is made voluntarily by XZENT, and it will, in any case, extend your statutory rights. As a
consumer, you remain fully entitled to your statutory rights, such as the statutory guarantee. This Warranty
XZENT, moreover, does not warrant (expressly, implicitly, statutorily, or otherwise) the quality, performance, also has no effect whatsoever on your contractual rights against the reseller. You may continue to exercise
reliability or suitability of the product for a particular purpose except as described, nor the software/firmware these rights in full.
installed on the device ex works.
24 25ADDITIONAL INFORMATION TECNICAL SPECIFICATION
CONNECTION DIAGRAM
TECNICAL SPECIFICATION
Electrical characteristics
Power supply: +12 V DC against vehicle ground
External protection against internal short-circuit: 15 A Mini-ANL fuse
Operating currents*
ACC off idle status:INHALT SICHERHEITSINFORMATIONEN
Allgemein
1. D ie in diesem Handbuch enthaltenen Beschreibungen und sonstigen Inhalte können vom tatsächlichen
Gerät abweichen.
ÜBER DIESES HANDBUCH 2. Die in diesem Handbuch und einigen HMI-Screenshots gezeigten Bilder können vom realen Gerät abweichen.
3. Die technischen Daten und das technische Design dieses Gerätemodells können ohne Vorankündigung
Dieses Handbuch enthält wichtige Informationen und Warnungen zum Betrieb dieses XZENT-Gerätes. geändert werden.
Bitte bewahren Sie es an einem Ort auf, zu dem Sie später Zugriff haben.
■ Lesen Sie die Anleitung vollständig durch. Beachten Sie alle Warnhinweise. Befolgen Sie die Anweisungen.
■ Bewahren Sie dieses Handbuch auf. Jeder, der das Gerät benutzen will, sollte Zugang zu diesem Hand-
buch haben.
■ Dieses Gerät ist für den Einsatz in Fahrzeugen mit 12-V-Gleichstrombatterie und negativer Masse ausgelegt.
■ Das Gerät darf nicht anders betrieben werden, als in dieser Anleitung beschrieben. Bei Nichtbeachtung der
SICHERHEITSINFORMATIONEN 29 Anweisungen kann die Garantie erlöschen.
■ Nehmen Sie das Gerät nicht auseinander und verändern Sie es in keiner Weise, da sonst Ihre Garantie
GERÄTESUPPORT, SOFTWARE-UPDATES UND WARTUNG 30 erlischt. Versuchen Sie nicht, das Gerät selbst zu reparieren oder zu warten, sondern wenden Sie sich
stattdessen an einen autorisierten XZENT-Händler.
GERÄTEFRONT 31 ■ Verwenden Sie nur Originalzubehör, das für das Gerät konzipiert und hergestellt wurde, da sonst Schäden
auftreten können. Montieren Sie das Gerät gemäß der Montageanleitung mit dem mitgelieferten Montage-
EINSTELLUNG DER DISPLAY POSITION 23-33 zubehör. Die Beschleunigungskräfte bei Unfällen können enorm sein. Fehlerhaft montierte Geräte stellen
bei einem Unfall ein ernsthaftes Risiko für Fahrer und Beifahrer dar.
HAUPTMENÜ 34 ■ Schützen Sie das Gerät vor Wasser und anderen Flüssigkeiten, die in das Gehäuse gelangen könnten. Ein
Kurzschluss oder sogar ein Brand könnte die Folge sein.
LENKRADTASTEN (OE-Modus, IR-Stalk-Schnittstelle) 35-37 ■ Um einen Kurzschluss zu vermeiden, stecken Sie niemals metallische Gegenstände (z. B. Münzen oder Metall-
werkzeuge) in das Gerät.
GERÄTEEINSTELLUNGEN 38–39 ■ Bevor Sie eine defekte Sicherung austauschen, versuchen Sie, die Ursache für den Kurzschluss zu finden.
Achten Sie auf die Kabel des Netzteils! Wenn der Kurzschluss nicht auf einen Fehler in der Stromversor-
DAB-RADIO-QUELLE 40 gung oder Verkabelung zurückzuführen ist, können Sie die defekte Sicherung durch eine neue (mit dem-
selben Wert) ersetzen. Wenn der Kurzschluss weiterhin besteht, wenden Sie sich an einen autorisierten
UKW-RADIO-QUELLE 41 XZENT-Händler.
■ Wenn Sie ein anderes Gerät anschließen, lesen Sie die Bedienungsanleitung bezüglich der Kompatibilität und
USB- / iPod- / BT- / MUSIK(A/V)-QUELLE 42–43 der Hinweise zu den elektrischen Anschlüssen. Versuchen Sie nicht, inkompatible Produkte anzuschließen.
■ Achten Sie darauf, dass Sie die Autobatterie während der Benutzung des Geräts nicht entleeren, wenn
BLUETOOTH-KOPPELN, VERBINDUNG, ANRUF, MUSIK 44–45 der Fahrzeugmotor abgestellt ist. Da das Gerät viel Energie verbraucht und die Batterie nur bei laufendem
Motor geladen wird, kann es vorkommen, dass sich die Batterie so weit entlädt, dass es nicht mehr möglich
APPLE CARPLAY-QUELLE 46 ist, den Motor zu starten.
■ Nach geltenden Recht in verschiedenen europäischen Ländern ist das Fahren mit Monitoren, die Filme im
GOOGLE ANDROID AUTO-QUELLE 47 Sichtbereich des Fahrers zeigen, nicht erlaubt, da der Fahrer vom Verkehr abgelenkt werden kann. Bitte
beachten Sie die Verkehrsvorschriften Ihres Landes oder Sie können bei Unfällen, sonst müssen Sie bei Un-
CAMERA-QUELLE 48 fällen mit Strafen oder sogar Verlust Ihres Versicherungsschutzes rechnen. Achten Sie auf die Wiedergabe-
lautstärke in Ihrem Fahrzeug, da Sie äußere Warntöne wie Polizeisirenen usw. wahrnehmen können müssen.
A/V-IN, HDMI-QUELLE 49 ■ Setzen Sie das Gerät keinen harten Stößen aus. Eine mechanische oder elektrische Fehlfunktion des
Gerätes kann die Folge sein.
GARANTIEBEDINGUNGEN 50-51 ■ Sollten während der Montage Probleme oder Fragen auftreten, wenden Sie sich bitte an Ihren
XZENT-Händler bzw. -Importeur.
ZUSÄTZLICHE INFORMATIONEN, TECHNISCHE DATEN 52
28 29GERÄTESUPPORT, SOFTWARE-UPDATES UND WARTUNG GERÄTEFRONT
Software-Updates und -Verbesserungen werden über USB-Updates bereitgestellt, die von unserer Website www.
xzent.com heruntergeladen werden können. Dort finden Sie auch Kundenbetreuung, FAQs und andere nützliche
Informationen.
ACHTUNG: Dieses Gerät verfügt über spezielle USB-Ports mit speziellen Funktionen ((USB-1, grau) und
(USB-2, schwarz). Die Verlängerungskabel sind durch ein Textetikett unterscheidbar, um eine korrekte Zuordnung
zu gewährleisten.
Über XZENT bereitgestellte Software-Updates MÜSSEN auf „USB-1“ (USE FOR SW UPDATE) installiert werden.
Wenn die Installation durch Dritte ohne ordnungsgemäße Markierung/Identifikation des Verlängerungskabels
durchgeführt wurde, versuchen Sie es am anderen Port, falls das Update fehlschlägt.
A 2 3 1 4 5 B
Bedientasten:
1. VOL/POWER: Halten Sie diese Taste gedrückt, um den Standby-Modus zu aktivieren (Bildschirm AUS,
Audio AUS).
Wenn das Gerät eingeschaltet ist, drücken Sie, um es stumm zu schalten.
Wenn das Gerät ausgeschaltet ist, drücken Sie zum Einschalten.
Drehen Sie im Uhrzeigersinn, um die Lautstärke zu erhöhen.
Drehen Sie gegen den Uhrzeigersinn, um die Lautstärke zu verringern.
2. HOME Drücken Sie, um zum Startbildschirm zurückzukehren.
Drücken Sie auf dem Startbildschirm, um zur letzten Quelle zu gelangen (falls vorhanden).
3. VOICE Press to start voice recognition (in use with CarPlay or Google Android Auto)
4. CAM: Drücken Sie, um die Standardkamera anzuzeigen, und drücken Sie erneut, um die Kame-
raansicht zu schließen.
5. VOICE: Drücken, um die Spracherkennung zu starten (in Verbindung mit CarPlay)
6. DAB: Drücken Sie, um die DAB-Quelle zu öffnen. In der DAB-Quelle drücken Sie erneut, um
auf UKW umzuschalten.
7. FAV: Drücken Sie, um die zugewiesene FAV-Kurzdrückfunktion aus den Geräteeinstellungen
auszuführen (siehe Kapitel Geräteeinstellungen).
Halten Sie gedrückt, um die zugewiesene FAV-Langdrückfunktion aus den Geräteeinstel-
lungen auszuführen (siehe Kapitel Geräteeinstellungen).
A. MIC internes Mikrofon für Freisprechfunktionen
B. RESET Drücken Sie, um einen Power-Reset durchzuführen.
30 31EINSTELLUNG DER DISPLAY POSITION CUSTOMIZING AND DISPLAY DEPTH ADJUSTMENT
Schritt 1:
Entfernen Sie die Abdeckung Nr. 14 des
Verstellmechanismus
1
No.3
EINSTELLUNG DER DISPLAY POSITION (VERTIKALE HÖHE, HORIZONTALER
BLICKWINKEL UND NEIGUNG).
Schritt 2:
Das Display des X-127 lässt sich vertikal in der Höhe sowie im Blickwinkel und der Neigung einstellen.
Entfernen Sie die 4 äußeren oberen Schrauben
Hinweis: und lassen Sie die mittlere Schraube angezogen.
• Einstellungen am Display sollten nicht während der Fahrt vorgenommen werden. Ziehen Sie die Display-Montagehalterung durch
• Beachten Sie die Sicherheitsrelevanten Hinweise des Fahrzeuges. Achten Sie auch auf Ziehen an der Displaygruppe vorsichtig aus dem
Zugänglichkeit von Tasten wie Warnblinker oder Luftauslässen. Gehäuse in die gewünschte 1/2“- oder 1“-Position.
• Das Display sollte immer mit beiden Händen „parallel“ (links und rechts mittig) angefasst Ziehen Sie die 4 äußeren oberen Schrauben an, um
werden um es zu verstellen. die Halterung zu fixieren (siehe Abbildung).
• Das X-127 sollte fest montiert sein.
Blickwinkelanpassung und Neigung:
Fassen Sie das Display am linken und rechten Rand mittig an und drücken mit der einen Hand
und ziehen mit der anderen Hand um den Blickwinkel einzustellen. Für den Neigungswinkel
führen Sie mit beiden Händen eine Kippbewegung von sich weg oder zu sich hin aus. 2
Höhenverstellung
Fassen Sie das Display am linken und rechten Rand mittig an und schieben Sie das Display Note:
nach oben oder unten. Do not remove
the center Auf den Demobildern ist die Displaygruppe nicht
Die Tiefeneinstellung benötigt eine Teildemontage und Anpassung der Standardbefestigung. screw sichtbar, damit die oberen Schrauben besser zu
Beachten Sie hierzu den gesonderten Abschnitt. sehen sind.
ANPASSEN DER TIEFENEINSTELLUNG DES DISPLAYS
Die Tiefeneinstellung des Displays kann von der Standardeinstellung 0“ (0mm) auf 1/2“
(12,5mm) oder 1“ (25mm) geändert werden.
1" (25 mm) 1/2" (12.5 mm) Flush (default 0 mm)
A
Vorausgesetzt: Der X-127 ist vom 1-DIN Armaturenbrett
gelöst und es ist kein Montagekäfig montiert. Um das Gerät 3 Schritt 3:
A vom 1DIN-Armaturenbrett zu entriegeln, drehen Sie die Installieren Sie das X-127 auf dem 1-DIN
Anzeigegruppe in eine 90°-Position, indem Sie sie mit beiden Armaturenbrett (siehe separates Kapitel). Der
Händen halten und um 90° im oder gegen den Uhrzeigersinn Installationsprozess ist derselbe wie bei der
drehen. Lösen Sie die Verkleidungshalterung vom Standardinstallation, aber am Ende werden andere
Hauptgehäuse und stecken Sie die Entriegelungsschlüssel Nr. Abdeckungen für den Einstellmechanismus
3 in den entsprechenden Spalt auf der linken und rechten Seite benötigt.
einführen (in der Mitte, zwischen dem Hauptgehäuse und der
1Din-Halterung - siehe Abbildung). Die Entriegelungsschlüssel
müssen so weit eingesteckt werden, bis die Klemme der
Flush (default 0 mm)
Montagehalterung gelöst ist. Ziehen Sie den X-127 heraus,
wenn sich die Klemmen der Halterung gelöst haben. 1" (25 mm)
1/2" (12.5 mm)
32 33HAUPTMENÜ LENKRADTASTEN (OE-MODUS, IR-STALK-SCHNITTSTELLE)
Das XZENT-Gerät ist für den Betrieb mit einem IR-Stalk-Interface vorkonfiguriert, das NICHT im Set enthalten ist.
Alternativ kann eine vorhandene analoge Lenkradsteuerung an das XZENT Analog Key Interface (Key1 / Key2 / GND) angeschlossen
werden. X-127 hat 2 verschiedene Modi, MODE-2 (Standard für hohe Ohm-Werte) oder MODE-1 (für niedrige Ohm-Werte), um
A verschiedene Ohm-Bereiche zu unterstützen. Die Ohm Bereiche können nicht gemischt werden um Lenkradtasten aus beiden
Bereichen zu untertützen.
MODE 2 (HOHE OHM-WERTE):
1
4
1
2 5
6
B A1 A2
3
A B
Tasten und Display für die Bedienung des HAUPTMENÜS
Bedientasten:
A Uhrzeit und Datum
1. Vorwärts überspringen: diese Schaltfläche folgt der Funktion der grafischen Benutzeroberfläche
B Seitenanzeige
(GUI) der aktiven Audioquelle.
2. CAM/voice: Drücken, um die CAM-Quelle zu aktivieren. Drücken Sie erneut, um
1. Quellen-Symbol Drücken Sie, um die ausgewählte Quelle zu öffnen.
die CAM-Quelle zu schließen.
Drücken und halten Sie die Taste, um die CarPlay-Sprachsteuerung
Um durch die verschiedenen Quellen-Symbole zu blättern, streichen Sie nach links oder rechts. Alternativ können
zu aktivieren.
Sie auch die Pfeiltasten drücken, um durch die verschiedenen Seiten zu blättern.
3. Zurück überspringen: Diese Schaltfläche folgt der Funktion der grafischen Benutzeroberfläche
Um zu diesem Bildschirm zurückzukehren, können Sie die Front-Sensortaste HOME oder die Pfeiltaste Zurück
(GUI) der aktiven Audioquelle.
in der linken oberen Ecke jeder Quelle drücken.
4 . Vol+: Drücken, um die aktive Lautstärke zu erhöhen.
5. Stummschaltung/Annahme/Auflegen: Wenn es keinen aktiven Anruf gibt, drücken Sie auf MUTE um stumm
zu schalten oder die Stummschaltung aller Audioquellen aufzuheben.
Drücken Sie während eines eingehenden Anrufs (Klingeln), um den
Anruf anzunehmen. Drücken Sie bei einem aktiven Anruf auf , um den
Anruf zu beenden.
6. Vol-: drücken, um die aktive Lautstärke zu verringern.
A: Sie können die Tasten Ihres SWC durch Platzieren von Standard- oder alternativen Tasten auf Ihrem SWC
nach Ihren Wünschen anpassen. Der Vorgang wird am Ende dieses Kapitels erläutert.
Alternative Tasten:
A1. Alternative Funktion SRC/voice: Drücken Sie, um eine adnere Quelle über das Hervorheben im Haupt-
menü auszuwählen. Drücken und halten um CarPlay / Google Android
Auto Sprachassistent auftzrufen.
A2. Alternative Funktion NAV/voice: Drücken und halten Sie diese Taste, um die zugeordnete NAV-Funktion
aufzurufen (nicht für X-127 verfügbar).
Drücken und halten Sie die Taste, um die CarPlay / Google Android
Auto-Sprachsteuerung zu aktivieren.
B: Mit dieser Taste wird jede benutzerdefinierte Konfiguration des SWC auf die Werkseinstellungen zurückgesetzt.
34 35MODUS 1 (NIEDEROHMIG): SWC-(Neu-)Zuweisungsprozess:
Der Prozess ist bei beiden SWC-Modi ähnlich und unterscheidet sich nur durch andere Standard- und Alternativ-
tasten. Die Funktion der Standard- und Alternativtasten wird am Anfang dieses Kapitels für jeden Modus erklärt.
Bitte beachten Sie, dass dieser Modus NICHT für den IR-Stalk-Interface-Modus geeignet ist. Drücken Sie auf
die „Ändern“, um die Funktionen nach Ihren Wünschen neu zuzuordnen. Das System löscht alle Tasten des
Lenkrads und markiert die linke obere SWC-Taste, die zuerst zugewiesen werden soll. Sie müssen alle Sie
1 2 3 4 5 müssen alle gelöschten Tasten der Reihe nach von links oben nach unten und dann die rechte Seite von oben
nach unten zuweisen. Die aktuelle Taste, die mit einer Funktion belegt werden soll, wird für Sie hervorgehoben.
Beispiel: Um eine Funktion zuzuweisen, wählen Sie ein Funktionssymbol durch Antippen aus der Mitte (z.B.
SRC / Stimme). Nachdem die gewünschte Funktion (in diesem Beispiel SRC / Stimme) markiert ist, drücken
Sie die entsprechende SWC-Taste (in diesem Beispiel oben links). Das System wird nun die SRC / Voice-Taste
in der Mitte ausgrauen und die SRC / Voice-Funktion auf die linke obere SWC-Taste legen. Später können Sie
6 7 8 9 10 die SRC-/Sprachfunktion durch Drücken der linken oberen SWC-Taste auslösen (anstelle der standardmäßigen
MUTE-Taste). Nachdem die erste Taste zugewiesen wurde, beleuchtet das System die nächste Taste, die mit
einer noch verfügbaren (nicht ausgegrauten) Funktion aus der Mitte zugewiesen wird. Nachdem alle Tasten
auf der SWC definiert sind, können Sie die SWC-Zuweisung schließen und die neue Konfiguration von nun an
verwenden. Um die Standardwerte wiederherzustellen, drücken Sie die Schaltfläche „Standard“. Die Funktionen
werden dann auf die Standardwerte zurückgesetzt.
11 12 Anmerkung:
Die beiden Modi für nieder- oder hochohmige SWC können nur in einem bestimmten Bereich funktionieren.
Wenn ein Fahrzeug eine Kombination von Tasten aus beiden Modi hat, können nicht alle SWC-Tasten unter-
stützt werden
Mögliche Tastenfunktionen und Bedientasten
1. Stumm/mute kurz drücken um das XZENT Gerät stumm zu schalten. Erneut drücken um Stumm-
Schaltung aufzuheben.
2. Vol- kurz drücken um aktiven Lautstärkekanal (Medienquelle, usw.) zu reduzieren.
3. Vol+ kurz drücken um aktiven Lautstärkekanal (Medienquelle, usw.) zu erhöhen.
4. Sprung zurück kurz drücken um gleiche Quellfunktion (DAB, USB, FM, usw.) wie dieTouchbedienung
der Quelle auszuführen.
5. Sprung vorwärts kurz drücken um gleiche Quellfunktion (DAB, USB, FM, usw.) wie dieTouchbedienung
der Quelle auszuführen.
6. Abheben kurz drücken um eingehenden Anruf anzunehmen.
7. Auflegen kurz drücken um aktives Gespräch zu beenden.
8. SRC Drücken Sie, um eine adnere Quelle über das Hervorheben im
Hauptmenü auszuwählen.
9. FAV kurz drücken um die zugewiesene FAV-Funktion aus den Geräteeinstellungen
auszuführen (siehe Kapitel Geräteeinstellung)
10. CAM Drücken Sie, um die Standardkamera anzuzeigen, und drücken Sie erneut, um die
Kameraansicht zu schließen.
11. Ändern kurz drücken um Lenkrad-Tastenbelegung zu löschen und neu zuzuweisen (siehe
Kapitel LFB(neu)Zwueisung).
12. Standard kurz drücken um die Standardeinstellung für Fiat Ducato X290 wiederherzustellen.
36 37GERÄTEEINSTELLUNGEN
4(f) Subwoofer-Verstärkung: Drücken Sie die Pfeiltaste, um die Subwoofer-Verstärkung zu
1 ändern, wenn Subwoofer an ist.
4(g) Startlautstärke: Drücken Sie die Taste „“ ٭ ٭ ٭. Hier können Sie alle verfügbaren Quellen
in Bezug auf die Startlautstärke individuell anpassen.
2 Sie können wählen, ob Sie die zuletzt verwendete Lautstärke verwenden oder beim
Start eine fest eingestellte Lautstärke haben möchten.
5. TFT Hier können Sie Einstellungen in Bezug auf den Bildschirm vornehmen, z. B. Helligkeitsmo-
dus und -werte.
5(a) TFT-Helligkeit am Tag: Drücken Sie die Pfeiltasten, um den Wert für den Tag-Modus
einzustellen.
5(b) TFT-Helligkeit in der Nacht: Drücken Sie die Pfeiltasten, um den Wert für den Nacht-Mo-
dus einzustellen.
5(c) Dimm-Modus: Drücken Sie die Pfeiltasten, um den Wert einzustellen.
Auto: Die Helligkeit wird beim Einschalten der Frontscheinwerfer des Fahrzeugs (Nacht)
automatisch angepasst.
Tag: Die Helligkeit ist dauerhaft auf dem Tageswert.
Nacht: Die Helligkeit ist dauerhaft auf dem Nachtwert.
5(d) Touchscreen Auto-Standby: Bei eingestellter Leerlaufzeit wird der Bildschirm ausgeschal-
tet, wenn er nicht bedient wird (der Ton wird im Hintergrund weiterhin wiedergegeben).
6. Kamera Ermöglicht es Ihnen, die Einstellungen der angeschlossenen Rückfahrkamera anzupassen.
3 4 5 6 7 6(a) Rückfahrkamera: Drücken Sie die Pfeiltasten, um den Wert einzustellen.
Cam1: Verwendet den Eingang der Cam1
Cam2: Verwendet den Eingang der Cam2
Cam1+Cam2: Verwendet die Cam1 im Rückwärtsgang und schaltet nach einer Verzö-
Bedientasten: gerung automatisch auf Cam2 um, nachdem der Rückwärtsgang verlassen wurde.
1. Zurück Drücken Sie, um zum Startbildschirm zurückzukehren. 6(b) Stummschaltung der Rückfahrkamera: Drücken, um den Wert zu wechseln
2. Listenbereich Der angezeigte Listenbereich ist abhängig von der aktuell ausgewählten Kategorie. (Stummschalten, Reduzieren, Aus)
Um andere Einstellungen zu sehen, können Sie die Liste nach oben und unten scrollen/strei- 6(c) R-Cam Ausschaltverzögerung: Drücken Sie die Pfeiltasten, um die Verzögerungszeit zu
chen oder eine andere Kategorie im unteren Bereich auswählen. ändern, bis sich die Kameraansicht nach Verlassen des Rückwärtsgangs automatisch
3. Allgemein Enthält allgemeine Einstellungen wie Sprache, Datum und Uhrzeit, FAV-Tastenbelegung. schließt.
3(a) Systemsprache: Drücken Sie die Pfeiltasten, um die Sprache auszuwählen. 6(d) Kamerabild: Drücken Sie die Pfeiltasten, um den Wert einzustellen (normal oder hori-
zontal gespiegelt).
3(b) Uhrzeit-Zeitsynchronisationsmodus (DAB+): Drücken Sie den Schalter auf EIN/AUS.
6(e) Kamera 1 Rasterlinien: Drücken Sie diese Taste, um die Rasterlinien der Kamera 1 aus-
3(c) Kurzes Drücken von FAV: Drücken Sie die Pfeiltasten, um eine andere Funktion zuzuweisen.
und einzuschalten. Bei der Kameraquelle können Sie die Position der Linien anpassen,
3(d) Langes Drücken von FAV: Drücken Sie die Pfeiltasten, um eine andere Funktion zuzuweisen. wenn die Funktion an ist.
3(e) Signalton: Drücken Sie den Schalter auf EIN/AUS (Aktivieren/Deaktivieren der Tasten-Pieptöne). 6(f) Kamera 2 Rasterlinien: Drücken Sie diese Taste, um die Rasterlinien der Kamera 2 aus-
3(f) Mikrofon: Drücken Sie die Pfeiltaste, um das ausgewählte Mikrofon zu wechseln. und einzuschalten. Bei der Kameraquelle können Sie die Position der Linien anpassen,
3(g) Hintergrundbild: Drücken Sie, um einen anderen Hintergrund auszuwählen. wenn die Funktion an ist
3(h) Tasten Beleuchtung: drücken um Farbe der Tastenbeleuchtung zu ändern. 7. Sonstiges Hier finden Sie Informationen über die Software-Version des Geräts und die Werkseinstellung.
3(i) Datum: Drücken Sie, um ein Datum manuell einzustellen (nur möglich, wenn der Synchroni- 7(a) Software-Version: Drücken Sie die Taste „“ ٭ ٭ ٭, um die Softwareversion des Gerä-
sationsmodus auf AUS gesetzt ist). tesystems anzuzeigen.
3(j) Uhrzeit: Drücken Sie, um die Uhrzeit manuell einzustellen (nur möglich, wenn der Synchro- 7(b) Software installieren: Drücken Sie die Taste „“ ٭ ٭ ٭, um die Software-Installation über
nisationsmodus auf AUS gesetzt ist). den USB-1-Anschluss zu starten.
3(k) Zeitzone: Drücken Sie diese Pfeiltasten, um die Zeitzone manuell einzustellen. Wenn die Dateien nicht gefunden werden, werden die Schaltflächen zum Fortfahren
3(l) Zeitformat: Drücken Sie die Pfeiltasten, um das 12/24h-Format zu ändern. nicht aktiviert.
3(m) Apple-Konnektivität: drücken, um den Modus zu wechseln 7(c) Werkseinstellungen: Drücken Sie die Taste „ “ ٭ ٭ ٭und bestätigen Sie, um einen Werks-
reset durchzuführen.
4. Audio Enthält die Einstellung für Audio- und Sound.
7(d) LFB-Zuweisung: Drücken Sie diese Taste, um den LFB-Zuweisungsbildschirm für den
4(a) Balance: Drücken Sie die Pfeiltasten, um die Mitte nach links oder rechts zu verschieben.
Analog-Tasten-Modus zu öffnen (nicht für den IR-Stalk-Schaltflächen-Modus)
4(b) Fader: Drücken Sie die Pfeiltasten, um die Mitte nach vorne oder hinten zu verschieben.
7(e) Open-Source-Lizenz: Drücken Sie, um den Lizenztext anzuzeigen.
4(c) Equalizer: Drücken Sie, um den EQ zu öffnen. Sie können verschiedene EQ-Voreinstel-
7(f) Legal: Drücken um hinweise zu sehen.
lungen auswählen oder die Frequenzbänder manuell nach Ihren Wünschen ändern.
Balance und Fader können auch optisch angepasst werden oder LPF, Subwoofer-Pegel
und Loudness können eingestellt werden.
4(d) Loudness: Drücken Sie diese Taste, um die Lautstärke ein-/auszuschalten.
4(e) Ein-/Ausschalten des Subwoofers: Drücken Sie diese Taste, um den Subwoofer ein-
und auszuschalten.
38 39You can also read