VMS-6100 Video Monitoring System - Jovision
←
→
Page content transcription
If your browser does not render page correctly, please read the page content below
Jovision

VMS-6100 Video Monitoring
        System
      User Manual / Benutzerhandbuch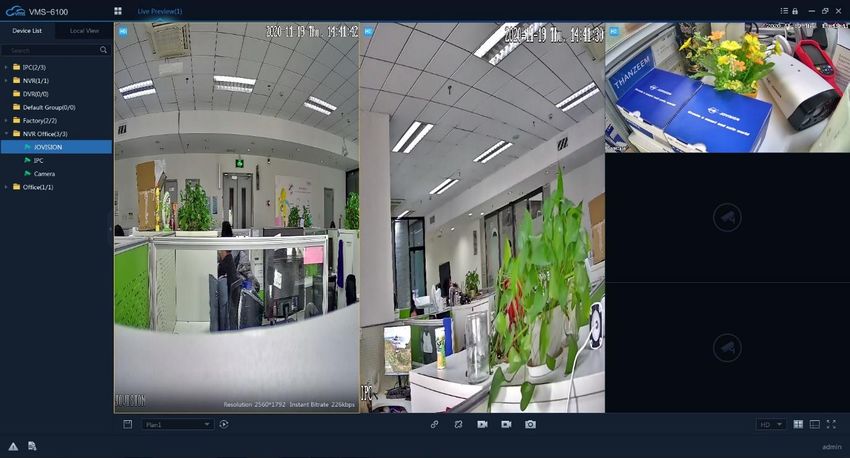
Contents

1.      Open Source Software License ...................................................................................... 1
2.      System Requirements....................................................................................................... 2
3.      Login...................................................................................................................................... 2
4.      Software Interface .............................................................................................................. 3
5.      Device Management .......................................................................................................... 4
     5.1      Device Management .............................................................................................. 4
     5.2      Channel Management ........................................................................................... 5
6.      Live Preview ........................................................................................................................ 7
     6.1      Video Preview ......................................................................................................... 8
     6.2      Screen Management .............................................................................................. 9
     6.3      Channel Management ......................................................................................... 11
7.      Video Sequencing ............................................................................................................ 13
     7.1      Add Task................................................................................................................. 13
     7.2      Video Split Screen ............................................................................................... 14
8.      Playback ............................................................................................................................. 15
     8.1      Video Playback ..................................................................................................... 15
     8.2      Download Task ..................................................................................................... 16
     8.3      Tag Management .................................................................................................. 17
9.      Temperature Detection ................................................................................................... 17
10.        Temperature Records .................................................................................................. 19
11.        Person Management .................................................................................................... 20
     11.1 Add Organization ................................................................................................. 20
     11.2 Add Person ............................................................................................................ 21
     11.3 Delete Person ........................................................................................................ 21
     11.4 Move Person .......................................................................................................... 21
     11.5 Import Person ....................................................................................................... 22
        11.5.1          Import Person Info. ........................................................................................ 22
        11.5.2          Import Person Face........................................................................................ 23
     11.6 Export Person ....................................................................................................... 24
        11.6.1          Export Person Info ......................................................................................... 24
        11.6.2          Export Person Face ....................................................................................... 25
     11.7 Sync to Device ...................................................................................................... 25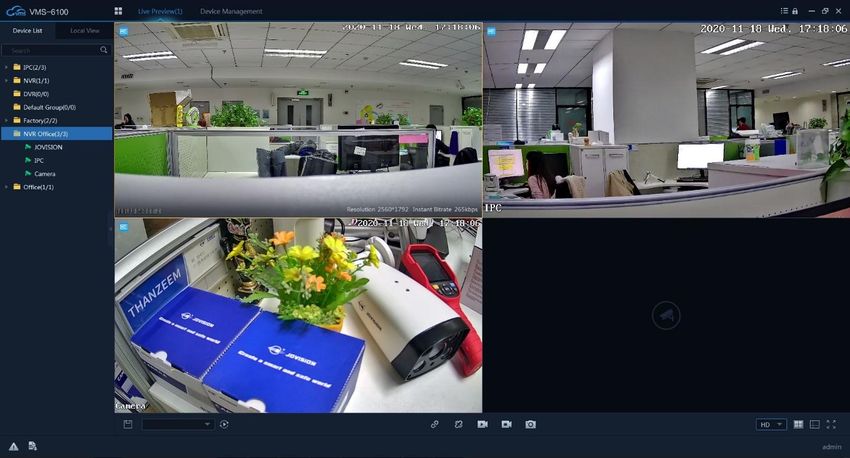
11.8 Sync from Device ................................................................................................. 26
     11.9 Custom Field ......................................................................................................... 27
12.        Attendance Management ............................................................................................ 27
     12.1 Attendance Settings ............................................................................................ 27
        12.1.1          Basic Rule ........................................................................................................ 27
        12.1.2          Attendance Location ..................................................................................... 28
        12.1.3          Holiday Settings.............................................................................................. 29
        12.1.4          Time Range ...................................................................................................... 31
        12.1.5          Shift Setting ..................................................................................................... 32
        12.1.6          Shift Management .......................................................................................... 33
        12.1.7          Attendance Statistics .................................................................................... 35
13.        System Configuration .................................................................................................. 38
        13.1.1          Basic Configuration ....................................................................................... 38
        13.1.2          Video .................................................................................................................. 39
        13.1.3          Face .................................................................................................................... 39
        13.1.4          Event .................................................................................................................. 39
        13.1.5          Hot-Key.............................................................................................................. 39
        13.1.6          File Path ............................................................................................................ 40
14.        System ............................................................................................................................. 40
        14.1.1          About ................................................................................................................. 40
        14.1.2          Feedback .......................................................................................................... 41
        14.1.3          Tools .................................................................................................................. 42
15.        Technical support ......................................................................................................... 45

Inhalt

1.      Anweisung ......................................................................................................................... 46
2.      Open-Source-Software-Lizenz...................................................................................... 46
3.      Systemanforderungen .................................................................................................... 47
4.      Anmeldung......................................................................................................................... 47
5.      Software Interface ............................................................................................................ 48
6.      Geräte-Management ........................................................................................................ 49
     6.1      Geräteverwaltung ................................................................................................. 49
     6.2      Kanalverwaltung................................................................................................... 51
7.      Live-Vorschau ................................................................................................................... 51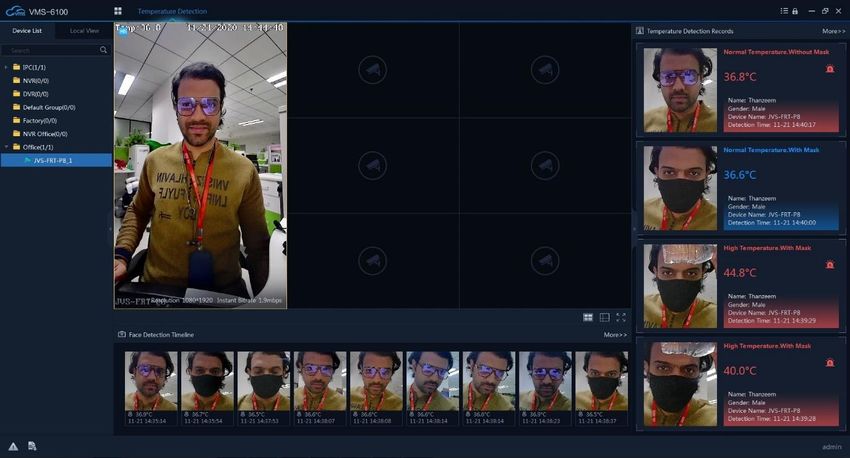
7.1      Video-Vorschau .................................................................................................... 53
     7.2      Bildschirmverwaltung ......................................................................................... 54
     7.3      Kanalverwaltung................................................................................................... 56
8.      Video-Sequenzierung...................................................................................................... 58
     8.1      Aufgabe hinzufügen ............................................................................................ 59
     8.2      Video-Split-Screen ............................................................................................... 60
9.      Wiedergabe ........................................................................................................................ 61
     9.1      Video-Wiedergabe................................................................................................ 61
     9.2      Aufgabe herunterladen ....................................................................................... 62
     9.3      Tag Management .................................................................................................. 63
10.        Temperatur-Erkennung ............................................................................................... 63
11.        Temperatur-Aufzeichnungen ..................................................................................... 65
12.        Personenverwaltung .................................................................................................... 66
     12.1 Organisation hinzufügen ................................................................................... 67
     12.2 Person hinzufügen............................................................................................... 68
     12.3 Person löschen ..................................................................................................... 68
     12.4 Person bewegen ................................................................................................... 68
     12.5      importieren ........................................................................................................... 69
        12.5.1          Informationen zur Importperson ................................................................ 69
        12.5.2          Import Person Gesicht .................................................................................. 70
     12.6 Person exportieren .............................................................................................. 71
        12.6.1          Personendaten exportieren ......................................................................... 71
        12.6.2          Export Person Gesicht .................................................................................. 72
     12.7 Synchronisierung mit dem Gerät..................................................................... 72
     12.8 Synchronisierung vom Gerät ............................................................................ 73
     12.9 Benutzerdefiniertes Feld .................................................................................... 73
13.        Anwesenheits-Management ....................................................................................... 74
     13.1 Anwesenheitseinstellungen .............................................................................. 74
        13.1.1          Grundregel ....................................................................................................... 74
        13.1.2          Ort der Anwesenheit ...................................................................................... 75
        13.1.3          Feiertagseinstellungen ................................................................................. 76
        13.1.4          Zeitbereich........................................................................................................ 78
        13.1.5          Einstellung der Verschiebung .................................................................... 80
        13.1.6          Schichtverwaltung ......................................................................................... 81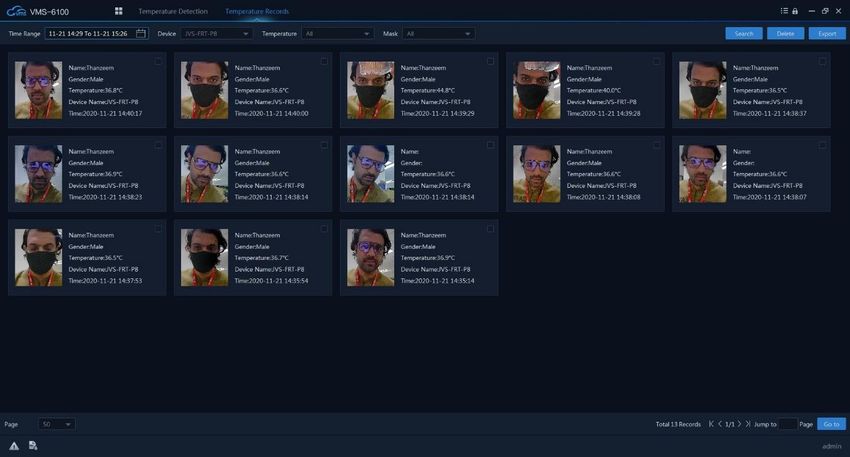
13.1.7        Anwesenheitsstatistik ................................................................................... 84
14.    System-Konfiguration .................................................................................................. 86
      14.1.1        Grundlegende Konfiguration ...................................................................... 87
      14.1.2        Video .................................................................................................................. 87
      14.1.3        Gesicht .............................................................................................................. 88
      14.1.4        Ereignis ............................................................................................................. 88
      14.1.5        Schnelltaste (Hot-Key) .................................................................................. 88
      14.1.6        Dateipfad ........................................................................................................... 89
15.    System ............................................................................................................................. 89
      15.1.1        Über .................................................................................................................... 89
      15.1.2        Rückmeldung .................................................................................................. 90
      15.1.3        Tools .................................................................................................................. 91
16.    Technische Unterstützung ......................................................................................... 94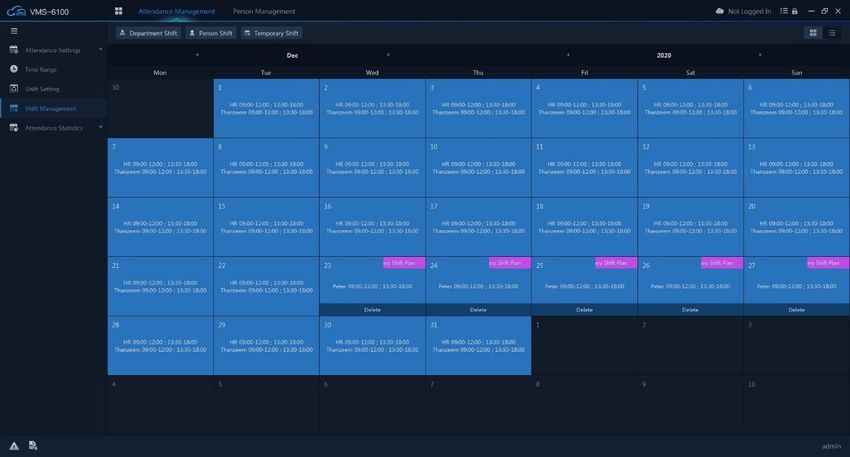
Statement
Thank you for choosing Jovision. This user manual is intended for users of VMS-6100. It
includes instructions on how to use the software. Before using the software, read the user
manual carefully. Keep this manual for further clarifications. The functions, descriptions
and technical parameters of the software may vary with the actual software version. The
software is governed by the user license agreement.

Copyright

This Manual is subject to domestic and international copyright protection. Jovision
Technology Co., Ltd. (“Jovision”) reserves all rights to this manual. This manual cannot
be reproduced, changed, translated, or distributed, partially or wholly by any means
without the prior written permission of Jovision.

Privacy Notice

Surveillance laws vary by jurisdiction. Check all relevant laws in your jurisdiction before
using this software. For surveillance purposes to ensure that your use of this software
conforms. Please refer to the software specification. When using VMS-6100, personal
information such as face, license plate number, telephone number and location
information may be collected. When using the software, please abide by the local laws
and regulations of each country to protect the legitimate rights and interests of others. If
necessary, please let others know before this and contact them effectively.

Disclaimer

This user manual is for reference only. It may contain several technical incorrect places
or printing errors, and the content is subject to change without notice. All information in
this guide has been thoroughly reviewed. Jovision Technology Co., Ltd. is not liable for
damage caused by improper use of this software.

1. Open Source Software License

This product contains software whose right holders license it under the terms of the GNU
General Public License, version 2 (GPLv2), version 3 (GPLv3) and/or other open source
software licenses. If you want to receive the complete corresponding source code, we
will provide you and any third party with the source code of the software licensed under
an open-source software license if you send us a written request by mail or email to the
following addresses:

                           Jovision OSS Support Team
                         Email: opensource@jovision.com
                       Postal: Jovision Technology Co., Ltd.
      Floor 12, Building No.3, Aosheng Square, NO.1166 Xinluo Street, Jinan,
                                 Shandong, China

Detailing the name of the product and the firmware version for which you want the source
code and indicating how we can contact you.
Please note that we will ask you to pay us for the costs of a data carrier and the postal

English                                                                              Page 1
charges to send the data carrier to you. The amount can be varied according to your
location and Geniatech oss support team will notify the exact cost when receiving the
request. This offer is valid for three years from the moment we distributed the product
and valid for as long as we offer spare parts or customer support for that product model.

2. System Requirements

Since the software manages a large number of real-time network devices, it occupies
more memory than conventional software. It is recommended that you choose the
following installation environment.

   •      Win7/8/10 Operating System(32/64bit)
   •      RAM 4GB or more.
   •      Intel Core i5 3.1GHz and above processor.
   •      500GB or above HDD.
   •      Monitor with 1920x1080 resolution.

3. Login

After installation, the user will be asked to create a Username and Password. In this
window, users can choose the software display language.

    Note:
    • Password should be 8 to 16 characters length. Combinations of numbers, lowercase
      letters, uppercase letters and special characters can be used for password.
    • The password cannot be the same or reverse of the username.

English                                                                           Page 2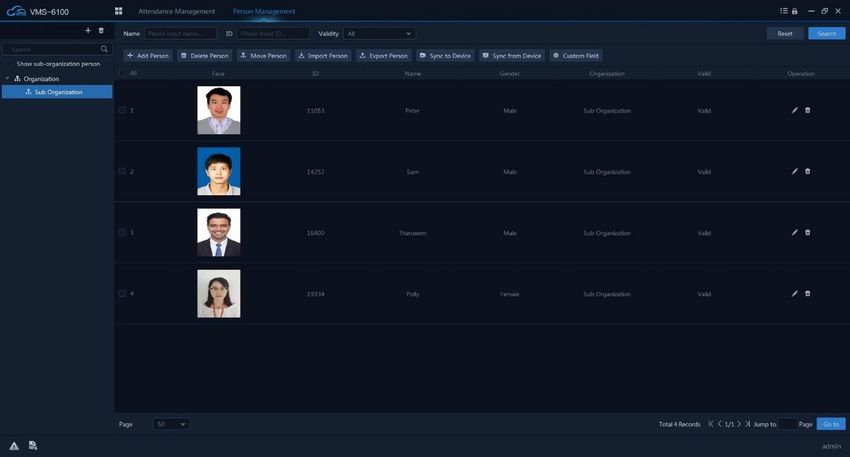
After setup the username and password, the software required to setup security
questions for password protection. Once you setup security question, click Login button.

4. Software Interface

After successful login, you will enter to the main interface of the software. There you
can see the main functional modules of the system.

  Area                                    Description
    A      Home: Switch to Home for open other function modules.
           Function Bar: Functions opened will be displayed here. You can switch
    B
           functions here.
           System: About Software, Feedback, Import/ Export and Boot Update
    C
           Tool.
           Lock: It locks the software interface. You need to input password to
    D
           unlock
    E      Minimize: It minimizes the software to task bar.

English                                                                              Page 3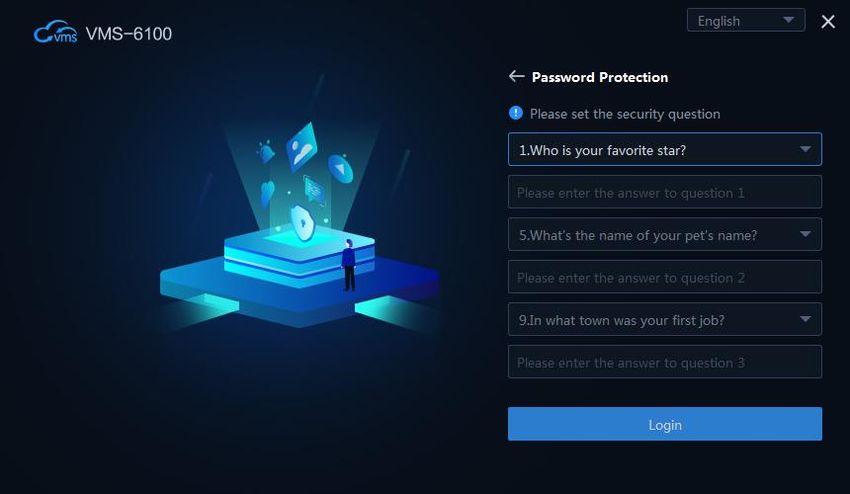
F         Maximize or Restore: It maximizes or restore the software window.
    G         Close: It closes the software.
              Common Functions:
              • Click to open the function module.
    H
              • Drag to rearrange the modules.
              • Drag the Common Functions from H area to the Basic Functions I
              Basic Functions:
              • Click to open the function module.
     I
              • Drag to rearrange the modules.
              • Drag the Basic Functions from I area to the Common Functions H
    J         Events: View real-time events.
    K         Download Task: View download tasks.
    L         User: Current user logged in.

         Note: The interface of the software may vary with the actual software version.

5. Device Management

   5.1 Device Management

Device Management is to add the devices into VMS-6100 and manage it. It supports
multiple ways to manage IP Cameras, NVRs and other types of devices by specific IP
Address and Port, by CloudSEE ID or by Onvif protocol.

VMS-6100 will automatically search LAN devices and listed in Online Device list. Select
the device you want to add and click on Add to Management to add devices into
Managed Device list.

English                                                                                   Page 4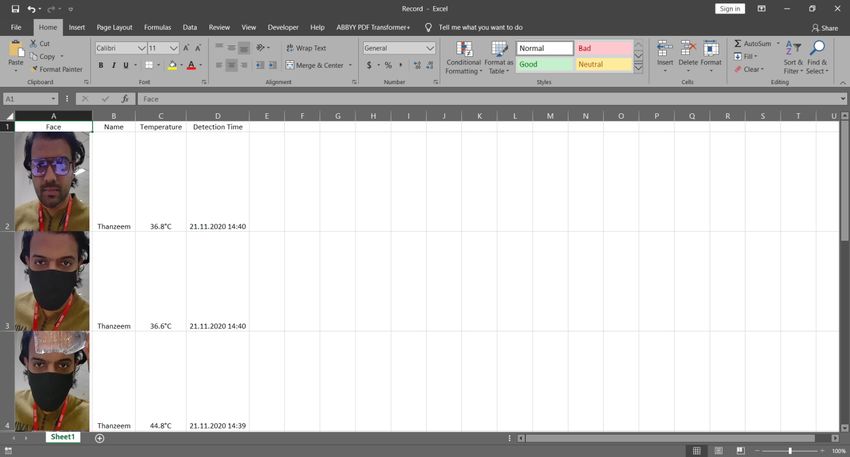
The software adds devices with default device account (Username: admin and
Password: ). If you changed the password, the device will not
connect and it shows “Wrong Username or Password ()” in the Status and

Tool Tip.

Double click the device or click , and input correct Username and Password. Click OK.
The device status will become Online.

    Note: The Error Code is randomly generated. You can use the error code to get the device
    password reset support from Jovision technical support engineers.

You can access the device settings by clicking           button and reboot the device by
clicking  button on each device in the list.

You can add device manually by clicking Add Device in Manage Device list. You can
add devices by IP/DDNS, CloudSEE ID or ONVIF.

   5.2 Channel Management

In Device Management, you can create group and add channels into the group. Click on
Group tab to access the device group management.

Click on + on the right top of the left side bar to create a group. Click on Add Channels
to add the device channels into the group.

English                                                                                Page 5
Select the channels on the left side you want to add into the group. Then select the group you want the channels to be added. Click on Add>> button. If you want to add all the channels to a specific group, then select the group and click Add All>> button. In this same method, you can remove single channels from group by clicking
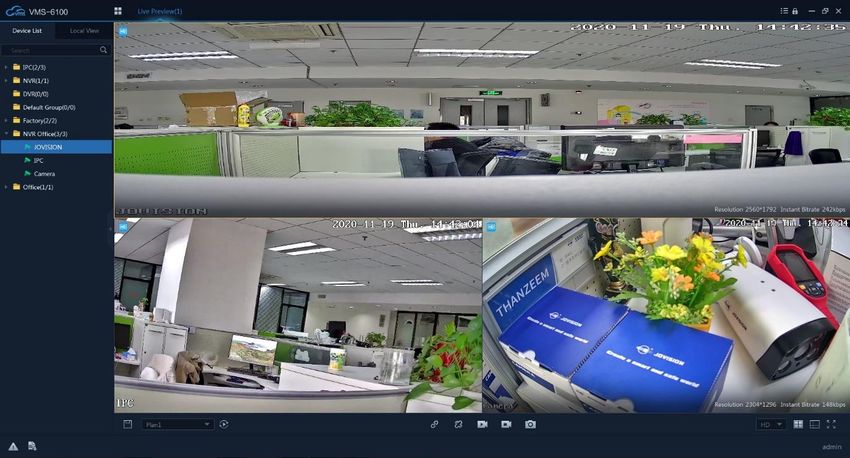
6. Live Preview

For the surveillance task, you can view the live video of the added network cameras,
video encoders and video intercom device on the Main View page. And some basic
operations are supported, including snapshot, manual recording, PTZ control, etc.

  Area                                  Description
    A     Device List: List the groups set in the Device Management
          Local View: Groups displayed on the video monitoring area (C area).
          When we display videos grouped by different devices in the video
    B
          monitoring area, we can group those videos into one view for detailed
          management and display.
          Video Monitoring:
          • A centralized area that displays real-time surveillance videos.
    C     • The default is four screens. This can be changed in the Split Screen
             Selection (M are) and Custom Split Screen (N area).
          • You can click and drag between screens to swap it.
    D     Save to View: Save Video Monitoring area to the Local View.
    E     Sequence Group List
    F     Start Sequencing
          Reconnect All: Reconnect all disconnected channels in the video
    G
          monitoring area
          Disconnect All: Disconnect all connected channels in the video
    H
          monitoring area
          Record All: Record all the channels in the video monitoring area to local
     I
          storage.
          Stop Recording: Stop the recording of all the channels in the video
    J
          monitoring area
    K     Snapshot: Snapshot the selected channel in the video monitoring area.
English                                                                          Page 7
HD/SD Switch: It switches the channel video streaming between HD
L
and SD.
M Split Screen Selection.
N Custom Split Screen.
Full Screen: It turns the video monitoring area into full screen.
O For exiting full screen, please press the Esc key on the keyboard or
right-click and click "Exit Full Screen"
Note: If you want to full screen a single channel, just double-click the channel. Double-
click again for exit full screen.
6.1 Video Preview
Single Channel Video Preview
From the Device List column, select Group and expand. Double-click any channel or click
and drag channels to the Video Monitoring area to preview the video of the device.
Group Video Preview
From the Device List column, select Group and double-click on the group name to
preview the video of all the channels in the device.
English Page 86.2 Screen Management Split Screen Selection The default video monitoring area is four screens. This can be changed in the Split Screen. You can set the number of screens in the following ways. The number in the above figure represents the number of screens. The screen can be displayed in equal size according to actual needs. The screen size can also be adjusted according to the needs of the scene. If you select "5 screens", it will display on the left and two vertical screens on the far right. Three vertical screens. The effect is as follows. English Page 9
Custom Split Screen
When you need to customize the split screen, you can do so by going to the custom split
screen, as shown in the following image

If we want to customize three screens, how to set the top one and the bottom two screens?

English                                                                         Page 10
Click and drag to select screens. Click Merge to merge the selected screens.
If you want to customize three screens, one screen above and two screens below.

   6.3 Channel Management

In addition to the overall operation of the device, you can also manage a single channel
in detail. When right-click on the channel, the management menu will pop up, including
the following modules

     Options                                     Description
      HD/SD         Switch video streaming between HD and SD.
    Snapshot        It takes the screenshot of the channel.
 Batch Snapshot It takes 5 consecutive screenshots of the channel.
   Start/Stop   It records the channel video to the local storage. For the recording
   Recording    path, you can check the “System Configuration”.

English                                                                         Page 11
Quick playback playbacks the recording of N minutes before the
Quick Playback moment. Playback time can be set in "System Configuration". Quick
Playback Time is 5 minutes by default.
Its normal record playback. Playback duration depends on the
recording time of the device.
Playback
You can view and operate the recordings in the "Playback" function
module
Open/Close It opens/close the device audio. When sound is opened, an icon of a
Sound speaker will be displayed at the left top of the channel.
Device Settings Remote settings of the device.
Open PTZ function to adjust the movement of the device. This
PTZ
operation requires the device should support PTZ function.
Streaming Info. You can view the stream data information of the device
It uses to disconnect the current channel manually from Video
Disconnect
Monitoring.
Clear the device video information of the channel from Video
Clear Video
Monitoring
Snapshot Editor
When you snapshot a channel, a picture editor will appear. You can edit the snapshot in
it and save to local storage.
Options Description
Copy to clipboard: It copies the snapshot to clipboard.
Save As: Save the snapshot to different location. The default storage
location of snapshots can set in "System Configuration"
Edit: You can simply edit the snapshots here.
Delete: Delete the current snapshot.
English Page 127. Video Sequencing
The Video Sequencing function provides the auto switching of configured scene(s) at a
certain time. In Home, click Video Sequencing to enter sequencing management window.
The interface as shown below.
Area Description
A Add: Add new sequencing plan.
B Delete: Delete selected sequencing plans.
C Plans: List of all the sequence plan added.
D Add Task: Add new tasks into the sequence plan.
E Tasks: List of all the tasks added in the sequence plan.
7.1 Add Task
After creating Sequence Plan, select the plan click + (D area) to add tasks into the plan.
English Page 13In the Add Task window, select the Group and expand it under the Device List column. Double-click or click and drag any channel to the Video Monitoring area for adding the channel into sequence task. You can set the Name, Duration of each tasks here. Also, edit the Stream Type and Stay Time of each Channels. 7.2 Video Split Screen There are two split screen options are available. Predefined and Custom Split Screens. The default sequence task video monitoring area is in four screens. This can be changed in the Split Screen. You can set the number of screens in the Split Screen Selection area by following ways. Also, if you need to customize the split screen in the sequence task, you can do that by custom split screen selection as shown in the following image Once you setup the task. Save it. You can find the Sequence Plan list in Video Preview area. Select the plan from the combo box and click button to start the channel sequencing view. English Page 14
8. Playback

   8.1 Video Playback

In the Home window, click Playback module to get the recorded video playback. The
interface as given below.

  Area                                 Description
    A     Device List: List the groups set in the Device Management
    B     Local View: List the local view set in the Live View
          Video Preview: The default is four screens. This can be changed in the
    C
          Split Screen Selection or Custom Split Screen (K area).
          Recording Type: You can select All Recording, Alarm Recording and
    D
          Normal Recording types here.
          Recording Source: There are Local Recording (Video recorded in the
    E     local computer) and Remote Recording available (video recording from
          NVR HDD or IP Camera SD Card).
    F     Time Period: Select recorded video time range for search.
          Search: Filter and search video recordings according to Video Type,
    G     Video Source and Time Period. Search results will be listed in File (L
          area)
    H     Progress Bar: Displays the playback progress of the selected channel.
          Playback Controls:
           • Stop: Stop playback
     I     • Play/Pause: Play or Pause the video playback.
           • Next frame: Each time when you press this button, it will playback
             only one frame (1/12Sec) and then pause.

English                                                                       Page 15
• Mute/Unmute: It mute/unmute the playback audio. When sound is
opened, an icon of a speaker will be displayed at the left top of the
video.
Speed: You can choose the playback speed from 1/8x to 8x. Default
J
speed is 1x.
Screen Management:
• Split Screen Selection
K • Custom Split Screen
• Full Screen
Timeline Mode: It list the channels and recordings on the timeline. The
L normal recording will be displayed in green and alarm recordings in red
in each channel timeline.
File Manage:
• Download: It download the selected video files to the local storage.
M Download progress and status can see it in the Download Task.
• Tag: Drag tag button to the timeline (N area) to add a tag to the video
to describe the specific time.
Timeline. It indicates the time duration for the video file. Click on the
N
timeline to playback the video of the specific time.
Tag Management: You can manage all the tags you added in the
O
timeline in the Tag Management Window.
Channel List. It displays the channel list in Timeline Mode. If you
P
selected File List Mode, the channel list will change to file list.
Show/Hide: It Show/Hide the timeline area and expand the video
Q
preview.
R Zoom: It zooms the timeline to get the detailed time selection.
8.2 Download Task
All the download tasks will be displayed here. You can see the downloading, successful
and failed tasks in this window. Also, you are able to set the path to save the downloading
files. You can Batch Start, Batch Pause and Batch Cancel the downloading task as well.
English Page 168.3 Tag Management
Tags marked in the timeline can manage here. All the tags will be listed in the Tag
Management. You can Edit, Delete the tags. Also, you can playback the recording from
the tagged position.
9. Temperature Detection
In the Temperature Detection module, you can see the real time temperature detection
(Normal Temperature/High Temperature), Mask Detection (With Mask/Without Mask)
and Facial Recognition of people.
Area Description
A Device List: List the groups set in the Device Management
Local View: Groups displayed on the video monitoring area (C area).
B
When we display videos grouped by different devices in the video
English Page 17monitoring area, we can group those videos into one view for detailed
management and display.
Video Preview: The default is four screens. This can be changed in the
C
Split Screen Selection or Custom Split Screen (G area).
Temperature Detection Records: It display the real time detection details
with Person Face, Temperature, Person Name, Gender, Device Name,
D
Detection Date&Time, Normal/High Temperature, With/Without Mask
information.
E More>>: It redirect to Temperature Record module.
Face Detection Timeline: After 4 detections, the detection records will
F be moved to Face Detection Timeline. It display the Detected Face,
Temperature and Date&Time.
Screen Management:
• Split Screen Selection
G
• Custom Split Screen
• Full Screen
Note:
• Please make sure “Upload to Client” and other detection options are enabled in the
device settings.
• If the face is recognized, then only it displays person Name and Gender.
Check the temperature detection interface effect in the below picture.
Normal Temperature. With Mask Normal Temperature. Without Mask High Temperature. With Mask
English Page 18Note: Double-click on the temperature card to pop-up the video preview from the device. It is 10. Temperature Records Temperature Records displays all historical temperature measurement data, including Person Face, Name, Gender, Temperature, Device Name, and Detection Date&Time. You can set the Date&Time range, select Device, filter Temperature and Mask then search it. All the temperature records will display here. By default, 50 records will display. You can change it to 100 max. If you want to delete the temperature records, select the records and click Delete button. Click Export button to export all the records as .xlsx or .csv file. English Page 19
11.       Person Management

You can add person information to the system for further operations such as access
control using face recognition devices, and time and attendance etc.

   Area                                       Description
    A        Add: Add new Sub Organizations.
    B        Delete: Delete selected Sub Organizations.
    C        Organizations: List of all Organizations.
    D        Search Filters: Filter for person search.
             Functions:
             • Add Person: Add a single person into the software.
             • Delete/ Delete All Person: Delete a selected person or delete all the
                person from the list.
             • Move Person: Move selected person between organizations.
      E
             • Import Person: Import batch of person into the software.
             • Export Person: Export persons as .csv file.
             • Sync to Device: Send persons to the selected devices.
             • Sync from Device: Get person to the software from selected devices.
             • Custom Field: Add custom info field into add person window.
      F      Persons: It list all added and imported persons

   11.1 Add Organization

You can add an organization and import person information to the organization for
effective
Management of the persons. You can also add a sub organization for the added one.
There will be a default organization. You can edit the parent organization first. Then click
+ on the top to add sub organizations under the parent organization.
 Note: You cannot remove the parent organization from Person Management.

English                                                                             Page 20
11.2 Add Person You can add persons to the client software one by one. The person information contains basic Information, detailed information, profiles, custom information etc. Input basic information like Name, ID, set Gender and other information. Click + to add person face. Then click Add button to add the person into software and close the window. Press Add Continue button to add the person and continue to add other persons. Note: • The face picture format must be .jpg and the size cannot exceed 512Kb. • The maximum resolution of the pictures should be 960x960, and the minimum resolution should be 30x30. 11.3 Delete Person Select the person you want to delete and click Delete button to delete it from the software. If you click Delete All, all the persons in the software database will be removed. 11.4 Move Person You can move added persons to another organization if you required. Select the person you want to move then click Move Person button. You will get a change organization window. Select the organization to move persons then click Ok. Note: • Make sure you have added at least two organizations/sub organizations. • Make sure you have added or imported person information into the system before move person. English Page 21
Move person interface as shown in the following image.

   11.5 Import Person

You can import multiple persons to the software in a batch. There are two methods to
import persons into the software.
          11.5.1 Import Person Info.

You can enter the information of multiple persons in a predefined template (.csv file) to
import the information to the software in a batch.
Select organization first, then click Import Person button. An Import window will appear.
Choose Person Info. Click Download Template to download .csv file template first. Then
input person details and save it. Load the .csv file in to the Import File and click Import
button. The software will import all the persons’ information into the software.

English                                                                            Page 22
11.5.2 Import Person Face
In the Import window, choose Person Face. You have to follow the naming rules and the
picture format mentioned in the interface. Arrange the person face images as per the
ruleand put it in a single folder. Load the folder into the import file and click Import button.
The software will import all the persons’ pictures into the software. After importing face
pictures for the added persons to the software, the persons in the pictures can be
identified by the file name and added the face in the corresponding person information.
Note:
• Make sure you have added at least two organizations/sub organizations.
• Make sure you have added or imported person information into the system before move
person.
Person Management interface as shown in the following image.
English Page 2311.6 Export Person
Similar like Import, You can export persons’ data from software to local PC. There are
two methods for export persons’ data.
11.6.1 Export Person Info
You can export the added persons' information to local PC as a CSV file.
Select organization and click on Export Person button. An export window will appear. You
can select the desired items to export. Click Export button to export it as .csv file into local
PC.
Note:
• Make sure you have added persons’ information to an organization.
English Page 2411.6.2 Export Person Face
In the Export window, choose Person Face and select the desired items to export as
picture name. Click Export button and choose the folder for the files to be exported.
Note:
• Make sure you have added persons’ information and face image to an organization.
11.7 Sync to Device
Sync to Device option used to upload the person data to face recognition devices. When
you click on Sync to Device button, a sync device window will open as follows. There are
two type of sync options.
• Sync. People: It upload only the selected people into the device.
• Sync. Organization: It upload all peoples’ data under the organization to the
English Page 25device. • Delete duplicate data: It delete duplicate data in the device while uploading. Select the desired upload method first and select the device from device list to upload the data. Click Sync button to complete the upload. 11.8 Sync from Device It downloads the person data from face recognition devices to software. Click Sync from Device, a sync device window will open. Select the devices from the device list to download the data and click Sync button. All persons’ data will be downloaded to Software. English Page 26
11.9 Custom Field

You can customize the person information which are not pre-defined in the software
according to actual needs. e.g., Job position, Expert in, Place of birth etc. After
customizing, when add a person, you can enter the custom information to make the
person information complete.
Click +Add button to add new custom fields. Click Ok to save it. You can Edit and Delete
existing custom fields.

12.       Attendance Management

The Attendance Management module provides multiple functionalities to track and
monitor when employees start and stop work, and full control of employees working hours
such as late arrivals, early departures, time taken on breaks and absents.

   12.1 Attendance Settings

You can configure the attendance parameters, including the Basic Rule, Overtime,
Attendance Location, Temperature Settings, Holiday, Absent Settings etc.
          12.1.1 Basic Rule

In the basic rule settings, you can set the Weekends, Abnormal temperature, General
attendance settings like on duty and off duty time in the morning and afternoon, Allowable
late and early departure time, basic attendance rules, Absence settings etc.
The days of weekends may vary in different countries and regions. The client provides
weekend’s definition function. You can select one or more days as the weekends
according to actual requirements, and set different attendance rules for weekends from
workdays.
The interface is as shown below.

English                                                                           Page 27
Note:
• The parameters configured here will be set as default for the newly added time period.
It will not affect the existed one(s).
12.1.2 Attendance Location
You can set the face recognition devices as the attendance check point, so that the
detected face in the face recognition device will be recorded for attendance.
In attendance location settings, all the devices will list. Choose the device and select the
Attendance Location Type. You can choose Check-In. Check-Out or Both for each device.
Once you add the device into the attendance location, select the added device and click
English Page 28Link to Organization to link the device to the corresponding organization.
Note: You should add face recognition device before configuring attendance location. For
details, refer Device Management.
12.1.3 Holiday Settings
The required attendance time on holidays might differ from that on usual days. For ease
of operation, the system provides Holiday setting which allows you to set the attendance
time and rules for holidays. There are two functions in Holiday Settings.
a. On Holiday
Usually, the holiday is nationally official holidays, such as New Year Day, Labor
Day or National Day Holiday etc. The holiday can also be flexibly set according to
your requirements.
Click +Add button to add holidays.
Select the type On Holiday and set Holiday Name. Select the Holiday Start Date
then set Days that how many days you need to set as holiday from the starting
date. Click Add button to add the holidays into the attendance system.
English Page 29Note: During holidays, check-in and check-out will not be recorded in the attendance
system.
b. Additional Shift
This option allows to add additional shift to the attendance system after holidays.
For example, as per basic rule, Saturdays and Sundays are general holidays. So,
the check-in and check-out will not be recorded on these days. Some companies
add additional shift on Saturdays and Sundays after holiday. You can set that here.
Select the type Additional Shift and set Shift Name. Select the Start Date then set
Days that how many days you need to set additional shift from the starting date.
Click Add button to add it into the attendance system.
Note: If there is no check-in and check-out in Additional Shift days count as absent.
After add Holiday or Additional Shift, you can Edit or Delete it from the list. The
details will be displayed in the calendar on the right side as shown in the below
image.
English Page 3012.1.4 Time Range
On the Time Range page, you can add general time for employees, which requires the
fixed on-duty time and off-duty time. Also, you can set valid check-in/out time, allowable
late and leaving early times.
Click +Add button to add the time range according your requirement. Similar like basic
rule settings, you can set the Weekends, General attendance settings like on duty and
off duty time in the morning and afternoon, Allowable late and early departure time, basic
attendance rules, Absence settings etc. Set all the required details and click Add button
to save the time range.
Options Description
Time Range Name Set time range name
Check-In
Set the Check-In time for morning and afternoon.
(Morning/Afternoon)
Check-Out
Set the Check-Out time for morning and afternoon.
(Morning/Afternoon)
Allow Late Set allowable late time for Check-In
Early Leave
Set allowable time for early Check-Out
Allowed
Ignore Midday If this option enabled, morning Check-out and afternoon
Attendance check-in will not be recorded.
Ignore Morning If this option enabled, morning Check-in and check-in will
Attendance not be recorded.
Ignore Afternoon If this option enabled, afternoon Check-in and check-in will
Attendance not be recorded.
English Page 31Set the late time duration for check-in. If the check-in
Late Check-In exceeds the time period, the attendance data will be
marked as absent.
Set the early time duration for check-out. If the check-out
Early Check-Out earlier than the normal leave time, the attendance data will
be marked as absent.
If the person does not check in, attendance data may be
No Check-in
marked as absent or late.
If the person does not check out, attendance data may be
No Check-Out
marked as absent or early leave.
Note: This system work like First-In & Last-Out (Stack) method. The first check-in time is
recorded as od-duty time and the last check-out time is recorded as the off-duty time.
12.1.5 Shift Setting
You can add shift for persons including setting shift period by day or by week. According
to the actual requirements, you can add multiple time ranges in one shift for persons,
which requires them to check-in and check-out for each time range.
Click +Add button to add shifts. You can add shifts by Day or by Week.
Input Shift Name and select the rotation type. Click Time Range on each day, the added
time range will be listed there. Select the required time range for the day. Click Add button
to add the shift into the list.
You can Edit or Delete the added shifts from the list.
English Page 3212.1.6 Shift Management
Shift work occurs in a 24-hour-a-day work schedule and occasionally seven days a week
to keep an organization operating without a hitch and optimize work output and
productivity. Here you can set Department Shift, Person Shift and Temporary Shift.
a. Department Shift
You can set the shift schedule for one department, and all the persons in the
department will be assigned with the shift schedule
Select the department from the list first. Then Select the Shift. All the added shifts
will be listed here. Set the date range for the shift and click Add button to add
department shift into the calendar.
Note: In Attendance Management, the department list is the same with the organization.
You should add organization and persons in Person Management first.
English Page 33b. Person Shift
You can assign the shift schedule to one or more persons. You can also view and
edit the person schedule details.
Select the one or more persons from the department list first. Then Select the Shift.
All the added shifts will be listed here. Set the date range for the shift and click
Add button to add person shift into the calendar.
c. Temporary Shift
You can add a temporary shift for the person and the person will be assigned with
the shift schedule temporarily. Select the one or more persons from the
department list first. Then Select the dates from calendar. Select the type whether
its working days or rest says. Then select the Time Range from the list. All the
added time ranges will be listed here. Click Add button to add temporary shift into
the calendar.
English Page 34After set the shifts, the interface will be displayed as below.
You can click on these buttons (Calendar View and List View) on the
right top corner to change the display style of the interface.
12.1.7 Attendance Statistics
You need to calculate the attendance data before searching and viewing the overview of
the attendance data, employees' detailed attendance data, employees' abnormal
attendance data, the employees' overtime working data, and face recognition records etc.
a. Face Recognition Record
It lists all the recognized faces from the face recognition device.
Select the department or a person from the organization list first. Then set the time
range. You can filter the records by person ID as well as All, Normal or Abnormal
temperature details. Click Search button to search the face recognition records
English Page 35according to the filter you set. You can export the records as .csv files to the local
PC.
b. Attendance Record
After fetch, the face recognition records from the device to software, you can
calculate the attendance in the Attendance Record function.
Select the department or a person from the organization list first. Then set the time
range. You can filter the records by person ID as well as the status as Normal,
Abnormal, Overtime or All Status details. Click Search button to search the
attendance records according to the filter you set. Click Re-Calculate button to
calculate the attendance. You can export the calculated attendance as .csv file.
Note: It will calculate the attendance data till the previous day.
c. Attendance Report
English Page 36Here you can generate attendance reports according to the attendance records
calculated.
For attendance report, select the department or a person from the organization list
first. And click on the desired report type from the interface. Set the Date and click
Re-Calculate. Then click on Generate Report button. It will open the system dialog
to save the report as .csv file. The report types are below.
Type Description
It generates the attendance report of a time range. You
Daily Report cannot generate the current day report. It only generates
report till the previous day.
Monthly Report It generates the attendance report of a one whole month.
Abnormal It generates the attendance report with all abnormal
Attendance conditions like Absent, Late, Left Early, Abnormal
Report Temperature etc.
Absent Report It generates the attendance report with all absents.
Late Report It generates the attendance report with all late check-in.
Left Early Report It generates the attendance report with all early check-out.
Abnormal
It generates the attendance report with all abnormal
Temperature
temperatures.
Report
English Page 3713. System Configuration
You can configure the software system settings here including Basic configurations,
Video configurations, Face management, Event settings, Hotkey as well as Storage path
etc.
13.1.1 Basic Configuration
In basic configuration, you can configure the network interface card, display orientation,
date and time format, default screen, log, auto lock, password as well as automatic
upgrade etc.
• NIC: You can choose the NIC from the list. It only for searching for video decoding
cards.
• Maximize Mode: You can choose the screen orientation when you click on
maximize button. You can choose Maximize or Full Screen.
• Date Format: Set the date format in yyyy-MM-dd or dd-MM-yyyy
• Default Screen: You can choose the default screen to run the software if you
connected multiple display with your PC.
• Log Saved for: You can set the duration of the log storage.
• Auto Lock: You can set the time for auto lock the software when the software is
not active for the selected time period.
• Password Required: It enables the software required password when you want
to close VMS-6100.
• Auto Upgrade: It enables the software to detect if the software update available
in the server.
English Page 3813.1.2 Video
You can configure the video settings of CMS-6100 here.
• Hide Video Processing: You can set the video preview when splitting the screen.
If its Clear video, it removes the channels from the screen. If you choose
Disconnect Video, it disconnects the video preview from the screen when splitting
it. If you choose Maintains Decoding, the video maintains the decoding settings
and keep previewing when splitting the screen.
• Snapshot Format: You can set the snapshot image format as .JPEG or .BMP
• Quick Playback Time: You can set the playback duration of quick playback
function.
• Automatic Recover: If you enabled this option, after you re-open the VMS-6100,
it will still display the same channels previewing before you close the software.
13.1.3 Face
You can set the face recognition related settings here.
• Record Storage Duration: According to the privacy low of different countries,
people don’t want to store their face images into a system. You can set the face
storage duration here. Set the desired date and the stored face faces will be
automatically deleted.
• Temperature Unit: You can choose the temperature unit display as °C or °F
according to your country standard.
• Detection Type: You can choose the abnormal detection types you want to
display in the software. You can choose All, Abnormal Temperature and Without
Mask.
13.1.4 Event
You can set the alarm related settings here.
• Pop-up Video: If it is selected, when the software started, the pop-up video for
the alarm will be disabled.
• Block Motion Detection: It stops the motion detection alarm from the device.
• Loop Alarm: You can set the alarm sound here.
13.1.5 Hot-Key
You can set the short cut keys for some of the VMS-6100 functions. Hot-keys and
functions are below.
Key Function
F2 Full Screen
English Page 39F3 Playback
F4 Event Monitor
F5 System Config.
F6 Sequence Config.
F7 Snapshot
F8 Screen Lock
F9 User Manual
F10 Enable/Disable Event Sound
Ctrl+R Start/Stop Local Recording
13.1.6 File Path
You can set the recording path and storage handling here.
• Record Path: Set the path for local recording.
• Snapshot Path: Set the path for store the snapshots.
• Download Path: Set the path for downloaded files from the device.
• Handle HDD: You can set the HDD handling option here when the HDD is full. If
you choose Overwrite, the software will overwrite the recordings. If you choose,
stop and notify, the software will stop recording and give notification.
14. System
Here you can manage some of the software system functions like software update,
feedback, Import/ Export and boot update tool. Click button on the right top corner of
the software to access System.
14.1.1 About
In About option, you can check the current version details of the software. Also, you can
update the software if software update available in the server.
English Page 4014.1.2 Feedback With this feedback system, you can submit the software information, insights, issues, bugs and experience with software etc. Input the detailed description not less than 15 words and not more than 500 characters. Input the subject and then upload the screenshots. Click + to add screenshots. You can upload maximum 5 screenshots. Then click Ok button to submit the feedback. We shall collect the feedback and review it and we will improve the functionalities as well as fix if there is any bug on software update. English Page 41
14.1.3 Tools

In Tools, there are Import and Export option and there is a Boot Update tool to upgrade
the firmware IP camera firmware.
   a. Import
It imports the data from other client software like JNVR, CloudSEE as well as VMS-6100
database. The three options available in Imports are
   •      Import JNVR Data
   •      Import CloudSEE Data
   •      Import VMS-6100 Data

Open the import dialog and select the data type from the list. Browse the directory
containing the data file then click import button.

    Note: If you import VMS-6100 database file, it required password and the software will
    reboot.

   b. Export
You can export the VMS-6100 database file to local PC. Open the export dialog and
select the directory you want to export the database file. Input password and click Export
button to export. It required password and the software will close during export.

   c. Boot Update Tool
Boot Update too is a software tool to upgrade the IP camera firmware. Follow the below
steps to upgrade the firmware with tool.

English                                                                             Page 42
Step1: Run Boot Update Tool with administrator permission
Step2: Change the display language of the tool.
Step3: Click "Browse", Select the folder containing the firmware files and then click "OK".
Step4: Turn on the power of the device, and make sure that the LAN network connection
is good (If you use a laptop, please turn off the laptop wireless network), even if
the IPC is not listed, it does not matter. Click "Start Update". Turn off the device
power and turn it on again. The tool will search and list the devices, and then start
the transfer and update. You can see the progress in the program.
English Page 43You can also read