Market Participant User Guide - Customer Interface for Resource Adequacy (CIRA) Version 5.3 Last Revised: July 21, 2021 - California ISO
←
→
Page content transcription
If your browser does not render page correctly, please read the page content below
Market Participant User
                     Guide

    Customer Interface for
  Resource Adequacy (CIRA)

                            Version 5.3

                    Last Revised: July 21, 2021

                                                  Page 1
ISO Public
REVISION HISTORY
VERSION NO.           DATE        REVISED    DESCRIPTION
(Must match header)               BY
 5.1                  11/6/2019   Nancy      Updated Sections 8.1, 8.3, and 8.4 to reflect
                                  Strouse    UI changes
 5.2                  7/7/2021    Diana      Updated section 2.0 Roles and Access
                                  Attisani   levels
 5.3                  7/21/2021   Rashele    Updated the first paragraph of section 5.3 to
                                  Wiltzius   reflect correct submission timeline

                                                                                    Page 2
ISO Public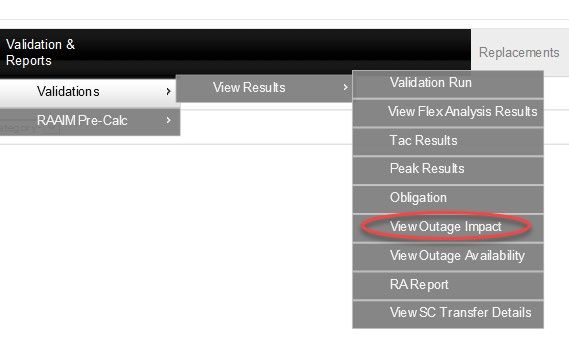
1     Introduction .............................................................................................................. 6
2     Roles and Access Levels ......................................................................................... 7
3     Plans ........................................................................................................................ 7
    3.1      RA Showings...................................................................................................... 7
    3.2      Resource Adequacy (RA) Plans......................................................................... 8
    3.3      Supply Plans ...................................................................................................... 8
    3.4      Templates .......................................................................................................... 8
      3.4.1        RA Plan Template ....................................................................................... 8
      3.4.2        Supply Plan Template................................................................................ 12
    3.5      Sequence of Events at a High Level ................................................................ 16
    3.6      Submission of RA Plans ................................................................................... 17
      3.6.1        Errors on Upload of RA Plan ..................................................................... 18
    3.7      Submission of Supply Plans ............................................................................. 19
      3.7.1        Errors on Upload of Supply Plan ............................................................... 20
    3.8      Download Plans ............................................................................................... 21
      3.8.1        Download RA Plan .................................................................................... 21
      3.8.2        Download Supply Plans ............................................................................. 25
    3.9      Manage Import Allocation ................................................................................ 27
      3.9.1        View SC Import Allocation ......................................................................... 28
      3.9.2        Submit Bilateral Trades ............................................................................. 29
      3.9.3        View Bilateral Trades ................................................................................. 31
    3.10        Net Qualifying Capacity (NQC) ..................................................................... 32
      3.10.1          Upload/Download NQC Request Form .................................................. 33
      3.10.2          Approve/Reject NQC .............................................................................. 35
      3.10.3          NQC Comments ..................................................................................... 36
      3.10.4          NQC Report............................................................................................ 36
4     RA Validation ......................................................................................................... 37
    4.1      Cross Validation (CV) Runs ............................................................................. 38
      4.1.1        Cross Validation Supply Plan Details ........................................................ 38
      4.1.2        Cross Validation RA Details....................................................................... 40
      4.1.3        Cross Validation LSE Obligations Details .................................................. 40
    4.2      Flex Cross Validation Runs .............................................................................. 41
      4.2.1        Flex Cross Validation Supply Details ......................................................... 42

                                                                                                                              Page 3
ISO Public
4.2.2 Flex Cross Validation RA Details ............................................................... 43
4.3 Outage Impact Analysis (OIA) .......................................................................... 43
4.3.1 MW Impact by Outage ............................................................................... 44
4.3.2 Operational RA .......................................................................................... 45
4.4 Planned Outage Substitution Obligation (POSO) ............................................. 45
5 Substitutions .......................................................................................................... 47
5.1 Forced .............................................................................................................. 48
5.1.1 Create ........................................................................................................ 48
5.1.2 Review ....................................................................................................... 51
5.1.3 Release ..................................................................................................... 53
5.1.4 Compatible Resources .............................................................................. 53
5.2 Planned ............................................................................................................ 54
5.2.1 Create ........................................................................................................ 54
5.2.2 Review ....................................................................................................... 57
5.3 Outage Exemptions.......................................................................................... 59
6 RAAIM Pre-Calc ..................................................................................................... 60
7 CSP Offers ............................................................................................................. 63
7.1 The Timeline and process for CSP .................................................................. 63
7.2 View and Submit CSP Offer Set....................................................................... 64
7.3 Search for Available Resources ....................................................................... 69
7.4 CPM Designations ........................................................................................... 71
8 Reports .................................................................................................................. 73
8.1 RA Report ........................................................................................................ 74
8.2 SC Transfer Report .......................................................................................... 76
8.3 Generic Obligation Report ................................................................................ 77
8.4 Flex Obligation Report ..................................................................................... 78
9 Legacy Replacements............................................................................................ 79
9.1 TAC Results ..................................................................................................... 80
9.2 Peak Results .................................................................................................... 81
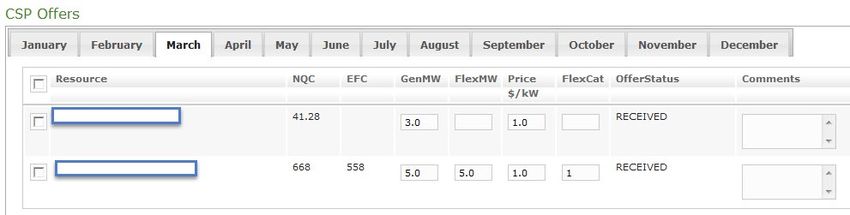
9.3 View Outage Impact ......................................................................................... 82
9.4 View Outage Availability ................................................................................... 84
9.5 Approve/Reject Replacements ......................................................................... 85
9.6 View Replacement Details ............................................................................... 86
9.7 OM Replacements ........................................................................................... 86
Page 4
ISO Public
9.8       Approve/Reject OM Replacements .................................................................. 86
   9.9       Replacement Requirement............................................................................... 86
10 Common User Issues............................................................................................. 87
   10.1        User Sees a Blank Screen or Gets an ‘HTTP Status 404’ Error When Using
   IE          ……………………………………………………………………………………….87
11 Appendix ................................................................................................................ 88
   11.1        Entity Relationship for Planned Outage Substitution..................................... 88

                                                                                                                        Page 5
ISO Public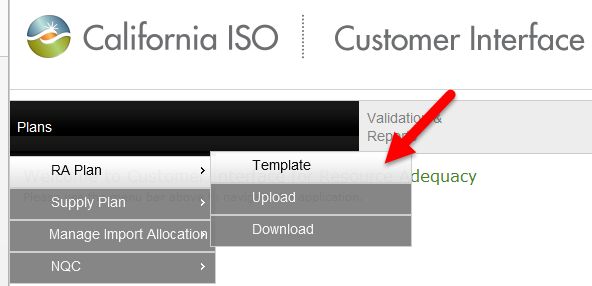
1 Introduction
The Customer Interface for Resource Adequacy (CIRA) application is an external user
interface that accommodates the functionality to manage ISO’s resource adequacy
needs. Providing an external user interface allows Scheduling Coordinators (SCs) to
submit their annual and monthly Supply and Resource Adequacy (RA) Plans, obtain
reports on errors/warnings/delays/missing plans, resubmit corrected Supply and RA
Plans, view submission processing status, view and download their previously accepted
plans, and upload the changes back through the application. CIRA gives the capability
for Scheduling Coordinators (SCs) and Load Serving Entities (LSEs) to provide their
generic and flexible RA capacity information to ISO using their Supply and RA Plans.

Suppliers can view the results of the Outage Impact Analysis and check if their planned
outage(s) have been assigned a Planned Outage Substitution Obligation (POSO). CIRA
provides the mechanism to support scheduling coordinators (SCs) to perform
substitutions on RA and CPM resources for both POSO assigned planned outages and
approved forced outages, with any resource that has eligible non RA capacity for the
substitution period.

CIRA also supports bilateral trades of import capability between SCs within a branch
group. SCs can view import allocation data and submit bilateral trades.

Through CIRA, SCs can submit NQC requests, view NQC reports, and download the
NQC templates previously submitted.

SCs can also create, submit, and view Competitive Solicitation Process (CSP) offers.

LSEs can check their monthly and annual Generic and Flex obligation in CIRA. LSEs
and SCs can also view details of the RA submitted for their resources for a compliance
month or a shorter duration.

The CIRA application will be accessible via the Market Participant Portal by clicking the

CIRA icon.     New users should request access to CIRA by submitting an Application
Access Request Form (AARF) to the ISO help desk at HelpDesk@caiso.com.

                                                                                    Page 6
ISO Public
2 Roles and Access Levels
CIRA Access and Permissions
CIRA Access Levels Access Level Description
EXTERNAL RA READ ONLY Permission to read the RA Plans, Supply Plans, NQC,
(app_cira_ro) Import Allocations, Validation Results, RA Reports,
Obligation Reports, Review Forced Substitution, and
historic Replacements
EXTERNAL RA READ- Permission to read, upload, and maintain data in the RA
WRITE Plans, Supply Plans, NQC, Import Allocations, and
(app_cira_sc) Forced Substitution. Permission to read Validation
Results, RA Reports, Obligation Reports, and historic
Replacements
EXTERNAL OFFER READ- Permission to read CSP offers data
ONLY
(app_cira_bid_read_ext)
EXTERNAL 0FFER READ- Permission to submit CSP offers and maintain data
WRITE
(app_cira_bid_write_ext)
CALIFORNIA ENERGY Permission to upload and view peak demand obligation
COMMISSION
(app_cira_cec)
EXTERNAL SUPPLIER Permission to read Outage Analysis reports, Planned
READ Outage Substitution Obligation (POSO) assignments,
(app_cira_supplier_read_ext) and review Planned Substitution
EXTERNAL SUPPLIER Permission to read Outage Analysis Reports, Planned
WRITE Outage Substitution Obligation (POSO) assignments,
(app_cira_supplier_write_ext) create and maintain Planned Substitution
EXTERNAL LRA READ- Permission to read Peak Demand, LCR by TAC and Flex
ONLY credits, Generic and Flex Obligations
(app_cira_lra_read_ext)
EXTERNAL LRA WRITE Permission to read Peak Demand, LCR by TAC and Flex
(app_cira_lra_write_ext) credits, Generic and Flex Obligations (at this time the
upload functionality for the LRA write role is disabled)
3 Plans
3.1 RA Showings
The ISO Resource Adequacy is made up of three criteria:
Page 7
ISO Public• The Local Capacity Requirements (LCR)
• The Peak Demand and Reserve Margin Requirements
• Flexible RA Capacity Requirements
The LCR is an annual number that is used for each month. The Peak Demand and
Reserve Margin Requirement varies monthly and is applicable to the ISO Balancing
Authority Area (BAA). The Flexible RA Capacity Requirement also varies by month.
These three requirements are the base of the Resource Adequacy program. There are
two categories of market participants that meet these requirements:
• Load (Resource Adequacy Plan)
• Generation (Supply Plan)
3.2 Resource Adequacy (RA) Plans
RA Plans identify the specific resources that the Load Serving Entity (LSE) is relying on
to satisfy its forecasted monthly Peak Demand and Reserve Margin for the relevant
reporting period. For Load Serving Entity, the Resource Adequacy Plans must be
submitted pursuant to the schedule set forth in Exhibit A-2 of the Reliability Requirements
BPM.
3.3 Supply Plans
Supply Plans are an integral element in the resource adequacy process as they represent
the primary means of informing ISO of the capacity that is designated for the resource
adequacy purposes for a specified month or year. Supply Plans are essentially a
verification and confirmation by Scheduling Coordinators for Resource Adequacy
Capacity of the information contained in Resource Adequacy Plans submitted by
Scheduling Coordinators for LSEs. The Supply Plan confirms that a Scheduling
Coordinator is committed to scheduling and/or Bidding the Resource Adequacy Capacity
that has been reported to ISO. The Supply Plan establishes the formal business
commitment between the ISO and Resource Adequacy Resources by confirming the
status of the resource as Resource Adequacy resource. For suppliers, the Resource
Adequacy Plans must be submitted pursuant to the schedule set forth in Exhibit A-2 of
the Reliability Requirements BPM.
3.4 Templates
3.4.1 RA Plan Template
There are two ways to access the RA Plan template:
Page 8
ISO Public1. Link to the RA Template posted on ISO website:
http://www.caiso.com/Documents/ResourceAdequacyPlanTemplate.xls.
2. Use CIRA to download the template: https://portal.caiso.com/cira/.
Steps:
1. Navigate to Plans.
2. Select RA Plan.
3. Select Template to download the RA template.
1.1.1.1 Fill out RA Template
Complete these worksheets in the RA template:
Admin Info
The ISO uses a single template to collect its Annual and Monthly RA submissions. Data
for all months is populated in this template for the annual RA submissions. On the Admin
Info worksheet, after clicking the Report Type field, select Annual for annual plans and
Monthly for monthly plans. Fill in the other fields with the required information.
All fields are required. Under the Admin Info tab complete the following fields:
• Report Type
o From the drop down menu, select Annual for annual plans or Monthly for
monthly plans.
• Report Date
o For monthly submissions, the Report Date must be the first date of the
month for which the plan is being submitted (e.g., “01/01/2016” for January,
Page 9
ISO Public“02/01/2016” for February). For annual submissions, the Report Date must
be the first date of the year for which the plan is being submitted (e.g.,
“01/01/2016” for 2016).
• Name of the Load Serving Entity (LSE)
o Enter a valid LSE name
• Scheduling Coordinator (SCID)
o Enter a valid SCID for the LSE
• Person who prepared this RA Plan (Name)
• Title
o Title of the person who prepared this RA Plan
• Primary Contact
o Name, title, address, telephone number, and e-mail address of the primary
contact person
• Back-Up Contact information
o Name, title, telephone number, and email address of the back-up contact
person
Page 10
ISO PublicRA Capacity
On the RA Capacity worksheet, complete the following required fields:
• Resource ID in ISO Master File.
• Local RA Capacity (MW 00.00 No Rounding).
• System RA Capacity (MW 00.00 No Rounding)
• Flexible RA Capacity (MW 00.00 No Rounding)
• Flex Category
• RA Capacity Effective Start Date (mm/dd/yyyy)
• RA Capacity Effective End Date (mm/dd/yyyy)
Page 11
ISO PublicUsage Tips:
• Users can submit generic RA (local and system) and Flex RA for a resource for
the compliance month in a single row.
• The effective start and end dates are in a date format. Any time component
provided here will be ignored.
• RA for ITIEs and TGs can be a subset of days within the compliance month but
take care to sync up the date range between the RA and Supply plans so it
passes system validation. For better performance and faster validation, users
can provide a date range for the RA rather than a record for each day with RA in
the compliance month.
Other
On the Other worksheet, complete the following required fields:
• Resource ID (if applicable)
• RA Capacity (MW 00.00 No Rounding)
• RA Capacity Effective Start Date (mm/dd/yyyy)
• RA Capacity Effective End Date (mm/dd/yyyy)
• Capacity Designation (UC, LD, CM, RM, or DR)
• TAC Area (SCE, PGE, SDG, VEA, or SYS)
Usage Tip:
• If the Credit value in column C is non-zero then a valid date range, the credit type
and TAC must be provided.
3.4.2 Supply Plan Template
Page 12
ISO PublicThere are two ways to access the supply template:
• Link to the Supply Plan template posted on the ISO website.
• Use CIRA to download the template.
Steps:
1. Navigate to Plans.
2. Select Supply Plan.
3. Select Template to download the Supply Plan Template.
3.4.2.1 Fill out Supply Plan Template
Complete these worksheets in the template:
Admin Info
The ISO uses a single template to collect its annual and monthly supply showings.
Fill in all fields with the required information.
• Report Type
o Select Monthly from the drop down menu for monthly submissions
and Annual for annual submissions.
• Report Date
o For monthly submissions, the Report Date must be the first date of the
month for which the plan is being submitted (e.g., “01/01/2017” for
January and “02/01/2017” for February). For annual submissions, the
Report Date must be the first date of the year for which the plan is being
submitted (e.g., “01/01/2017” for 2017).
• Name of Supplier
o Enter a valid supplier name
Page 13
ISO Public• Scheduling Coordinator
o Enter a valid SCID for the supplier
• Person who prepared this Supply Plan (Name)
o Name of the person who prepared the plan
• Title
o Title of the person who prepared the plan
• Primary Contact
o Name, title, address, telephone number, and e-mail address of the primary
contact person
• Back-Up Contact
o Name, title, telephone number, and e-mail address of the back-up contact
person
RA Capacity
On the RA Capacity worksheet, complete the following required fields:
• Resource ID in ISO Master File
• Local RA Capacity (MW 00.00 No Rounding)
Page 14
ISO Public• System RA Capacity (MW 00.00 No Rounding)
• Flexible RA Capacity (MW 00.00 No Rounding
• Flexible Category 1, 2, 3
• RA Capacity Effective Start Date (mm/dd/yyyy)
• RA Capacity Effective End Date (mm/dd/yyyy)
• RA Capacity Effective End Date (mm/dd/yyyy)
• SCID of Load Serving Entity
Usage Tips:
• Users can submit generic RA (local and system) and Flex RA for a resource for
the compliance month in a single row.
• The effective start and end dates are in a date format. Any time component
provided here will be ignored.
• RA for ITIEs and TGs can be a subset of days within the compliance month but
take care to sync up the date range between the RA and Supply plans so it passes
system validation. For better performance and faster validation, users can provide
a date range for the RA rather than a record for each day with RA in the compliance
month.
Page 15
ISO Public3.5 Sequence of Events at a High Level
LSEs/Suppliers submit monthly RA/Supply Plans prior to the last day of the showings due
date for the compliance month. The Showings Due Date is set to 45 days prior to the
start of the compliance month for monthly RA, thereby requiring LSEs and SCs to submit
their plans 45 days prior to the start of the compliance month. The due date is the last
business day of October for the annual RA process. All plans must be submitted through
CIRA.
On upload, the application will check for valid resource IDs, NQC, dates, information on
the Admin tab, Other tab, PMAX, RA MWs, Peak Demand and LCR by TAC, and check
the Flexible Category. If a plan passes validation on upload, the application will accept
the plan and the status is set to validation in progress. LSEs and SCs should check the
validation results to ensure that there are no errors. In case of an error, resubmission is
required by the cure period cut-off at 30 days prior to the start of the compliance month.
If the LSE or supplier misses the deadline, SCs can still submit after the deadline and
CIRA issues a warning. ISO will track these late submissions and SCs can resubmit the
plan regardless of the plan status. Additional information regarding late submission is in
the Reliability Requirements BPM.
Page 16
ISO PublicCSP offers by suppliers are due 40 days before the start of the compliance month. Once
the CSP offers are submitted, the SCs can adjust their offers until 30 days prior to the
start of the compliance month. Refer to the CSP calendar for details.
At the end of the cure period, the ISO will validate all plans, finalize the RA capacity values
for the compliance month and may issue a Capacity Procurement Mechanism (CPM)
event starting 25 days before the start of the compliance month, if required.
After the submittal deadline at 45 days prior to the start of the compliance month, the ISO
will run Flex cross validation. If there are any errors for the Supplier or LSE, or a flex RA
deficiency for the LSE, then the corresponding plan is set to Resubmittal Required and
the LSEs/Suppliers can log in to CIRA to view all errors/ deficiencies. LSEs may choose
to procure additional flexible RA capacity to cure Flex RA deficiencies. At the end of the
cure period 30 days prior to the compliance month, the ISO will validate all plans and will
finalize the flex RA capacity values for the compliance month by T-7 and may issue a Flex
CPM, if required.
3.6 Submission of RA Plans
Market participants must use the CIRA application to submit RA Plans for the resource
adequacy monthly or annual process. All plans are due by T-45 for the corresponding
compliance month or prior to the last business day of October for the annual process.
Steps:
1. Navigate to Plans.
2. Select RA Plan.
3. Select Upload to display the Upload screen.
4. Select the Submittal Type as Monthly for monthly and Annual for the annual
process.
5. Select the Target Period Month (for monthly only) and Year.
6. Select the LSE SCID.
7. Click Browse… to locate the RA Plan to be uploaded.
8. Add Comments, if needed, to explain a late submission or other details about
the submission.
9. Click Upload to submit the RA Plan.
Page 17
ISO Public3.6.1 Errors on Upload of RA Plan
Below is a list explaining error messages.
RA Capacity Tab
1. Two entries with the same resource ID, RA type, start and end dates will result
in duplicate rows.
2. Resource ID used must be valid ISO master file resource ID.
3. Start and end date for RA Capacity for a physical resource should be the first
and last day of the month.
a. Example for physical resource– 04/01/2018 to 04/30/2018
4. ITIE and TGs can be a subset of days.
a. Example for ITIE – 04/20/2018 to 04/23/2018
5. RA MW cannot be blank, cannot be zero, and must not exceed two decimal
places.
a. Blank is not allowed.
Page 18
ISO Publicb. 0 MW is not allowed.
c. 0.99999999 (more than two decimal places) is not allowed.
6. If the user selects annual, then the start and end dates must be for the
compliance year 2019.
7. Only a local resource within the ISO BAA can have a local showing.
8. When Flexible RA is a positive number, the Flexible Category must be a valid
number.
Other Tab
1. The start date for RA Capacity in the Other tab should be the first day of the
month and LD.
2. The end date for RA Capacity in the Other tab should be the last day of the
month and LD.
3. Designation in the Other tab cannot be blank. Every entry must have one of
the following: RMR, CAM, DR, or LD.
4. TAC in the Other tab cannot be blank. Every entry must have one of the
following: PGE, SCE, SDG, VEA, or SYS.
3.7 Submission of Supply Plans
Market participants must use CIRA to submit Supply Plans for the resource adequacy
monthly and annual processes. All plans are due by T-45 for the corresponding
compliance month for the monthly process and by T-61 for the annual process.
Steps to submit a Supply Plan:
1. Navigate to Plans.
2. Select Supply Plan.
3. Select Upload to display the Upload screen.
4. Select the Submittal Type as Monthly (for monthly) and Annual (for annual)
5. Select the Target Period Month (for monthly) and Year.
6. Select the SCID.
7. Click Browse… to locate the Supply Plan to be uploaded.
8. Add Comments, if needed, to explain a late submission or other details about
the submission.
9. Click Upload to submit the Supply Plan.
Page 19
ISO Public3.7.1 Errors on Upload of Supply Plan
Below is a list explaining error messages.
RA Capacity Tab
1. Two entries with the same resource ID, RA type, start, and end dates will result
in duplicate rows.
2. Resource ID used must be a valid ISO master file resource ID.
3. The start and end date for RA Capacity for a physical resource should be the
first and last day of the month.
a. Example for a physical resource– 04/01/2018 to 04/30/2018
4. ITIE and TGs can be a subset of days.
a. Example for ITIE – 04/20/2018 to 04/23/2018
Page 20
ISO Public5. The RA MW cannot be blank, cannot be zero, and must not exceed two decimal
places.
a. Blank is not allowed.
b. 0 MW is not allowed.
c. 0.99999999 (more than two decimal places) is not allowed.
6. If user selects Annual, then the start and end dates must be for the compliance
year 2019.
7. Only a local resource within the ISO BAA can have a local showing.
8. When Flexible RA is a positive number, the Flexible Category must be a valid
number.
9. The sum of Generic RA across all LSEs for a resource should not exceed its
NQC/ PMax.
10. The sum of Flex RA across all LSEs for a resource should not exceed its
EFC.
11. For ITIEs and TGs, the sum of Generic RA across all LSEs should not exceed
the import allocation of the Branch Group.
3.8 Download Plans
3.8.1 Download RA Plan
3.8.1.1 Download Submitted Plans
Steps to download the RA Plan:
1. Navigate to Plans.
2. Select RA Plan.
3. Select Download to display the download screen.
Page 21
ISO Public4. Select the Month Ahead or Year Ahead Submittal type.
5. Select the Target Period Month and Year.
6. Select the LSE SCID.
7. Select Version.
a. User can select Latest version submitted to ISO.
b. User can select Initial version submitted to ISO.
c. User can select All versions submitted to ISO.
8. Select Display Plans: Submitted, Missing, or Late.
9. Click View to view RA Plans.
10. Select Download Screen Results or Download All Results.
On the grid, the user will see the LSE SCID and Submittal Type. The Plan Month will
show the month number in the Month Ahead view and the default is ‘01’ for Plan Month
in Year Ahead view. The submission Id indicates the order of submission, with the
highest submission Id being the most recent plan. The Submission Date indicates when
the plan was submitted.
1. Status:
a. Resubmittal required
i. Error or deficiency associated with the plan and requires
resubmission
b. Validation in progress
i. ISO working on validating the plan
c. Closed
i. The plan passed all validations and is considered final
2. Actions:
a. Show details:
i. Click Show Details on the left side of the Actions column to display
the plan details for the RA Plan submittal.
1. Download Show Type: Drop down can be used to view
a. RA resources
b. Credit resources
c. Flex RA resources
2. Click View to see the results.
3. Export to Excel, CSV, or PDF format.
b. Download file:
i. Click Download File on the right side of the Actions column to
download and save the Excel file.
3. Comments:
Page 22
ISO Publica. Comments that are added to the Upload form are displayed here.
3.8.1.1.1 RA Resources
This is to view the RA Resources Tab of the RA Plan. In keeping with the template
changes, there are new columns for the Local and System RA capacity.
When the user clicks View, the default view is the ‘RA Resource’ details as shown
below.
Page 23
ISO Public3.8.1.1.2 Credit Resources
This is to view the Other tab of the RA Plan. When the user chooses the Credit
Resources view, the screen displayed is as below:
3.8.1.1.3 Flex RA Resources
This is to view Flexible RA Capacity tab of the RA Plan. When the user chooses the
Flex RA Resources view, the screen displayed is as below:
3.8.1.2 Download Missing/ Late RA Plans
LSEs and ISO users can track missing and late plan submissions for compliance assessment of
RA Plans. Comments that the SC had provided with the RA plan upload related to the late
submission are displayed on the Download RA Plan landing page.
Page 24
ISO Public3.8.2 Download Supply Plans
Steps to download the Supply Plan:
1. Navigate to Plans.
2. Select Supply Plan.
3. Select Download to display the download screen.
4. Select the Monthly or Annual Submittal type.
5. Select the Target Month and Year.
6. Select the SCID.
7. Select version:
a. User can select latest version submitted to ISO.
b. User can select initial version submitted to ISO.
c. User can select all versions submitted to ISO.
8. Select option for timeline with plan submission:
a. User can select all plans that were ‘Submitted’
b. User can select all plans that were submitted but were ‘Late’
9. Click View to view Supply Plans.
Page 25
ISO Public3.8.2.1 Download Submitted Supply Plans
Once the submitted Supply Plans are displayed:
1. On the grid, the user will see SC ID, submittal type, plan month, plan year, and
submission ID – indicates the order of submission with the highest submission ID
being the most recent plan.
2. Status
a. Resubmittal required
i. Error associated with the plan and requires resubmission
b. Validation in progress
i. ISO is working on validating the plan
c. Closed
i. The plan passed all validations and is considered final
3. Actions
a. Show details :
i. Will display the plan details for the RA Plan submittal
1. Download Show Type: Drop down can be used to view.
a. Supply Plan Resources: This is to view the
Resources tab of the Supply Plan.
b. Flex RA Resources: This is to view Flexible RA
Capacity tab of the RA Plan.
2. Click View to see the results.
3. Export to Excel, CSV, or PDF format.
Page 26
ISO Public3.8.2.2 Late Supply Plans
Supplier and ISO users can track late submissions for compliance assessment of Supply
Plans. On the Download Supply Plans screen select the Late Plans option and click View
to the see the late plans.
Comments that SC had provided with the RA plan upload related to the late submission
are displayed on the Download RA landing page.
3.9 Manage Import Allocation
To access the Manage Import Allocation tab:
1. Navigate to Plans.
2. Select Manage Import Allocation.
3. Select from the dropdown menu:
a. View SC Import Allocation
b. Submit Bilateral Trades
c. View Bilateral Trades
Page 27
ISO Public3.9.1 View SC Import Allocation
To view the base SC import allocations:
1. Select the SCID.
2. Select the Import Group.
3. Select the Target Period Year.
Once the data is displayed:
On the grid, the user will see the SCID, SCID Name, Group Name, Import Allocation,
Group Type, Start Date, and End Date.
Page 28
ISO PublicTo view screen results:
1. Check the box Download Screen Results.
2. Select CSV, Excel, or PDF.
3.9.2 Submit Bilateral Trades
1. Navigate to Submit Bilateral Trades.
a. Select from the dropdown menu under Manage Import Allocation.
2. After the screen has been loaded:
b. Select the Transferor SC.
c. Select the Transferee SC.
d. Select the Import Group.
e. Enter the Price $/kw Month.
f. Select the Term period.
Page 29
ISO PublicNote: The Term start date must be the first day of the next or future
month. The Term end date must be the last day of the next or future
month. The current month cannot be selected.
g. Enter the Quantity.
h. Select Submit Transfer or View Current Allocation.
An SC can only submit a trade. If the SC wants to reject a trade, the SC must submit a
CIDI ticket requesting that the ISO reject the trade.
Page 30
ISO Public3.9.3 View Bilateral Trades
To view bilateral trades:
1. Navigate to View Bilateral Trades.
2. After the screen has been loaded:
a. Select Transferor.
b. Select Transferee.
c. Select the Import Group.
d. Select the Start Date.
e. Select the End Date.
f. Click View to display the results.
Page 31
ISO Public3.10 Net Qualifying Capacity (NQC)
The NQC tab has a dropdown menu with three functions. The three functions of the
NQC tab are Upload/Download, Approve/Reject NQC, and access the NQC Report.
To access this dropdown menu:
1. Navigate to Plans.
2. Select NQC from the dropdown menu.
Page 32
ISO Public3.10.1 Upload/Download NQC Request Form
1. Select Upload/Download from drop down menu.
2. Select SCID.
3. Provide an upload file for the NQC Request Form.
Note: If a resource does not have a queue number, the SC must provide
“NA” in the field.
The NQC template is used for NQC requests.
Under the Admin Info tab, complete the following template fields:
1. Enter Name of the Entity.
2. Enter a valid SCID.
3. Enter the person who prepared this NQC Request (Name) and Title.
4. Enter primary contact information such as name, title, address, valid telephone
number, and valid e-mail address.
5. Enter back-up contact information: Name, Title, Telephone, and E-mail.
Page 33
ISO PublicNQC Request
Fill in all columns with the required information:
1. Enter the Effective Date (mm/dd/yyyy).
2. Enter the Resource ID - present in Master File (required) must be a valid
resource ID and must be associated to the SCID in the ISO Master File
3. Enter the correct queue #/WDAT#. If the queue # is not known, then enter “NA”.
The ISO will assign the queue.
4. Enter the Local Regulatory Authority.
5. Answer Yes(Y) or No (N) to Historical Based NQC Calculation.
• If the answer to Historical Based is “Yes”, it is used to calculate the NQC
and ISO must work with the local regulated authority to wire the NQC
numbers.
6. The effective date must be the first business day of a month.
When the screen has loaded:
1. Select View to view the results.
2. Click Show to view details.
3. Click Download to download details.
Page 34
ISO Public3.10.2 Approve/Reject NQC
To view approved or rejected NQC request details, navigate from the Plans tab to
Approve/Reject NQC.
Filter results by Status, LRA, SCID, Resource ID, Fuel Type, Area and Queue/WDAT#.
Click View for results and Reset to return to the previous screen.
Note: Data in the Approve/Reject NQC tab is View Only for market
participants. The ISO approves and rejects NQC requests.
Page 35
ISO Public3.10.3 NQC Comments
To post comments during the Annual NQC Draft listing, navigate from the Plans tab to
Approve/Reject NQC.
Users have the ability to comment in the far right Comments column to suggest
changes to the NQC list. Be sure to click the Save button after posting comments.
3.10.4 NQC Report
To view the NQC Report:
Navigate from the Plans tab to NQC Report.
Page 36
ISO PublicThis report will show the resource ID, the area, the generator name, and the results
data by month. Click Download to download the results.
Note: Once the ISO has processed the request, the SC will receive an
e-mail notification stating the request has been processed.
4 RA Validation
Validation runs are scheduled jobs that run in the system at set times during the day.
The Cross Validation will run at 8AM, 12PM, 2PM between 44 days and 30 days prior to
the compliance month. The Outage Impact Analysis for Planned Outages and POSO
assignment runs at 3AM, 8AM, 10AM, 12PM, and 2PM (Pacific) between 25 days prior
to the start of the compliance month through the end of the compliance month.
If a new plan is submitted, it will get picked up the next time the cross validation runs.
Likewise, if a new outage is submitted, it will be taken into account the next time the
outage impact analysis job runs for that outage type.
Steps:
Page 37
ISO Public1. Navigate to RA Validation.
2. Select View Results to display the list of screens that are available to the
user.
After the screen has been loaded:
3. Select Submittal Type as Month Ahead/ Year Ahead.
4. Select the Target period Month (for monthly submittal type only) and Year.
5. Select the Validation Type:
a. CV – visible to LSEs and Suppliers
b. Flex_CV – visible to LSEs and Suppliers
c. OIA – visible to Suppliers only
d. POSO – visible to Suppliers only
6. Click View to display the results .
4.1 Cross Validation (CV) Runs
Cross validation (CV) runs validate RA and Supply Plans for deficiencies and
discrepancies.
Details shown on the grid are the Cross Validation Run Number, Validation Type (CV in
this case), Submittal Type (M for Monthly), Plan Month, Plan Year, Plans Effective as of
date, Run Start Date, Created By, and View Details. The View Details column displays
one button for viewing input and one for viewing results.
There details of the cross-validation are presented in 3 views:
1. Supply Plans
2. RA Plans
3. LSE Obligations
4.1.1 Cross Validation Supply Plan Details
Page 38
ISO PublicOn this screen, user can view cross validation results errors and warnings associated to
the Supply Plan. The screen can be filtered on:
1. SCID – an optional filter on the SCID is available
2. Resource ID – details can be filtered for a specific resource ID
Details presented are:
1. Validation Status: On completion of a cross validation run, the application will
set the plan status to Re-submittal Required if the plan has errors. The SC
needs to resubmit the plan to correct errors.
2. Supplier: The SC ID of the resource
3. Resource ID
4. Local RA Capacity: MW in the Local RA column of the supply plan for the
resource
5. System RA Capacity: MW in the System RA column of the supply plan for the
resource
6. Supplier’s Total RA Capacity (MW): Sum of the Local and System RA columns
7. Effective Start Date: Start date from the Supply Plan
8. Effective End Date: End date from the Supply Plan
9. SC ID of the LSE: LSE ID from the Supply Plan
10. Errors and Warnings:
a. Passed records will have no value in this column.
b. Warnings will have a message stating system level checks and overrides
that were applied.
c. Errors will have a message prompting corrective action that is needed by
the SC.
Note: Note: Resources will now be cross referenced against
corresponding RA plan for Local and System RA Capacity listings.
Resource, RA Type, Start and End Dates must match exactly for
associated Supply and RA Plans.
Page 39
ISO Public4.1.2 Cross Validation RA Details
On this screen, the user can view cross validation results, errors, and warnings
associated to the RA Plan. The screen can be filtered on:
1. LSE: An optional filter on the ID is available.
2. Resource ID: Details can be filtered for a specific resource ID.
If there are errors resulting from cross validation, then the SC has to fix the error on the
RA Plan or the Supply Plan by resubmitting a correct plan else ISO will default to Supply
Plan data.
Details presented are:
1. Validation Status: On completion of a cross validation run, the application will
set the plan status to Resubmittal Required if the plan has errors and LSE
needs to resubmit the plan to correct errors.
2. LSE: LSE ID from the RA Plan
3. Resource ID
4. Local RA Capacity: MW in the Local RA column of the RA plan for the resource
5. System RA Capacity: MW in the System RA column of the RA plan for the
resource
6. LSE’s Total RA Capacity (MW): Sum of the Local and System RA columns
7. Effective Start Date: Start date from the RA Plan
8. Effective End Date: End date from the RA Plan
9. Errors and Warnings:
a. Passed records will have no value in this column.
b. Warnings will have a message stating system level checks and overrides
that were applied.
c. Errors will have a message prompting corrective action that is needed by
the SC.
4.1.3 Cross Validation LSE Obligations Details
Page 40
ISO PublicOn this screen user can view cross validation results warnings associated to RA Plans.
This screen notifies the LSE the RA capacity shortage in a TAC area. The screen can be
filtered on:
1. LSE – an optional filter on the ID is available
2. Type –
a. Peak Demand
b. LCR by TAC
c. Listed Local
Details from this screen are:
1. Validation Status
a. Warning: If the cross validation run has LCR by TAC warnings or Peak
demand and reserve margin warnings, then it is up to the LSE to cure the
deficiency by resubmitting a revised RA Plan else ISO may enforce Tariff
Section 43 – CPM.
b. Passed
2. LSE: LSE ID
3. Effective Start Date: Start of the compliance month
4. Effective End Date: End of the compliance month
5. Validation Type
a. LCR by TAC
b. Peak Demand
c. Listed Local
6. Obligation MW
7. Plan RA MW: RA that has passed cross validation
8. Short/ Long MW: The absolute difference between RA and Obligation MW
9. Obligation Status: Status is Short when RA is less than the Obligation MW
else it is Long
10. TAC: Populated for LCR by TAC and Listed Local checks
4.2 Flex Cross Validation Runs
From the RA Validation > View Results page, select:
1. Submittal type
2. Month: For monthly showing
Page 41
ISO Public3. Year
4. Validation type: Select Flex CV. This is an optional filter.
Click View to see the Flex CV runs, then click Results.
Detail Type: Select from one of 2 options:
1. Flex Supply Plans: Default view
2. Flex RA Plans
4.2.1 Flex Cross Validation Supply Details
On this screen, the user can view flex cross validation results, errors, and warnings
associated to the Flex Supply Plan. The screen can be filtered:
1. Resource ID: Details can be filtered for a specific resource ID.
2. SCID: An optional filter on the SCID is available.
Details from this screen are:
1. Validation Status: Warning / Passed / Error
2. Supplier: SC ID
3. Resource ID
4. Category: Flex Category
5. Flex Capacity (MW): Flex MW from the Supply Plan
6. Effective Start Date: Start date from the Supply Plan
7. Effective End Date: End date from the Supply Plan
8. LSE: LSE ID in the Supply Plan
9. Errors and Warnings:
a. Passed records will have no value in this column
b. Warnings will have a message stating system level checks and overrides
that were applied
Page 42
ISO Publicc. Errors will have a message prompting corrective action that is needed by
the SC
4.2.2 Flex Cross Validation RA Details
On this screen, the user can view flex cross validation results, errors, and warnings
associated to the Flex RA Plan. The screen can be filtered:
1. Resource ID: Details can be filtered for a specific resource ID.
2. LSE: An optional filter on the LSE is available.
Details from this screen are:
1. Validation Status: Warning / Passed / Error
2. LSE: LSE ID from the RA Plan
3. Resource ID
4. Category: Flex Category
5. Flex Capacity (MW): Flex MW from the RA Plan
6. Effective Start Date: Start date from the RA Plan
7. Effective End Date: End date from the RA Plan
8. Errors and Warnings
d. Passed records will have no value in this column.
e. Warnings will have a message stating system level checks and overrides
that were applied.
f. Errors will have a message prompting corrective action that is needed by
the LSE. On completion of a flex cross validation run, the application will
set the plan status to Resubmittal Required if the plan has errors and LSE
can resubmit the RA plan to correct errors.
If errors result from flex cross validation, then the SC has to fix the error on the RA Plan
or the Supply Plan by resubmitting a correct plan else ISO will default to Supply Plan data.
If the cross validation run has Flex Analysis warnings, then it is up to the LSE to cure the
deficiency by resubmitting a revised RA Plan.
4.3 Outage Impact Analysis (OIA)
Page 43
ISO PublicA supplier can see the impact of planned and/or forced outages by selecting the OIA
validation type and clicking the details as shown below. The Outage Type field on this
view indicates the types of outages for which the analysis was done.
Outage Analysis calculates:
a. Outage Impact on the compliance month RA
b. Operational RA for Planned Outages, Forced Outages, and Planned and Forced
Outages.
Outage Impact Analysis will consider outage in status other than Received, Cancelled,
and Disapproved.
The user can pick from the two reports by selecting from the Detail drop-down menu as
shown below.
4.3.1 MW Impact by Outage
The intent of this report is to provide the impact to the compliance month RA due to the
outage. If the analysis is run on planned outages then only the planned outages are
considered. Likewise, the analysis can be run for only forced outages or both planned
and forced outages.
Example: Resource A has a PMax of 100 MW and has committed RA for 70 MW. The
resource has a planned outage O1, with curtailment for 50 MW. The resource has an
availability of 100-50 = 50 MW. The impact due to O1 is 70-50 = 20 MW.
It is important to note that the Planned Outage Substitution Obligation which will be
further detail in the next section, only considers Planned outages.
This screen can be filtered on:
1. Resource ID
2. Outage ID
3. Start Date: Start date within the compliance month for which this analysis was
run
4. End Date: End date within the compliance month for which this analysis was run
Click View to see the results.
Page 44
ISO PublicDetails presented on the screen are:
1. Run ID: Internal system ID that uniquely identifies the OIA run
2. Resource ID
3. Impact MW: Impact to RA MW due to the outage
4. Short/ Long: If impact is positive then the status is Short else Long
5. Start Date: Start date of the outage
6. End Date: End date of the outage
If the outage spans multiple days, there is a row for each day
7. Outage ID: One or more of the outages that the resource is on
8. Outage Status: Status of the outage when the outage impact analysis was run
9. Priority TS: Priority timestamp pertaining to the outage. This continues to follow
the rules that when the curtailment increases, outage worsens the priority
changes becomes more recent.
4.3.2 Operational RA
This report shows the Operational RA for each day of the compliance month. RA can be
from Plan showings (after successful validation), Substitution or CPM.
The report can be filtered on:
1. Supplier ID
2. Resource ID
The report will show results if the resource has RA for even one day in the compliance
month. The RA data is at a daily granularity.
Click View to see the results.
4.4 Planned Outage Substitution Obligation (POSO)
No later than 22 days before the start of the RA month, the ISO will assign a POSO for
RA resources on Planned Outages.
Page 45
ISO PublicThe Planned Outage Substitution Obligation (POSO) results will be displayed when the
Outage Impact Analysis (OIA) is run for planned outages and there is an impact due to
planned outages in the month is greater than zero.
The initial POSO run is highlighted in green as shown below. The initial POSO will be
available in all subsequent runs for that compliance month and this assignment will not
change.
Any updates to outages and new Planned Outages will be considered for subsequent
POSO runs as validation runs 5 times a day. If curtailment or duration of an outage
worsens then the POSO assignment may also change.
POSO assigns the obligation by stacking outages in last in first out order (LIFO) based
on the Outage submission date.
All Planned Outages irrespective of nature of work are considered for analysis. Only off
peak outages are treated differently.
There is no automatic notification on an assignment of POSO. The SC for the resource
is responsible to track POSO assignments in CIRA and provide RA substitution (via the
Planned Substitution screens) accordingly.
Click View Details to see the details of the run.
Once the screen loads, click View to see the results.
Details on the POSO results are as follows:
1. Trade date
2. Initial POSO MW
3. Latest POSO MW
Page 46
ISO PublicView Options:
1. To see which resources have been assigned POSO for a specific trade date,
click any of the columns, Date, Initial POSO, or Latest POSO, to see the
POSO assignment and outage details.
2. To collapse the grid and return to the summary information, either click again
on the left columns or reload the page by clicking View.
Download Options:
1. To view only the outages belonging to the supplier’s resources that have
been assigned POSO, a user can either view the details or download screen
results.
2. To view all the outages belonging to the supplier’s resources that were
considered for the POSO analysis, a user can click Download POSO
Analysis Details. Details presented are as follows:
a. Date: Trade date
b. Initial POSO MW
c. Latest POSO MW
d. Supplier: ID
e. Resource ID
f. Outage ID
g. POSO MW: POSO MW will amount to the Impact MW
h. Nature of Work: Pertaining to the specific outage
i. Opportunity: The opportunity flag pertaining to the outage
j. Priority Date: Of the outage
k. POSO Assigned: This is a flag to indicate if POSO was assigned or not
5 Substitutions
The Substitutions tab provides substitution information for the user. The Substitutions
drop-down menu allows the user to select from the following: Forced, Planned, and
Outage Exemptions.
Page 47
ISO PublicUse the matrix below as a guide to determine which screen to navigate to for providing
substitution:
Outage
RA Type Source of RA Type Substitution Screen Used
Generic Plan, CPM, Planned Substitution, if POSO is
RA Substitution Planned assigned
Generic Plan, CPM,
RA Substitution Forced Forced Substitution
Plan, CPM,
Flex RA Substitution Planned Forced Substitution
Plan, CPM,
Flex RA Substitution Forced Forced Substitution
5.1 Forced
This tab involves substitutions in the Forced timeframe and consists of: Create,
Review, Release, and Compatible Resources.
5.1.1 Create
The screen is used to create substitution for forced outages. The user can use one or
more of the following fields to find the resource requiring substitution:
1. Trade Month
2. Trade Year
Page 48
ISO Public3. Outage ID
4. Outage Type: Values are ALL, Forced, and Planned (for Flex)
5. Resource ID
6. Supplier SC
7. Substitution Required: This field is driven based on the exemption rules, esp. the
NOW. It is not tied checking if the resource has RA for the compliance month.
Click Show Outages to see the list of outages.
A screen, similar to the one seen below, will appear by clicking Show Outages. Here
the user can see if substitution is required on their outage.
When the user clicks Generic RA, the pop-up displayed breaks out the RA into its
components: Local, System, and CPM MW.
Once an outage selection is made a screen like the one seen below will appear. Here,
the user can review the substitution amount and the days for which substitution is
required. Substitution criteria available are as follows:
1. Resource ID: Optional, for a specific substitute resource ID
2. SC ID: Optional, for a specific SC ID to be used for substitute resources
3. Area: Optional, for a specific local area to be used
4. Resource with Non-RA capacity left: Checked by default. A substitute resource
should have non-RA capacity left in order to substitute
Page 49
ISO Public5. Compatible only: Use this flag when applicable based on the rules for substitution
6. Third party resources: By default, the system will search for resources belonging
to the same supplier as the original resource. Check this box when searching for
third party resources.
7. Physical / ITIE: Use this radio button as needed when searching for substitute
resources in keeping with substitution rules for Local versus System MW
8. Substitution Type: Values are Generic and Flex
9. Market Timeframe: Values are RT (for Real-Time) and DA (for Day-Ahead)
10. Substitution Start Date: Start date for providing substitution. The substitution start
date can be a date after the outage start date. The substitution start date will be
aligned with the Day-Ahead Market (DAM) timeframe.
Note: Users should take care to put in a start date when they have a
positive substitution to provide esp. when using a third party resource
for substitution. This is to avoid a situation wherein there is not
adequate time to approve the substitution due to a bad choice of a start
date.
11. Substitution End Date
Click Search to view substitute resources.
The user can then add resources that they would like to use as substitution and enter in
MW amount for each substituting resource. When MW outage amount has been
completely substituted for, the user can then submit their request.
It is up to the user to determine the substitution split across the local, system and CPM
MW. The system will restrict the user from submitting substitution MW to exceed the
corresponding break-up of the original resource. Example: In the screenshot below, the
original resource has Local RA of 38 MW, System RA of 7 MW and CPM of 38.09 MW.
A substitute resource cannot provide Local MW greater than 38 MW, System MW
greater than 7 MW and CPM MW greater than 38.09 MW.
Page 50
ISO Public5.1.2 Review
The user can search, update and cancel forced substitutions on this screen.
Search function:
Under this tab the user can Review forced substitutions they have already created by
searching with the below fields:
1. Substitution ID: Internal system ID for a substitution
2. Original resource ID
3. Sub Resource ID: ID of the substitute resource
4. Outage ID
5. Substitute Status: Optional search. The user can choose to search on a specific
status or leave the field blank to look at all possible status values, which are:
a. Approved
b. Pending
c. Rejected
d. Cancelled
6. Trade Month
7. Trade Year
8. Substitution Type: This is the RA type to provide either Generic or Flex
substitution
9. Supplier SC
10. DA: Check box to search for only Day-Ahead Market substitutions
11. Third Party: Check box to search for substitutions using only third-party
resources
12. RT: Check box to search for only Real-Time Market substitutions
Click Search to view results.
Page 51
ISO PublicAfter clicking Search a screen will appear showing user information based on
substitutions made.
Actions that can be performed on the Review Forced Substitution screen are:
1. Update: To make changes to a pending substitution within its market time-frame
2. Approve: To approve pending third party substitutions
3. Reject: To reject pending third party substitutions
4. Cancel: To cancel/ nullify the substitution prior to the start of the substitution.
a. A cancellation cannot be performed if the start date of the substitution is for
trade date for which the DAM has already run.
b. If there are multiple substitute resources used for a single substitution
transaction, a cancel action would cancel all the substitute resources and
transfer the RA to the original resource.
The user needs to select one or more substitute resource and then click the action that
is needed to be performed on these resources.
Note: The system provides the user the flexibility of adding multiple
substitute resources in a single substitution. Use caution with the cancel
option because a cancellation is applicable at the substitution level and
not at each substitute resource level.
Page 52
ISO PublicYou can also read