Mobile Evaporative Cooler with humidification control
←
→
Page content transcription
If your browser does not render page correctly, please read the page content below
C O O L I N G   S O L U T I O N S

                                          INDEX

                                          Safety Rules..............…1
                                          Quick Start............….…2
                                          Features........................3
                                          Maintenance.........….....4
                                          Cooler Parts........……...5
                                          Warranty.............……...6
                                          Trouble Shooting……....7

Mobile Evaporative Cooler
with humidification control
                      Use & Care Guide
                          MC26 / C262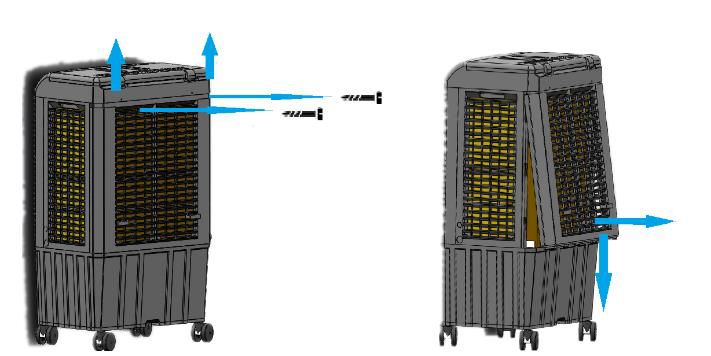
Safety
                 Safety Rules                                    Key Operational Points

1. Read and follow all instructions, cautions,          Your cooler must be positioned in front of an
and warnings. Failure to do so could result in       open window or door if it is to operate effectively.
personal injury, death or property damage.           (see below picture)

2. Unit must be in the OFF position and                 1. Always ensure that there is another open
UNPLUGGED from power receptacle before                     window or door through which the air can
performing any maintenance.                                exhaust from the room.
                                                        2. Ensure the rigid media is kept clean
3. Make sure the electrical power source                   throughout the use of your cooler.
conforms to the requirement of the evaporative          3. At the end of each day run your cooler on
cooler(s) as well as local codes.                          FAN ONLY for 30 minutes to dry out the
4. To reduce the risk of fire or electrical shock,         rigid media.
do not expose electrical connections to water.          4. Prior to putting your cooler away for
                                                           winter, always:
5. Do not touch electrically live components.                  a. Drain the tank and wipe clean.
                                                               b. Clean the rigid media.
6. Assure that all power cords do not meet any
                                                               c. Reassemble and run on FAN
sharp edges, hot surfaces or chemicals.
                                                        ONLY for 30 minutes to dry out the rigid
Immediately replace any damaged parts.
                                                        media.
7. Never leave unit unattended.
8. Continuous fill not to be used indoors or
unattended.

                                                                        Indoor Use

     CAUTION: BEFORE CLEANING OR SERVICING DISCONNECT POWER SUPPLY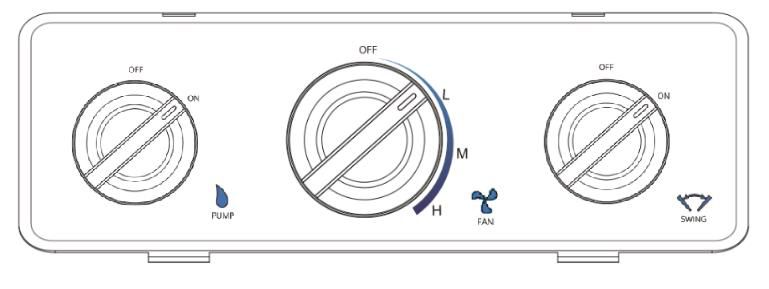
Quick Start
After unpacking your evaporative cooler, carefully inspect for any damage that may have occurred
during transit. Inspect for loose, missing or damaged parts.
Contents: Evaporative cooler (1), Hardware Bag (1), Ice pack (2)
1 Remove ice pack from cooler and place in freezer for several hours before
replacing and using in cooler.
2 Connect GFCI cord 5 Turn the cooler
to any power supply On and ENJOY
3 Install Garden
hose adapter
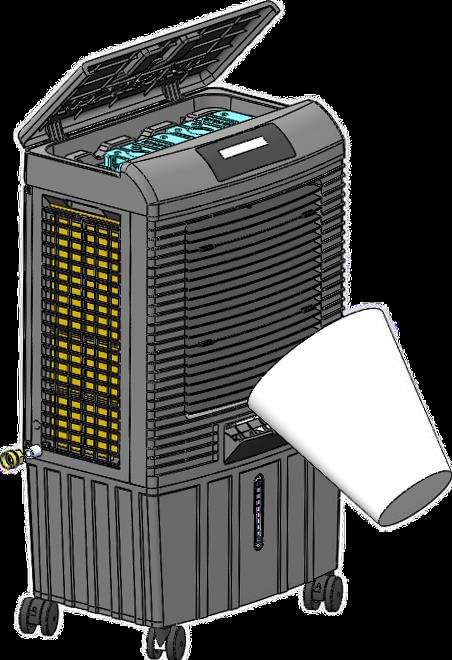
4 Fill cooler by
using bucket or hose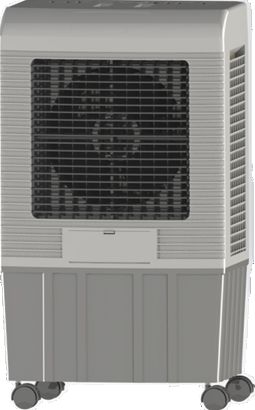
Features
MC26A Control Panel                                  Remote control (For MC26A Only)
                                                     The remote-control functions:
                                                        1)   Power
                                                        2)   Fan speed
                                                        3)   Swing
                                                        4)   Pump
                                                        5)   Timer
                                                     To replace the battery, slide the back panel of
Swing Button - Press to operate oscillation
motor to swing the air left to right.                the remote-control down to release it. Remove
                                                     old battery and replace with CR 2025 round
Timer Button Lit when engaged - Press to             battery.
select the desired timer selection, cooler will
stop running all features when selected time
expires.

Pump Button - Pump will function continually
when this light is lit.

* Press and hold the pump button for 2 seconds
to set the humidity. The setting range is from
50% to 90% RH. Each press increase 5% RH.
Once the desired RH is adjusted, the value will
flash 5 seconds. The setting is automatically        MC26L Control Panel
activated after 5 seconds.
                                                     Switch for Fan
Fan Button - Fan ON/OFF                              Has 4 positions. (Clockwise from OFF)
                                                     OFF, LOW, MED, HI.
Power Button – If Green light, all functions will    Switch for Pump - Controls the pump
be able to operate. Red light, all control           Switch for Swing - Controls the fan oscillation
functions will be off.
Main power control. When the power is turned
to the “OFF” position, the other controls will not
work.
Cooler Maintenance
                                                    Use all precautions and
                                                    disconnect from power source
                                                    before performing any
                                                    maintenance.

                                                              Removal and Replacement of Cooling Media
Cleaning Filters and Rigid Media Pads
                                                                 1. If your cooler includes media pins,
                                                                     remove by unscrewing/pulling out the
                                                                     disc.
                                                                 2. Remove media pad. Replace with new
                         Pull out the filter from                    pad.
                         the top                                 3. Reinstall the back panel and you are
                                                                     ready to use the cooler again.
                                                              Go to www.hessaire.com for instructional videos
                                                              and tips for eliminating any odors.

The removable filters can be washed and media                 Draining the Cooler Tank
pads can be sprayed out on the ground to clean.
Use light pressure when spraying pads. You can                    1. Pull or unscrew drain plug/cap from drain
use a soft bristle brush to gently wipe away                         assembly.
deposits. NEVER spray pads with water while                       2. Tip unit to ensure all water exits the unit.
cooler is operating, and fan is running. This can                 3. Replace drain plug.
cause damage to motor and will void the
warranty.

Removal of the Back Panel (Disconnect power
supply before this procedure.)

                                                              Hose Adapter
                                                              Our convenient hose adapter allows you to have
                                                              continuous water fill. Never leave your cooler
                                                              unattended.

 Unscrew the screws      Pull out the bottom of
 in the back panel       the back panel then
 first, then pull the    take it down.
 back panel up.
                                                              Be sure your float valve is adjusted at a forty-
                                                              five-degree angle never straight downward
                                                              insuring it does not hit media panel. This will
                                                              assure no overflow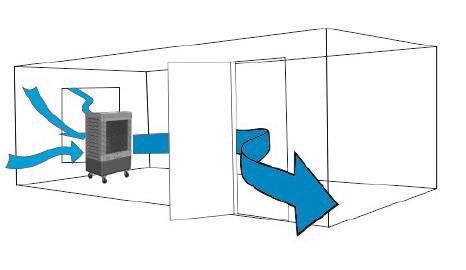
Cooler Parts
Please visit www.hessaireparts.com to shop for cooler parts.

                    #                     Parts                 MC26
                    1                     Pump                 6050026
                    2                     Motor                6051026
                    3                Rigid Media Set            CP260
                    4                 Control Panel            6069026
                    5                    Casters               6061026
                    6                Casters w/lock            6062026
                    7                   Fan Blade              6017052
                    8                  Float Valve             6018058
                    9                 Hose Adapter             6018088
                    11               Oscillator Motor          6057026
                    12               Water Fill Door           6076026
                    13                 Drain Plug              6017081
                    14                  Filter Set             6080026
                    15                Ice Pack Set             6090026
                                     Remote Control            6006026
Warranty Policy
Hessaire Products Inc. Manufacturing cost associated with the troubleshooting and or
Warranty repair of the cooler whether the product is under
EVAPORATIVE COOLER warranty or not.
Each new cooler is warrantied to be free from
defects in material or workmanship for one full Damaged Shipments
year from the date of original purchase. If
component and or components are found to be Hessaire is not responsible for damaged
defective within this period, Hessaire or shipments or shortages resulting from carrier
Hessaire’s distributor will repl ace the defective mishandling. Notify your carrier’s office
component and or components free of charge. immediately to file a claim. Keep damaged
Components are available at authorized dealers goods and containers for inspection until
or online. Copies of proof of purchase and advised by the carrier as to disposal.
cooler manufacturing label will be needed for
the warranty claim. Returns
Hessaire’s dealers shall implement return policy
What is not covered by the warranty that is consistent with the dealer agreement. If
dealer’s return policy allows returns within
1. Malfunctions resulting from misuse, reasonable period, agreed to by Hessaire and
negligence, alteration or lack of necessary the dealer, customer may return product to point
maintenance. of purchase. Dealer may reject, accept, or
2. Loss of time, inconvenience, use of accept return with restocking fee at the sole
product or other consequential damages due to discretion of the dealer. If the customer wishes
defects. to repair defective cooler, the customer can
3. Return transportation costs. All return contact Hessaire for troubleshooting and
transportation costs are the responsibility of the service parts, which is provided free of charge
purchaser. for products under the warranty period.
4. Hessaire warranty does not cover laborTrouble Shooting
Problem Cause/Remedy
1. Cooler fails to work at all1.1 Check that the unit is plugged properly.
1.2 Check the POWER switch, push it to "ON".
1.3 The TIMER switch is "OFF", turn it to "ON".
1.4 Make sure cooler is not plugged into a tripped GFIC outlet. If so,
reset GFCI or move to non GFCI outlet.
2. Cooler does not pump 2.1 Pump is not activated. Push the PUMP switch to "ON".
2.2 Water level is low. Fill with water and make sure pump is
activated.
2.3 Be sure the pump and pump hose are clear of debris.
2.4 Pump may be defective. Replace pump. ***
3a. Fan does not operate 3.1 Check that unit is plugged in properly.
3.2 Check the POWER switch, push it to "ON".
3.3 If connected to a GFCI outlet, check if it is tripped.
3.4 Troubleshoot rotary switch.***
3b. Fan runs slow at start up 3b.1 Replace motor capacitor. ***
4. Louver does not operate 4.1 Louver does not move. Put swing switch position to "ON".
4.2 Check Oscillator motor for proper placement and operation.
5. Water leakage 5.1 Check the cap of the drain assembly, make sure it tightened.
5.2 Inspect tank for cracks or breakage.
5.3 Make sure cooler is level.
5.4 Check the media pads for buildup. The scaling may be disrupting
the flow of water over the pad frame. Change media if needed.
5.5 If water is coming out fan, check for leaks in water distribution
hoses and/or leaks at hose connections to spreaders,
5.6 Be sure there is at least 4 inches of space for rear panel free
from wall or other obstruction. This could make the side panels
release water to airstream due to increased air velocity through the
sides.
5.7 Spreaders may have scale buildup allowing water to pool and
spill over into airstream---Clean spreaders.
6. Float Valve 6.1 If water levels are too high/low, adjust the wing nut on the valve.
6.2 If there is a leak, check for cracks. Purchase new valve at
www.hessaireparts.com
*** - See instructional videos for repairs and replacements at www.hessaire.com under the Media tabYou can also read