OfficeSuite PC Console - User Guide Version 1.0 June 26, 2017 - Windstream Enterprise
←
→
Page content transcription
If your browser does not render page correctly, please read the page content below

OfficeSuite® PC Console
User Guide • Version 1.0								              June 26, 2017

                     Page 1        © 2017 Broadview Networks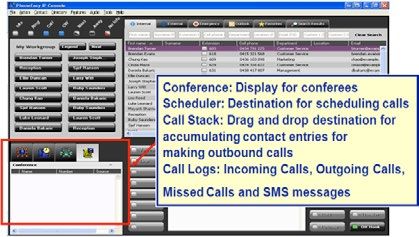
TABLE OF CONTENTS
Introduction                                          3    Using IP Console                                            12-16
PC Console Overview                                  4-9       1.   Adding Directory entries                               12
   1.   File Menu                                     4        2.   Adding Presence for Internal Directory entries         12
   2.   Action Menu                                   4        3.   Adding My Workgroup entries                            12
   3.   Contact Menu                                  4        4.   Making a Call                                          12
   4.   Directory Menu                                5        5.   Answering a Call (max 6 calls)                         12
   5.   Features Menu                                 5        6.   Terminating a Call                                     13
   6.   Audio Menu                                    5        7.   Holding a Call                                         13
   7.   Tools Menu                                    6        8.   Divert Alerting Calls                                  13
   8.   Help Menu                                     6        9.   Perform a Blind Transfer                               13
   9.   Directories                                   6        10. Perform a Consultative Transfer                         13
   10. Dialing Area                                   7        11. Performing Transfer to Voicemail function               14
   11. Dialing Functions                              7        12. Conference (4 way Conference including yourself )       14
   12. Active Call Area                               7        13. Call Scheduling                                         14
   13. FlexKeys                                       8        14. Call Stacking                                           14
   14. Feature Pane                                   8        15. Call Log                                                15
   15. My Workgroup                                   8        16. Email & SMS (SMS not supported)                         15
   16. Legend                                         9        17. Creating & Using a Filter Flexkey                       15
PC Console Configuration                            9-12       18. Creating & Using Forward all Flexkey                    15
   1.   Tools>Options>SIP Settings                    9        19. Creating & Using Forward to Voicemail Flexkey           15
   2.   Tools>Options>SIP Settings>Audio devices      9        20. Creating & Using Park Flexkey                           15
   3.   Tools>Options>SIP Settings>Audio settings     9        21. Creating & Using a Pickup Call Flexkey                  16
   4.   Tools>Options>SIP Settings>Sounds             9        22. Creating & Using a Redial Flexkey                       16
   5.   Tools>Options>Directory                      10        23. Creating & Using a Speed Dial Flexkey                   16
   6.   Tools>Options>Call Settings (Incoming)       10        24. Creating & Using a Toggle Mute Flexkey                  16
   7.   Tools>Options>Call Settings (Outgoing)       10        25. Creating & Using a Voicemail Message Waiting            16
   8.   Tools>Options>Call Settings (Call Stack)     10            Indication (MWI)

   9.   Tools>Options>My Workgroup                   10        26. Flexkey                                                 16

   10. Tools>Options>Pop-up Options                  10
   11. Tools>Options>Keyboard Shortcut Settings      10
   12. Tools>Options>Ordered Workflow Settings       11
   13. Tools>Options>FlexKey Settings                11
   14. Tools>Options>SMS Settings (Not Supported)    12

                                                      Page 2                                         © 2017 Broadview Networks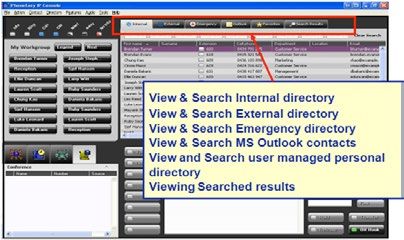
INTRODUCTION

OfficeSuite PC Console
The OfficeSuite PC Console puts all the benefits of a hardware console onto the user’s PC screen.
All company-wide contacts are listed in the Internal, External and Emergency directories. In addition, a user can access any
contacts in their Outlook Notes folder and add personal contacts to their Favorites directory.
The “My Workgroup” entity has a provision for 32 contacts enabling the user to easily monitor and contact those people whom
they deal with most frequently in the organization. A single click-of-the-mouse to dial, or right-click to send an email to the
desired contact is all that is required.
The color coded presence indicators allow the attendant to make informed choices when determining how to handle a call. At a
glance, an attendant can see: who is free to take a call (no color); which extension is ringing (quick flashing blue); who is on a call;
(solid blue).
The Outlook calendar mining capabilities of the PC Console also enable the operator to see who is in a meeting (half black) and
who is away (solid black).
The Active Calls section of PC Console represents a user’s telephone, thus equipping a user to manage calls using a keyboard or
mouse, while the Active Display icons allow a user to see the status of calls at a glance.

Features and Benefits
•   Drag and drop contacts into the Call Stack to automatically dial the number sequence. If a call is unanswered, a single
    mouse click sends an email directly from the PC keyboard.
•   Call Scheduler – never forget to make that important call again. Drag and drop a contact into the Call Scheduler and
    a ‘pop up’ window will issue a reminder when the call is due and identify the reason for the call.
•   Conference Calls? Easy! With a few clicks, a conference call can be initiated, or an existing conversation extended
    to incorporate other parties, effortlessly.
•   Transfer announced and unannounced calls with ease. Simply drag and drop the phone number from any directory
    into the transfer box, or enter the number manually.
•   The Activity Log stores a record of calls received, made, and missed.

                                                                 Page 3                                       © 2017 Broadview Networks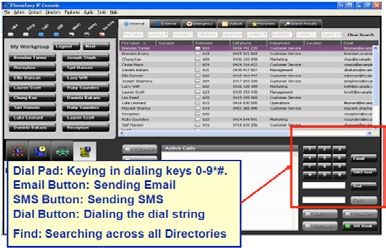
PC CONSOLE OVERVIEW
1.   File Menu

2.   Action Menu

3.   Contact Menu

                      Page 4   © 2017 Broadview Networks
4.   Directory Menu

5.   Features Menu

6.   Audio Menu

                      Page 5   © 2017 Broadview Networks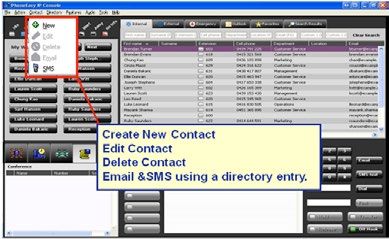
7.   Tools Menu

8.   Help Menu

9.   Directories

                   Page 6   © 2017 Broadview Networks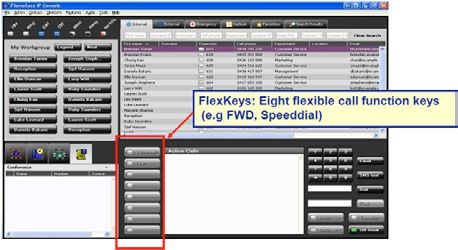
10. Dialing Area

11. Dialing Functions

12. Active Call Area

                        Page 7   © 2017 Broadview Networks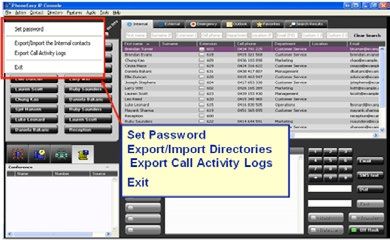
13. FlexKeys

14. Feature Pane

15. My Workgroup

                   Page 8   © 2017 Broadview Networks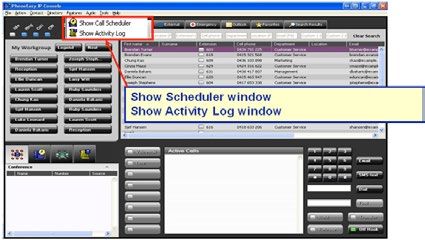
16. Legend

PC CONSOLE CONFIGURATION
1. Tools>Options>SIP Settings
   Network Settings:
       • Username: Your OfficeSuite extension
       • Password: Your PIN
       • Domain: Please refer to the Welcome Letter you received
       • Proxy: Not needed
       • Port: 5060
    Unpark (Not Supported):
       • Select No Unpark
    Music on Hold (Not Supported)
    Resource List (Not Supported)
    Group Pickup:
        • No Group Pickup
        • Dial the following code: Input *94 then the # of the pickup group that you are a member of. Only one pickup group
          can be designated that will work with the “Pickup” Flex key.
    Directed Pickup:
        • No Directed Pickup
        • Do not need to dial a code
        • Dial the following code *94 then the extension number
    MWI Server: Provide the extension of the Message Waiting Indicator service for your server if required, e.g. 3020
    Enable extended SIP event logging: Tick to enable extended SIP event logging. This will create “AdvaTel Applications” in the
    Windows Event Viewer to which the extended SIP events will be logged.
2. Tools>Options>SIP Settings>Audio devices
   Microphone: Select from drop-down list.
   Speakers: Select from drop-down list and adjust Volume if required.
   Ringing: Select from drop-down list and adjust Volume if required.
3. Tools>Options>SIP Settings>Audio settings
   Codec priority: Sort the codecs into the preferred order using the drop-down boxes.
4. Tools>Options>SIP Settings>Sounds
   Ringtone, Ringback, Dialtone, Busy Tone and Call Waiting Tone: Select the required wav or mp3 file to be played. Default files are
   provided in the C:\Program Files\AdvaTel\IP Console\tones\ folder. Click  to save the changes.

                                                               Page 9                                      © 2017 Broadview Networks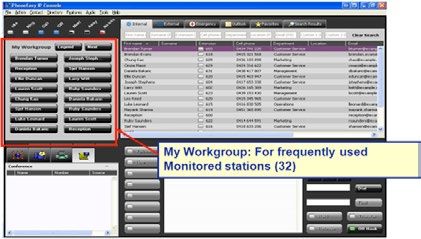
5. Tools>Options>Directory
   Messaging system: Select either No Messaging System Interaction or Logon to Outlook. The Logon to Outlook radio button,
   if checked, will cause IP Console to log on to Microsoft Outlook for contact information using the current Microsoft Outlook
   profile on your computer. If Microsoft Outlook is not already running when IP Console is started then it will be started
6. Tools>Options>Call Settings (Incoming)
   Voicemail Number field: Enter *98
   Transfer to Voicemail Prefix: Enter *99
7. Tools>Options>Call Settings (Outgoing)
   Length of internal numbers field: Commonly used extension numbers are 3 or 4 digits in length.
   Phone and Modem Settings:
       • Dial numbers as they are entered
       • Use my Phone and Modem settings to prepare numbers before dialing
8. Tools>Options>Call Settings (Call Stack)
   An inter-call delay: can be set by specifying a value for Seconds between Calls.
9. Tools>Options>My Workgroup
   Pickup calls when clicking on a BLF: An alerting call at a My Workgroup member station can be picked up by clicking on its
   BLF button
   Mine Microsoft Outlook Calendars: enables calendar mining.
   Mining Interval: A Mining Interval of two minutes instructs IP Console to read calendar Information once every two minutes
   Mine Ahead: A setting of five minutes means that meeting status for BLF entries are read and analyzed for the next five
   minutes and stored for use by the IP Console
   Show Tentative Meetings as Busy: checkbox to include items marked as Tentative in Microsoft Outlook as being in a Meeting
   in IP Console
10. Tools>Options>Pop-up Options
    Pop to the front Setting:
        • Don’t Popup (Nothing happens)
        • Show Notification near the System Tray (Small window near clock)
        • Bring IP Console to Front (Brings console to the front of everything)
11. Tools>Options>Keyboard Shortcut Settings
    Keyboard Shortcut: The default key mappings provide a consistent and easy to remember keyboard layout.
    Getting a line:
         • Press the Num Enter key
    Dialing a number:
         • Press the Num Enter key (to get a line)
         • Type in the number
         • Press the Num Enter key (to dial)
    Dialing a number with the highlighted directory highlighted:
         • Press the Num Enter key (to get a line)
         • Press the Num Enter key (to dial)
    Answering a Call:
         • Press the Num Enter key
    Releasing a Call:
         • Press the Num + key
    Holding a call:
         • Press the Num – key
    Resuming a call:
         • Press Ctrl and Num (1–6) key combination, for the appropriate line or call
    Transferring a call:
         • Press the Num Enter key to answer the call
         • Type the number (or type text and press Num Enter to find a directory entry then move highlight to required entry)
         • Press the Num Enter key (to dial)
         • Press Num + to Cancel Transfer or press Num Del to Complete Transfer

                                                               Page 10                                   © 2017 Broadview Networks
12. Tools>Options>Ordered Workflow Settings
Ordered Workflow: allows you to specify a rotary sequence of functions to be accessed by the Ordered Workflow keyboard
shortcut ( `)
The default Ordered Workflow: is designed to enable the attendant to quickly jump to the internal directory for a first name
search then to the Find text box for the Find function.
13. Tools>Options>FlexKey Settings
FlexKey behavior: FlexKeys behaves much like a feature button on a telephone set.
FlexKey options:
• Conference – Allows you to create a manual conferencing function FlexKey
• Action Type – Conference
• Action Caption - Conference
• Filter – Allows you to display a directory entry from Internal, External, Emergency, Outlook & Favorite using a preset filter
• Action Type – Filter
• Action Caption – Filter
• Directory – Internal, External, Emergency, Outlook & Favorite
• Fields & Filter Value – The Flexkey below have been configured search for “Sales” in the “Department”
field of the Internal Directory.
• Forward – Allows you to forward all calls to your extension to the number specified
• Action Type – Forward
• Action Caption – Forward
• Number – Enter the # you want your calls forwarded to or enter *99 + your extension if you want to forward
your calls to voicemail
• Forward to Voicemail (Not Supported)
• Park – Allows you to park a call (Not supported)
• Action Type – Park
• Action Caption – Park
• Number – Enter *95 to have the system select the park location or enter *95PL where PL=the park location to
park it at a specific park location. Please note the system does not inform you which park location has been
used.
• Pickup Call – Allows you to do a group pickup for the oldest ringing call in the designated pickup group
• Action Type – Pickup Call
• Action Caption – Pickup
• Redial – Allows you to last number redial
• Action Type – Redial
• Action Caption – Redial
• Speed Dial – Allows you to specify a Speed dial which dials the specified number
• Action Type – Speed dial
• Action Caption – Speed dial
• Number – Input the number you want to use as a Speed Dial
• Toggle Mute – Allows you to Mute or Unmute microphone during call
• Action Type – Toggle Mute
• Action Caption – Mute
• Voicemail – message waiting indicator, doubles as speed dial to retrieve voicemail
• Action Type – Voicemail
• Action Caption – Voicemail
Page 11 © 2017 Broadview Networks14. Tools>Options>SMS Settings (Not Supported)
SMS Settings: The PhoneEasy SMS feature has the ability to send messages which are marked for reply to your choice of email
or SMS. This enhanced two-way SMS capability is available from SMS services hosted by Messagenet (URL to register for a
Messagenet Account is https://www.messagenet.com.au/advatel/).
Proxy Settings: PhoneEasy SMS functions connect to the Messagenet SMS service by HTTP. Where a HTTP proxy is in use IP
Console will require proxy account details for HTTP access. The details required are Proxy Server, Port, Domain, Username,
Password and whether NTLM or basic authentication is used.
USING PC CONSOLE
1. Adding Directory entries
Using a CSV files: Load the PC Console Internal, External, Emergency & Favorites Directory into the PC Console by going to
File>Export/Import using a csv file. The easiest way of getting a feel for importing and exporting a directory is to insert one or
two entries into a blank directory, export it, review the resulting exported CSV file, make a change or two before importing it
again into PC Console.
Using a Directory Entry: Right Click and select New in PC Console Internal, External, Emergency & Favorites Directory and fill
in the appropriate details and select Ok.
Using the Activity Log Entry: Right Click and select Add Contact to Internal, Add Contact to External or Add Contact
to Favorites.
Note: You can only add a maximum of 20,000 Internal & External Contacts, 100 Emergency Contacts and 500 Favorites Contacts.
The Search function will return a maximum of 1,000 results.
2. Adding Presence for Internal Directory entries
Using Internal Directory Entry: Right Click on the one or more entries in the Internal Directory and select Monitor contact.
Note: You can only monitor a maximum of 400 lines.
3. Adding My Workgroup entries
Using an Internal Directory Entry: Click on the entry in the Internal Directory and drag and drop it on the My Workgroup Button
Using Tools>Options>My Workgroup: Go to Tools>Options>My Workgroup and select the required button. Then click on the
search icon in “Last Name” and select the required Internal Directory Entry and click Ok.
4. Making a Call
Using the Off Hook/Answer (Operation) Key: Click in the Dial display area to enter the number to dial then press the
Off Hook/Answer (Operation) key.
Using My Workgroup: Click on a My Workgroup Entry to dial its destination station or select a number from the right
mouse menu.
Using a Directory Entry: Double click on a directory entry to call its primary number or select a number from the right
click menu.
Using a Contact Entry in a Features Pane: Double click on an entry in either the Conference Display or Call Logs Display to call its
primary number. In the Call Logs Display a number can also be selected from the right mouse menu.
5. Answering a Call (max 6 calls)
Using the Off Hook/Answer (Operation) Key: Answer by pressing the Off Hook/Answer (Operation) key.
Using the Active Call Area: Answered by clicking on the alerting call in the Active Call Area
Page 12 © 2017 Broadview Networks6. Terminating a Call
Using the Release Key: Terminate by pressing the Release key
Using the Active Call Area: Terminate by selecting release from the right mouse menu in the Active Call Area
7. Holding a Call
Using the Hold key: Hold a connected call by pressing the Hold key
Using the Active Call Area: Hold a connected call by clicking on the call. Clicking in the Active Call Area free space will hold
a connected call and provide dial-tone for making an outbound call
Note: When you have one or more held calls and a connected call, the most recently held call will display as “HOLD PENDING
TRANSFER”. Any other held calls will display as “HOLD”.
8. Divert Alerting Calls
Dragging to My Workgroup: Divert to a My Workgroup destination station by dragging the alerting call from the Active
Call Area and dropping it on a My Workgroup key
Dragging to a Directory Entry: Divert to a directory entry’s primary number by dragging the alerting call from the Active
Call Area and dropping it on a directory entry
9. Perform a Blind Transfer
Dragging to a My Workgroup: Blind transfer to a My Workgroup destination station by dragging the connected call from
the Active Call Area and dropping it on a My Workgroup key
Dragging to a Directory Entry: Blind transfer to a directory entry’s primary number by dragging the connected call from
the Active Call Area and dropping it on a directory entry
Note: You can only do a Blind Transfer to Internal Directory or My Workgroup entry.
10. Perform a Consultative Transfer
Using the Off Hook/Answer (Operation) Key:
• Commence a consultative transfer by pressing the Off Hook/Answer (Operation) key. The call is placed On Hold Pending
Transfer and dial-tone is provided for the consultation call.
• Make the consultation call. Press Transfer to Complete the Transfer of the call to the transferee. Press Release to cancel
and abandon the consultation call
Dragging a My Workgroup Entry to the connected call:
• Commence a consultative transfer by dragging a My Workgroup entry to the connected call. The call is placed On Hold
Pending Transfer and the destination station for the My Workgroup entry is dialed for the consultation call.
• Press Transfer to Complete the Transfer of the call to the transferee.
Press Release to cancel and abandon the consultation call
Dragging a directory entry to the connected call:
• Commence a consultative transfer by dragging a directory entry to the connected call. The call is placed On Hold
Pending Transfer and the primary number for the entry is dialed for the consultation call.
• Press Transfer to Complete the Transfer of the call to the transferee. Press Release to cancel and abandon the
consultation call
Dragging a Call Log entry to the connected call:
• Commence a consultative transfer by dragging a call log entry to the connected call. The call is placed On Hold
Pending Transfer and the primary number for the entry is dialed for the consultation call.
• Press Transfer to Complete the Transfer of the call to the transferee. Press Release to cancel and abandon the
consultation call
Note: Regardless of how the new call is made, the Transfer key will act upon the most recently held call marked as
“HOLD PENDING TRANSFER” and the connected call.
Page 13 © 2017 Broadview Networks11. Performing Transfer to Voicemail function
• Transfer to Voicemail function requires that each mailbox matches the user’s extension with a prefix that is consistent
across all mailboxes.
• E.g. Given 2 extensions 101 & 102 and a transfer to Voicemail prefix of “5”. The respective mailboxes will be 5101 & 5102
• Fill in Transfer to Voicemail Prefix in Tools>Options>Call Settings>Incoming calls
• After answering a call, Right Clicking on the Internal Contact or My Workgroup entry and select Transfer to Voicemail.
12. Conference (4 way Conference including yourself)
Creating a Conference
• Commence a Conference by making calls to the required parties. (These could be a mixture of both inbound or
Outbound calls)
• Right click on any call in the Active Call Area and select Conference to start the conference OR click on the Conference
Flexkey to start the conference.
• To add a new party to the conference, Right click on the call in the Active Call Area and select Conference OR Right click
on the conference call in the Active Call Area and select Conference OR click on the Conference Flexkey.
• You are NOT able to explicitly specify the party that you wish to conference.
• So, for example, if there is 1 call in the Active Call Area, Right clicking on the call in the Active Call Area and
selecting Conference OR clicking on the Conference Flexkey will put the active call in the Active Call Area in a
conference call together with the IP Console user.
• If there are 2 calls in the Active Call Area, Right clicking on any of the calls in the Active Call Area and selecting
Conference OR clicking on the Conference Flexkey will put both the active call in the Active Call Area in a
conference call together with the IP Console user.
• If there are 3 calls in the Active Call Area, Right clicking on any of the calls in the Active Call Area and selecting
Conference OR clicking on the Conference Flexkey will put the three active calls in the Active Call Area in a
conference call together with the IP Console user.
• If there are more than 3 active calls in the Active Call Area, Right clicking on any call in the Active Call Area and
selecting Conference OR clicking on the Conference Flexkey will not be available.
13. Call Scheduling
Scheduling of Calls:
• Commence a Scheduling by dragging My Workgroup or directory entries into the Scheduler Display.
• Fill up the Call Scheduling window which pops up for call details and click ok.
• When the scheduled time arrives a Scheduled Call Due window pops up. This window presents a choice of Dial to make the
call, Snooze to defer for a user specified period, and Dismiss to remove the call from the Scheduler
Note: You can only Schedule a maximum of 50 Contacts.
14. Call Stacking
Stacking of Calls:
• Commence Stacking calls by dragging My Workgroup or directory entries into the Call Stack Display for making outbound
calls.
• Start or stop the stack through the right mouse menu, and calls can be skipped also from the right mouse menu.
• The Call Stack inter-call delay is configurable at Tools – Options – Call Settings. The default delay value is seven seconds.
Note: You can only stack a maximum of 50 Contacts.
Page 14 © 2017 Broadview Networks15. Call Log
• Exporting Logs: Go to Features>Show Activity Log and on the “Activity Logs” pop up select File>Export Logs
and then select the logs that you wish to export.
• Clearing Logs: Go to Features>Show Activity Log and on the “Activity Logs” pop up select the appropriate tab
(Incoming, Outgoing, Missed Calls or SMS Log) and select File>Clear all Logs.
16. Email & SMS (SMS not supported)
Email & SMS Contacts:
Right Click a contact in My Workgroup or Directory to Email or SMS.
Note: You can only send a SMS to a maximum number of 50 Contacts Simultaneously.
17. Creating & Using a Filter Flexkey
• Create a Filter Flexkey by going to Tools>Options>Flexkey Settings and selecting Action Type as Filter, Action Caption
as Filter (Note: the Action Caption can be renamed as required). Then select Directory as Internal, External, Emergency,
Outlook or Favorite and the required Fields & Filter Value. The Flexkey below have been configured search for Sales in
the Department field of the Internal Directory.
• Clicking on the Filter Flexkey will populate the search fields of the specified Directory with the specified Filter Value
and display the entry matching the Filter Value if found.
18. Creating & Using Forward all Flexkey
• Create a Forward all Flexkey by going to Tools>Options>Flexkey Settings and selecting Action Type as Forward, Action
Caption as Forward (Note: the “Action Caption” can be renamed as required). Then select your extension and specify the
extension to which all your calls will be forwarded to.
• Clicking on the Forward Flexkey will Forward all calls to your extension to the extension specified when creating the
Flexkey. Clicking on the Forward Flexkey again will undo this Call forward.
19. Creating & Using Forward to Voicemail Flexkey
• Create a Forward to Voicemail Flexkey by going to Tools>Options>Flexkey Settings and selecting Action Type as
Forward to Voicemail, Action Caption as Fwd VM (Note: the “Action Caption” can be renamed as required).
• Fill in Voicemail number in Tools>Options>Call Settings>Incoming calls
• Clicking on the Forward to Voicemail Flexkey it will Forward all calls to your extension to your voicemail. Clicking
on the Forward to Voicemail Flexkey again will undo this Forward to Voicemail.
20. Creating & Using Park Flexkey
• Create a Park Flexkey by going to Tools>Options>Flexkey Settings and selecting Action Type as Park, Action Caption
as Park (Note: the Action Caption can be renamed as required). Then specify the park orbit.
• Clicking on the Park Flexkey will Park the call at the specified Park Orbit. Clicking on the Park Flexkey again will
retrieve the parked call.
Page 15 © 2017 Broadview Networks21. Creating & Using a Pickup Call Flexkey
• Create a Pickup Call Flexkey by going to Tools>Options>Flexkey Settings and selecting Action Type as Pickup
Call and Action Caption as Pickup (Note: the “Action Caption” can be renamed as required)
• If Directed Pickup is configured and the dial box contains a ringing extension the call pickup flexkey will
attempt a directed pickup to the ringing extension.
22. Creating & Using a Redial Flexkey
• Create a Redial Flexkey by going to Tools>Options>Flexkey Settings and selecting Action Type as Redial, Action
Caption as Redial (Note: the “Action Caption” can be renamed as required).
• Clicking on the Redial Flexkey dials the last number dialed from your extension.
23. Creating & Using a Speed Dial Flexkey
• Create a Speed Dial Flexkey by going to Tools>Options>Flexkey Settings and selecting Action Type as Speed dial,
Action Caption as Speed dial (Note: the “Action Caption” can be renamed as required). Then specify the extension
that you would like to dial.
• Clicking on the Speed Dial Flexkey will dial the extension that you have specified for the speed dial.
24. Creating & Using a Toggle Mute Flexkey
• Create a Toggle Mute Flexkey by going to Tools>Options>Flexkey Settings and selecting Action Type as Toggle
Mute, Action Caption as Mute (Note: the “Action Caption” can be renamed as required).
• Clicking on the Toggle Mute Flexkey will mute/unmute the PhoneEasy user.
25. Creating & Using a Voicemail Message Waiting Indication (MWI) Flexkey
• Create a Voicemail Flexkey by going to Tools>Options>Flexkey Settings and selecting Action Type as Voicemail,
Action Caption as Voicemail (Note: the “Action Caption” can be renamed as required).
• Fill in Voicemail number in Tools>Options>Call Settings>Incoming calls
• Clicking on the Voicemail Flexkey will dial the Voicemail number specified above. It will also light up when
there are messages.
1-800-BROADVIEW | broadviewnet.com
Page 16 © 2017 Broadview NetworksYou can also read