Optimizing Print Performance - Configuring Your Printers and Optimizing Your Templates for Maximum Throughput - Seagull Scientific
←
→
Page content transcription
If your browser does not render page correctly, please read the page content below

Optimizing Print Performance
 Configuring Your Printers and Optimizing
 Your Templates for Maximum Throughput

                                        WHITE PAPER
Contents
Overview                                           3
Designing Your Items                               4
  Font Selection                                   4
  Barcode Rendering                                6
  Image Sizing and Resolution                      6
  Summary Quick Help Chart                         6
Configuring BarTender                              7
  Object Print Method                              7
  Printer Serialization                            7
  Printer Storage and Caching                      8
  Summary Quick Help Chart                        10
Optimizing Your Printer Driver                    11
  Verification of Job Completion                  11
  Graphic Dithering                               11
  Windows Printer Pooling                         13
  Printer Resolution                              13
  Print Speed                                     13
Evaluating Your Printer Hardware                  15
  Use the Fastest Cable                           15
  Experiment with Alternate Network Connections   15
  That Old Printer                                16
Related Documentation                             17
Overview
Getting the right item printed at the right place at the right time can be the critical path for many
shipping and inventory control departments. Whether you are designing your items in BarTender or
printing them, you can improve your printing performance with a few quick and easy modifications. In
this paper, you will find handy tips to print up the printing process by making modifications to the
ways you design your items in BarTender, configure your printer and printer driver, and define the
application settings of your software.

Optimizing Output Performance                                                                           3

Designing Your Items
The choices you make when designing your items can profoundly affect the size of your print code,
and subsequently, the speed at which your documents print. If you're looking to increase your
printing performance, consider these simple design techniques:

Font Selection
In general, fonts come in two varieties: TrueType fonts and printer-based (or resident) fonts.

TrueType fonts are completely scalable, and you can specify any size text you want. By using
TrueType fonts, such as Arial or Times New Roman, BarTender ensures that what you see on your
template is the same font that will print on your item. However, any text objects on your design are
sent to the printer as graphics.

Conversely, printer-based fonts are saved to the printer, rather than the computer. In heavy
production environments, the use of printer fonts allows the items to print more quickly, since your
application does not have to send the text to the printer as an image. Instead, all that is sent is a set
of code numbers, one for each character.

Some printers have the capability to download TrueType fonts directly to the printer's memory. Since
the font is then stored in the printer’s memory, text that uses the font does not have to be sent to
the printer as a graphic. The font usually remains in the printer’s memory until a user deletes it.

    Resident Fonts
    In BarTender, resident fonts are listed with a printer icon     to the left of the font.

    Unlike TrueType and OpenType fonts, the resident fonts available to you depend entirely on
    which printer is selected for the active document. If you print the same document to multiple
    printers, there may be no one resident font that is available on all the printers you will be using.
    In this situation, to gain the performance boost you get from using resident fonts, select a
    TrueType or OpenType font , but enable the Substitute Best Matching Printer Font check
    box on the Font tab of the Text Properties dialog.

    None of your print jobs will actually use the font you selected. Instead, each printer will substitute
    the resident font that most closely matches the TrueType or OpenType font you selected.

    Downloaded Fonts
    Downloaded fonts come in two varieties: scalable and bitmap.

    A scalable font contains rules and formulas that specify how each symbol is to be drawn. It is not
    simply a file that specifies pixel-by-pixel which pixels in each letter are black and which are white.
    With scalable fonts, you have multiple font size options; however, this advantage comes at the
    cost of a slight decrease in printing performance.

    A bitmap font is a pixel-by-pixel specification, for each letter in the font, of which pixels are black
    and which are not. Even though TrueType and OpenType fonts are scalable, your driver can
    create a bitmapped font of a single size of a single font and download that to the printer. Note
    that a single bitmapped font contains one single font size; although any one bitmapped font

Optimizing Output Performance                                                                                 4
usually takes up less printer memory than a scalable font, the combined memory used by several
    such bitmapped fonts using the same typeface but different sizes might exceed the amount of
    memory used by a single scalable font.

    Note that to download a font to your printer, your printer must support this functionality. To
    download a font:

       1. Open the Windows Devices and Printers pane.
       2. From the printer's context menu, select Printer properties. The Printer Properties dialog
          opens.
       3. Click the Fonts tab. (If there is no Fonts tab, then your printer does not support any type of
          device fonts.)
       4. From the Font dropdown list, select Download Font. The Download Font dialog opens. (If
          there is no Download Fonts option, then your printer does not support downloading
          fonts.)
       5. On the Download Font dialog, select Scalable or Bitmap. (Your printer may support only
          one and not the other.)

               l   If you selected Scalable, select a font type and style.
               l   If you selected Bitmap, select a font type, style, size, scale and character set.
       6. Leave the Location setting at its default. Consult your printer’s documentation for
          information on this setting.
       7. Click OK and the driver will download
          the font to the printer. The new font
          appears in the Fonts list on the Printer
          Properties dialog.
       8. Click OK to close the Printer Properties
          dialog.

You can now select this font in BarTender.
Although it will not have a printer icon beside its
name, it is now, in effect, a kind of resident font
for the current printer.

Optimizing Output Performance                                                                              5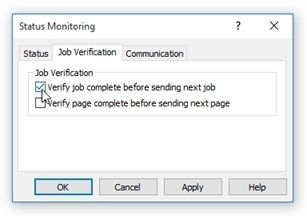
Barcode Rendering
Most thermal printers have built-in support for many popular barcode symbologies. By taking
advantage of this printer feature, you can send only the data for the barcode to the printer and let
the printer itself render the barcode symbol to print.

      NOTE: If the desired symbology is unsupported by your printer, there are application
      settings which may enhance your printing performance. See Object Print Method later in
      this white paper for more information.

BarTender, by default, will take advantage of this capability, but you can verify that the default has
not changed with these steps:

  1. Be sure that the printer you will be using is selected in the Print dialog for your document.
  2. Double-click the barcode object to open the Barcode Properties dialog.
  3. From the Navigation Pane on the left side, click Symbology and Size.
  4. Verify that the desired symbology is selected.
  5. Click the Print Method button. The Print Method
     Options dialog opens.
  6. Verify that either option where barcodes are
     controlled by the printer is selected.
  7. Click OK to close the Print Method Options dialog.
  8. Click OK to close the Barcode Properties dialog.

Image Sizing and Resolution
Printing is slowed when BarTender sends large images to the printer. To increase printing
performance, use graphics sparingly in your designs and try to minimize the use of large graphics in
your designs. Additionally, you can use graphics with fewer colors or decrease the resolution of your
images to decrease their size.

Summary Quick Help Chart
       Potential Performance Slowdown                       Optimization Techniques
                                                    l   Change to a printer-based font
                                                    l   Enable Substitute Best Matching Printer
    Use of TrueType fonts                               Font
                                                    l   Download the TrueType font

                                                    l   Let the printer render the barcode object
    Use of barcodes
                                                    l   Change to a supported symbology

                                                    l   Use graphics sparingly
    Use of large graphic files
                                                    l   Convert graphic files to a smaller format

Optimizing Output Performance                                                                            6
Configuring BarTender
Many of BarTender's print settings can affect the size of your printer code file, and subsequently, the
speed at which your documents print. The following suggestions can be adjusted from within the
BarTender application and will apply to any printer that you select from the Print dialog.
NOTE: The following optimizations are only available for printers installed with Drivers by
Seagull.
Object Print Method
In the previous chapter, we talked about modifications you can make when designing your items to
improve printing performance. There may be, however, situations in which you do not have control
over the design and/or you need to use text, barcodes or graphics that are not directly supported by
your printer. Luckily, BarTender allows you to control how these unsupported objects are sent to the
printer. Experiment with these different settings on the Object Print Method tab of the Print dialog to
see how they may affect your printing performance.
Unsupported Barcode Symbologies
If your design uses a barcode symbology that your printer does not support, then BarTender
must send the barcode as a graphic. It can treat the image as a set of device lines or as a raster
graphic (bitmap). It usually takes BarTender longer to send to the printer a bitmap (a bit for every
dot that makes up the barcode) than it does to send only the position and size of each line in the
barcode. However, there are exceptions: many 2D symbologies have a large number of very
short lines, meaning that each one is composed of only a relatively small number of dots. In such
cases, sending the position and size of every one of those lines might take longer than just
sending a bitmap of the barcode.
The printer driver will default to the method that is usually the fastest for your printer model. In
most cases, it defaults to using device lines for 1D symbologies and to using bitmaps for 2D
symbologies. However, these defaults are not best in every situation.
Lines and Shapes
Lines, boxes and ellipses in your design can be sent to the printer in one of two ways: either as
device lines (where the only information sent is the size and position of the line or shape) or as a
raster graphic (a bitmap, where a bit for every single dot in the line or shape is sent to the
printer). Typically, your items will print faster if you send lines, shapes and ellipses as device lines.
Printer Serialization
If you have any serialized text or barcodes on any of your BarTender documents and your printer has
its own serialization feature, BarTender will use the printer’s serialization by default. When the
printer is updating the serialized field, BarTender will not send an updated value for the field with
every printed item. It sends only the starting value at the beginning of the print job, and the printer
will then update the field with each item. To use your printer's serialization capability, enable Allow
Serialization on the Performance tab of the Print dialog.
Even if you have checked the box, the following options prevent BarTender from using the printer’s
serialization:
Optimizing Output Performance 7l Using paper stock that has multiple labels per page.
l Setting the total number of serial numbers in the print job to a value greater than the printer
can render.
l Using a TrueType font on a serialized text object instead of a resident font or downloaded font.
l Using a symbology that the printer does not support on a serialized barcode.
l Using a serialized barcode that has a check digit.
l Using a serialized barcode that has visible human readable text being rendered by BarTender
instead of the printer.
l Using a character template for a serialized barcode. (See BarTender’s help for information
about character templates.)
l Using a Visual Basic script that runs with every item in the print job or every time the serialized
object is incremented/decremented.
l Selecting Every copy as the Serialization Event in the Serialization dialog.
l Enabling a Reset option in the Serialization dialog.
l Selecting any method other than Numeric in the Serialization dialog.
l Setting the Event Internal to anything other than "1" on the Serialization dialog.
l Serializing any data source, except the last one, in a multiple data sourced object.
Printer Storage and Caching
When you print a document from BarTender, you have the option to store (or cache) graphics,
objects or entire documents to the printer's internal memory. Some of the options allow you to store
graphics for the duration of a print job, while others let you cache objects and documents between
multiple print jobs.
Storing Objects for the Duration of a Print Job
Typically, there are parts of the BarTender document that will be exactly the same on every item
in the print job. These might be graphics, boxes, lines, text or even barcodes. Resending each of
these objects for every printed item slows your printing. By enabling the following settings on the
Performance of the Print dialog, you can ensure that the printer will store these items for the
duration of the print job, so that BarTender only has to send these elements once at the
beginning of each print job.
l Allow Static Objects: This causes the printer to store, for the duration of the print job, all
objects on your design that do not contain data that changes.
l Allow Static Graphics: This has the same effect as Allow Static Objects, except that it
applies only to graphics. “Graphics” includes text areas that use a TrueType or OpenType
font that you have not downloaded to the printer.
NOTE: Some printers do not support storing of non-graphic objects (such as
barcodes, lines or shapes) but do support the storing of graphics.
l Allow Variable Data Optimization: This causes BarTender to use the printer’s data merge
feature, where the printer stores, for the duration of the print job, formatting information
Optimizing Output Performance 8(object positions, barcode symbology, font name and size, line and box colors, etc.) for
both static and variable objects. BarTender then needs to send only the content of the
objects to the printer. If the content is also being stored by means of either option above,
then BarTender will have to send only the content of variable objects for each item. The
printer will merge this data into the appropriate fields on the document. (BarTender will
not use this feature, even if it is enabled, when a text object on the document contains
tabs, is configured as a paragraph, or contains multiple data sources using different
fonts.)
Caching Graphics and Templates
Many printers allow graphics or whole templates to be stored between print jobs. This ensures
that BarTender does not have to resend these elements to the printer at the start of every print
job. The portion of the printer’s memory that holds these items is called the cache. There is no
limit, in principle, to how long items can stay in the printer’s cache. They can stay there literally
for years. (If the printer does not have flash memory, then the cache is emptied when the printer
is powered off.)
Once caching is enabled, printed items and/or graphics are stored in the printer’s cache the first
time it prints. In the future, when a print job uses that printed item or graphic, the driver will
check to see if it is already in the cache. If it is, then BarTender will not resend it; instead, the
printer driver will simply tell the printer to fetch the BarTender document or graphic from the
cache.
To enable caching, check Allow Graphic Caching and/or Allow Template Caching on the
Performance of the Print dialog.
WARNING: Because the printer driver on the computer, not the printer, keeps the
record of what items have been cached, there is a potential hazard if two different
computers are sending jobs to the printer. If a second computer uses the printer, it
overwrites the printer memory that the first computer was using as the printer’s cache.
Thus, the first computer’s record of what is in the cache is no longer accurate. The next
time the first computer sends a job to the printer, it will not resend items that used to
be in cache and this will cause blank areas on the printed items. To avoid this hazard,
you can install the printer as a network printer on all computers that use it. This means
they will all be using the same printer driver and, thus, the same record of what is in the
cache.
Optimizing Output Performance 9Viewing the Cache
To view the printer cache, take these steps in
BarTender:
1. Open the Print dialog and verify that
you have selected the correct printer.
2. Click the Printer Cache's tab.
3. Click the Manage Cache button. The
Manage Cache dialog opens.
4. Click the Cache Contents tab to see a
list of items in the cache.
Flushing the Cache
Even if you use caching only when no other
computer will be using the printer, the printer driver’s record of what items it has cached can
become inaccurate in some circumstances. If you replace the printer, for example, the printer
driver does not have any way of knowing that you have done so. Once this happens, BarTender
can execute a print job and fail to send certain items to the printer because it thinks that the
items are already stored there. This can result in printed items with missing parts, or even blank
printed items.
To prevent this, you should periodically flush (clear) the printer's cache. This empties the cache
and it tells the printer driver that the cache is now empty. Using the Printer's Cache tab of the
Print dialog, you can flush the cache manually and/or configure BarTender to flush it on a set
schedule.
Summary Quick Help Chart
Potential Performance Slowdown Optimization Techniques
Template design contains boxes, lines, and/or
Render as device lines
barcodes
Text or barcode object is serialized Enable printer serialization
Enable Allow Static Objects and Allow Static
Multiple items are printed in a single print job
Graphics
The same print job is printed multiple times Use printer caching
Optimizing Output Performance 10Optimizing Your Printer Driver
This section discusses ways that you can configure your Seagull Scientific printer driver for optimal
performance.
Verification of Job Completion
Some printers have a feature, called job buffering, which enables the printer driver to begin sending
a new print job to the printer even before the last items of the preceding print job have printed.
However, the printer will not use this feature if the printer driver is configured to verify the completion
of each print job before it starts the next print job. So to use job buffering, you need to turn off
verification of job completion.
NOTE: By using this optimization, you are unable to log print job verifications to your
computer for later analysis. If you require logs of your print jobs, please try other
optimizations before turning this option off.
1. Open the Windows Devices and Printers pane.
2. From the printer's context menu, select Printer properties. The Printer Properties dialog
opens.
3. Click the Tools tab.
4. Click the Status Monitoring button. The Status
Monitoring dialog opens.
NOTE: If the button is grayed out, then the
printer is not using its verify print job
completion feature. If the printer supports
job buffering it will buffer jobs
automatically. At this point, continue to
the next optimization.
5. Click the Job Verification tab.
6. Be sure that Verify job complete before sending next job is not checked.
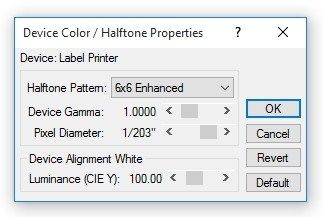
Graphic Dithering
Dithering is a process of distributing black dots against a white background throughout a sub-area of
an image. This makes the area appear to be gray. If your template contains a graphic (color or not)
that prints with shades of gray, then your printer driver is using some method of dithering to produce
these gray areas.
You can reduce the amount of information that BarTender must send to the printer, and thus get
better throughput, by using the simplest dithering method that maintains acceptable quality. To
adjust dithering:
1. Open the Windows Devices and Printers pane.
2. From the printer's context menu, select Printing preferences. The Printing Preferences dialog
opens.
3. Click the Graphics tab.
Optimizing Output Performance 11In the Dithering area are listed several methods of dithering. If any method is grayed out, then it is
not available on your printer. If it is available, Device Dithering is the best choice, because it means
the printer itself will do all the dithering so that the computer does not have to send specific
information about which dots in the gray areas will be black and which will be white. The other
options are listed in order from the fastest (but poorest quality) to the slowest (but best quality). You
want to find the fastest dithering method that maintains acceptable quality.
The option None means that there will be no gray
areas: every area of the graphic will be all black or all
white. Each of the remaining four options, Halftone,
Ordered, Algebraic, and Error Diffusion, is really the
name of a family of dithering algorithms (that is,
methods). When you select any of these radio
buttons, you can click the Dithering Setup button to
open a Dithering Setup dialog that enables you to
choose from among the algorithms of the selected
family of algorithms.
Before you give up on any family as too poor in
quality, do some experimenting with the alternate algorithms for the family.
NOTE: Dithering affects only bitmap graphics with color or gray areas. It does not
change the darkness of pure black images, barcodes or fonts.
Optimizing Output Performance 12Windows Printer Pooling
In some situations, it is not necessary that a particular print job use a particular printer. For example,
some shipping departments would work fine if BarTender sent print jobs to any of two or more
identical printers sitting side by side. In this situation, configuring two or more identical printers to
use Windows Printer Pooling will improve print job performance because BarTender will send any
given print job to the first available printer in the pool, even if it is not the currently selected printer in
BarTender.
1. Open the Windows Devices and Printers pane.
2. From the printer's context menu, select Printer properties. The Printer Properties dialog
opens.
3. Click the Ports tab.
4. Enable the check box Enable printer pooling.
5. Click OK.
6. Repeat steps 2 through 5 for one or more printers of the exact same make and model as the
first one.
WARNING: You may not use printer caching with any pooled printers.
Printer Resolution
If your printer supports more than one resolution, select the lowest resolution that maintains
acceptable quality of output using these steps in BarTender:
1. Open the Windows Devices and Printers pane.
2. From the printer's context menu, select Printing preferences. The Printing Preferences dialog
opens.
3. Click the Graphics tab.
4. Use the Resolution dropdown list to select a resolution.
NOTE: The Resolution setting only affects performance for templates that contain
graphics or TrueType fonts that you have not downloaded to the printer.
Print Speed
The print speed is the measure of how fast a single item will move through the printer while multiple
items are printing. While increasing the print speed will improve printing performance, note that it
may also reduce the quality of the printed items. Experiment by printing one copy, at each available
speed, of a representative sampling of your BarTender documents. Set your speed at the fastest
value that preserves acceptable quality.
When you are evaluating quality, keep in mind that you may be able to compensate for the increased
printer speed by increasing the darkness of each dot printed. The steps for adjusting this setting and
even the name of the setting will vary with the printer model. Open the help for the printer driver and
search on terms like "darkness," "contrast," "print head temperature" or "print density."
NOTE: Regardless of what the darkness setting is called, increasing it on a thermal
Optimizing Output Performance 13printer means increasing the temperature of the print head. So before you experiment,
consult the literature of your stock and ribbon manufacturers: either or both may have
set an upper limit for print head temperature.
Optimizing Output Performance 14Evaluating Your Printer Hardware
The rate at which printing data is sent from the computer to your printer via a cable or your network
directly affects your printing performance. Consider the following when optimizing your printer
hardware:
Use the Fastest Cable
When you have directly cabled the printer to a computer, you should use the fastest computer-to-
printer connection available for your printer. In order from fastest to slowest, as measured by the
maximum data transfer rate they allow, the types of connections are: USB 2.0, USB 1.0, parallel, and
RS-232 (old-style serial).
NOTE: Using the printer’s fastest connection does not guarantee that items will print
faster, because some printers do not process the data any faster than they would if you
were using a slower connection.
Optimizing an RS-232 Connection
You can speed up an RS-232 connection by setting a higher baud rate on the printer than the
default. After you reconfigure the printer, you must change the baud rate in your Windows
operating system to the same value. See Windows Help for details. Increasing the baud rate may
result in unreliable communication depending on cable length, interference, and other factors;
so, experiment with representative templates and verify that they all print correctly.
Also, you should use a watch to verify that your effective baud rate really increases when you set
a higher nominal baud rate. The RS-232 standard requires that the printer check each part of
the data for errors, and that the computer resend erroneous parts. An increase in the baud rate
may increase the number of errors in the data. It is possible that the time lost resending data will
cancel the nominal speed increase, so that you end up with a lower effective baud rate.
Experiment with Alternate Network Connections
If you have not directly connected the printer to the computer running BarTender, then your print
jobs will go through your network. You can often improve printing performance by changing how or
where you have connected the printer to the network. Experimentation is advisable because
situation-specific factors, especially network load, have more impact on printing performance than
network design. Nevertheless, these rules of thumb can guide you:
l A printer that you have directly connected to a network, with a TCP/IP card, for example, will
receive data faster than one that you have cabled to a computer on the network. But if
multiple users are sending jobs to this printer at the same time, there may be problems since
there is no print server to direct the printer traffic. You could also use a hardware print server
with an Ethernet card connecting it directly to your network.
l Data that stays within the same LAN as the computer running BarTender will usually reach the
printer faster than data that has to pass through a gateway, router, or network bridge.
l Different parts of your network may run at different speeds. For example, some parts may
allow data throughput of 10 Mbits (megabits) per second while others allow 100 Mbits a
second. Whenever possible, avoid sending data to the printer through the slowest parts of the
network.
Optimizing Output Performance 15That Old Printer Some printers are just old and slow. If that is your situation, then all the tips in this paper may only marginally improve your printing performance. You should investigate the cost effectiveness of getting a printer with a higher rate of items-per-second. Another option, for some printer models, is to add memory to improve the printer’s capacity to store static objects between labels and/or between print jobs. Optimizing Output Performance 16
Related Documentation
White Papers and Manuals
    l   Drivers by Seagull™
    l   Installing Drivers by Seagull™
    l   Status Monitoring
For downloadable versions, visit:

   http://www.seagullscientific.com/support/white-papers

BarTender Help System
    l   Print Dialog
    l   Print Method Option Dialog
    l   Substitute Best Matching Printer Font

                              Version 2015-11-09 Copyright © 2015 Seagull Scientific, Inc.
You can also read