Wattle Introduction Guide for Lecturers January 2018 - Wattle Guide for Lecturers
←
→
Page content transcription
If your browser does not render page correctly, please read the page content below

Wattle Guide for Lecturers

                                                         Moodle 3.3

                                               Updated: January 2018

Wattle Introduction Guide for Lecturers [January 2018]                 Page 1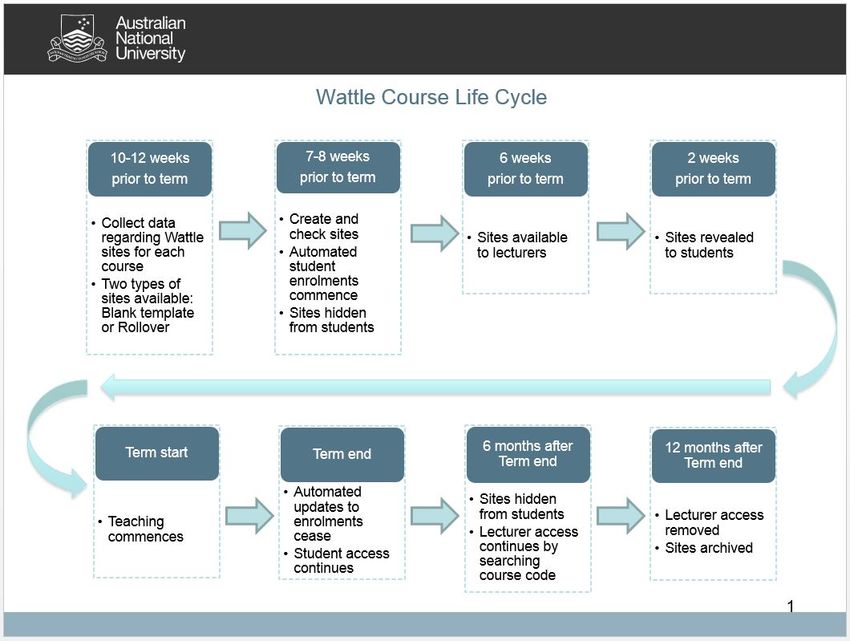
Table of Contents
Wattle Guide for Lecturers ............................................................................................................................................... 1
Table of Contents .............................................................................................................................................................. 2

Wattle Guide for Lecturers .................................................................................................................................... 3
Overview of Wattle ................................................................................................................................................... 3
Recommended Internet browsers .................................................................................................................................... 3
Access Wattle and your Courses ....................................................................................................................................... 3
Dashboard ......................................................................................................................................................................... 4
Basic Structure of a Wattle course site ............................................................................................................................. 5
Navigation within a Course Site: Breadcrumb ................................................................... Error! Bookmark not defined.
Displaying Information: Blocks.......................................................................................................................................... 6
Profile ................................................................................................................................................................................ 6
Setting Forum and Other Email Notifications: Preferences .............................................................................................. 7

Create Course Content ............................................................................................................................................. 8
Turn editing on .................................................................................................................................................................. 8
Activity Chooser for Resources & Activities ...................................................................................................................... 8
Editing icons .................................................................................................................................................................... 10
Default Text Editor: TinyMCE .......................................................................................................................................... 10
ATTO HTML..................................................................................................................................................................... 12

Manage your Course Site ...................................................................................................................................... 13
How do you add other lecturers or tutors to your course site? ..................................................................................... 13
How do you check what a student can see? ................................................................................................................... 13
How do you see the students enrolled in your course? ................................................................................................. 13
When do students have access to your course site? ...................................................................................................... 13
Wattle Course Life Cycle ................................................................................................................................................. 14
Resources ........................................................................................................................................................................ 15
Useful Blocks ................................................................................................................................................................... 15
Activities .......................................................................................................................................................................... 16
Forum .............................................................................................................................................................................. 16
Group selection ............................................................................................................................................................... 18
Turnitin Assignment ........................................................................................................................................................ 19
Assignment...................................................................................................................................................................... 19

Contacts and Support ............................................................................................................................................. 24

Wattle Introduction Guide for Lecturers [January 2018]                                                                                                                         Page 2
Wattle Guide for Lecturers
WATTLE (Web Access To Teaching & Learning Environments) is the Australian National University’s web-
based teaching and learning environment.
Wattle consists of Moodle as the main platform and is integrated with other software such as text-
matching service (Turnitin), lecturer recordings (Echo360 Active Learning Platform) and web video
conferencing tool (Adobe Connect). Its main purposes are to provide teaching staff and students with a
virtual classroom environment, to help facilitate the flexible delivery of teaching and learning content and
activities, and to streamline communication between teaching staff and all their students.
This guide will introduce you to Wattle by providing a brief overview of how to access and use Wattle.

Overview of Wattle
Recommended Internet browsers
Wattle can be accessed in most browsers but the recommended browser versions are:
     • Mozilla Firefox 51.0 or later – preferred browser for Wattle
     • Google Chrome 58.0 or later
     • Safari 10 or later
     • Internet Explorer IE 11
     • Microsoft Edge 39 or later
It is recommended to keep all browsers up to date.

Access Wattle and your Courses
        1.   To access Wattle, go to wattle.anu.edu.au
        2.   Enter your University ID (include the ‘u’) and HORUS password then click Login to Wattle or Enter
        3.   You will be taken to your dashboard which will display all the course sites* you are enrolled in.
        4.   To enter a site, click on a course site link and you will be taken to that site’s homepage.

*Note: Your courses are sorted into “In progress”, “Future” and “Past” based on their specified start and
end dates. For more information, please see Page 4 on Dashboard.

Wattle Introduction Guide for Lecturers [January 2018]                                                           Page 3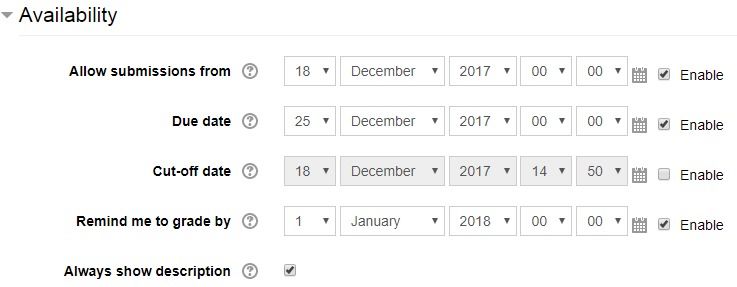
Dashboard
The dashboard is the first page you’ll see when you enter Wattle. It gives an overview of all the course sites you are
enrolled in and provides information about course progress, upcoming activities and assessable Moodle activities
e.g. assignments. This information can be found in the Course Overview section (i.e. Centre block).

By default, you will be brought to the Courses tab where your courses are sorted into three categories: In progress,
Future or Past. As their names suggest, these are based on specified start and end dates during setup. You can
change this by going to your course site under Course Administration > Edit Settings > General > Course start date.

You can also switch to the Timeline view (as shown below). This shows you recently overdue activities as well as
upcoming activities – such dates must be specified when you are setting up the activity (e.g. Assignment). As
lecturers, you will assignments that require grading or other activities that may require your interaction.

Wattle Introduction Guide for Lecturers [January 2018]                                                          Page 4
Basic Structure of a Wattle course site
This is a generic view of a course site. The basic structure of a Wattle course is a page with a header and columns on
the side(s). The centre column contains content and activities of the course which can be divided into sections to
organise the content (e.g. Based on weekly topics). The left and right columns can display blocks with useful controls
and/or information.

                                                                                   6           9

                                                                               7                                    11

                                                3                                                      10
           1

       2                             4

                                                                                          8

                                                                5

From left to right:

     1. Docked Block                                         7.    Full Name of Course
     2. Block (on a left side column)                        8.    Block (on the right side column)
     3. Navigation/Breadcrumb bar                            9.    Notification panel
     4. Announcement (or other Activities)                   10.   Turn Editing On/Off
     5. Activity chooser for adding resources and            11.   Quick access to grades, profile, messages
        activities                                                 and preferences
     6. Links to resources

Wattle Introduction Guide for Lecturers [January 2018]                                                         Page 5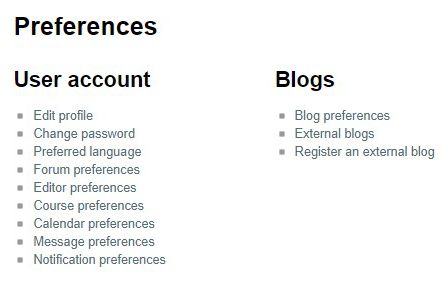
Displaying Information: Blocks
A block displays information in a small area in the right or left column in Wattle. They are tools that add convenience
and functionality to your course site. For example, blocks can be used to show important contacts for a course, or
the most recent forum posts. You can add, remove, and move blocks within your course.

Blocks can also be docked. The docked blocks become vertical tabs along the left margin attached to the page, and
give the main content a bit more space. Depending on the themes, there are two versions of the docking and
undocking icons.

    •   To dock a block

    Click the docking icon at tshe top right of the block:

    •   To undock a block

    Hover over the docked block’s tab and click the undocking icon:

    •   Undock all blocks

    Hover over the bottom left of the left page margin and click the undock all icon:

    •   Retract or open a block

    To retract the contents of a block, use this icon:       . To open the block, click on this icon:

There are two default blocks in Wattle: Navigation and Administration blocks. They provide different links and will
change depending on whether you are at a course level or a resource/activity level.

                          Use the Navigation block to move between pages and course sites. Links include Wattle
                          dashboard, and My courses. ‘My courses’ lists the courses you are currently enrolled in as
                          lecturer, tutor or student.

                                   The Administration block provides context-sensitive links including Course
administration, Edit settings (for course or specified activities), Users, Gradebook setup and other resource/activity
administration, etc.

Profile
Everyone who has an account in Wattle has a user profile. Basic information such as name and email address is
populated automatically. It is a good idea to review your profile settings and add a photo.

To update your profile (See images below):

    1. Go to the quick access dropdown menu at the top right corner of your Wattle site which is located beneath
       your name. Click on Profile.
    2. In the User details box, select Edit Profile.
    3. Review the settings and make changes.
    4. To add a picture in the User picture section, drag and drop an image file.
    5. Click Update Profile to save any changes.

Wattle Introduction Guide for Lecturers [January 2018]                                                           Page 6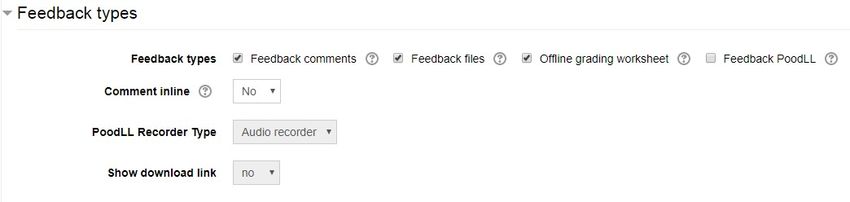
Step 1: In the top right corner,         Step 2: A new screen then appears. Click on Edit Profile.
 click on the quick access
 dropdown menu and select
 Profile.

                                          Step 3: This will then open a new screen allowing you to add a description,
                                          display an email address, and add a profile picture, a web page, phone
                                          number or address.

Setting Forum and Other Email Notifications: Preferences
Wattle allows you to set a number of preferences including forum or other email notifications. To change these, go
to the quick access dropdown menu located at the top right corner and click Preferences.

 Step 1: In the top right corner, click on the     Step 2: A new screen will appear in which you can alter the details
 quick access dropdown menu and select             in your User account such as your profile, password, forum and
 Preferences.                                      blog preferences, etc.

Wattle Introduction Guide for Lecturers [January 2018]                                                          Page 7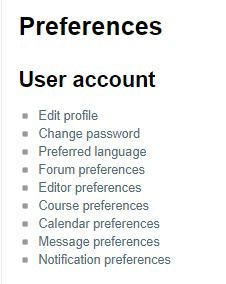
Email notifications: Forum preferences

In each course, the News forum has forced subscription, meaning you will receive forum post emails regardless of
your Forum auto-subscription preference. For other forums, you can choose to subscribe or unsubscribe.

By default, you are subscribed to forums when you add a post to that forum – this can be changed in under Forum
preferences > Forum auto-subscribe (see image below).

You can also choose from the following three types of email digest type, if subscribed to a forum:

    •   No digest - single email every time when a new post is added.
    •   Complete - one email per day after 5pm with full copies of all posts from all the forums.
    •   Subjects - one email per day after 5pm with only the subjects of all posts.

Create Course Content
Turn editing on
To add or change blocks, resources or activities in the course, you need to switch to the editing mode first. Click the
            button on the top right, just underneath the header. The editing icons and menus will become available.

Activity Chooser for Resources & Activities
To add content to a course site, click the Turn editing on button on the top right. The Activity Chooser appears in
each topic and it is a hyperlink:

The Activity Chooser allows you to add content to the course:

    •   Resources enable content to be inserted into the course (such as course documents or files).
    •   Activities create content that allows student input to be added to the course such as forums, assignments
        and group selection (for tutorials).

Stealth Activity

Earlier versions of Moodle had a “quirk” that allowed activities or resources to be hidden inside “extra” weeks or
topics, but still be accessible to students. These were known as “orphaned” activities and allowed Moodle users to
achieve particular designs for their courses.

Now in Moodle 3.3 you can put any activity or resource into “stealth mode” to achieve this same effect in a more
officially-supported way.

Wattle Introduction Guide for Lecturers [January 2018]                                                          Page 8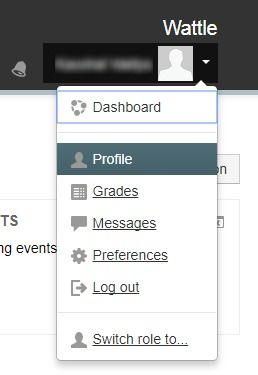
Step 1: Click Edit for the activity or resource you would like to apply stealth mode to.

Step 2: Once the content link is hidden from students, they need to make it available to them. Click Edit again and
you should now find the option to Make available. Note the difference between Show and Make available. “Show” is
to unhide the activity and “Make available” is to create Stealth activity.

Lecturer can then use the content link in any other content such as the course main page.

Wattle Introduction Guide for Lecturers [January 2018]                                                      Page 9
Editing icons
Once you turn editing on, some icons will appear next to each item in your Wattle site.

In Moodle (Wattle), the majority of the icons are moved to a drop-down menu.

This table explains each of their functions:

     Icon            Name                Description
                     Pencil Icon –       Edit the title of sections, activities or resources directly from the course
                     Edit Title          content page.
                     Indent              Move the activity or resource to the right or left.

                     Move                Move an activity or resource to another part of the site, using drag and
                                         drop.
                     Update              Update the details of the section, resource or activity.
                     Duplicate           Duplicate the resources or activity.
                     Delete              Deletes an activity or resource. This cannot be undone.
                     Hide                Click the open eye icon to close it, which hides an activity or resource from
                                         students. It will appear greyed-out to staff.

                     Show                Click on the closed eye icon to open it, which reveals an activity or resource
                                         to students.
                     Groups              Attach a particular group to an activity.

                     Assign Roles        Assign a specific role to this activity (such as student, tutor, or lecturer).

                     Dock Blocks         Blocks can be docked. The docked blocks become vertical tabs along the
                                         left margin attached to the page.
                     Undock Blocks       Hover over the docked block on the left margin and select the undock block
                                         icon.
                     Retract or          Use these to retract or show the information in the block.
                     Open Blocks

Default Text Editor: TinyMCE
The default text editor in Moodle is called TinyMCE. It allows you to edit plain text by changing font size, colour or
adding links to text.

The TinyMCE editor first appears with just one row of buttons. Clicking the icon top left will expand it to three rows.

Collapsed view

Wattle Introduction Guide for Lecturers [January 2018]                                                              Page 10
Expanded view Toolbar buttons The TinyMCE text editor has the following tools and buttons: Row 1 Row 2 Wattle Introduction Guide for Lecturers [January 2018] Page 11
Row 3

ATTO HTML
Another available text editor is Atto. It provides functions including accessibility checking and screen reader helper,
which are only available in Atto. To change the text editor to the Atto HTML text edit (See images below):

    1. Go to the quick access dropdown menu and select Preferences
    1. Click on the Editor Preferences
    2. From the Editor Preferences drop down menu select Atto HTML editor

 Quick access drop down menu (Top right of                     Click Editor Preferences and then select Atto then
 screen)                                                       select Atto HTML editor

Wattle Introduction Guide for Lecturers [January 2018]                                                          Page 12
Manage your Course Site
Managing your course site consists of a variety of tasks for organising, updating and administering your
site.
How do you add other lecturers or tutors to your course site?
1. Locate Administration block > Course administration
2. Click Users > Enrolled users
3. Click Enrol users button on the top right
4. Select the appropriate role in the Assign Roles dropdown
5. Search the person with their UniID or name in the pop-up window and click Search
6. Click Enrol button next to the name
7. Click Finish enrolling users or close the window
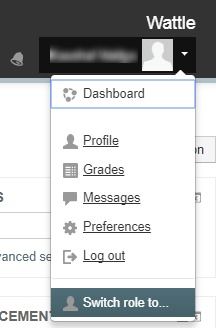
How do you check what a student can see?
1. In the Administration block, click the Switch Role to link
2. Select Student to change the view
3. To return to your lecturer role, click Return to my normal role
How do you see the students enrolled in your course?
To view the students enrolled in the course, click the Participants link found in the Navigation block.
• Participants are located in Navigation: My courses > [Course Name] > Participants
• Add the People block and the course Participants will display in the block.
When do students have access to your course site?
The upcoming courses are available to students two weeks before the teaching session starts. The
upcoming courses are available to lecturers about six weeks before the teaching session starts.
Wattle Introduction Guide for Lecturers [January 2018] Page 13If students do not see their course sites when they log in, please have them:
• Check ISIS – note that ISIS indicates the official enrolments
• Wait a day – new enrolments will have Wattle access one full working day after the enrolment is
completed in ISIS
• Check with the lecturer – some course sites are released later than the standard date
Wattle Course Life Cycle
To know more about the Wattle Course Life cycle, please view the diagram below:
Wattle Introduction Guide for Lecturers [January 2018] Page 14Resources
Resources allow you to add content to your course. There are eight types of resources available.
In the Activity Chooser, scroll down to see the Resources.
Icon Resource Resource description
Book Create multi-page resources with a book-like format, such as
chapters and sub chapters.
File Upload a picture, document, spreadsheet, sound file, video file
and etc.
Folder Organise files in folders and one folder may contain other folders.
IMS content Add static material from other sources in the standard IMS
package format.
Label Separate a section of your site into sub-headings, include
instructions, or display an image on the main page of your site.
Lightbox gallery Create image galleries within your course.
Page Create a new page in your site with text, video, images, HTML, or
any other content.
URL Link to another website, such as government websites, YouTube,
or online resources.
For more information on how to add or edit resources, please find the relevant user guides here:
https://services.anu.edu.au/information-technology/software-systems/wattle
Useful Blocks
Blocks appear on the right- and left-hand sides of the main course content. They can be used to display important
information in a way that is easily visible to students.
These are some of the useful blocks you may want to include in your course site. Note that the new Echo360 Active
Learning Platform (ALP) will no longer be added as a block to Wattle. Rather, it will be added as an activity under
Activity Chooser.
Activities block
The Activities block lists and allows navigation between the different activities available
in your course, such as forums, quizzes, assignments, and so forth. The activities list will
grow as you add activities to your course.
Wattle Introduction Guide for Lecturers [January 2018] Page 15HTML block
A HTML block is a standard block used to add text or images on a site or course page. The
block is flexible and can incorporate a variety of functions. It has the standard text editor
for formatting text and adding images. For example, it can be used to display Course
Contacts information.
The title bar can be left blank and will make the block undockable.
Evaluations (SELT) block
The Student Experience of Learning and Teaching (SELT) block is an ANU developed
block. It is based on the SELT survey which was developed following consultation
between the Student Evaluation Working Party and College Education Committees.
Surveys will appear in this block for students based on their current enrolment at the
end of each teaching session.
For further information about SELT, visit http://unistats.anu.edu.au/surveys/selt/
To add a block:
1. Click Turn editing on.
2. Locate the Add a block section which will appear at the bottom of your existing blocks (usually on
the right-hand side).
3. Select the block you would like to add from the dropdown menu.
4. The new block will appear just above the Add a block section.
Activities
There are many different types of activities available, including communication tools (Forum, Chat, Dialogue),
assessment tools (Assignment, Turnitin Assignment, Workshop, Quiz), and others such as Feedback, Wiki, Lesson,
and Database. Note the new Echo360 ALP is now added as an activity to Wattle (this should be pre-loaded into all
Semester 1, 2018 courses). Below are some of the most common activities.
Forum
The forum module is an activity where students and teachers can exchange ideas by posting comments. The most
common type is the standard forum for general use.
Standard forum for general use
The standard forum is most useful for large discussions that you intend to monitor or guide. Within the forum,
students will see the forum description as the introduction text. In the discussion field, you will see the information
such as the title of its author, the number of replies and the date of the last post. You can now pin a forum
discussion to the top of your list so that it is more visible to students and stays at the top.
Adding a permalink
A permalink allows you to link directly a specific forum post so you can easily share it with others. You will see the
permalink option when clicking to reply to a post.
Wattle Introduction Guide for Lecturers [January 2018] Page 16Announcements An Announcement (forum) is generated when a Wattle course is created. It automatically subscribes all participants in a course. The name of the Announcement can be changed to something more appropriate, such as ‘Course updates and announcements’. It can be used to announce exam dates, times or changes to exams, lectures or seminars, as well as other important information about the course. Send forum post notifications with no editing-time delay Ticking the box does not send out an email immediately. It will send an email to all forum subscribers according to their personal digest settings. The way for a lecturer to send an instant email to students is through the Participants page (Navigation > My courses > [Course] > Participants). Select the students you would like to email and choose Send a message or Send an email in the dropdown menu at the bottom of the page. Sending a message through Participants will generate a message in Moodle as well as an email to the students. The message can be sent to all or just some students. Discussion Locking With discussion locking enabled (this can be found under Forum Administration > Edit settings or when setting up a forum), individual discussion threads can be closed after a set period of inactivity. Some discussions will be locked and not accept new posts from students after the specified time. Consider discussion locking instead of time-restricting single-topic forums. To re-open discussion in a locked discussion, reply as a lecturer or tutor. Wattle Introduction Guide for Lecturers [January 2018] Page 17
Group selection
The Group selection activity module allows students to select a group in the course that they want to be members
of. Its most common use in Wattle is for tutorial sign-up. A limit can be placed on the number of users in every
group. The activity can also be set to open and close at specific times.

To create a group

    1.   In the Administration block > Course administration > Users, click Groups
    2.   Select Create group
    3.   Enter a Group name and optional group description (e.g. Wednesday 10am tutorial)
    4.   Click the Save changes button

You will then need to add the group to a grouping.

To create a grouping

    1.   In the Administration block > Course administration > Users, click Groups
    2.   In the tabs across the top, click Groupings
    3.   At the bottom of the screen, select Create grouping
    4.   Enter a grouping name and optional grouping description (e.g. Tutorial groups)
    5.   Click on the Save changes button

You will then need to add the groups you created in the earlier step to this grouping.

To add groups to a grouping

    1. In the Administration block > Course administration > Users > Groups > Groupings, locate the grouping you
       would like to edit
    2. Click on the Show groups in grouping icon next to this grouping
    3. Select the groups you would like to add from the right hand column and click Add to add them to this
       grouping
    4. When you are finished, click Back to groupings

Once this had been completed, the Group selection tool will need to be added to that students can nominate which
group they would like to be a part of.

To add the group selection tool

    1. On the main page of your Wattle site, click Turn editing on
    2. Select Add an activity or resource on the main page of your Wattle site
    3. Click Group selection.
    4. Give it a name and description, select which grouping you would like it to use, and add how many
       participants can be in each group.
    5. Click Save and return to course.

Wattle Introduction Guide for Lecturers [January 2018]                                                    Page 18
When a student is faced with the activity they just need to click on the correct button to select a group.
Turnitin Assignment
Turnitin is the university’s preferred software for online assignment. In rare cases where online submission using
Turnitin software is not technically possible, or where not using Turnitin software has been justified by the Course
Convener and approved by the Associate Dean (Education) on the basis of the teaching model being employed,
students shall submit assessment online via ‘Wattle’ outside of Turnitin, or failing that in hard copy, or through a
combination of submission methods as approved by the Associate Dean (Education). The submission method is
published in the course outline.
For further information on the Turnitin assignment submission policy, please go to the ANU Policy library.
policies.anu.edu.au/ppl/document/ANUP_004603 and review the Assessment Task Submission in the Student
assessment (coursework) Policy.
To set up a Turnitin assignment:
1. Click Turn editing on
2. In the Activity Chooser, select Turnitin Assignment and click Add
3. Enter the Turnitin Assignment Name and Summary
4. The defaults have the settings that work for most standard Turnitin assignments. For additional option
setup, please see the Turnitin Setup guide
5. Click Save and display
Training materials and further information on using Turnitin and User Guides can be found on the ANU services
website.
ANU Online has also published a Guide for using Turnitin Feedback studio.
Assignment
The standard Moodle Assignment module allows lecturers to collect work from students, review it, allocate
assignments to markers, and provide feedback including grades, rubrics, and marking guides.
To create an assignment:
1. Click Turn editing on
2. In the Activity Chooser, select Assignment and then click Add
3. Enter the Assignment Name and Description
4. Configure the Assignment (see details below)
5. Click Save and return to course
Wattle Introduction Guide for Lecturers [January 2018] Page 19A. Assignment Availability:
Allow submissions from: Specify the date/time when students can start submission. If disabled, students can submit
immediately.
Due date: Submission received after this date/time will be marked as late.
Cut-off date: If enabled, the submission will not be accepted after the selected date without an extension. In order
to prevent submissions after a certain date the ‘Cut-off date’ should be enabled and set.
Remind me grade by: If enabled, lecturers can setup a reminder to grade the assignment for a specific date. A
reminder will appear in the Moodle on a top right corner at the notification bell icon.
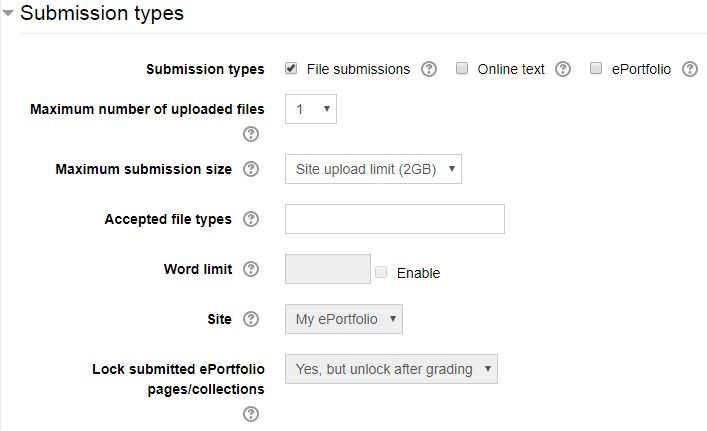
B. Submission Types:
You can now have a combination of the submission types. Submission Types allows you to configure all previous
assignment submission types:
File Submissions - this covers both ‘Single’ and ‘Advanced’ uploading of files.
Online Text - students type in their submission in the text editor online.
ePortfolio - submission will be done through ePortfolio (see eportfolio.anu.edu.au)
Note: Assignment submission can be a multiple combination of ‘Online Text’, ‘File Submissions’ and ‘ePortfolio’
Accepted file types - A lecturer can specify the file types students can upload to their assignment during the
assignment setup
Wattle Introduction Guide for Lecturers [January 2018] Page 20C. Feedback Types:
Select which feedback options you would like to use to give feedback to the students on their assignment by ticking
the boxes. Note: PoodLL is an integrated audio/voice recorder.
D. Submission Settings:
Require students click submit button: If enabled, students have to click a Submit button and their submission will be
become final.
Require that students accept the submission statement: By setting this to ‘Yes’ all students submitting this
assignment will be required to accept a submission statement in order to submit their assignment:
Attempts Reopened: This setting determines whether students’ assignment submissions can be reopened, allowing
resubmission.
Maximum attempts: The maximum number of assignment submission attempts a student can make.
E. Notifications:
Notify graders about submissions: If enabled, you will receive a message whenever a student submits an
assignment, early, on time or late.
Notify graders about late submissions: If the first option ‘Notify graders about submissions’ is disabled, you can
choose whether you want to be notified about late submissions.
Default setting for “Notify students”: When grading student assignments, you have the option to notify them by
email when you have saved their grade. Select here which you would like to be the default option. This can always
be changed on any individual students’ assignment.
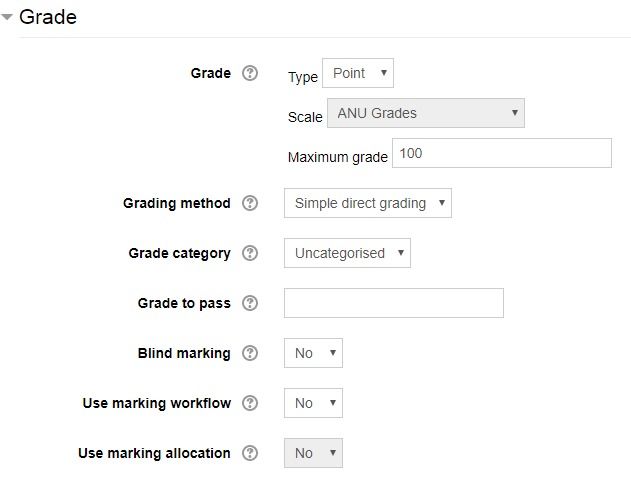
Wattle Introduction Guide for Lecturers [January 2018] Page 21F. Grade:
Grading method: You can choose from Simple direct grading (number scale), Marking guide or Rubric.
Blind marking:
When this option is set to ‘Yes’, blind marking will hide the student identities and a participant ID will be
assigned randomly to each student.
Blind marking settings will be locked and cannot be changed once a submission or grade has been made in
relation to this assignment, whichever occurs first.
When blind marking is enabled, there will be a link to Reveal student identities. The action to Reveal student
identities is one-time-only and cannot be undone. Once the student identities have been revealed, the
marks will be released to the gradebook.
Use marking workflow: This feature lets you indicate which stage of marking different assignments are at, such as
“Not marked”, “In marking”, “Marking completed”, “In review”, “Ready for release”, and “Released”.
Use marking allocation: You can assign specific student assignments to specific markers, tutors, or teachers in your
course for them to grade.
Negative score rubrics (NEW):
Moodle has improved its rubric feature and it now allows you to input negative scores for the Rubrics grade
calculation. For more information on how to set up a Rubric for marking, please see our user guide here.
Consider storing penalties (such as for lateness) as negative marks in an Assignment rubric.
Wattle Introduction Guide for Lecturers [January 2018] Page 22Assignment Override (NEW): A lecturer can override a deadline for an individual or group from the assignment settings (Administration > Assignment administration > Group/User overrides). When adding overrides for a group, it is possible to have one group override trump another. This is achieved by moving the override up/down on the group overrides page. Override setup – Group (Administration > Assignment administration > Group overrides): Override setup – individual (Administration > Assignment administration > User overrides): Wattle Introduction Guide for Lecturers [January 2018] Page 23
Contacts and Support
To contact the support team within your college, visit wattle.anu.edu.au/contacts.php

Additional Help with Wattle

    •   Wattle Support via
        IT Service Desk or
        phone (02) 612 54321,
        select option 1, 5
        Mon-Fri: 9am-5pm

    •   Moodle After-hours support
        Phone 1300 544 894
        Mon-Fri: 5pm-10pm
        Sat-Sun: 9am-5pm

        wattle.anu.edu.au
        ql.anu.edu.au/wattle

Wattle Introduction Guide for Lecturers [January 2018]                                  Page 24
You can also read