Phantom Whirlpool 1800 - INSTALLATION, USE AND MAINTENANCE MANUAL - 01_2015
←
→
Page content transcription
If your browser does not render page correctly, please read the page content below
Phantom Whirlpool 1700
Phantom Whirlpool 1800
INSTALLATION, USE AND MAINTENANCE MANUAL

01_2015
Thank you for choosing a WREN Living Ltd. product. Welcome to our world of
total wellbeing.

We would like to remind you our products are built using excellent quality
materials that are accurately tested according to safety standards in force.

This guarantee of quality and comfort is accompanied by strong innovation
and sought-after design.

All we need to do now is wish you happy relaxation.

                                                         WREN Living Ltd.

Page 2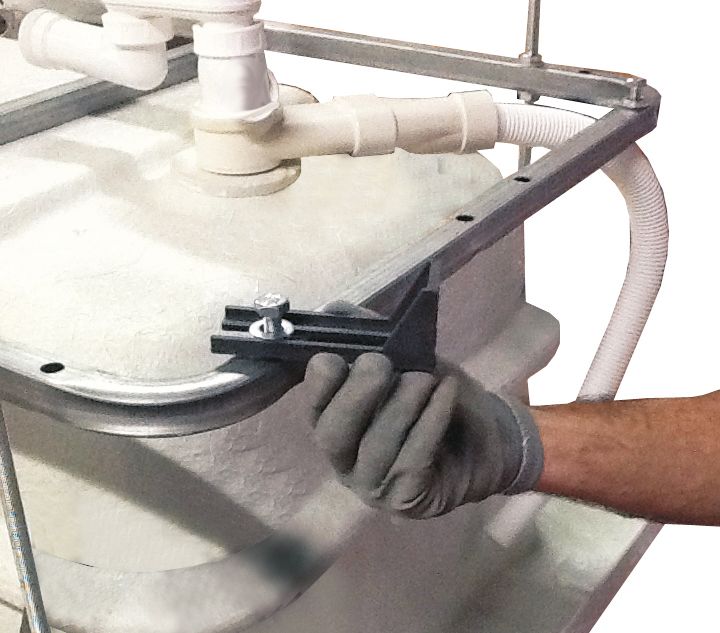
CONTENT
INTRODUCTION                                    4

THE USE AND MAINTENANCE MANUAL
SAFETY SPECIFICATIONS

INSTRUCTIONS FOR INSTALLATION                   5

- MOUNTING ALL PARTS
- INSTALLATION OF THE BATHTUB

INSTRUCTIONS FOR USE                           12

- GENERAL FUNCTIONS
- DESCRIPTION OF PARTS
- USING PHANTOM WHIRLPOOL 1700 COMMAND PANEL
- USING COLOUR THERAPY COMMAND PANEL
- USING PHANTOM WHIRLPOOL 1800 COMMAND PANEL

MAINTENANCE                                    19

- SURFACE CLEANING

PARTS LIST                                     20

WARRANTY                                       21

- WARRANTY CONDITIONS
- WARRANTY CERTIFICATE

Page 3
INTRODUCTION
THE USE AND MAINTENANCE MANUAL
This manual is a guide for safe use of our products, therefore you need to pay utmost attention when
reading it before using the product.

This manual is of fundamental importance, therefore it must be carefully kept, for any future consultation.

We reserves the right to make changes to the product, which are considered necessary, without prior
notification or replacement.

SAFETY SPECIFICATIONS
To correctly use the product, fully read the instructions in this manual. The manufacturer cannot be held
liable for any damage caused by improper use of the product.

Remember to check the installations comply with the instructions on the technical data sheet and the
installation manual of the product. The manufacturer cannot be held liable for any damage caused by
products that are tampered with or incorrectly repaired.

In the event of product malfunctioning, if the warranty is valid, exclusively contact authorised technical
staff.

Page 4
INSTRUCTIONS FOR INSTALLATION

                         Unpack the product

  1

                         Turn upside down
           180°
                                       ATTENTION

                         Please make sure the top surface of the
                         bath is protected against any possible
                         damage form abration from items on the
                         floor area when turning the bath upside
                         down to fit the leg assemblies.

  2

                         Adjust the legs to the right height as per
                         picture.
  60 cm.
  5 cm.

                     3

Page 5
INSTRUCTIONS FOR INSTALLATION
Mount the water trap
1
2
5
(command panel side)
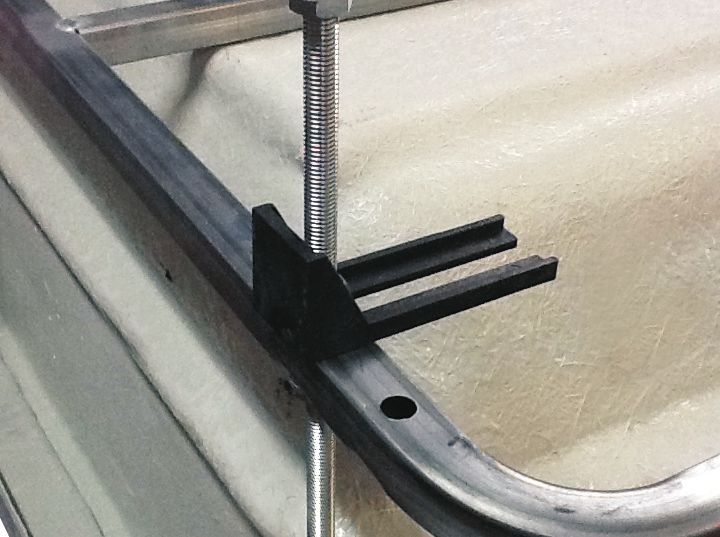
Mount the three brackets on the threaded
rods
6
Page 6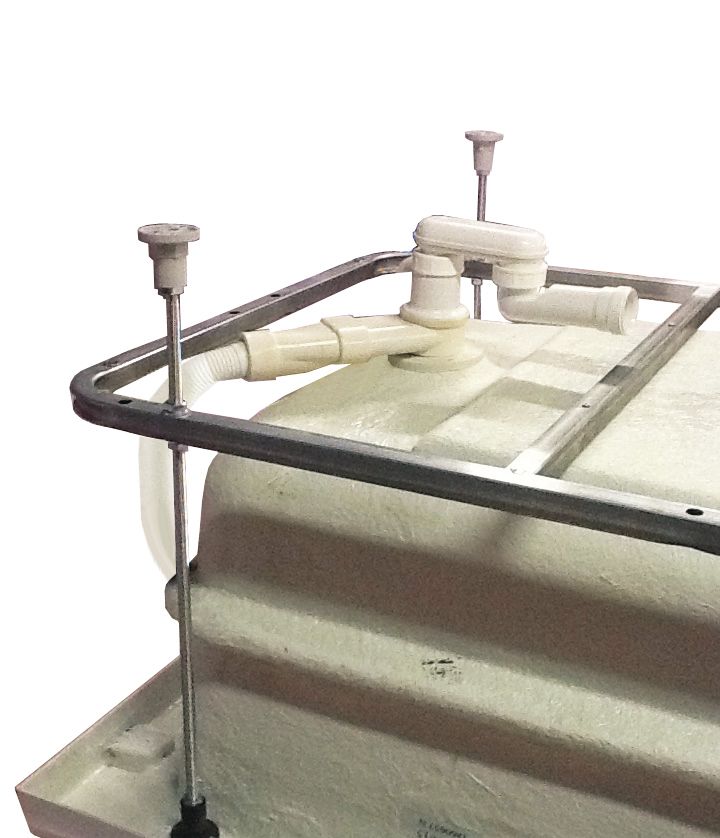
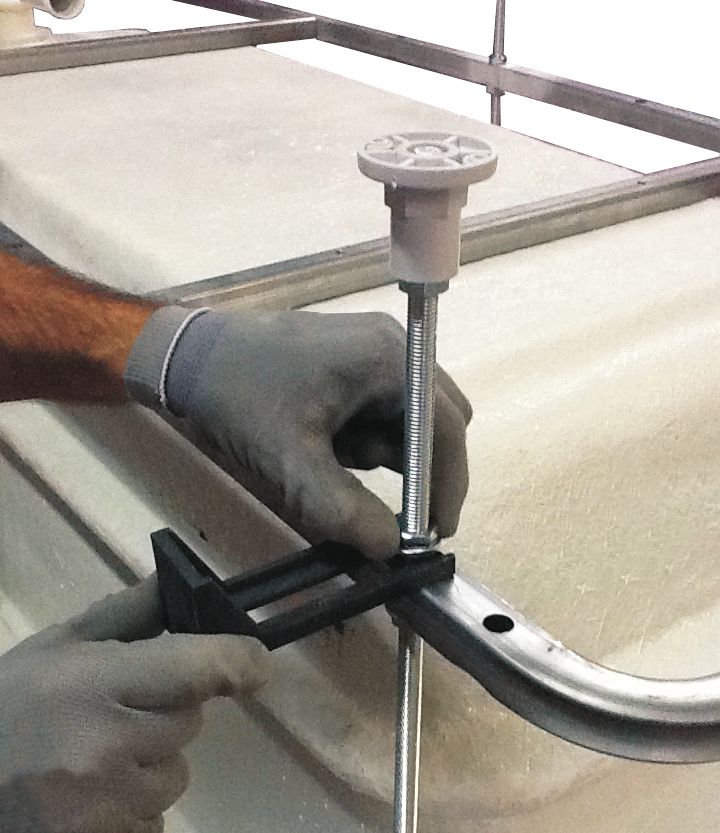
INSTRUCTIONS FOR INSTALLATION

                         Push them back

                         (drain side)

  7                      Repeat the same operations

  8

                         Take the front panel

  9

Page 7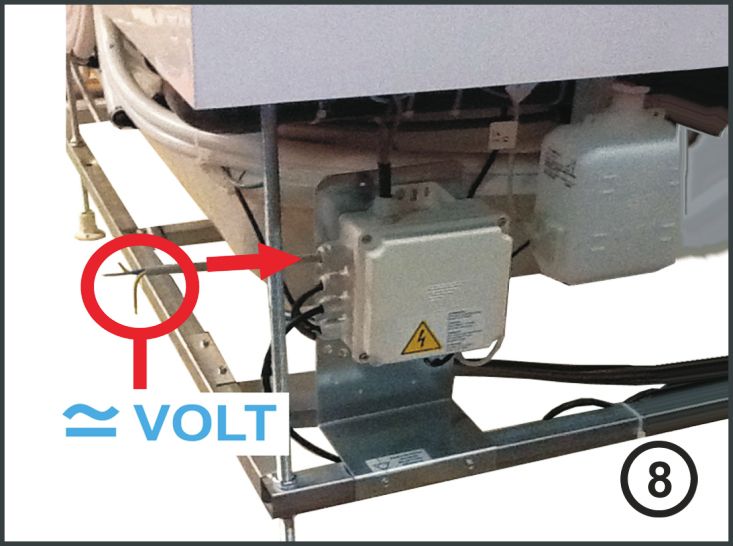
INSTRUCTIONS FOR INSTALLATION

                         Mount the two supports with the four
                         screws.

                         Repeat the same operation for the end
                         panel.

 10

                         Front panel
                         Mount, near the three threaded rods, the
                         steel springs with two screws each one

                         End panel
                         Mount, on the two blocks under the edge of
                         the bathtub, the steel springs with two
                         screws each one

 11

Page 8
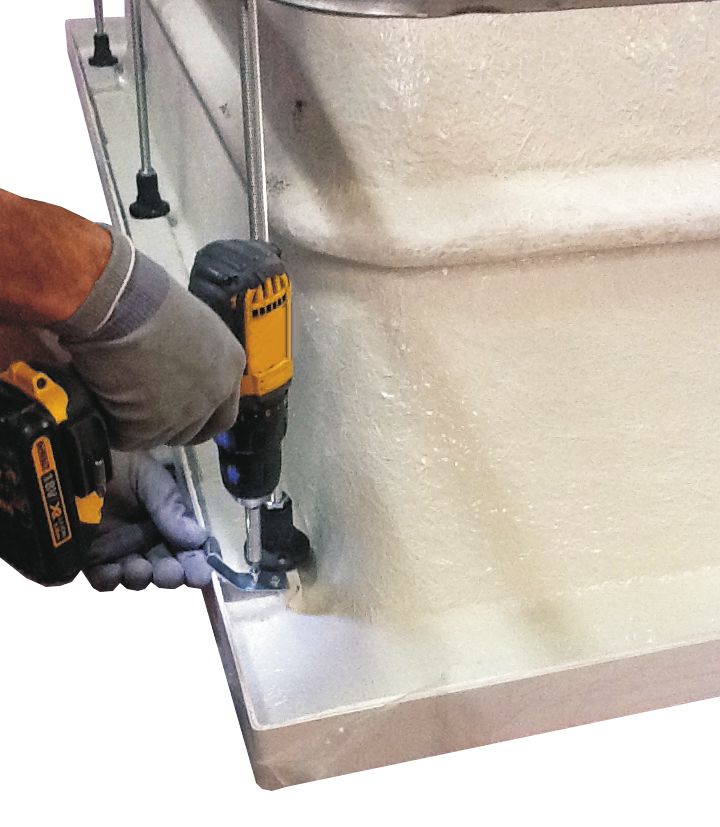
INSTRUCTIONS FOR INSTALLATION

                         Mount the front panel on the bathtub

 1

         2

 12

                         Set the angle at 90° between the panel and
                         the bathtub.

                         Adjust the position of the three brackets
                         and tighten the nuts.

                         Repeat the same operation with the end
                         panel.

                         Once you have adjusted all the panels,
                         remove them and continue the bathtub
                         installation

               90°

 13

Page 9
INSTRUCTIONS FOR INSTALLATION
Using a level, put the bathtub perfectly
horizontal.
If you need, turn the adjustable feet
14
Connect the hydromassage control box to
the electricity supply.
ATTENTION
All Electrical work to be carried out only by
a quaiified Electrician and to be Certified
for compliance to all required Regulations
and current UK Standards
15
Connect the water trap of bathtub to the
floor drain with 1 and half inch (40mm).
16 9
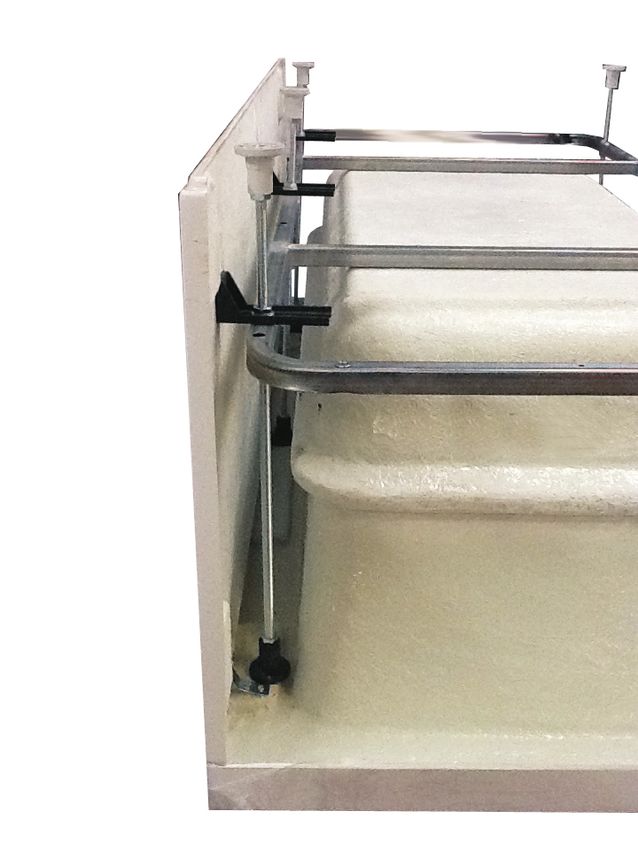
Page 10INSTRUCTIONS FOR INSTALLATION
Insert the end panel under the edge of the
bathtub.
17
Put the temporary supports under the
panel.
Repeat the same operation for the front
panel.
18
Keep the panels in place, unscrewing the
two panel adjustable supports
19
Page 11INSTRUCTIONS FOR USE
GENERAL FUNCTIONS
PHANTOM WHIRLPOOL 1700 COLOR THERAPY COMMAND PANEL
PHANTOM WHIRLPOOL 1700
COMMAND PANEL
CLICK CLACK DRAIN
PHANTOM WHIRLPOOL 1800
PHANTOM WHIRLPOOL 1800
COMMAND PANEL
CLICK CLACK DRAIN
Page 12DESCRIPTION OF PARTS
HYDROMASSAGE
The Phantom Whirlpool bath includes a
patented hydromassage system.
This device allows you to take advantage of the
hydromassage without the physical presence
of the device generating the hydromassage,
clearly improving the product ergonomics.
For system functioning, see the control panel
specifications (see page 15 and 17).
LED COLOUR THERAPY
Led colour therapy on the product is positioned
in the external grooves and, through the
transparent part of the bath, enabling light
diffusion.
The absence in the bath of the light generation
device clearly improves product ergonomics
and reduces the risk of breakage.
For system functioning, see the control panel
specifications (see page 16-17-18).
Page 13DESCRIPTION OF PARTS
CLICK CLACK DRAIN
To close the drain press the plug (Fig. 1)
To open again, bring the plug to the original
position (Fig. 2)
It can be internally accessed for cleaning by
unscrewing the plug.
Fig.1 Fig.2
Fig.3
Page 14USING PHANTOM WHIRLPOOL 1700 COMMAND PANEL
KEY1: Whirlpool On/Off
KEY1: Disinfection On/Off
KEY2: Venturi On/Off
KEY1 KEY2
WHIRLPOOL KEY
To turn on the hydromassage function, fill the bath up to 5 cm., over the
hydromassage slit (if the level goes below this slit, the function deactivates
in 3 seconds).
Press KEY 1 to switch on the pump generating the supply in the bath with
pressurised water: the function is confirmed with the indicator light on, on
the key.
If you want to stop the function, simply press KEY 1 again and the
simultaneous switching off of the indicator light confirms it is off.
The function however has an automatic safety stop after 15 minutes.
DISINFECTION ON/OFF KEY
The function activates in the presence of a sufficient water level in the bath
through prolonged pressure on KEY 1 ( approx. 5 seconds ) to request
activation of the function, the indicator light starts to flash, to confirm the
disinfection cycle press KEY 1 again during the third flash of the indicator
light. The active function is signalled by fast flashing of the indicator light.
The function automatically stops after 5 minutes.
VENTURI ON/OFF KEY
This function can only be switched on if the Whirlpool is already on.
To switch on, press KEY 2. The indicator light switches on to confirm
activation. The bath starts to fill with water mixed with air, with a whirling
effect. To stop it, simply press KEY 2 again and the simultaneous switching
off of the indicator light confirms it is switched off.
If you want to stop the function, simply press KEY 1 again and the
simultaneous switching off of the indicator light confirms it is off.
Page 15USING THE COLOUR THERAPY COMMAND PANEL
KEY1: Colour Therapy On/Off
KEY2: Manual colour change On/Off
KEY3: Automatic colour change On/Off
KEY1 KEY2 KEY3
COLOUR THERAPY ON/OFF KEY
Press
PremeteKEY 1 to activate
il TASTO 1 per the function
attivare and theewhite
la funzione light switches
si accenderà la luceon.
bianca.
At
A this point,
questo youè can
punto choose
possibile to manually
scegliere fra unchange
cambio between 8 fixed
manuale tra colours
8 colori fissi
and
e un cambio colore automatico. Per fermare la funzione, basta agire sul 1.
an automatic colour change. To stop the function, simply press KEY
TASTO 1.
MANUAL COLOUR CHANGE KEY
To change
Per to the
passare next colour
al colore presspremere
successivo KEY 2. il TASTO 2.
The sequence of fixed colours is as follows:
- white
- yellow
- orange
- green
- indigo
- light blue
- blue
- red
- fuchsia
COLOUR THERAPY ON/OFF KEY
Press KEY 3 to activate the function. This cycle gives a complete experience
of the entire colour range that changes gradually.
Page 16USING PHANTOM WHIRLPOOL 1800 COMMAND PANEL
On/Off Whirlpool Light Colour Disinfection
therapy
ON/OFF KEY
On
Allafirst
primaswitch-on,
accensionethe key will sarà
il tasto be backlit in blue and
retroilluminato all others
di blu willaltri
e tutti gli be
off, to indicate all the functions have inhibited use.
saranno spenti, ad indicare che tutte le funzioni sono inibite all’uso.
On
Allafirst
primapressing the key,
pressione the backlighting
del tasto on the keydel
la retroilluminazione changes to red,
tasto passa a
while all the others switch on in blue and the system is ready
rosso, mentre tutti gli altri si accendono in blu ed il sistema è pronto for use.
After pressing the key, the system returns to standby status, switching
all’uso.
off the backlighting
Successive pressioniof del
all the keys
tasto and switching
riportano offinallstato
il sistema the active
di riposo,
functions (except drainage as explained later).
spegnendo la retroilluminazione di tutti i tasti e spegnendo tutte le
funzioni attive (ad accezione dello scarico come spiegato più avanti).
WHIRLPOOL KEY
With the system
Con sistema in OnOne and a sufficient
livello d’acqua inlevel of water
vasca in thelabath,
sufficiente, press
pressione
the hydromassage
del tasto on key, whichche
attiva l’idromassaggio, stays on untilattivo
rimarrà pressedsinoagain
alla or for a
nuova
maximum
pressione time of 20o minutes.
del tasto per un tempo massimo di 20 minuti.
The On status
Lo stato of thefunzione
di On della function èisidentificato
identified by the retroilluminazione
dalla backlighting in red di
on the rosso
colore icon. dell’icona.
If
Sethe key is pressed
premuto il tasto mabut nonthere isn't a highlivello
vi è sufficiente enough water
acqua level in
in vasca the
(vedi
bath,
pg. 7)three red flashes
verranno are givenditorosso
dati 3 lampeggi indicate an anomaly.
ad indicare l’anomalia.
LIGHT KEY
With the system
Con sistema in OnOneand a sufficient
livello d’acqua water level
in vasca in the bath,
sufficiente, press the
la pressione
key
del tasto attiva l’illuminazione a led bianca, funzione che cheuntil
to activate the white led light, a function which stays on the
rimarrà
key is pressed again or for a maximum time of 60 minutes.
attiva sino alla nuova pressione del tasto o per un tempo massimo di
The ON status of the function is identified by the backlighting in red on
60 minuti.
the icon.
Lo stato di On della funzione è identificato dalla retroilluminazione di
Ifcolore
the key is pressed
rosso but there isn't a high enough water level in the
dell’icona.
bath, three red
Se premuto flashes
il tasto ma are
nongiven to indicatelivello
vi è sufficiente an anomaly.
acqua in vasca (vedi
pg. 7) verranno dati 3 lampeggi di rosso ad indicare l’anomalia.
Page 17PHANTOM WHIRLPOOL 1800 COMMAND PANEL
LIGHT COLOURS KEY
With the light
Con luce on, pressing
accasa, la pressionethe delkeytasto
changes the colour
fa cambiare of thedelle
il colore lights to
luce
8trabasic
gli 8 colours. The "lights" key
tonalità fondamentali. will remain
Il tasto lit in red,
“luci” rimarrà while the
illuminato «light
di rosso,
colours"il tasto
mentre key will lightluci”
“colori up in
si red for 2 seconds
illuminerà di rosso after
per i it2 is pressed,
secondi dopoandla
then return dello
pressione to blue.
stesso, per poi tornare blu.
No
Nonprolonged pressing
sono previste is planned
pressioni for fast
prolungate colour
per progression veloce
un avanzamento
dei colori.
DISINFECTION KEY
Conthe
With sistema
system in On
On,andlivello d’acqualevel
a sufficient in vasca
of watersufficiente,
in the bath,disinfettante
sufficient
sufficienteinnel
disinfectant serbatoio
the tank and all the e functions
tutte le Off funzioni
(including in colour
stato therapy)
di Off
(cromoterapia
press the key tocompresa), la pressione
enable an automatic del tasto
cleaning abilita un ciclo di
cycle.
pulizia automatico.
cycle.
Lo stato
The di onofdel
on status theciclo
cyclesarà will identificato
be identifieddel by tasto
the red illuminato di rosso.
lighting key.Since
Essendo
the la function
disinfecting funzioneis di disinfezione
an automatic, un ciclo completamente
complementary cycle, a safety
automatico,
procedure è prevista
is planned foruna proceduraby
its activation di double
sicurezza per la the
pressing suakey.
Onattivazione composta
first pressing, the key dawill
una doppia
flash threepressione
times in blue,del tasto.
if within the third
Alla confirmation
flash prima pressione verranno
is given, fatti 3 lampeggi
the function starts and in blu
the del tasto: se stays
backlighting entro
il terzo lampeggio viene data conferma la funzione
on and fixed red, otherwise the function aborts and the backlighting turns parte e la retro-
illuminazione
blue again. rimane accesa in rosso fisso, altrimenti la funzione
Ifabortisce
the key isepressed
la retroilluminazione
when one of the torna ad essere
conditions blu.
is not met (level in bath,
Se viene premuto il tasto quando una delle
disinfectant level or active functions), an anomaly signal is given with condizioni nontheè
soddisfatta
key flashing (livello
red three in vasca,
times. livello disinfettante o funzioni attive), verrà
data segnalazione di anomalia facendo tre lampeggi in rosso del
tasto.
Page 18MAINTENANCE
GENERAL SURFACE CLEANING
Generic
I prodottiproducts,
generici, such
quali ias neutral
liquidi liquid detergents
detergenti can beessere
neutri possono used for normalper
utilizzati surface cleaning.
la normale Youdelle
pulizia are
advised to apply the product with a soft cloth, rinsing carefully with water.
superfici. E’ consigliabile applicare il prodotto con un panno morbido , risciacquando accuratamente
Do
connot use all specific detergents for limescale removal.
acqua.
Sono da escludere tutti i detersivi specifici per la rimozione del calcare. A causa della loro composizione
Due to their
alcalina alkaline
possono composition,
danneggiare they can dei
le superfici damage thecome
prodotti surfaces of the products
le rubinetterie such
o altre as taps
finiture and other
metalliche.
metal finishes.
To dry, you are advised to use a deer skin cloth.
To maintain surface shine, periodically use common polish.
NEVER USE ABRASIVE
ASSOLUTAMENTE PRODUCTS
NON OR SUBSTANCES
USARE PRODOTTI WITH AN
ABRASIVI, ALCOHOL,ACETONE
SOSTANZE OR OTHER
A BASE ALCOLICA,
SOLVENT
ACETONEBASE.
O ALTRI SOLVENTI.
NEVER USE SPONGES
ASSOLUTAMENTE NONWITH A METAL
UTILIZZARE OR ABRASIVE
SPUGNE MESH.METALLICHE O ABRASIVE.
CON RETINE
TAP CLEANING
For all surfaces in chrome, brass and gold, you can use cloths or sponges soaked in clean water.
NEVER USE ABRASIVE PRODUCTS OR SUBSTANCES WITH AN ALCOHOL, ACETONE OR OTHER
SOLVENT BASE. NON USARE PRODOTTI ABRASIVI, SOSTANZE A BASE ALCOLICA,
NEVER USE SPONGES WITH A METAL OR ABRASIVE MESH.
ok liquid
soap
Page 19PARTS LIST cod. 62221 - Phantom Whirlpool 1700 cod. 62222 - Phantom Whirlpool 1800 cod. 62223 - Phantom Whirlpool 1700 Front Panel cod. 62224 - Phantom Whirlpool 1700 End Panel cod. 62225 - Phantom Whirlpool 1800 Front Panel cod. 62226 - Phantom Whirlpool 1800 End Panel Page 20
You can also read