Polaris Ranger Doors #06005 - Installation & Operations Manual 2009-2013 Mid Size Polaris Rangers - Seizmik
←
→
Page content transcription
If your browser does not render page correctly, please read the page content below
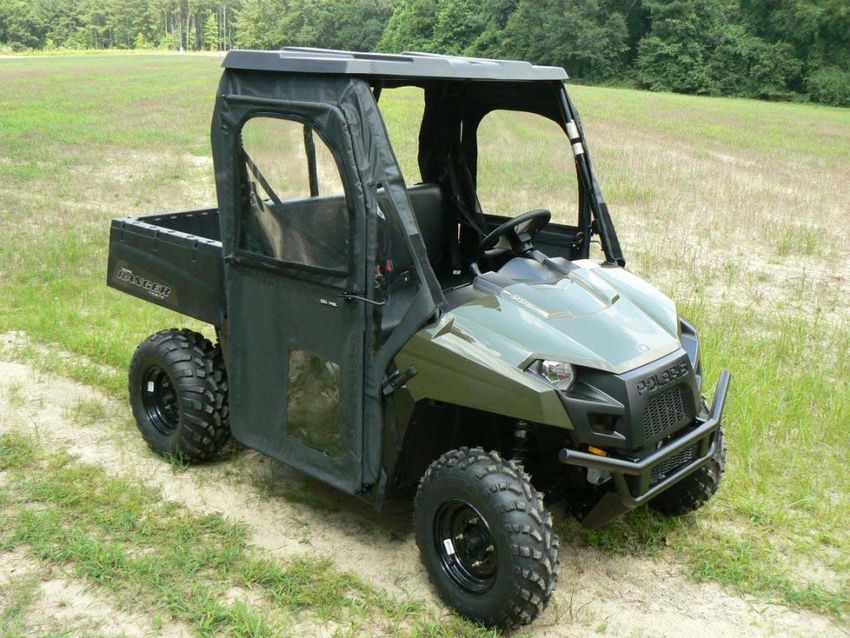
Polaris Ranger Doors #06005
                                           2009-2013 Mid Size Polaris Rangers
                                           Installation & Operations Manual

Before You Start:                               Installation information:
Please familiarize yourself with all the        • Approximate installation time: 1 – ½ hours
steps before beginning assembly.                • This product is easiest to install with: 2 people

Compatibility Info:
This Door System is designed to work with other Seizmik branded Accessories for the Full Size Polaris
Ranger as well as OEM Polaris branded hard tops. Please note Seizmik cannot guarantee fitment with
other branded aftermarket products. Please research installation details thoroughly on our products
& others when trying to combine different branded accessories.

Seizmik makes Windshields, Mirrors, Cab Systems, Light Bars, Storage Boxes, Hood Racks, and other
great accessories for UTV’s to maximize the vehicles usefulness. To help you do what you do better.

If you have any questions, comments, need assistance, or are missing parts, please call 1-866-838-
3366 xt.110 between 9:00AM and 5:00PM EST. Or email us at support@seizmik.com. Visit
www.seizmik.com for more information on our products.
                                                                                                        1
Ranger Doors Parts List

    /ƚĞŵ   ĞƐĐƌŝƉƚŝŽŶ               YƚLJ͘    /ƚĞŵ    ĞƐĐƌŝƉƚŝŽŶ                 YƚLJ͘       10.
      ϭ    hƉƉĞƌŽŽƌ&ƌĂŵĞ           Ϯ        ϭϬ    ŽŽƌ,ĂŶĚůĞ                   Ϯ
      Ϯ    >ŽǁĞƌŽŽƌ&ƌĂŵĞ           Ϯ        ϭϭ    ^ƉĂĐĞƌƐ                       ϰ
      ϯ    ZĞĂƌ,ĂŶŐĂƌ&ƌĂŵĞ          Ϯ        ϭϮ    ^ĞĂƚĞůƚƌĂĐŬĞƚ             Ϯ
      ϰ    hƉƉĞƌ,ĂŶŐĂƌ&ƌĂŵĞ         Ϯ        ϭϯ    ZĞĂƌ,ĂŶŐĂƌDƚŐ͘ƌŬƚ͘        Ϯ                     18.       17.
      ϱ    >ŽǁĞƌ,ĂŶŐĂƌ&ƌĂŵĞ         Ϯ        ϭϰ    WĂŶ,ĞĂĚDϲdžϮϱ             ϭϰ
      ϲ    >ŽǁĞƌ,ĂŶŐĂƌDŽƵŶƚ         Ϯ        ϭϱ    WĂŶ,ĞĂĚDϲdžϯϬ              ϴ
      ϳ    hƉƉĞƌ,ĂŶŐĂƌDƚŐ͘WůĂƚĞ    Ϯ        ϭϲ    WĂŶ,ĞĂĚDϲdžϮϬ              Ϯ
      ϴ    ĂƌůĂŵƉ                  Ϯ        ϭϳ    ϭͬϰͲ ϮϬdžϮ͘ϱŽůƚΘEƵƚ     Ϯ
                                                                                     .
      ϵ    ŶĚWůƵŐ                   ϰ        ϭϴ    ϭ͘ϰΗtĂƐŚĞƌ                  ϴ
                                                                                                        11.
                                                                                 9.
             Door Frame                     Door Hangar Frame
                                                                                                              6.
                               1.                          4.
                                                3.

                                                                                 12.

                                                                                       7.

                     14.                                     5.

      2.
                                                                                                  13.
                                                                                 8.

Textiles                                                              Bolt Index
1. Upper Passenger Door 4. Lower Driver Door
2. Lower Passenger Door 5. Passenger Side Panel
3. Upper Driver Door    6. Driver Side Panel

                           6                5

                 3
                                                                  1

             4

                                                                                                                         2
                                                                  2
Ranger Doors Parts & Assembly Details

   Door Hangar Frame Assembly                                                          4.

            11.                2.                               4.
                                                                                                                                         1.

  1.                                9.
                                                                     12.
                       10.
                                                          10.

                                                                                                                                              5.
                  6.                                                                                            3.

       .
                                          5.
                  5.

                                         3.
                  7.

                                                                                                                                              2.
                                                5.

  Door Hangar Frame Assembly
   1. Seat Belt Bracket
   2. Upper Hangar Frame                                        8.                   Door Frame Assembly
   3. Lower Hangar Frame             8. Lower Hangar Mount                           1. Upper Door Frame
   4. Clamp                          9. Upper Hangar Mt. Plate                       2. Lower Door Frame
   5. Pan Head M6 x 25              10. Pan Head M6 x 30                             3. Pan Head M6 x 25
   6. Rear Hangar Frame             11. End Plug                                     4. End Plug
   7. Rear Hangar Mtg. Brkt         12. Pan Head M6 x 20                             5. Handle Assembly

                                                           1.              4.
                              1.                                                                                          2.
       3.

                                                                                                                                    3.
                                                                                      3.

                                                     2.

                              2.                                                5.                                       1.

                                               Seat Belt Bracket Assembly                         Back Connector Assembly
  Lower Hangar Frame                                                                              1. Rear Hangar Mtg. Brkt.
                                               1. Seat Belt Bracket
  Assembly                                     2. End Plug                                        2. Rear Hangar Frame
  1. Lower Hangar Frame                        3. Pan Head M6 x 30                                3. Pan Head M6 x 25
  2. Lower Hangar Mount                        4. Upper Door Hangar                                *Do this assembly after the back
  3. Pan Head M6 x 25                                                                              bottom connector has been
                                               5. Rear Hangar Frame                                attached to Vehicle roll cage. (see
                                               *Orient the hinges on Door Hangar                   step 3-5)                                   3
                                               Frame should towards the back of
                                               vehicle with barrels facing outwards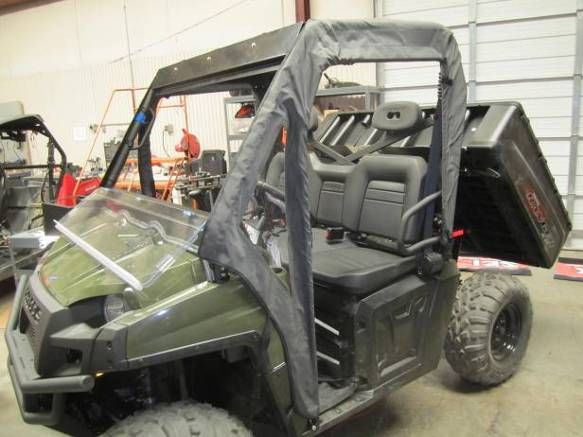
Ranger Doors Installation
Front Hangar Mounting Bracket Installation:

1. Place the Bar Clamp 5 inches down from            2. Attach the Upper Hangar Mounting Plate to the clamp. The long side of the plate
the top of the handle on the passenger side          connects to the clamp.
of the Ranger roll cage.

 *Note: Flanges should face to the rear              *Note – Leave bolts loose to adjust clamp & plate position when mounting the
 & on the outside of the bars                        Door Hangar Frame Assembly.

                                                                                                                                  A

  3. Remove the bolts in the lower back portion       4. Mount Rear Hangar brkt. using bolt        5. Install the Lower Hangar Mount (A)
  of the roll cage, save this bolt and nut for the    removed in step 3. Orient as shown with      beneath the lower net block. Removal and
  next step.                                          hinge barrel facing forwards & to outside.   Re- Installation of foot grip is necessary

  Hangar Frame Assembly Mounting Details:

    Upper
    Door
    Hangar                         A
   Lower
   Door
   Hangar

6. Attach lower hangar to   Hinge barrels face out. Remove Seat Belt Nut (A),
upper hangar frame          insert seat belt bracket and re-install. Tighten.
                            Refer to Diagram on Page 3 for more detail

                                    7. Mount the Door Hangar Frame assembly to the vehicle and completely tighten hardware.
                                                                                                                                                4
Ranger Doors Installation

Textile Installation:

8. Install the textile side panels over the door hangar frame by wrapping the             9. There is a notch in the side doors that make it
Velcro flaps around the vehicle’s roll cage & the hangar frame assembly.                  possible to slide the doors over the Upper Door
                                                                                          Hangar Mounting Bracket. Adjust bracket
Tip - Raise the dump bed for easier installation
                                                                                          position if required.

                                                                           Hardtop

                                                                                Strap

                                                                           Roll Cage

                                                                                Door

                                                                                        12. When installing doors in conjunction with a
11. Pull compression straps over roll cage & buckle. Tug on straps to
                                                                                        hardtop, the straps should go under the hardtop.
secure the Side Panels tight.
*Note: Compression straps route under hard tops

13. Buckle the back straps and tighten.                       14. Note Velcro inside edges of      15. Wipe roll cage bars with                5
                                                              side panels along roll cage pillars. alcohol to remove dirt & grease.
Ranger Doors Installation
 Textile Installation:
                                                                                  17. The 2 Front Lower Straps on the Side
                                                                                  Panels are secured by the 2 Torx bolts that
                                                                                  are located in the back edge of the front
                                                                                  fender wells.
                                                                                  Pull the straps tight to the bolt locations &
                                                                                  mark where the bolts will pass through the
                                                                                  strap. Cut a ¼” hole through the strap for
                                                                                  the bolts to pass through.
                                                                                  Remove the 2 Torx bolts in the front fender
                                                                                  wells. Pull the Lower Side Panel Straps to
                                                                                  the bolt hole locations tight and run the
                                                                                  screws through the straps back into their
                                                                                  corresponding holes. Ensure that the straps
                                                                                  are taut once installed.

 16. Secure side panels to roll cage bars     *Note: Adjust side panel position as required so it fits taught and
 with Velcro. Adjust position as necessary.   with minimal gaping & wrinkles. Tighten down all compression
                                              straps.

 Mounting the Doors:

 14. Mount the doors by guiding the pins in the back of the door frame onto the hinge barrels along the Rear Hangar Bar.

                                                                                                                                  6
Accessories Installation:
  Installing Windshields with this Door System:
  IMPORTANT: Please review the outlined procedure as not all windshield mounting systems
  are the same & yours may require a different approach to working with this door system.
  There are two fundamentally different ways to mount the system:
         1. If you have a full 1pc Windshield:
                 • Mount the windshield first, then Velcro the side panels directly over the side edges of
                    your windshield.
         2. If you have a full 2pc or Half Windshield setup like a Versa Shield or similar :
                 • It is best to mount the side panels directly to the front roll cage bars, then mount the
                    windshield over the side panels. You will need to cut out notches in the side panels to
                    accommodate the P-Clamps or Straps that mount the windshields.
         3. Other windshields:
                 • Other types of windshields may require different approaches to combining with this door
                    system.

  The following procedure is based on item 2 above. Fully familiarize yourself with the sequence. If you study
  your windshields mounting procedure, you will be able to retrofit according to your specific requirements.

 Versa-Shield Windshield P/N23048 (not included):

 1. Mount side panel cab          2. Lay the windshield in position noting location of   3. Be sure to clearly note where the mounting
 sections positioned              the slots where the mounting straps will go            straps/clamps will be positioned relative to the
 correctly & taught.                                                                     side panel
  NOTE: You will cut the side panels – Ensure they are positioned correctly.

 4. Mark the fabric where straps/clamps are located as this is where the side panel textile will need to have slots cut.

                                                                                                                                            7
 IMPORTANT: Carefully verify the windshield is positioned correctly when marking for the cuts!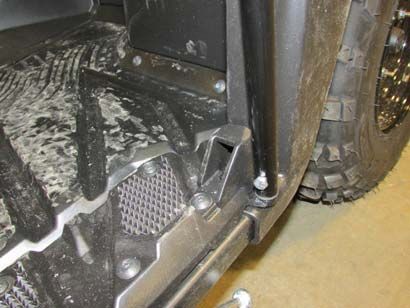
Accessories Installation:
 Versa-Shield Windshield (not included):
                                                                                                                        6. Mend the cuts with
                                                                                                                        a lighter. Hold the
                                                                                                                        flame on the material
                                                                                                                        edge just long enough
                                                                                                                        to melt the edge
                                                                                                                        slightly. This will
                                                                                                                        prevent the material
                                                                                                                        fraying over time.

 5. Cut 2 horizontal slits across the edge of the fabric to create
 tabs. Do not cut past the first vertical seam.

 7. Fold cut flap back into panel    6. Install windshield on top of
                                     the side panels                   8. Install straps lacing through the flap opening to the inside of the
                                                                       cab & secure Velcro strap or P-Clamps. Reference Sezmik Versa-
                                                                       Shield Manual for Strap operation instructions..
 SEIZMIK Hood Rack P/N 08052
 (not included):

                                                                       9. Adjust as required & secure straps tightly.

    The side panel textile needs to be cut to
    accommodate the hood rack roll cage clamp
    / brackets.
    Follow the procedure outlined for the                                                                                                       8
    windshield strap / clamp and LED Light Bar.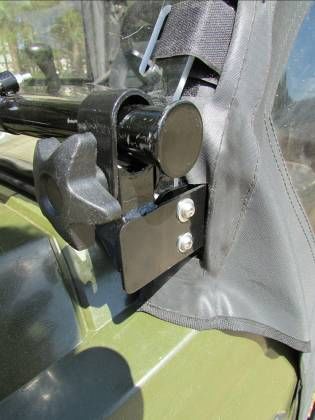
Accessories Installation:
 SEIZMIK Side View Mirrors P/N18041 (not included):
                                                                                                   Install mirror with
                                                                                                   supplied hardware.
                                                                                                   Adjust position as
                                                                                                   required.

                                                                                                   TIP: Tension adjustment
                                                                                                   bolt to tighten mirror
                                                                                                   movement if required
                                                 Locate plate behind
                                                 inside Velcro flap &
  The Upper Door Frame has provisions to
                                                 mark to punch holes
  mount SEIZMIK 18041 Side View Mirrors.
                                                 in fabric.

SEIZMIK LED Light Bar P/N12030 (not included):

 1. Mount bar to vehicle & verify position in correct area.
 NOTE: Verify windshield hardware if applicable
                                                              2. Mark position of light bar clamps on roll cage.

                                                4. Reinstall side panels, 5. Cut fabric across   6. Cut fabric across
                                                verify light bar clamp    Do not cut past        Do not cut past vertical
                                                position & mark fabric vertical seam             seam

 3. Remove bar & Install side panels
 to the front roll cage bars correctly.

 NOTE: Verify position of side panels on
 the roll cage bars!!! You will cut the                                                                                  9
 material & don’t want to cut in the            7. Fold cut flap inside   8. Install light bar
 wrong location!!!                                                        bracket & bar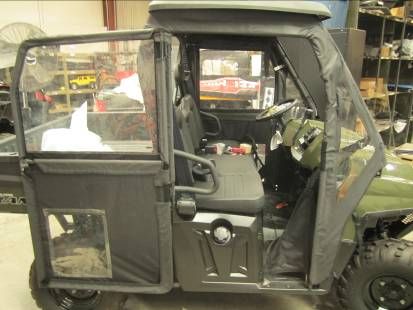
Mid size Polaris Ranger Doors - round tube (06005)
Item #     Part#                          Description
  1      54-SW-90367                     Upper door frame
  2      54-SW-90346                     Lower door frame
  3      54-SW-90347               Rear hanger frame Driver side
  3      54-SW-90348             Rear hanger frame passenger side
  4      54-SW-90368                    Upper hanger frame
  5      54-SW-90349                    Lower hanger frame
  6      54-SW-90350                    Lower hanger mount
  7      54-SW-90369               Upper hanger moun�ng plate
  8      54-SW-90352                      Steel bar clamp
  9      54-SW-90353                      Plas�c end plug
         54-SW-19201                     06005 Door HW Kit
  10     54-SW-90354                  Door handle driver side
  10     54-SW-90355                Door handle passenger side
  11     54-SW-90673                        Plas�c spacer
  12     54-SW-90370                Seat belt bracket driver side
  12     54-SW-90371              Seat belt bracket passenger side
  13     54-SW-90358               Rear hanger moun�ng bracket
  17     54-SW-90359                     1/4 - 20 x 2.5" bolt
  17     54-SW-90360                      1/4 - 20 lock nut
         54-SW-90372                        Hardware kit
                                            TEXTILES
 3       54-SW-90373                Upper door tex�le driver side
 1       54-SW-90374              Upper door tex�le passenger side
 4       54-SW-90363                Lower door tex�le driver side
 2       54-SW-90364              lower door tex�le passenger side
 56      54-SW-90375        Sub frame tex�les driver side/passenger side
         54-SW-90988            06005A rear panel/subframe tex�les
         54-SW-90377                        1/4" washer
You can also read